Cycles 2+3 (Sara)
Posted: April 28, 2021 Filed under: Assignments, Sara C | Tags: Godot Leave a comment »Intent
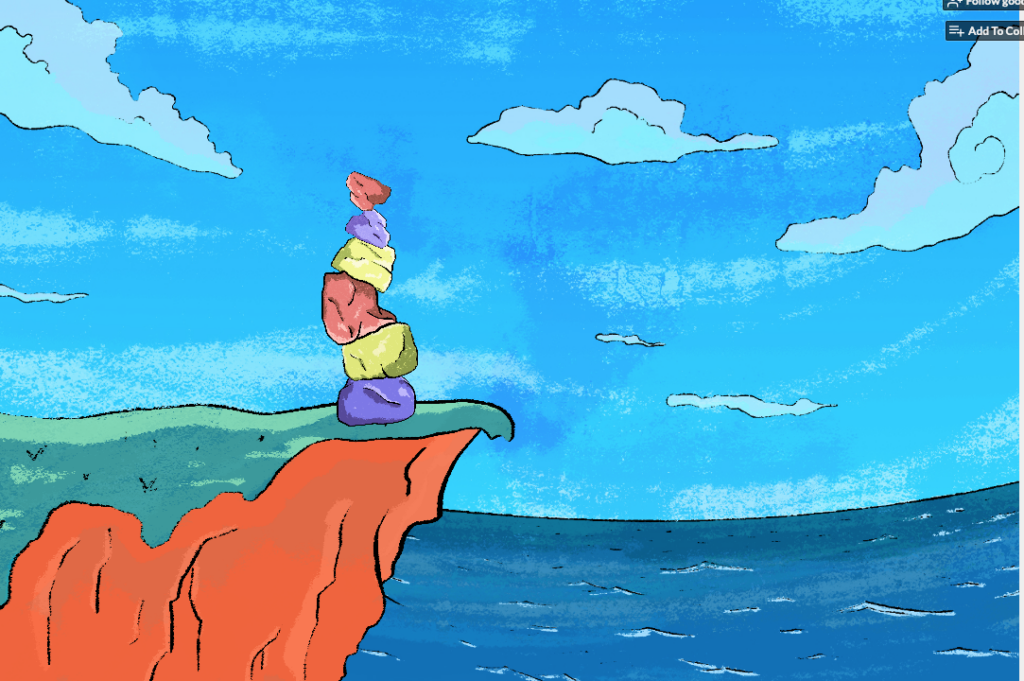
Originally, I intended to call this project “Cliffside Cairn.” My goal was to build an ambient, meditative game in which the user could pick up and stack rocks as a way to practice slowing down and idly injecting a moment of calm into the churn of maintaining a constant online presence in the current global pandemic. I took inspiration from the Cairn Challenges present in Assassin’s Creed: Valhalla. While I haven’t been able to maintain the attention necessary to tackle a new, robust open-world game in some time, my wife has been relishing her time as a burly viking bringing chaos down upon the countryside. Whenever she stumbled upon a pile of rocks on a cliff, however, she handed the controller over to me. The simplicity of the challenge and the total dearth of stakes was a relief after long days.

As the prototype took shape, though, I realized that no amount of pastels or ocean sounds could dispel the rock stacking hellscape I had inadvertently created. I showed an early version to a graduate peer, and they laughed and said I’d made a punishment game. Undeterred, I leaned into the absurdity and torment of watching teetering towers tumble. I slapped the new name Rock Stackin’ on the project and went all in.
Process
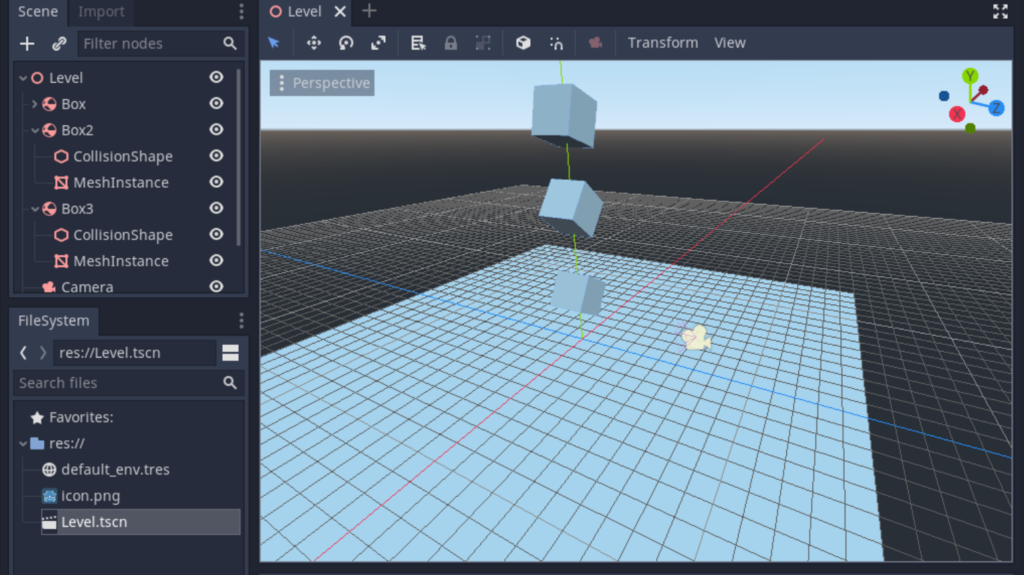
Initially, I sought to incorporate Leap Motion controls into the Godot Game Engine, so the user could directly manipulate 3D physics objects. To do so, I first took a crash course in Godot and created a simple 3D game based on a tutorial series. With a working understanding of the software under my belt, I felt confident I could navigate the user interface to set up a scene of 3D rock models. I pulled up the documentation I had barely skimmed the week before about setting up Leap Motion in Godot—only to find that the solution required a solid grasp of Python.
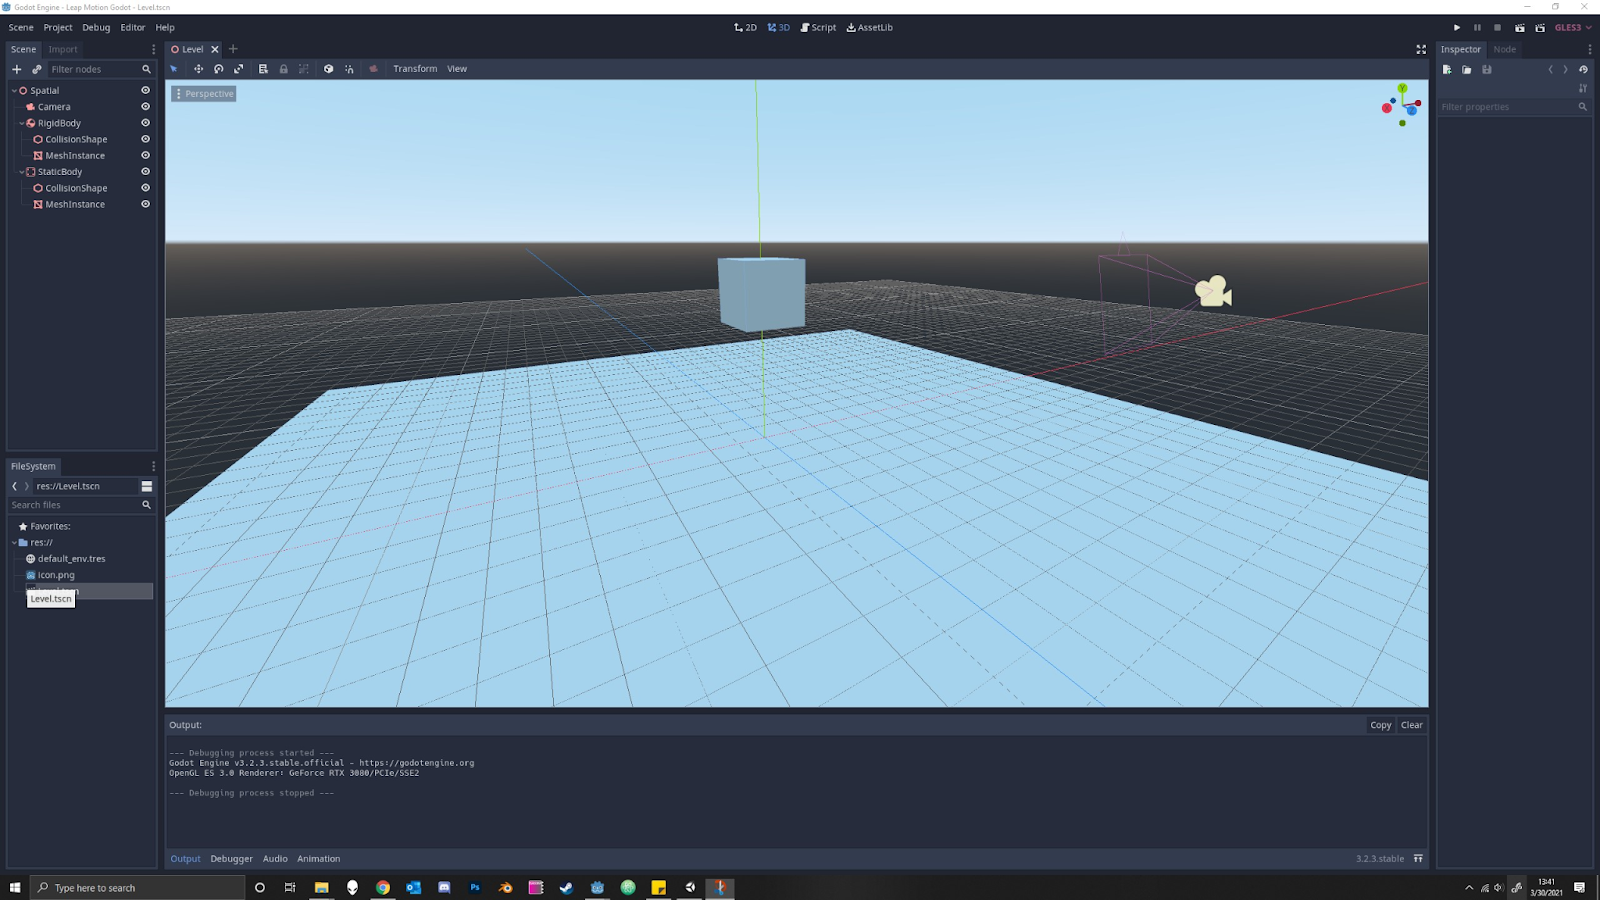
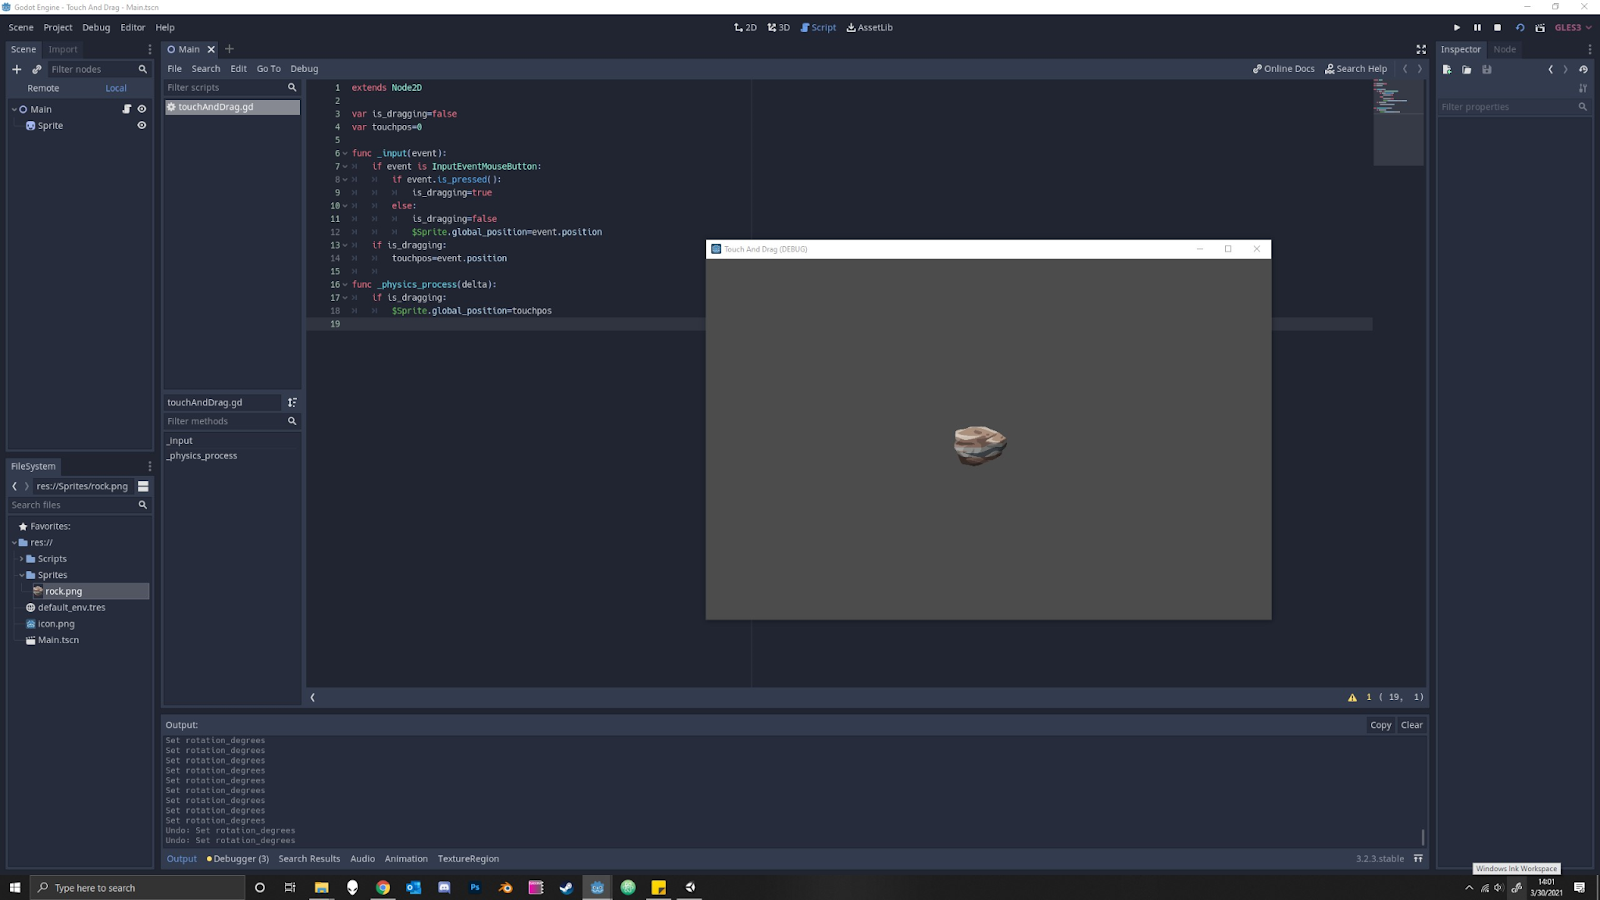
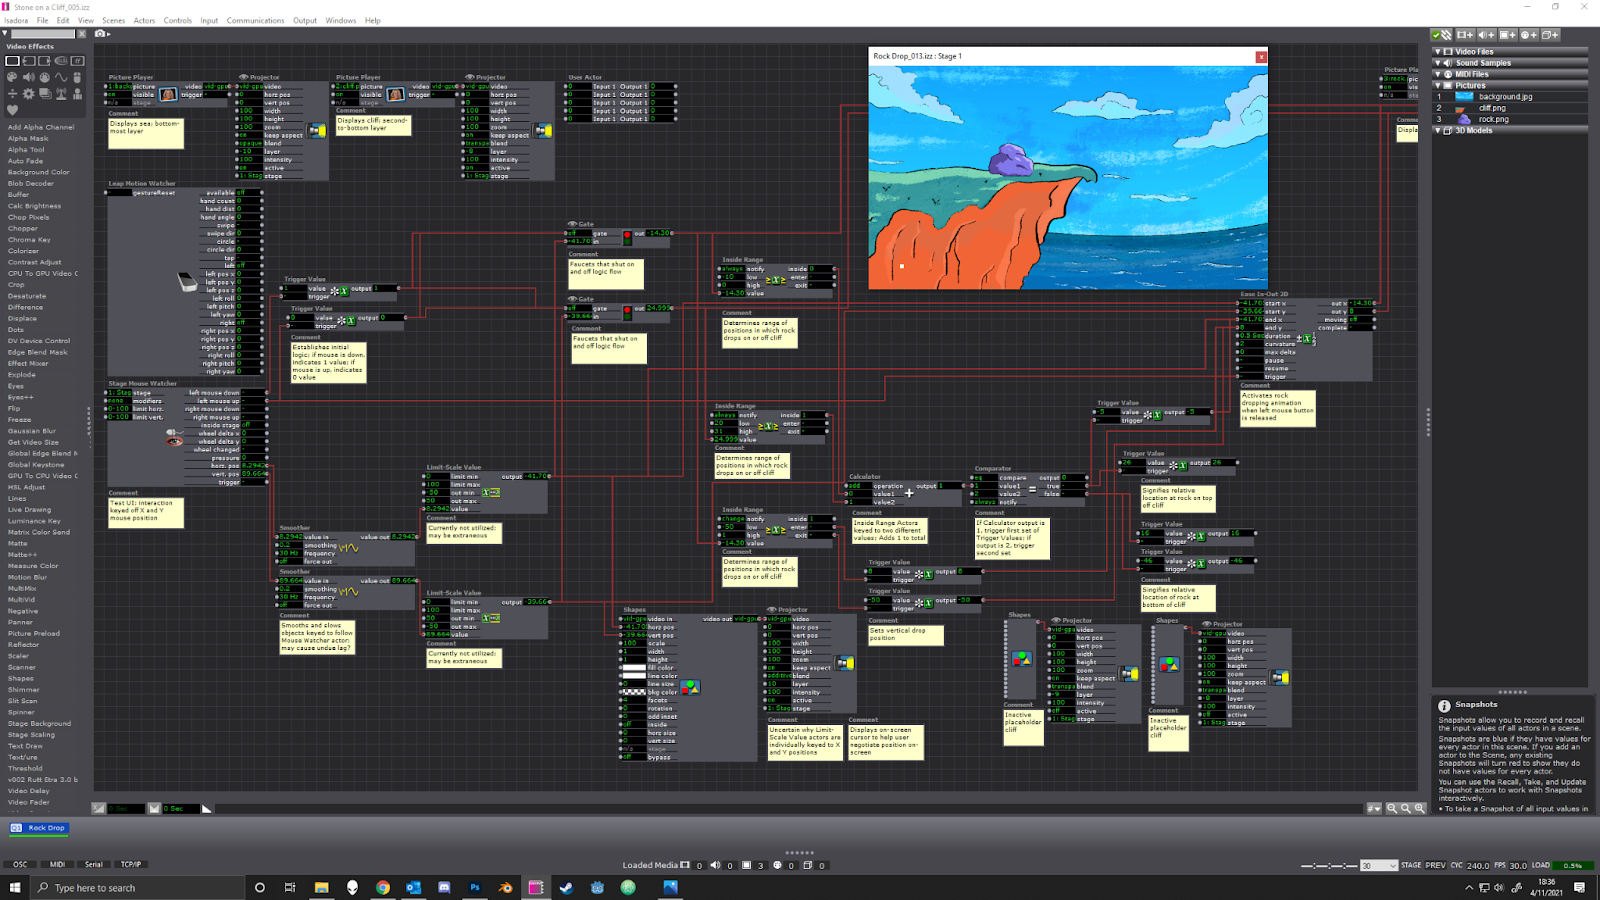
After it became clear that I would not be able to master Python in a week, I briefly toyed around with touch-and-drag controls as an alternative before setting Godot aside and returning to Isadora. Establishing Leap Motion controls in Isadora was straightforward; establishing physics in Isadora was not. Alex was remarkably patient as I repeatedly picked his brain for the best way to create a structure that would allow Isadora to recognize: 1. When a rock was pressed, 2. When a rock was released, and 3. Where the rock should fall when it was released. With his help, we set up the necessary actors; however, incorporating additional rocks presented yet another stumbling block.
I returned to my intent: stack rocks for relaxation. Nowhere in that directive did I mention that I needed to stack rocks with the Leap Motion. Ultimately, I wanted to drag and drop physics objects. That was not intuitive in Isadora, but it was in Godot, so at the 11th hour, I returned to Godot because I believed it was the appropriate tool for the job.
Challenges
As a designer, I know the importance of iteration. Iterate, iterate, iterate—then lock it in. The most significant challenge I faced with this effort was the “locking it in” step. I held onto extraneous design requirements (i.e., incorporate Leap Motion controls) much longer than I should have. If I had reflected on the initial question and boiled it down to its essential form sooner, I could have spent more time in Godot and further polished the prototype in time for the final presentation.
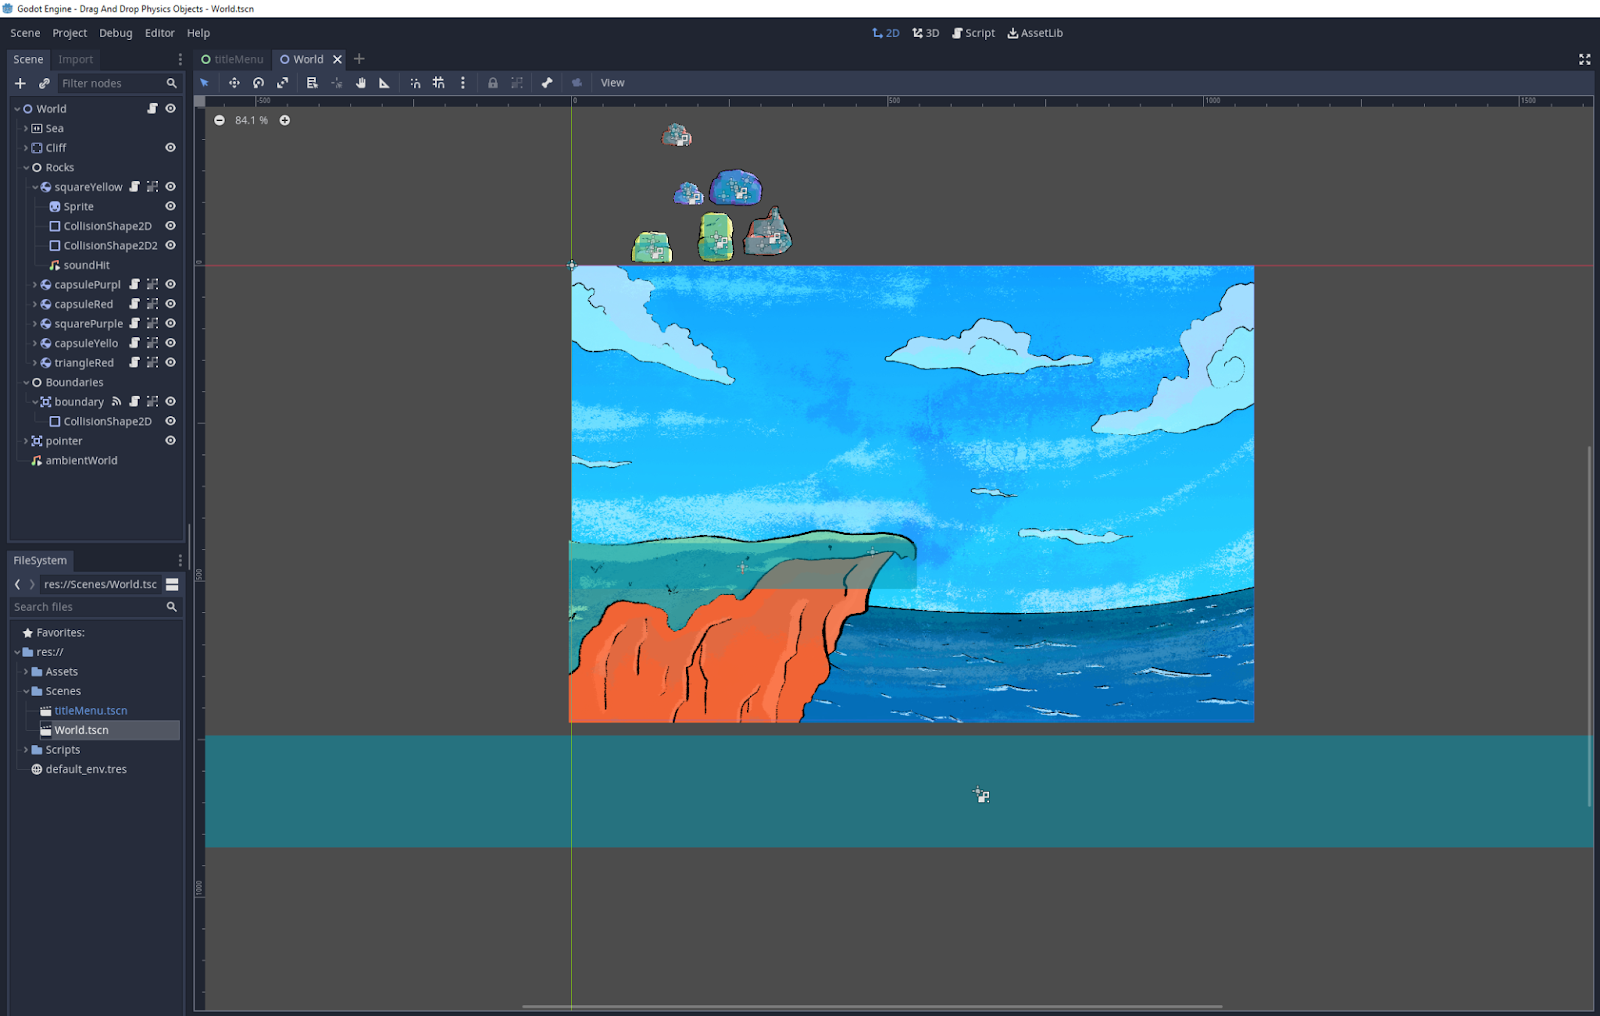
Additionally, when I did decide to lean into the silliness of the precariousness of the rock stack, I decided I wanted to insert a victory condition. If the user could indeed create a rock stack that stayed in place for x amount of time, I wanted to propel them to a “You Win!” screen. I thought I would replicate the boundary reset script I successfully implemented, but I realized one could game the system just by dragging an object into the Area2D node.
Finally, while I did incorporate ambient wave sounds, I struggled to add additional sound effects. The rock splash sound was only supposed to trigger when it hit the water, but it fired when the scene began as well. I faced similar challenges when trying to add rock collision sound effects.
Accomplishments
Challenges aside, I’m incredibly pleased with the current prototype. I successfully implemented code that allowed for dragging and dropping of physics objects that interacted with colliders. Without that, Rock Stackin’ would have been impossible. Furthermore, I established a scene reset script if the user flings a rock off the edge. At first, I prevented the user from being able to drag a user off the screen with the inclusion of multiple invisible colliders. However, I wanted some tension to emerge from the potential of a tumbling tower, and a reset seemed like a gentle push. Lastly, I’m pleased with the rock colliders I added. Capsule colliders caused jitter, while rectangle colliders provided no challenge. Multiple rectangle colliders scaled and rotated to fit the rocks I had drawn and led to a pleasing amount of collision and groundedness.
Observations
As I mentioned previously, I was using software not ideally suited for my needs. My main observation stems from that realization:
Go where the water flows.
Identify the hierarchy in your design goals and use the best tools for the job. I spent a while bobbing against the shore before I pushed myself back into the stream to where the water flowed.
Cycles 1 (Sara)
Posted: March 25, 2021 Filed under: Assignments, Sara C Leave a comment »Intent
For the remainder of the term, Alex has given us free rein to explore any hardware or software we so choose in order to create an experiential media system of our very own. I’m a lifelong gamer who normally can’t abide motion controls (It’s like those Reese’s commercials: “You got your motion controls in my video game!”), but I’m also desperately curious about the ways in which we can make VR experiences more immersive. As a result, my goal for the next month is to test Leap Motion functionality by swapping out conventional video game controls for hand gestures. Problem 1: I don’t have a VR headset at the moment upon which to test. Problem 2:
I’ve never made a video game.
I decided I’d hop, skip, and jump over Problem 1 entirely and simply focus on a desktop-based, 3D game experience for the duration of this project. As for Problem 2? Well, I did what most any human in the world looking to acquire a new skill would do in the present day—I started browsing YouTube tutorials. I figured I’d run a crash course in rookie game dev before tackling my own Leap-Motion-Meets-Godot prototype. One week and an eight-part video series later:
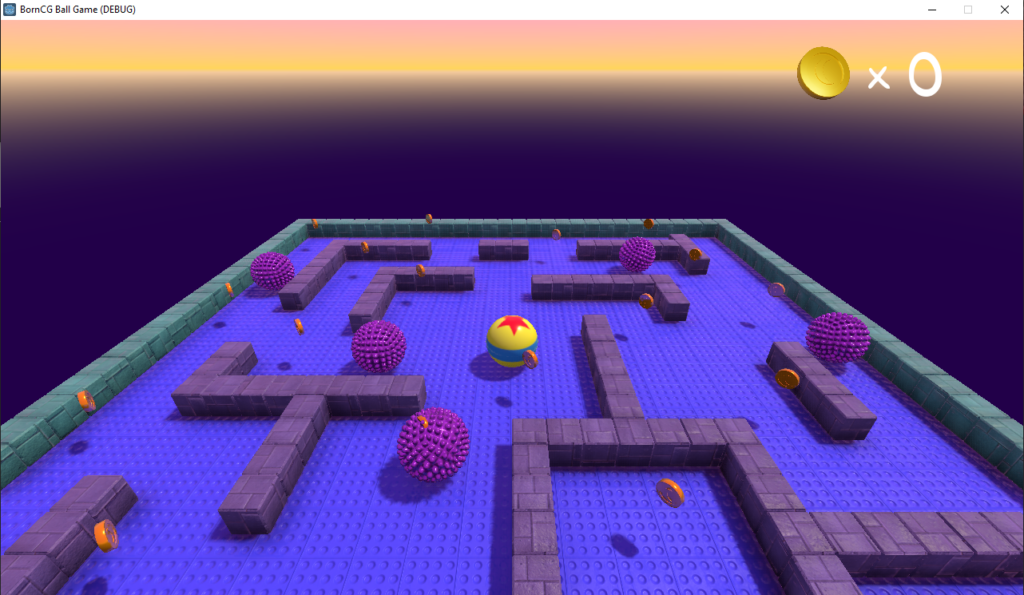
Et voilà, I made…someone else’s video game.
Difficulties
I mentioned to Alex that this achievement feels hollow. The BornCG channel is truly a monument to patient, thorough software skills instruction. I didn’t run into any significant difficulties while following this series because the teacher (who is an actual high school programming teacher, I believe) was so diligent in holding my hand the entire time. But I also completed the software equivalent of a Paint By Numbers picture. Because of that, I don’t feel true ownership of this project. Moving forward, I know I need to veer off the well-trodden, well-lit path and stumble around in the dark woods. It’ll be messy, yes. But it’ll at least be my mess.
Accomplishments
All of that being said, I will say there were a couple of lightbulb moments where I deviated from the script the tutorial instructor laid out before us. A commenter pointed out that the texture for the provided block asset was much larger than it needed to be, which resulted in slower game load times. I couldn’t quite parse the commenter’s proposed solution, so I hopped over into Photoshop and downscaled the texture maps in there and reapplied them in Blender. (Woo!) Later, someone else in the comments lamented that the built-in block randomization feature in Godot was buggy and prone to file size bloat, so I meticulously read, re-read, and re-re-read their solution for manually introducing block variety. (Huzzah!) Similarly, another commenter had a more straightforward solution to coin rotation transforms that didn’t include adding scores of empty objects; it took some time, but I successfully followed that little side trail as well. (아싸!)
Finally, like a teacher who shows you how to solve example problems before leaving you to your own devices, the instructor ended the series with the game only three quarters complete. I wanted to push it over the finish line, so using the skills I’d accrued, I populated the scene with additional enemies and coins to bring it wholly to life. I gotta say, while it may not feel like “my” game, I sure am proud of that low-poly assortment of randomized blocks, those spinning coins, and those gnarly, extra enemies.
Now, on to the next one!
(Link to video of completed game)
Pressure Project 3 (Sara)
Posted: March 11, 2021 Filed under: Assignments, Pressure Project 3, Sara C Leave a comment »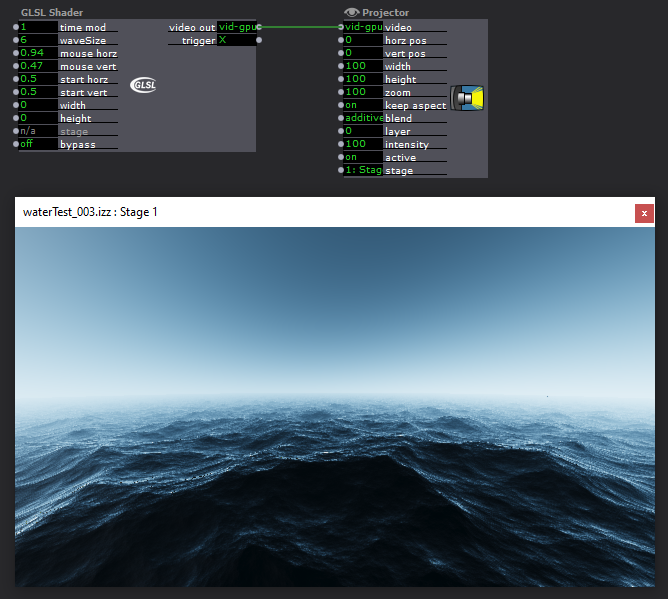
I plucked out the story I wanted to tell and the accompanying audio I wanted to use within half an hour of beginning. If only the remaining eight and a half hours spent on Pressure Project 3 had progressed as fluidly. Oh, well, Lawrence Halprin tells us “one of the gravest dangers we experience is the danger of becoming goal-oriented;” I don’t think anyone would accuse me of forgoing the process in favor of a goal over the course of this meandering rumination on how I’ve grappled with 3/11 in the ten years since the disaster.
First, the parts of the assignment that flowed easily:
Alex told us the deadline was Thursday, March 11. 3/11 marks the tenth anniversary of the Tōhoku earthquake and tsunami that in turn led to the Fukushima Daiichi Nuclear disaster. I was completing an undergraduate study abroad program in Shiga Prefecture at the time. As the earthquake struck and the tsunami was thundering towards the shore, I was shopping for a pencil case at a mall near Minami-Hikone Station. I was utterly oblivious to the devastation until I walked into my host family’s living room and saw a wave sweeping across airport runways.
So, yes, when Alex told us the deadline for this project was March 11, I knew there was only one “story of significant cultural relevance” I could tell.
After my study abroad program was summarily canceled, and we were forced to scramble for airfare back to the States, I spent a good deal of time adrift. Somewhere along the way, I decided I wanted to get in my car and head west. So I did. I drove west for a week, making it as far as the Badlands of South Dakota before turning around. Sometime later, I took a creative nonfiction course and wrote a piece about grappling with memories, grief, and coming unmoored. The writing was selected for my university’s literary journal, and so the audio you hear is my voice from all those years ago.
Now, onto process:
The piece was more than five minutes long, so I dumped the file into Audition and pruned it to meet Alex’s 3.5-minute requirement. Ensuring that the work still told a cohesive story after excising large swaths of it took half an hour.
After that is where things became tricky. We were told we didn’t have to use Isadora. I’ve been interested in dabbling with Godot for our upcoming Cycles project, so I was tempted to get a headstart and move directly into using the software. I jotted down the following notes:
“User plays with water while listening to audio?”
“3D water?”
Alex graciously explored GLSL shader options in Isadora with me. Unfortunately, I was 1.) stubborn and interested in Godot, and 2.) felt personally removed and emotionally remote from the visual experience. The waves were lovely, but I didn’t mold them myself. I wanted to dig my hands in the electronic clay.
I started watching Intro to Godot videos and quieted any voices in my head wondering if I was falling too far into the weeds. Four hours and fifteen minutes later, I had an amorphous blob of nothing. I wrote the following note:
“Do I press forward with Godot? Do I return to Isadora? Do I crawl back to my roots and make an animatic?”
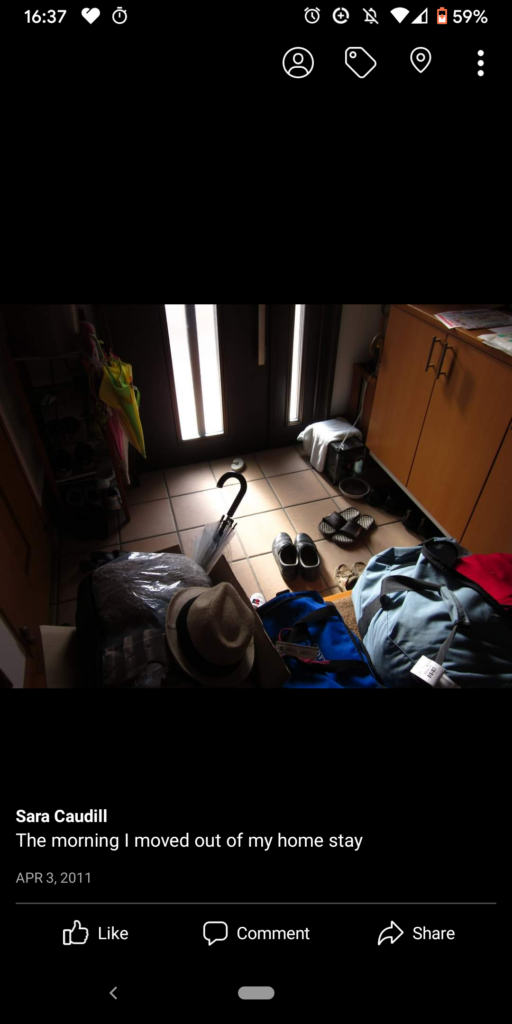
A few months ago, I had dabbled in 3D panoramas in Photoshop using equirectangular projections. I thought that perhaps that might be a way to bring the audience closer to the story without the kitsch of “splash around in fake water with your Leap Motion while listening to young, lost Sara.” I didn’t want to Google “3/11 Triple Disaster” and sift through the wreckage like a disaster tourist, so I instead looked up photos of Lake Biwa. The school where I studied squatted right on its shore. The Google results felt inert, so I then cracked open my defunct Facebook and went back to the albums I haven’t looked at in years. I found a photo of the entryway at my homestay strewn with boxes, luggage, and shoes. The caption read: “The morning I moved out of my homestay.”
Even after all this time, it hit me like a punch to the gut. I immediately started sketching it. I didn’t know what I was actually going to do with it, but drawing was a visceral, physical relief.
After making a messy sketch, I played with palettes. Eventually, I settled on the Japanese national red as the mid-tone and bumped the lights and darks around from there. I got even messier. I wanted the colors to sort of hurt the eyes; I wanted the whole thing to feel smudgy.
All right.
I had an audio clip.
I had an illustration.
Now what?
I found more old photos. I sketched more. I emailed my host family. I cried. Eventually, I found myself with half an hour to go and disparate, disconnected images and sounds. Finally, I listened to the wind outside the trees, thought about how it sounded like waves along the shore, and jumped into Premiere to make an audio-visual composition.
I don’t really feel like I created this work so much as wrenched it loose. Truthfully, I’m grateful for the opportunity.
Pressure Project 2 (Sara)
Posted: February 23, 2021 Filed under: Assignments, Pressure Project 2, Sara C Leave a comment »After opening the project file for the first time in a week, I was mystified by how to even “read” what I had created so far. I found myself getting hot and panicky when I couldn’t get the Leap Motion to track my hand—it took me an embarrassingly long time to recall that I need to have the Leap Motion Visualizer program open at the same time while using the device.
As it turns out, I need to do a better job of documentation. Currently, my “documentation” is a mess of contextless screenshots and notes scattered across two separate notebooks I also use for my TTRPG campaigns. (Like with most things, this would not be the case Pre-Rona. Your girl is a dutiful note-taker in classroom settings. Alas.)
So, first things first, I went about bypassing, disconnecting, and reconnecting nodes to determine just what exactly everything does in my patch. Then, I commented everything out.
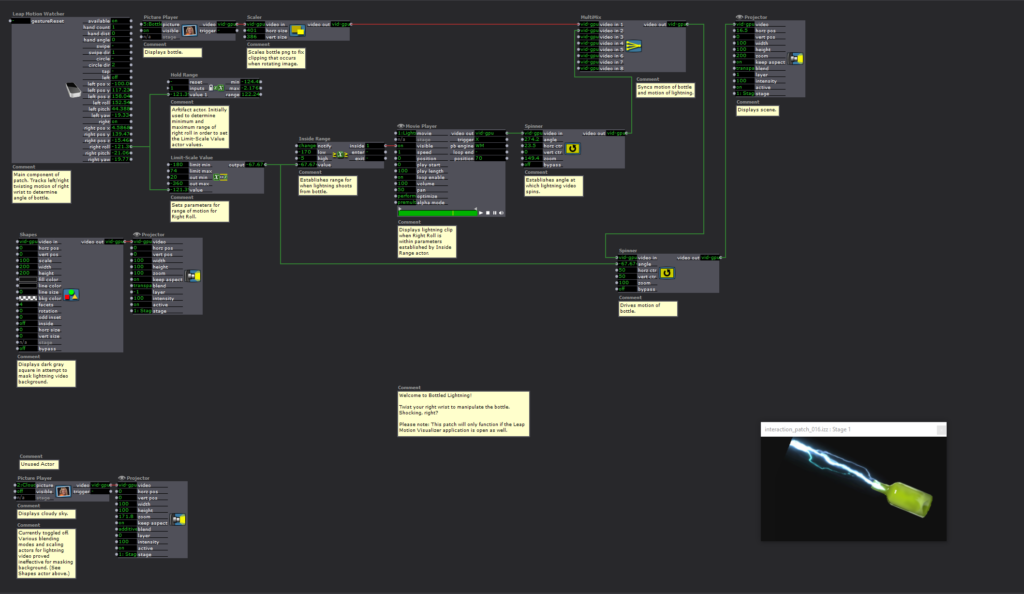
I’m pretty satisfied with the results. When the user twists their right wrist, lightning “shoots” out of the bottle when the angle of rotation is within established parameters. I can totally see this functionality being expanded into a sort of gamified wrist stretching exercise. “Hey, exhausted human who spends too much time at the computer! Twist your wrists to shoot the balloons out of the sky!” Perhaps that’ll be my final project if I can’t figure out how to develop a spooky Call of Cthulhu-esque Zoom UI?
Anyway, my biggest challenges with this scene entailed masking and image clipping. As the lightning activates, a low-opacity background appears. Additionally, the frame of the lightning clip is only so large, so the lightning cuts off before hitting the edge of the projector frame. When I ran into a similar issue with the bottle PNG being too small to rotate without clipping, Alex helped me add a Scaler actor. I thought the same method could both hide the sudden appearance of the background and scale out the lightning to the edge of the projector. Unfortunately, it seemed to only warp the clip. I managed to obscure the unwanted background with a dark gray square background, but I couldn’t find an answer to my lightning clipping issue.
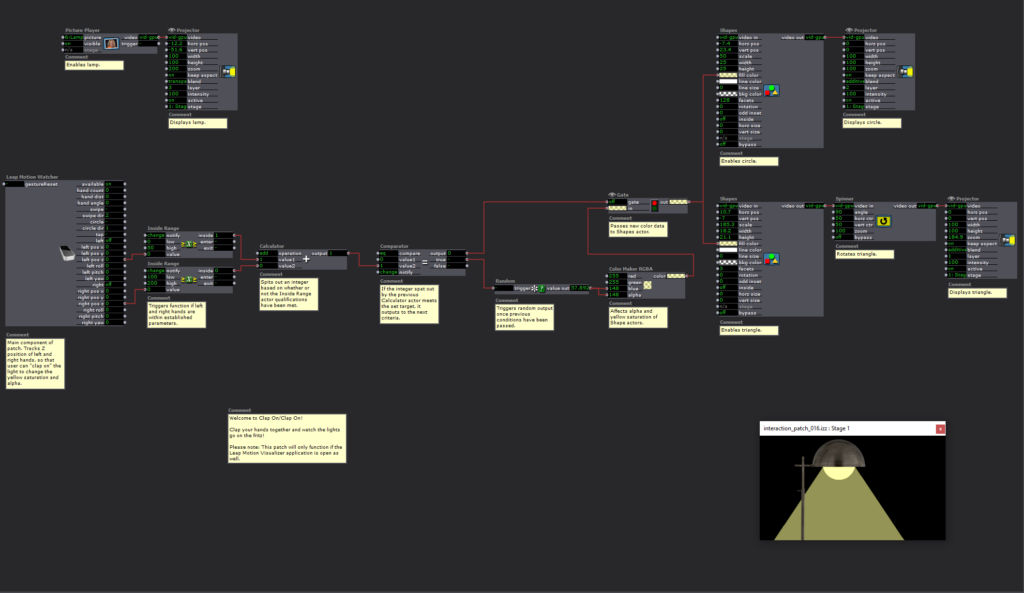
I still had quite a number of hours to go to complete the 5-hour limit for this Pressure Project, and I was fresh out of ideas for what more to do with this Bottled Lightning patch for now. I began reviewing the mishmash of screenshots I mentioned previously. Lo and behold, I stumbled upon one I named “Leap Motion Clap Color Change.” I remembered Alex and Maria puzzling through this practice patch in class, but I hadn’t yet tried it out for myself. Apologies if I totally ripped off your idea here, Maria, but I figured I had enough time to kill to try my own spin on it.
At first, I thought I’d try to do a “Clap On/Clap Off” lamp. When the hands were in range (i.e., clapping), the scene would illuminate. I even thought it might be neat to randomize the appearance of surprising/spooky/funny images.
Clap on!
“Oh, it’s a cute lil’ Shy Guy!”
Clap off!
[The lights turn off.]
Clap on!
“Ah! It’s the girl from The Ring! Clap off! Clap off!”
If you see the “TEST: Image Generator” scene in the file, you can see my attempts to sort out how to turn on and off Shy Guy.
I didn’t want to throw in the towel entirely, so I shifted to a “Clap On/Clap On” idea. In Maria and Alex’s original patch, they randomized the color of a square through a Comparator > Random > Color Maker RGBA actor sequence. Then, the same Comparator and Color Maker RGBA actors were plugged into a Gate actor that hooked up to the Shape actor. Spinning off of that, I tried to put a street light “on the fritz.” There was this unsettling path in the woods back in my William and Mary days where the lights would buzz, falter, and go out just as you happened to walk under them. I plugged the Random actor just into the blue and alpha channels to simulate that change in saturation and strength. Then, I dumped the whole thing into a shape actor, duplicated it, and scaled it down to make it look like a series of them.
In the Bottled Lightning scene, I was pleased with the Leap Motion functionality but a little vexed by the bare-bones appearance of the product. With this scene, the reverse proved true. It looked moody and evocative, but the clapping motion didn’t work as well as I would like. I’m not certain why this is the case, but I think it may have something to do with the values I input for the Inside Range actors.
Truth be told, this project felt a bit like a “sophomore slump” for me. My first project was a wacky, freeing, and free-wheeling exploration of what Isadora can do. This time around, I felt a self-imposed pressure to deliver something bigger and better. I’m still learning. I’ll keep at it and try again next time.
Pressure Project 1 (Sara)
Posted: January 31, 2021 Filed under: Assignments, Pressure Project I, Sara C Leave a comment »The Power—The Passion—The PATCH!
Intent
I used the time-based, “pressure” parameter of this project as permission to throw spaghetti at the wall, have fun, and get weird. After all, with a hard stop of only five hours to create something that wrests the audience’s attention for as long as possible, I figured a good metric of success would be if I could make myself laugh.
This project happened to coincide with my most recent Xena Warrior Princess rewatch, so I jotted the following ideas down in my notes:
- Xena criss-crosses landscapes
- Start with patches from class tutorials and get more outlandish
- Include audio?
- Make Greece wibbly-wobbly?
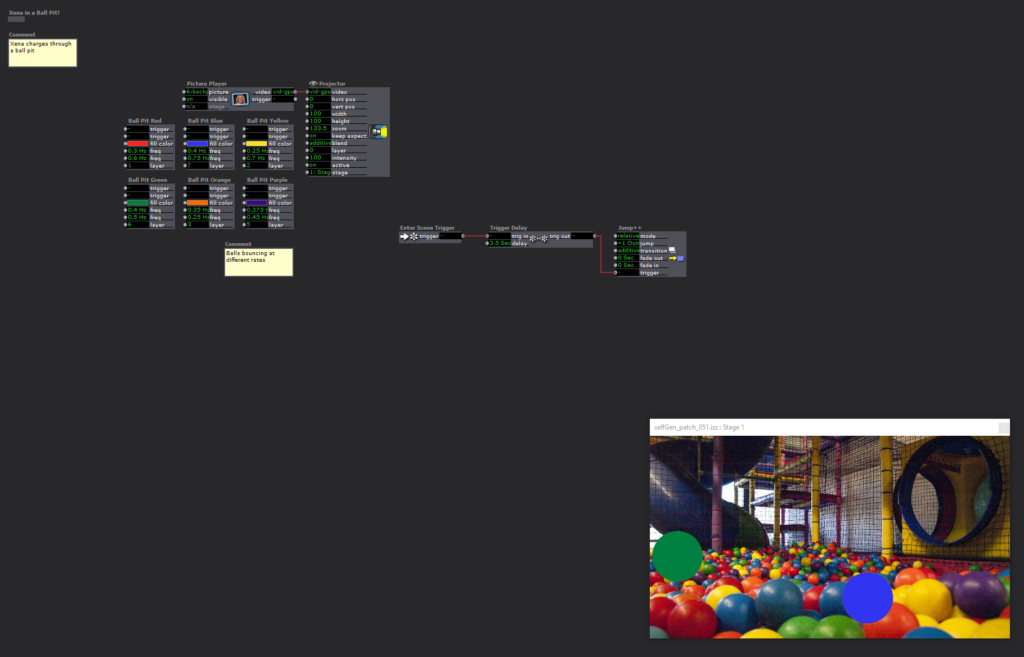
After finding a PNG of Xena in profile charging with her a raised sword, I started inserting it as a user actor in multiple scenes. I thought it would be strange and delightful for her to race across non sequitur landscapes in a bizarre imitation of a side-scrolling video game.
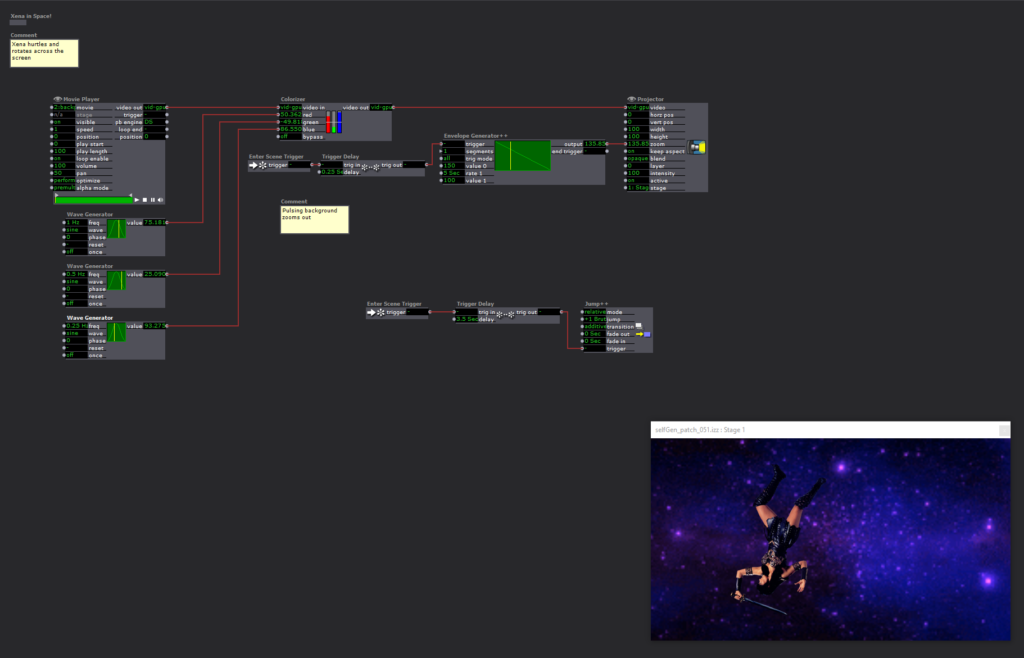
I sought to riff on ideas introduced in class in playful ways. Imagine Xena wading through a ball pit! That’d be a good use of the toying with the Shape actor. We created weird, pulsing effects with the Wave Generator—that sort of reminds me of ping-ponging through a wormhole! My goal was to tweak and adjust and keep Xena’s quest fresh with each subsequent scene.
Difficulties
I desperately wanted to include the Xena Warrior Princess Main Title theme to score this oddball project, but I ran out of time to hammer out the specifics. I watched an Isadora sound tutorial that was fairly straightforward, but I couldn’t for the life of me get the mp3 to import into the Sound Bin; despite my flailing efforts, it kept getting stuck in the Video Bin. As such, I couldn’t follow the tutorial’s advice for setting start and stop times since it was predicated on using the Sound Player actor. Perhaps there’s a way to lay a sound bed underneath every scene, but I wasn’t certain how to do it, and I didn’t have the time to individually fiddle and tweak individual Video Player actors to get the song to flow fluidly between scenes.
Additionally, the initial vertical and horizontal positions of some images had to be repeatedly tweaked and didn’t remain consistent upon repeated plays. Maybe the issue will crop up in the class critique. If it does, I’ll gladly point it out and request help resolving the matter!
Accomplishments
My proudest accomplishment with this project is establishing automation. Once the user hits the Start button, a network of Enter Scene Triggers, Trigger Delays, and Jump Actors will bob and weave the disparate scenes and elements together, one right after the other. Once the patch finishes, it hops all the way back to the beginning, and the user can hit the Start button again. Truthfully, that small trick is what brings me the most delight.