Final Project
Posted: December 14, 2018 Filed under: Uncategorized 1 Comment »For my final project I wanted to create an experience that was playful, interactive, tricky , and physically engaging. Thus, a life-size version of candy land emerged on my Isadora patch. Though I had a loose idea of how I envisioned the game to function when I began the project, it quickly grew beyond my original construct in to something far more complex.
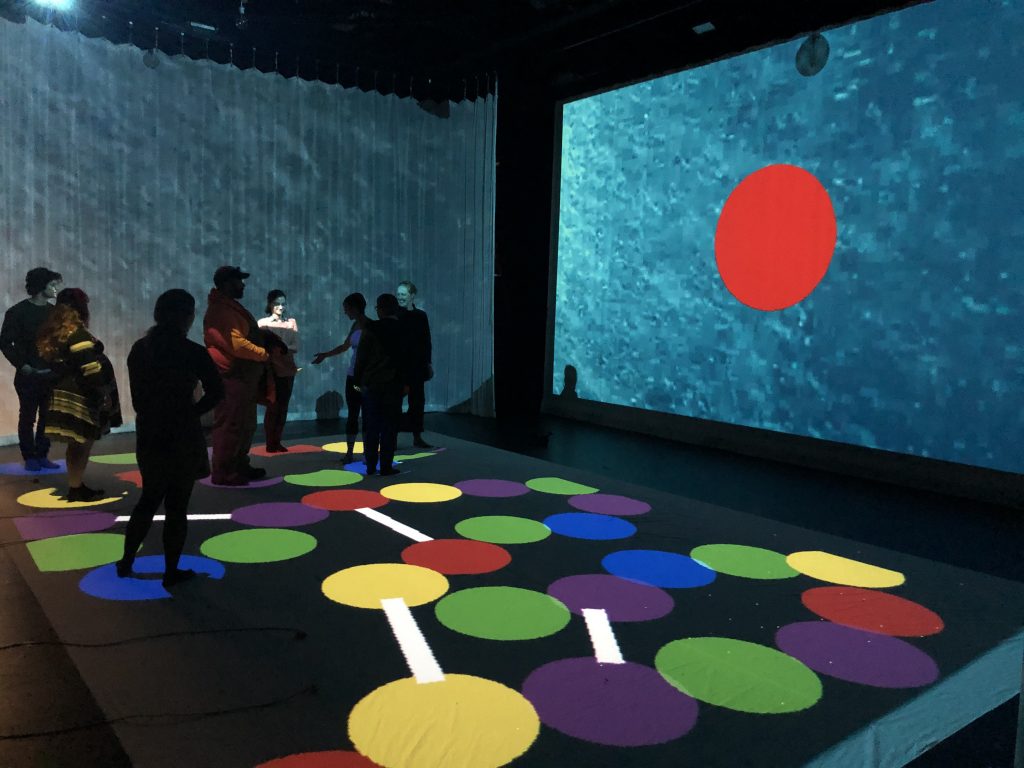
The game begins with the players “picking a card” by pressing a button on a wii remote. The button then sends an osc message to my patch that triggers a random colored dot. This colored dot is then projected on to the main screen, signaling the player to move forward to that color dot.
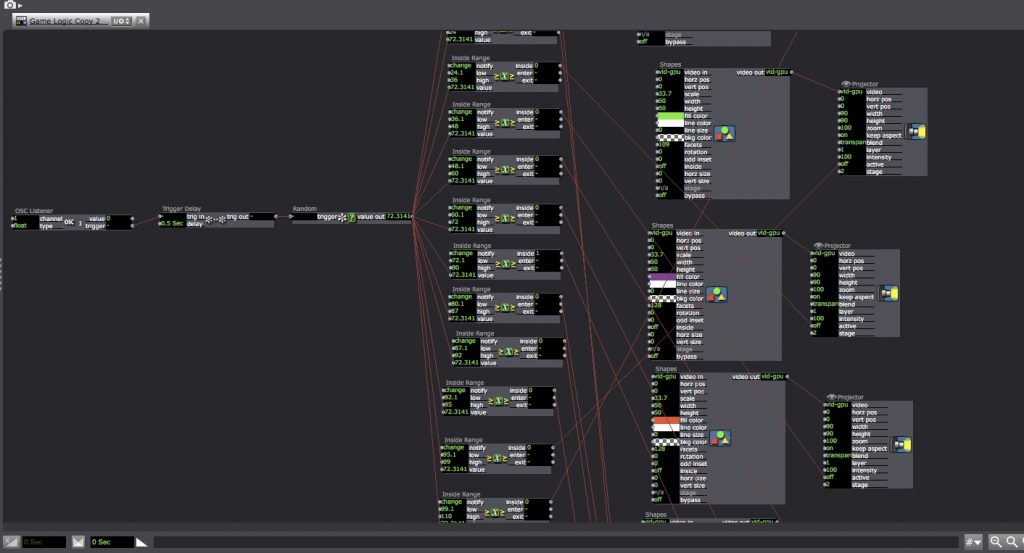
I used a random number generator actor to pick a number to land in one of 12 inside range actors. Each of the 12 inside range actors either activated a shapes actor to project a colored dot on the screen or a jump actor to jump to a “special card”.
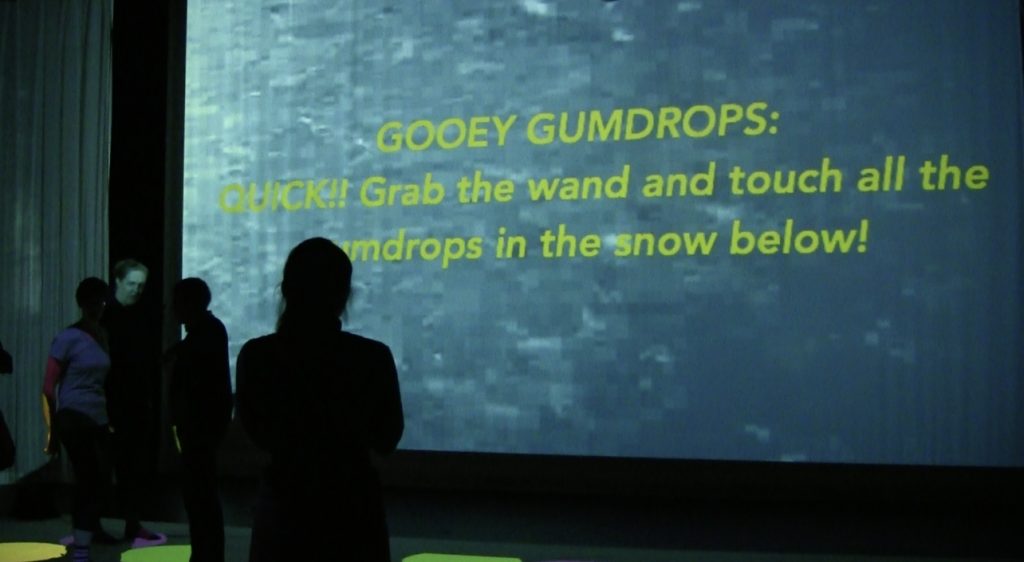
The special cards I chose to incorporate were the licorice card (freeze for one turn), the lollypop woods card (travel to the spiraling shape on the game board), the chocolate swamp(return to the start of the board game), and my personal favorite, the gooey gumdrop card.
The gooey gumdrop card instructed the player to pick up a wand and tap the gooey gumdrops in the snow below. This section of the game allowed me to incorporate my new comfortability with makey makeys. I created the gumdrops and the wand from aluminum foil and then painted them to fit the scene. I think this card added an element of adrenaline to the game and a higher level of physicality because the players had to find the gumdrops, bend to their level to tap them, and get them all before time ran out.
Like all projects, a few challenges arose in creating my Isadora patch. However, I was able to workshop the issues and within the problem solving I realized how much my Isadora competency has grown over the semester. I feel very comfortable with the program and I am proud of the logic I have grasped.
As a whole, I think that all of the players enjoyed themselves and had a fun time reconnecting with this childhood classic board game. I had a blast creating it and would love to recreate more board games in the future.
Final Project – Werewolf
Posted: December 14, 2018 Filed under: Final Project, Uncategorized Leave a comment »For this final project, many aspects changed over its development. Initially, I started work on a voting sort of game. I wanted everyone experiencing to have an app loaded to their mobile device written in ReactNative, then proceed to each have an interface to participate in the game. Essentially I would find through research that I wanted to create what is known as a Crowd Game.
Further reading: http://stalhandske.dk/Crowd_Game_Design.pdf
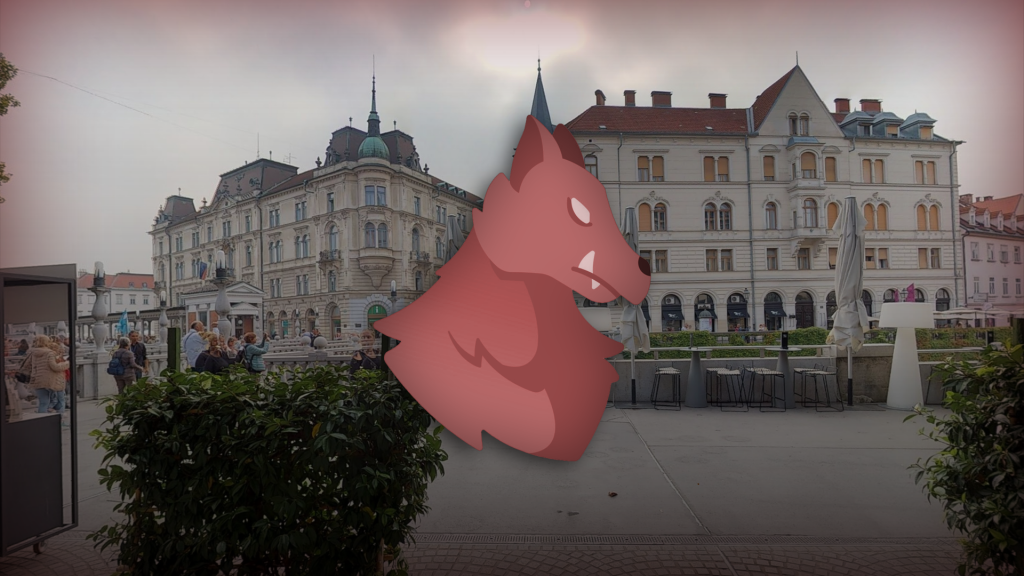
Through much of my development time, I worked with the concept of a voting game and how to get people to form coalitions. Ultimately, I found it difficult to design something around this concept, because it was difficult to evoke strong emotions without serious content or without just having the experience revolve around collecting points. Shortly before the final few days of development, I had the idea to completely change and base the experience on the party game known as Mafia or Werewolf (Rules example: https://www.playwerewolf.co/rules/). This change better reflected my original desire to have a Crowd Game, but with added intimacy and interaction between the players themselves, as opposed to with the technology. If people are together to play a game, it should leverage the fact that the people are together.
Client / Mobile App
– Written in React.js (JavaScript) using the ReactNative and Expo Frameworks. Excellent choice for development, written in a common web language for Android and iOS, able to access system camera, vibration, etc. https://facebook.github.io/react-native/ https://expo.io/
– Unique client ID. Game Client would scan and display QR codes so players can select players to kill automatically from distance with consensus. Also randomly assigns all rolls to players.
– Expo allowed me to upload code to their site and load it to any device. A website serving HTML/JS would be easier to use if one did not intend to use all the phone functions.
– This part of development went smoothly and was fairly predictable with regard to time sink. Would recommend for use.
Isadora
– Isadora patch ran in the Motion Lab. Easy to setup after learning software in class.
– Night/Day cycle for the game with 3 projectors.
LAN Wi-Fi Router
– Ran from laptop connected to Server over ethernet. Ideal for setups with need for high speed/traffic.
Game Server
– Written in Java, by far the most taxing part of the project.
– Contains game logic, handling rounds, players, etc.
– Connects to clients via WebSockets with the Jetty library. I could get individual connections up and running, but it became a roadblock to using the system during a performance because I could not fix the one-to-many server out-messages.
– This had a very high learning curve for me, and I would recommend that someone use a ready system like Colyseus for short-term projects like this final. http://colyseus.io/ https://github.com/gamestdio/colyseus
During the final performance, I only used the game rules and Isadora system setup in the Motion Lab, but I feel as though people really enjoyed playing. Certainly more effective than the first game iteration I had, even with the technology fully working. My greatest takeaway and advice I would give to anyone starting a project like this, would be to just get your hands dirty. The sooner you fully immerse yourself in the process, the sooner you can begin to see all it could be.
Nostalgia
Posted: December 14, 2018 Filed under: Uncategorized Leave a comment »For the longest time I didn’t know what to do. I knew I just wanted people to enter in on the world of my own sensory associations but I wanted them to feel things. I thought initially about putting colored light from the ceiling, and then have a sensor watch when people sit and certain music would come forth. I was actually really struggling with what the interface would look like.
It really wasn’t until a few weeks before the due date when a classmate told me, okay, you really gotta start planning the nuts and bolts. hahah. So i made a list of what objects I wanted in the room. I decided I would have a series of objects that had personal significance, and then when they touched the objects, it would trigger a projected reaction. At the same time, I wanted it to be multisensory, so I wanted smell and sound to be in there as well. Eventually, I decided that I would have nine objects laid out: books, blue light, purple light, yellow light, red light, some handcrafted smells from Candle Lab to evoke the smell of coconut and lime, iranian tea, and firewood, and then finally an Indian necklace family friends had given me. I would explore with the colors some of the imagery and feelings that were evoked for me. I would do the same with smell: coconut and lime were smells i thought of my mom doing my hair, and lime cooking in the kitchen with my aunts.
As far as the programming, I used Isadora. It has been a great program for me to use considering I have never used tech stuff before. It helped me to feel more confident because the first couple weeks in the class felt so difficult. So by the end I felt amazing.
ISADORA
I had about 27 scenes! I had a base scene, and I decided that i would have a keyboard watcher with 9 triggers total for each object.
- because i wanted to connect it to a makey makey so audience members could select each object themselves and watch the images and sound that came after, I decided it would be easiest if I told audience members to trigger one at a time. (even though initially i had imagined that several people trigger the buttons and I just make it a smooth transition). That felt too complicated for the amount of time I had, and I kind of liked the idea of audience members watching together.
- So I set up 9 triggers, each jumping to the scene I wanted from the base page. Each scene would play 60 sec before jumping back to the main page.
- because i had three projectors for each object (and each slide was in a different scene, i chose to “activate scene” in the first scene triggered so the other two for that object would go off as well.
- so I had: jump to scene 1 from base scene,
- on scene one: enter scene trigger – activate scene 2 and 3
- on scene one at the same time: enter scene trigger – trigger delay for 60sec – deactivate scene 2 and 3
- on scene one at the same time: enter scene trigger, trigger delay for 60sec – jump to base
- repeat for each new object
There are other ways I could have done it so i didn’t need to use activate scene, like putting all three projections per object on one scene. But it felt like it would be messy for me to follow allllll of those logics on one scene. so for visual purposes I didnt do that.
The other part was since I had several videos playing at the same time, I had to edit the sound so it didn’t overlap in ways that didn’t sound nice. I was really working up to the final show, so it ended up being a little stressful–i had people who wanted to come and see my installation while I was still setting up! All in all, it helped me though. I got over the fear that somehow it needed to be realllly perfect in order for people/myself to enjoy it. And i got awesome reactions! I never thought people would be looking at me as some kind of tech expert after the show. hahah
All in all, it was super meaningful.
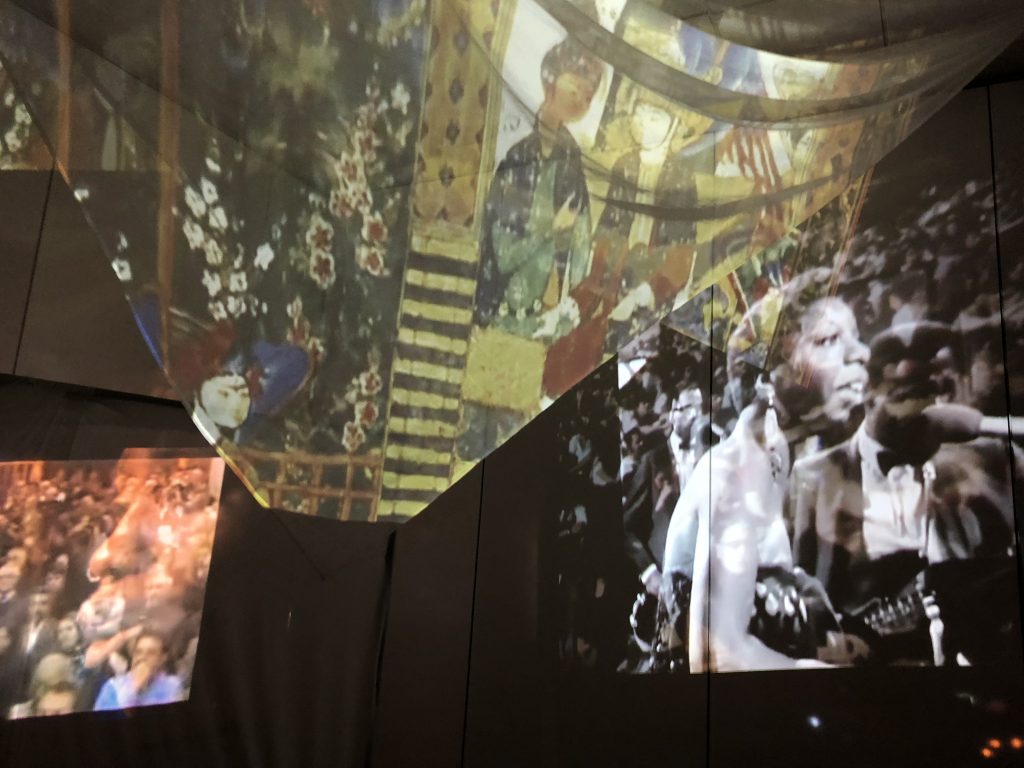
When setting up the room, I tried to think of how I could make it as dreamy as possible. I hooked some sheer fabric to the ceiling, played with how I wanted my images to overlap on the projections, and folded the fabric in different ways to create a layered image effect. In order to watch “the color blue” i believe you have to download the file below.

If you want to see more, I plan to post them on my IG: _parisa_rose
Thanks!
Parisa
Magic Window
Posted: December 14, 2018 Filed under: Uncategorized Leave a comment »This interactive window came on the heels of a video installation that I made for the Hopkin’s Hall Gallery, State of Swing. Making this, I considered reality’s complexity, and the filtering and framing we do to make meaning for ourselves.
Two videos play simultaneously, and filters hang on a pedestal for viewers to pick up and look through. Each filter blocks out one video and lets the other pass through.
While I find the simplicity of State of Swing captivating, I wanted to see what could be possible with Isadora while holding onto a similar concept–the audience controls what they see and becomes aware of how much happens that they don’t perceive.
Thinking about framing, reflecting, refracting, and obscuring, a window came to mind. I was excited by the idea that a window would reflect myself back at me when I was on its the light side. I’m pocketing this, because, while this didn’t become a part of this version of this installation, I hope it comes back!
I went to Columbus Architectural Salvage, found dusty window, and tried to project onto it. The dust allowed me to see a faint projection on the window, but the Kinnect could only sense the glass when it was perfectly perpendicular to its waves.
Meanwhile, I did some research about projecting onto glass, and there is really expensive film that adheres to glass, making it a projectable AND TRANSPARENT surface. COOL! But, the cheaper option was to paint buttermilk onto the glass. (No it doesn’t smell at all once it dries.)
Still, the surface must still have been too flat and reflective for the Kinnect. So, Alex helped me figure out a WiiMote and Malu helped me solder together a couple of small IR lights and connect them to the window. I’m glad I learned how to do this, but they weren’t bright enough and were too directional to get a consistent reading from the WiiMote. Luckily, the MoLa had a couple of IR lights, and we turned the system around.
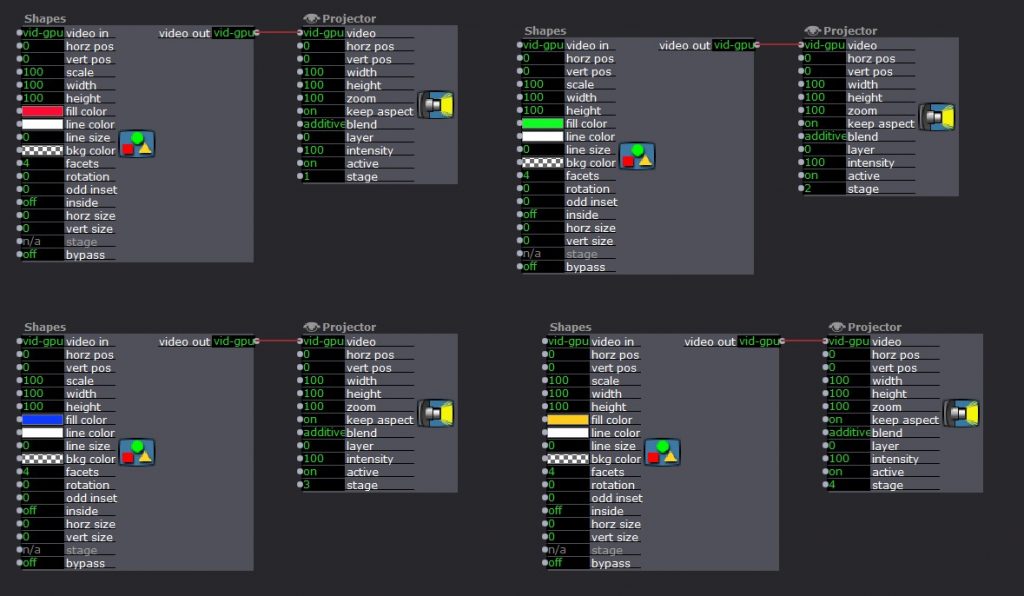
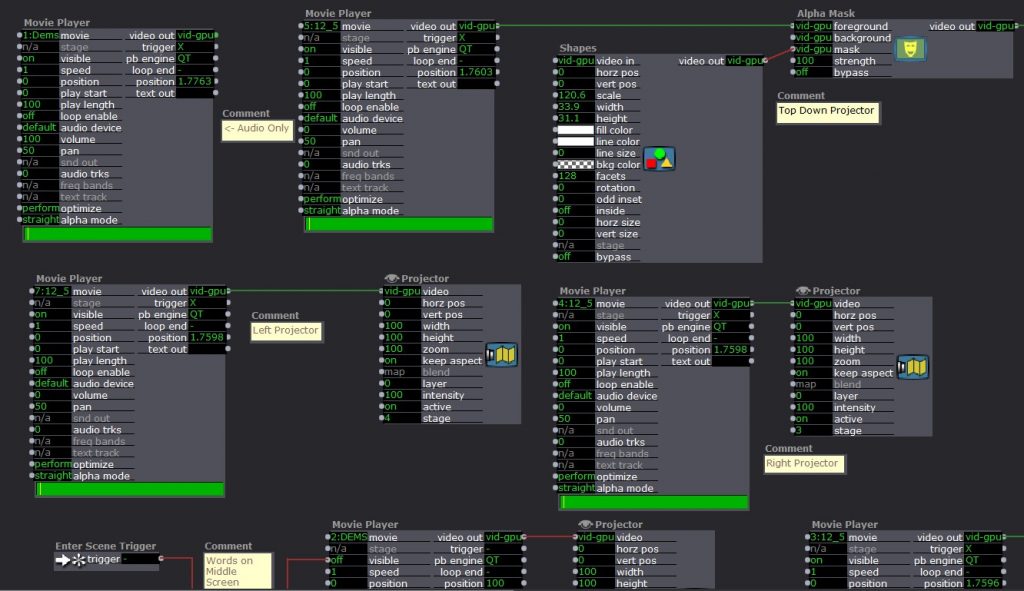
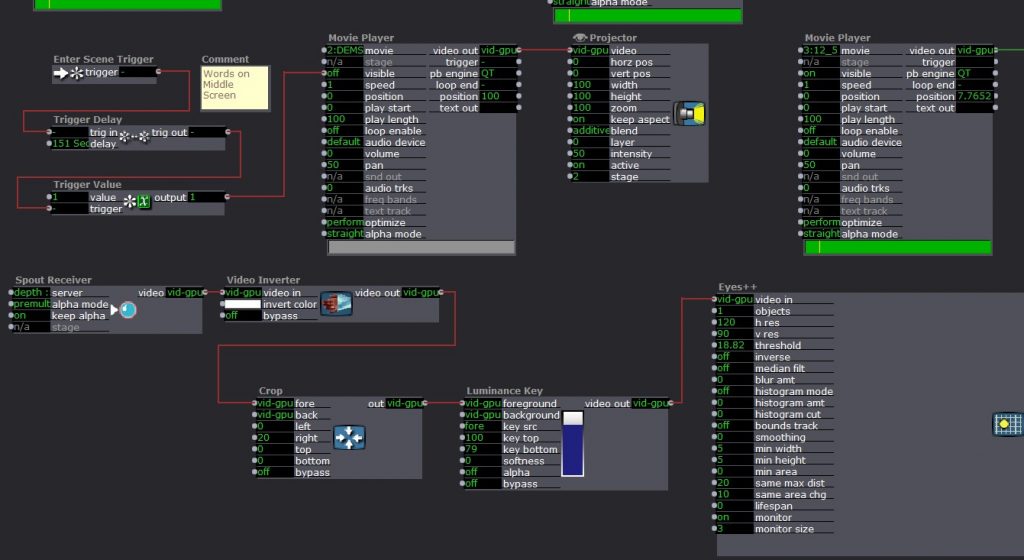
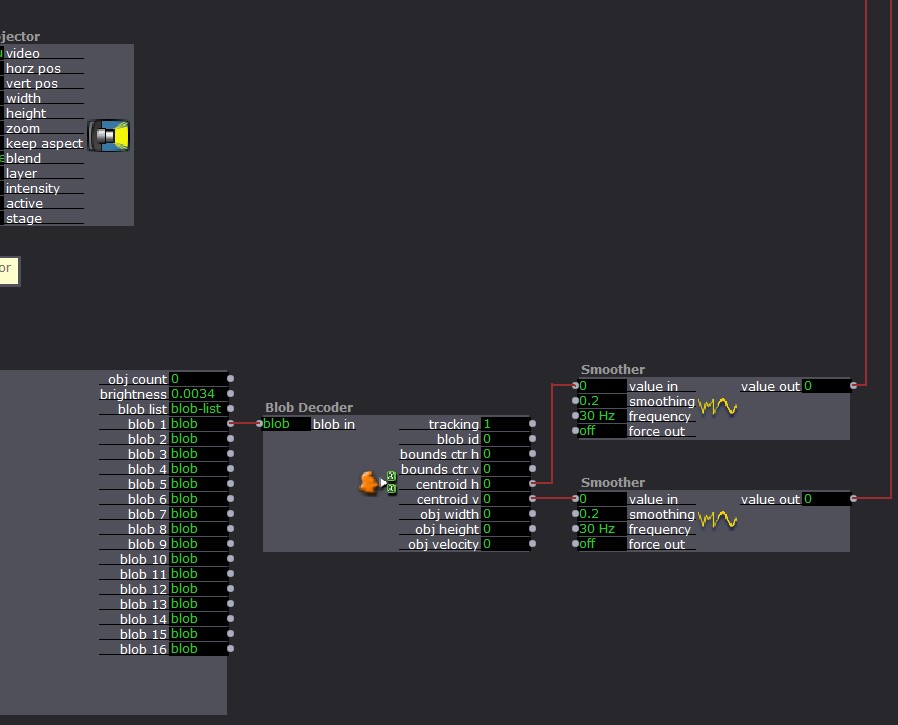
Now, the IR light sits on the projector and the WiiMote is connected to the window. The WiiMote sends its x and y coordinates to the computer via Bluetooth. These coordinates connect to the shapes actor in Isadora. Then, each scene had two videos playing. For example, one was a hill in the the woods. The other shows this same hill with people dancing. With the Shapes Actor and and Alpha Mask Actor, a user can aim the window (connected to the WiiMote) towards the WiiMote in order to see the dancers on the hill. Additionally, while holding the window, the user can move throughout the projection to see different parts of the image.
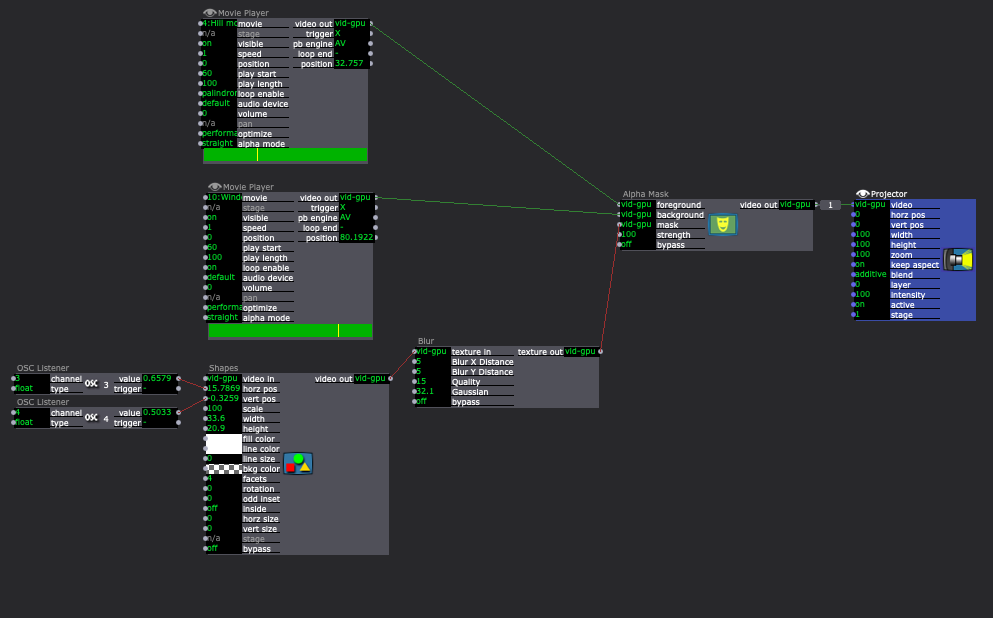
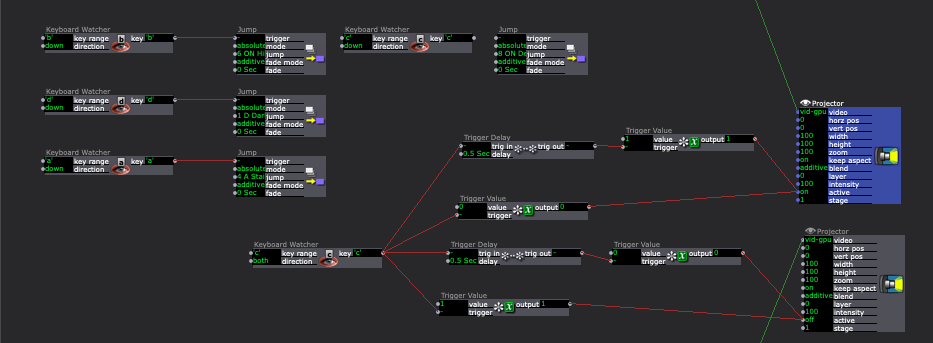
Then, I created four places where the window would hang. Using a Makey Makey, each hanging place changed the video projection by jumping to another scene. I mapped the projection to project only on the window while the Makey Makey circuit was closed. Then, once the window is lifted off of that hanging place, the image expands to fill the space and the the user can move around to reveal new parts of the image. If they set the video down in a different place, the scene will change and the process begins again.
The Makey Makey works like an external keyboard. Closing the circuit functions like typing a letter. Turning the Projector Actors on and off with up and down key strokes (closing and opening the Makey Makey Circuits) was a little tricky. The closed circuit repeatedly sent the “down” signal. The image below shows a solution to this problem.
See it for yourself! This video contains some user interaction, and more of me explaining how to use the system and how it works.
Final Project
Posted: December 10, 2018 Filed under: Uncategorized Leave a comment »For the final project I wanted to incorporated my costume design into media. I wanted to test painting designs onto fabric while a performer is moving around. For this project I brought in several skills and learned new skills while creating the experience.
Preparing for the final project.
I had to create a skirt that would also act as a media surface. I decided to go with a hoop skirt as that would provide a large space to project upon. I ended up drafting a pattern and sewing a skirt made out of taffeta. I purchased a white turtle neck shirt to allow for more surface to project upon.
I had to obtain the audio and visual aspects of the experience. When I first put together the project it was just a dress form in the middle of the space. After running it one time for the class and obtaining feedback as well as experiencing Andre’s multi-media experience, I knew that I was missing elements that finally came to mind. I needed more atmosphere. This is when I had to decide on a story and find audio and visual elements to go with it.
I wanted to utilize a Blue October song as their music themes had been weighing heavily on me lately. It was after finding one that I liked that I knew I needed to find some corresponding audio as well. After countless hours of searching on the internet I finally decided to pull audio from five sources. Those were One Republic’s Connection, Lovelytheband’s Broken, Blue October’s Daylight, a short film called Siren, and Lindsey Stirling’s First Light.
For visual I utilized top down images that were found randomly that included mandala’s and geometric shapes. This was projected onto the performer from the grid. I had two side scrims that I put images on that were very similar. The images included people in crowds where they did not interact, geometric shapes, a disco ball type lights as if you were inside the ball that were turning, a hillside looking down to the ocean, and then the northern lights. The disco ball lights moved in a direction going towards the center screen. The hillsides were similar but different in that they both went downward towards the middle screen. The center screen started with a man who kept going through a crowd of people where he was not able to interact with anyone, then we moved to an eye that had digital images on the iris, the next video was two videos overlapped with the visual of rain falling on a window with words that corresponded to lyrics that showed up. The lyrics were recorded in a PowerPoint slide show, the next video was where you were underwater looking at the surface, followed by videos of ink being injected into water.
Before this project I had not done any audio or video editing. I ended up finding a program online called Video Pad Video Editor. I was able to get down to the single frame to be able to edit the different images to change at the same time. I first edited the middle video to the audio that was my starting point. It was definitely an eye opener as to what video editors go through which I now have a new appreciation for.
I used Isadora to create the framework for the videos to push through the projectors. I also utilized the Kinnect to follow the performer. I connected the Kinnect to Isadora through the program Vuo. Everything had tested well and worked on the last class period and when I got into the motion lab the day of performance the Kinnect was no longer in the same spot. I even tested the top down projector and it seemed to work. Between then and when I was able to set up again for the actual performance there were changes to the projector in Isadora which caused the projections on the performer not to work the way it had previously. Luckily Alex was there to create a new projector for the video to go through correctly.
It looked like the audience enjoyed the experience. After the performance I was able to get another video for archival purposes. After that there were three faculty members from ACCAD, Design and Theatre and I was able to run it one more time. After reflecting on the conversation that happened afterwards, I realized that I have grown. I was able to describe what was technically going on fairly easily. At the beginning of the semester there is not a way that I could have done that. Overall, I am very happy with the way everything turned out.
Isadora Set-Up
Isadora Play Scene
Final Project
Posted: December 10, 2018 Filed under: Uncategorized Leave a comment »For our final project, we were instructed to create an experience that we would share at an open house type event. The idea was to have a project that could be iterated more than once. For my project, I elected to create an immersive experience based upon a song by Stravinsky called the Firebird. This song was used in a play with the same name. Ultimately, this project helped me explore the use of sound within a virtual space and also the
Line Describing a Cone
Posted: December 3, 2018 Filed under: Uncategorized Leave a comment »I’ve been meaning to post this for a while. This is Line Describing a Cone by Anthony McCall. It is a 30 minute 16mm film that is projected with a fog machine, making the light appear solid.