Pressure Project 2 – Personality Test – Min Liu
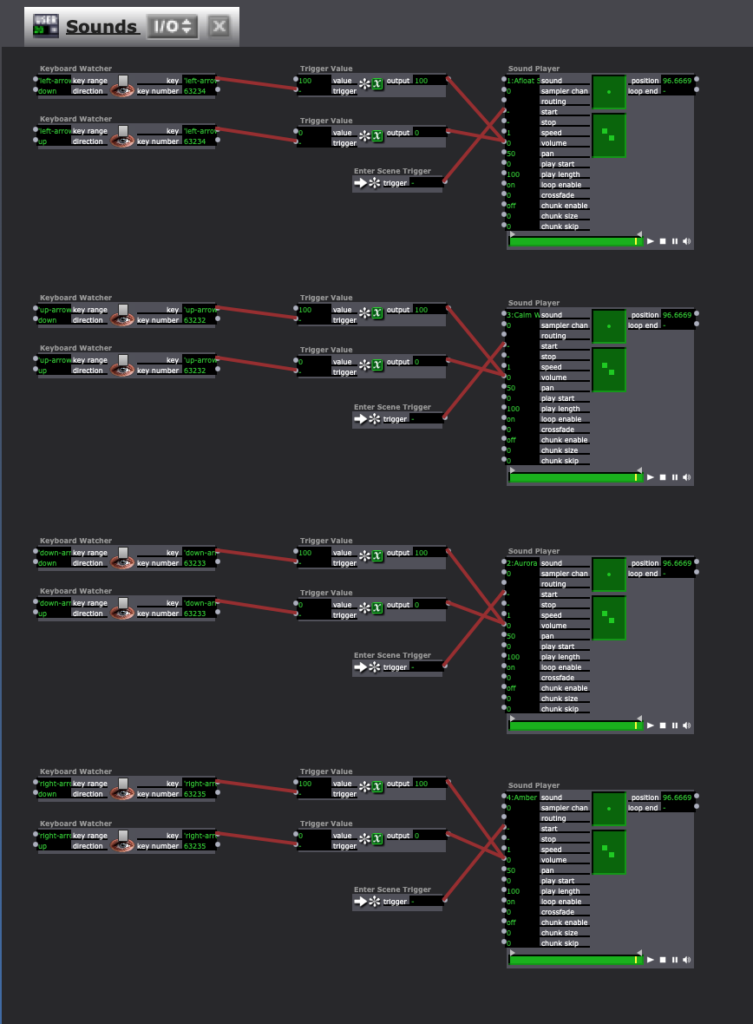
Posted: February 23, 2022 Filed under: Uncategorized Leave a comment »This project asked us to real a mystery using Isadora and Makey Makey. I wished that the building steps to the secret could have strong connections to the final mystery itself, so I thought of the personality test. Different people may have different feelings about the same sound due to their characters, and their answers reveal the personality mystery. I set up three questions and four personality types. Each question has two answer options. Testers put the alligator of the corresponding color into the bottle to choose an option. This can be a fun interaction way than just pressing the keys.
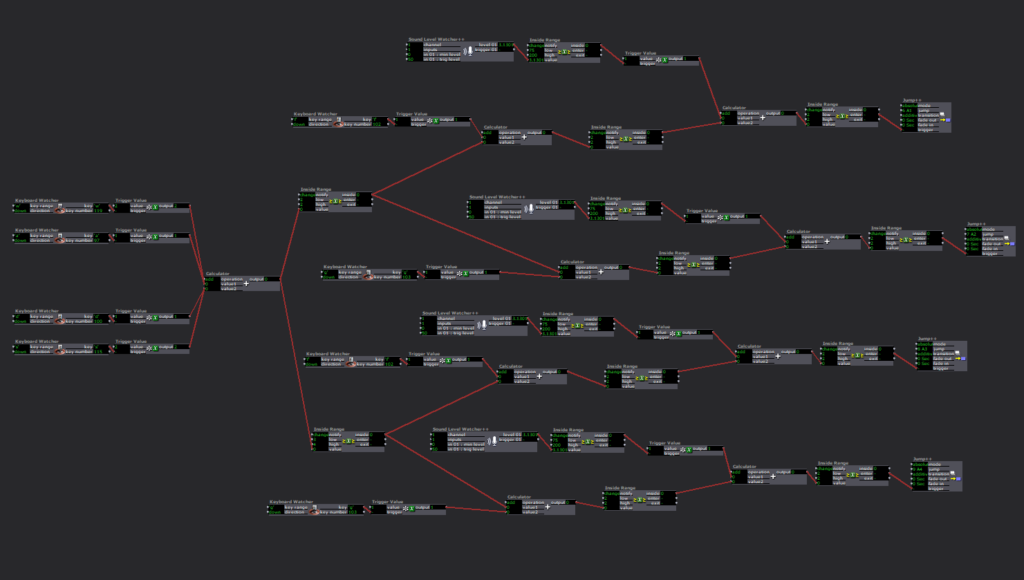
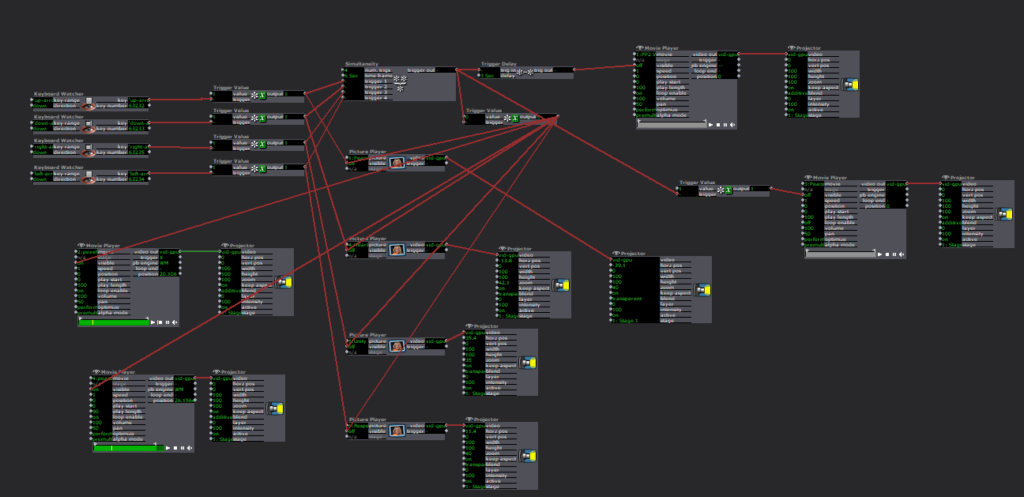
The most difficult part of this project was deciding the mathematical logic behind the personality test and setting it in Isadora. For now, I didn’t know how to feed data from one scene to another. I set a different key to each answer option. And I built a separate scene to deal with the logic. Actually, it is interesting but kind of strange to calculate a personality. I also tried to interpret different sounds with abstract elements like lines and dots. I am going to learn more about video effect actors and tools for transmitting data in Isodora. This is the Isadora patch for calculating personalities:


I was a proud of the final outcome. But I also met some issues in the test in class. First, the first scene about game instructions is too easy to be triggered by movement… so many testers missed this scene. Second, in one test, two alligators twisted together and trigger a scene unexpectedly, which disrupted the experience. So, it’s important to sort out circuits. This is the test video at home:
Pressure Project @ – Patrick Park
Posted: February 22, 2022 Filed under: Uncategorized Leave a comment »Reveal your secret! What is a secret and how could I reveal it to the people (our classmates). I started by revisiting past week materials and recordings on what we have learnt on isadora. Flipping through the old recordings, my thoughts about “revealing a secret” changed from literal secret to “if a certain condition is achieved by the audience then certain action will happen”.
Once I was able to categorize my thought process as “whatever I make the audience do, that is the trigger. Now what do I want my trigger to do?” So naturally I started with the shape actor and started thinking about what could be manipulated in this actor. This thing that the audience is manipulating should be visually apparent enough that “oh! If I do this, this happens!” Since the easiest thing that one could recognize the change of is color I’ve decided that color would be what changes visually.
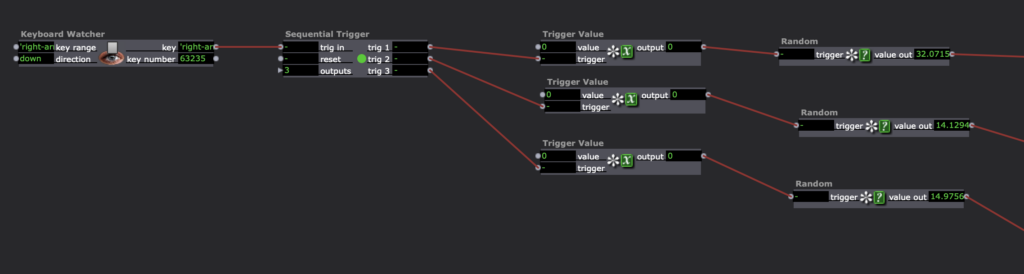
After I had decided that I was going to manipulate colors, it was a matter of setting up the system in isadora. To run the tests before connecting to the makey makey, I used the letter a, s, and d as a test trigger. The ‘a’ triggered the change in color of the inner square, ‘s’ triggered the outline of the square, and finally ‘d’ triggered the background color. I was able to achieve this by using a ‘sequential trigger’. Sequential trigger allows each trigger that this actor receives the output to be triggered sequentially (ei. Click ‘a’ and Output 1, output 2, output 3 is triggered with each press sequentially). From the sequential trigger I built a trigger value that plugged into a random actor. The random actor then goes into limit-scale value which will take any values that the random is giving and scale it to the numbers I have set. Each of these random values plugged into ‘red’, ‘green’, ‘blue’ of color maker RGBA. This process was copied and pasted as the main function of my patch.

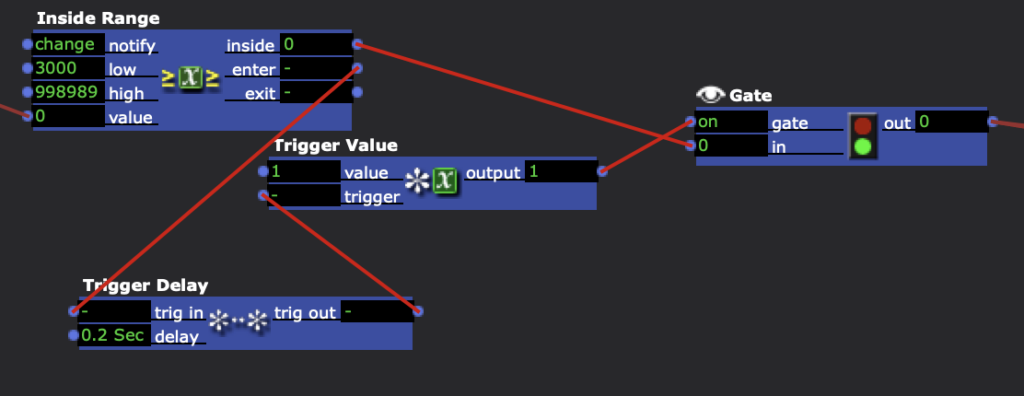
Since I have achieved basic function for each trigger (each button changes color in a specific area), I wanted the triggers to do something when a condition is met and when triggers were activated together at the same time. I made the condition of the trigger to be pressed for 3 seconds. I achieved this by putting together a keyboard watcher into a timer actor. When a trigger is pressed it will start to run the time, this output is connected into float to integer actor so the actors involving integer input can understand the time information. Float to integer actor is connected to Inside range actor which sends a trigger when a number you’ve set is inputted into this actor. This was then connected to the gate actor, which controls if the trigger is going to push through at the end.

When you press ‘a’ for three seconds the line size will change line size making the inner square small and bigger. When you press ‘d’ for three seconds the background will start to change automatically.
Finally I wanted the secret to be revealed when all three triggers were to trigger at the same time. Since the color was changing the most dramatic thing to do in my mind was to move the squares. So using the simultaneity actor, I’ve set it up so if all three triggers are triggered within 0.5 seconds, then it will activate the pulgeneraters which are connected to the wave generator. Finally the wave generators are plugged into the vertical, horizontal, and rotational section of the shape actor.

Things that I’ve noticed as learned: My particular patch doesn’t give the motivation to find the secret without the context of this assignment which I thought was interesting. The question I got the most during my presentation was “is this the secret?” 🤐 🤫 maybe designing how to make people want to look for a secret? and having a clear indication of “you have achieved it and came to the next part of the thing” is something to think about for the future projects.
Pressure project 2 – Yujie
Posted: February 22, 2022 Filed under: Uncategorized Leave a comment »This pressure project asks us to use Isadora and Makey Makey to reveal a secret. I was struggling for a long time about how to define a secret that can be connected to physical forms that conduct electricity. First, I was thinking about the things that are serious, epic, or hidden in daily lives. But those things are really hard to connect with daily objects that could animate Makey Makey. However, it hits me in the last class where Alec said that the secret can also be something that is delightful and small. These comments then reminded me of something I find delightful myself. I couldn’t stop watching the funny and silly videos where people use various materials and ideas to make Bing Dwen Dwen, the mascot of the 2022 Beijing winter Olympics. Because of its surging popularity and unexpected shortage of supply, people can’t get the mascot even after waiting for long hours. So, they started to make all sorts of creative and personalized versions of Bing Dwen Dwen. I was so amazed by people’s creativity and exceptional skills. I think my class would be also fascinated by these grassroots creations.
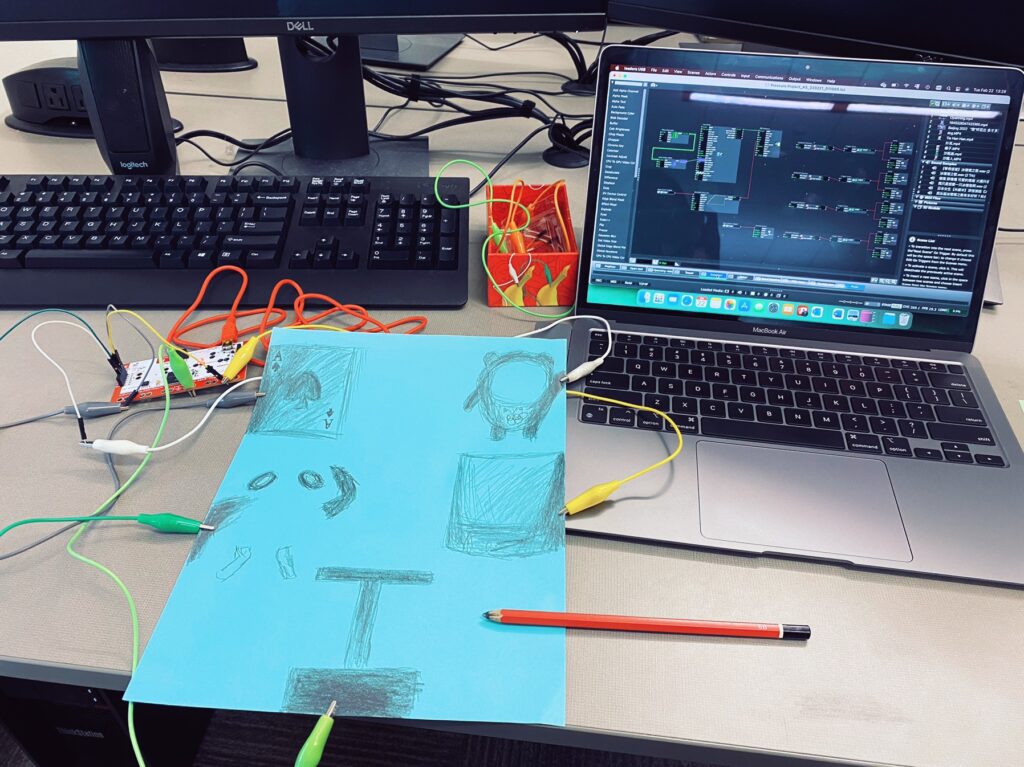
I first download and edit the news videos about how cute and popular Bing Dwen Dwen is to give some context for people who don’t really watch the Winter Olympics. Then I use text draw to give directions to the class that you can actually get one if you follow the process. By holding the “I” button with one hand and pressing one of the drawings with the other hand, the earth and output of the Makey Makey will be connected through the human body and the pencil graphite. Then different videos of Bing Dwen Dwen creation will be triggered to display.
The four options are represented on a paper with pencil drawings. The four drawings have some elements related to the video so that they can trigger some imagination and lead people to reveal the secrets behind them. After one of them is revealed, the display will always go back to the selection scene for the next revelation.
Here is the main Isadora scene of trigger connection between videos and drawings.
Picture of connection
Pressure Project 2: PLUR
Posted: February 22, 2022 Filed under: Uncategorized Leave a comment »For each of my pressure projects, one of my goals was to apply at least one of my three passions to the assignment: Theme Parks, EDM, and Marvel. This pressure project is the realization of a popular cultural trend at electronic festivals called PLUR. While the trend is not as proliferated these days, you will still see individuals at festivals passing off their “Candy” bracelets to one another in an act of Peace, Love, Unity, and Respect (PLUR).
The prompt of this pressure project was that a secret is revealed. This started me off on a brainstorming session in which I was trying to figure out a way to include electronic music as a revelation. My first train of thought was making a sort of puzzle that had to be solved in order to reveal a specific song. The thought of the acronym of PLUR popped into my mind as a discussion of the popular the game Wordle was occurring, prompting me to devise a system that required the user to get the configuration of the letters of PLUR in the correct order.
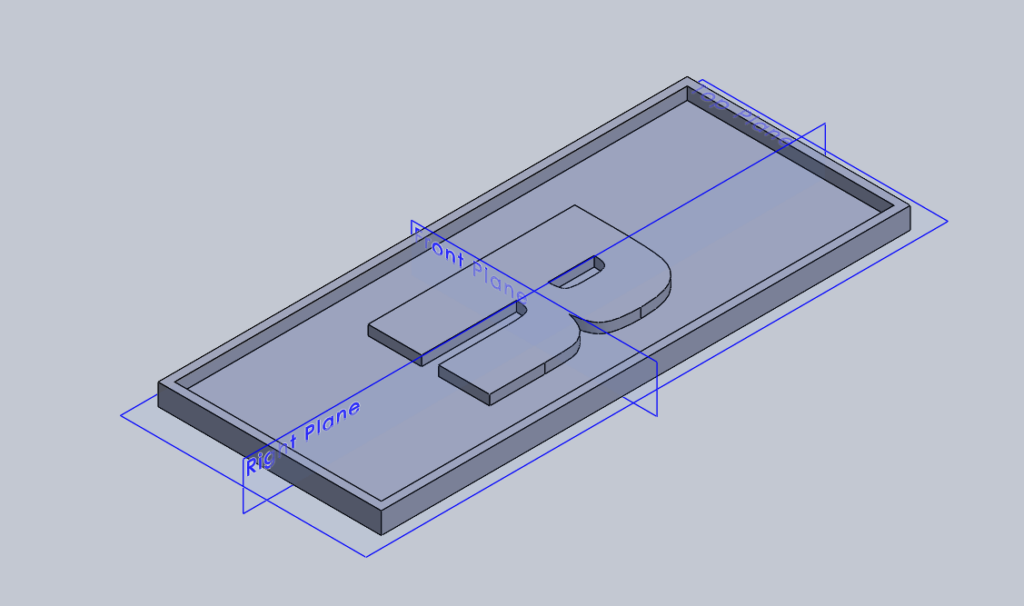
Another criteria of the project was that it included the use of the Makey-Makey. I went to my CAD of choice, SolidWorks, and began sketching a prototype housing and letter tiles.
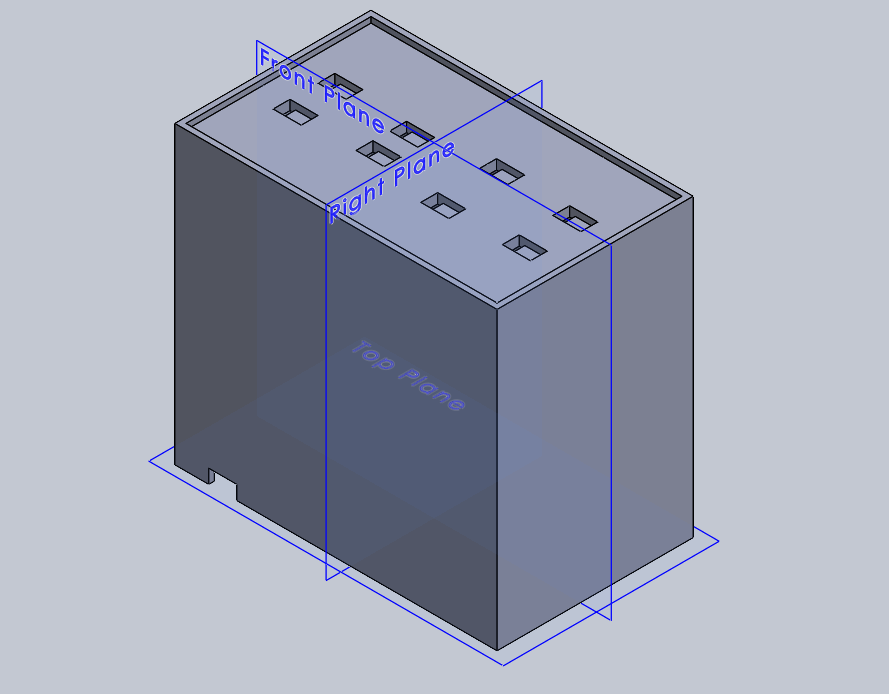
My vision for the system was that each tile had its own unique spacing, so that it could only fit on one spot on the housing. Each tile would complete the circuit for one of the arrow keys on the Makey-Makey, helping to trigger a specific action within an Isadora patch.
The Isadora patch is arranged such that each tile correctly placed triggers an icon onto the stage. Once all 4 icons are triggered, then the secret is revealed. I chose to use a clip from Tomorrowlands After Movie, found at this link here
The point of the project is to introduce the idea of PLUR to others and also show off how incredible the European Music Festival scene is.
If given more time with project I would go back and fix the following items:
- Larger clearances for the tiles spacing. Although I factored in the accuracy of a printed part, I did not give the model enough clearance and was left to sand down some of the tiles.
- More room in the housing to fit my hand into to make secure the alligator clip connections. This got frustrating.
- Less of a focus on small details and more of a focus on functionality. I put extra effort into dimensioning the Makey-Makey to have it sit nicely within the housing, but due to the inaccuracies with printing, it ultimately just had to be haphazardly contained within the model.
- Have the patch play the main reveal on a second stage to the output monitor so that manual intervention is not necessary to hide the icons after reveal starts.

Pressure Project #2- Orlando Hunter
Posted: February 22, 2022 Filed under: Uncategorized Leave a comment »Pressure project #2
For pressure project two I thought about how to incorporate my artistic practice using a dance film created in an urban garden with my dance collective Brother(hood) Dance! In order to create a revealing element within the film I wanted to use photography to illustrate urban growers in the community. To provide sensory awareness to the earth I engage participants by placing their left hand in moist soil to literally ground them in the moment. While lifting the leaf of a plant to reveal photos on the screen and picking up an apple to remove the photo all while the film plays as background, lift the leaf, surprise! Another photo. You only get the surprise if you stay grounded.
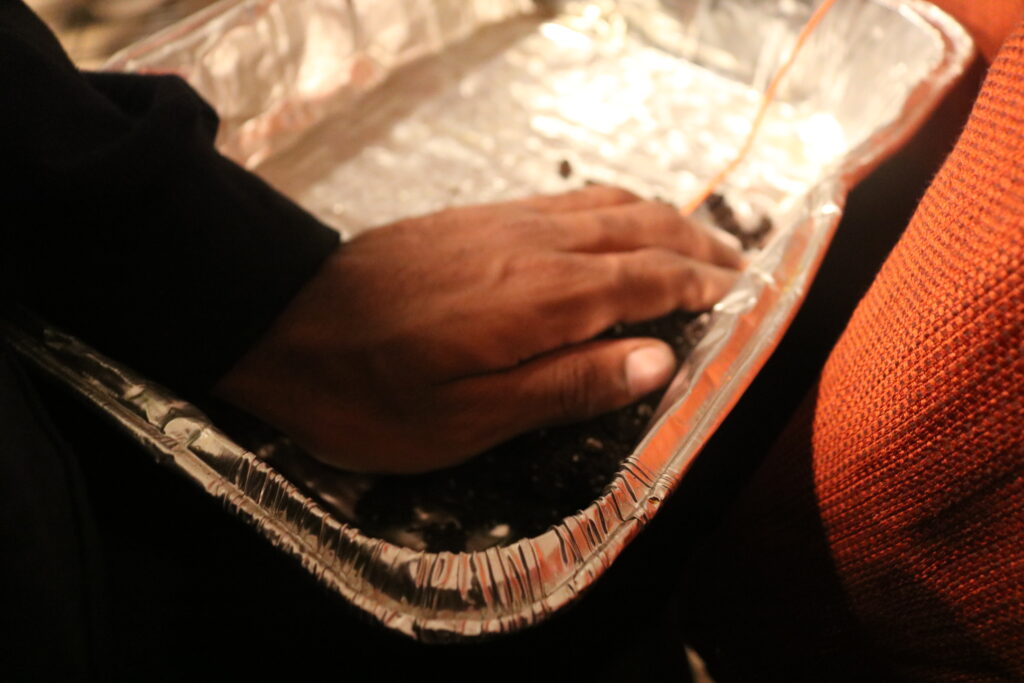
Keep your left hand on the soil.
Pick up the apple for nutrition.
lift the leaf for relief.
Always leave on a high note.

Using the Makey Makey I curated the moist soil to connect to the literal earth on the device which serves as an electronical grounding for the full experience. The apple as the down arrow symbolizing the digestive process which is a downward process to revealing the picture on the screen to illustrate those who grow the nutrition in my neighborhood and the up arrow indicating how house plants give you an upward boost in your wellness from mental to spiritual health.
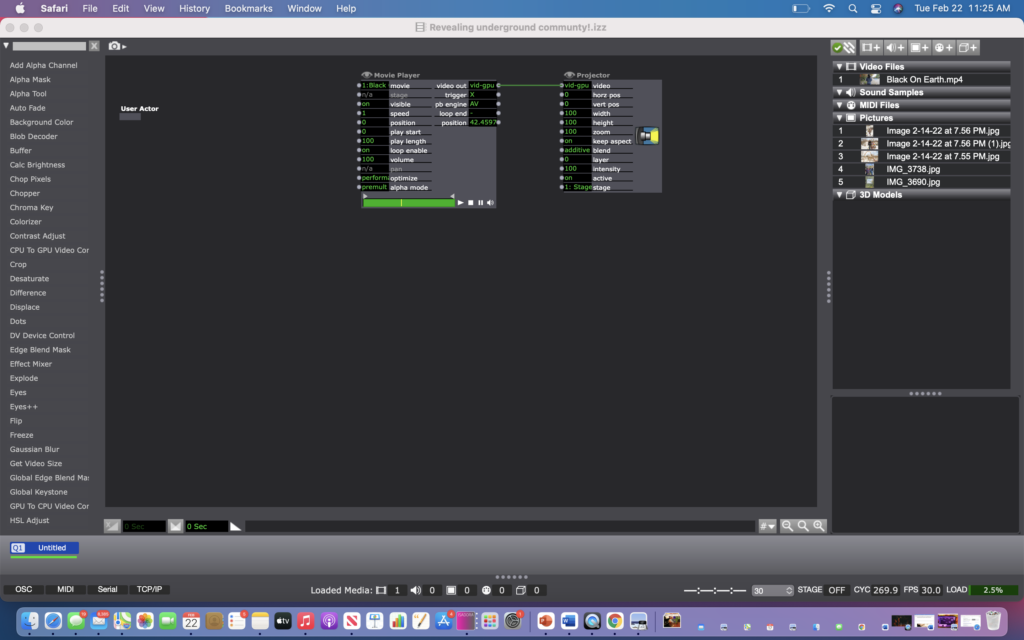
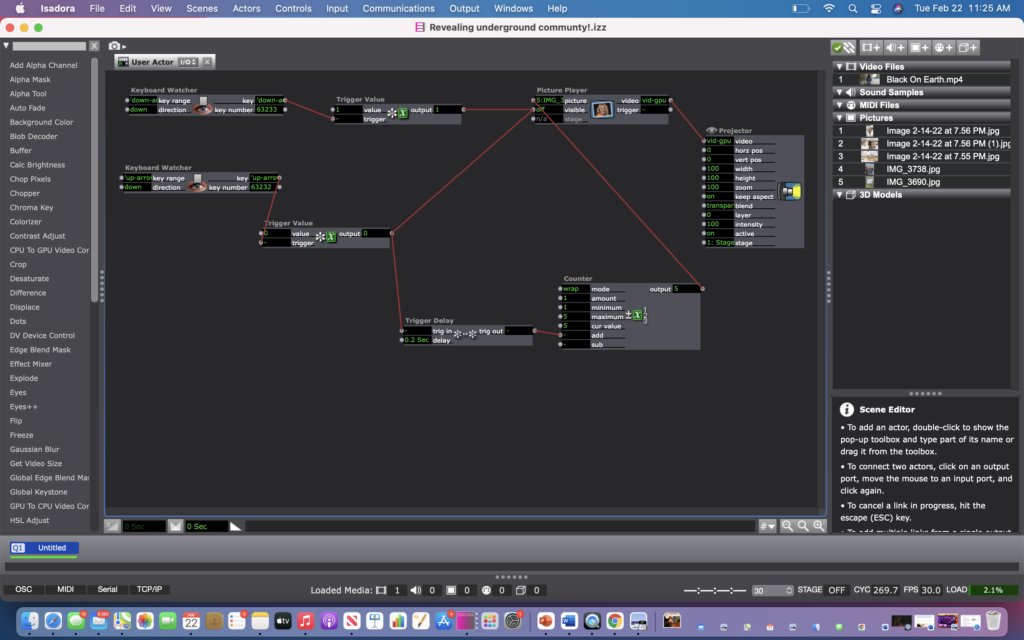
On the front end I have a movie player playing the dance film. To keep the back end hidden I used a user actor. In the user actor I conducted the change of pictures circuit by using a keyboard watcher to indicate up and down. Then I needed to trigger these functions which in this case up equals plant leaf and down equals apple, soil equals. I had to shift the value for the down arrow so that Isadora knows to signal the photos onto the screen. I also created a trigger delay so that the up arrow would know to switch out photos a specified time within the picture player.
Pressure Project 2 – Ashley Browne
Posted: February 22, 2022 Filed under: Uncategorized Leave a comment »My pressure project 2 uses conductive paint and the MakeyMakey to make a pseudo video synthesizer using Isadora.
On the MakeyMakey, the connection inputs are using the ‘W’ ‘A’ and ‘D’ keys that each trigger a unique video effect in Isadora. The effects are able to be combined simultaneously, and the user is able to mix and match. With the conductive paint, I did a little research about how to work with it before I started. I learned that each unique signal or ‘key’ could not overlap with the other, meaning I had to be very deliberate about where I painted each section. Also, I made sure to work with separate brushes and cups of water so that there was no contamination or mixing between the acrylic paint and the conductive paint.
I’ve labeled the 3 effects as:
- Glitch
- Split Screen
- Surprise (Video Portal)
For the glitch effect, I used a GLSL Shader from the shadertoy website that produces a glitch overlay on top of the video feed. This is triggered by tapping anywhere along the black line of paint on the canvas. Here is the link to the code I used and my patch in Isadora:
https://www.shadertoy.com/view/XtK3W3

I used a gate and toggle switch to turn the GLSL Shader on and off when triggered.
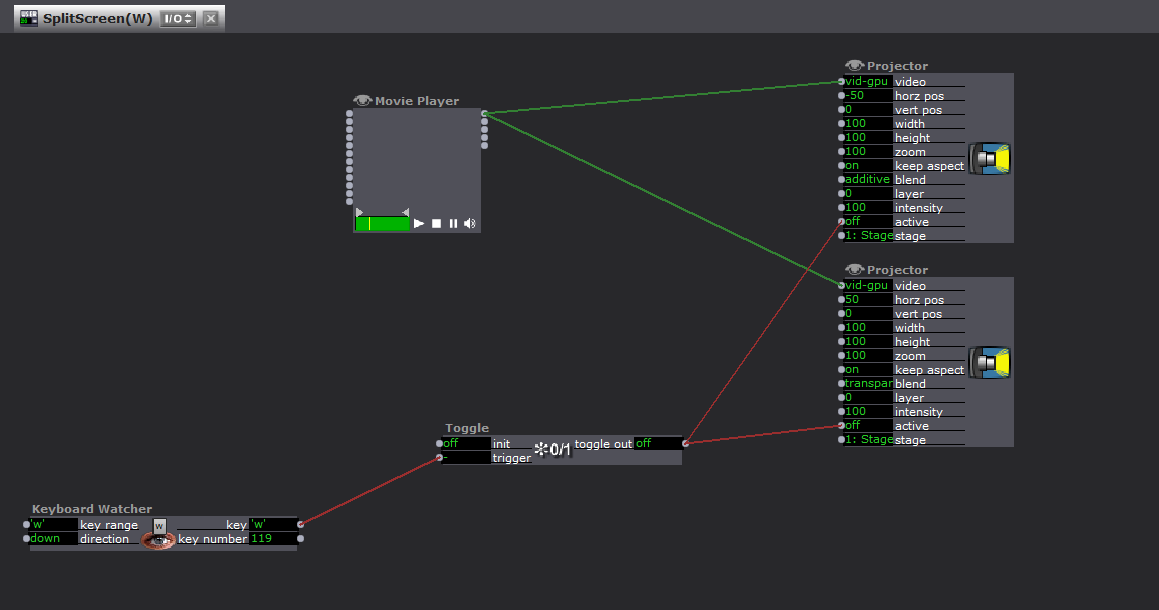
The split screen was fairly simple, I just split up the video feed into two projectors that were similarly triggered on and off using the toggle actor.
Lastly was the Video Portal patch, which was one of the more complex ones. This was ultimately my surprise or secret reveal. It reveals the 2nd video underneath, which plays through the shape of a circle or portal. I learned how to do this by searching through the Isadora forum page, and messed around with the Alpha Channel to get different results. It basically connects the second video into an Alpha Channel that projects on to the specific shape actor. The Get Stage Size ensures that the video proportions are the same.
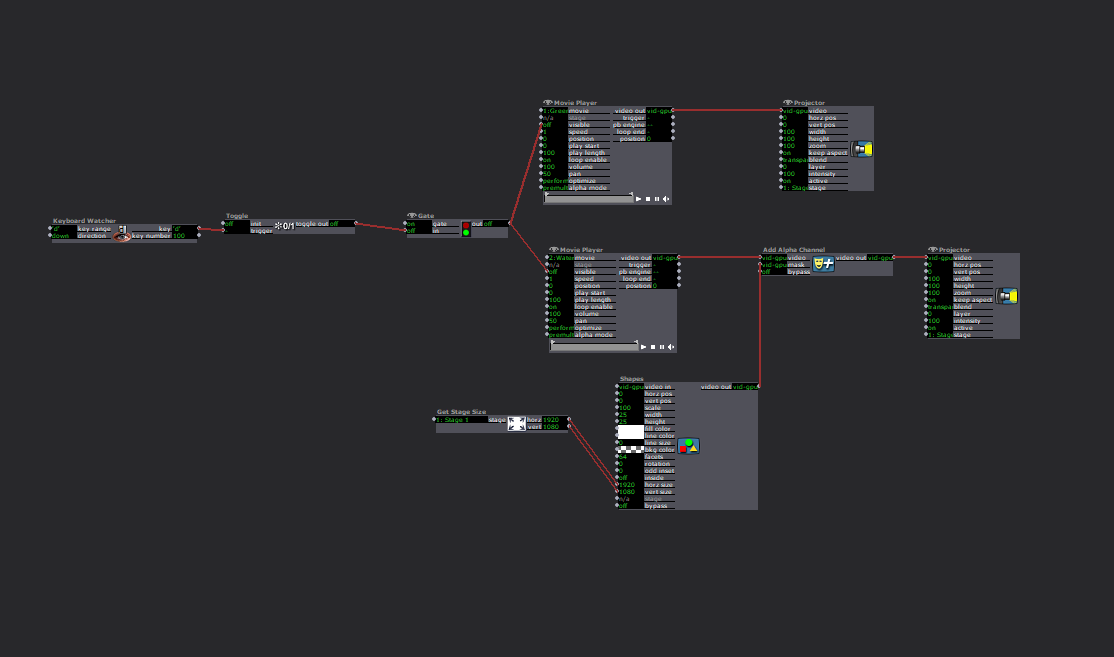
I put each effect into its own User Actor for better organization and had a movie player and projector set up independently. Here is final documentation of the project:
Pressure Project: Umbrella
Posted: February 22, 2022 Filed under: Uncategorized Leave a comment »My original idea was to have three umbrellas that each represents me and my friends on a rainy day. I wanted Isadora to have unique sonic effects when the operator opens the umbrellas as follows:
Umbrella A: Jenna by herself on a rainy day (in her car)
Umbrella B: Ellen by herself (listening to music)
Umbrella C: Sejeong by herself (taking a walk)
Umbrella A and B: Jenna and Ellen having phone call
Umbrella A and C: Jenna and Sejeong having phone call
Umbrella B and C: Ellen and Sejeong having phone call
Umbrella A, B, and C: All Chatting
I wanted to reveal our video clips when the audience figure out the system. However, I could not figure out how to trigger videos with multiple keys in different combinations, so I decided to narrow them down to one variable: Jenna on a rainy day, indoor versus outdoor. When the umbrella opens, the audience see an outdoor video on a rainy day. When it closes, the audience see an interior image of the Sullivant Hall, where I took the video.

Pressure Project 2–Allison Smith
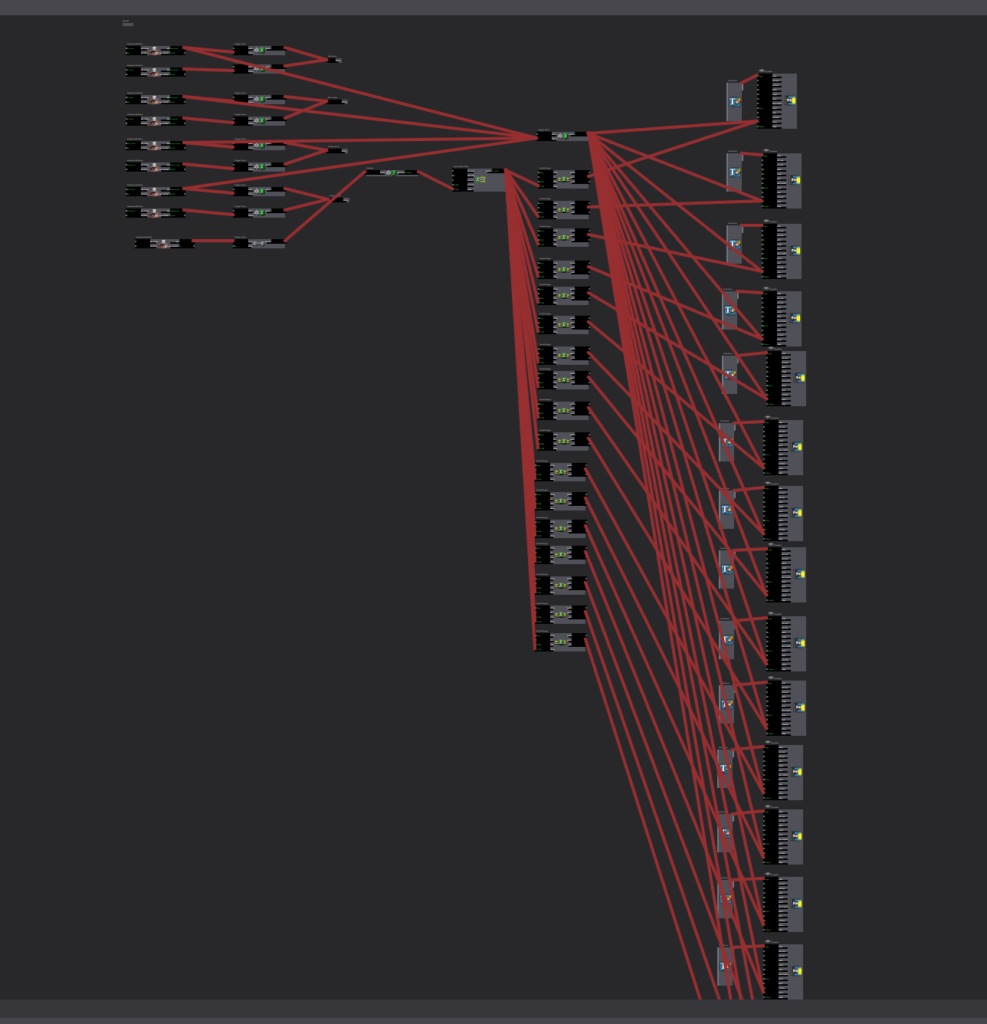
Posted: February 22, 2022 Filed under: Uncategorized | Tags: MakeyMakey Leave a comment »For this project we were required to use the MakeyMakey and Isadora, and our prompt was that a secret is revealed. I had trouble coming up with what I wanted to do for this project. I tried to think of an experience involving touch that I already enjoy, and then look for a way to make that more enjoyable with an unexpected digital media element. I went with the game Twister where there is a mat and you have to place different hands and feet on different colors. Since that reminded me of dance, I wanted to add music to it. To make it extra fancy, not only did I add music but I also added visuals for each of the colors.
Here is a picture of my Twister game. Due to the shortage of time, instead of full body Twister, it is Finger Twister!
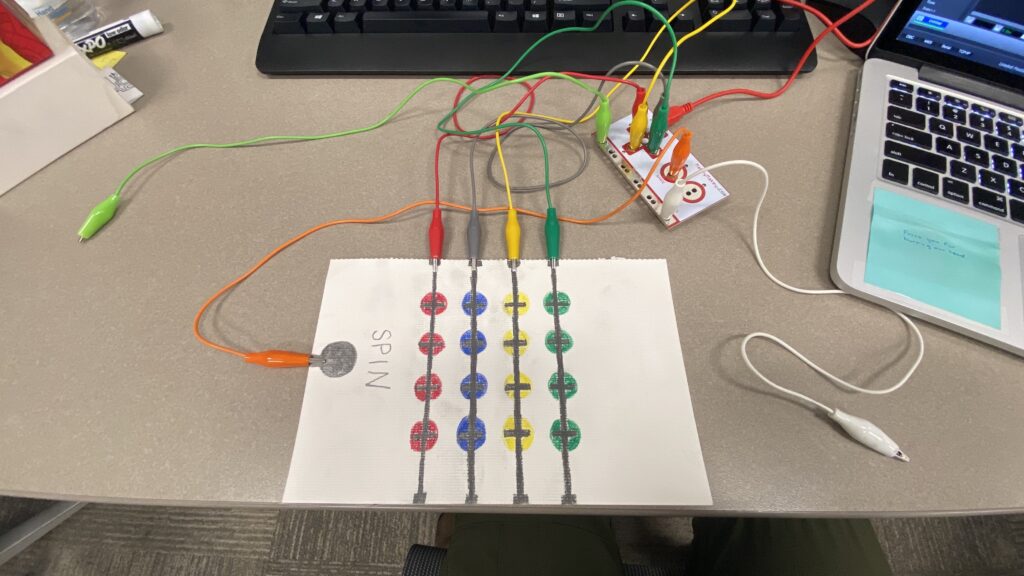
As you can see, I used the pencil to connect all of the colors to one trigger. I also chose to make a spinner on the side. With one participant holding the light green grounding alligator, they could use their finger to press the spinner. With the other participant holding the white grounding alligator, they could play the game with their fingers acting as the connection.
When the red was played on, it brought up an image of red squares circling the screen while playing the sound of a synth. When the blue was played on, small blue circles fell from the top of the screen similar to digital raindrops or snowflakes, with a different sound playing. When yellow was played on, there were yellow stars that changed in scaling on the screen with a new sound. Finally, when the green was played, there were three green triangles rotated in the center of the screen with a grounding beat playing.
There were a few surprises ingrained in this experience. Obviously, normal twister doesn’t play music or cue videos with the same colors, so that was a surprise. Another surprise was that the spinner had the option of not just saying “THUMB RED” but a secret “PARTY” cue that would give permission for ending the game and just playing around with all of the sounds as a sort of DJ. The final secret surprise, though, was that all of the sounds fit together on the same beat and made a cohesive song together. As you can see in the video from the presentation, one truly gets the opportunity to create their own music.
To make this happen, I created a different keyboard watcher trigger for each color and for the spinner. For the colors and sounds, the trigger was on for the “down” action of the key and off for the “up” action of the key. For the spinner, there was a random generator from 1-17, and depending on the number, a certain text was triggered. Then, when the down action occurred that also activates the sound and color, the spinner text would be deactivated. Here are screenshots of my isadora setup.
Finally, in order to create my sounds, I went into GarageBand and played around with the different loop tracks. After finding four loops that I liked together, I exported the raw aif. files into Isadora. They loops continued playing the whole time so they stayed on the same timing, and all that was adjusted was the volume.
If I were to keep working on this project, I think it would be fun to make this into a full-sized Twister. A more bite-sized next step, though, would be to make the spinner text go away with a timer instead. A new key, or color, needed to be touched in order for the text to go away, and if the spinner instructed the participant to stay on the same color with a different finger, the text stayed on the screen. Overall, though, I am super happy with the product and found it was fun to program and it was enjoyable to watch my friends experience this.
Pressure Project 2, Gabe Carpenter
Posted: February 21, 2022 Filed under: Uncategorized Leave a comment »My pressure project focuses on playing a simple maze game with the Makey-Makey. The game is controlled with the D-Pad and includes a reset mechanic, secret messages, and a short ending that reveals a secret exit.
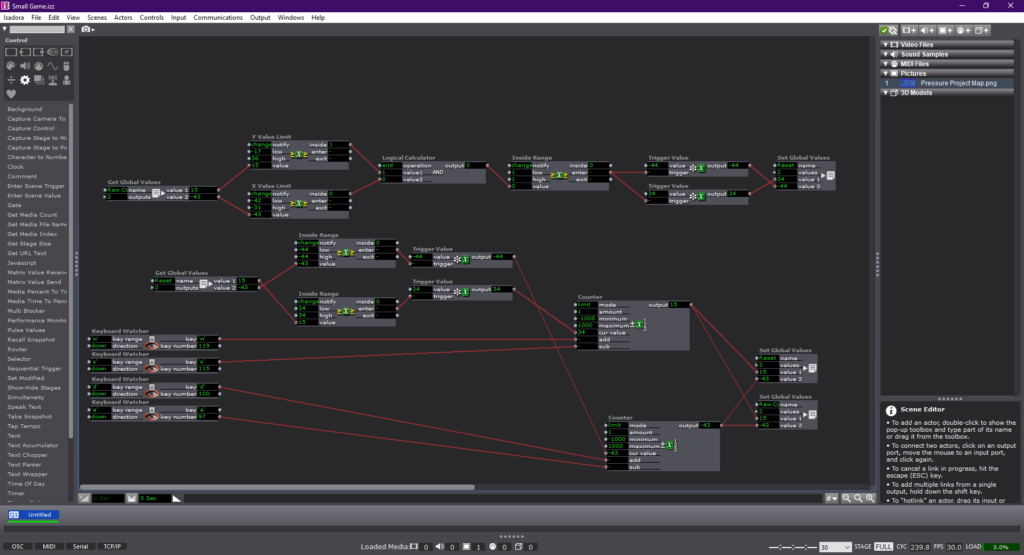
The first trial of my game included a non-functional collision system but aimed to set up the basic wall detection that the program would use. The wall detection started out as an attempt to use 2 inside range actors and comparators to determine if each parameter was met. The 2 inside range actors act as the x and y boundaries of any given wall.
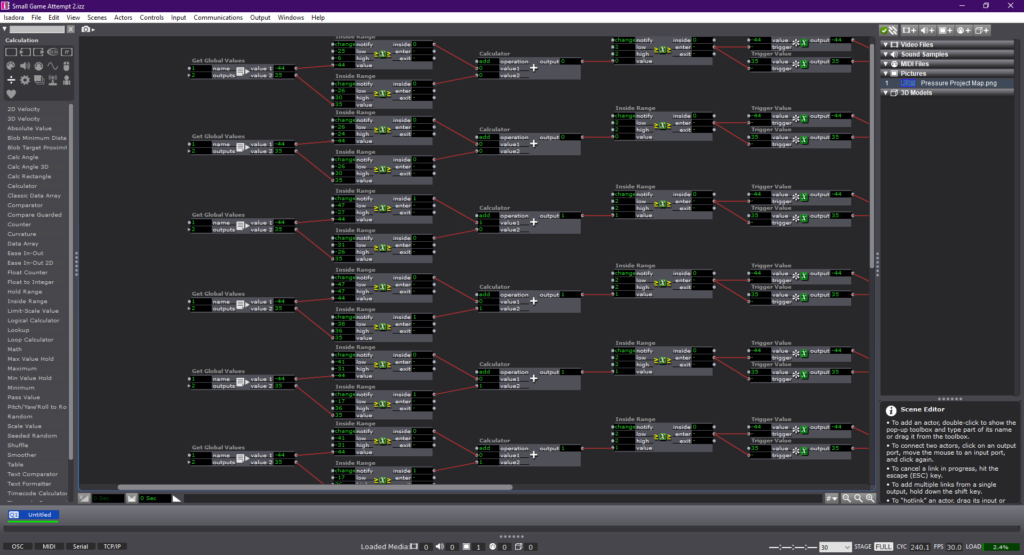
The next phase of development yielded a solid method for determining hitboxes. This method feeds the aforementioned two inside range actors into a calculator, that then adds the outputs together. Upon receiving a “2” output, the calculator triggers a value that resets the player back to their original position. The data of the position is sent to a global values actor, which relays it to the counter that acts as the memory portion of the game.
The final layout may seem messy at first, but the long row along the left side of the image is a series of hit detection pipelines for each individual wall. The row in the middle is an added sequence change that occurs when the player enters a certain area. The screen will change color and a message will be given to the player. This is done using another hitbox detection system, and triggering a waveform generator to fade the new image onto the map and then take it away again. The other smaller pipelines are the controller link and the ending “cutscene” trigger.
This is a video of me playing the game and achieving the ending.