Cycle 3–Allison Smith
Posted: April 28, 2022 Filed under: Uncategorized | Tags: dance, Interactive Media, Isadora 1 Comment »I had trouble determining what I wanted to do for my Cycle 3 project, as I was overwhelmed with the possibilities. Alex was helpful in guiding me to focus on one of my previous cycles and leaning into one of those elements. I chose to follow up with my Cycle 1 project that had live drawing involved through motion capture of the participant. This was a very glitchy system, though, so I decided to take a new approach.
In my previous approach of this, I utilized the skeleton decoder to track the numbers of the participants’ hands. These numbers were then fed into the live drawing actor. The biggest problem with that, though, is that the skeleton would not track well and the lines didn’t correspond to the person’s movement. In this new iteration, I chose to use a camera, eyes ++ and the blob decoder to track a light that the participant would be holding. I found this to be a much more robust approach, and while it wasn’t what I had originally envisioned in Cycle 1, I am very happy with the results.
I had some extra time and spontaneously decided to add another layer to this cycle, where the participant’s full body would be tracked with a colorful motion blur. With this, they would be drawing but we would also see the movement the body was creating. I felt like this addition leaned into my research in this class of how focusing on one type of interactive system can encourage people to move and dance. With the outline of the body, we were able to then see the movement and dancing that the participant’s probably weren’t aware they were doing. I then wanted to put the drawing on a see-through scrim so that the participant would be able to see both visuals being displayed.
A few surprises came when demonstrating this cycle with people. I instructed that viewers could walk through the space and observe however they wanted, however I didn’t consider how their bodies would also be tracked. This brought out an element of play from the “viewers” (aka the people not drawing with the light) that I found most exciting about this project. They would play with different ways their body was tracked and would get closer and farther from the tracker to play with depth. They also played with shadows when they were on the other side of the scrim. My original intention with setting the projections up the way that they were–on the floor in the middle of the room–was so that the projections wouldn’t mix onto the other scrims. I never considered how this would allow space for shadows to join in the play both in the drawing and in the bodily outlines. I’ve attached a video that illustrates all of the play that happened during the experience:
Something that I found interesting after watching the video was that people were hesitant to join in at first. They would walk around a bit, and they eventually saw their outlines in the screen. It took a few minutes, though, for people to want to draw and for people to start playing. After that shift happened, there is such a beautiful display of curiosity, innocence, discovery, and joy. Even I found myself discovering much more than I thought I could, and I’m the one who created this experience.
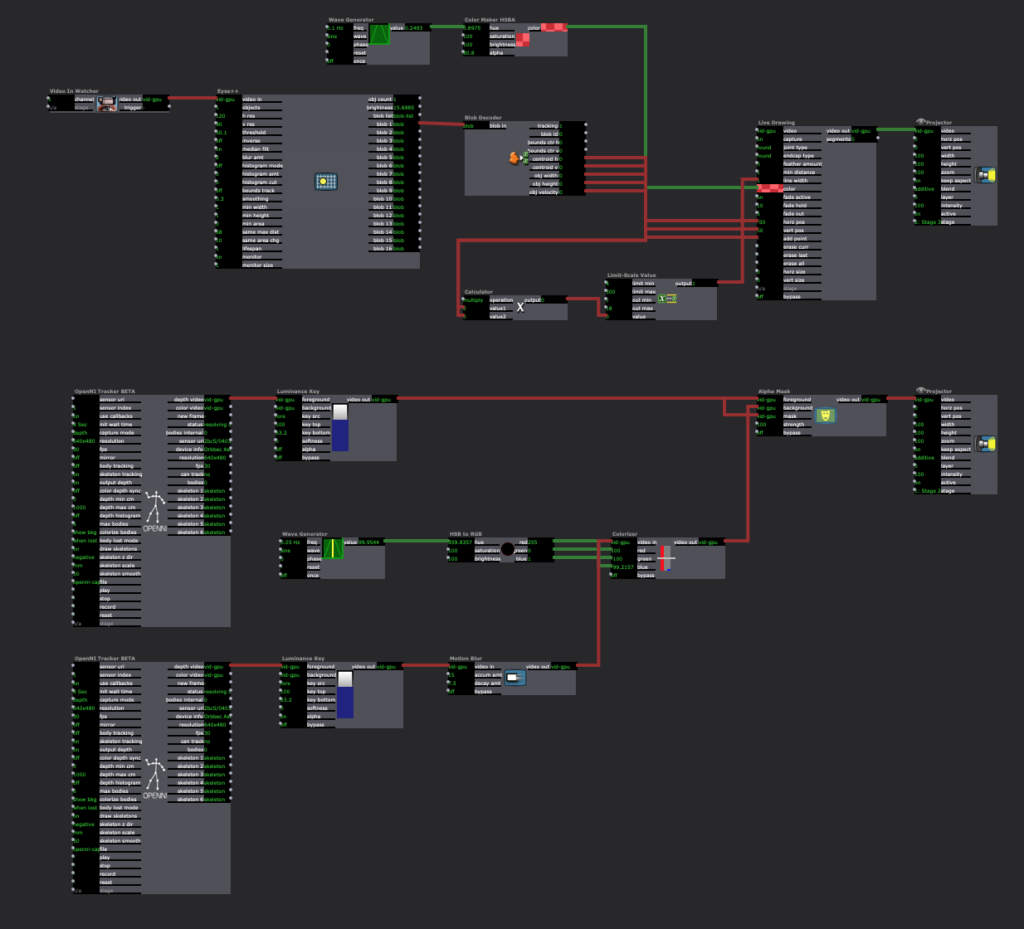
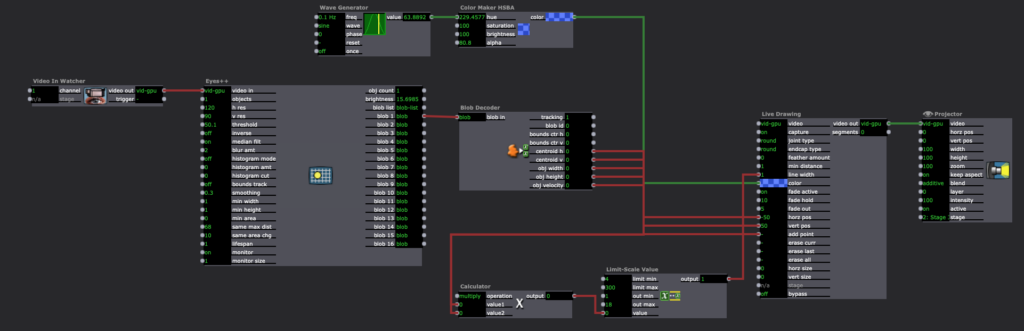
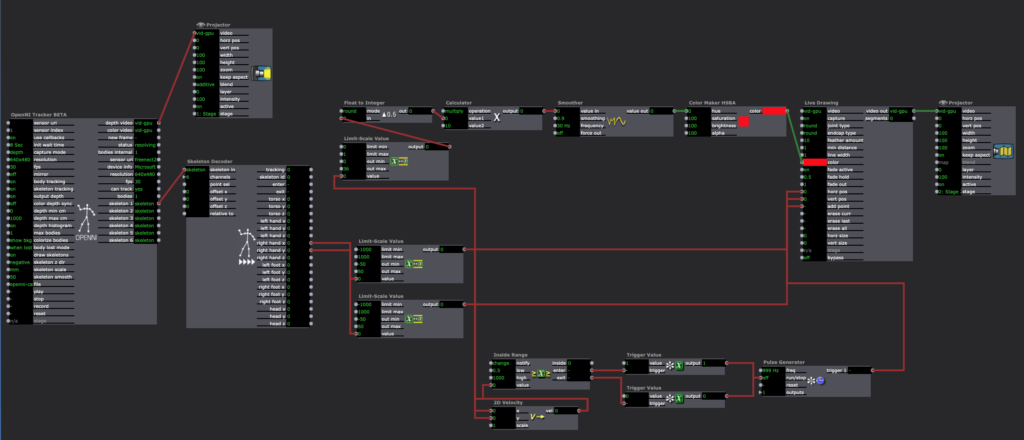
The coding behind this experience is fairly simple, but it took a long time for me to get here. I had one stage for the drawing and one stage for the body outlines. For the drawing, like I mentioned above, I used a video in watcher to feed into eyes ++ and the blob decoder. The camera I used was one of Alex’s camera as it had a manual exposer to it, which we found out was necessary to keep the “blob” from changing sizes when the light moved. The blob decoder finds bright points in the video, and depending on the settings of the decoder, it will only track one bright light. This then fed into a live drawing actor in its position and size, with a constant change in the colors.
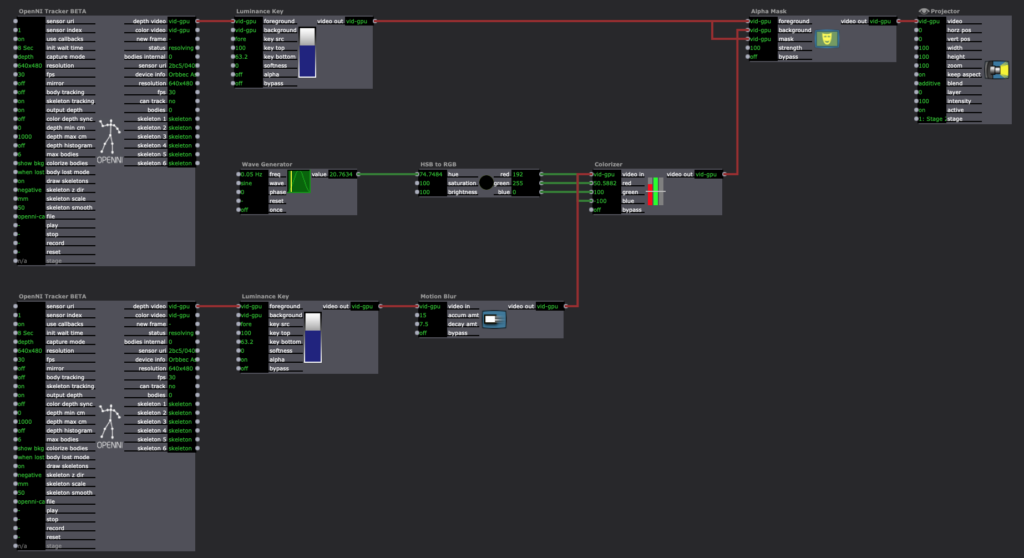
For the body outline, I used an astra orbec tracker feeding into a luminance key and an alpha mask. The foreground and mask came from the body with no color, and the background was a colorful version of the body with a motion tracker. This created the effect of having a white colored silhouette with a colorful blur. I used the same technique for color in the motion blur as I did with the live drawing.
I’m really thankful for how this cycle turned out. I was able to find some answers to my research questions without intentionally thinking about that, and I was also able to discover a lot of new things within the experience and reflecting upon it. The biggest takeaway I have is that if I want to encourage people to move, it is beneficial to give everyone an active roll in exploration rather than having just one person by themselves. I was focused too much on the tool in my previous cycles (drawing, creating music) rather than the importance of community when it comes to losing movement inhibition and leaning into a sense of play. If I were to continue to work on this project, I might add a layer of sound to it using MIDI. I did enjoy the silence of this iteration, though, and am concerned that adding sound would be too much. Again, I am happy with the results of the cycle, and will allow this to influence my projects in the future.
Cycle 2–Allison Smith
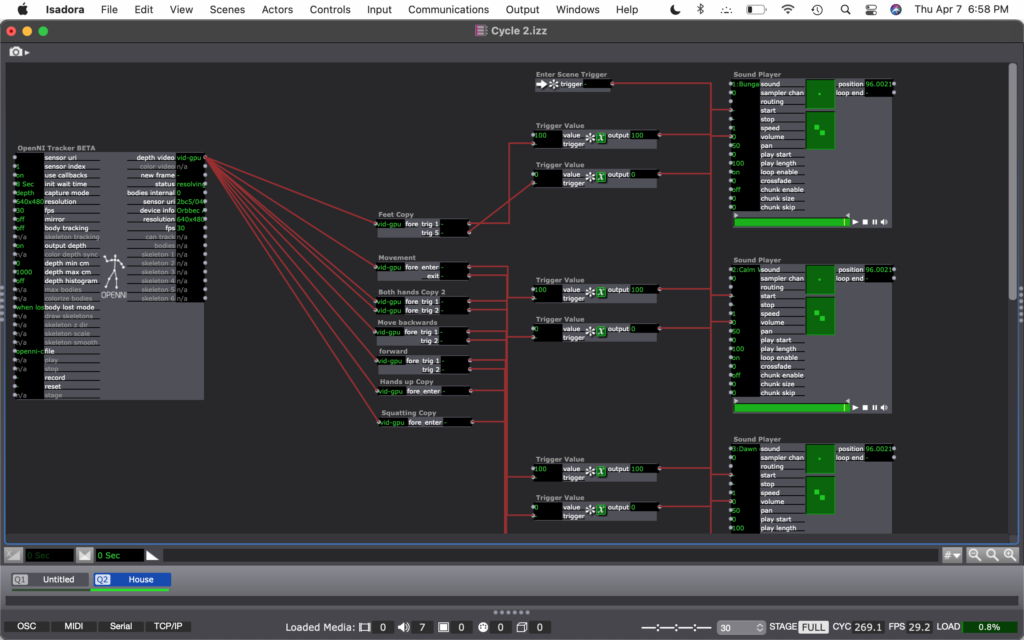
Posted: April 7, 2022 Filed under: Uncategorized | Tags: Cycle 2, dance, Interactive Media, Isadora Leave a comment »For my cycles, I’m working on practicing different media tools that can interact with movement. For this cycle, I chose to work with the interaction of movement and sound. Similar to my PP2, I had a song with several tracks playing at the same time, and the volume would turn up when it’s triggered. The goal was to allow a space to play with movement and affect the sound, allowing that to affect the movement.

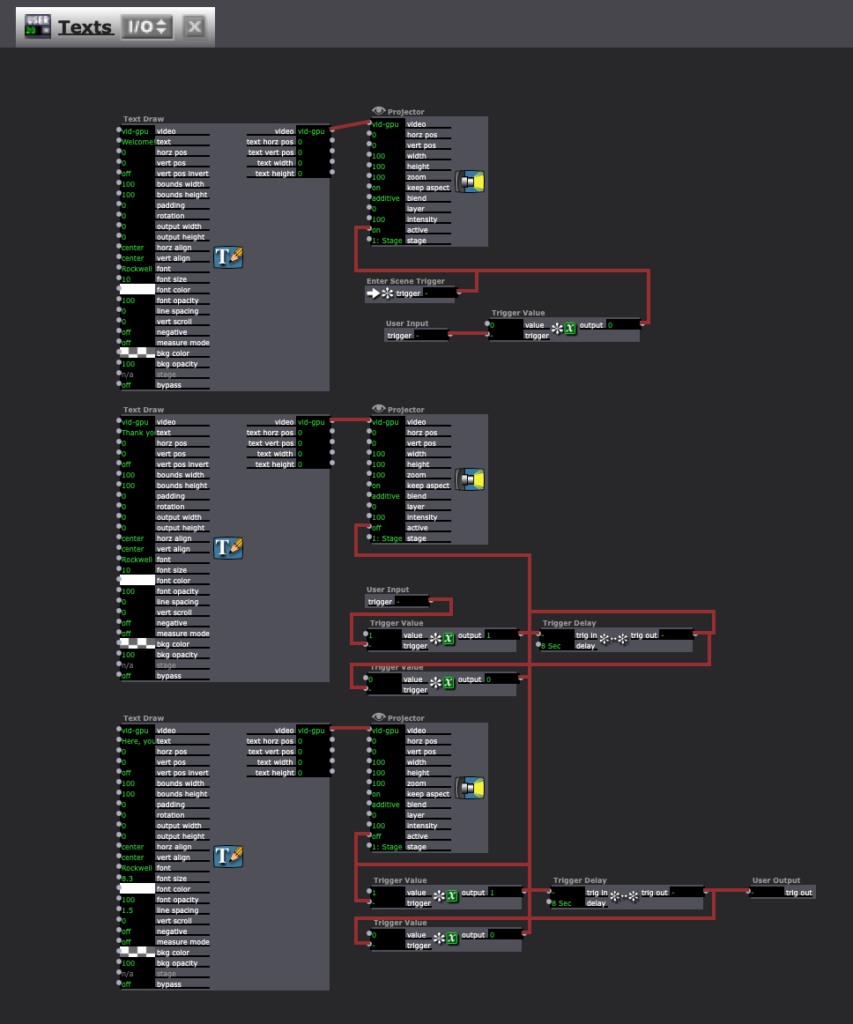
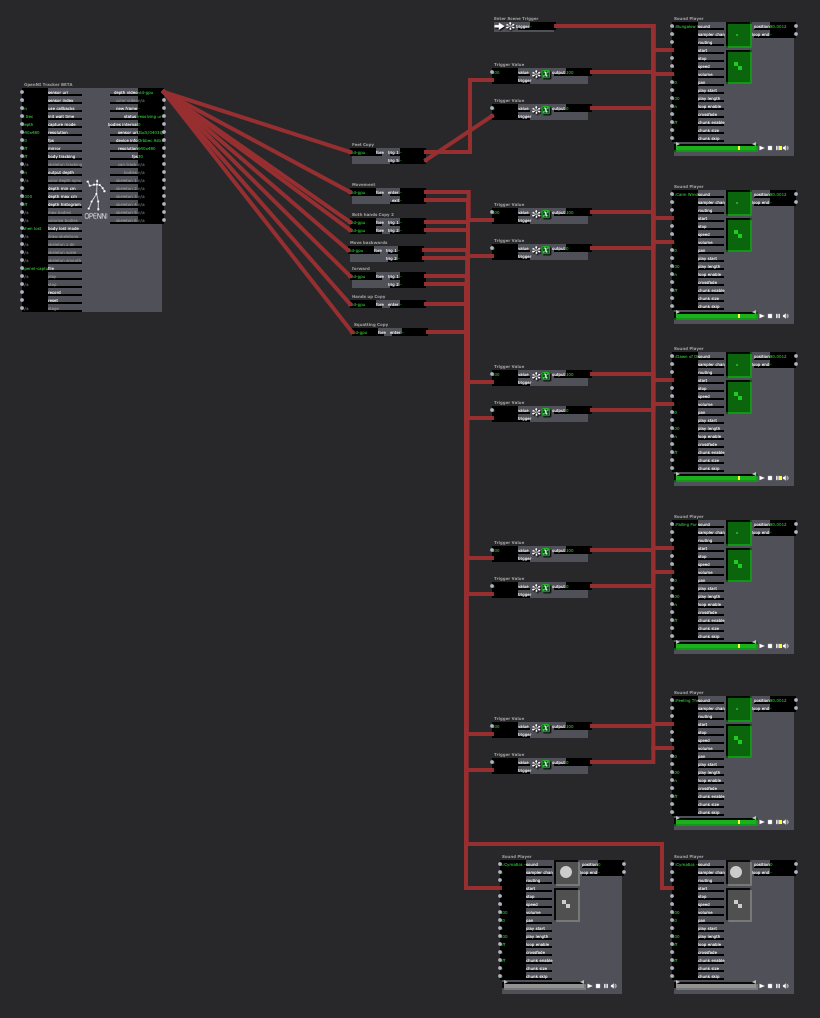
I had two possible audiences in mind for this. The first audience I was considering was people who don’t typically dance, and who find this in a type of installation and want to play with it. Like I mentioned at the beginning, I’m curious about how completing an activity motivated through exploration will knock down inhibitions that are associated with movement. Maybe finding out that the body can create different sounds will inspire people to keep playing. The other audience I had in mind was a dancer who is versed in freestyle dance, specifically in house dance. I created a house song within this project, and I inspired the movement triggers based on basic moves within house dance. Then, the dancer could not only freestyle with movement inspired by the music, but their movement can inspire the music, too.
For this demo, I chose to present it in the style for the first audience. Here is a video of the experience:
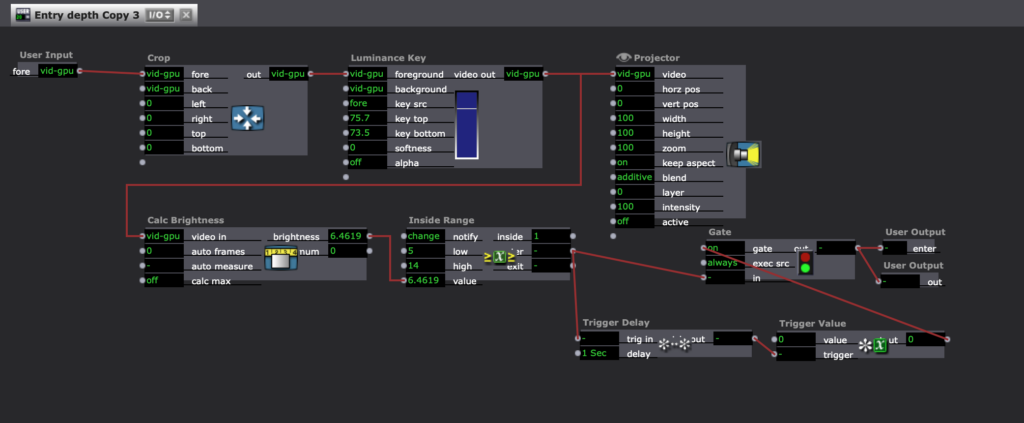
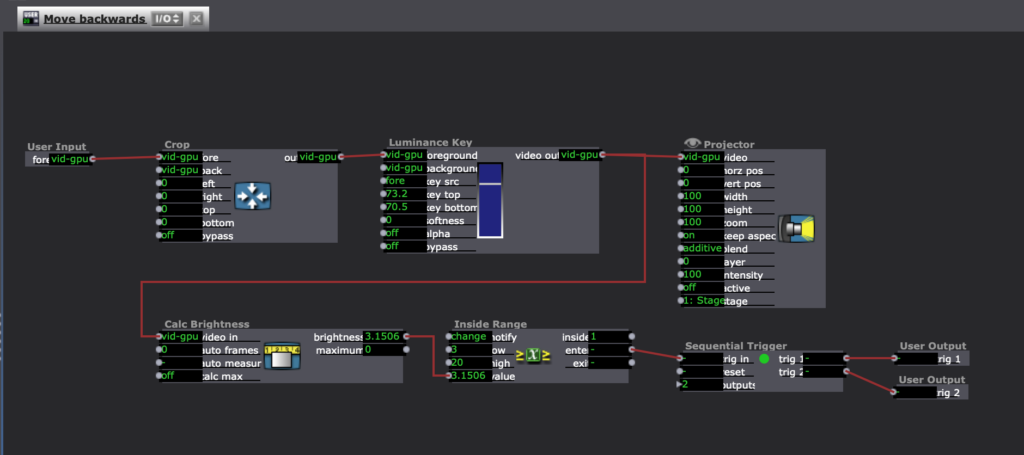
I ran into a few technical difficulties. The biggest challenge was how I had to reset the trigger values for each space I was in. The brightness of the depth was different in my apartment living room than it was in the MOLA. I also noticed that I was able to create the different boundaries based on my body and how I would move. No one moves exactly the same way, so sounds will be triggered differently for each person. It was also difficult to keep things consistent. Similarly to how each person moves differently from each other, we also don’t ever move exactly the same. So when a sound is triggered one time, it may not be triggered again by the same movement. Finally, there was a strange problem where the sounds would stop looping after a minute or so, and I don’t know why.
My goal for this cycle was to have multiple songs to play with that could be switched between in different scenes. If I were to continue to develop this project, I would want to add those songs. Due to time constraints, I was unable to do that for this cycle. I would also like to make this tech more robust. I’m not sure how I would do that, but the consistency would be nice to establish. I am not sure if I will continue this for my next cycle, but these ideas are helpful to consider for any project.
Cycle One–Allison Smith
Posted: March 24, 2022 Filed under: Uncategorized Leave a comment »For my first cycle, I chose to practice with motion tracking and what I can do with that. As a dancer, I was excited to play with how the tech could inspire movement both for dancers and for non dancers. My goal was to track the extremities of the user, right and left hands and feet, and use that tracking to paint lines on a projector screen. Noticing how these experimental systems encourage people to play, I was hoping that people would be intrigued to play and then see what the body can create.
Using a Kinect feeding into the skeleton decoder actor, I was able to get numbers for all of the extremities. I plugged the X and Y coordinates into the live drawing actor, and I plugged the velocity of these coordinates into the hue of the drawing. The goal was that faster movement would be a different color than slower movement, cuing the participant to play with different speeds. I also plugged the velocity of these coordinates into a trigger for adding a point of the drawing, so that when the participant isn’t actively moving their arms, it won’t create unwanted drawings.
This didn’t go as technically smooth as I would’ve wanted it to. The Kinect was finicky and didn’t track more than one extremity at once. It also was glitchy in its tracking, so the movement of the drawing was rigid rather than smooth. It also took a long time to catch the cactus pose of my first individual, which wasn’t the experience I was hoping for. Finally, as much as I played with the numbers, the color changing didn’t pan out the way I wanted it to. I wanted it to look like paint that was blending into different colors, but instead it looks more like an LED light. I’ve attached a video of my demo here:
I received helpful feedback after the demo. It was brought up how the cactus pose experience was turning off other people from volunteering. People also explained that going up by themselves was intimidating, and it might have been more inviting if they were by themselves or if other people could do it with them. I was encouraged to consider my audience and my setting to motivate how I set up the experience. Do I tell people what to do, or do they figure it out themselves? Would having something on the screen before people approached the screen be more inviting than having a black screen to walk up to?
If I were to work further on this project, I would try to make this experience more inviting. Since I am a dancer, it was helpful to hear feedback on how this is intimidating for someone who doesn’t typically move their body in that manner, and it was helpful to hear how to cater this experience differently. I would also try to make this either fully independent of my instruction so people could engage with it in an installation, or fully capable of tracking dance that could be used during a performance. I am not sure if I want to continue to work on this project in the next cycle or the third cycle, but I will keep this feedback in mind for any of my future work.
Pressure Project 3–Allison Smith
Posted: March 3, 2022 Filed under: Uncategorized | Tags: Pressure Project 3 Leave a comment »For our third pressure project, we were asked to share a story of importance to us and relevant to our cultural heritage, and to share this story primarily through audio. Additional goals were to tell someone a new story, to make someone laugh, and to make the experience interactive. Alex gave us the freedom to define cultural heritage for ourselves; we all grow up in a specific culture…whatever that may mean to us. I decided to focus on my family’s culture growing up, because I believe that is something that particularly shaped me into the way I am today. I also chose to look up the definition of heritage, as I find definitions very helpful to me. Here’s one definition that stood out to me:
Something transmitted by or acquired by a predecessor
I brainstormed passions that I have that were heavily influenced by my family environment, and the biggest one that stood out to me was art. In my family, there were also several mediums used to engage in art, and I wanted to give the participants that variety in my story telling, so I chose three art mediums that I felt were influenced by my family’s interests. Within that, I discerned what we were specifically passionate about within each medium. As you can see in my notes, I chose Musical theatre because of its immersion in a new world, movies because of the creative processes of facilitating deeper meanings, and music because of how its dynamics could be played with for expression.
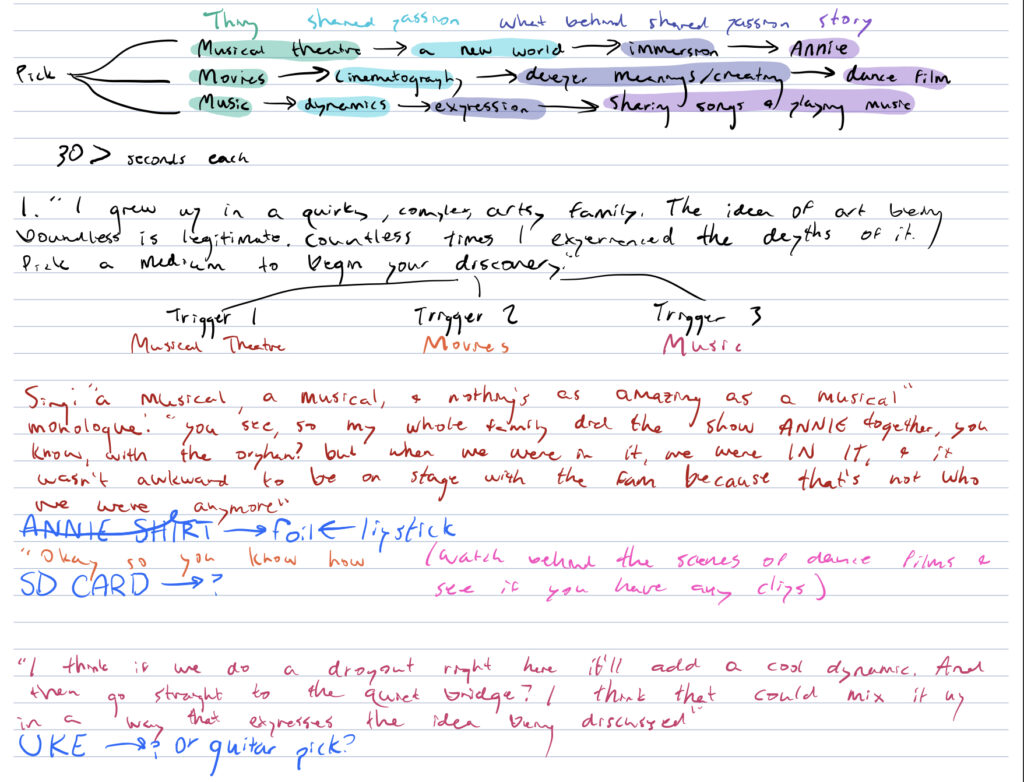
One of the overall threads I have seen in art is its deeper meaning and space for interpretation. So, in my different approaches of sharing my stories, I didn’t want to clearly communicate the specific passions of each art medium. I chose to imply what I appreciated through the way it was communicated. These are the sound samples I used for each short story:
Then, I added an intro and transition. Focused on the theme of art, I made the intro a bit more poetic sounding, and the transition was focused on discovery:
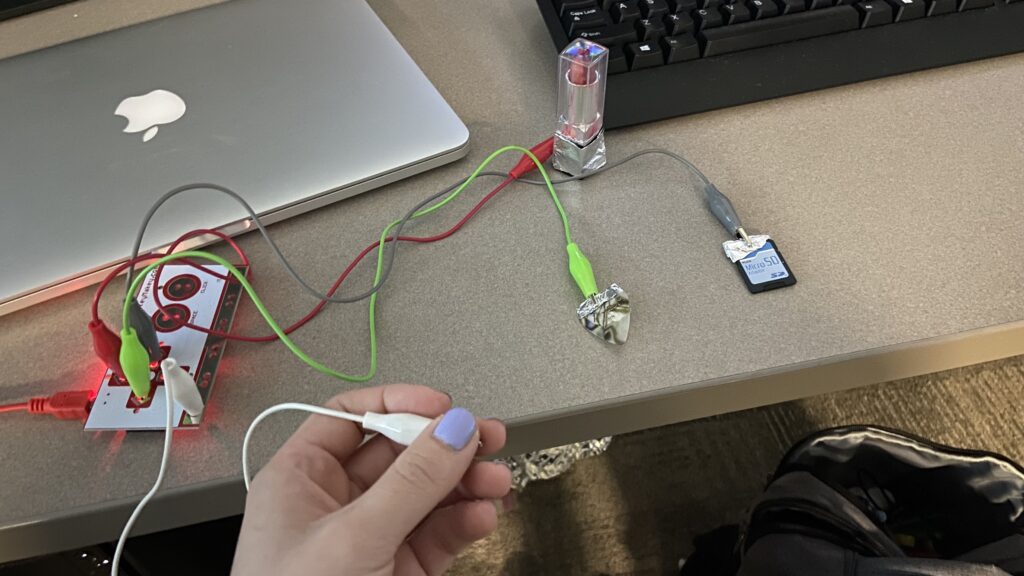
Finally, I wanted to make this interactive. In order to explore each medium, I provided a small object that represented it for me, and used those as triggers by connecting them through the MakeyMakey. I used a guitar pick for music, and SD card for film, and lipstick for musical theatre. My peers explained that having this textural connection to the audio helped them connect more to the audio and immersed them more in each of the stories.
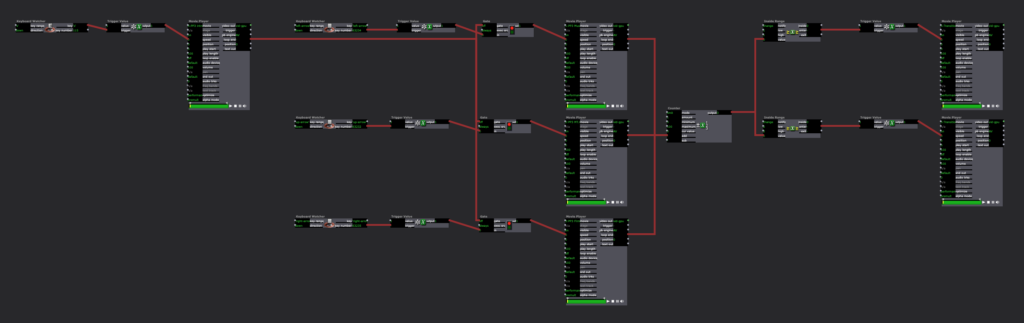
In Isadora, I had the intro play with my cue, then opening the gate to let people play around with the different objects. Using the keyboard watcher, each object triggered the sound, and then when the loop ended, it went into the counter. When the counter was between 1 and 2, it triggered the transition audio, and then after all of the audios had been listening, putting a 3 into the counter, there was no longer a transition audio cued.
I originally wasn’t very excited about this pressure project, as I prefer to have more longevity in my projects, and this one was meant to be shorter, and I also am not a huge fan of more light-hearted, comedic projects. That being said, I was pleasantly surprised by the enjoyment I got from creating this and seeing it play out with my peers. I’ve attached a video of the full experience.
Pressure Project 2–Allison Smith
Posted: February 22, 2022 Filed under: Uncategorized | Tags: MakeyMakey Leave a comment »For this project we were required to use the MakeyMakey and Isadora, and our prompt was that a secret is revealed. I had trouble coming up with what I wanted to do for this project. I tried to think of an experience involving touch that I already enjoy, and then look for a way to make that more enjoyable with an unexpected digital media element. I went with the game Twister where there is a mat and you have to place different hands and feet on different colors. Since that reminded me of dance, I wanted to add music to it. To make it extra fancy, not only did I add music but I also added visuals for each of the colors.
Here is a picture of my Twister game. Due to the shortage of time, instead of full body Twister, it is Finger Twister!
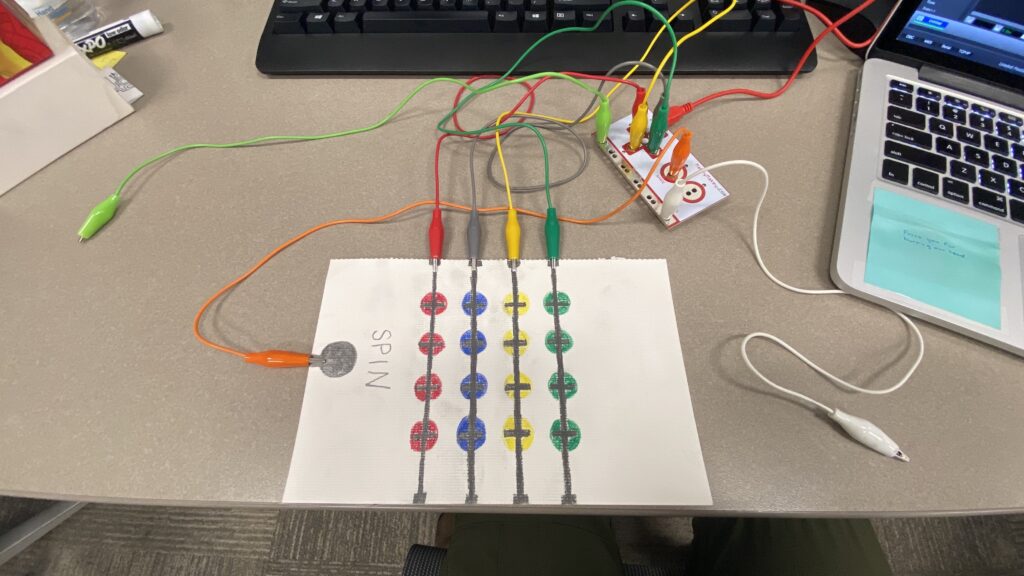
As you can see, I used the pencil to connect all of the colors to one trigger. I also chose to make a spinner on the side. With one participant holding the light green grounding alligator, they could use their finger to press the spinner. With the other participant holding the white grounding alligator, they could play the game with their fingers acting as the connection.
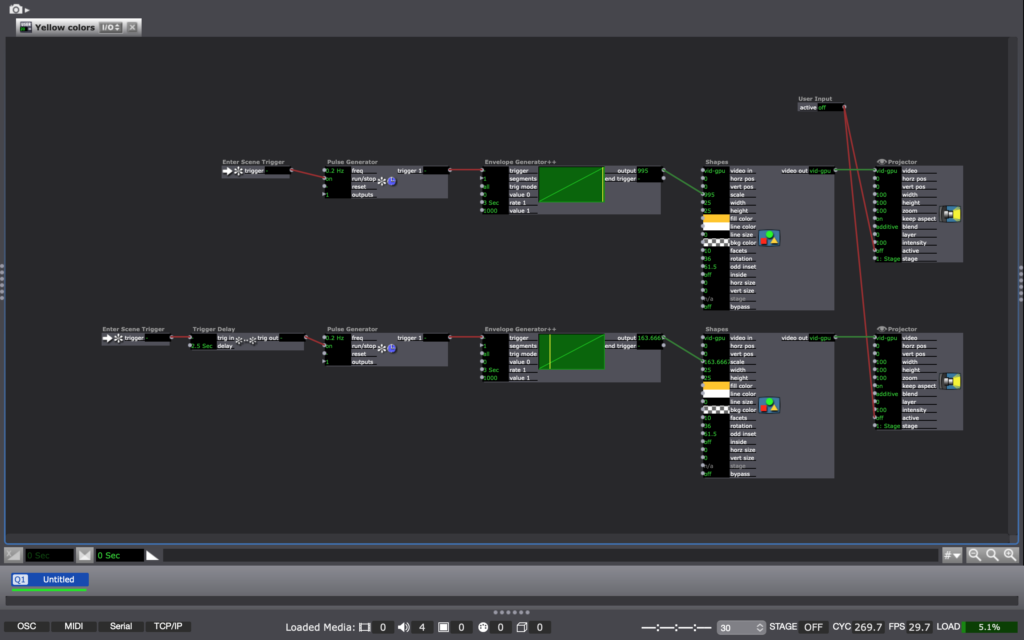
When the red was played on, it brought up an image of red squares circling the screen while playing the sound of a synth. When the blue was played on, small blue circles fell from the top of the screen similar to digital raindrops or snowflakes, with a different sound playing. When yellow was played on, there were yellow stars that changed in scaling on the screen with a new sound. Finally, when the green was played, there were three green triangles rotated in the center of the screen with a grounding beat playing.
There were a few surprises ingrained in this experience. Obviously, normal twister doesn’t play music or cue videos with the same colors, so that was a surprise. Another surprise was that the spinner had the option of not just saying “THUMB RED” but a secret “PARTY” cue that would give permission for ending the game and just playing around with all of the sounds as a sort of DJ. The final secret surprise, though, was that all of the sounds fit together on the same beat and made a cohesive song together. As you can see in the video from the presentation, one truly gets the opportunity to create their own music.
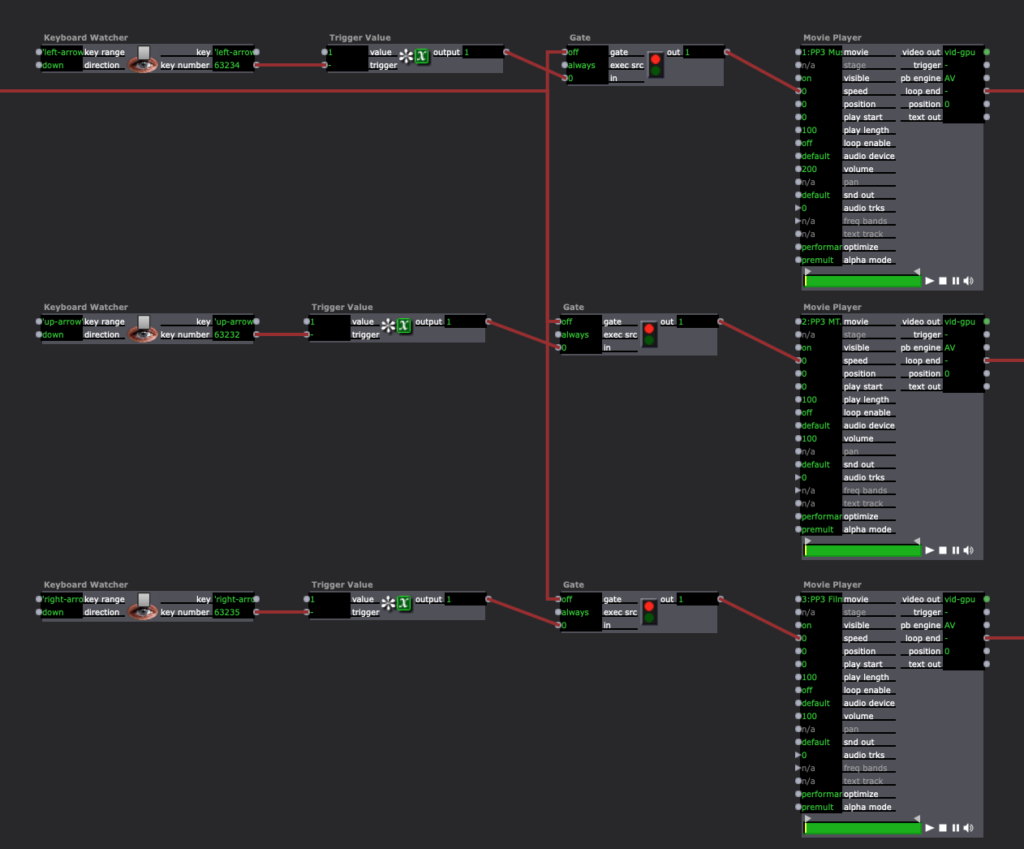
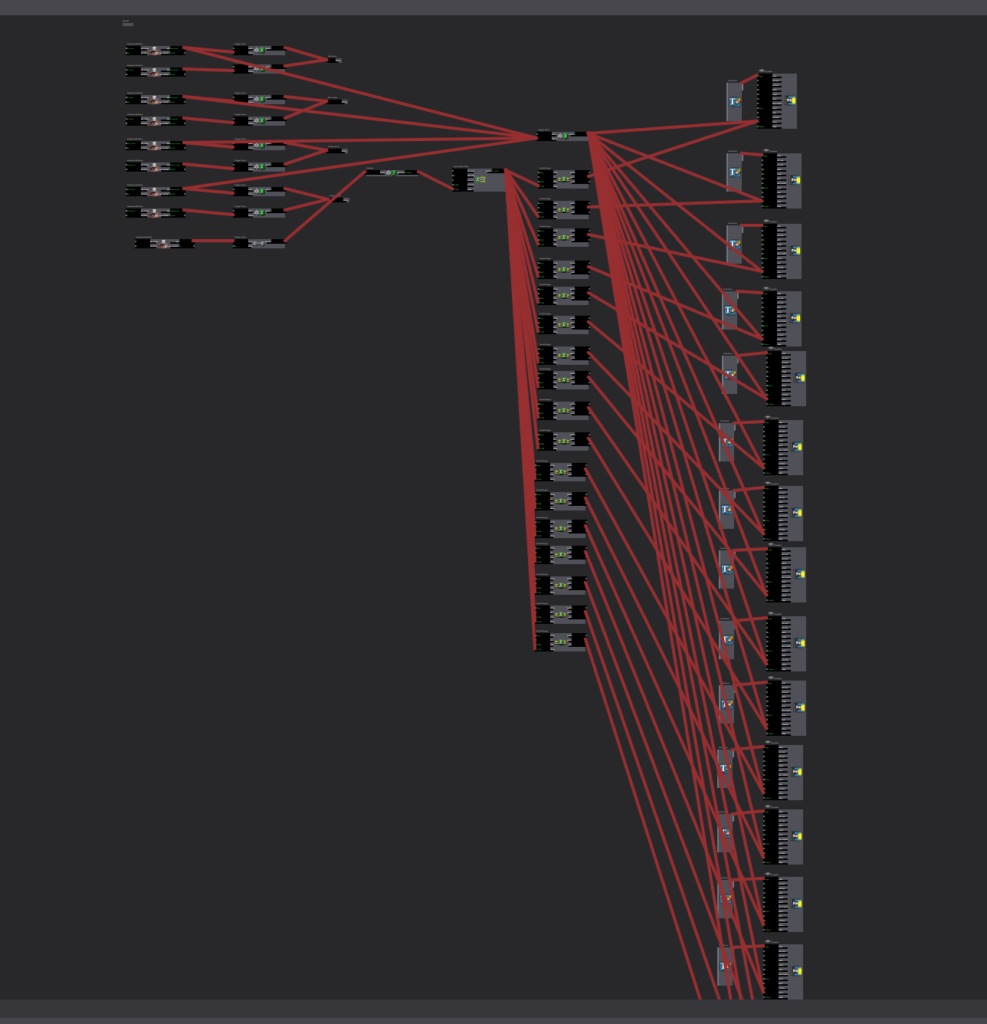
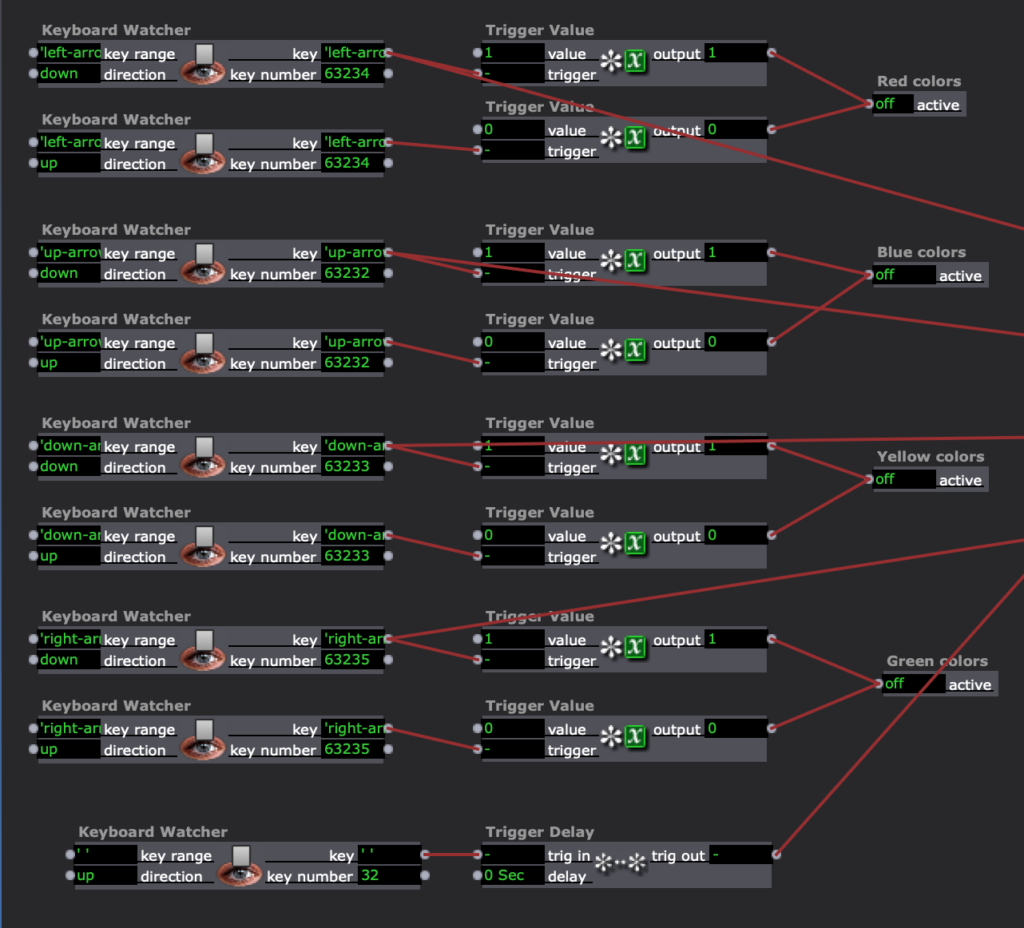
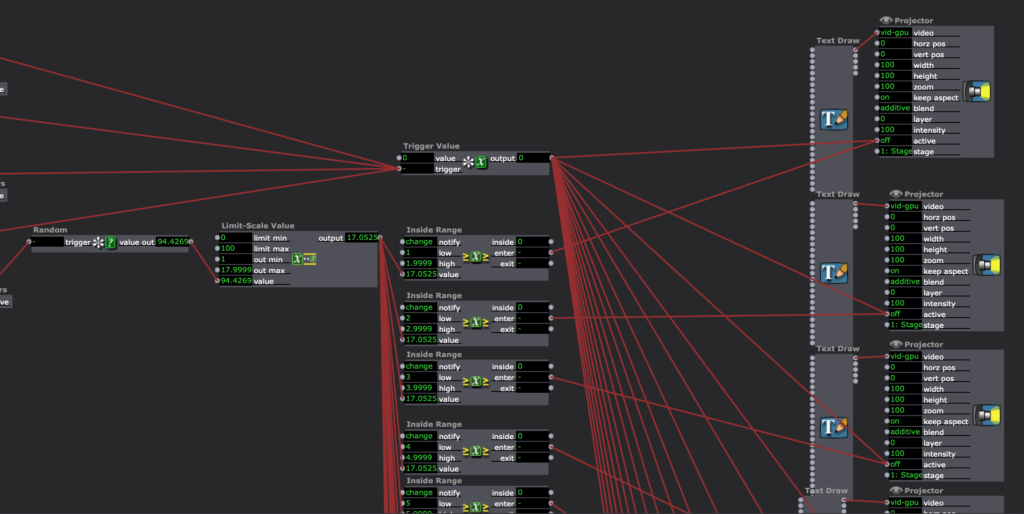
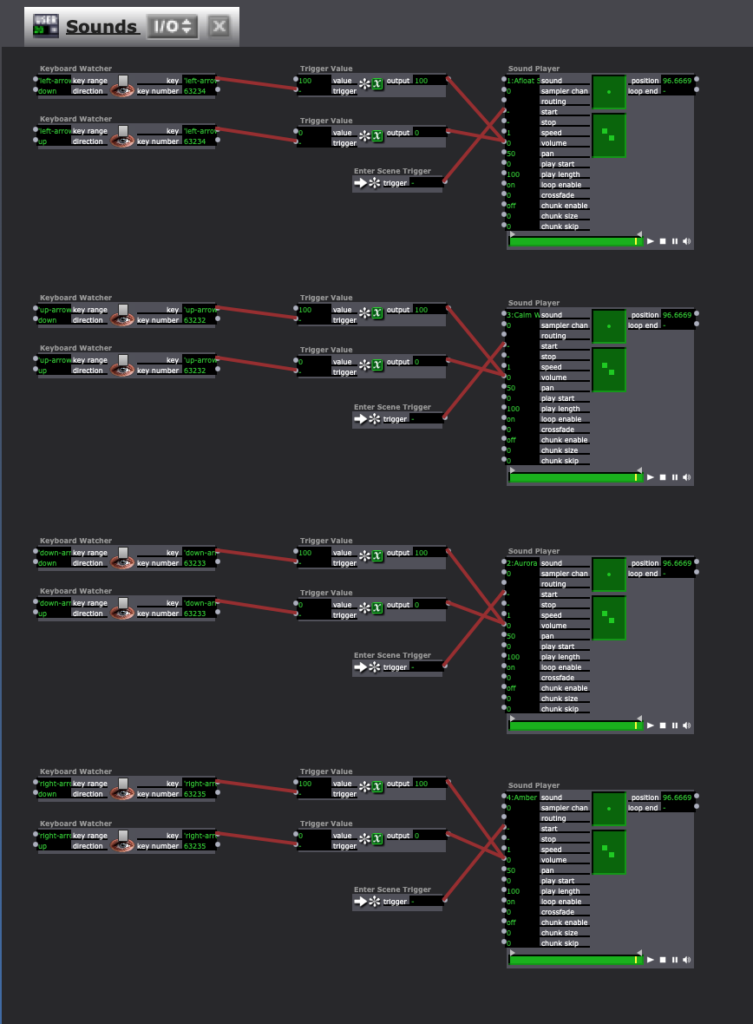
To make this happen, I created a different keyboard watcher trigger for each color and for the spinner. For the colors and sounds, the trigger was on for the “down” action of the key and off for the “up” action of the key. For the spinner, there was a random generator from 1-17, and depending on the number, a certain text was triggered. Then, when the down action occurred that also activates the sound and color, the spinner text would be deactivated. Here are screenshots of my isadora setup.
Finally, in order to create my sounds, I went into GarageBand and played around with the different loop tracks. After finding four loops that I liked together, I exported the raw aif. files into Isadora. They loops continued playing the whole time so they stayed on the same timing, and all that was adjusted was the volume.
If I were to keep working on this project, I think it would be fun to make this into a full-sized Twister. A more bite-sized next step, though, would be to make the spinner text go away with a timer instead. A new key, or color, needed to be touched in order for the text to go away, and if the spinner instructed the participant to stay on the same color with a different finger, the text stayed on the screen. Overall, though, I am super happy with the product and found it was fun to program and it was enjoyable to watch my friends experience this.
Pressure Project 1: Benevolent Spacing
Posted: January 27, 2022 Filed under: Pressure Project I, Uncategorized Leave a comment »For this pressure project, we were assigned to view a public space experiencing a high level of traffic and congestion. The day before it was due, I had a very stressful experience in a classroom having to do with traffic patterns and congestion (including a spilled coffee), so I decided to make that classroom my chosen space for the project.
In the classroom, there are rows of seats that are very close together and hard to walk through. There are desks attached to the seats that fold out, causing even less walking space. During the last 60 seconds of class, everyone already starts to aggressively pack and zip their backpacks, queuing to our teacher to end the class. In order for people to get out of their seats, they either have to step around people with their fat backpacks running into each other, or wait for the outside person to finish packing up. I, being left-handed, like to sit on the outside to get the left-handed desk. When class ends, people are either awkwardly squeezing around me or waiting for me to gather my items in a discombobulated manner.
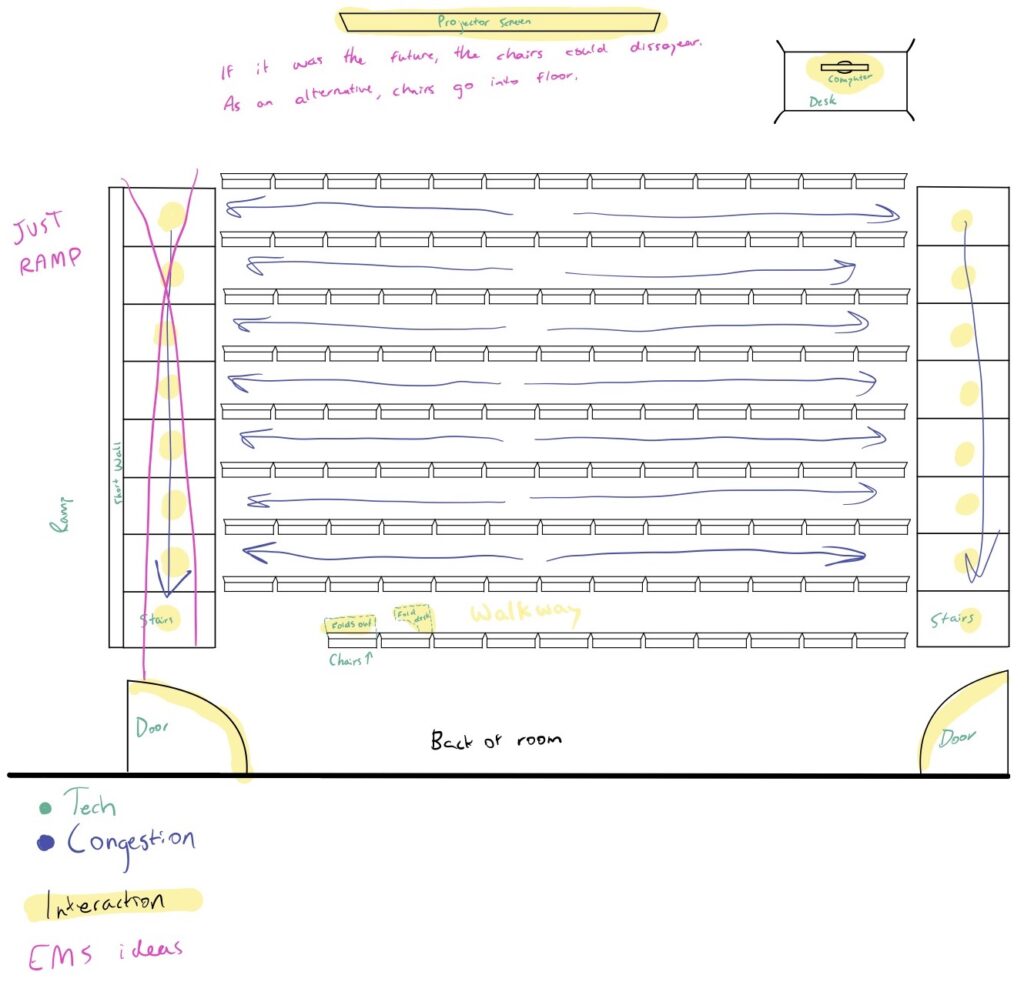
In the picture below, I drew a diagram of the classroom illustrating the different tech in the room, as well as where the congestion occurs.

After creating this diagram, I then began to brainstorm some ideas for how to benevolently adjust the space, reducing the congestion. Here were some ideas I had:
- Eliminate the left-side stairs, making that whole side a ramp and giving more space to walk up towards the door.
- There is not enough space between the chairs. To fix this, we only need chairs necessary for the amount of students. When not in use, chairs are stored under the floor. They are collapsable/foldable, and are only out when they are being sat in.
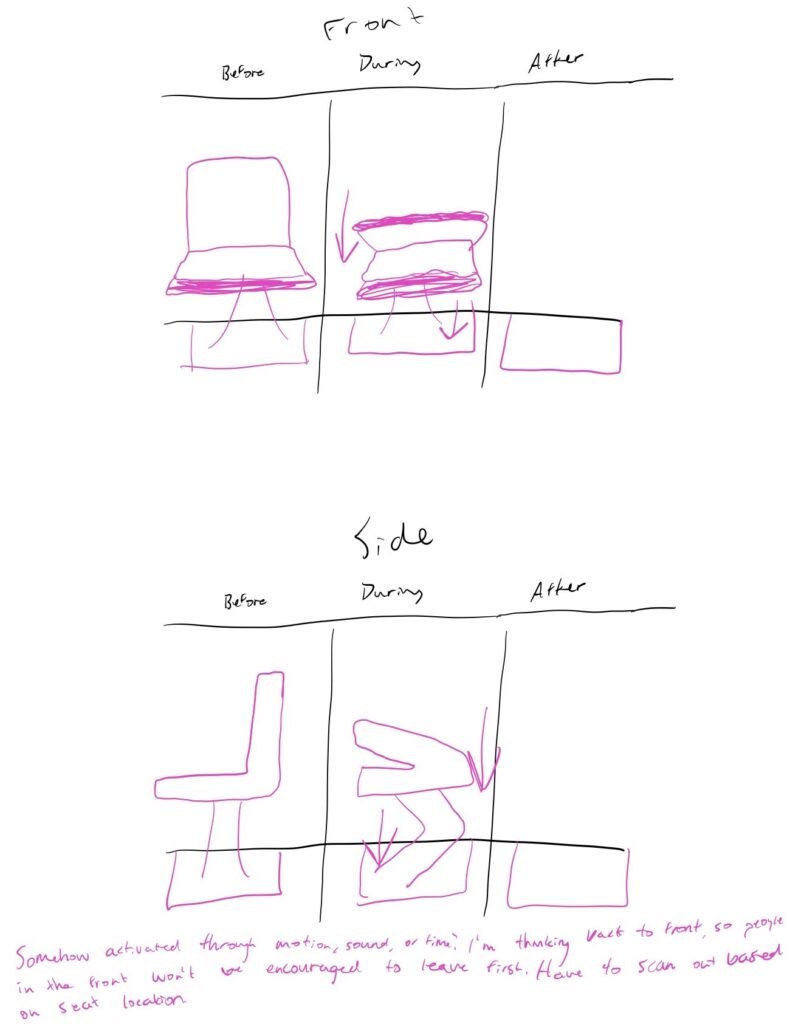
- To guide traffic, the seats could fold down automatically, working their way from the back to the front. This would encourage students who sit in the back to leave first, and the students who are sitting in the front will be encouraged to wait their turn to leave and not run over the people trying to get out of their seats closer to the back.
- Since this is college, it’s possible that the students won’t care the order the seats fold in. So instead, the students would swipe their BuckID on their seat, and they would need to swipe their BuckID to exit the room. The swipes would only be accepted in a particular order based on the seats that students were sitting in. While this is more authoritarian than I prefer, it would create a more efficient traffic pattern when leaving the classroom.
- Finally, Alex offered the idea of the teacher letting the students out five minutes early, but making sure to discuss with the students that the five minutes was given to them to take their time leaving and to not run fellow students over on their way out the door.
In the picture below, I drew out what some of the modifications to the room could look like, and I also drew out what the folding seat would look like:
This pressure project challenged me to think more deeply about inefficient uses of the space and designs that were not made by people who would also be using the space. The people who designed this classroom were not also going to be sitting in there, and then have to make it across campus in ten minutes for their next class. As someone who is in the space, I am able to think more experientially about the design, and then make adjustments where I see fit.