Cycles 2+3 (Maria)
Posted: April 30, 2021 Filed under: Maria B Leave a comment »Intent
The overall intent for my cycles was to create an interactive experience using the LEAP motion. For the first cycle and a lot of the second, I focused more on the types of interactions that would happen and their intuitiveness. Starting in the second cycle, I started thinking more about how I could use a narrative to tie these interactions together and give them meaning. My overall goal was to explore what it means to design UX for motion interaction devices.
It took me awhile to land on a story I liked and made sense to me. I pulled inspiration from escape room plots, different video games, movies, and the simple aesthetic that naturally arises in Isadora by using simple shapes. I ended up taking a lot of influence from the game “There is No Game,” which was really fun in the way it broke the 4th wall with the users. I combined that with the simple, almost 8-bit aesthetic to make a story where the person playing the game is taking part in ‘user testing’ for a new, immersive video game and ends up getting trapped. Then, depending on which ‘door’ they choose, they either win, lose, or break the game
Process
I made a wireframe of my storyboard in Miro, writing out what narration and game objects were in each scene, and how it responded to different actions of the user.

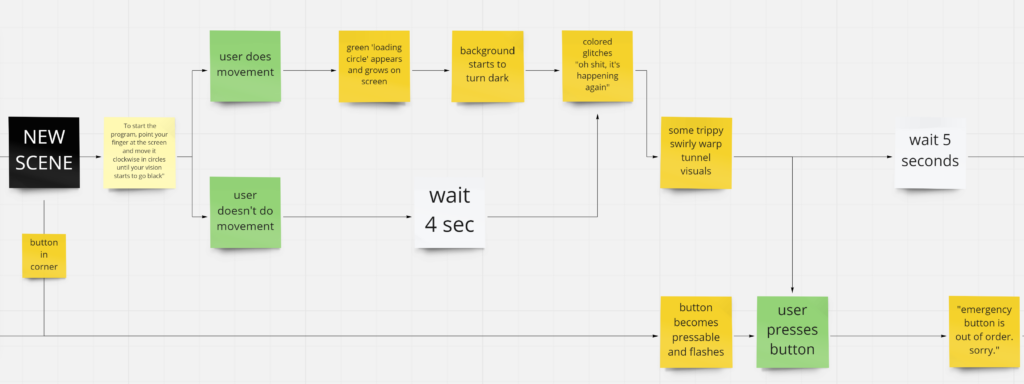
Next, I went into Isadora to mock everything up. The individual activities I made in cycle 1 and the beginning of cycle 2 proved really helpful because, even though I didn’t use all of the exact activities, I used a lot of similar bits of code that I was able to pull and apply to the new ones. The original goal was to do a second pass-through and add better assets, but I ran out of time.
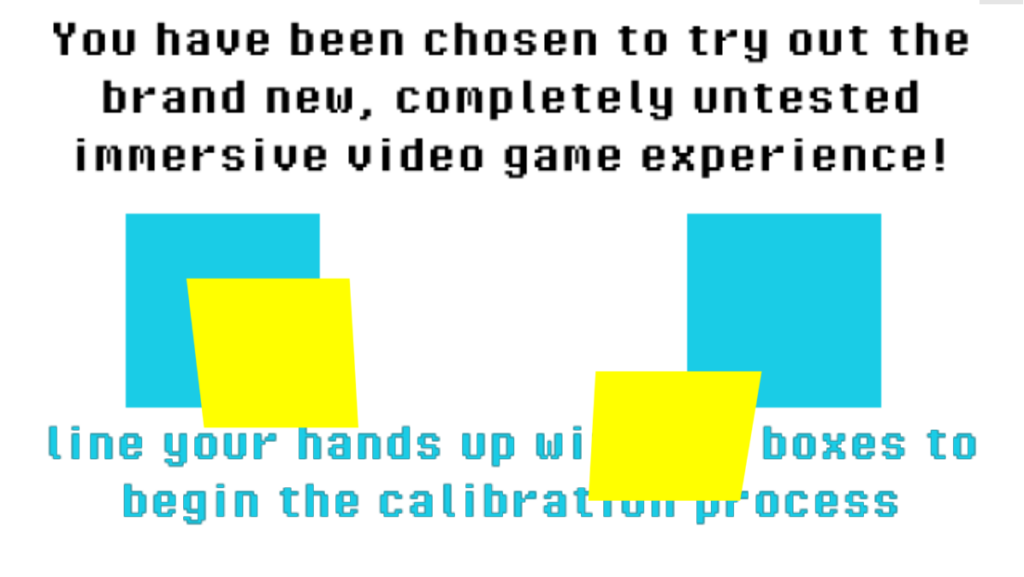
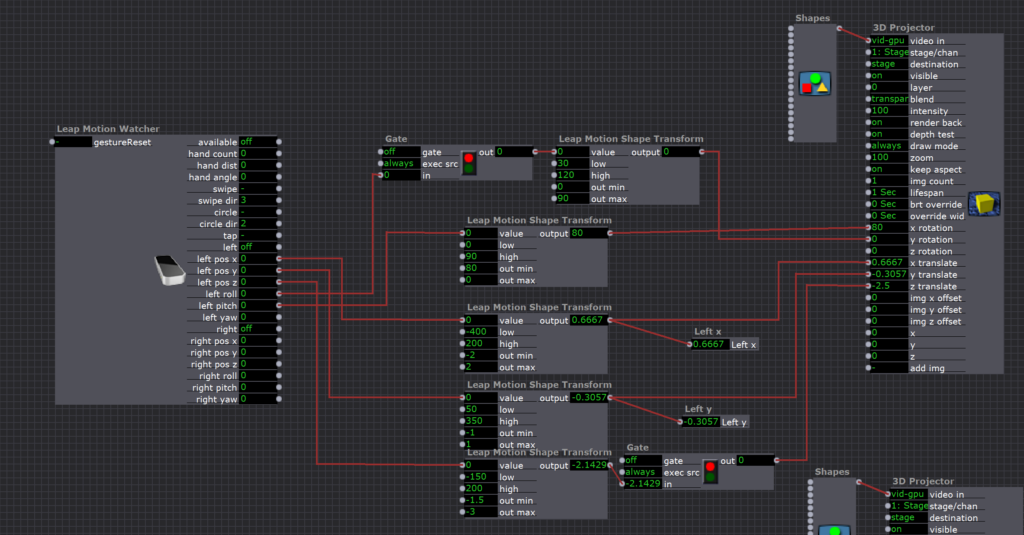
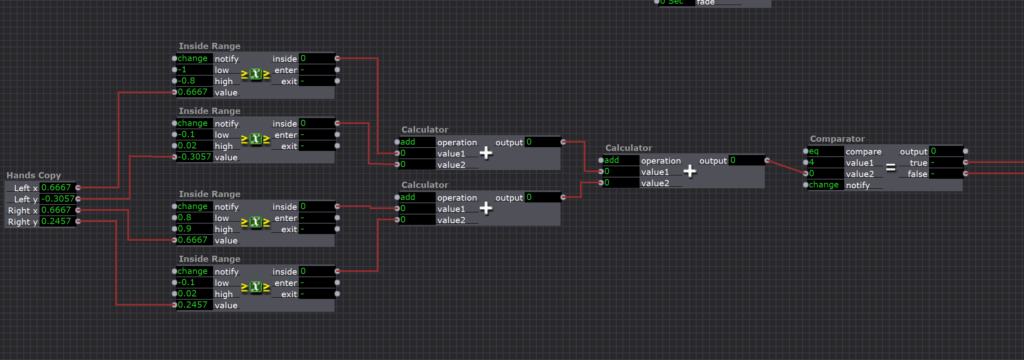
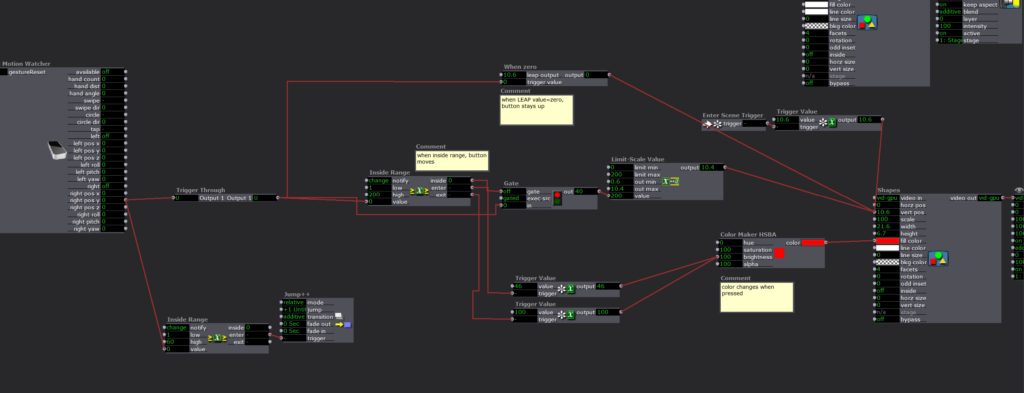
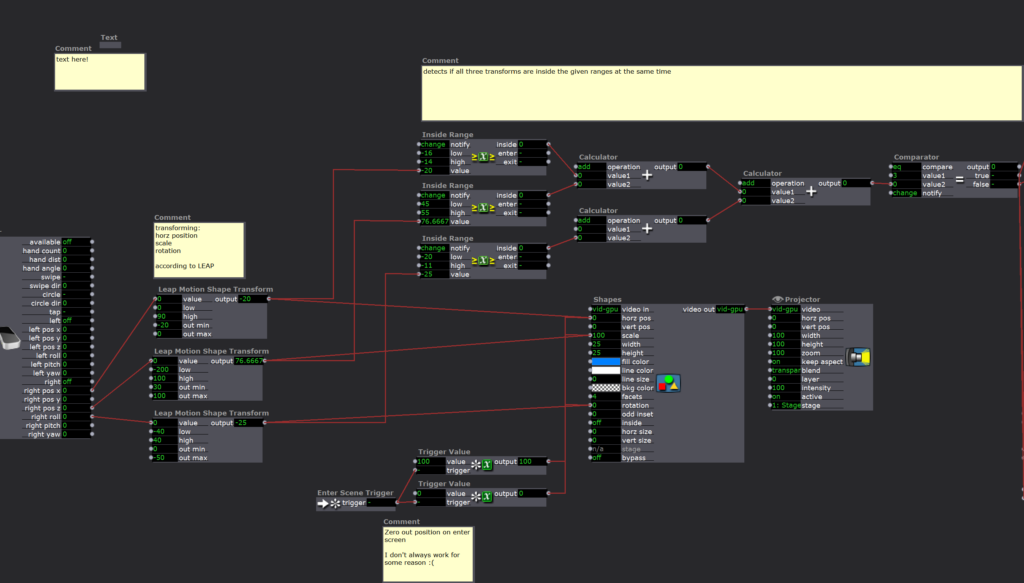
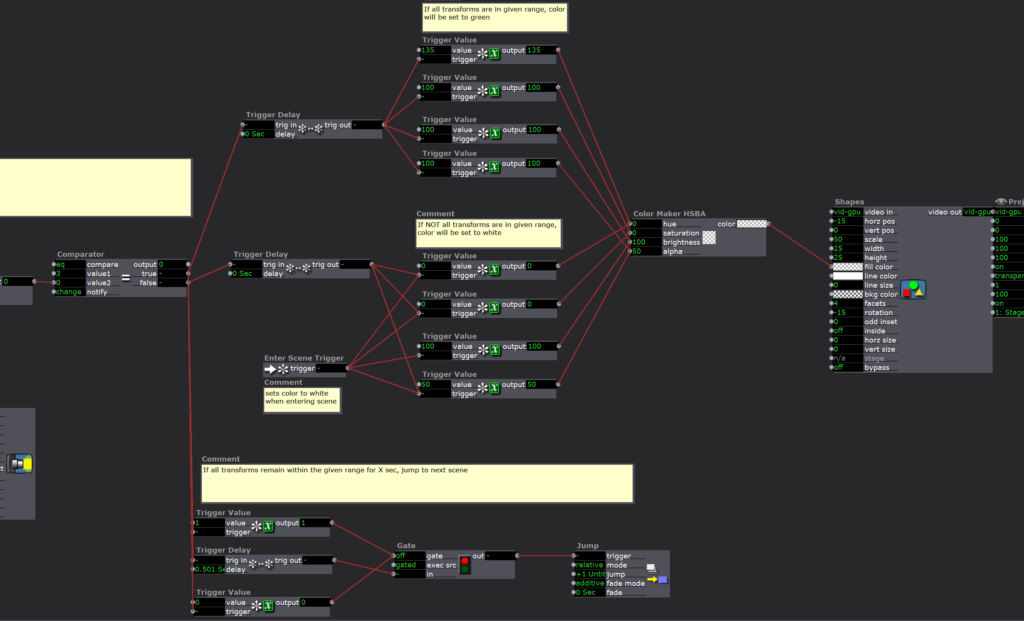
In the first scene, I made a hand tracker that tracked the angle and position of the player’s hands using a LEAP motion and a 3D projector. I used a series of Inside Range Actors and calculators to track when the hands were inside the boxes, and when they were it sent a signal to jump to the next scene
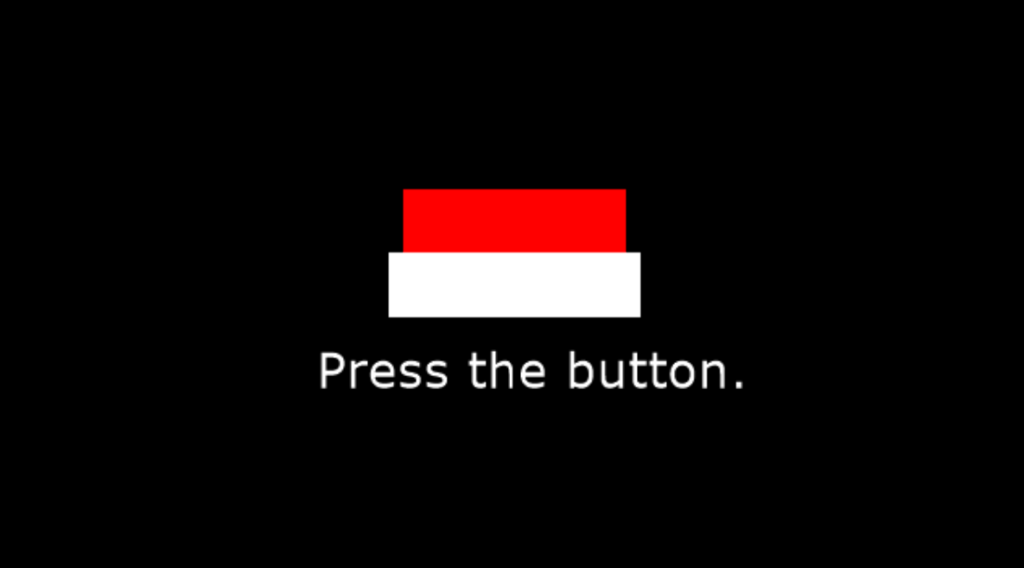
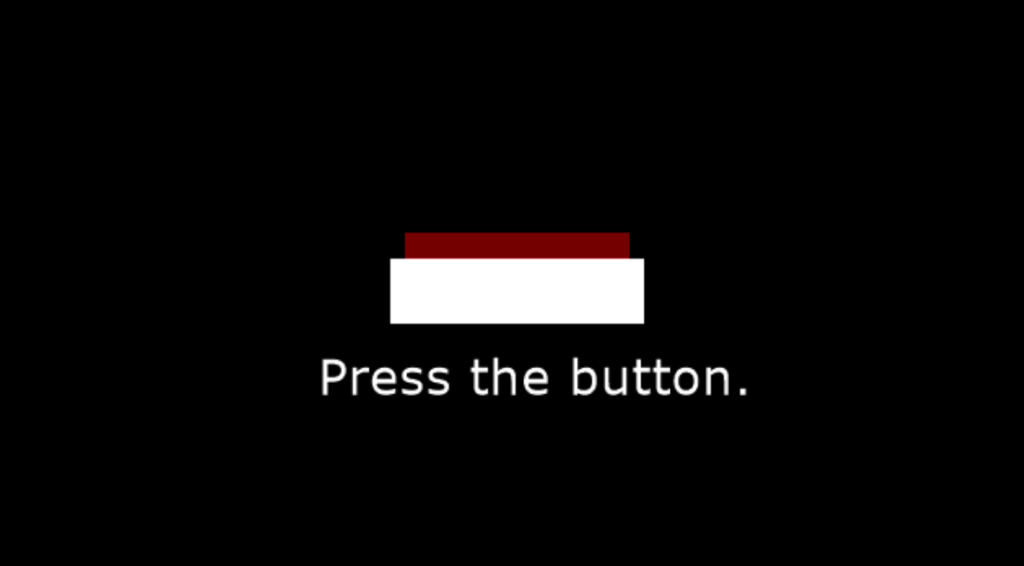
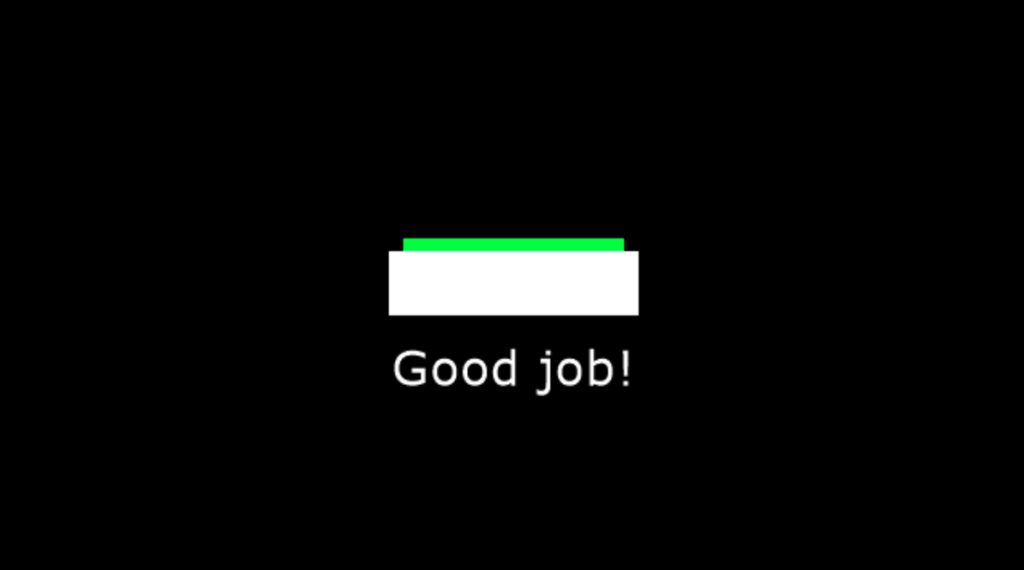
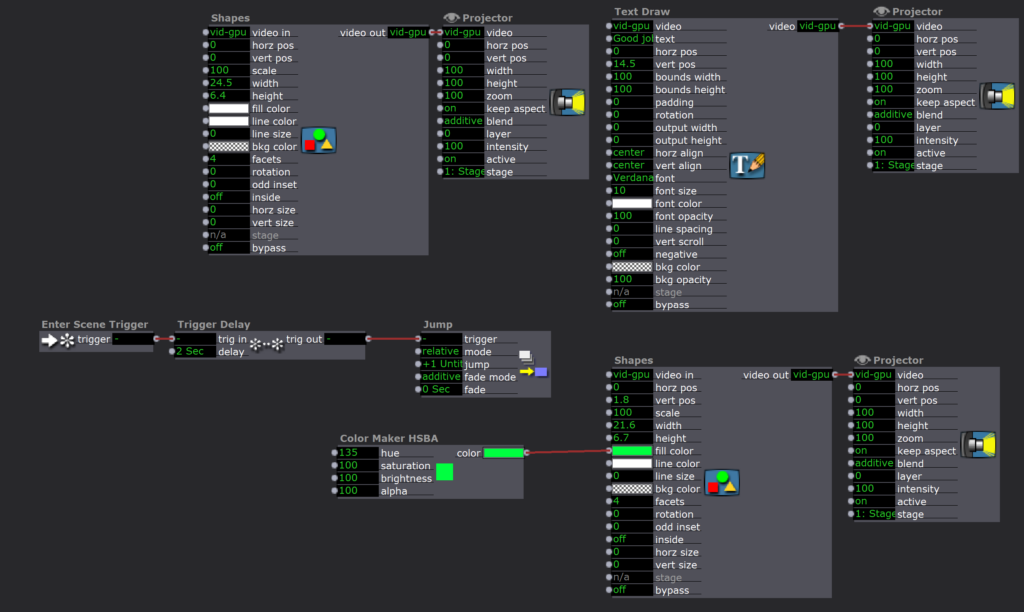
The second scene was just a copy of the button press scene I made in cycle 1.
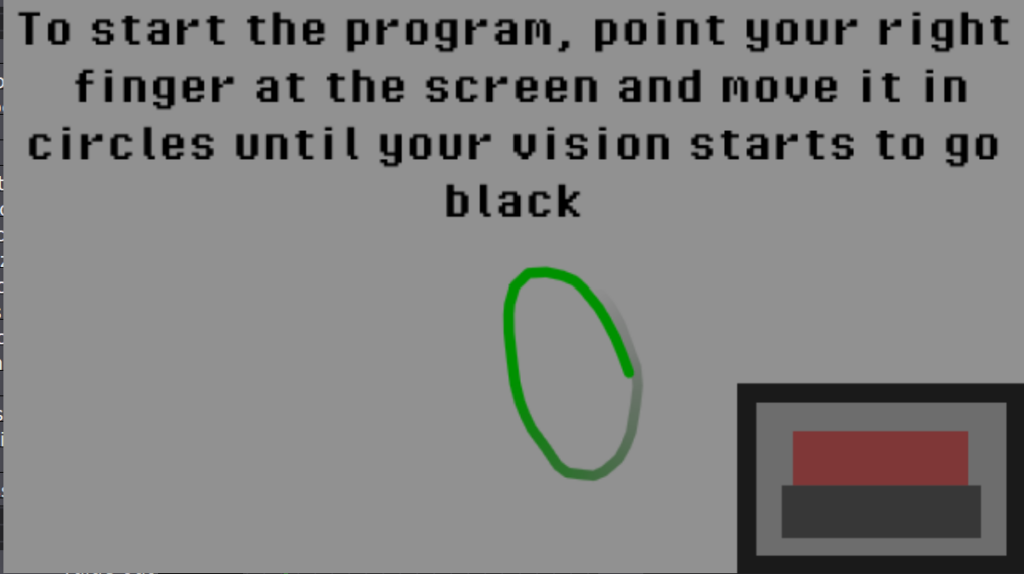
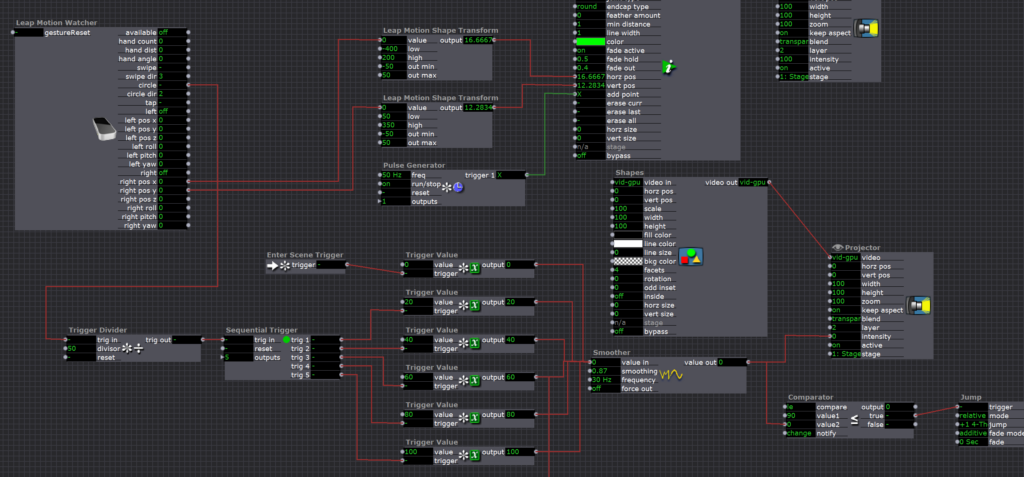
The third scene used a Live Drawing actor to make the circles, and the circle trigger on the Leap Motion Watcher actor to set of sequential triggers that gradually made the scene darker as the user drew circles
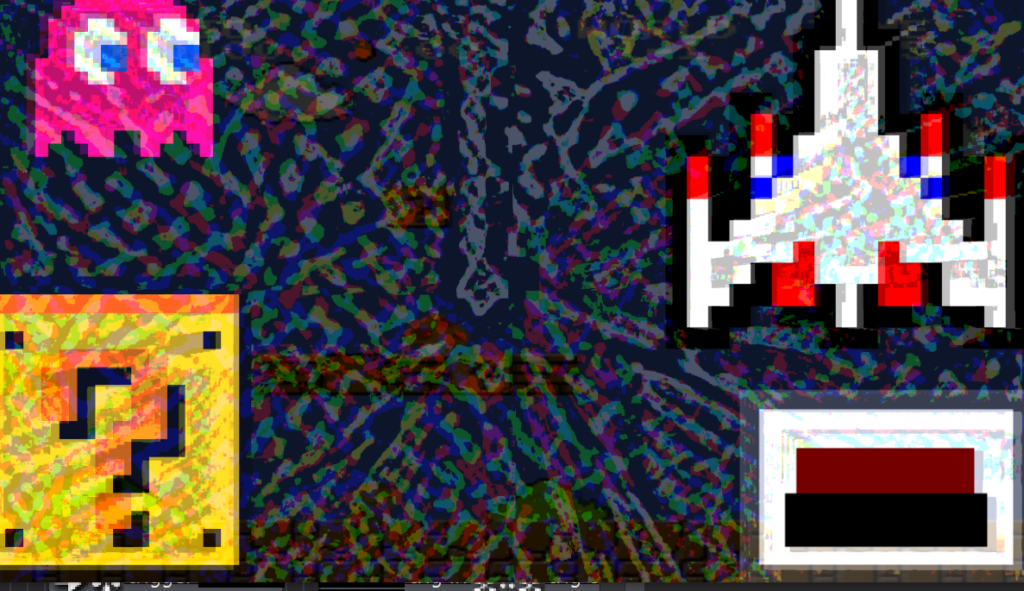
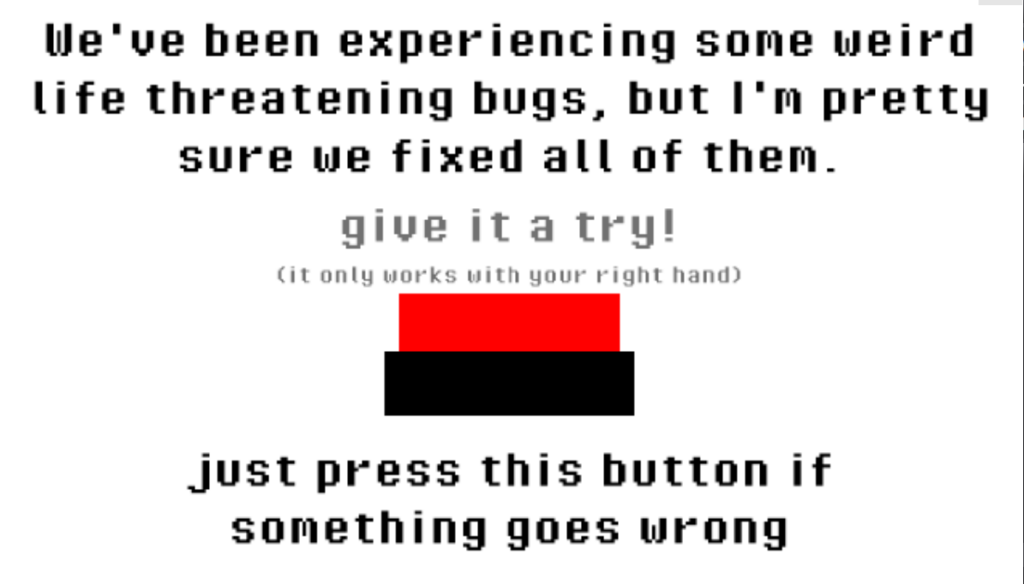
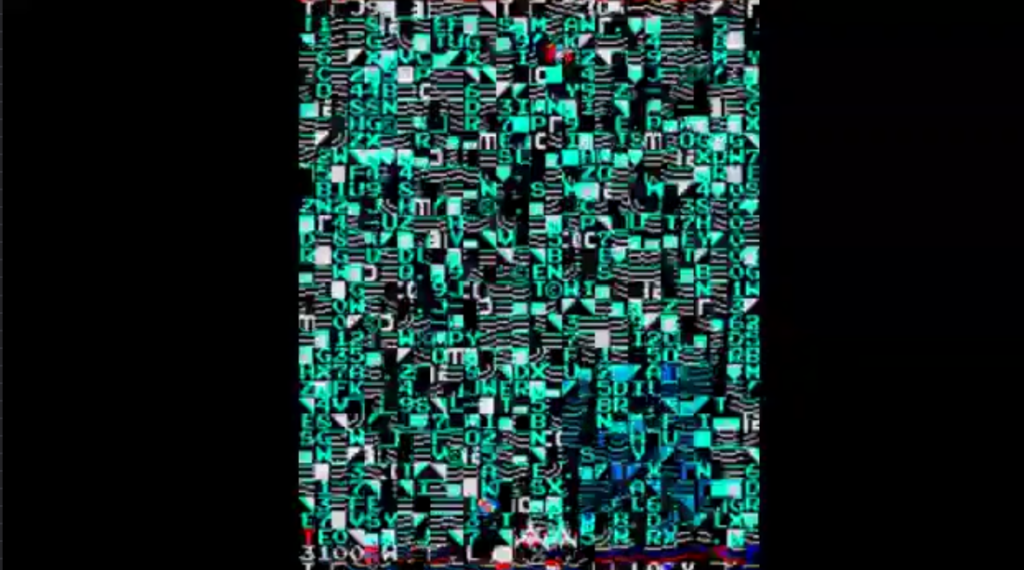
Scene 4 was a bunch of chaos that was made to be the ‘glitch’ in the program. I initially didn’t have sound in this scene, but adding it made a huge difference in recognizing that the program was glitching out. I was really happy to see that users recognized that the situation was an ’emergency’ and everyone who played it attempted to press the ’emergency button’ that was introduced a few scenes earlier (yay successful UX design!).
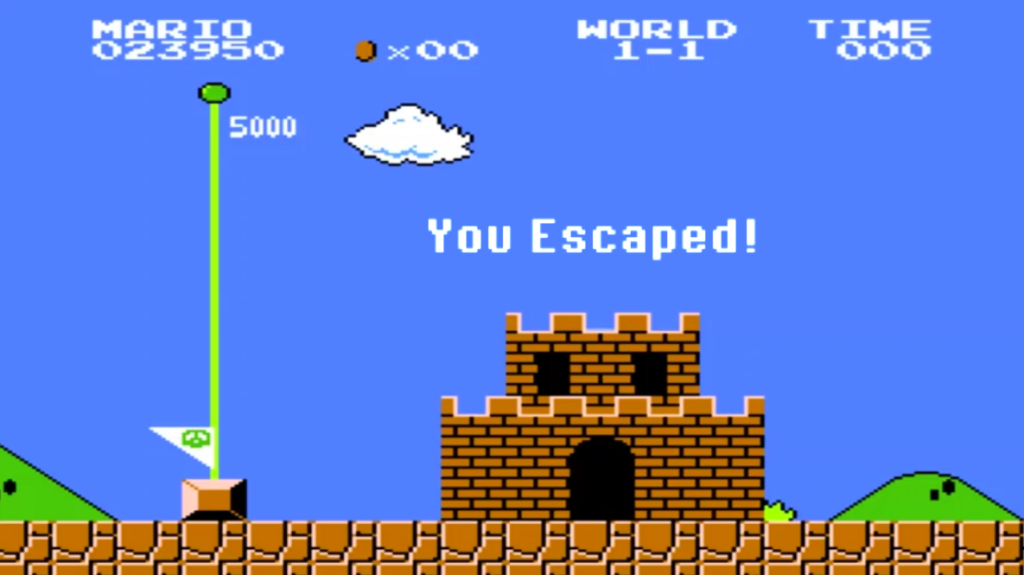
If you look closely you can see a super mario bros level in the background (music from the game is also playing) — this is an ‘easter egg’ that gives users a hint for later in the game!

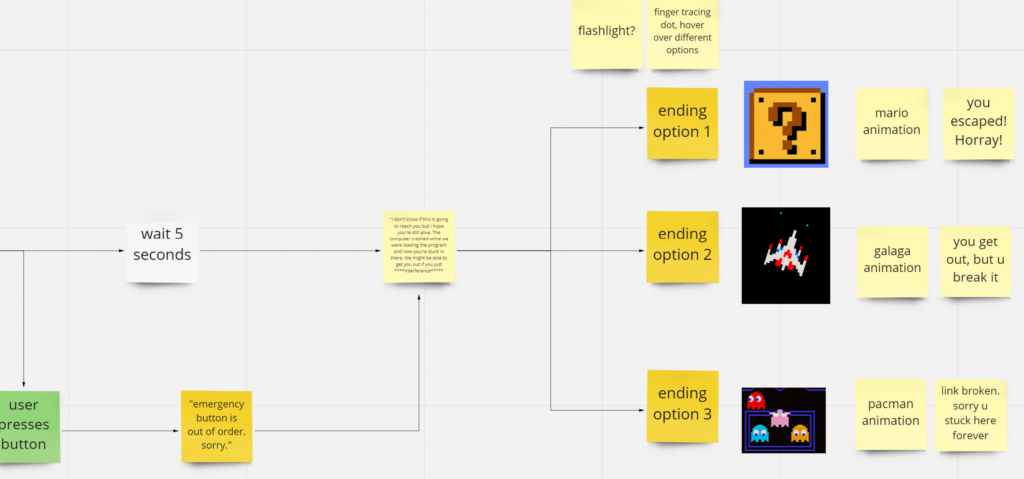
If the users pressed the button, they were taken to this scene. Basically acknowledging that the user pressed the button, but it did no good because the button was out of order. If the user didn’t press the button, the patch automatically jumped from scene 4 to scene 6 after about 8 seconds.
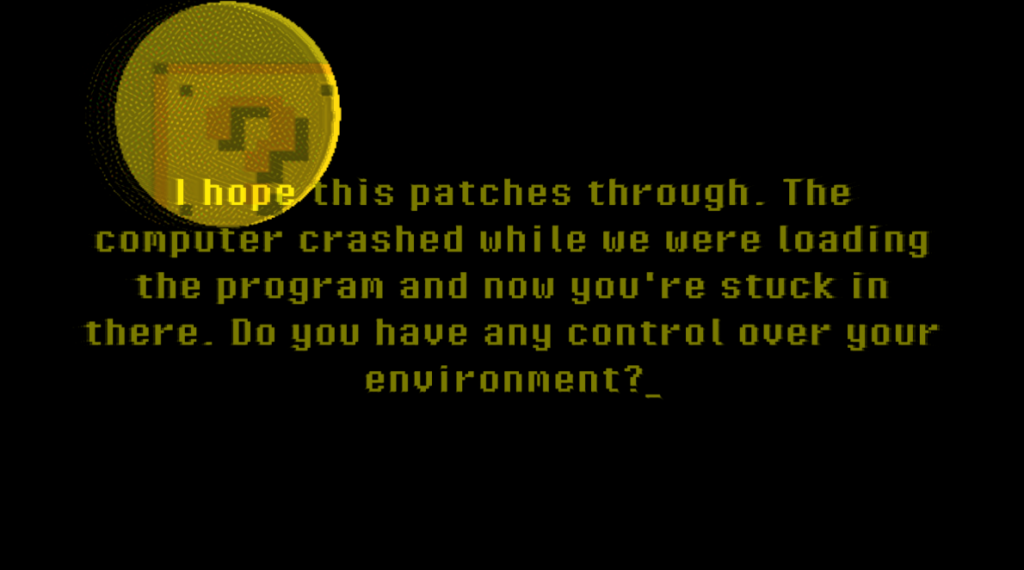
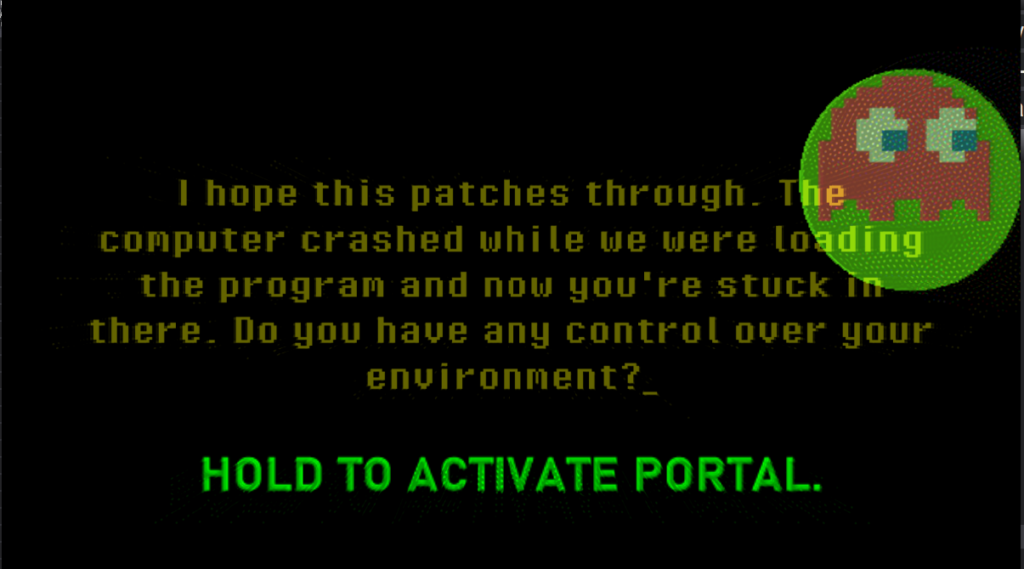
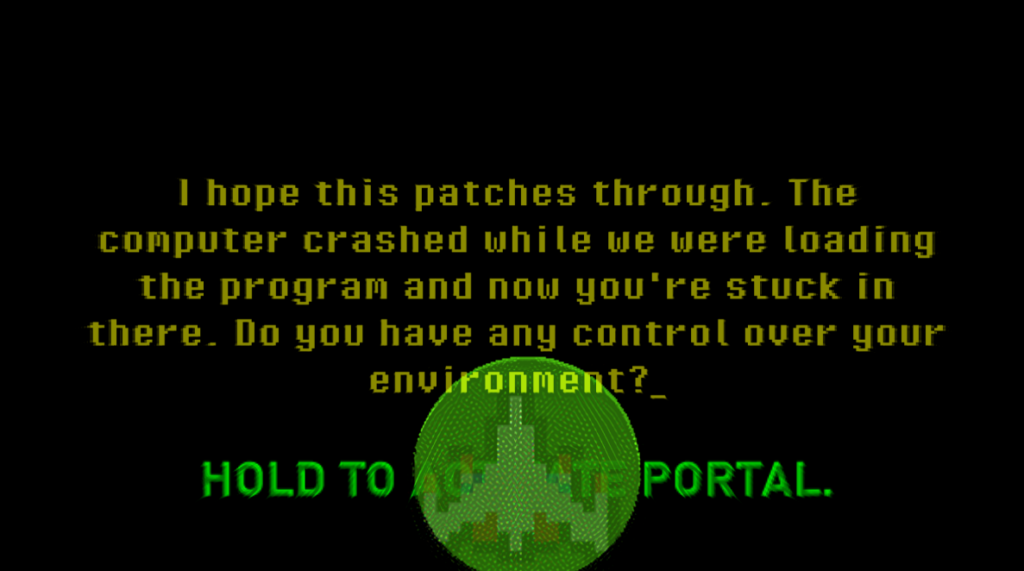

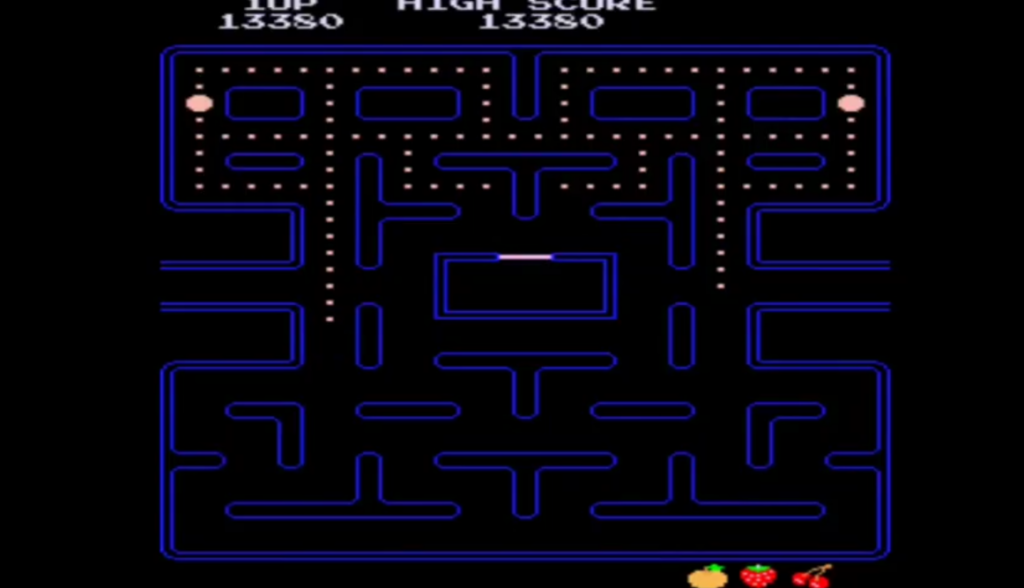
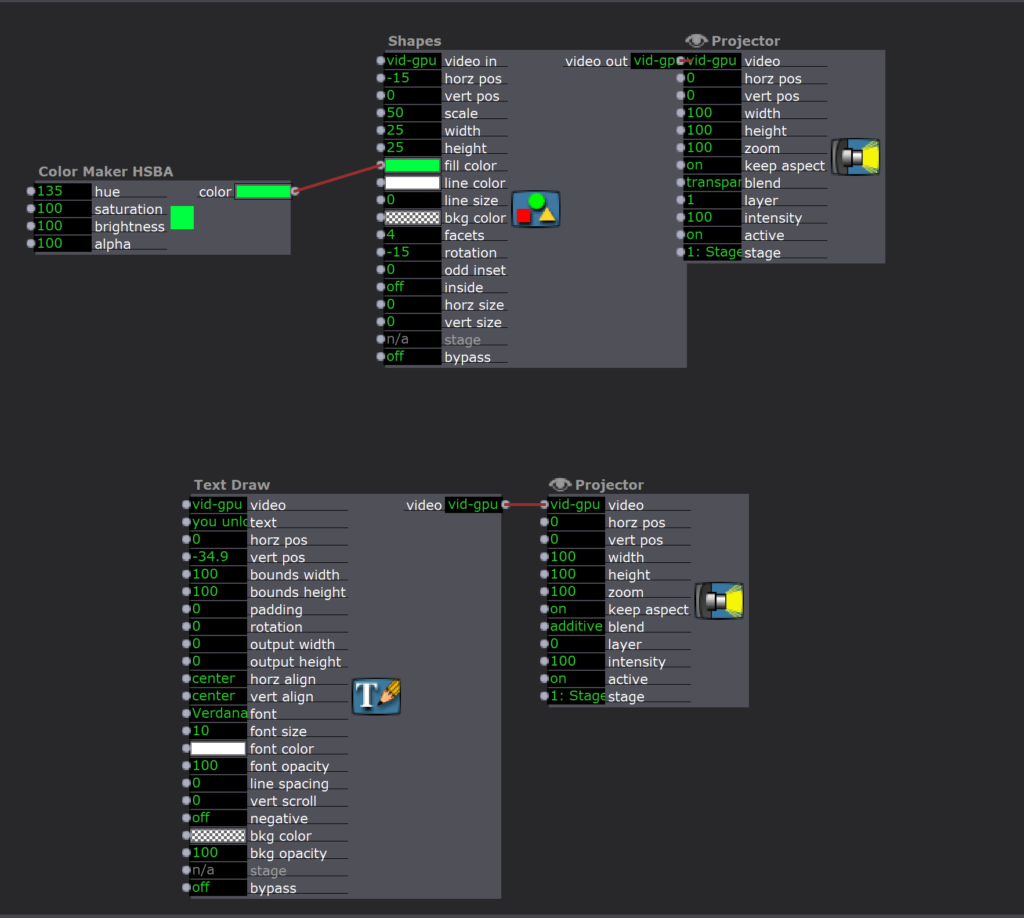
This is the scene where user choice comes in. There is a yellow circle (a ‘flashlight’) that responds to the position of the users hand movement. Hidden in the darkness are 3 ‘portals’: a pacman ghost, a galaga ship, and a mario ‘?’ block. Each of these portals leads to a different ending! The light turns green and a green message pops up when the user holds the light directly above the object, and if they hold it for 3 seconds it takes them to the associated ending.
To make the ‘flashlight’ in Isadora, I used a chroma key. Basically, when the foreground layer is a specified color (in this case yellow), it reveals the background layer that holds the hidden object, BUT if the foreground layer isn’t the specified color, you only see the foreground layer. To keep the flashlight from disappearing completely, I slightly offset the flashlight color from the ‘key hue,’ making the flashlight slightly transparent and still revealing the background.
To send the user to the appropriate ending when their hand/the yellow dot was inside a specified range, I used the same method as I did back in the first scene with the hand tracking, but I made a different one for each of the three hidden icons.
Challenges
One of the biggest challenges of this project was choosing/creating a story that would give meaning to and make sense with the kinds of interactions I wanted to make. A lot of the stories I was coming up with were a lot more complex than I had time for or just didn’t really make sense with the context of these interactions. I found myself succeeding when I just picked a story and ran with it. Even though the initial story I ran with didn’t end up fitting with the interactions exactly, it helped me come up with a similar story with a different context that made a lot of sense with the LEAP motion-based interactions!
Another challenge I faced was the attempt to make motion-based interactions with the LEAP Motion in Isadora that (1) Worked, and (2) made intuitive sense to the users. When I was originally storyboarding, I came up with all these interactions like pinching to grab, clapping, etc. that just didn’t work. I ended up sticking to more basic motions like moving your hand around that was associated with a dot on the screen or moving your hand up and down to push a button.
Adding on to the challenge of making motion-based interactions that works and made intuitive sense, it was hard to get a feel for how the users would respond to the prompts without user testers, and I could’ve really benefitted from getting more frequent feedback from others. One big example of issues with this was the button press scene. Some users didn’t really understand how they were supposed to ‘press’ the button without physically pressing it. They would try pressing their hand towards the screen or just pause in confusion. Once they figured out how they were supposed to press it (downward motion with your hand like you’re pressing an invisible button on the desk in front of you), users often tried to press it really fast and/or continued the motion until their hand hit the table. This made a lot of sense upon seeing others do it, but it was never something I realized when creating the patch on my own. I knew that the LEAP wouldn’t detect my hand motion if I moved too fast and that it would lose the position of my hand if I set it down on the table next to the device, so when I was testing it I was sure to move my hand slow and keep it in range–but people who have never used the device before have no way of knowing that!! I’ve come to really enjoy thinking about how to design/problem solve for these intricacies and edge cases that come up when designing for motion detection 🙂
Another challenge I faced was just how long each of these scenes seemed to take, and it really started to make me feel bogged down and unmotivated because I felt I wasn’t getting anywhere. It was additionally frustrating because I was working on a project using another visual coding platform at the same time, and it was hard trying to shift my brain back to working in Isadora. However, as the project went on, I found it a lot easier because I had more ‘tricks’ up my sleeve (bits of code that I had used in other scenes) that I could use in future scenes! I also found it a lot easier to do when I had a more detailed plan. Something like a post-it note or two in Miro spelling out exactly what I wanted to accomplish in the scene and, even better, writing out the basic logic/actors I’m going to use to accomplish it.
Accomplishments
I was really proud of the intuitiveness I was able to accomplish with some of the interactions. The top two were the user knowing to press the ’emergency’ button when the screen started glitching out, and the scene where the message asks if the user “has any control over their environment” and the user has to figure out what to do with the yellow orb they can move around with their hands (this one could’ve been smoother with some more testing, but I liked how it introduced a sort of puzzle to the users). Basically I was just really excited about anything I could get the user to do without explicitly telling them to do it!
I was also really happy with the narrative I ended up coming to, and the way it engages with the users. I really enjoy how it breaks the fourth wall and gives the user the sense that they are an integral part of the story that has an impact on what happens. If I had a cycle 4,5,6, etc, I would love to push this further and give the user even more sense of choice and decision-making.
Finally, by the end of this project I felt like I had a really good handle on Isadora and figuring out new things to accomplish with it. Although I probably won’t be using Isadora much in the future, I can totally see this way of thinking benefiting me when using other coding languages!! I may even go and try to teach myself java 🙂
Observations/Takeaways
I feel like there are a lot of ‘observations’ sprinkled throughout this article, but I’ll try to sum some up here!
- Even though Isadora isn’t necessarily built for my field, it serves as a great learning tool that helped me realize some of the creative powers of coding!
- Planning is KEY, and I need to work on it (take advantage of Miro!)
- Reflecting is also key to learning, so I’m glad I’m doing this 🙂
- Pick something and run with it! Just because you make a decision now doesn’t mean you can’t change things later down the road
- Engaging multiple senses (even just adding sound) adds SO MUCH to an experience
- Giving users a sense of choice makes them more engaged
- You have to give users a REASON to do something (which is why having a narrative is key)
- Coding (even visually) is a design in itself. It is so satisfying and exciting when you get something to work! I love the thinking and logic that goes into it, and I want to keep on doing it!
- I really enjoy finding creative ways to engage users!
- I really enjoy the problem-solving process of making interactions intuitive to users
Cycle 1 Documentation (Maria)
Posted: March 29, 2021 Filed under: Maria B, Uncategorized Leave a comment »For this cycle, I wanted to explore interaction design with the LEAP motion. I made two little ‘puzzles’ in Isadora in which the user would have to complete certain actions to get to the next step. I thought a lot about the users experience–providing user feedback in response to actions and making the movements intuitive. The first one was simply pressing a button by moving your hand downwards.
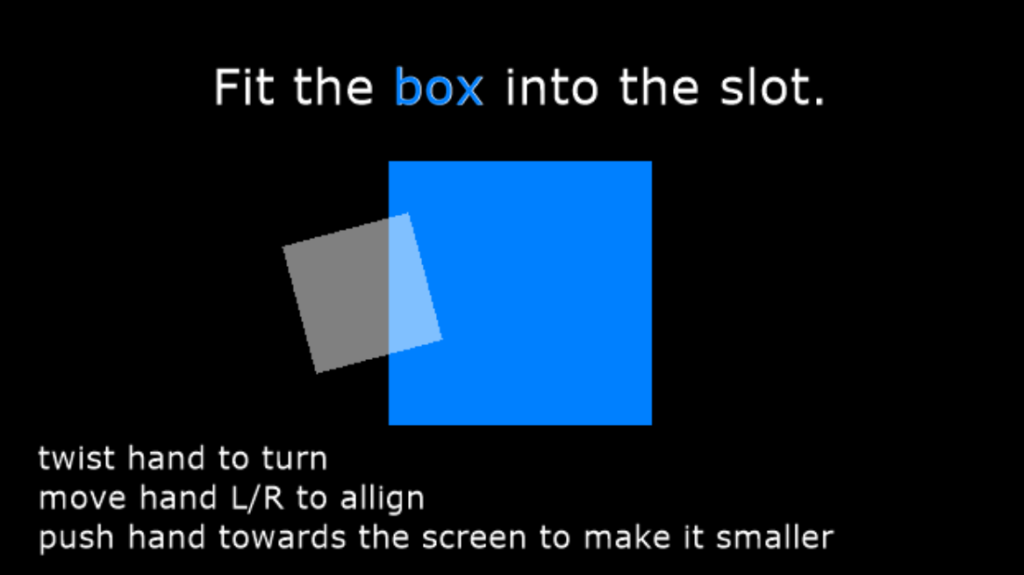
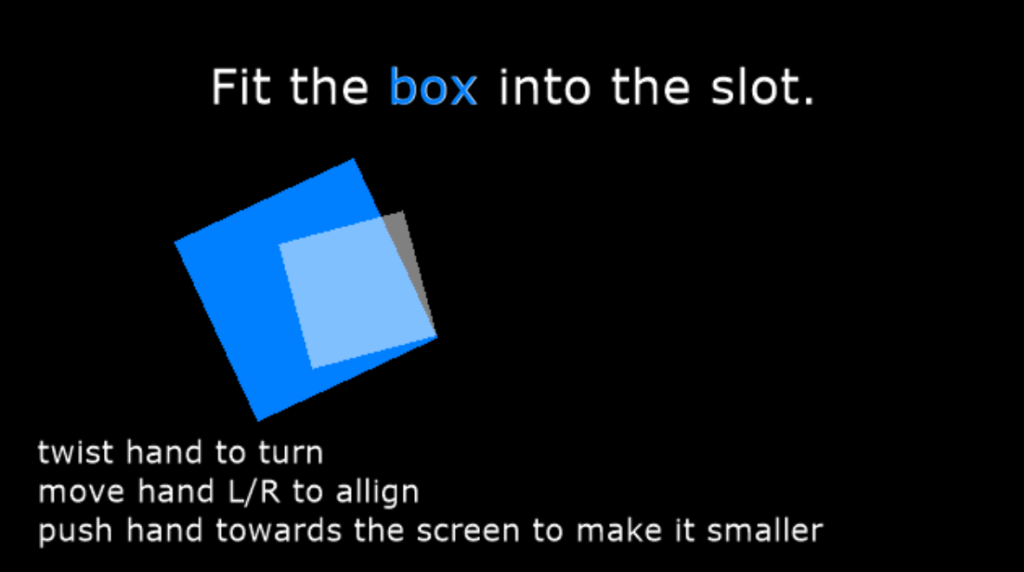
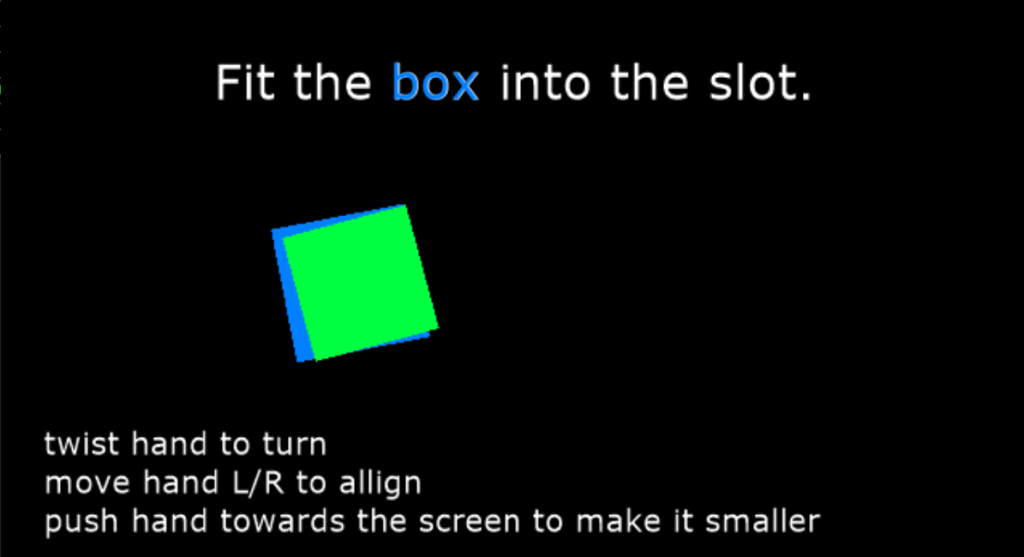
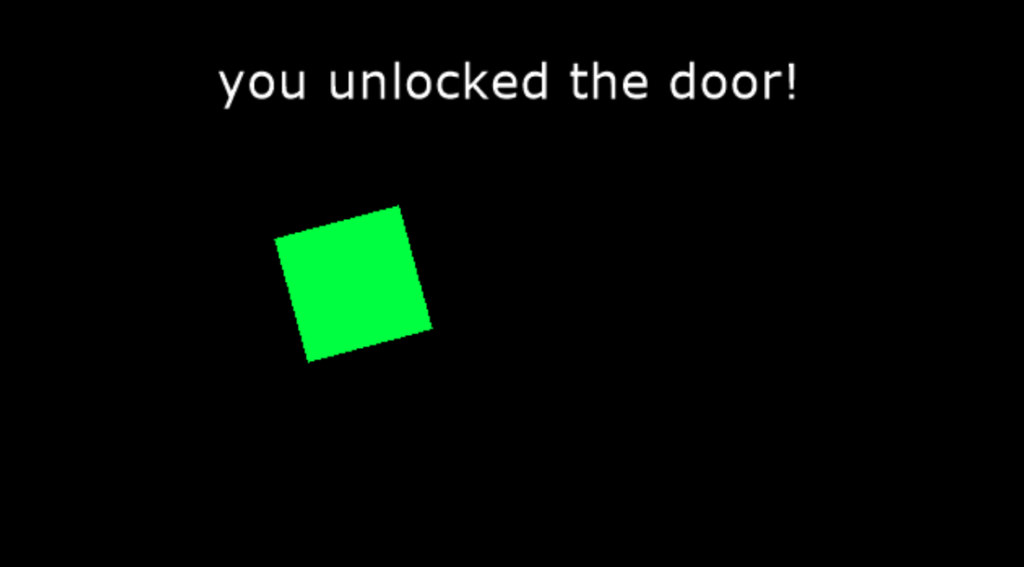
The second puzzle was aligning a shape into a hole based on the movement of the users hands.
For the next cycle, the goal is to create more of a story that guides/gives purpose to these puzzles.
Pressure Project 3 (Maria)
Posted: March 12, 2021 Filed under: Maria B, Pressure Project 3, Uncategorized Leave a comment »I approached this project wanted to tell a fictional, widely recognized narrative that I knew well. So I chose to tell the story of The Lion King. My initial plan for this pressure project ended up being a lot more than I could chew in the allotted 9 hours. I wanted to bring in MIDI files that told the story through sound, and map out different notes to coordinate with the motion and color of visuals on the screen (kind of like what was demonstrated in the Isadora MIDI Madness boot-camp video). After finding MIDI versions of the Lion King songs and playing around with how to get multiple channels/instruments playing at once in Isadora, I realized that trying to map all (or even some) of these notes would be WAY too big of a task for this assignment.
At this point, I didn’t have too much time left, so I decided to take the most simple, straightforward approach. Having figured out the main moments I felt necessary to include to communicate the story, I went on YouTube and grabbed audio clips from each of those scenes. I had a lot of fun doing this because the music in this movie is so beautiful and fills me with so many memories 🙂
- Childhood
- Circle of Life
- Just can’t wait to be King
- “I laugh in the face of danger”
- Stampede
- Scene score music
- “Long live the king”
- “Run, run away and never return”
- Timone and Pumbaa
- First meet
- Hakuna Matata
- Coming Back to Pride Rock
- Nala and Simba Reunite
- Can You Feel the Love Tonight
- “simba you have to come back” “sorry no can do”
- Rafiki/omniscient Mufasa “Remember who you are”
- Simba decides to go back
- The Battle
- Score music of sad pride lands/beginning of fight
- “I killed Mufasa”
- Scar dies
- Transition music as Pride Rock becomes sunny again -> Circle of Life
I took this as an opportunity to take advantage of scenes in Isadora and made a separate scene for each audio clip. The interface for choosing the correct starting and ending points in the clip was kind of difficult, it would definitely be easier to do in Audition but this was still a good learning experience.
I used MP3 files since they act as movie files, and the movie player actor has outputs while the sound player does not. I determined the correct starting position using the ‘position’ input (and sometimes using a ‘Time to Media Percent Actor’ if I already knew exactly where in the clip I wanted to start). I connected the position output to a comparator that triggered a Jump actor to go to the next scene when the position value (value 2) went above the value I inputted (value 1).
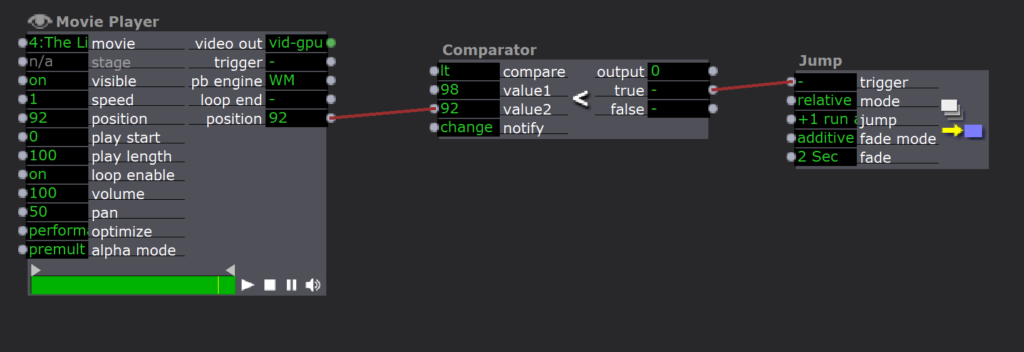
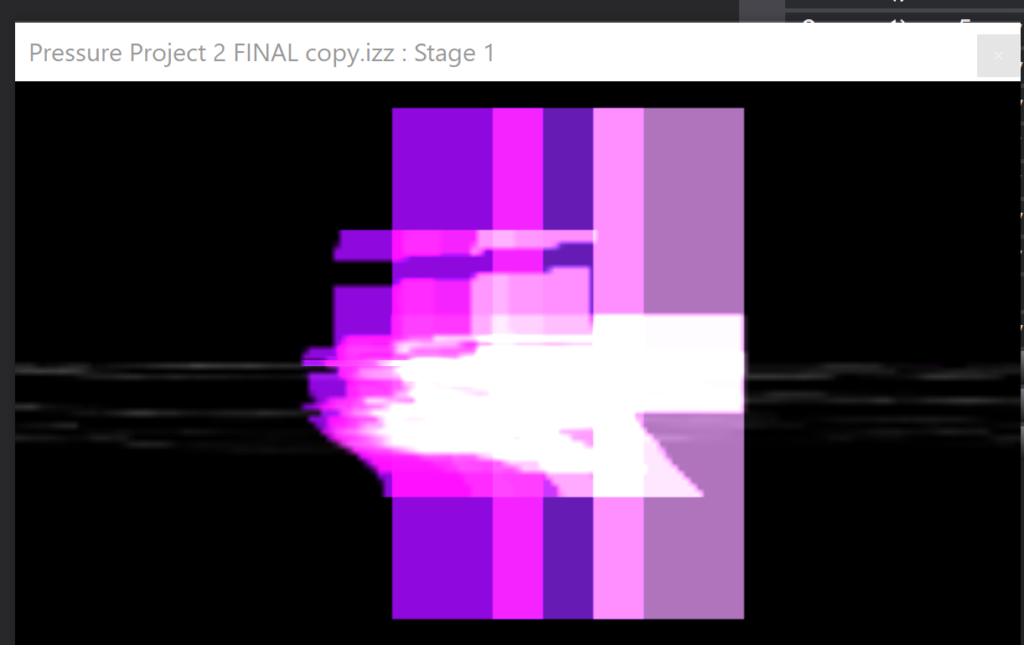
Here is the final result:
I wasn’t super proud of this at first because I didn’t feel like I took enough creative liberties with the assignment. However, when I shared it in class, it seemed to evoke an emotional response from almost everyone! It really demonstrated the power music has to bring up memories and emotions, especially when it is something so familiar. Additionally, it showed the power of a short music/audio clip to tell a story without any other context–even the people who weren’t super familiar with the movie were able to gain a general sense of the story arc.
Pressure Project 2 (Maria)
Posted: February 27, 2021 Filed under: Maria B, Pressure Project 2 Leave a comment »After playing around with making a ‘graphite piano’ with the Makey Makey in class, I realized how fun creating sound through unique interactions was and wanted to try it out with the Leap Motion! The basic idea was to create a piano whose notes could be played by moving your hand back and forth through the air and had accompanying visuals for each note.
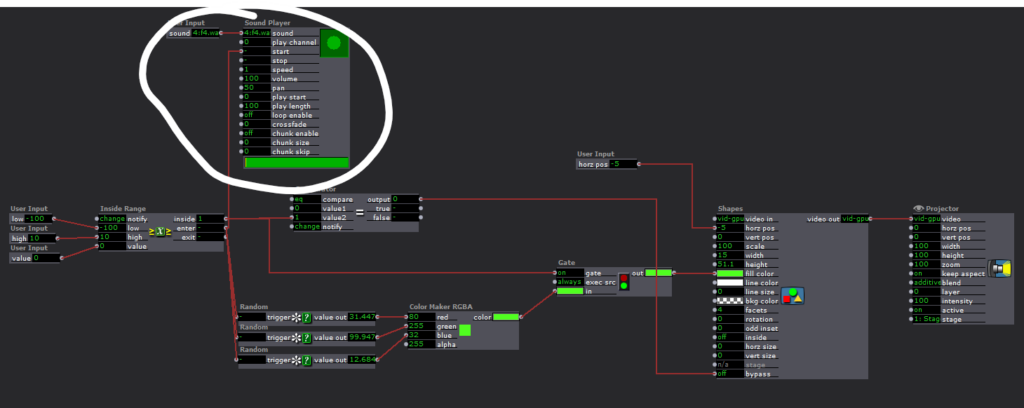
At first, I attempted to do a MIDI output from Isadora to play notes through a FL Studio plugin. I’ve never done anything with MIDI before so this was extremely confusing. I decided for the sake of time and usability on other people’s devices without additional software that it would be better to just import individual audio files. At first, I downloaded mp3 files but realized that Idadora interprets these as video files, and the functionality with video files is different than with audio files on Isadora. So I converted them to WAV files and Isadora was able to recognize them as sounds 🙂
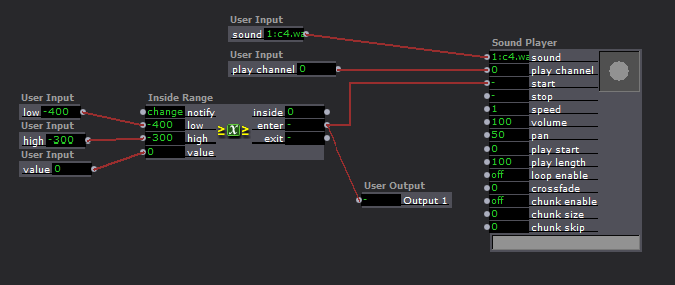
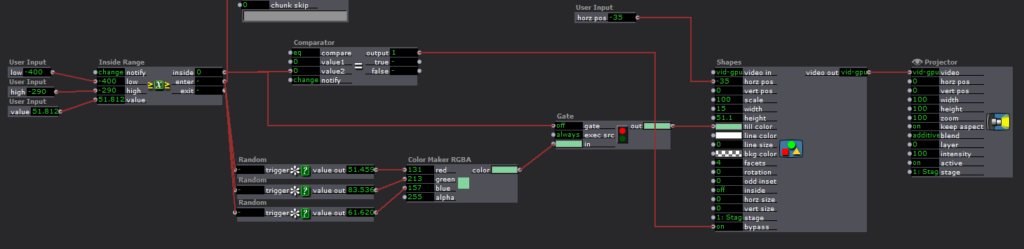
I started with programming the sounds to go with my movement with the intent to add in the visuals after. I made individual user actors for each note (see photos below) that trigger the note upon entering a certain number range. (Question: Is there a way to automate the entering of sequential numbers into a series of actors? For example if I wanted the range of the first actor to be 0-100, the next one 100-200 and so on, is there a way to do that without entering in all the values individually?)
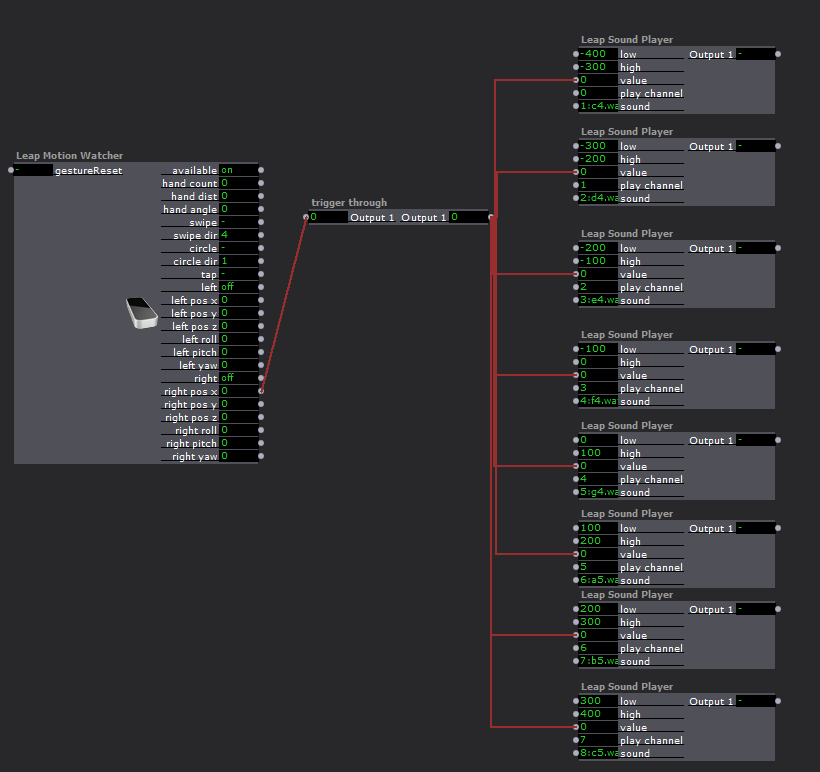
For whatever reason Isadora did not like what I was doing and decided to crash almost every time I tried to test it 🙁 I tried to change things around by adjusting the ranges to be wider (from 50 to 100) and tried putting the sounds on separate channels and not all on one. It didn’t change too much so I decided to build out the visuals separately so they could be played without the audio if I wasn’t able to get it to work during my presentation.
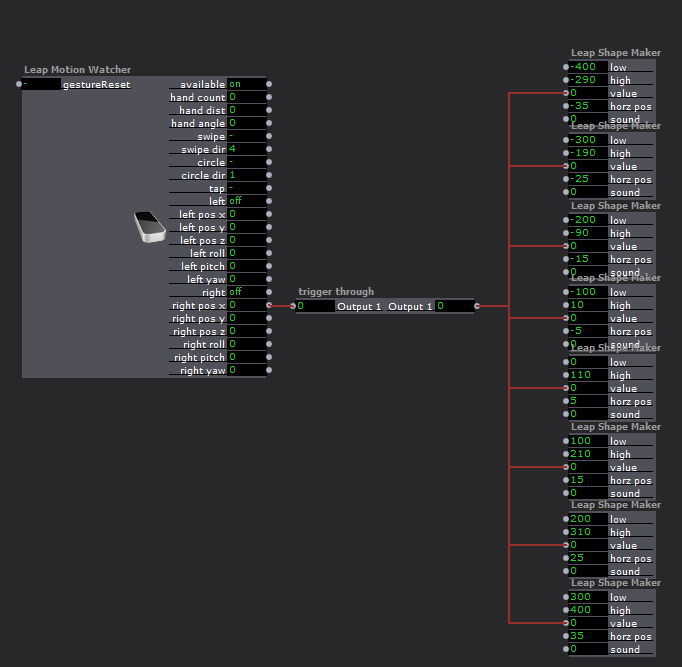
Similar to the sounds, I created a user actor with inputs I could use for the visual associated with each note. They were essentially randomly colored rectangles in a line that showed up when the right hand x pos was inside a specified range and dissapeared when it wasn’t. I had some fun figuring out how to finagle this using the comparator actor plugged into the bypass input of the shape. The output of the range actor was 1 when inside the range and 0 when outside the range, so connecting it straight to the bypass would make the bypass turn ON (turning the shape off) when I was inside the range, and I needed the opposite. I was able to set the comparator to send the ON, or 1, signal to the bypass (turning the shape off) when the output from the range actor was equal to zero!
I also set it so the color would change every time the shape appeared by plugging random triggers (activated when the value exited the range) into the values of a color-maker, that connected to a gate that was opened when the value entered the range.
I then went back to experimenting with the sound to see if I could get it to work any better, and found that it didn’t freeze quite as much if I added the sound inside each shape actor.
To top off the visuals, I added a TT Gamma Actor and a TT Grid Warp Actor that were influenced by the Y position of the right hand. It gave it a cool techno feel that I realized probably would’ve aesthetically fit better with a different sounding instrument, but figured it wasn’t worth it at that point to go back and change everything.

When it came to the in-class critique, there were still a few issues with crashing and Alex suggested I tried copying the scenes over into a fresh file to see if it would help. I did, and it didn’t do much, so there must just be something about the way I set up my actors that Isadora doesn’t like :/
Overall, this project got me really excited about the potential of sound in interactive experiences and has got me thinking about how I can take it further in the cycle projects!!
Pressure Project 1 (Maria)
Posted: February 3, 2021 Filed under: Maria B, Pressure Project I Leave a comment »I used this first pressure project to get a better feel for the different actors in Isadora and how I could manipulate them to make weird and unique visual effects. It wasn’t inspired by anything in particular, but it was interesting to hear how different classmates interpreted its meaning and its stylistic resemblance to existing works.
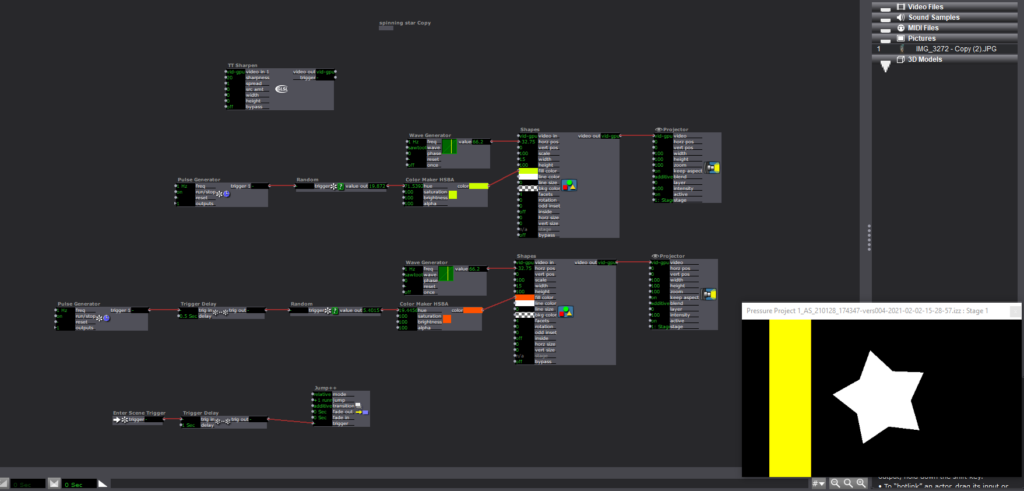
I started with a simple star shape and continued to riff off of it in subsequent scenes. I started by making it look like it was rolling by attaching a sawtooth wave generator to the star and adding rectangles moving by in the background.
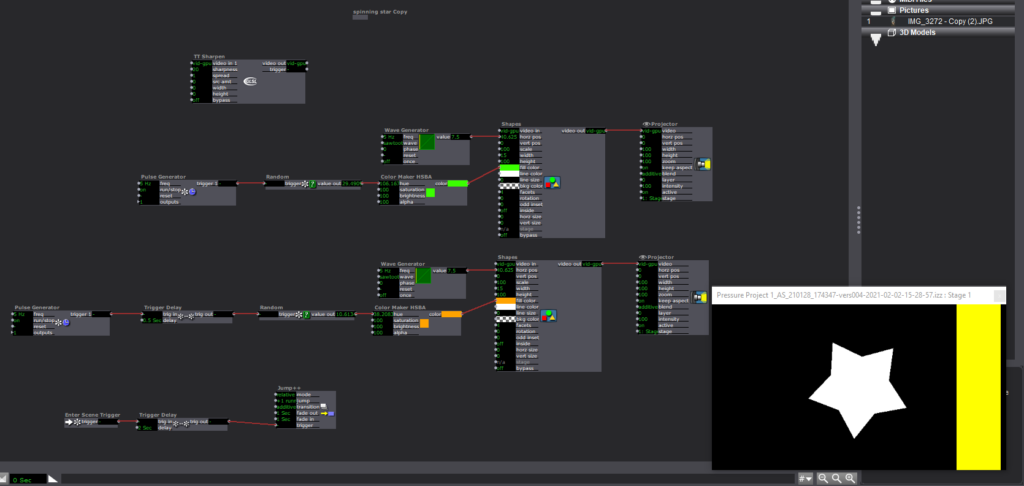
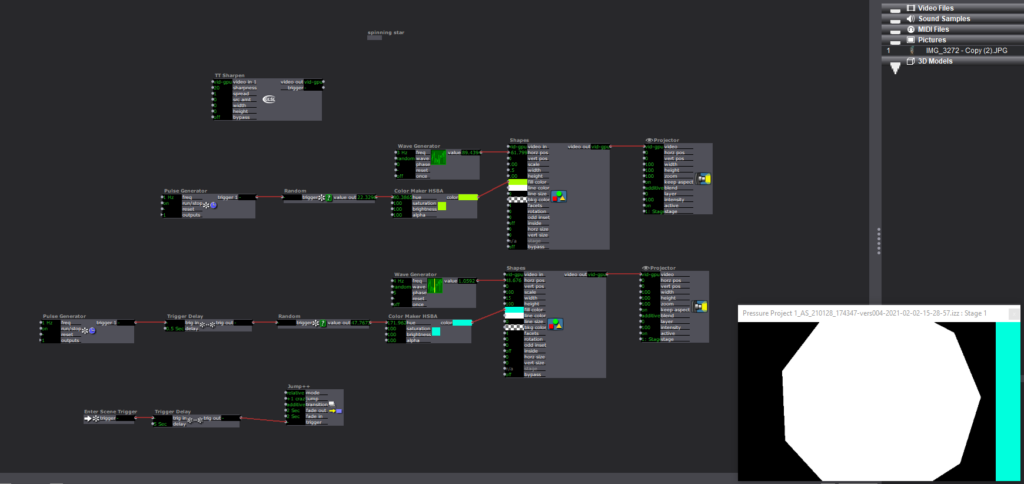
In the next scene the “plot” begins to escalate as the star moves faster and then, in the next scene, grows bigger and randomly changes # of facets (Pulse generator > random > facet input of shape actor).
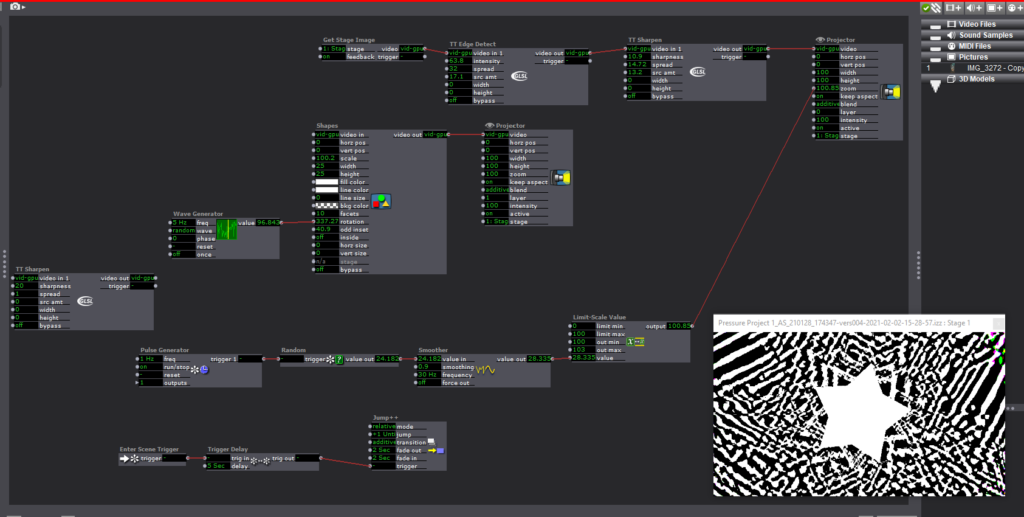
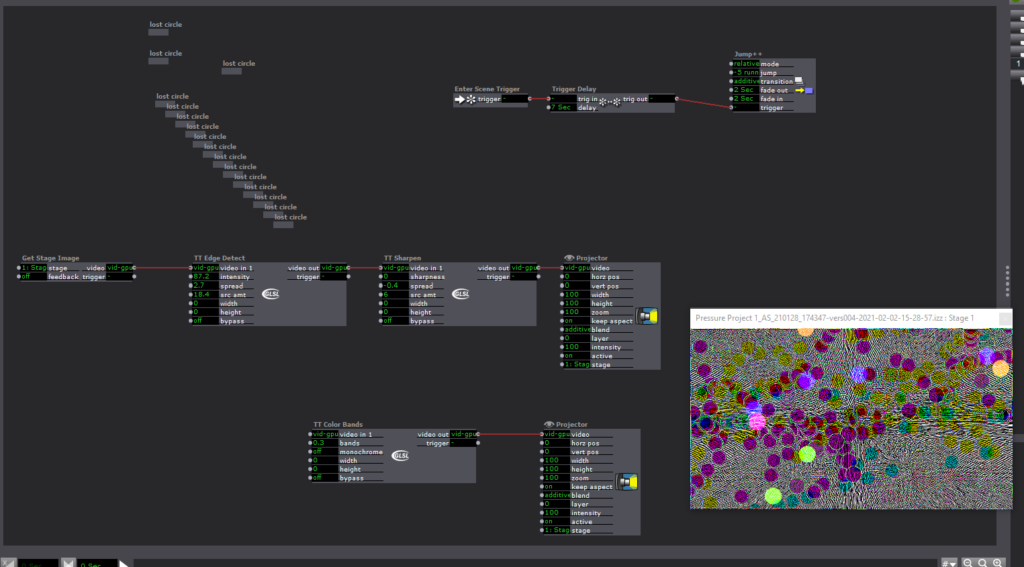
In the next scene, things start to get a little trippy. I experimented with both the TT edge detect and TT sharpen (not entirely sure what happens when these two are impacted by layering them, still need to play around with it more), and tried to find ways to make the visual effects more “random.” I’m sure there are a lot of ways to do this, but the best way I knew how was to mess with the zoom of the stage, which would then alter the stage image that the Get Stage Image actor was receiving. I used a pulse generator > Random > Smoother > Limit scale value > zoom input of Projector (this was a series of actors I found myself using a lot). A common issue I had with the smoother tool was limiting the scale of the output value without making the end result choppy. Typically I’m able to fix this issue by adjusting the min and max values within an actor input/output, but for some reason I was only able to get this one to work by using the limit scale value actor.
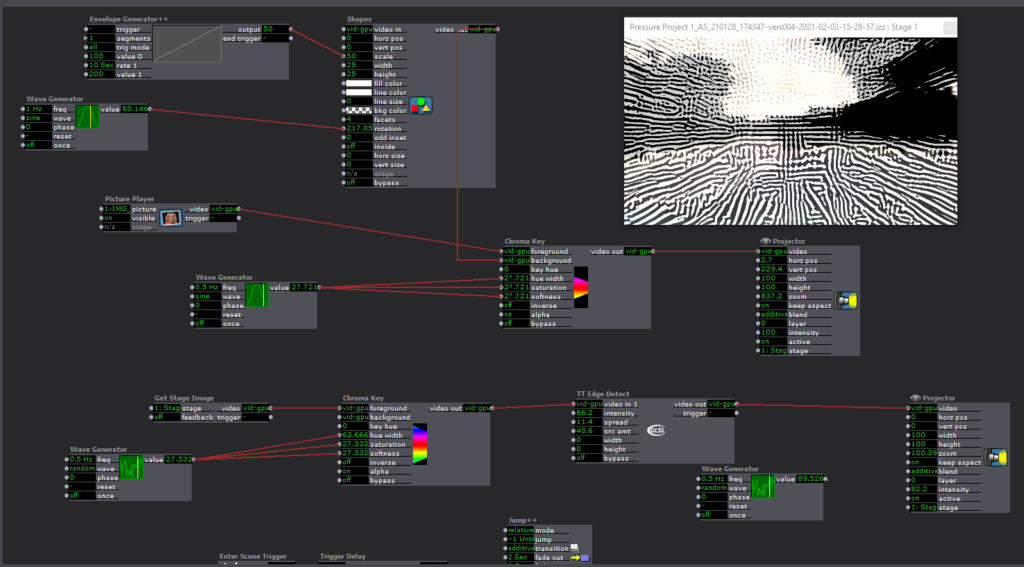
At this point, I ditched the star and starting messing around with adding cool effects to and manipulating a photo. I zoomed into a part of a picture with some interesting texture and color and experimented with using the chroma key and the TT edge detect and sharpen actors. The goal was to create an effect similar to the demo Alex did with the fractal photo, but I couldn’t really figure out/didn’t have the time to get there. One other thing I couldn’t figure out how to do was rotate the photo, which I thought might’ve had a cool effect on the TT Edge Detect and Sharpen Actors.

In this final scene, I wanted mess around with making a bunch of little shapes moving around the scene to see how much chaos I could create. I used a lot of the same actors and series of actors as in previous scenes, but it was interesting to see how different the final result turned out.
Looking Forward
I’m really looking forward to learning more about adding in interactivity via the motion and depth sensors we got in our kits for the class. I’m excited to see what doors it will open up for potential applications for this software and how I might be able to use it (or similar software) in the future.
I also want to improve the organization and labeling within scenes, because up to this point I’ve been doing things rather haphazardly and I don’t think things are going to go too well if I continue to do this in more complex projects.