Mollie Wolf Cycle 2: The WILDS – Dancing w/ Cody
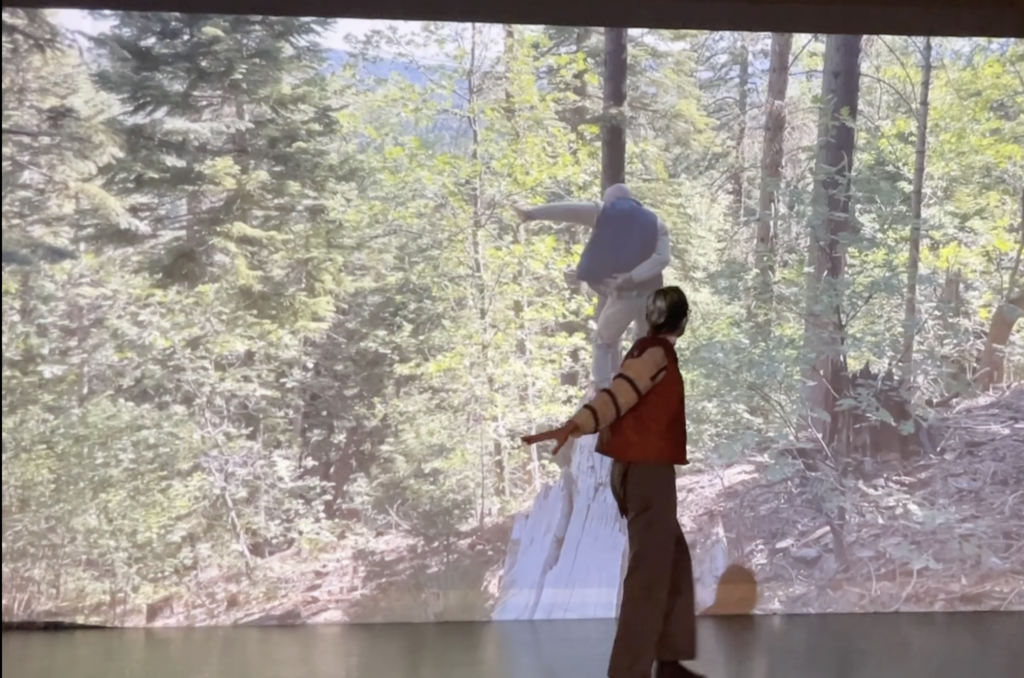
Posted: November 27, 2022 Filed under: Uncategorized | Tags: depth camera, Interactive Media, Isadora, kinect, mollie wolf Leave a comment »For Cycle 2, I began experimenting with another digital ecosystem for my thesis installation project. I began with a shot I have of one of my collaborators, Cody Brunelle-Potter dancing, gesturing, casting spells on the edge of a log over looking a mountain side. As they do so, I (holding the camera) am slowing walking toward them along the log. I was rewatching this footage recently with the idea of using a depth camera to play the footage forward or backward as you walk – allowing your body to mimic the perspective of the camera – moving toward Cody or away from them.
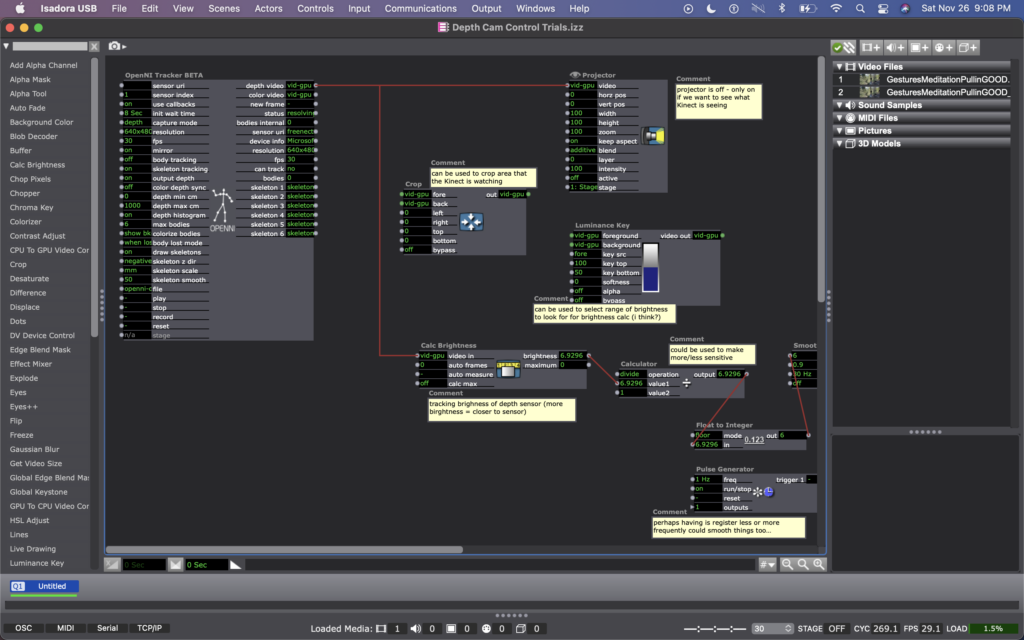
I wasn’t exactly sure how to make this happen, but the first idea I came up with was to make an Isadora patch that recorded how far someone was from an Xbox Kinect at moments in time regularly, and was always comparing the their current location to where they were a moment ago. Then, whether the difference between those two numbers was positive or negative would tell the video whether to play forward or backward.
I explained this idea to Alex; he agreed it was a decent one and helped me figure out which actors to use to do such a thing. We began with the OpenNI Tracker, which has many potential ways to track data using the Kinect. We turned many of the trackers off, because I wasn’t interested in creating any rules in regards to what the people were doing, just where they were in space. The Kinect sends data by bouncing a laser of objects, depending on how bright the is when it bounces back tells the camera whether the object is close (bright), or far (dim). So the video data that comes from the Kinect is grey scale, based on this brightness (closer is to white, as far is to black). To get a number from this data, we used a Calc Brightness actor, which tracks a steadily changing value corresponding to the brightness of the video. Then we used Pulse Generator and Trigger Value actors to frequently record this number. Finally, we used two Comparator actors: one that checked if the number from the Pulse Generator was less than the current brightness from the Calc Brightness actor, and one that did the opposite, if it was greater than. These Comparators each triggered Tigger Value actors that would trigger the speed of the Movie Player playing the footage of Cody to be -1 or 1 (meaning that it would play forward at normal speed or backwards at normal speed).
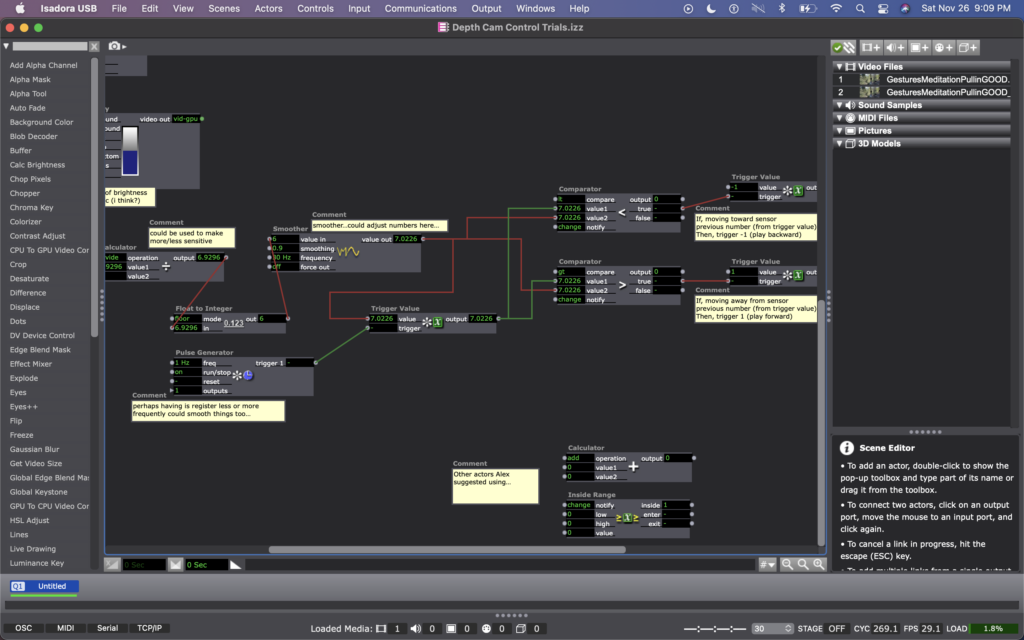
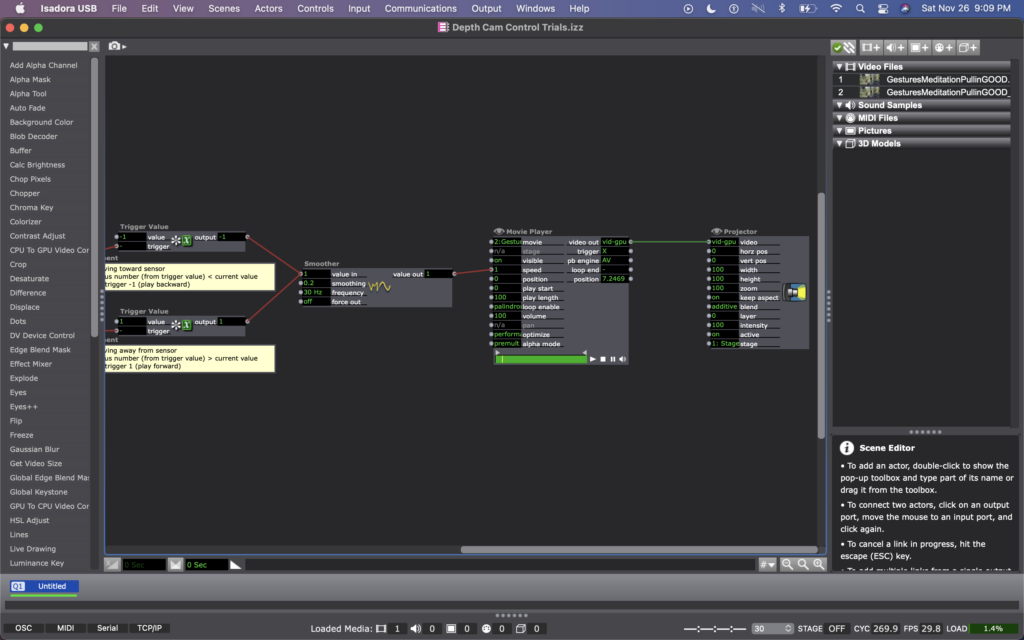
Once this basic structure was set up, quite a bit of fine tuning was needed. Many of the other actors you see in these photos were used to experiment with fine tuning. Some of them are connect and some of them are not. Some of them are even connected but not currently doing anything to manipulate the data (the Calculator, for example). At the moment, I cam using the Float to Integer actor to make whole numbers out of the brightness number (as opposed to one with 4 decimal points). This makes the system less sensitive (which was a goal because initially the video would jump between forward and backward when a person what just standing still, breathing). Additionally I am using a Smoother in two locations, one before the data reaches the Trigger Value and Comparator actors, and one before the data reaches the Movie Player. In both cases, the Smoother creates a gradual increase or decrease of value between numbers rather than jumping between them. The first helps the sensed brightness data change steadily (or smoothly, if you will); and the second helps the video slow to a stop and then speed up to a reverse, rather than jumping to reverse, which felt glitchy originally. As I move this into Urban Arts Space, where I will ultimately be presenting this installation, I will need to fine tune quite a bit more, hence why I have left the other actors around as additional things to try.
Once things were fine tuned and functioning relatively well, I had some play time with it. I noticed that I almost instantly had the impulse to dance with Cody, mimicking their movements. I also knew that depth was what the camera was registering, so I played a lot with moving forward and backward at varying times and speeds. After reflecting over my physical experimentation, I realized I was learning how to interact with the system. I noticed that I intuitively changed my speed and length of step to be one that the system more readily registered, so that I could more fluidly feel a responsiveness between myself and the footage. I wondered whether my experience would be common, or if I as a dancer have particular practice noticing how other bodies are responding to my movement and subtly adapting what I’m doing in response to them…
When I shared the system with my classmates, I rolled out a rectangular piece of astro turf in the center of the Kinect’s focus (and almost like a carpet runway pointing toward the projected footage of Cody). I asked them to remove their shoes and to take turns, one at a time. I noticed that collectively over time they also began to learn/adapt to the system. For them, it wasn’t just their individual learning, but their collective learning because they were watching each other. Some of them tried to game-ify it, almost as thought it was a puzzle with an objective (often thinking it was more complicated than it was). Others (mostly the dancers) had the inclination to dance with Cody, as I had. Even though I watched their bodies learned the system, none of them ever quite felt like they ‘figured it out.’ Some seemed unsettled by this and others not so much. My goal is for people to experience a sense of play and responsiveness between them and their surroundings, less that it’s a game with rules to figure out.
Almost everyone said that they enjoyed standing on the astro turf—that the sensation brought them into their bodies, and that there was some pleasure in the feeling of stepping/walking on the surface. Along these lines, Katie suggested a diffuser with pine oil to further extend the embodied experience (something I am planning to do in multiple of the digital ecosystems through out the installation). I’m hoping that prompting people into their sensorial experience will help them enter the space with a sense of play, rather than needing to ‘figure it out.’
I am picturing this specific digital ecosystem happening in a small hallway or corner in Urban Arts Space, because I would rather this feel like an intimate experience with the digital ecosystem as opposed to a public performance with others watching. As an experiment with this hallway idea, I experimented with the zoom of the projector, making the image smaller or larger as my classmates played with the system. Right away, my classmates and I noticed that we much preferred the full, size of the projector (which is MUCH wider than a hallway). So now I have my next predicament – how to have the image large enough to feel immersive in a narrow hallway (meaning it will need to wrap on multiple walls).
Cycle 2: Puzzlr Progress
Posted: November 25, 2022 Filed under: Uncategorized Leave a comment »Introduction
Not too much has changed in the actual design of my project since the Cycle 1 check-in. I’m still working with a unique and fun way to create physical input methods that match a digital experience. My overall goal is applying the knowledge I gain from this project to my final thesis. So far there have been a few hiccups and issues, but I’m incredibly happy with the progress I’ve made and I look forward to finishing the project soon.

Progress Update
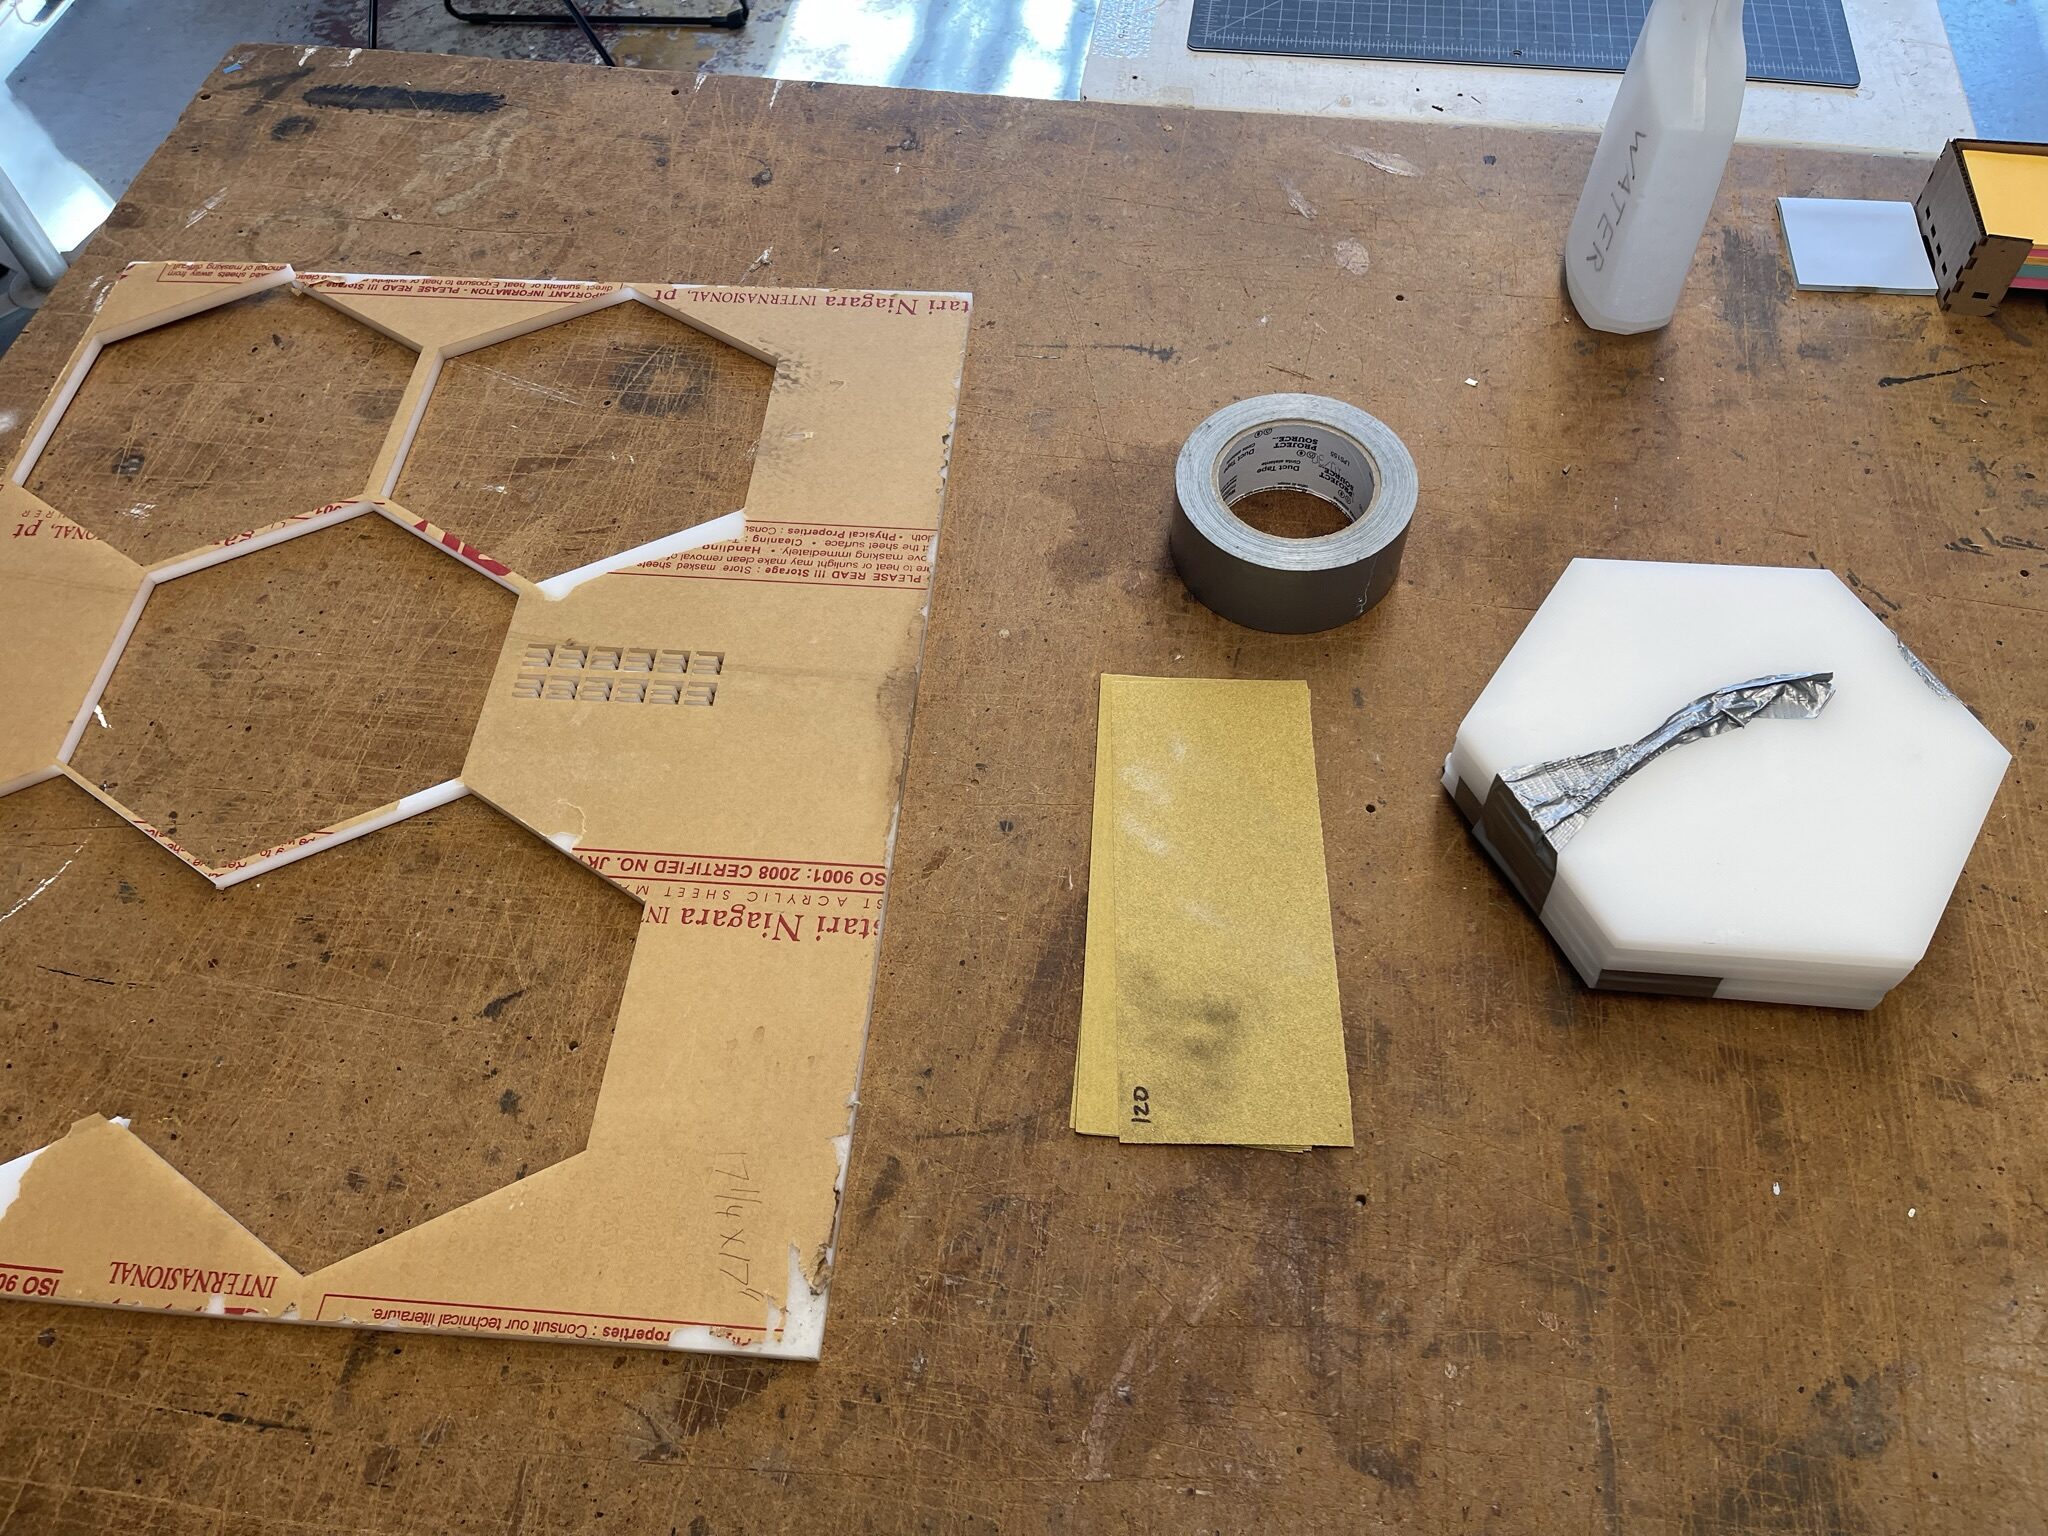
Most of the photos that will be in this Cycle 2 post will be work-in-progress shots of me laser cutting the final pieces, sanding them, and building up the puzzle system and circuits. The last few weeks have mostly been spent refining and building my puzzle board, as well as experimenting with some simple Isadora elements.
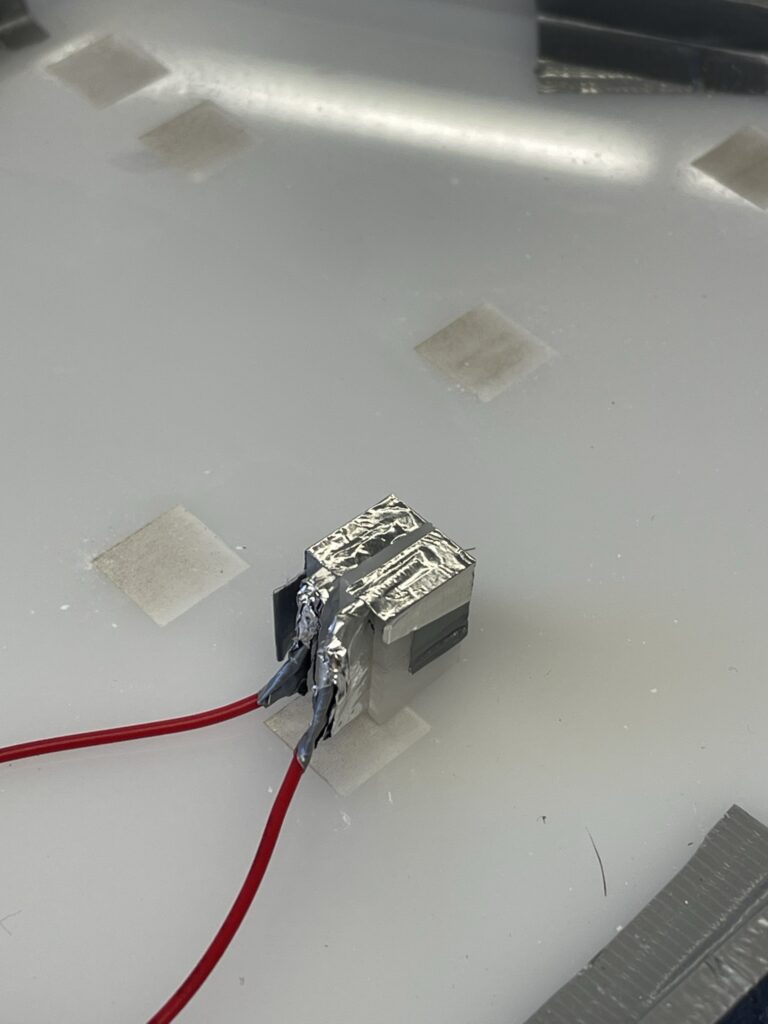
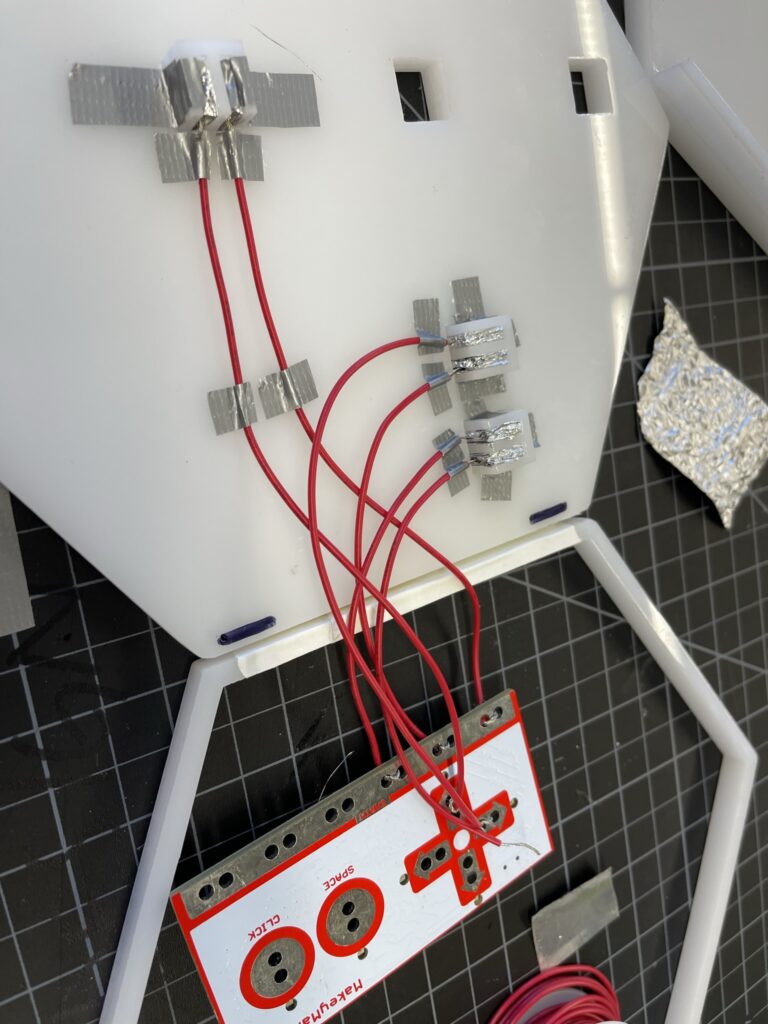
The final puzzle board was laser cut from white acrylic, and assembled using duct tape and super glue. The new board design came as a result of a lack of space on the first prototype; this version is much more stable, and includes a bottom space for circuits, a mid plate where the puzzle pieces sit, and then a border to help keep the puzzle pieces in. I also created a simple circuit system where the two wires meet under the contact point, but are separated by a plug-like shaft. Each side extends up into the board and splits into two contact points, the puzzle pieces themselves have metal foil underneath which complete the circuit when placed correctly.
Next Steps
As the project nears it’s end, I’m currently refining the circuit setup and improving the connection quality. I’m planning on including a simple visual component that will provide progress feedback to the player. Since that is an important part of my investigation into hand-eye coordination, I will be prioritizing the Isadora interface to get at least some feedback from that area of focus.
cycle 2 -simultaneous seeing : the digital self is real
Posted: November 22, 2022 Filed under: Uncategorized Leave a comment »Cycle 2 Documentation
11.22.2022
Katie O’Loughlin
For cycle two, I worked on creating a malleable environment that was affected by the choices people made within the space. I continued to play with feedback loops, although they weren’t the main focus anymore because of the variety of other choices that could be made. I also continued to think about the impact and effect of seeing and being seen, of framing a body other than your own, and of experiencing the digital image of your body as something less familiar, although not necessarily less real.
In the space, there were three cameras all attached to live feed video being projected in the space. One camera was being projected onto the large flat scrim via a capture card, one was being projected onto the large, curved scrim via NDI watcher, and one was hidden behind the curtains and projecting directly through a pico projector onto a small box. I implemented the pico projector in the corner of the space to play with scale. Where it was located, it would hide the person from the rest of the play space, giving a break from what could be chaotic experimentation.
The main area was carved into a circular-ish space with two curtains pulled around the curved track. The back scrim and one of the circle scrims had the two different live feeds playing on them. People were allowed to pick up both cameras and choose how to frame the room and the people in it. In the middle of the space there was a table with a magnifying glass, some shiny emergency blankets, and some plastic Fresnel lenses that warped and focused objects/people as you looked through them. These items were objects for the participants to play with to filter the images on the screens and change how they were viewing the space.
This cycle definitely didn’t have an end goal – there was nothing I was secretly trying to get the participants to realize. My research is invested in shifting perspective and understanding how perception affects experience. I am curious about how humans can be many things at once, including perceived as many things at once. I find myself invested in discovering how to hold multiple truths at once. As I watched the participants maneuver through the space, filter the images, and choose different framings, I was really interested in seeing the similarities and differences between the image on the screen, and the person I was seeing right in front of me. All of this work is really making me consider how integrated our digital lives are in society right now, and how we have a lot of agency in how we present ourselves, and others, to the world on digital platforms.
How does how we frame ourselves and our world affect other’s perceptions as they look into our world? What does real and fake mean in this day and age? If our digital selves are a representation of our identity, what is the impact on our own perception of self? How much choice do we get in how other people see us, or experience us? How carefully are we holding the idea that how we perceive someone else changes our reality of them, which in turn may change theirs as well?
I like giving participants agency in this work, to make choices and hold their own responsibility. As I do work with the digital body, I continue to be aware of the power structures, hierarchies, and delicate spaces that arise easily within this topic. One of the aspects of this cycle that I found really enjoyable was to see how all the participants interacted with each other much more than cycle one, and how I got to see the interconnectedness between choices and how that impacted the space as a whole.
Cycle 2 documentation
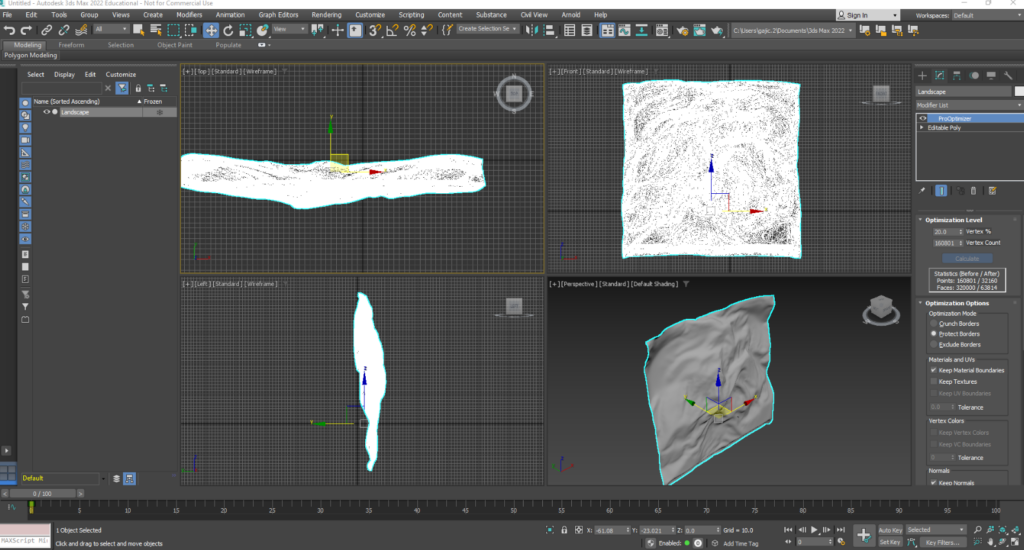
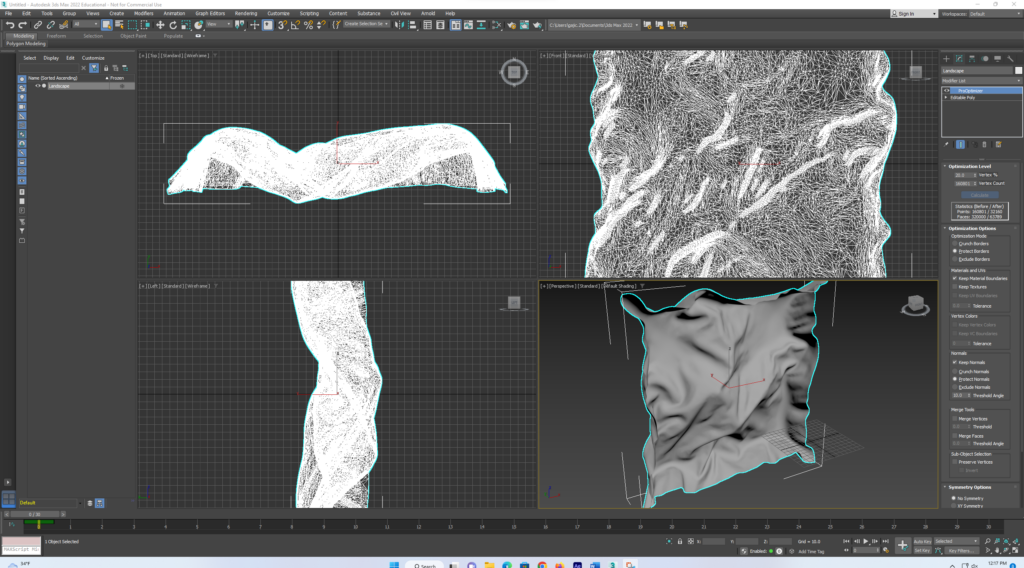
Posted: November 22, 2022 Filed under: Uncategorized Leave a comment »Since Cycle 1, I used Cinema 4D to create the final 3D cloth models I’m going to use for the installation, setting up Kinect and Isadora working in the Motion Lab, experimenting with projection spots, learning how to project in the first place, and I’ve also been modifying the Isadora patch based on the Motion Lab environment. One of the main changes I made is to have 4 separate scenes every minute at least. A big part of this process was optimizing the models in 3DS Max since the program has a maximum number of polygon faces that can be exported and my original models were much bigger than that:
At the time of the Cycle 2 presentation, my visuals were still in progress since I am learning how to make materials in 3DS Max which is the program I have to use because that’s the only format Isadora supports. But my vision for all the materials is to be non-shiny, like the first two scenes
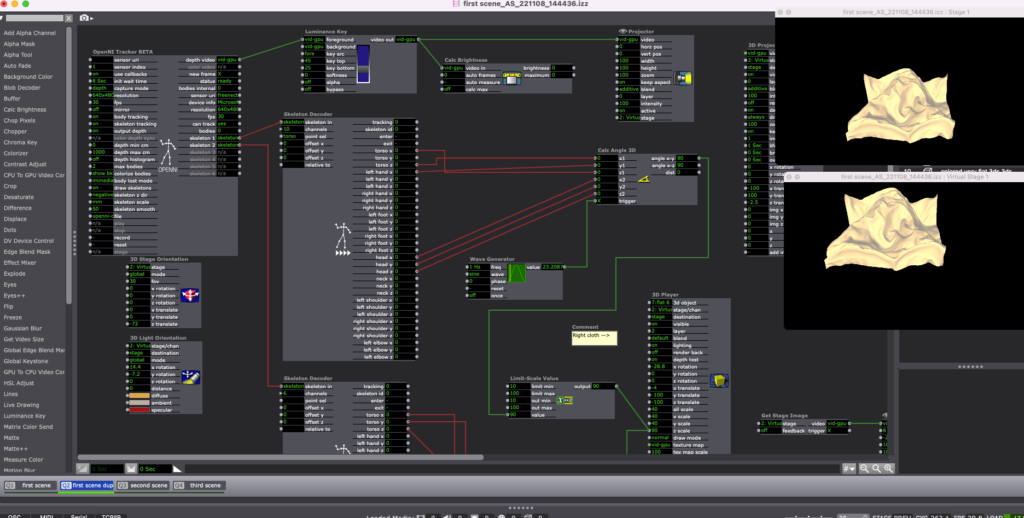
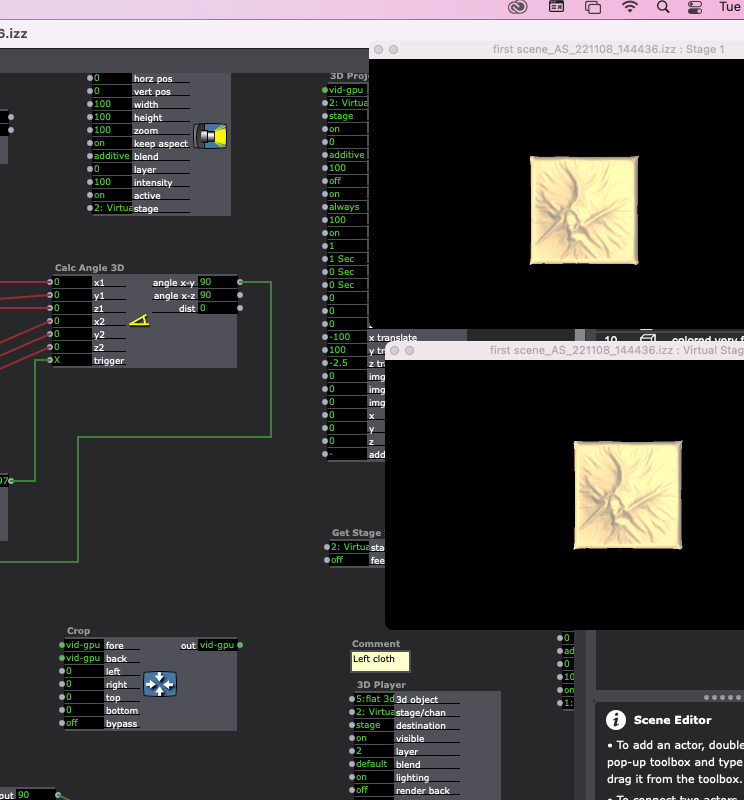
…which was also the feedback I got from the critique – scene number 2 was the most visually pleasing one, and I have to figure out how to edit the shiny materials on the other objects (scenes 3 and 4) this week.
During Cycle 2 I decided I want the projection to be on the main curtain at the front of the Motion Lab and I liked the scale of the projected models, but I need to remove the Kinect-colored skeletons from the background and have the background just be black.
The feedback from the critique also included experimenting further with introducing some more forms of movement to the cloth which I already tried but it was kind of laggy and patchy so I think once I learn how to control the skeleton numbers and output better I could use this to also expand the ways in which I can make the models move, and then I’ll experiment with having them move a little on the projection horizontally and vertically instead of just scaling along the Z-axis.

Next steps:
My main next step is to keep working on modifying the Isadora patch since it is really confusing to figure out which numbers are best to use based on the skeleton tracking outputs, I’m thinking I might switch back to using brightness/darkness inputs for some scenes since I liked how much more sensitive the cloth models were when I was using that. But I will first experiment with utilizing the skeleton data more efficiently. I am also going to polish the layout and materials of the 3rd and 4th scenes, and I think I’m happy with how the first and second scenes are looking, they just need some interaction refining. On Tuesday I am also going to work on setting up the Kinect to be much further from the computer, in front of the participants.
I am also going to render some animations I have of these same cloth models and try importing them into the Isadora patch in addition to the interactive models to see how that combination looks in the projections.
Cycle 2 – Perspective drawing tool
Posted: November 22, 2022 Filed under: Uncategorized Leave a comment »I decided to move from the small handheld book form to the motion lab for my next cycle. I have been working with my own students in the motion lab. I decided to explore the possibility of designing tools for teaching drawing that involve observation, collaboration, and movement in the process. My initial plan involved using 2-point perspective as a starting point. Typically teaching 2-point perspective is a guided drawing kind of process, step-by-step. It is most often experienced using a pencil and a ruler. A teacher guides students through steps for drawing a horizon line, two points, and then proceeds to demonstrate how to draw a simple dimensional cube, often using a document camera to project a larger live capture image of the teacher’s actions. Once students understand the basic process, they are set free to create on their own.
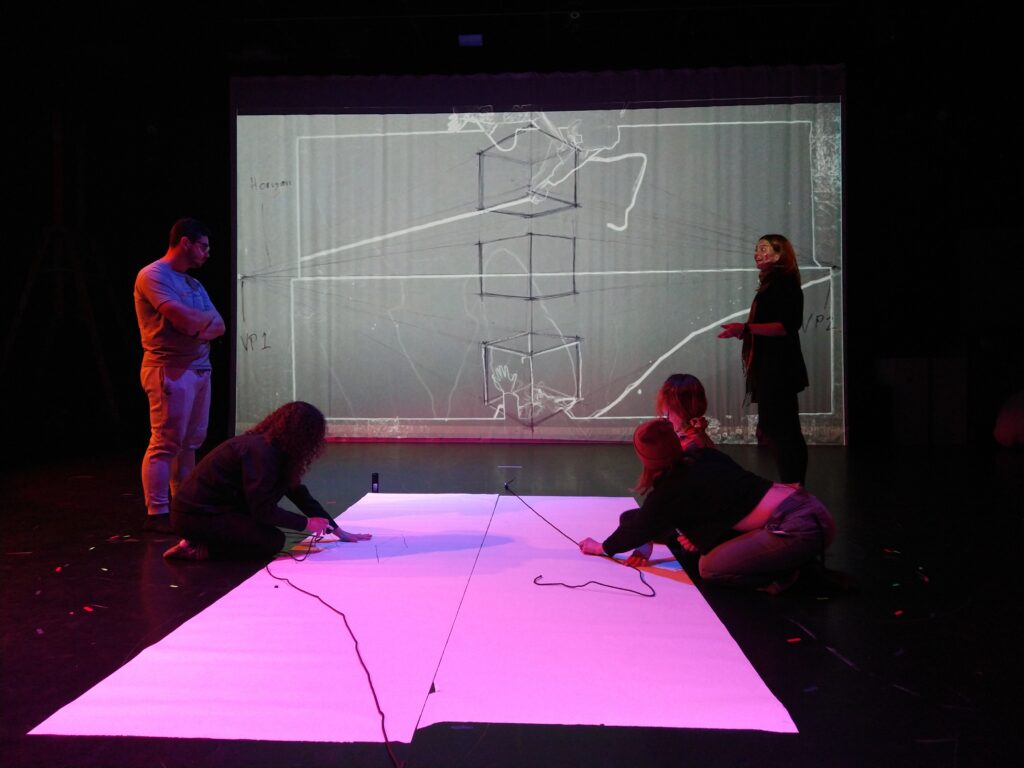
I scaled this process up and envisioned the motion lab as a large format document camera. I set up a drawing space in the center of the space, directly under a birds-eye-view camera. In the image below you can see that I projected the live feed image on the main projection screen and applied a TT edge detect filter in Isadora. In the photo you can see students using the ropes that were each tied to one of the points on our horizon line that bisects the image.
The patch I created was fairly simple, see below:
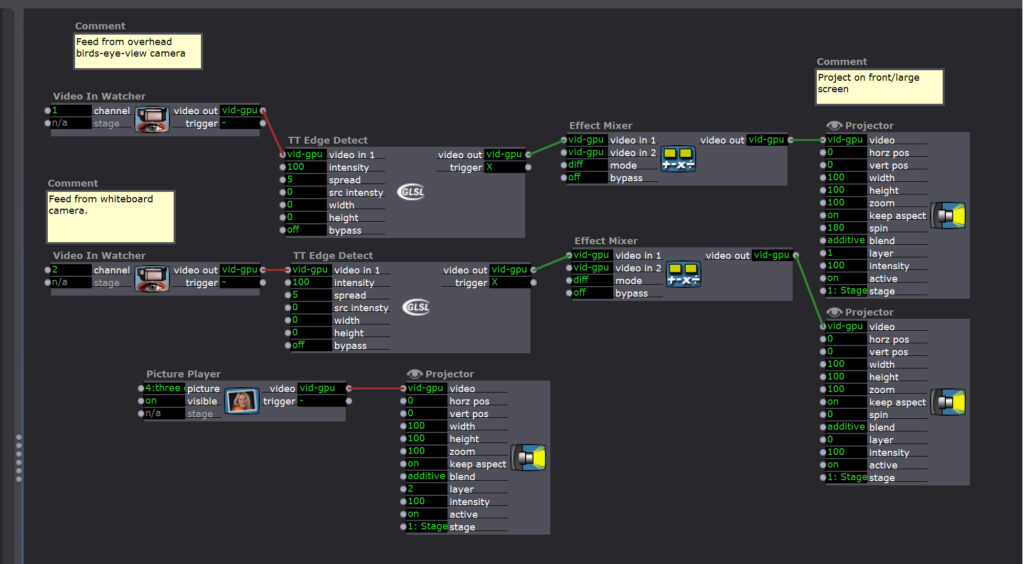
After the initial explorations with the one video in-watcher, I layered another feed from a camera on a tripod that was directed at a whiteboard. This is when participants began to play even more with what was happening on each screen and how they were interacting together in the projection.
For my final 3rd cycle, I want to continue to build on and play with this tool. My initial ideas about pushing it into another phase is to focus on observational drawing and the figure/body in motion. Maybe shifting the output 90 degrees so the drawers can face the large projection screen head on. Using two camera again, but one would be directed at a body moving in space and those drawing would try to capture the movement and gestures on the page. I also wanted to add in the live drawing tool and see how that adds another layer of complexity and interest to the projected image.
Cycle 1 – Ghosts in the Landscape – Mollie Wolf
Posted: November 2, 2022 Filed under: Uncategorized Leave a comment »For cycle 1, I decided to attempt an interactive portion of my installation. My initial idea was to use an Astra or Kinect, with a depth sensor to make the background invisible and layer live capture footage of audience members into a video of a landscape.
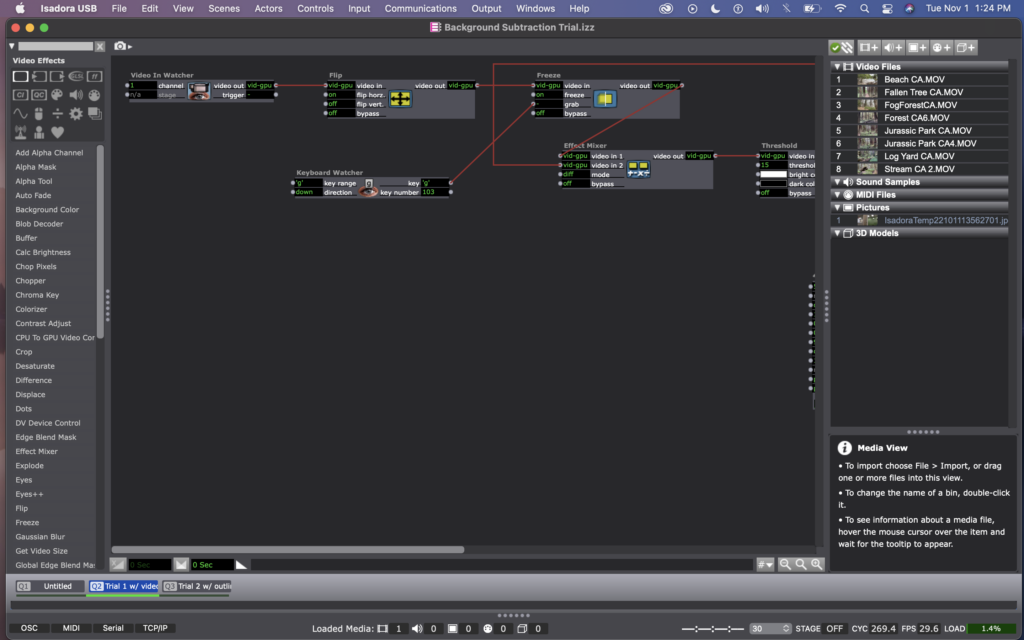
When I asked Alex for help in background subtraction, he suggested I use a webcam instead. We found an example patch that Mark had posted on Toikatronix for background subtraction, so I started there.
He essentially used an effects mixer with a threshold actor to read the data from a video in watcher, and identify when a person had entered the frame – by watching for a change in light, compared to a freeze frame grab of the same image. Then, he used an add alpha channel actor to mask anything that hadn’t changed (i.e. the background).
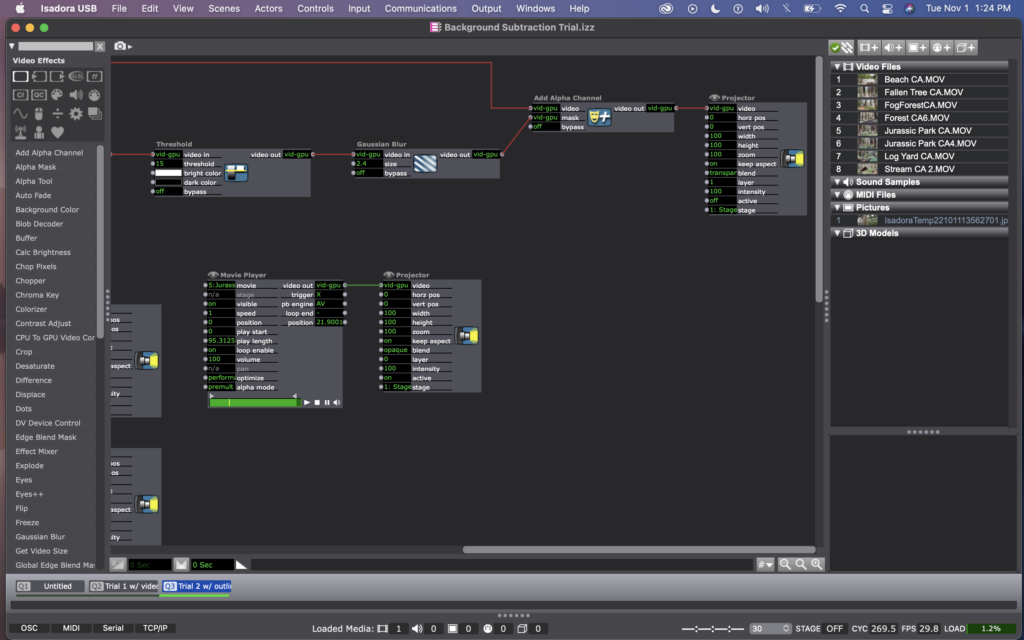
Here are photos of my version of Mark’s background subtraction patch.
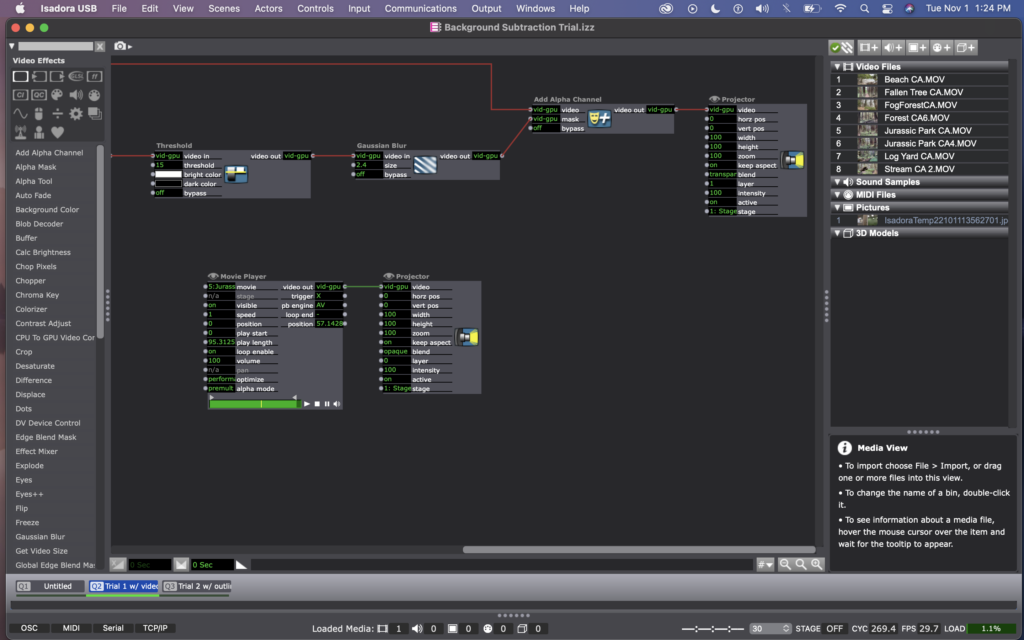
When I was first using this patch, it was a little finicky – sometimes only showing portions of the body, or flickering images of the background, or showing splotchy images. I noticed that it had a hard time with light colors (if the person was wearing white, as well as if their skin was reflecting the light in the room). I tried to fix this by adjusting the threshold number and by adding a gaussian blur to the image, but it still was more finicky than I’d like.
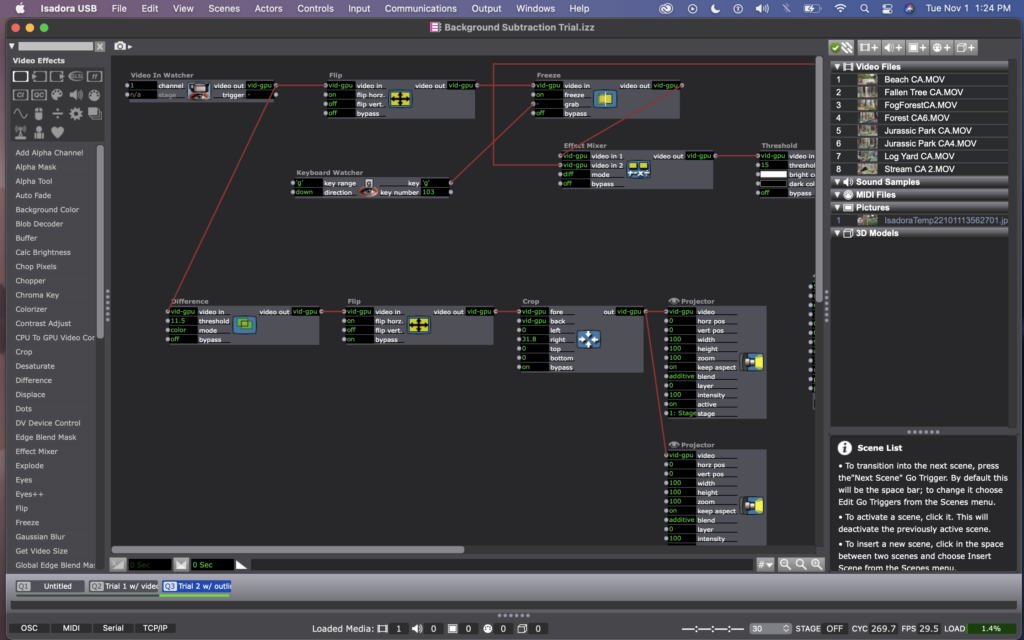
When I brought this issue up to Alex, he suggested that I could use a difference actor instead to do something similar. However, with the difference actor, it is mostly recognizing the outline of bodies rather than picking up the whole image of a person. I decided that I actually liked this better, aesthetically anyway – it made for ghost-like images to be projected in to the landscape, rather than video images of the people.
Here are photos of my current patch, using a difference actor. (The top line with the flip, freeze, effect mixer, etc – is still there from the previous attempt, but the projector is not active, so you can ignore that).
I think this method worked way better because it was no longer dependent on light in the room, and instead just on motion. (Which is way better for me, considering that I’m practicing this all in the Motion Lab with black walls and floors, but will be presenting it in Urban Arts Space with white walls and concrete floors). Conceptually, I like this version more as well, as it is an abstraction of people’s bodies and action, rather than a direct representation of it.
As a last minute experimentation, I laid out some platforms in the space and roughly lined them up with where there were mounds/hills in the landscape – that way if someone stood on the platform, it would look like their corresponding ghost image had climbed up the hill.
When I presented this version to the class, I was pleased to see how playful everyone became. With it just being an outline of their bodies, they were not looking at an image of themselves, and so there didn’t seem to be any amount of self-consciousness that I would expect if everyone were looking in a mirror, for example. People seemed to have genuine delight in figuring out that they could move through the landscape.
One interesting thing about the difference actor, is that non-moving bodies blend into the background (with no motion, there is no difference, frame be frame). So when someone decides to sit or stand rather than moving around, their ghost image disappears. While this is an inevitable aspect of the difference actor, I kind of like the metaphor behind this – you have to actively, physically engage in order to take effect on your environment.
We spent some time with the camera in a few different locations (to the side or in front of people). As we were discussing together, we came to a consensus that it was more magical/interesting when the camera was to the side. It was a, less obvious in terms of how to move (i.e. not as easy as looking into a mirror), which added to the magic. And having the camera to the side also meant that the landscape image was not obscured from view by anything. People only knew where the camera was if they went searching for it.
Here is a video of my peers interacting with the patch/system.