Pressure Project 3
Posted: October 29, 2020 Filed under: Uncategorized Leave a comment »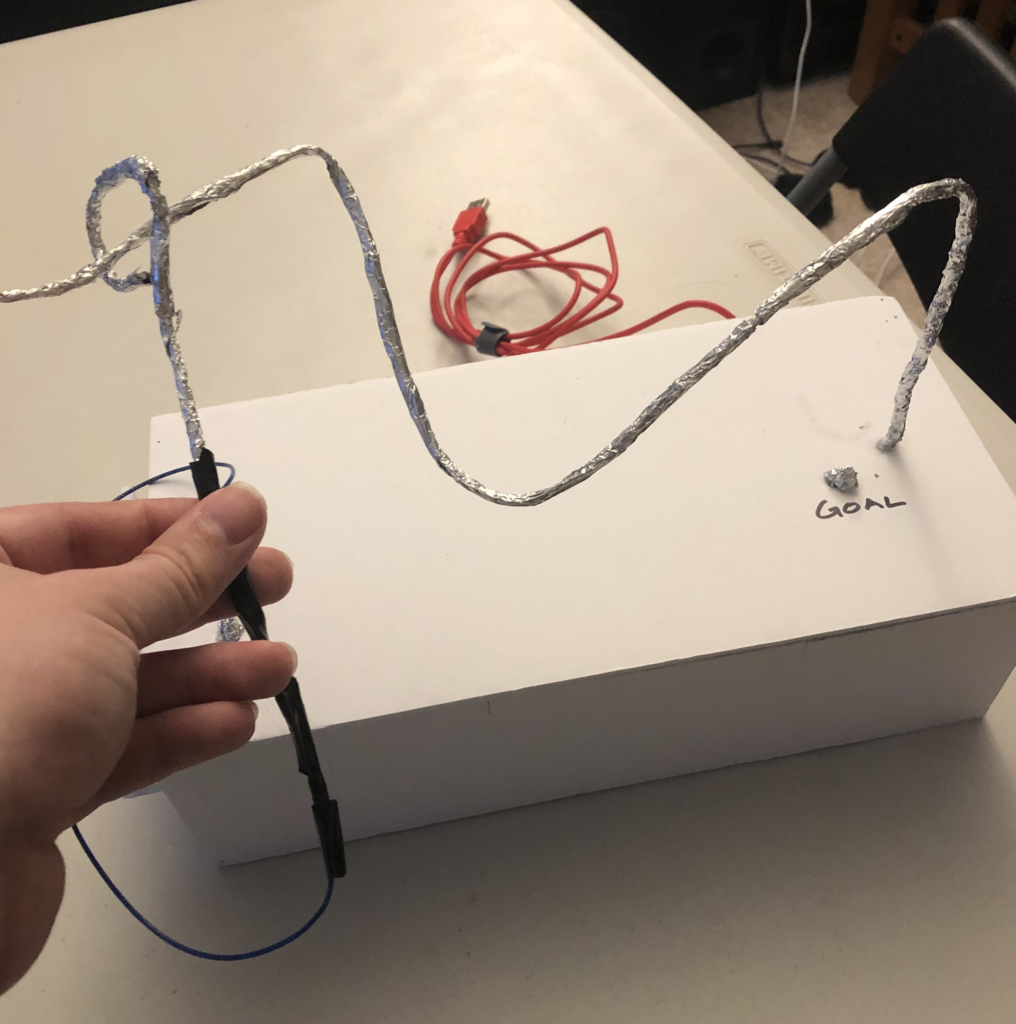
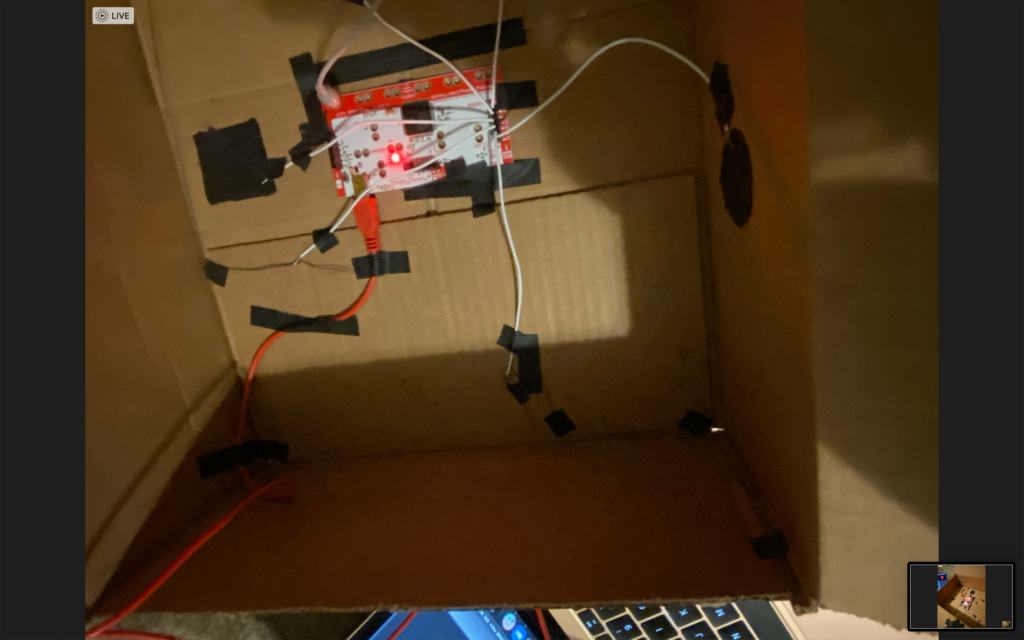
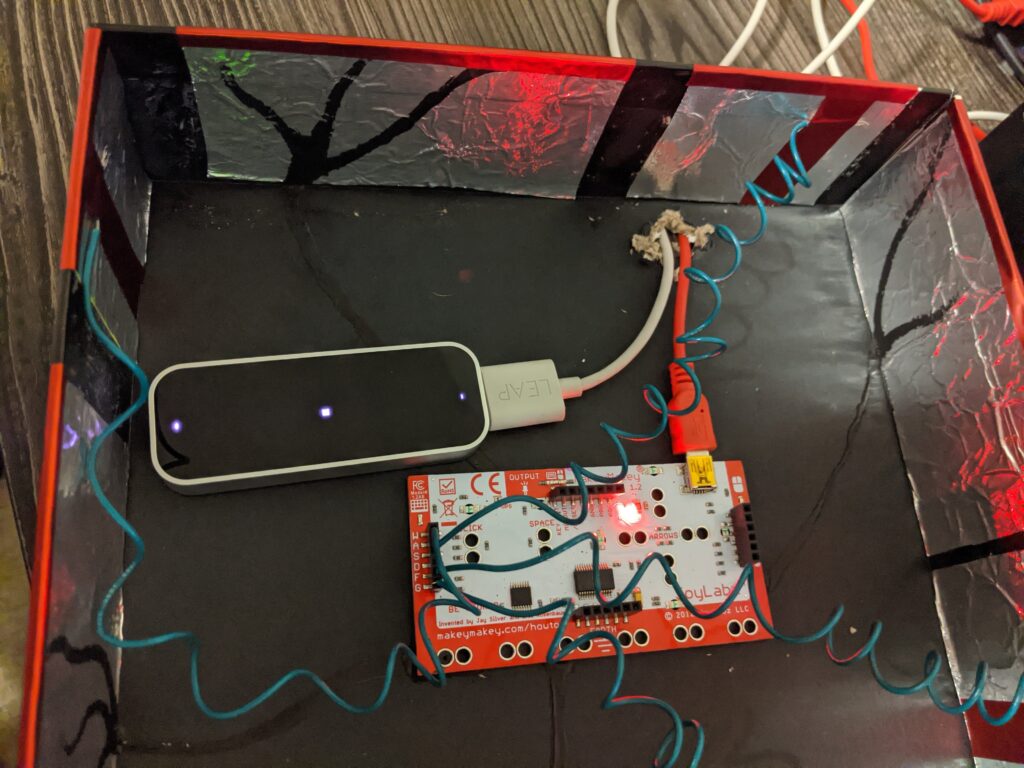
For this pressure project, I wanted to create a game where the player would attempt to move a conductive ring through an obstacle without contacting the obstacle (similar to the board game Operation). The object is to move the wand through the obstacle and touch the piece of foil labeled goal. This would trigger a victory scene. However, if any of the obstacle was touched with the wand, it would trigger a failure screen and the player would need to remove the wand from the obstacle and touch the reset button to go back into the game.
One thing I realized while designing the game was that it would be incredibly easy to cheat, for example moving the wand directly to the goal without going over the obstacle at all after starting the game. I decided to keep this feature in the game without resolving it because it made it very easy to test the game.
When I was building my box I expected I bent a coat metal coat hanger to create the wand and the obstacle. I assumed that the metal coat hanger would be conductive, however, the paint on the obstacle prevented that from happening. I could have sanded down the hanger, but instead, I glued and wrapped foil around the hanger. This created a few places where the wand was not conductive.
Another challenge I ran into was the physical construction of the box. I did not anticipate the need for room for the alligator clips to connect to the makey makey device. I ended up having to make a much taller box so the clips could stand up without strain or being bent at an angle inside of the box.
If I had more time to work on this project, I would have liked to have added another button to bring up a scene that would allow the player to play a “challenge mode.” This mode would force the player to complete the course within a certain amount of time. I also thought it would be interesting to force the player to engage with the Leap Motion controller with their other hand while trying to complete the game.
Download game files:
https://1drv.ms/u/s!Ai2N4YhYaKTvgbM4H-iN0GAvYMls6Q?e=nLweiY
Pressure Project #3
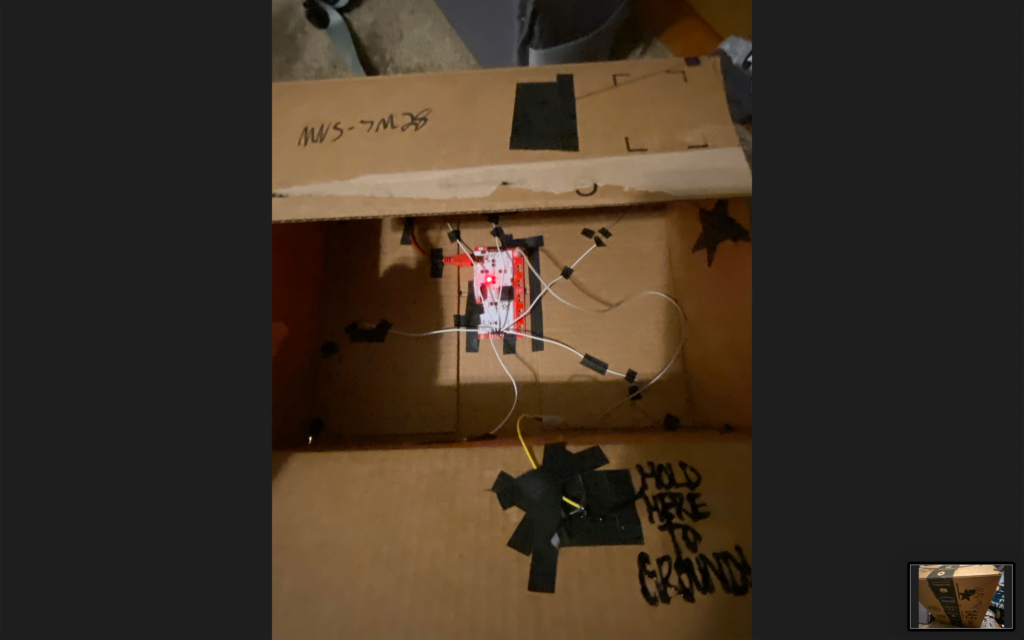
Posted: October 27, 2020 Filed under: Uncategorized Leave a comment »For this project, I wanted to create a mystery box, that depending on the spot touched, a different sound would play.
There are designated spots throughout the box, to trigger different sounds, but because I used the conductive thread, there were many spots that could be touched for the same sound, and sometimes without realizing. There is also randomness to the box at first, since the spots are not labelled it takes a moment to memorize what triggers what sound.
This spot triggers a colored star. 
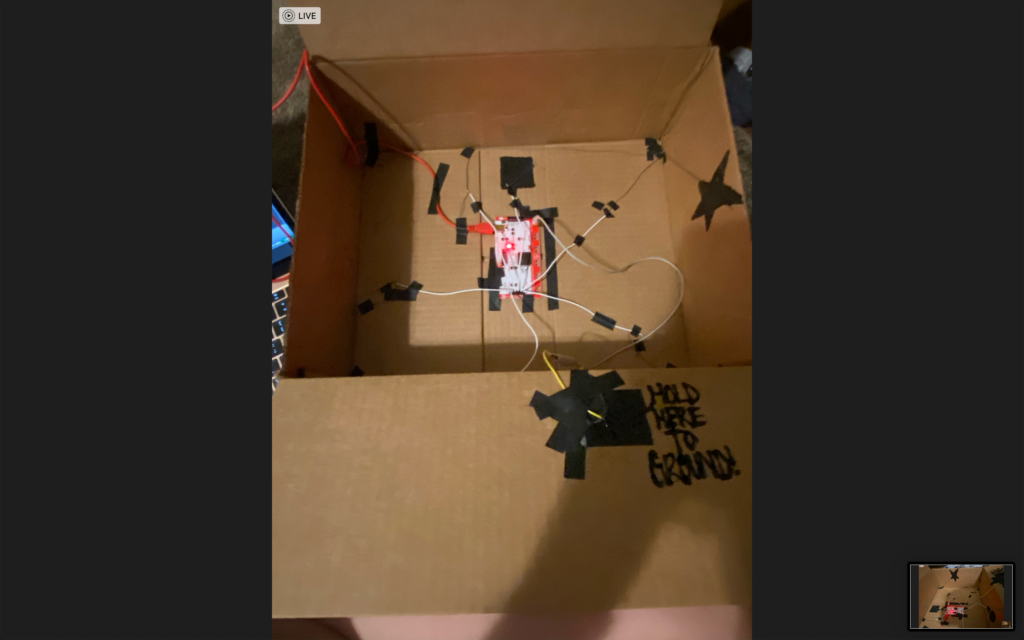
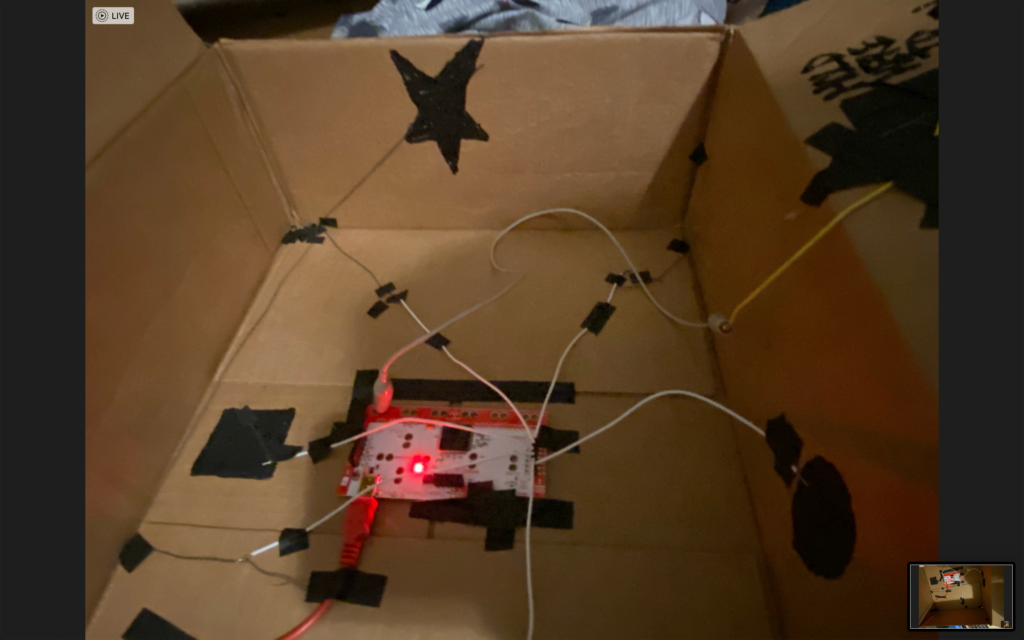
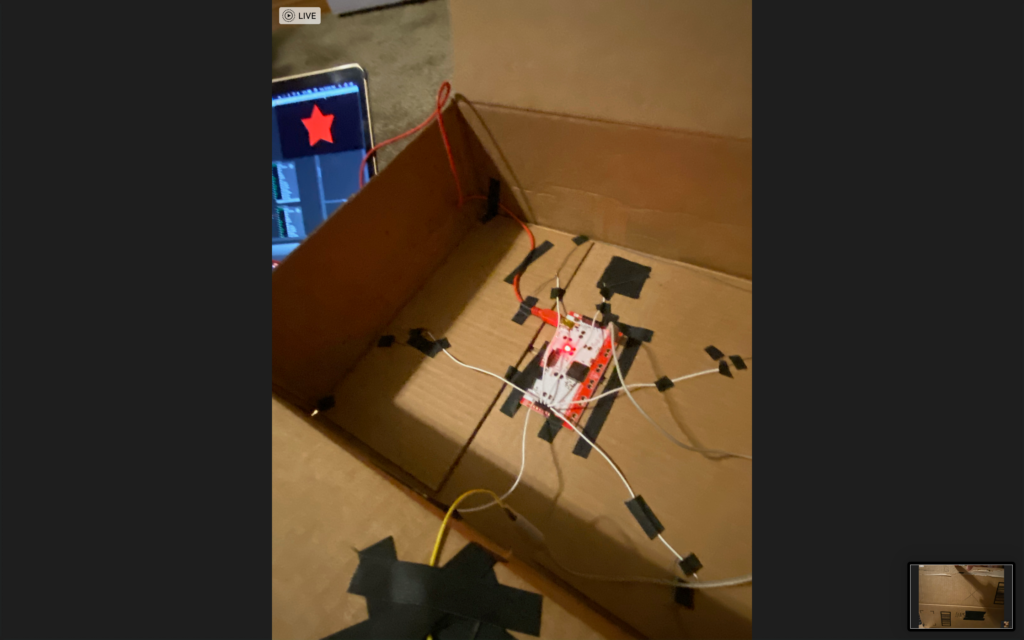
This photo shows the top of the box, including the spot where it grounds, and another cue.
Picking out different sounds, some are random effects, some are songs that may be recognized. My personal favorite is the “Jellyfish Jam” from Spongebob as one of the cues (I knew I wanted to use this going in).
This could be easily adaptable to a different device, as long as the device has six or less touchable spots that can be triggered.
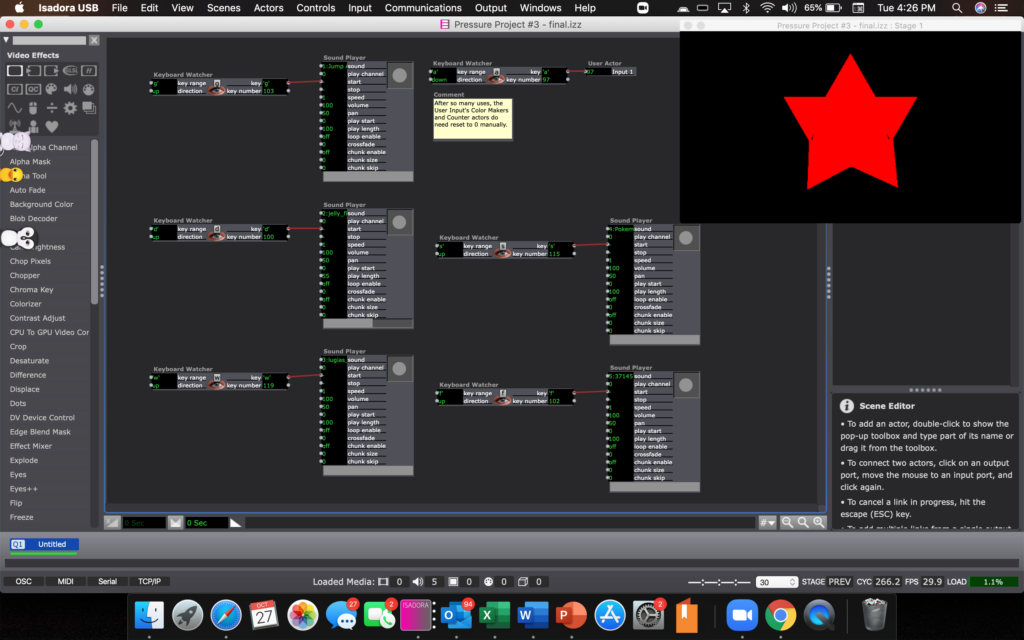
I also left a few notes of instruction, just saying to ground the box then touch any spot with thread or colored black, and that the star does need manually reset after so many touches.
Everything except for the star is an up key, so that it does not trigger until the spot touched is released. Below is the Zip file for the patch.
Pressure Project #2
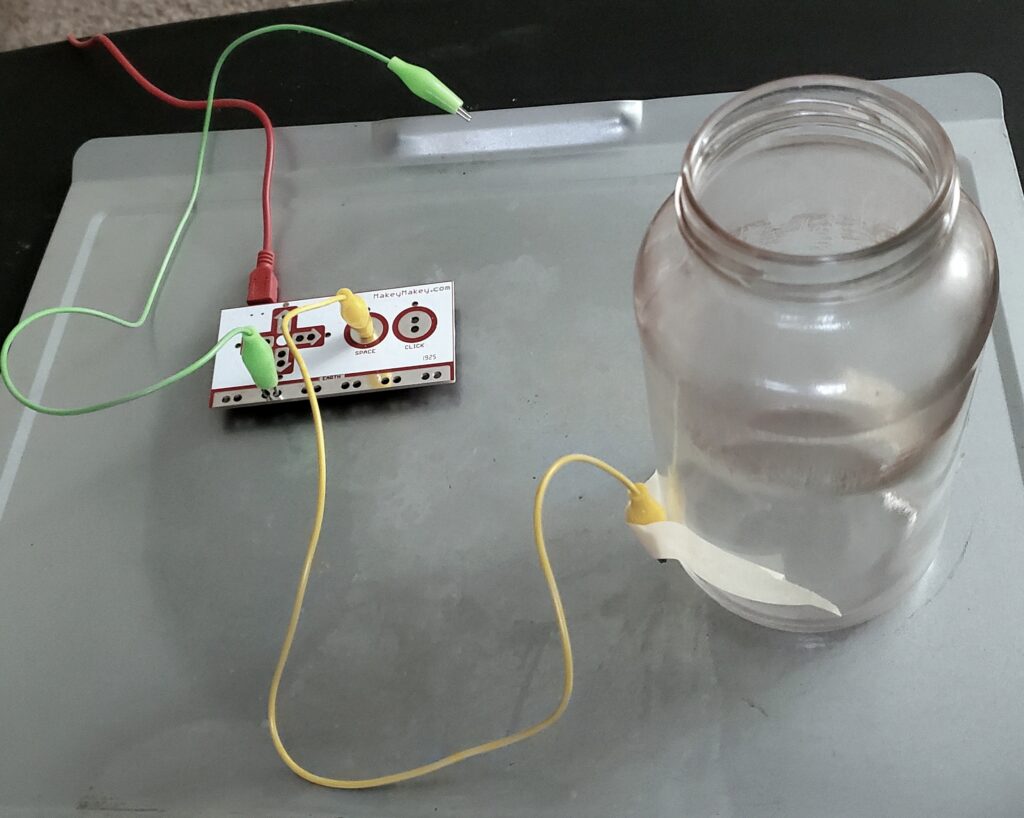
Posted: October 27, 2020 Filed under: Uncategorized Leave a comment »In this pressure project, I wanted to make a system that I could use during rehearsals, in order to count time during a 5 minute break, as I usually can lose track of a few minutes.
Using a keyboard watcher, I set it up to count 300 seconds as soon as a button is hit, grounded through my script’s binder that I always have with me, by attaching some alligator clips and a spot of aluminum foil between my binder and the MakeyMakey, allowing me to both ground and hit go at the same time.
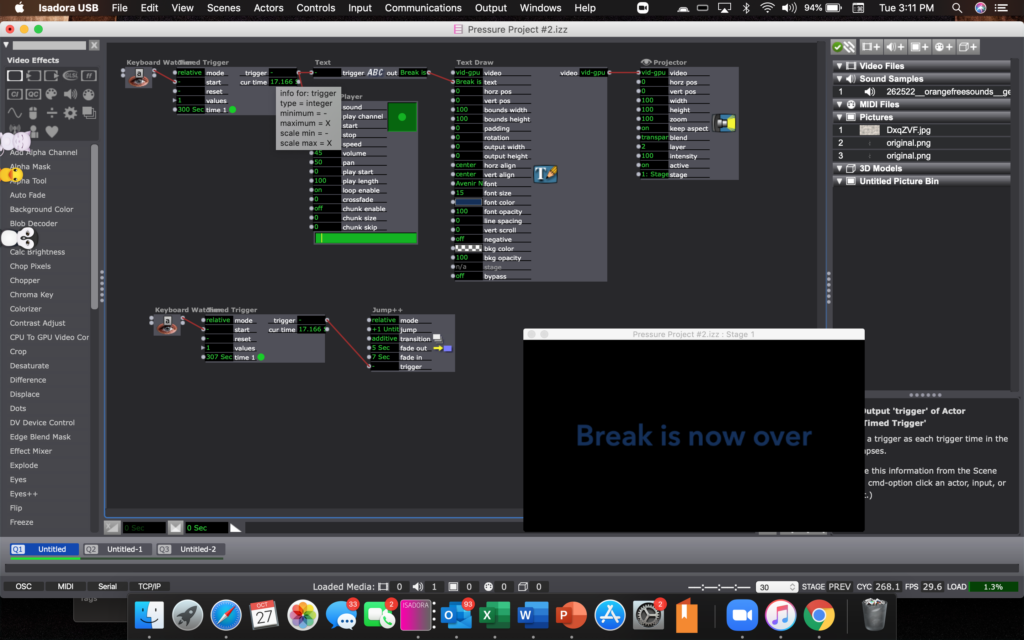
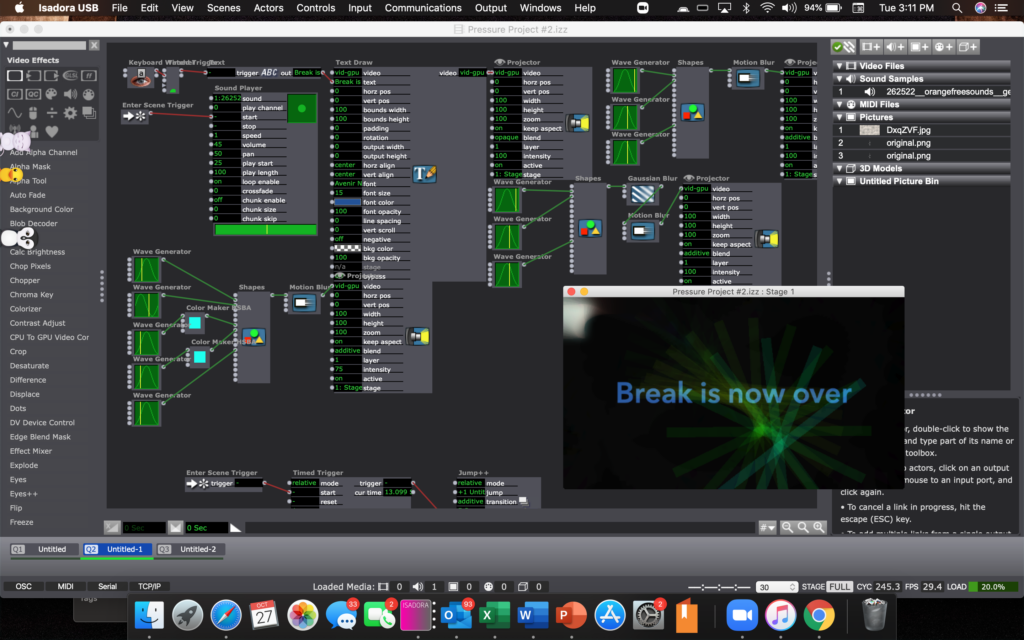
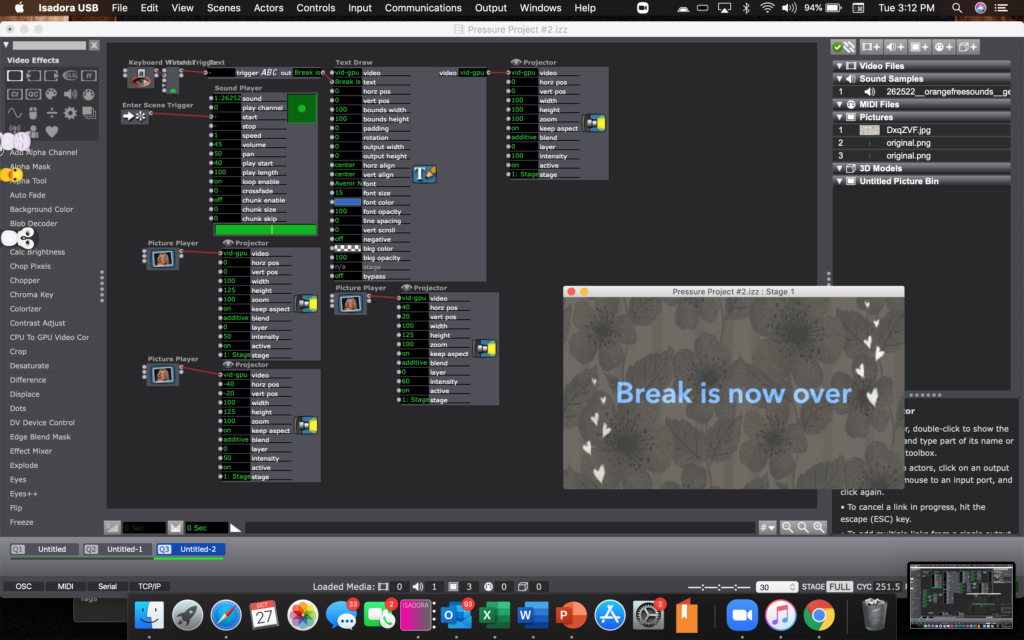
Above is the zip file to the Isadora patch, and the files used.
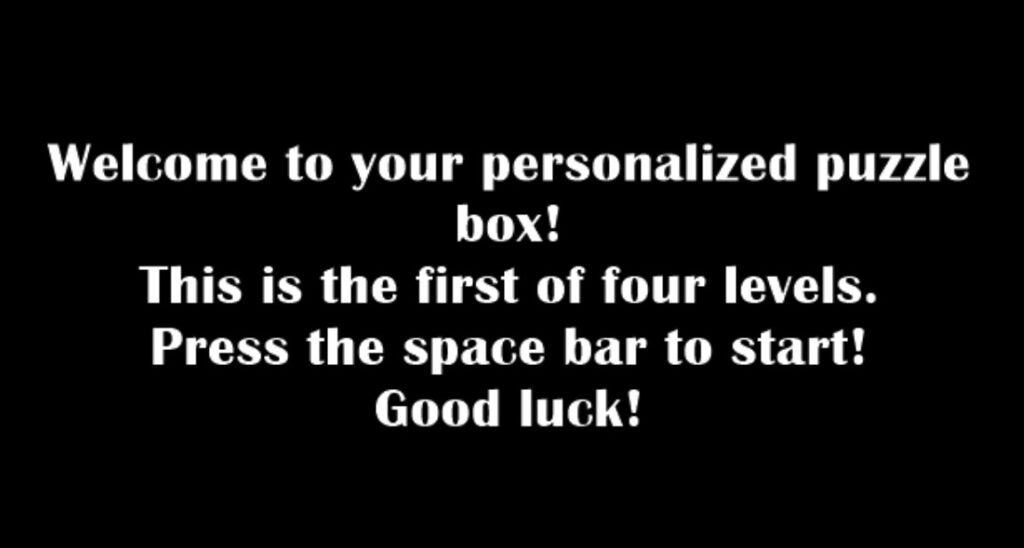
Pressure Project 3
Posted: October 18, 2020 Filed under: Uncategorized Leave a comment »I really focused on the word “puzzle” within this prompt so I created a box that required physical connections in response to prompts by text on the Isadora screen. The box itself was a challenge to make because of how small it was (I used a Kroger mac and cheese box) so it honestly took me hours to poke the holes in the sides of the box and thread all of the wires through them without messing something up and having to redo it. I wanted to make the workings of the box unclear so that the person would have to solve the riddle/puzzle/task in order to complete the level, rather than being able to see where the connections lead.
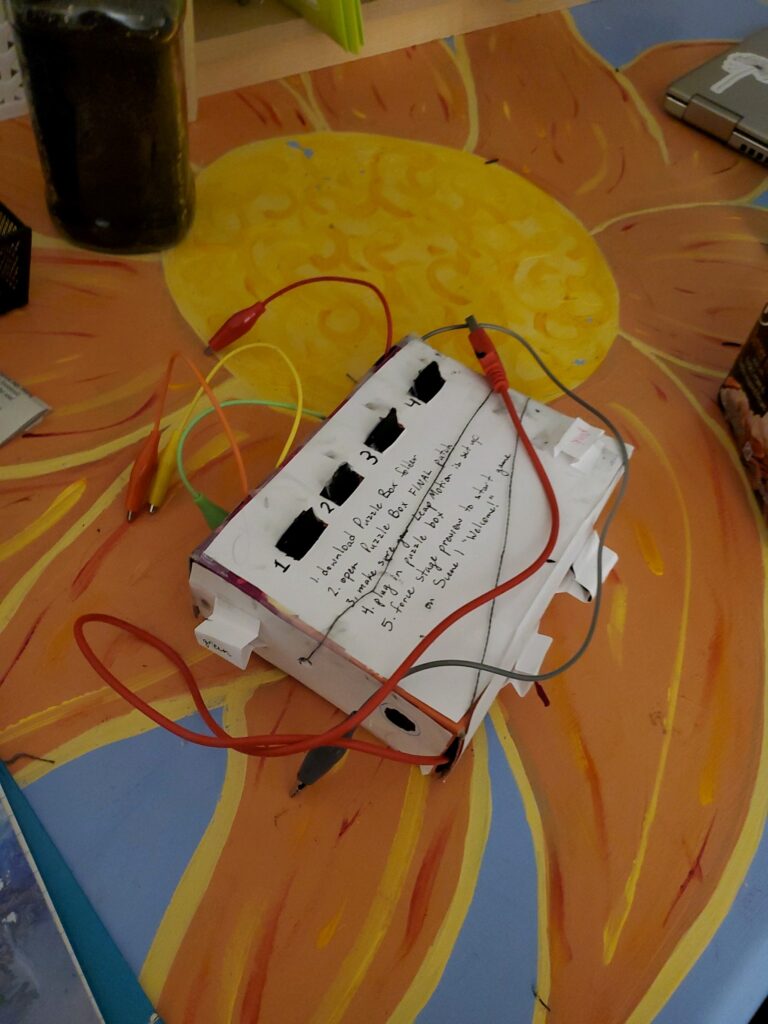
The prompts for each level appeared on the stage of the Isadora patch while everything else supposedly remained hidden. Each level consisted of a task that had to be completed on the box and then a series of hand movements over the LEAP. Over time the difficulty of the puzzles increased and the number of gestures that you had to do also increased, so in a way each level was cumulative.
While the first part of the level was all done on the box, the second part of the levels involving the LEAP used the Isadora stage to help guide the hand movements of the user. There were circles to represent the hands and color coordinated boxes that I hoped would help guide the user to do the required action. Something that I had assumed here was that people would hold their hands flat over the LEAP and move slowly so that is how I tested everything. When I handed it over to Tara that isn’t what happened so sometimes it would register her movement before she was even able to see what the screen was which made the levels unclear.
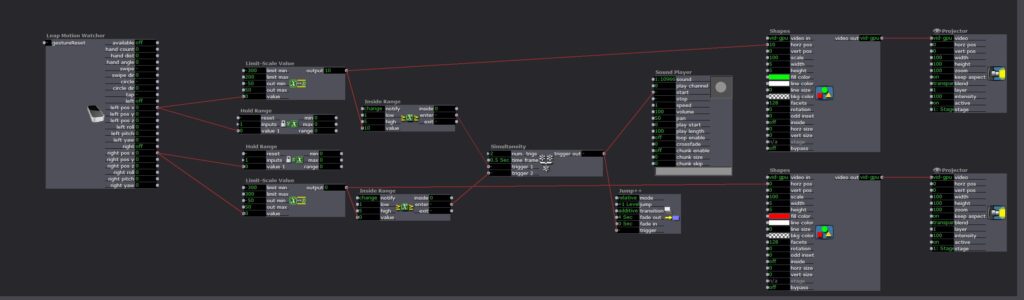
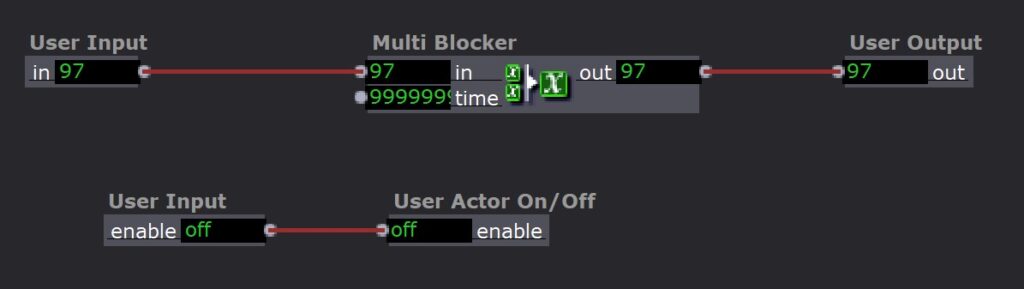
One of the challenges that I had when I was working on my patch was that I was trying to make a puzzle where people had to put a series of tones in ascending order (like a piano). This puzzle used alligator clips and tags on the box so I had the issue of constant triggers being sent. However, I couldn’t just use multiblocker because I assumed people would try to test the different alligator clips so I also needed the system to be able to reset once someone had tested the sound. I also needed the system to be able to recognize that the tones had been played in a specific order, from left to right on the tabs on the box.
The first challenge was solved with a user actor that contained a multiblocker but also allowed me to reset the time on it whenever the alligator clip was removed from the tab.
The second challenge was solved using a different scene for every tone. So once the user found the correct tone, it would jump to the next scene and they would get a prompt telling them that they got it right and could now move on to figuring out what sound went with the second tab on the box.
For the most part I was really proud of my puzzle box. There were some issues with the LEAP tracking so I would need to either be more specific in my instructions or make the system more able to adjust to different users. The last puzzle with the tones was also one where the instructions could have been more clear, Tara said that it wasn’t clear to her if she had got it right or not so I could have found a more clear way to indicate when each step had been successful. I learned a lot about how to use scenes and user actors when overcoming my struggles with the last puzzle. I also realized that I need to write out a list of the assumptions I am making about the user so that I can either instruct the user more clearly to match those assumptions or adjust to fit behavior outside of those assumptions.
Tara Burns – PP3
Posted: October 16, 2020 Filed under: Uncategorized Leave a comment »Goal
To expand my idea of the installation/performance sound box into a very small version while creating a surprise for my user
I feel I did get an opportunity to research the installation more in my first patch, but I aborted mission to create a cohesive experience switching the sounds to “shhhs,” labeling the box “The SHHHH Box,” and adding the prayer.
Challenges
I had a problem with one of my touch points continually completing the circuit. I remedied this by putting a piece of paper under the aluminum. I decided that either glue is conductive (I don’t think so), I accidentally connected the circuit with messy electric finger paint, or the box is recycled and might have bits of metal in that one part.
On my computer when I opened the patch, it would blurt out the final prayer. So, I added an instruction to Kara to connect the toggle to the movie player so the sound wouldn’t play and ruin the creepy surprise. Update: Alex showed us a remedy for this: 1) Create a snapshot of exactly how it “should” be (even though it keeps reverting to something other), then Enter Scene Trigger –> Recall Snapshot.
I also wish I had connected all the sounds properly, in haste, I put them in a new folder but forgot to connect the sounds and then Kara had to do that which made it more difficult for her in the beginning. If the paint goes to the aluminum my assumption is that since the aluminum is conductive that it should be trigger enough. But when Kara tested it, she seemed to have trouble triggering it.
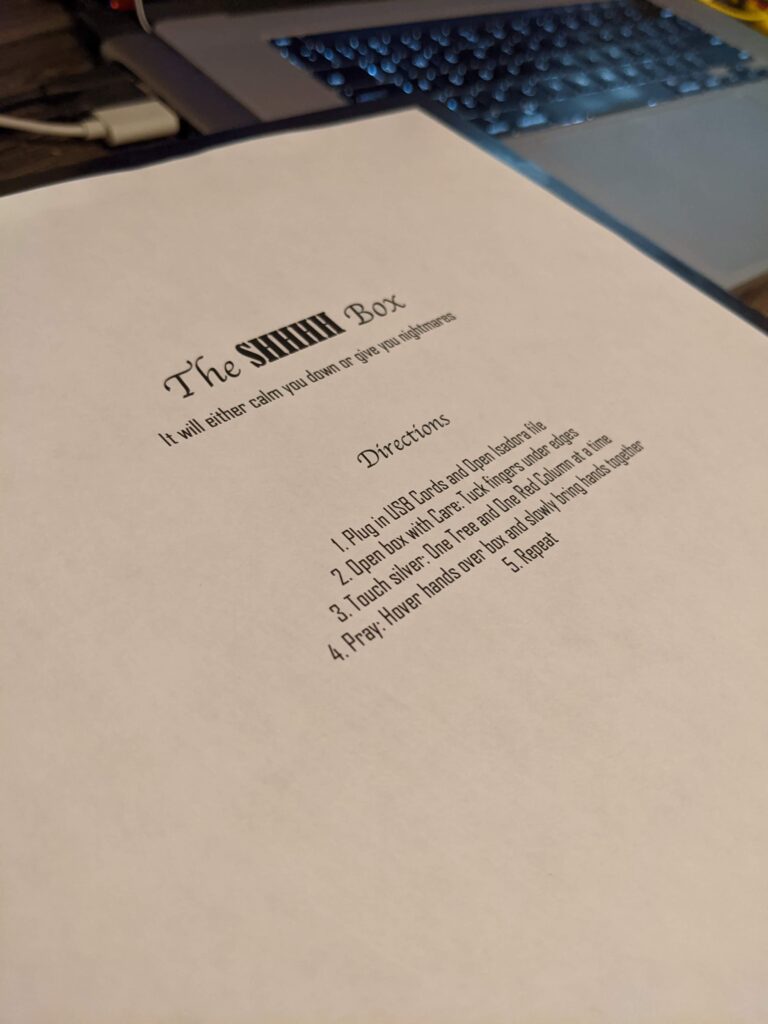
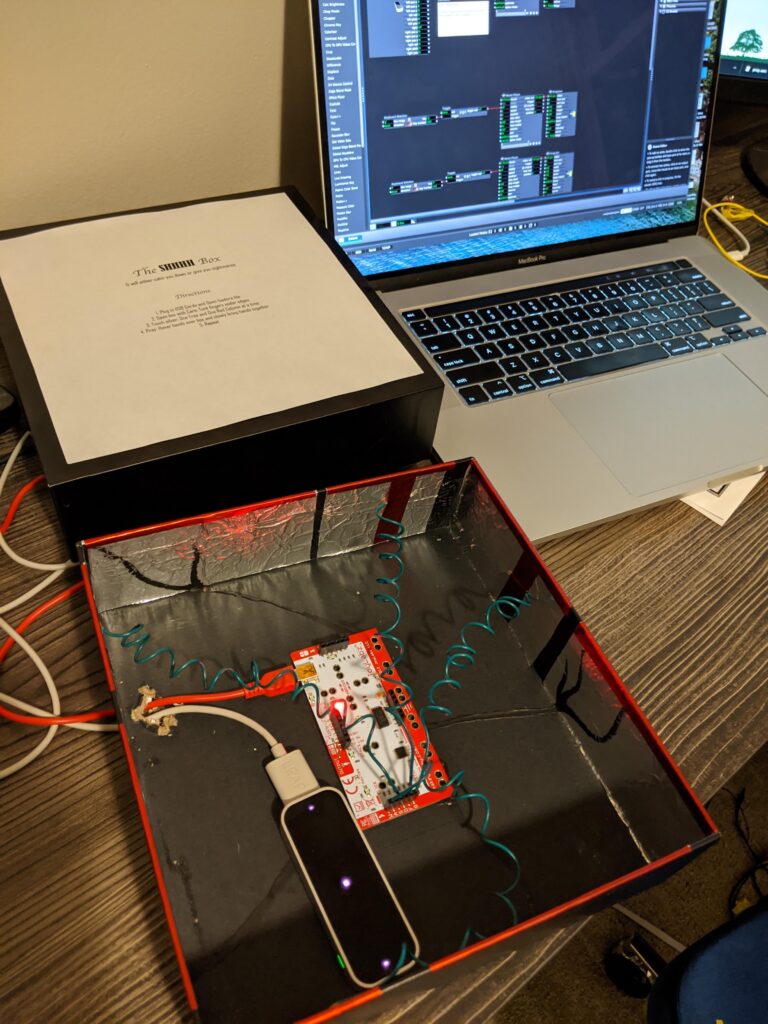
It will calm you down or give you nightmares.
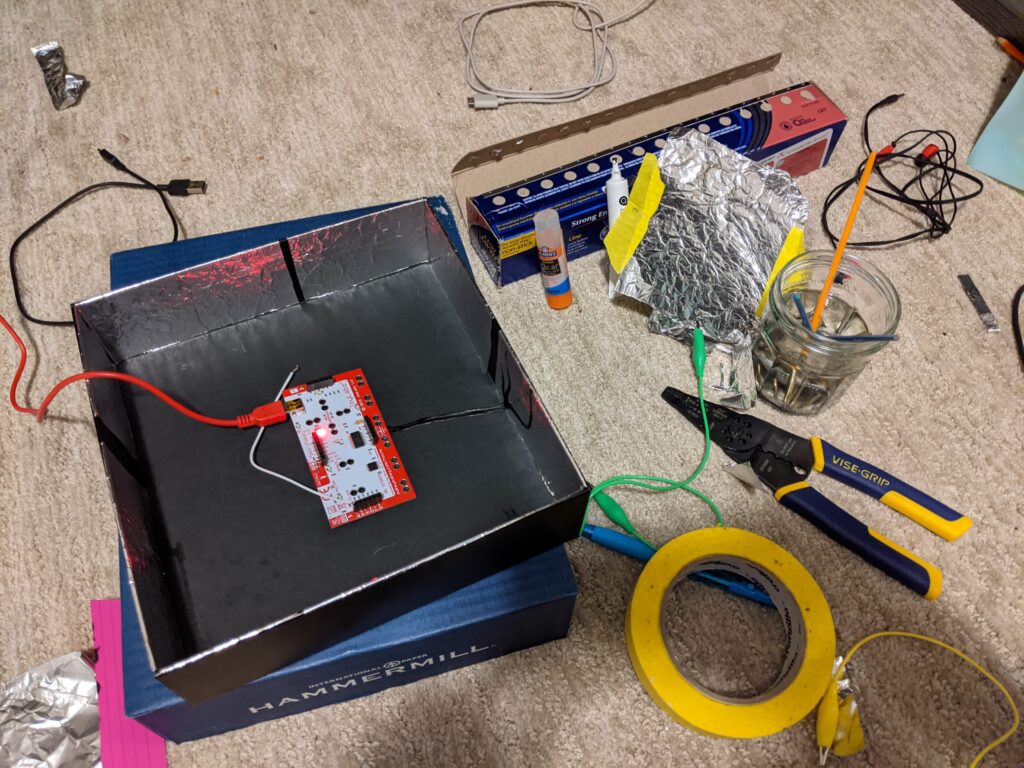

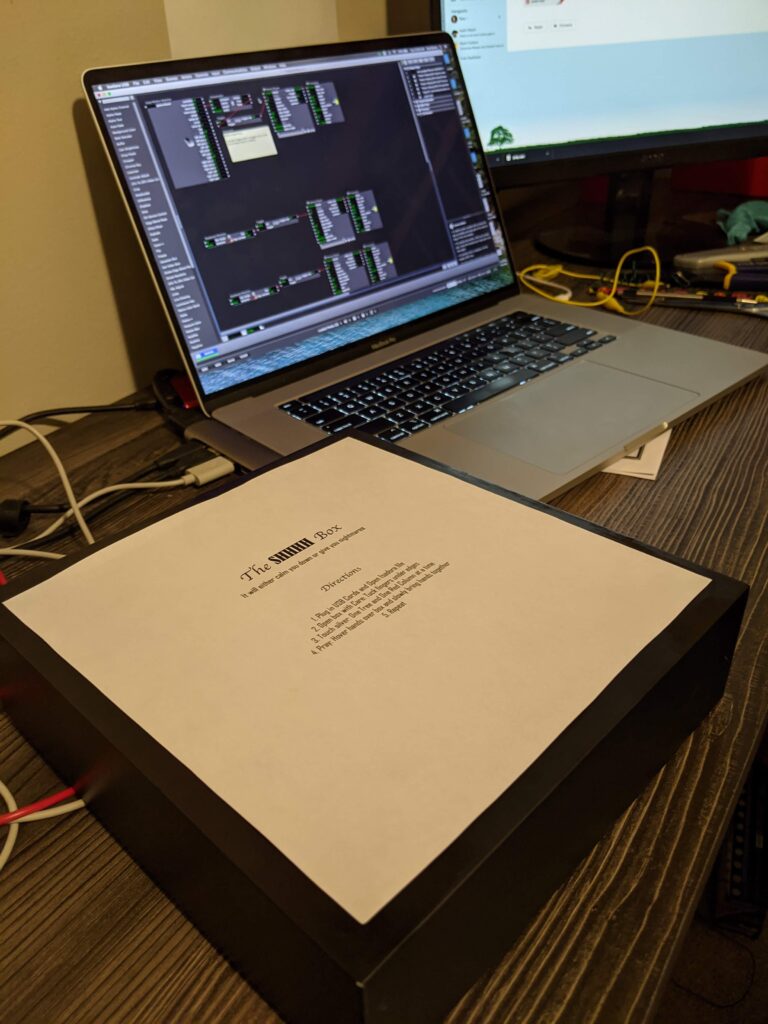
1. Plug in USB Cords and Open Isadora file
(PP3) Mystery Box Game Instructions and Reflection
Posted: October 15, 2020 Filed under: Uncategorized Leave a comment »By Kenny Olson
objective:
You are the white cube (bottom left corner). Shift and dodge away from the color changing bad guy (top right corner), who is protecting the color changing rainbow gold. You have three lives to collect as much rainbow gold as possible. As you steal more and more rainbow gold the bad guy will get more and more upset. The bad guy will do whatever it takes to protect and hide the rainbow gold. How much gold can you steal, and how long can you last!?!?!
Instructions:
- Plug the “Mystery Box” (Makey Makey) into the computer. Plug the Leap Motion into the computer. At this time do not touch the box until the “game starts” (If you don’t have the “leap motion” or the “Mystery Box”, the game can still be played, and you may skip this first step.)
- Download and open the Mystery Box zip file and open the Isadora File found within. Then immediately open the Isadora preview window full screen. hot key: (command + sift + S)
- A pink and blue loading bar will appear, the game is loading, wait till loading bar fills and the main title will appear.
- The main title will play music (adjust volume accordingly). Text will then flash saying “swipe hand to start” (swipe hand over the leap motion) to start playing. (If you don’t have the leap motion you may press the space bar or the zero key on the keyboard.)
- The main title and music will fade away and the game will start.
- To play the game. Pick up the “Mystery Box” and try touching random sides of the box together with your hands to move the white cube (found in the bottom corner at the start of the game). (The keyboard may also be used to move the white box around by using the arrow keys.) The smaller blinking box is the “rainbow gold” (meant to be collected). The colored box moving towards the white box (found in the top right corner at the start of the game) is the “bad guy” (say away form it).
- When you loose all three of your lives the game will end and present your final score. You will then be redirected to the main title screen. (jump back to step four.)
NOTE:
To achieve the best playing experience adjust your Isadora screen preview window ratio to 1920 by 1080.
Game Download:
Reflection:
I started this project in hopes to make a NES (Nintendo Entertainment System) look alike game, with an 80s/90s retro vibe. I referenced a lot of game systems to understand what kids of game I wanted to make. Gauntlet was one game that stood out the most. Gauntlet is a top down, roguelike, dungeon crawl type game. The game itself is never ending, however, gets progressively harder the farther the players get into the game. In the game players collect gold, potions, and food while trying to find the exit to the next level. While doing so there are different types of non playable “bad guys” who try to kill or harm the “good guys”.
In my game I wanted to try and recreate as much of the Gauntlet game system as I could. After talking with Alex I quickly understood how to allow players to control a characters movement around the screen. Alex said to think of the playing area like a grid and the character is jumping/moving from grid box to grid box. to get the character to move I used keyboard watcher actor (tied to the arrow keys) triggering a counter actor. The counter actor incrementally increased and decreased the horizontal and vertical values of the character (which in my game was a colored square made from a shapes actor) so when the arrow keys were pressed the character could move. For the bad guy I used the same system as for the good guy, however, the bad guy needs to both move on its own and chase/follow the good guy. I did this with a comparator actor, I took the horizontal and vertical values of the good guy and the horizontal and vertical values of the bad guy and fed both the horizontal values into one comparator actor and both vertical values into their own comparator actor. I then set each comparator actor to trigger the bad guy to move if the bad guys horizontal and vertical values are not equal to the good guys values. Not included in the Gauntlet game was a life counter/display. In the game I made, I gave the player three lives/chances to be killed before the game would reset from the start. Inside Isadora the code looks more complicated than what is happening. Basically, what is happening is if the horizontal and vertical values from the good and bad guy are the same, one of the three shapes actors (displayed in the top left of the active game window at the start of each game signifying three lives) is turned off. After this event happens a third time, a jump actor is triggered and sends the player to a “GAME OVER SCREEN” with the players score displayed, then sending the player back to the title screen. The game then resets. In Gauntlet, players collect items in the game (like gold and food) and exit each level by standing over an exit door. In my game, A character is tasked with collecting a small flashing cube (I called rainbow gold, because it changes colors) the when the character lands on a rainbow gold square several things happen. First, the players score increases by “100”. Two, the stage, obstacles, the bad guy, and the rainbow gold all changes colors (signifying a change in level). Third, the rainbow gold “randomly” changes its position to a new spot in the playing. As the player accumulates points by collecting “rainbow gold” the score increases and when the score increases several things happen. First, for every 1,000 points added to the score the bad guy moves faster (up until 10,000 points). Second, As the score gets higher several different sized squares appear over the playing area, and block the players view. The game still functions as usual, however, when the rainbow gold appears behind the “view blocking” square area, the player needs to then search with these areas to find the gold. When the bad guy or good guy enter these areas they also become obscured from view. This adds a much needed tension and strategie to the game play.
The most challenging aspect of this game to create was the character movement system (as explained prior). The system I created worked great (after exploring and testing several different systems before), however, the system I ended with could not function with negative numbers. This meant I had to manually shift the origin of the projector actor from the center of the preview screen, to the bottom left corner of the preview screen. (As shown below) the origin is the (0,0) usually found in the center of a projector actor preview window in Isadora. To insure all the characters would always land on a set of positive coordinates I had to physically zoom into the top right area of the screen . By doing this I ran into some scaling problems and gained some granularity with the objects that needed to interact with the grid (so the good guy and bad guy square shapes actors, the rainbow gold square shapes actor, the grid image I used in the background, and the view obscuring squares also made from the shapes actor). I overcame the fuzzy and granular look by adding more noise grain to the overall composition to help unify and make everything feel purposeful.

In the end the overall game works great, but there are some small glitches that happen from time to time. One glitch is the game will start the player off with two lives instead of three, even though the three squares (representing the player having three lives) in the top left of the screen are visible, under the hood, the code shows the player has already lost a life. Another glitch is sometimes the bad guy could take a life away from the good guy by only being on one of the same horizontal or vertical access as the good guy, this would also cause the bad guy to move around the screen in an odd way. Most of the glitches happen after the game ends (for whatever reason) the game does not fully reset when a new game starts.
If I were to continue with this game I would like to add more bad guys over time, a way for the player to gain an extra life, possibly grow and shrink the playing grid area, A scoreboard with player names. I also think adding a character selection screen would be interesting, the player could choose between different shapes to play as, and each shape has different abilities.
Using Isadora as a video game development software for RPGs is probably not something the developers meant for Isadora to be used as, and it shows. Regardless this was A fun experiment.
Tara Burns – PP2
Posted: October 6, 2020 Filed under: Uncategorized Leave a comment »Goal:
– To create a sound response to movement/dance
– To test the recording of sound from VR/Tilt Brush brushes for repurposing in Isadora
Challenges:
– Having the wire to ground attached to my body made it precarious and possibly dangerous for extended use.
– This would require A LOT of wire.
– The VR/Tilt Brush sounds recorded pretty soft.
Conclusions and future thoughts:
This project kind of turned into dance dance revolution. However, the help from the class/Alex to make a grounding agent for each pad (provided there is enough wire) would make it so I didn’t have to wear the grounding cable. For future application, I can imagine this controlling light and sound perhaps in a small box like a telephone booth (post-covid), that when touched the sounds rolled over one another. As it is, without the numbers, the sounds roll over each other and you can’t quite place what is happening and if in an installation or performance this is what I would prefer. However, the wires and connection to the Makey Makey don’t seem like they would stand up to the abuse I would require (as a dancer), so if everything was contained in a box, then it would probably be ok. In addition, the sounds in Tilt Brush get louder the faster you move, so this could be an interesting thing to try to add to the patch.

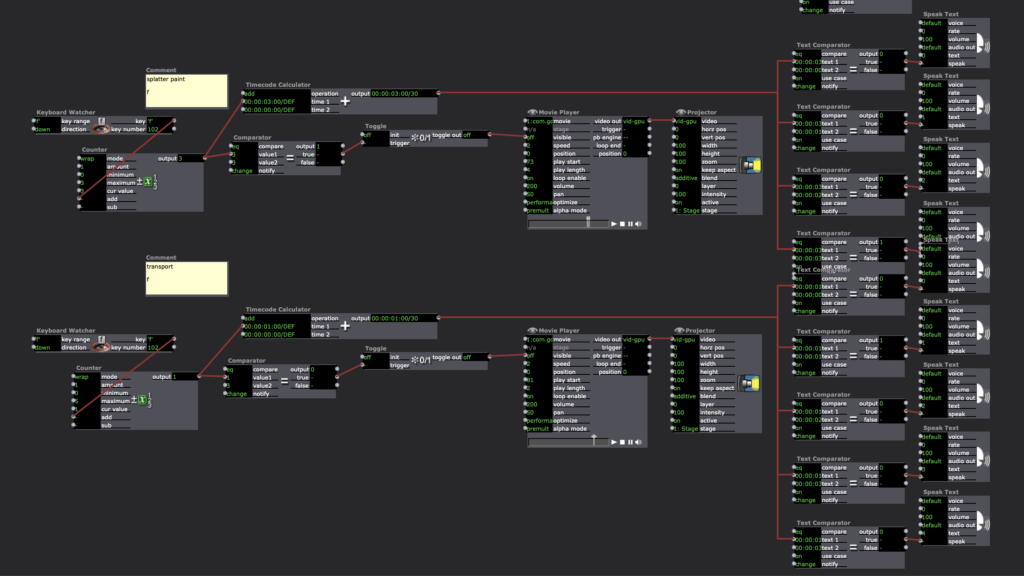
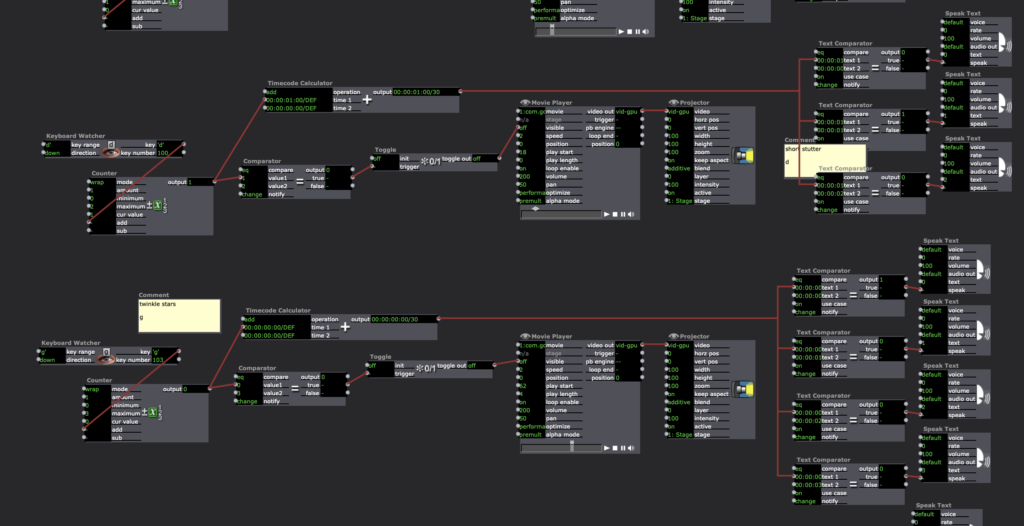
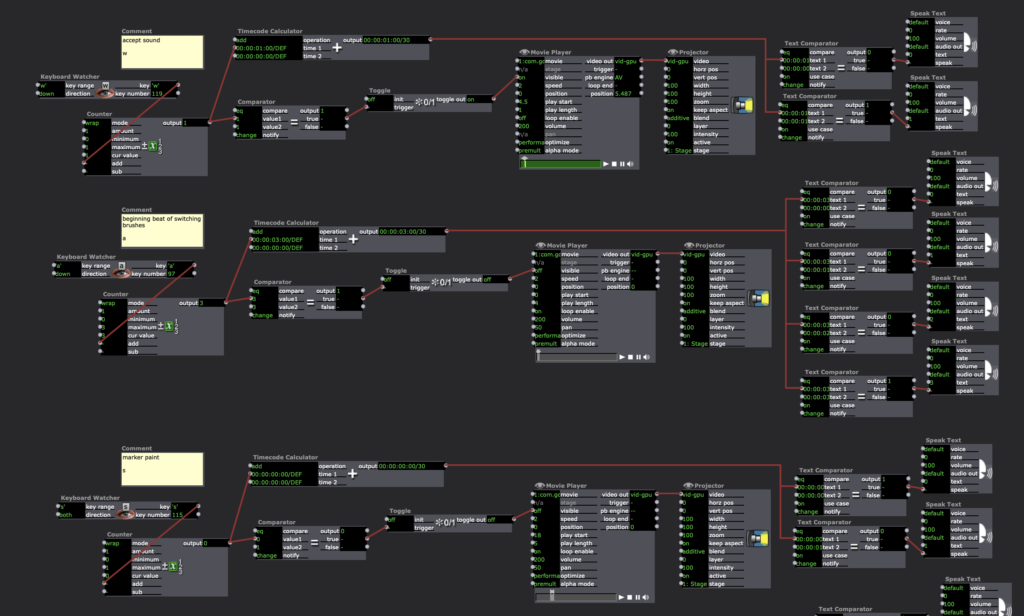
This addition included Timecode Calculator –> Text Comparator –> Speak Text actors.
Pressure Project 2 – Kenny Olson
Posted: October 3, 2020 Filed under: Uncategorized Leave a comment »For project 2, I made a Randomized Nicki Minaj Meme Generator Hydration Station System. The system set up is: a water glass reseting on a metal tray, and when the glass is picked up off the try, a random Nicki Minaj Meme audio clip is played. The mechanics of the system involve a Makey Makey. With one set of alligator clips connected to the metal try and the earth (or grounding) connection on the Makey Makey (the green wire shown below). With another alligator clip, one end is connected to the space button on the Makey Makey with the other alligator clip end taped to a water glass (the yellow wire shown below) with a metal conduction string in the alligator clips mouth. The sting goes under the glass and is secured on the adjacent side with more tape. When the water glass is placed on the metal tray, the string on the bottom of the glass makes contact with the tray, sending a signal to the Makey Makey telling it to trigger the space bar.
Inside of Isadora, a “keyboard watcher actor” (with direction set to: UP) triggers an “envelop generator++ actor” with a one second rate with a starting rate of 0 and an ending rate of 100. When the “envelop generator++ actor” ends, the end trigger goes in two directions. Direction one triggers and displays a number, counting the times the system is triggered. The second direction triggers a random audio sound from a preselected list of ten sound. Direction one works by, the “ADD” on a “counter actor” with a min value of 1 and max value of 101, and mode set to wrap. The output number is then fed into the line “Text/ure actor”. The text document connected to the “Text/ure actor” (accessible when the actor is double clicked) has a list of numbers from 0-100 displayed vertically. Finally the video out of the “Text/ure actor” is fed into a “projector actor”. Direction two works by, the “envelop generator++ actor” triggering a “random actor” the “random actor” produces a random rational number between the values of 1 and 100. The value from the “random actor” is then fed into a “float to integer actor” to get a natural number. This number is then sent to ten deferent “inside range actors”. each “inside range actors” is set to only trigger if the number given is between the predetermined values. Each of the ten “inside range actors” are set incumbently to only accept 10 numbers. So the first “inside range actors” only accepts numbers “1, 2, 3, 4, 5, 6, 7, 8, 9, and 10” and the next “inside range actors” only accepts numbers ” 11, 12, 13, 14, 15, 16, 17, 18, 19, and 20″ so on and so forth until 100. Next each of the “inside range actors” is fed to its own “envelop generator++” from the “inside range actors” enter to the “envelop generator++” trigger. The “envelop generator++” output is then connected to the play length of a “movie player actor”. The result is, when the “random number actor” is triggered, and formatted correctly, each “inside range actors” will read said number and determine whether or not trigger the “envelop generator++” to then play the audio.
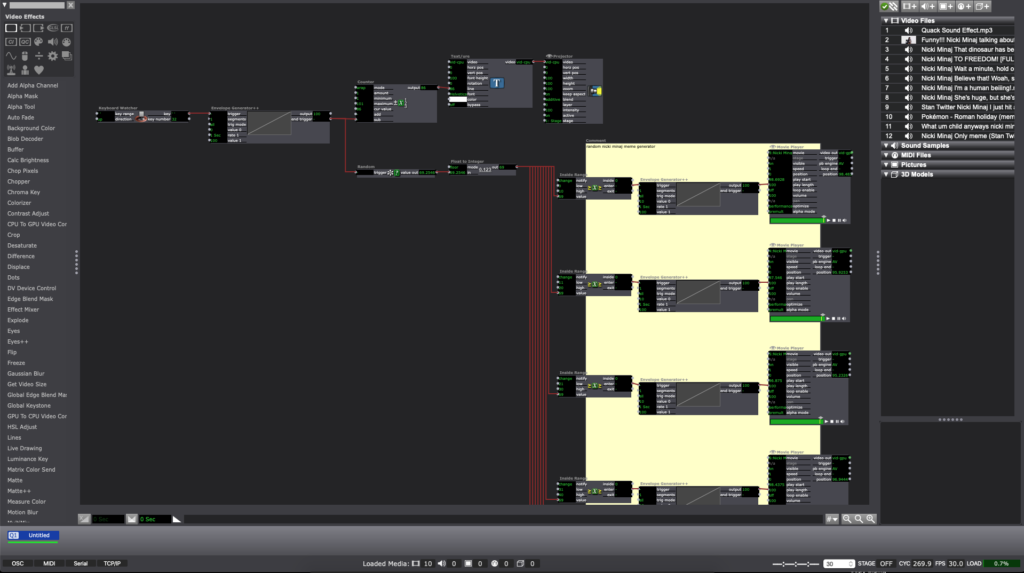
In the end, the system will run something like this: a person picks up the water glass from the tray, with a one second delay, a random audio sound will play (in my case a Nicki Minaj meme), and a number will be displayed, counting the number of times the glass is lifted or “drank from”.
Reflections:
Originally I wanted a sound to play after I opened my desk drawer and also count the times said door was opened, however, I found trying to make a button with the Makey Makey difficult with the limited arts and crafts tools I have. Inside of Isadora, Changing the direction of the “keyboard watcher” from down to up was a crucial and important revelation. Also, finding a way to visualize the automated counting system was the hardest part of this project. Once I found the “Text/ure actor” everything became much smoother.
Crutique:
During the critique, an interesting discussion about culture came about. “what if instead of a meme sound played, a video of someone needing water was projected, when someone picked up the water glass?” in the right setting or context a simple gesture with relatively simple tech could have astronomical cassations and implications.
Pressure Project 2
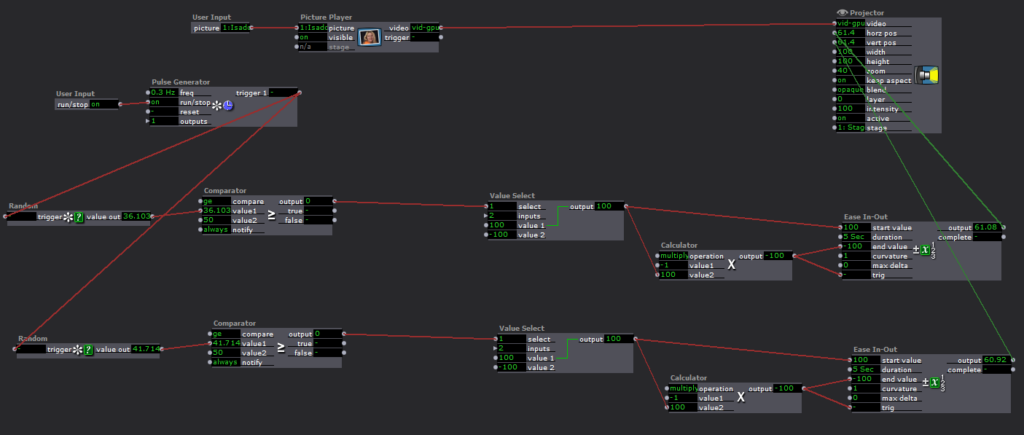
Posted: October 1, 2020 Filed under: Uncategorized Leave a comment »For this project, I wanted to use the makey-makey in order to trigger photos from a webcam to be taken. After a certain number of photos were taken, I wanted them to be displayed on a computer monitor.
I glued a couple of pieces of foil to a piece of cardboard and put a cloth mat over it and ran wires back to the makey makey in order to trigger a space bar press. One of my initial issues was the taking of several photos very quickly when the makey makey was pressed. I used an envelope generator between the keyboard watcher and the capture stage to picture actor in order to make it so one photo at a time was taken.
The next challenge was recalling the file names that had not been created yet. I discovered Isadora did not like referencing files which did not yet exist, so I needed to load in the values after the pictures were taken.
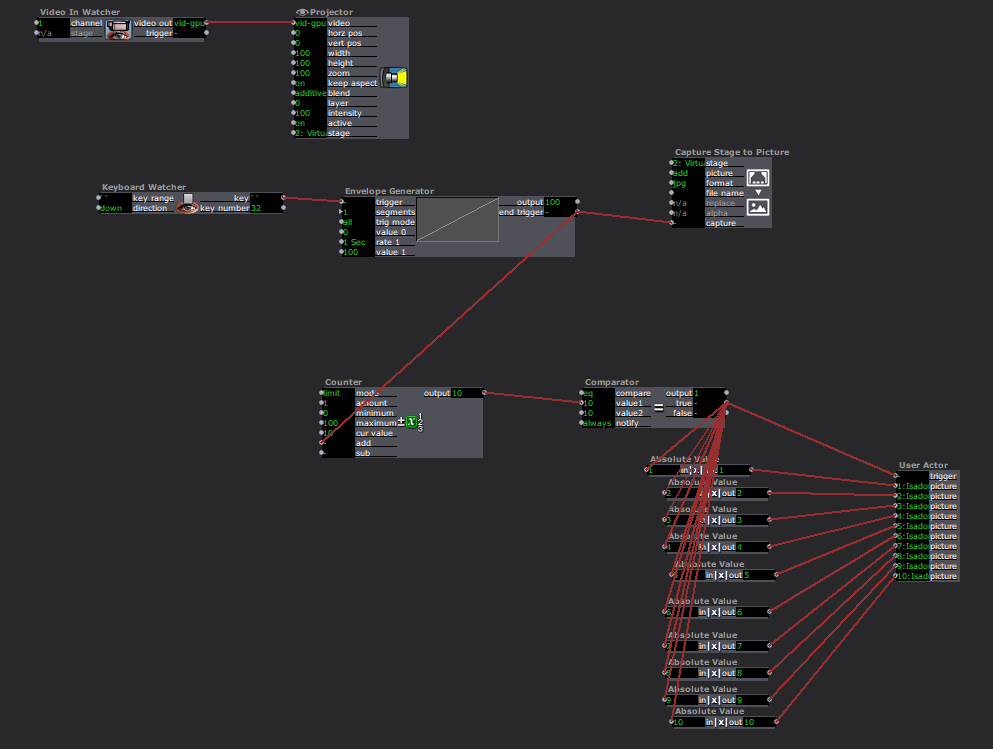
I built a user actor to display each image in a random way and nested it inside of another user actor.
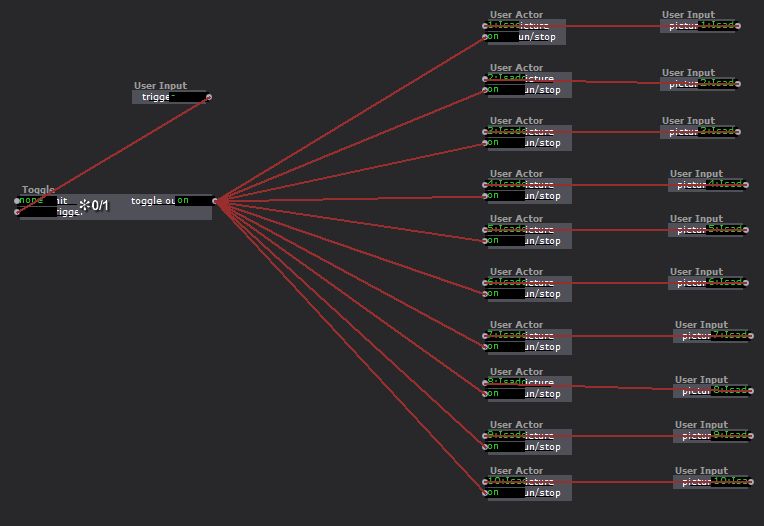
Inside of this actor, I used random value actors in order to randomly generate where the image would appear on the screen. The images would then fly over to the opposite side of the screen.
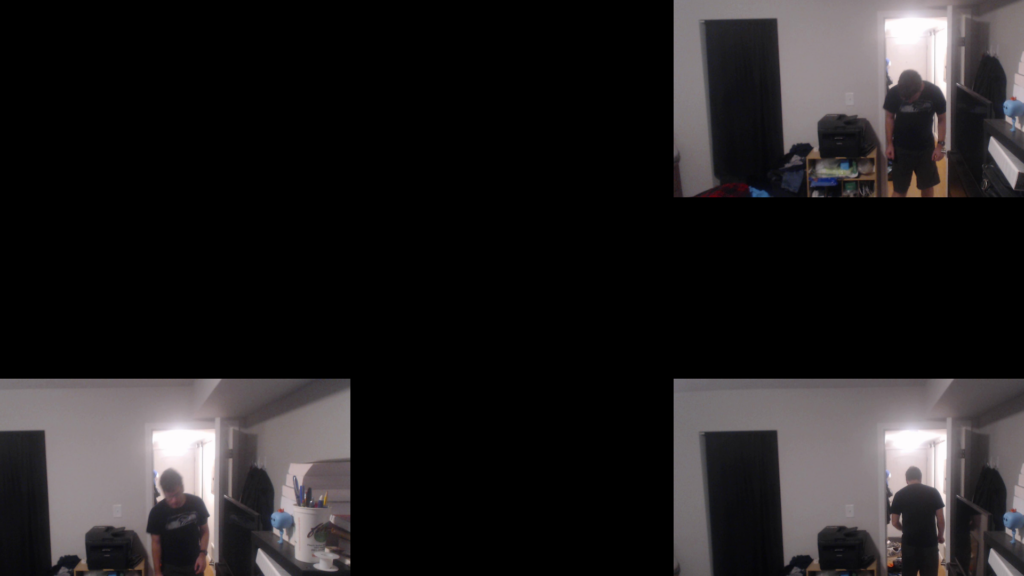
Ultimately I feel this project gave me a good grasp of manipulating a photo library in Isadora as well as a more sophisticated understanding of some of the logic and math functions.
Pressure Project 2
Posted: October 1, 2020 Filed under: Uncategorized Leave a comment »I learned from the last project and started with a written brainstorm of ideas before doing any actual work on this. Then I narrowed it down to what I actually wanted and drew a design, specified my goals, and the basic logic of the program. I decided to create a Spontaneous Dance Party Machine for my staircase. The goal was to randomly surprise someone coming down the stairs with an experience that would inspire them to dance and be in the moment. So while they might have been on their way to get food before trudging back up the stairs for more hours of Zoom, this gives them a chance to let loose for a minute of their day.
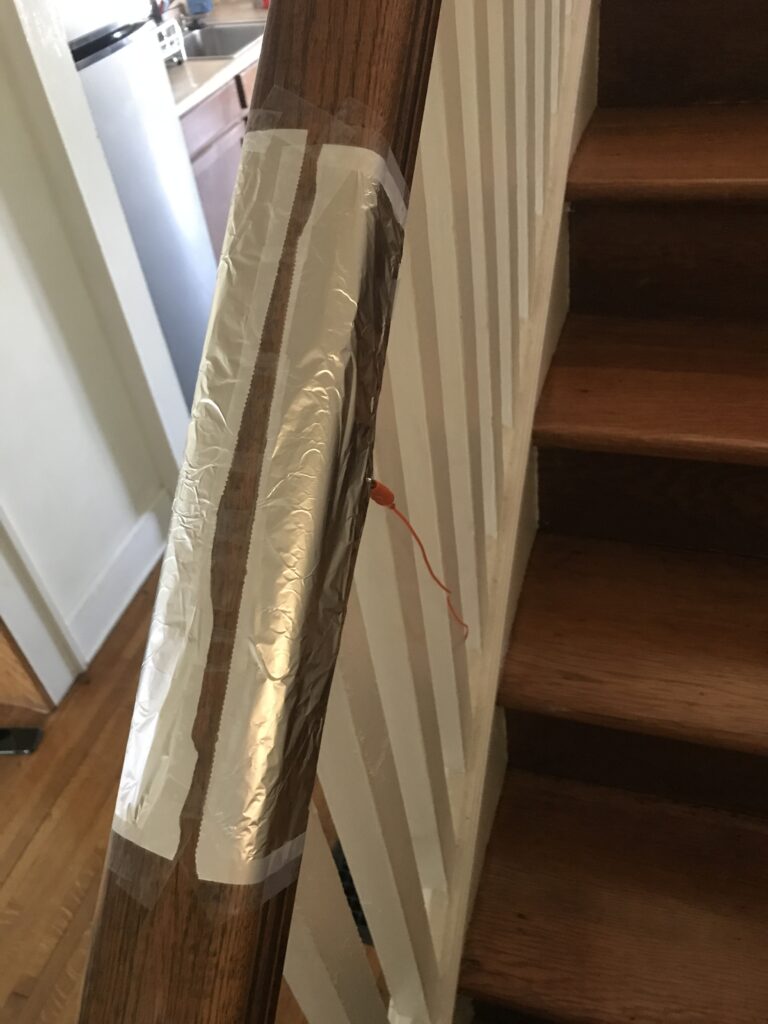
The resources I used for this were the Makey-Makey attached to aluminum for the trigger. I designed the aluminum on the staircase to be triggered by the normal way that someone might put their hand on the railing when descending.
Then the Makey-Makey plugged into my computer which ran the Isadora program.
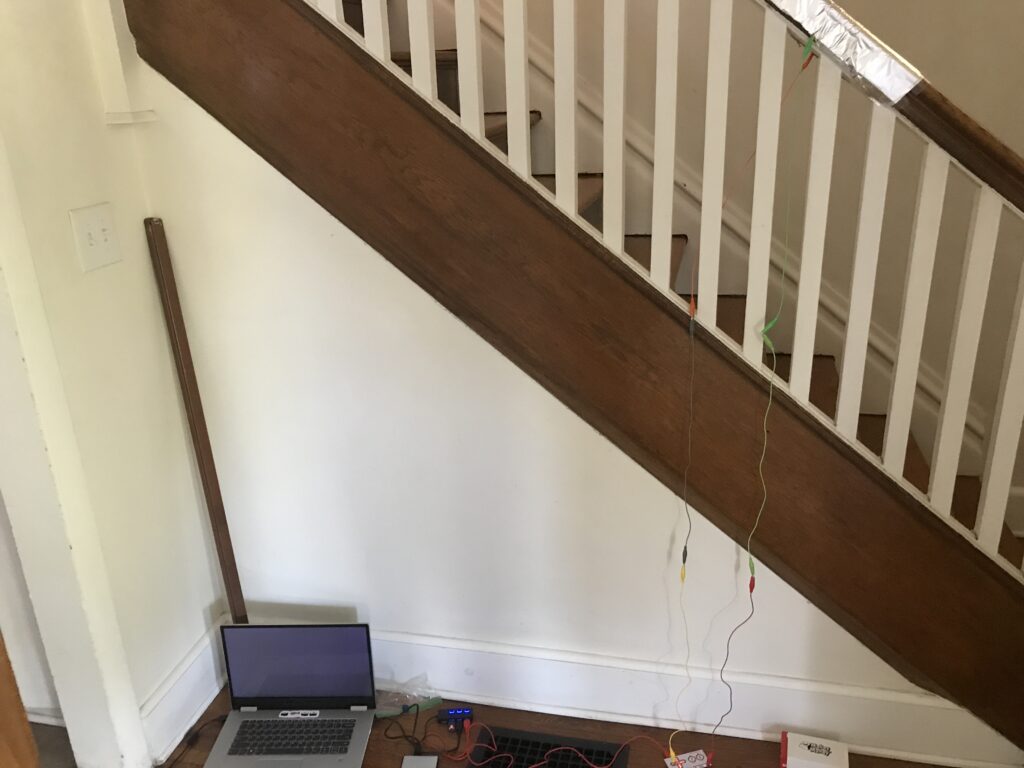
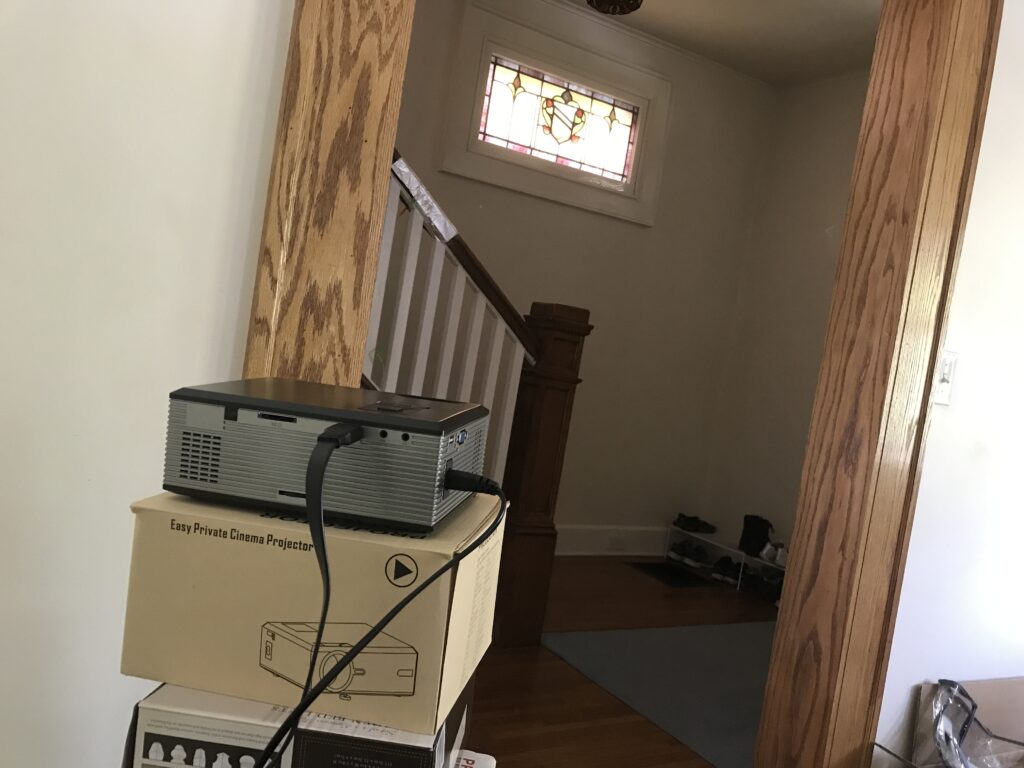
Then I had to get the stage from Isadora into my projector. I did not have the right kind of cable to plug the projector directly into my computer but it would plug into my phone. So I used an app called ApowerMirror which was installed on both my phone and computer in order to mirror my computer screen onto my phone. This allowed me to transfer what was on my full screen stage on my computer into the projector that would serenade the person who triggered the stairs.
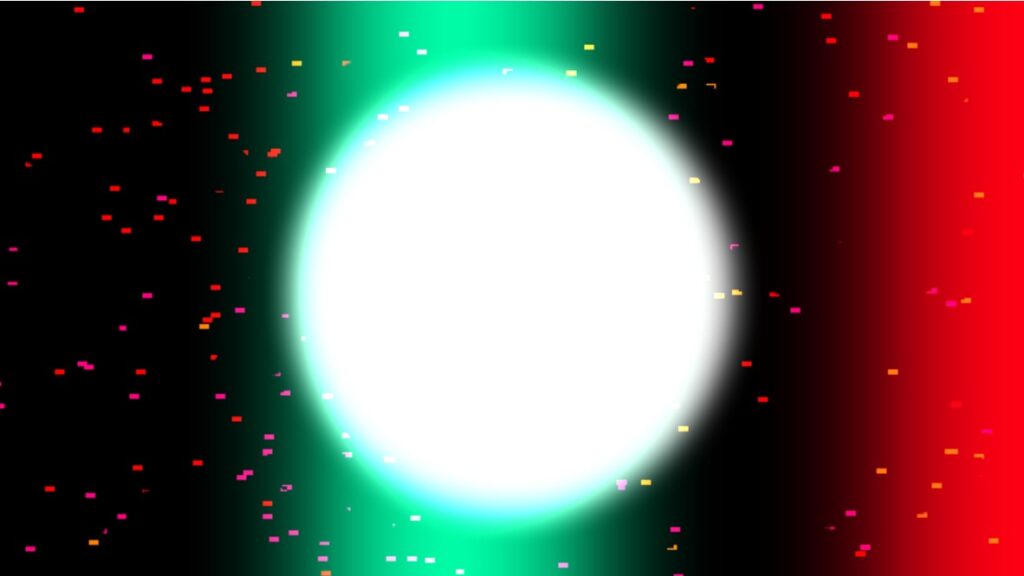
I used two scenes to manage this experience. The first one counted the triggers as well as determining how many times someone had to trigger the stairs before the projection and music would start. It randomly generated a new number from 5-10 for each round.
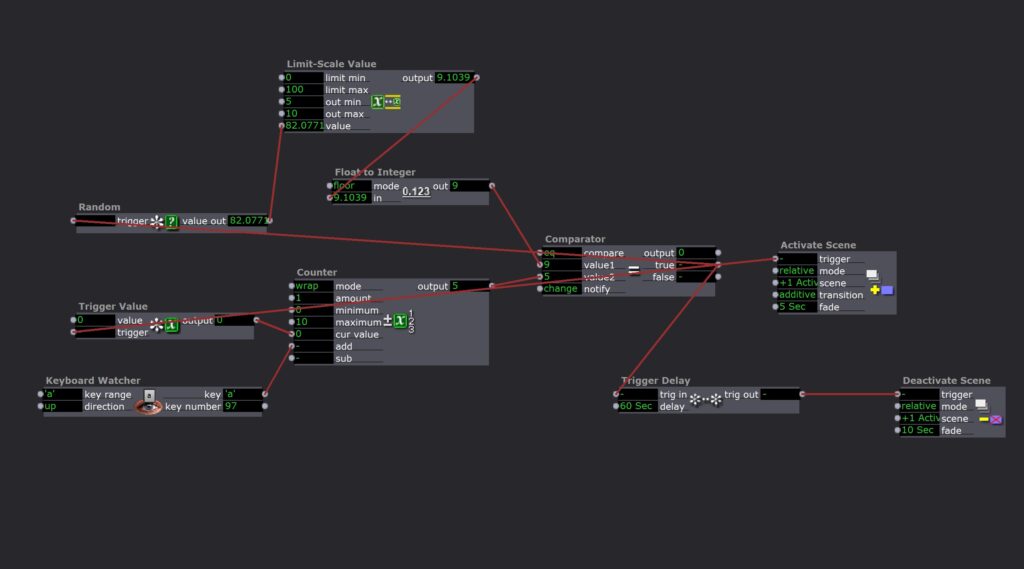
It would then activate the next scene which contained a colorful projection and started a random fun song to dance to. After one minute the scene would be slowly deactivated.
Overall I was really satisfied with this project. It took me a lot less time than the previous one I think because I took the time to plan at the beginning. It was also super fun to leave up in my house and spontaneously be able to jam out to a good song!
A few things to note for the future would be 1) I couldn’t projection map because I was just mirroring my computer screen; 2) my phone battery was used up very quickly my mirroring and projecting. So I would want to look for an app that could act as a second monitor or even better, get an HDMI to USB-A cord that would connect my projector directly to my computer.