Sound Reactivity LAB
Posted: September 26, 2023 Filed under: Uncategorized Leave a comment »In this sound reactivity patch made with Lexi, I animated three orbiting circles to music. The movement of each circle is generated by Sound Frequency Bands which through using a combination of Smoother, Limit-Scale Value and Color Maker RGBA. The movement idea came from using Spinner and Wave Generator, which is finally filtered through Motion Blur at the end. I really like the way the movement reacts to the beat by jumping in and out of orbit in a symmetrical way.
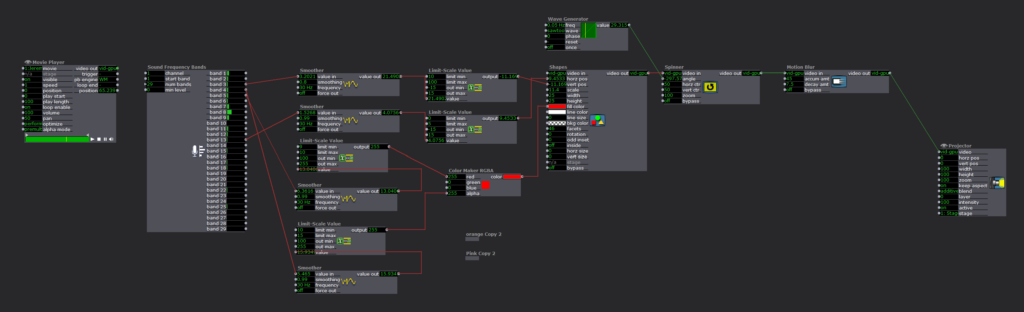
My biggest takeaway putting this together was actually the usefulness of the Limit-Scale Value. I also realized I was not clear on what limit min/max vs. out min/max meant and Lexi helped me to understand.
IZZ feeding sound practice
Posted: September 26, 2023 Filed under: Uncategorized Leave a comment »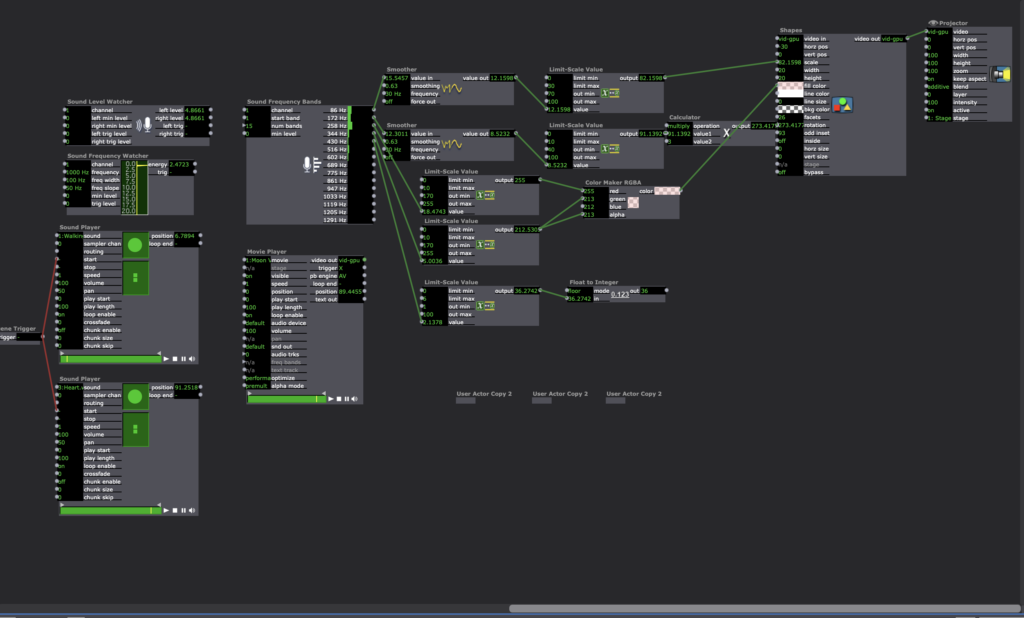
In this practice, I fed into isadora sound files of my own humming, the sound of my heart beat and footsteps. The raw numbers from the sound frequency actors were manipulated through the limit scale, calculator and smoother actors, before being plugged into the shapes actor, changing up the location, scale, rotation and color of the objects. I also used duplicated user actors to create multiples of the same moving object.
Audio Project
Posted: September 26, 2023 Filed under: Uncategorized Leave a comment »My goal for this short project was just simply playing with audio related actors.
I randomly picked up multiple values from Sound Frequency Bands actor, and connected them to many kinds of outputs such as shapes, positions, and colors transitions/transformations.
Even there was no order in those many connections between input and output values, the final video shows synchro with the music (of course, as inputs come from the music).
Especially, the intro part of Blue Train by John Coltrane clearly shows it (as it has the rhythm of the peak and the silence).
I really enjoyed the project, and got the sense of how I can deal with sound actors to use audio data as input or trigger.
Lawson: Audio Visualization
Posted: September 26, 2023 Filed under: Uncategorized Leave a comment »Here’s my audio visualization project!
Link to Isadora and Sound Files:
Sound-Reactive Project
Posted: September 26, 2023 Filed under: Uncategorized Leave a comment »For my sound-reactive project, I used analyzed the input from the microphone and used different parts of the audio spectrum to shade different parts of a moving visual “shooting star-like” field.
Ultimately I wasn’t able to get any audio routing software working on the ACCAD computer I was using (permissions, etc.) Fortunately though, I have prior experience with software like this, and I feel comfortable incorporating it into future projects (on my home desktop).


Link to Isadora file:
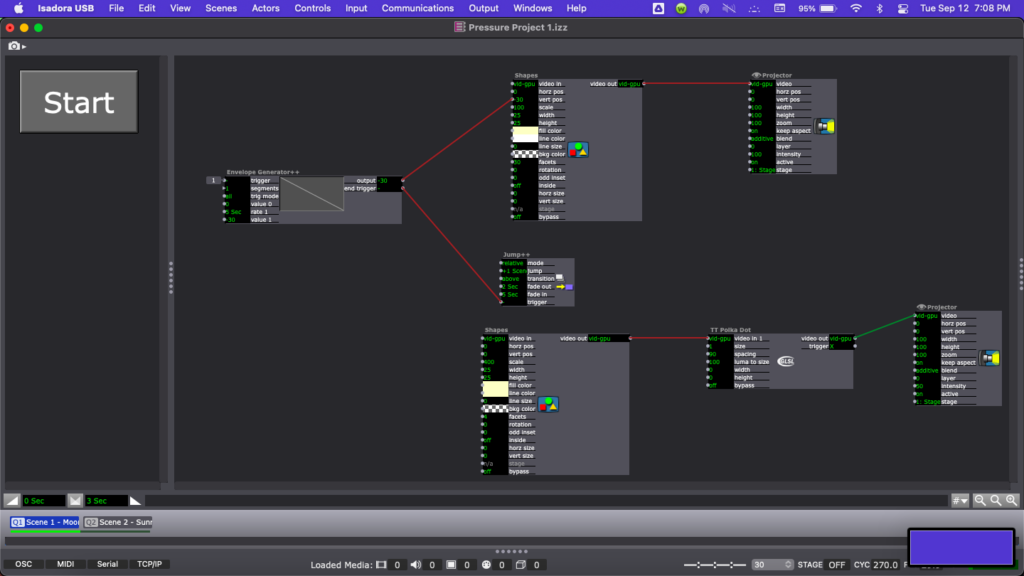
Pressure Project 1: “About Cycles”
Posted: September 13, 2023 Filed under: Isadora, Pressure Project I | Tags: Au23, Isadora, Pressure Project, Pressure Project One Leave a comment »Recording of the Pressure Project:
Motivations:
- Learn about Isadora
- General features/ways to create in Isadora
- Ways to organize objects in Isadora
- Ways to store information in Isadora
- Control flow
- Engage with the subject of “Cycles”
- This class uses cycles as an integral component of its processes. Therefore, focusing on the idea of cycles for this first project seemed fitting.
- Because this project encouraged the use of randomness to create something that “plays itself” (once you start it) and holds the viewer’s attention for some time, playing with indefinite cycles seemed appropriate.
- Find a “Moment of Joy”
- The “Side Quest” for this project was to invoke laughter or a moment of joy.
- When I started my 6 hours for this project, I was in a little bit of a bad mood. Consequently, I was not in the mood to create something joyful. Therefore, I decided to challenge myself to take something negative and turn it into something positive—since this artwork would feel more authentically “joyful” to me if that “joy” came from a genuine determination to find that joy within an honest acknowledgement of both the good and bad.
How the Project Supports those Motivations:
- The Storyline
- The beginning portion employs Sisyphean imagery to convey feelings of being trapped in cycles and not making any noticeable progress.
- I experimented with the number of times this scene would play to try to play it just enough times that the viewer could think that this scene was all there would be—a psychological trick that would hopefully invoke negative feelings corresponding to this theme.
- Since the animation was relatively abstract (there was no person figure included, for example), I was glad to hear from the people who watched it in class that they realized that this reference was being made.
- Eventually, it is revealed that the rocks that are rolling backwards are rolling backwards into somewhere new and exciting.
- The rock is traveling to these new places over bridges created by other rocks that had arrived there before. (I am not sure from the audience response whether this part came through, consciously or subconsciously. If I were to continue working on this project, I would change what the rocks look like to make it more obvious that the bridge is made of those rocks specifically.)
- This animation of the traveling rock cycles indefinitely, with the background effects randomized each time. (This, combined with the effect of the Sisyphean section of changing the location after the viewer starts to think that section will be the only one, had the interesting effect of causing the in-class audience to not be sure for some time that this section would repeat indefinitely. While this has some obvious drawbacks, it does arguably complement some of the themes of this piece.)
- While I want each viewer to come to their own personal interpretation of this piece, I am hoping it can encourage viewers to consider the idea that, even if we cannot see it, in the cycles in our lives we are stuck in—even the ones where the negative effects far outweigh the positive ones—we still get something each time, even if that is just a little bit more knowledge that we can use to get just a bit further next time.
- The beginning portion employs Sisyphean imagery to convey feelings of being trapped in cycles and not making any noticeable progress.
- The Technical Aspects
- This project did give me the opportunity to experiment with a variety of Isadora “Actors.” My favorite one (which this project used for special effects and textures) was the “Explode” Actor.
- I used User Actors (which I found could be used similarly to classes from more traditional object-oriented coding languages) frequently to keep things more organized and to limit the amount of copied and pasted Actors.
- I experimented with Global Values (which have some similarities to global variables from more traditional programming), the Calculator Actor, the Comparator Actor, Actors that handled Triggers, and the Jump++ Actor for control flow, especially to repeat Scenes.
- I tried to automatically set the Global Value at the start of the show, but some unknown aspect of my logic was incorrect, so I did have to remember to manually set it each time I played the show.
- Much of the control flow resulting in the final effect on the Stage could have been accomplished with just the Counter Actor, Actors that handled Triggers, and the Jump++ Actor. However, I specifically wanted to learn about Global Values using this project, and there is some symbolism involved in the fact the Scene itself truly does fully repeat (rather than just a set of steps within the Scene). This does raise an interesting question about how the way something is done can in itself be part of an artwork—but is that worthwhile when it takes more time, is less clean, and ultimately results in the same user/viewer experience?
Isadora File Documentation/Download:
PP1: Experiments in Synchromism
Posted: September 12, 2023 Filed under: Uncategorized Leave a comment »In this first plunge into Isadora, my main goal was to get to know the program through experiments in seeing. Using ‘synchronism’ as a guide (an art movement that draws analogies between color and music), I focused on orchestrating colors and the pacing between shapes.
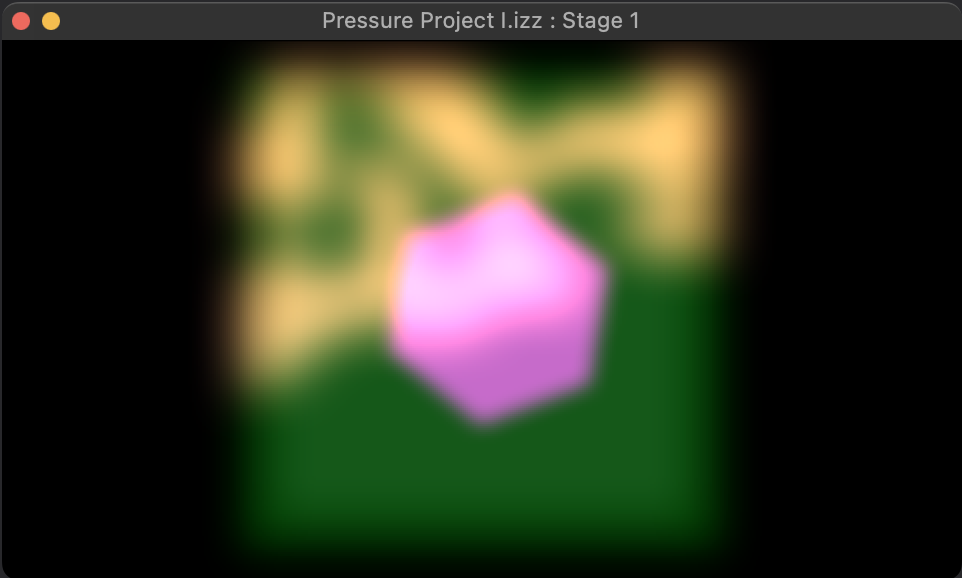
In the first scene, there are three elements at play: the pink transformer emerging from the depths, a green pulsing square sponge, and a blurry animated layer that gently envelops the two. [CG mentioned that the shapes had an organic feel, this may have something to do with the way they ‘breathe.’] The pacing of each shape was an important part of this scene, as a response to the prompt’s challenge of 20 seconds. I felt that if I could let the viewer watch the emerging pink transformer with anticipation, they would get the idea that you have to ‘wait and see’ rather than assume the loop will continue. In the programming, there was a wave generator altering color (+alpha), scale, and facets.
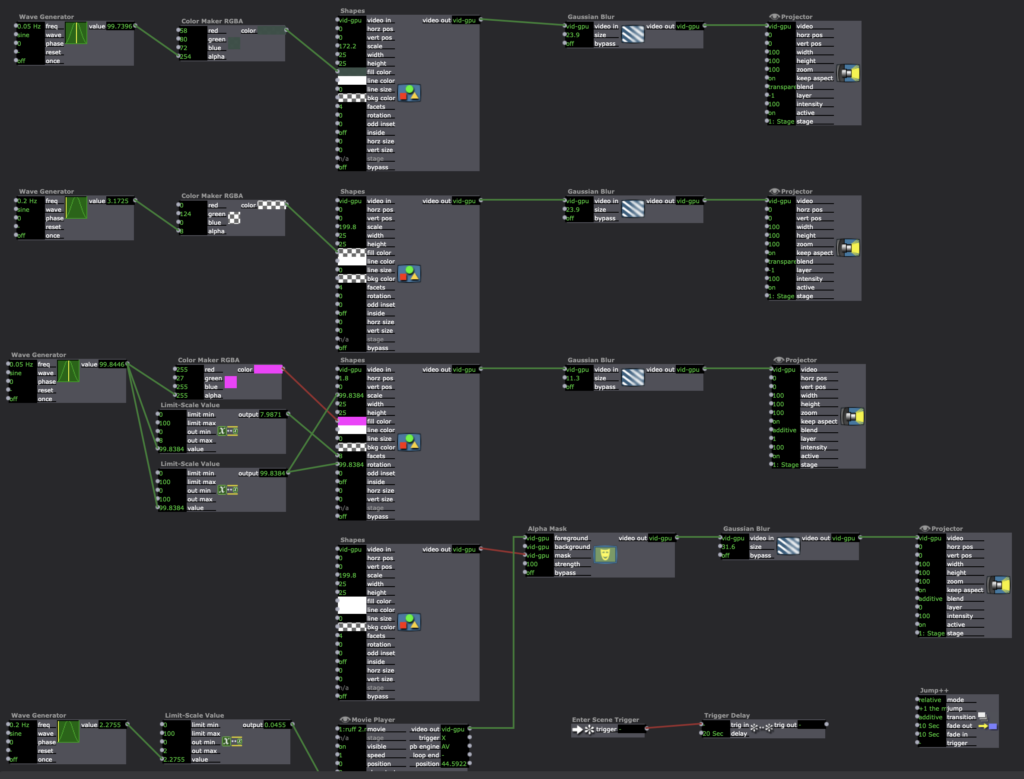
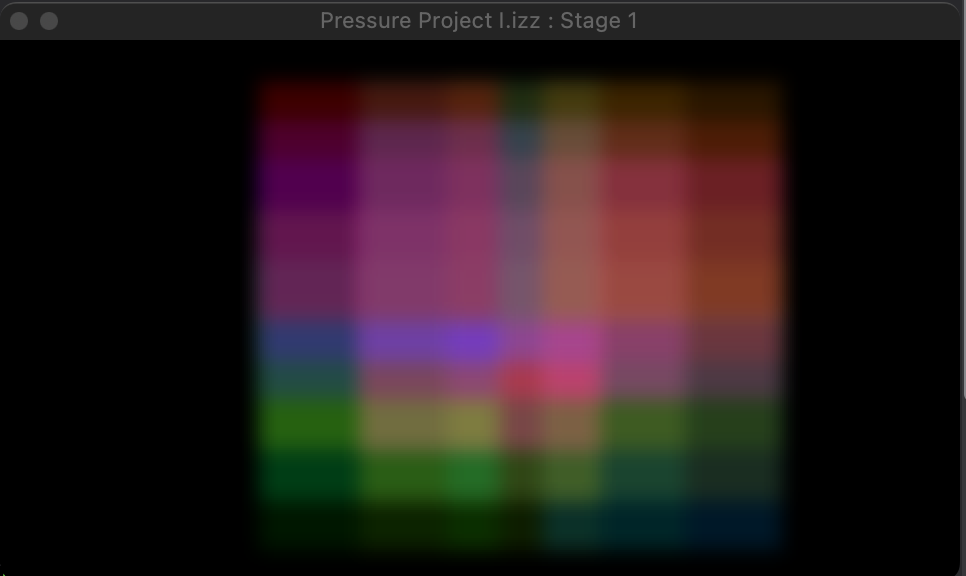
In the second scene, which was meant to be a continuation of the play of pacing, I encountered some technical difficulties (which Alex helped to resolve!) I wanted to create a prism where each square undulated at a subtly different speed so that they would influence the color of the next layer. You would ideally see all the layers in an unending loop, it sounded like a harp in my head. This worked for a good while until I created a new scene and then everything synched to one pulse, erasing the careful layering I had done earlier. Having spent so much time on that, I felt quite frustrated and gave up. The programming for this section comprised of a multitude of squares using wave generator influencing color + alpha. I placed each square so they would overlap with three vertically and three horizontally. Next time, I’ll make the squares very small rather than overlap so they act like pixels.
To be continued.
Conclusion: I learned a lot! I love the suggestion of the class to arrive at a place of clarity. Perhaps, another shape could emerge that is an amalgamation of the prism. I also really enjoyed seeing everyone’s interpretation of the prompts and was particularly impressed by the imaginative storytelling in every project. Kudos!
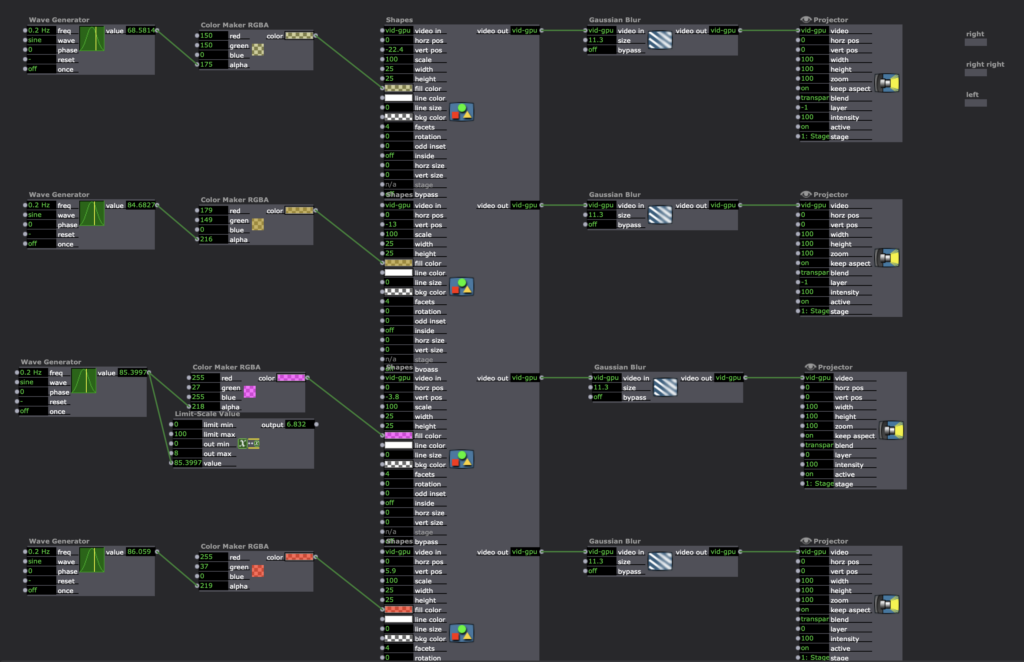
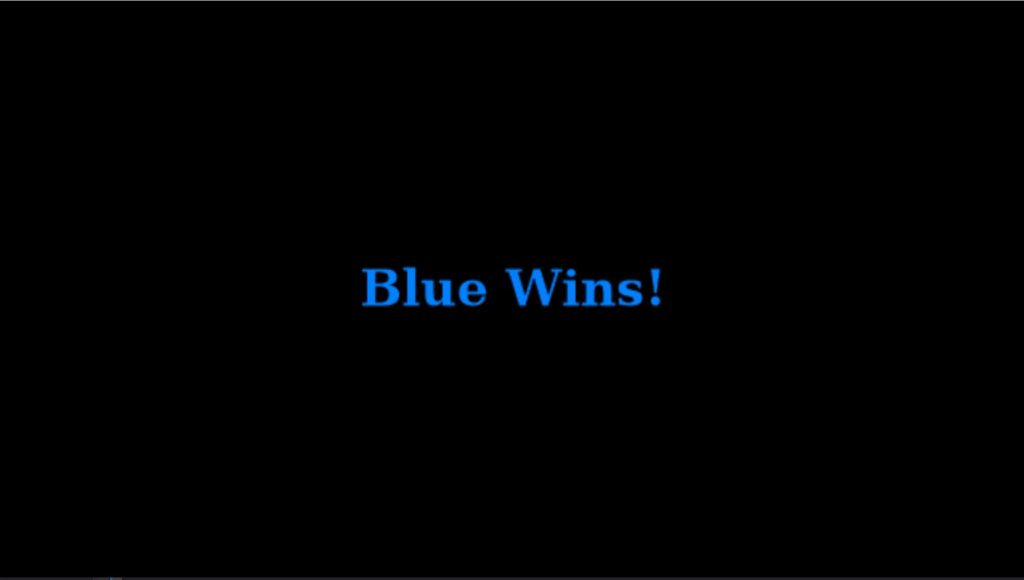
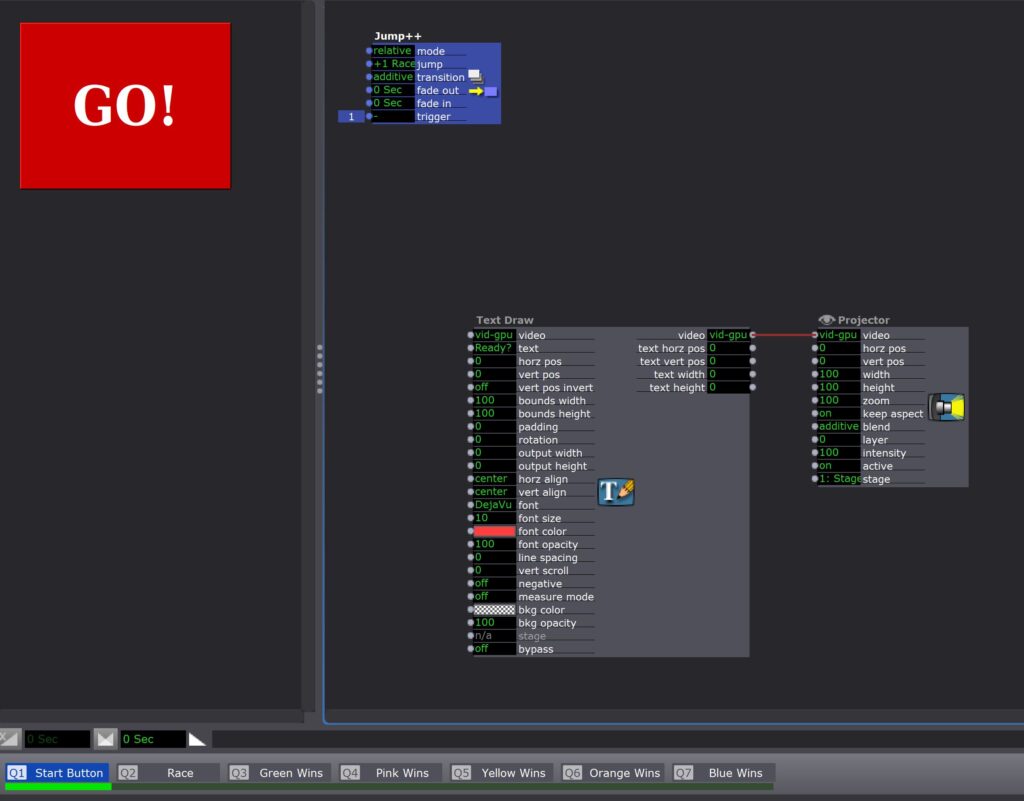
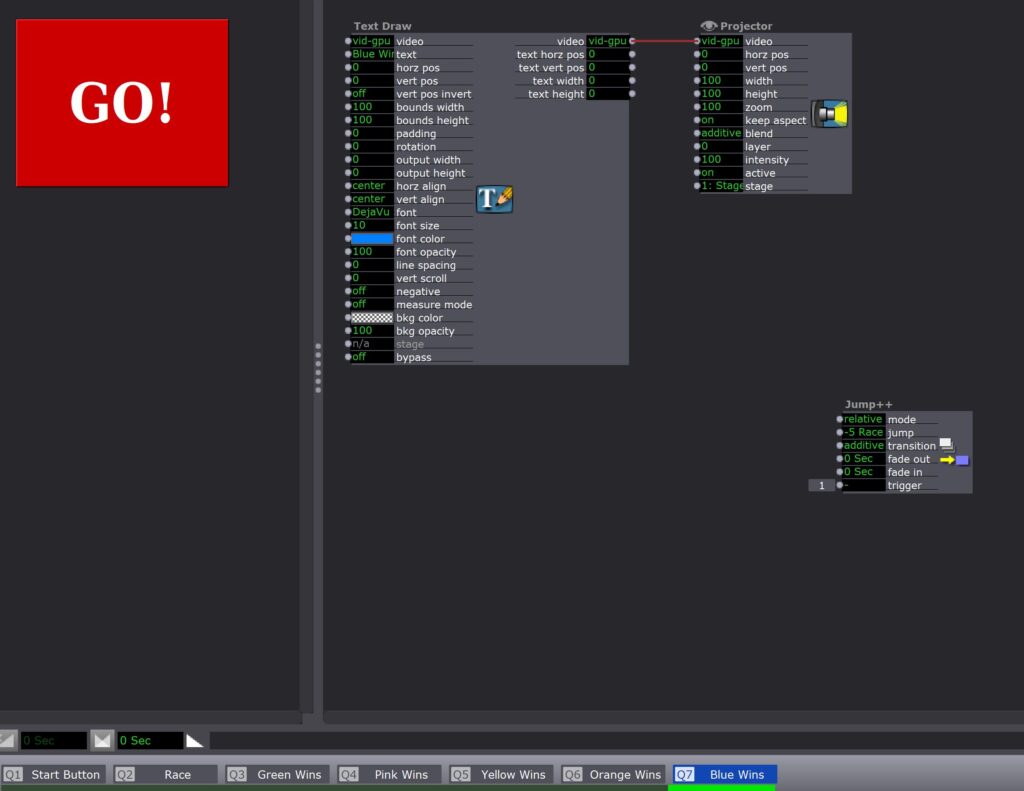
Pressure Project 1: Square Race
Posted: September 12, 2023 Filed under: Uncategorized Leave a comment »My idea for this project came about when I was considering how to create a drama that held viewers’ attention for at least 30 seconds. So I thought, why not create a race?

When the “Go!” button in the control panel is pressed, the race starts!

5 squares of differing colors race against each other, and the result varies every time the race is run. By far the most involved part of the project was the creation of the algorithm that propels each square. In the end, I settled on this:
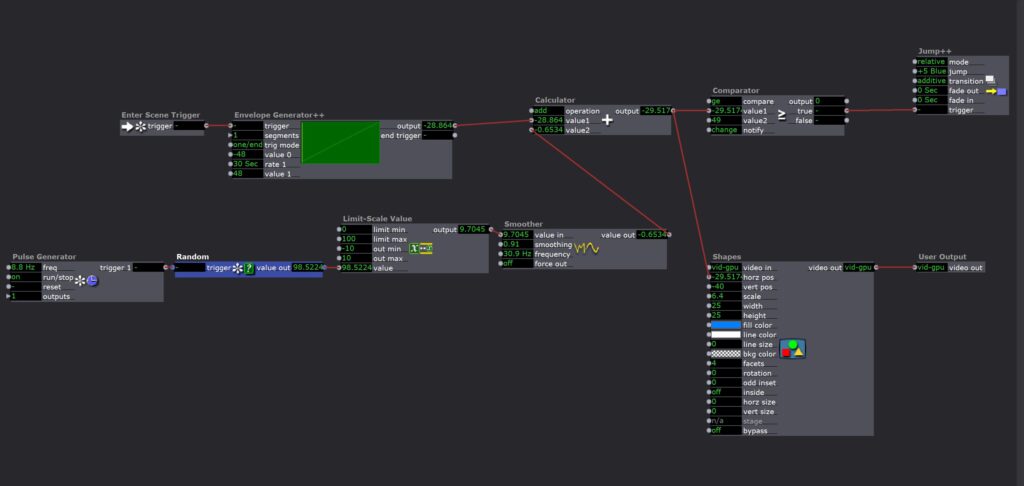
The heart of the algorithm is just a straightforward ramp envelope. The square is simply moved slowly across the screen over the course of 30 seconds. The random, back-and-forth movement of the squares comes from the addition of random numbers to the envelope. I used a smoother on the random values to make the random movement of the square smooth rather than jumpy. A comparator is used to determine if the square is at any point the winner — if the horizontal position of the square (equal to the envelope output plus the random output from the smoother) is at any point greater than or equal to 49, the comparator’s condition is met, and it triggers a jump actor that changes the scene to the “victory screen” for the corresponding color (just some text):
While the outcome of the race is in fact random and changes every time, in truth, due to the nature of the algorithm, the first 29 seconds or so of the race don’t impact the result whatsoever. This is because the random number generator that determines the current random displacement of the square does not take into account the previous random displacement of the square. This also means that the race will always be perceived as “neck and neck” and “anyone’s race to win” until the final second, further escalating the drama of the situation. I think this gives the race appropriate casino machine vibes — an elaborate, meaningless show to create anticipation for an outcome that is actually only determined in a brief moment.
One thing I didn’t get around to adding were audio effects and music. I wanted to add a starting gun noise that played when “Go!” was pressed, some anticipation-building music that played during the race, and a victory fanfare for each square. If I were to do this again, I would definitely add these things.
Reflection on PP1
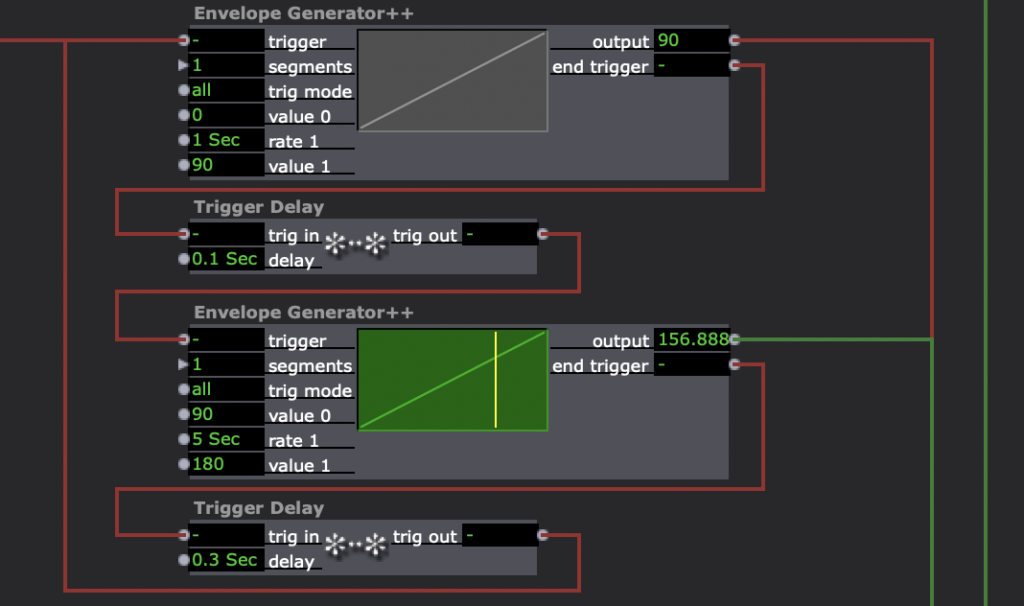
Posted: September 12, 2023 Filed under: Uncategorized Leave a comment »One of my goals for this project was to create an automatic transformation that keeps changing its shape randomly. So, my agenda was how to build a loop circuit which never repeat the same motion.


Firstly, I made some looping structures; Wave actor automatically loops so it was useful. Envelope actor has the ending point, but I found that if I connect end trigger to start trigger, it forms a loop circuit. Then, I can put Trigger Delay or the other Envelope actor to make the loop more complex.
Here’s an example of a looping part.
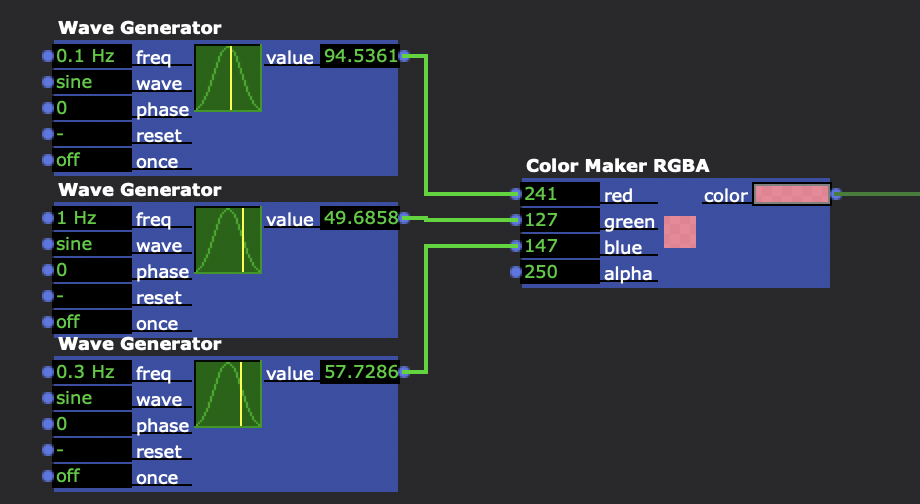
The next task was to insert some randomness. Random actor was one of the solutions, for sure. But I also used the differences between frequencies to make transitions seems random (it’s not actually random as different pitches make a long period loop, but it behaves like random on our eyes at least).
Here’s example; I used three Wave actors to change RGB values. As each frequency is different, the whole color transition seems random.
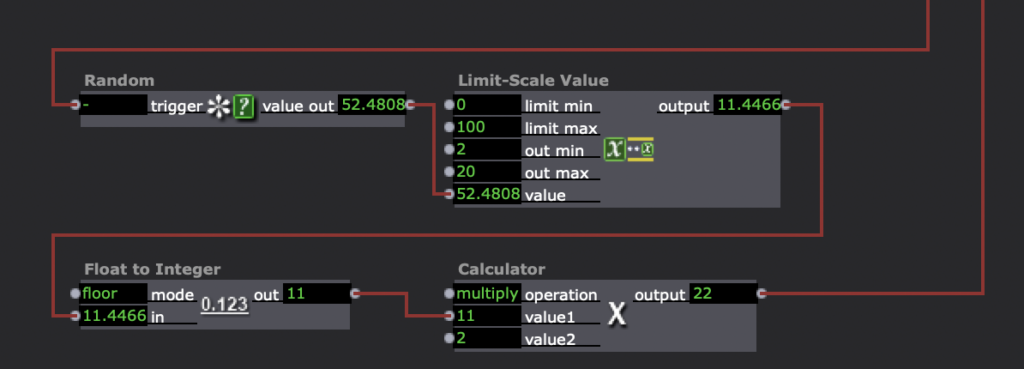
I found some actors to adjust values. For example, to make a star shaped polygon (an offset regular polygon) whose facets randomly change, I had to convert values generated by Random actor into integer even numbers. I used Float to Integer actor to get integer numbers and connect it to Calculator actor which multiplies it by 2 to make even numbers.
Throughout those process, I slowly realized that what Isadora’s chart of actors actually represents is definitely coding; accepting triggers, convert input values into outputs, and send values or signals to the next lines.
Also, it reminded me of building an electric circuit; make a loop of multiple signals by connecting modules.
For me, rather than a final output on Stage monitor (I’m certainly satisfied with it for sure), the realization of this sense (Isadora is coding/circuit building) was the biggest achievement.
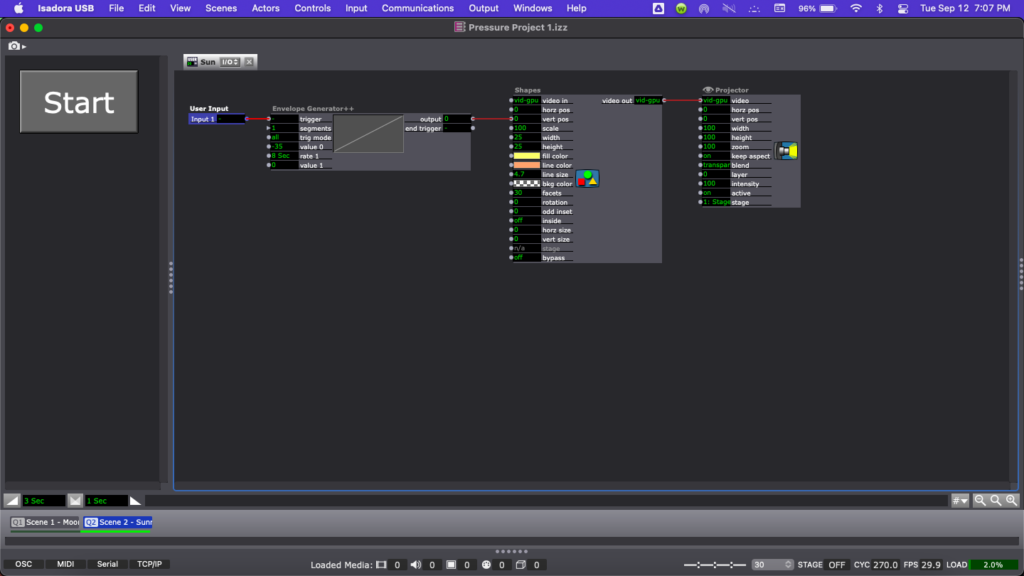
Pressure Project 1: Sunrise
Posted: September 12, 2023 Filed under: Uncategorized Leave a comment »For Pressure Project 1, I created a short scene of a moon setting that transitioned into a sunrise using Isadora.
Step 1: The Idea
Coming up with an idea for this project was probably one of the hardest parts for me because I did not have any ideas when I first sat down to work, but after a few minutes of playing around in Isadora, I started to come up with ideas.
Step 2: Iteration
My first idea started with colored rectangles that I wanted to have change colors over time, so I started working on rectangle placement. While working, I got another idea that excited me more than the one I was working on and scrapped the original concept. This new idea was going to play with negative space and would be entirely in black and white. I spent a lot of time working on trying to make the very first scene look the way I wanted, with a half black, half white circle on an opposing black and white background, but the split color circle ate up way too much time and I didn’t end up getting it to work the way I was hoping. From the ashes of the circle rose another idea: a sunset.
Step 3: Sun and Moon
In the time that I had left with this project, I started by making one of the circles yellow with an orange outline and deleted the extra one. Then I started to play with the position of the sun in the sky, making sure the action was not happening too fast, as sunrise is a naturally slower transition. Next, I used the Envelope Generator++ and Color Maker RGBA actors to make the color of the sky change from black to a pink-orange, making sure that this was happening in sync with the change in position of the sun. To add another element to my project, I created a new scene with a light yellow circle on a black background that would be a moon. I made the action of the moon going down slightly slower than that of the sunrise and I also added a TT Polka Dot GLSL Shader actor in an attempt to give the look of stars, though I did not end up having time to adjust this very much.
Step 4: Timing
Figuring out the timing of everything in this project took a lot of time. Coordinating the sun rising with the background color change, making sure the action wasn’t happening too slow or too fast, coordinating this with the timing of the mood falling, then adjusting the transition between the two scenes was more of a challenge than expected. If one of my elements was off by a couple seconds, then something looked off, so I spent what time I had left adjusting timing on several actors. I finished off the project by adding a button to start the show, as I forgot how to make it loop, but I did remember how to quickly program a start button.
Isadora File & Screen Capture

Reflection
I feel like this pressure project overall was a good introduction to both Isadora and the idea of a pressure project. While I did choose to mostly use actors we had already discussed in class, I do think there was enough time to play around with unfamiliar actors as well. Most of my time was spent on playing with Isadora and working on ideas that came before this one, but I don’t consider that to have been a waste of my time. To me, this time spent on elements that did not end up in my final project was spent equally as well because the final product is just an iteration of my previous ideas. I would have liked to do a little more, but I am happy with my project overall.