Cycle 3: Dancing with Cody Again – Mollie Wolf
Posted: December 15, 2022 Filed under: Uncategorized | Tags: dance, Interactive Media, Isadora, kinect, skeleton tracking Leave a comment »For Cycle 3, I did a second iteration of the digital ecosystem that uses an Xbox Kinect to manipulate footage of Cody dancing in the mountain forest.
Ideally, I want this part of the installation to feel like a more private experience, but I found out that the large scale of the image was important during Cycle 2, which presents a conflict, because that large of an image requires a large area of wall space. My next idea was to station this in a narrow area or hallway, and to use two projectors to have images on wither side or surrounding the person. Cycle 3 was my attempt at adding another clip of footage and another mode of tracking in order to make the digital ecosystem more immersive.
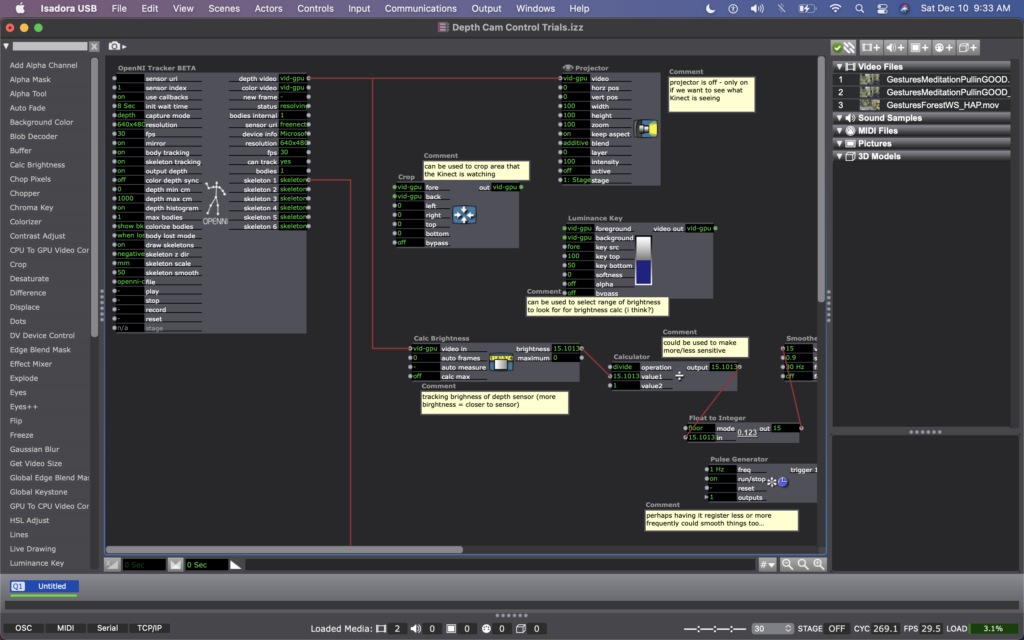
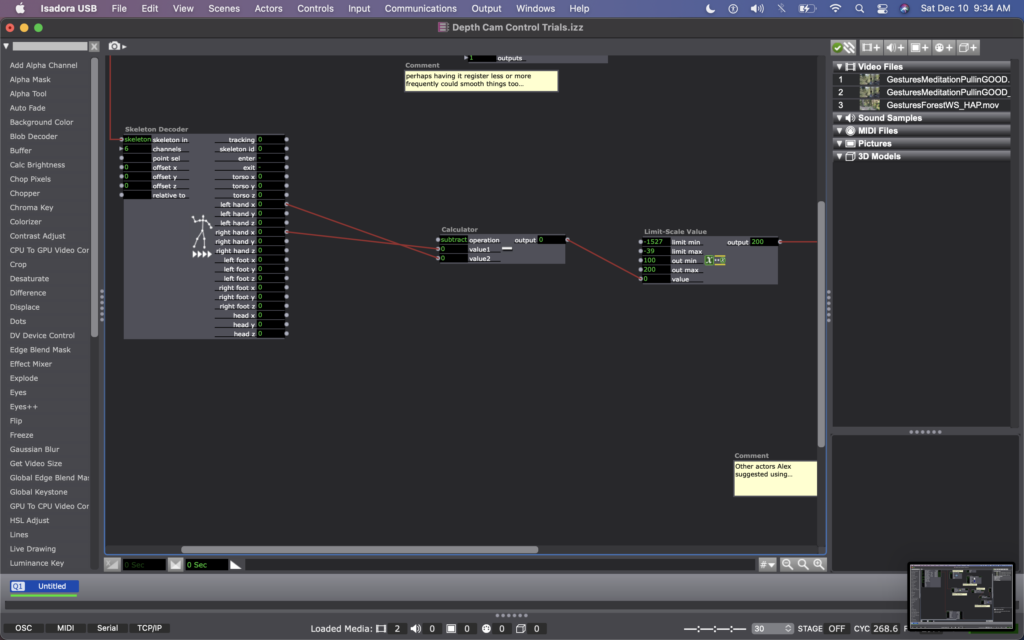
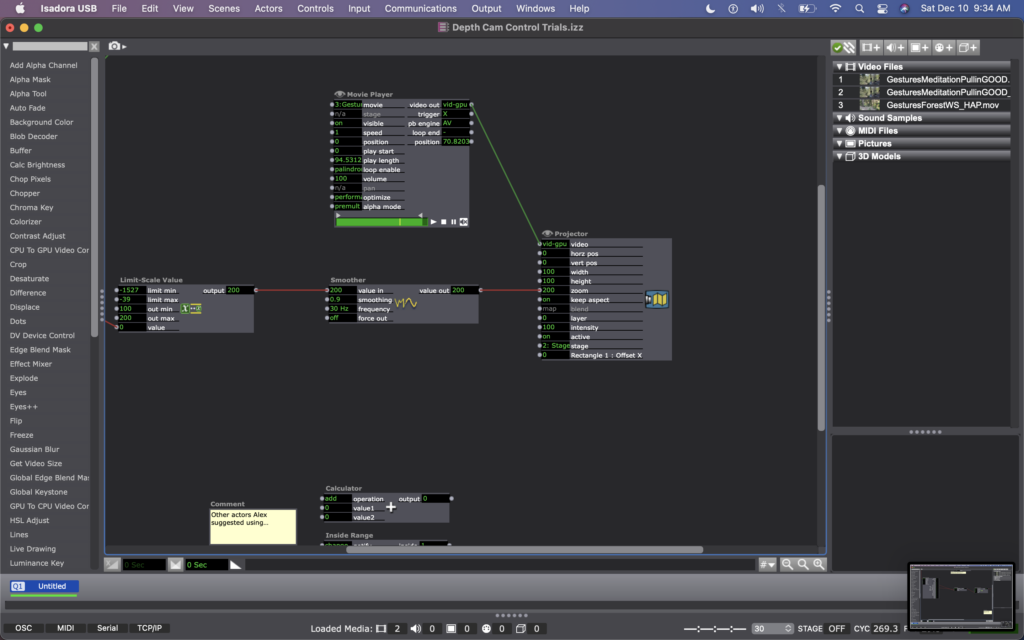
For this, I found some footage of Cody dancing far away, and thought it could be interesting to have the footage zoom in/out when people widen or narrow their arms. In my Isadora patch, this meant changing the settings on the OpenNI Tracker to track body and skeleton (which I hadn’t been asking the actor to do previously). Next, I added a Skeleton Decoder, and had it track the x position of the left and right hand. A Calculator actor then calculates the difference between these two numbers, and a Limit-Scale Value actor translates this number into a percentage of zoom on the Projector. See the images below to track these changes.
My sharing for Cycle 3 was the first time that I got to see the system in action, so I immediately had a lot of notes/thoughts for myself (in addition to the feedback from my peers). My first concern is that the skeleton tracking is finicky. It sometimes had a hard time identifying a body – sometimes trying to map a skeleton on other objects in space (the mobile projection screen, for example). And, periodically the system would glitch and stop tracking the skeleton altogether. This is a problem for me because while I don’t want the relationship between cause and effect to be obvious, I also want it to be consistent so that people can start to learn how they are affecting the system over time. If it glitches and doesn’t not always work, people will be less likely to stay interested. In discussing this with my class, Alex offered an idea that instead of using skeleton tracking, I could use the Eyes++ actor to track the outline of a moving blob (the person moving), and base the zoom on the width or area that the moving blob is taking up. This way, I could turn off skeleton tracking, which I think is part of why the system was glitching. I’m planning to try this when I install the system in Urban Arts Space.
Other thoughts that came up when the class was experimenting with the system were that people were less inclined to move their arms initially. This is interesting because during Cycle 2, people has the impulse to use their arms a lot, even though at the time the system was not tracking their arms. I don’t fully know why people didn’t this time. Perhaps because they were remembering that in Cycle 2 is was tracking depth only, so they automatically starting experimenting with depth rather than arm placement? Also, Katie mentioned that having two images made the experience more immersive, which made her slow down in her body. She said that she found herself in a calm state, wanting to sit down and take it in, rather than actively interact. This is an interesting point – that when you are engulfed/surrounded by something, you slow down and want to receive/experience it; whereas when there is only one focal point, you feel more of an impulse to interact. This is something for me to consider with this set up – is leaning toward more immersive experiences discouraging interactivity?
This question led me to challenge the idea that more interactivity is better…why can’t someone see this ecosystem, and follow their impulse to sit down and just be? Is that not considered interactivity? Is more physical movement the goal? Not necessarily. However, I would like people to notice that their embodied movement takes effect on their surroundings.
We discussed that the prompting or instructions that people are given could invite them to move, so that people try movement first rather than sitting first. I just need to think through the language that feels appropriate for the context of the larger installation.
Another notable observation from Tamryn was that the Astroturf was useful because it creates a sensory boundary of where you can move, without having to take your eyes off the images in front of you – you can feel when you’re foot reaches the edge of the turf and you naturally know to stop. At one point Katie said something like this: “I could tell that I’m here [behind Cody on the log] in this image, and over there [where Cody is, faraway in the image] at the same time.” This pleased me, because when Cody and I were filming this footage, we were talking about the echos in the space – sometimes I would accidentally step on a branch, causing s snapping noise, and seconds later I would hear the sound I made bouncing back from miles away, on there other side of the mountain valley. I ended up writing in my journal after our weekend of filming: “Am I here, or am I over there?” I loved the synchronicity of Katie’s observation here and it made my wonder if I wanted to include some poetry that I was working on for this film…
Please enjoy below, some of my peers interacting with the system.
cycle 3 : playful practices : katie O
Posted: December 14, 2022 Filed under: Uncategorized Leave a comment »For cycle 3, I chose to continue adding elements of interactive and participation into the work. I created a control panel where participants could change the settings of the image being projected, such as zoom, spin, shimmer, kaleidoscope, and others. I also implemented some textures from my previous work that would add different imagery into the space. The last element I added was my canon 70D camera on a tripod, which I set to a long exposure setting and people could take photos of the space if they wanted. This was in relationship to previous cycles, which included a handheld camera, a phone using NDI watcher, faux Fresnel lenses, a tucked away pico projector and camera feedback loop in micro scale, and emergency blankets.
Part of me wondered if the set up would be too chaotic and if there were too many options in the space. Seeing as this was a very process-oriented course, I decided to keep all the elements out as the idea of pairing down could come in later iterations. It does make me think about my work and how my process tends to involve laying many options out and then slowly scaling back as needed.
I’m excited by how this work has a wide mix of digital elements, software systems, physical interactions, and tangible items. The Isadora patch is surprisingly less complex than I imagined it would be, as it contains a video watcher and an NDI watcher and a movie player. The complexity comes through the triple head set up and matrix connection, and then the rest is left to what choices are being made in the space.
I was considering what aspects of the space participants truly get to interact with. It seems at times that interactive art lets you experience your body’s movements causing change in the space, but distance between participants and the technology itself is still a large divide. In this set up, especially since this group is trained to work with technology, I wanted to let them have their hands on as much tech as possible in addition to experiencing the result. This idea manifested as the participants got to hold the cameras projecting the live feed, they were able to push the button that took photos, and they had the chance to be at the computer and choose which filters to add to the projected images.
While watching participants interact with the space in cycle 3, I noticed how I was beginning to feel drawn to this type of work as a pedogeological method, or as a process in creative making. This differed from my original intention which was thinking of it as an installation or interactive performance. There was a clear sense of curiosity and playfulness in the interactivity of participants, which left me feeling like there was no sense of a wrong choice in what they were drawn to. Instead, it seemed that they followed their instinctual interests and felt free to change their interaction whenever they wanted. As an instructor, I’m inspired by bell hooks theory that learning comes from a place of deep joy, which occurs when you are genuinely interested in what you’re doing. Education can be a place of creating space for students to follow their curiosities, which I felt emerged from this cycle.
I was surprised, considering my previous concerns, in the feedback following this cycle that some people wished for more elements to interact with. After I heard that comment, I thought about my experience in Other World, and realized that it never felt like too much, and that I wasn’t too worried if I didn’t interact with every element. I like the idea of letting ideas flow easily in and out of my process and being able to try something and let it go or realize that may support my work at another time even if it’s not today.
I feel much more confident in this work after cycle 3. It didn’t fully resonate that I was able to fully set up this space alone – not that I always want to work alone, but that I feel a deeper sense of understanding as I cultivated the ability to set it up on my own. I’m very grateful for Alex’s patience and interest in teaching, and his genuine commitment to helping students achieve their goals.
Cycle 3: Layering and Gesture: Collective Play
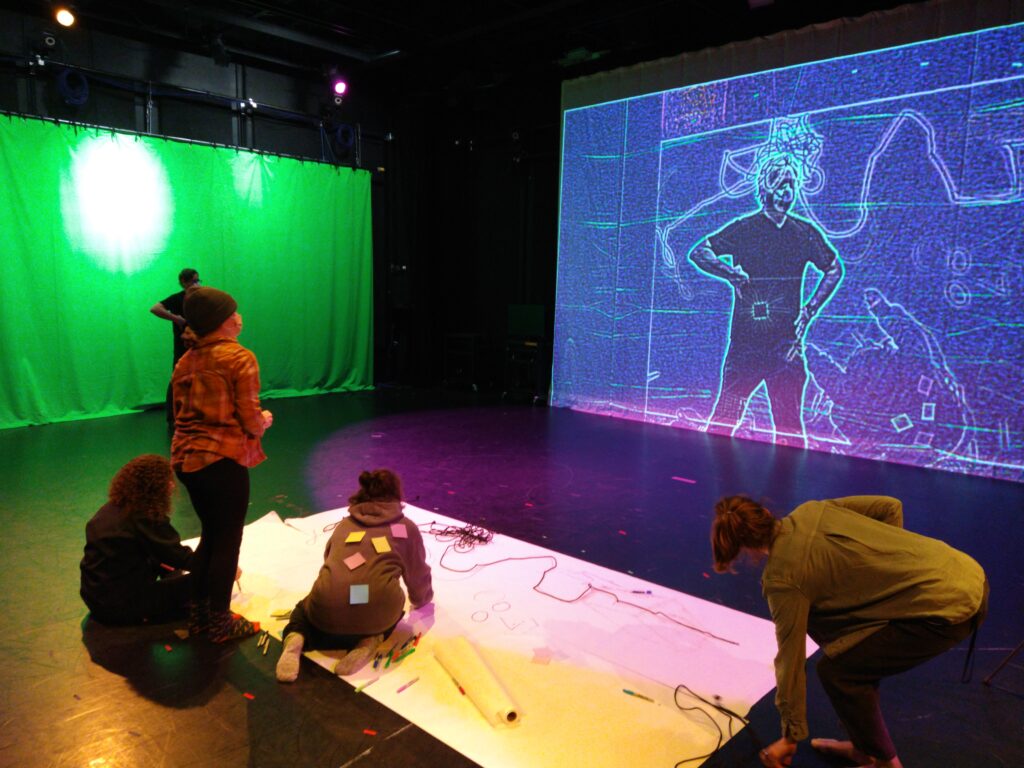
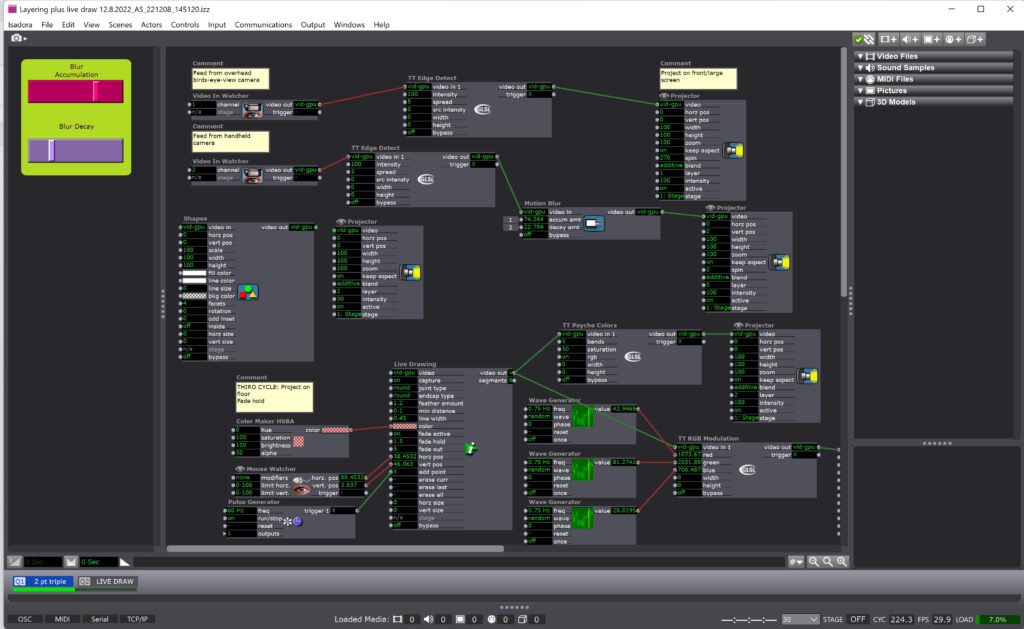
Posted: December 13, 2022 Filed under: Tamryn McDermott, Uncategorized | Tags: Cycle 3, Isadora 1 Comment »For this third iteration, I decided to set up three digital layers that provided space for play, collaboration, and digital/analog spaces to mingle. My initial idea was to consider how I could introduce the body/model into the space and suggest an opportunity for gestural drawing and experimentation both on physical paper and digitally. As you can see in the image below, participants were actively engaged in working on the paper, viewing what happening on the projection screen, and interacting with one another across these platforms and planes in space. A third layer not visible in the image below is a LIve Drawing actor in Isadora that comes into play in some of the videos below. I stuck with the TT Edge Detect actor in Isadora and played with a Motion Blur actor on the second layer so that the gestural movements would be emphasized.
Note the post-its on Alison’s back below. These were a great surprise as they were translated into digital space and were activated by her drawing and movement. They became a playful, unexpected surprise!
I really appreciated the feedback from this experience and want to share some of the useful comments I received as a record:
- Alison: I loved that Alison shared it was “confusing in a good way” and that she felt like it was a space where she could play for a long time. She identified that this experience was a social one and that it mattered that they were exploring together rather than a solo experience.
- Katie: Katie was curious about what would show up and explored in a playful and experimental way. She felt some disorientation with the screens and acknowledged that when Alex was using the live draw tool in the third layer, she didn’t realize that he was following her with the line. I loved that this was a surprise and realized that I didn’t share this as an option verbally well enough so she didn’t know what was drawing the line.
- Alex: Alex was one of the group that used the live draw tool and others commented that it felt separated from the group/collaborative experience of the other two layers. Alex used the tool to follow Katie’s movement and traced her gestures playfully. He commented that this was one of his favorite moments in the experience. He mentioned it was delightful to be drawn, when he was posing as a superhero and participants were layering attributes onto his body. There was also a moment when I said, “that’s suggestive” that was brought up and we discussed that play in this kind of space could bring in inappropriate imagery regardless if it was intended or not. What does it mean that this is possible in such a space? Consider this more. Think about the artifact on the paper after play, how could this be an opportunity for artifact creation/nostalgia/document.
- Mila: With each iteration, people discovered new things they can do. Drawing was only one of the tools, not the focus, drawing as a tool for something bigger. Love the jump rope action!
- Molly: How did we negotiate working together? This creates a space for emergent collaboration. What do we learn from emergent collaboration? How can we set up opportunities for this to happen? The live draw was sort of sneaky and she wondered if there was a way to bring this more into the space where other interactions were happening.
This feedback will help me work towards designing another iteration as a workshop for pre-service art teachers that I am working with in the spring semester. I am considering if I could stage this workshop in another space or if using the motion lab would be more impactful. If I set it up similarly in the lab, I would integrate the feedback to include some sort of floor anchors that are possibilities or weights connected to the ropes. I think I would also keep things open for play, but mention perspective, tools available, and gesture drawing to these students/participants who will be familiar with teaching these techniques to students in a K – 12 setting.
I have been exploring the possibility of using a cell phone mounted on the ceiling as the birds-eye-view camera and using NDI and a router to send through Isadora. I’ll work on this more in the spring semester as I move towards designing a mini-version for a gallery experience in Hopkins Hall Gallery as part of a research collective exhibition and also the workshop with the pre-service students. If I can get permission to host the workshop in the motion lab, I would love to bring these students into this space as my students this semester really appreciated the opportunity to learn about the motion lab and explore some of the possibilities in this unique space.
Cycle 3: Puzzlr Final
Posted: December 12, 2022 Filed under: Uncategorized Leave a comment »Introduction
The ending of this project was particularly frustrating because I ended up getting COVID the last week of classes. Yes if you’re reading this 20 years in the future, COVID was a terrible virus that crippled most of the planet in 2020, and we are now living with it every day. Because of this, I was not able to present my final prototype to the class, so a part of this documentation post will include a short video demo on how my game works!
The final project was a great prototype that I am very proud of. After refining some of the cable setups and improving the stability of the Makey-Makey board, I was able to get most of the contacts working. Because of the way I glued and reinforced the wires, some of the contacts cross over, so some will activate more than 1 “keystroke” on the Makey-Makey. Combining this with the digital experience I created on Isadora yielded a pleasing result that was an excellent insight into how different microcontroller boards work.
Reflecting on the Build Process

Building and testing Puzzlr was no easy process. It involved a lot if iteration through different laser-cut prototypes and testing scenarios. I learned how to wire-up and configure the Makey Makey within Isadora, and had to design a circuit system that would work with the Puzzle style.
The first wooden prototype allowed me to test the setup and whether the puzzle would be hard for others to solve. It turned out to be a n excellent learning moment because I ended up adjusting the thickness to actually fit the wires, and even learned that I had to flip the puzzle pieces to get the correct engravings.
The second and final prototype involved laser-cutting the puzzle out of white acrylic. Then I sanded everything down, cleaned it up, and put it together with duct tape. I would have glued it together but I needed constant easy access to the wire housing to make adjustments and improvements. Another hurdle at this stage was sanding down the circuit clips that hold the wires together. They were initially too tall and ended up poking through the holes; I had to sand them down so they would remain flush with the upper level. By using tin foil, foil tape, glue, and duct tape, I was able to put everything together and get the circuit completed.
How the Game Works
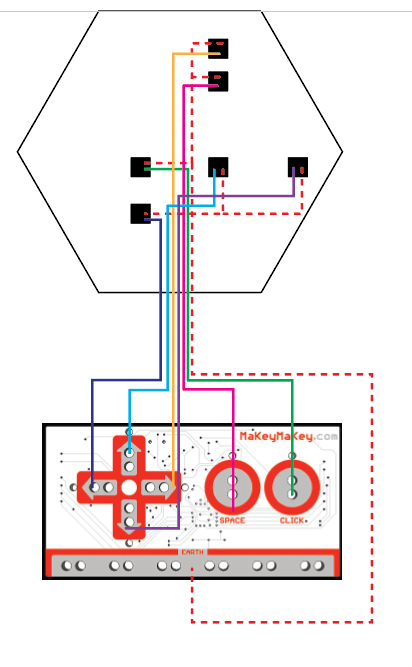
Here is a picture of the actual schematic I created for the puzzle board. The goal of the game is simple: get the pieces onto the board and in the right spots. Each puzzle piece has a piece of metal foil tape underneath it that corresponds to the black squares on the schematic. When the piece makes contact with the board it completes each circuit by closing the loop between the ground and input wires. Each contact corresponds to a certain input on the Makey-Makey, and when activated will relay a keystroke to the computer.

Starter Screen

Instruction Screen

Game screen. As pieces get placed on the board, they begin appearing here. If they are removed from the contact, the piece will disappear a few seconds after it is no longer receiving an input signal.

Win screen
Video Demo
Reflecting on the Project
I really enjoyed this exploratory project because it allowed me to experiment with something I was considering for my thesis. The Makey-Makey system is really unique but has it’s issues with more robust and complex applications. If I were to change anything about this project, I would have spent some time learning how to solder so the connections could be a little stronger. I will be applying the things I learned during this project when creating my own microcontroller input methods for my thesis in the future!
Cycle 3 documentation – Dynamic Cloth
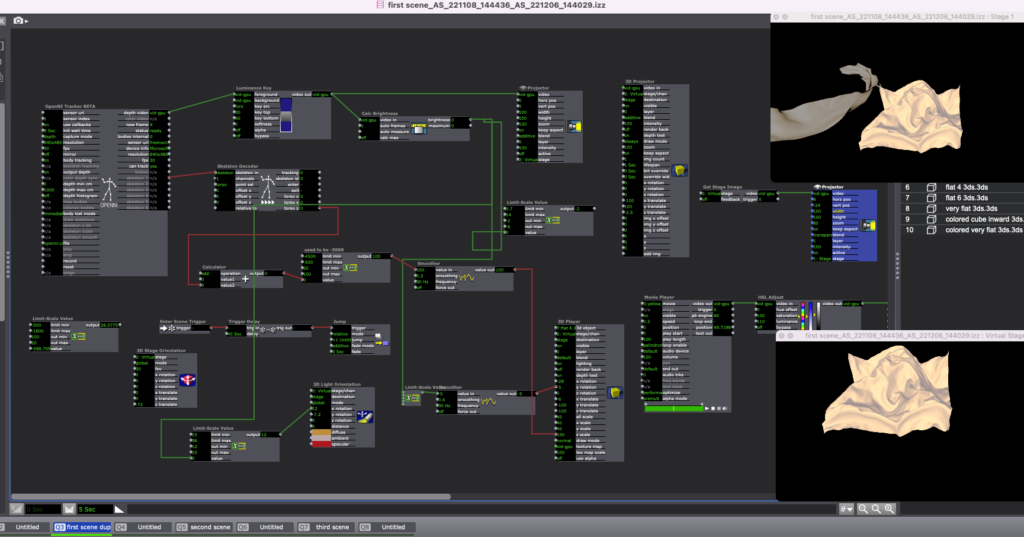
Posted: December 10, 2022 Filed under: Uncategorized Leave a comment »After cycle 2, the main aspect I worked on was controlling the Kinect input numbers in the ranges I wanted and that worked best for the type of movement I wanted, and also polishing the interactions based on that. I made the shapes ‘more sensitive’ in the Z-axis, more similar to how they were in Cycle 1, but using the skeleton data instead of just brightness inputs, although I still used brightness for subtle horizontal and vertical movement. I also experimented with placing some pre-recorded animations from Cinema 4D in the background, made transitions between the scenes smoother, and made the materials in 3ds Max less shiny.
The transitions required a workaround that Alex helped me with. Initially, I was trying to just set a 3-second delay in the Jump actor but I was getting weird glitches during that delay, like the next scene showing up temporarily in the wrong position, etc. So, I ended up putting empty scenes in between each interactive scene and setting a delay so that it looks like a smooth transition is happening between each scene.
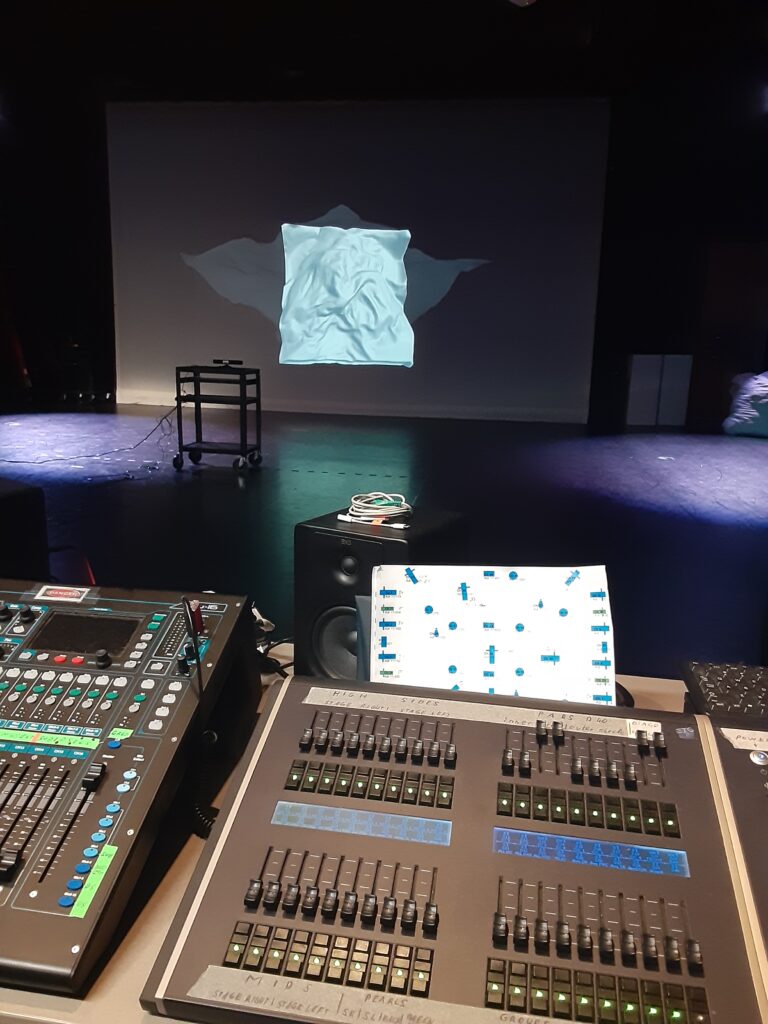
I’m happy with how the Cycle 3 presentation went (other than Isadora crashing 2 times) and I have gotten a lot of interesting and useful feedback. It was also very enjoyable seeing everyone engage with the projections. The feedback I have gotten included experimenting with adding texture to the materials and seeing how that impacts the experience and perception of the models, another comment was about potentially introducing a physical aspect like touching a real piece of fabric with something like Makey-Makey that triggers transitions between the scenes, as well as tracking more types of user movements instead of mainly focusing on depth of one direction. Comments also included that the animations felt a bit different from the main interactive models which were in the foreground, but the animations faded in the background, which I definitely agreed with. I think the next iteration would be making the animations interactive too and getting better at materials in 3ds Max and experimenting with more texture because I liked that suggestion. In the next iteration, I would apply all these suggestions except the physical cloth part since my main goal with this project was to experiment with introducing movement and body tracking as one method of interaction I could explore in virtual environments. With that said, I am very happy with the takeaways from this class and the whole Cycle 1-3 process, including learning Isadora, getting more comfortable using the Motion Lab, and trying out a new type of project and experience.
I also learned a lot of new things about designing in and around a physical space, since that is something I usually don’t think about much. I learned about important considerations when using physical space and more free-form movement, especially when Alex was running backward and collided with Kinect. That also prompted me to think about putting it in front of the projection in the next iteration like I initially had in mind, and moving the projections up higher so that the sensor is not right in front of them.
Video compilation of everyone’s experience from Alex’s 360 videos:
Another useful feedback was participants expecting and wishing that they could use their hands more since that was the main tendency when first seeing cloth on the screen; a lot of participants wished they could manipulate it using their hands similar to how they would in real life. I think this would also be very interesting to explore in the next iteration, playing with tracking the distance between hands and hand movements to influence the number ranges.
As I mentioned during the discussion, I have been experimenting with this in a different project using Leap Motion that we checked out. I created a virtual environment in the game engine Unity and used physics properties on interactive materials to make them responsive to hand tracking using Leap Motion, which allows participants to push, pull, and move cloth and various other objects in the virtual space, so I also wanted to share a short screen-recording of that here too: