Cycle 3: The Sound Station
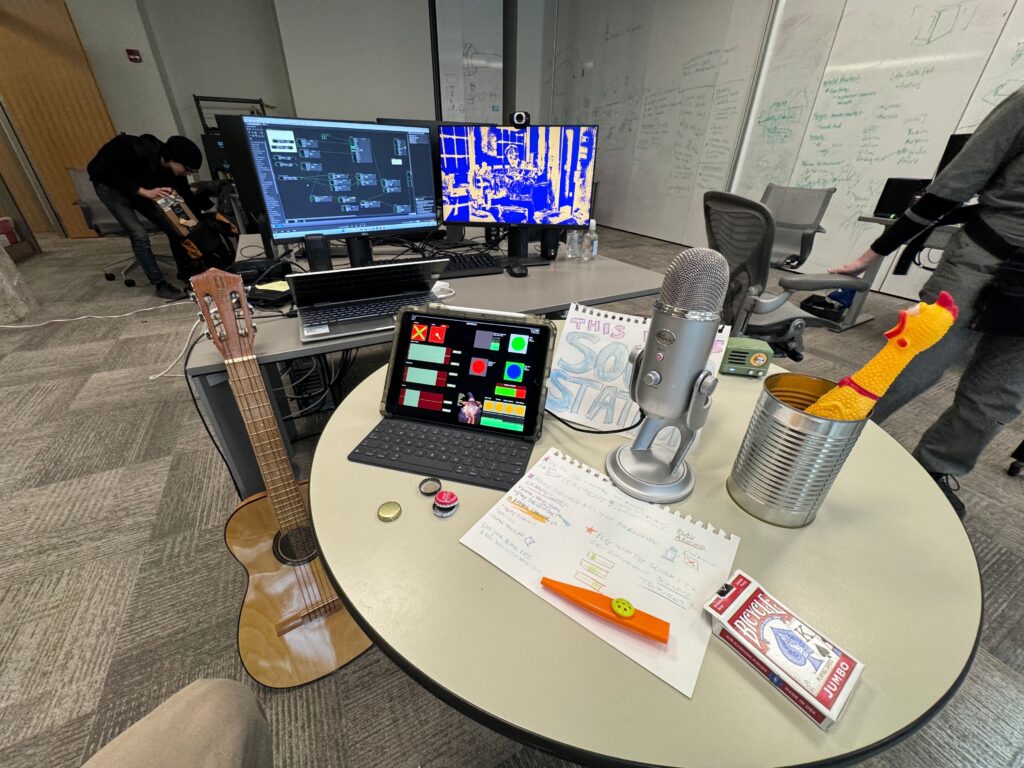
Posted: December 11, 2023 Filed under: Arvcuken Noquisi, Final Project, Isadora | Tags: Au23, Cycle 3 Leave a comment »Hello again. My work culminates into cycle 3 as The Sound Station:
The MaxMSP granular synthesis patch runs on my laptop, while the Isadora video response runs on the ACCAD desktop – the MaxMSP patch sends OSC over to Isadora via Alex’s router (it took some finagling to get around the ACCAD desktop’s firewall, with some help from IT folks).
I used the Mira app on my iPad to create an interface to interact with the MaxMSP patch. This meant that I had the chance make the digital aspect of my work seem more inviting and encourage more experimentation. I faced a bit of a challenge, though, because some important MaxMSP objects do not actually appear on the Mira app on the iPad. I spent a lot of time rearranging and rewording parts of the Mira interface to avoid confusion from the user. Additionally I wrote out a little guide page to set on the table, in case people needed additional information to understand the interface and what they were “allowed” to do with it.
Video 1:
The Isadora video is responsive to the both the microphone input and the granular synthesis output. The microphone input alters the colors of the stylized webcam feed to parallel the loudness of the sound, going from red to green to blue with especially loud sounds. This helps the audience mentally connect the video feed to the sounds they are making. The granular synthesis output appears as the floating line in the middle of the screen: it elongates into a circle/oval with the loudness of the granular synthesis output, creating a dancing inversion of the webcam colors. I also threw a little slider in the iPad interface to change the color of the non mic-responsive half of the video, to direct audience focus toward the computer screen so that they recognize the relationship between the screen and the sounds they were making.
The video aspect of this project does personally feel a little arbitrary – I would definitely focus more on it for a potential cycle 4. I would need to make the video feed larger (on a bigger screen) and more responsive for it to actually have any impact on the audience. I feel like the audience focuses so much more on the instruments, microphone, and iPad interface to really necessitate the addition of the video feed, but I wanted to keep it as an aspect of my project just to illustrate the capacity MaxMSP and Isadora have to work together on separate devices.
Video 2:
Overall I wanted my project to incite playfulness and experimentation in its audience. I brought my flat guitar (“skinned” guitar), a kazoo, a can full of bottlecaps, a deck of cards, and miraculously found a rubber chicken in the classroom to contribute to the array of instruments I offered at The Sound Station. The curiosity and novelty of the objects serves the playfulness of the space.
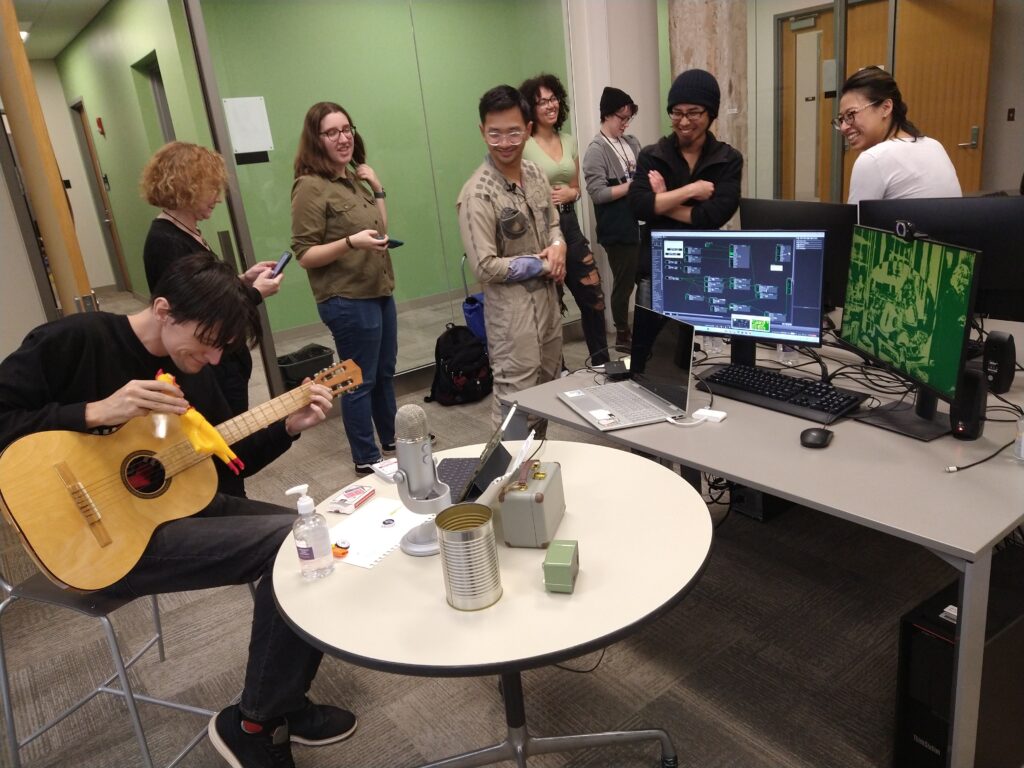
Before our group critique we had one visitor go around for essentially one-on-one project presentations. I took a hands-off approach with this individual, partially because I didn’t want to be watching over their shoulder and telling them how to use my project correctly. While they found some entertainment engaging with my work, I felt like they were missing essential context that would have enabled more interaction with the granular synthesis and the instruments. In stark contrast, I tried to be very active in presenting my project to the larger group. I lead them to The Sound Station and showed them how to use the flat guitar, and joined in making sounds and moving the iPad controls with the whole group. This was a fascinating exploration of how group dynamics and human presence within a media system can enable greater activity. I served as an example for the audience to mirror, my actions and presence served as permission for everyone else to become more involved with the project. This definitely made me think more about what direction I would take this project in future cycles, if it were for group use versus personal use (since I plan on using the maxMSP patch for a solo musical performance). I wonder how I would have started this project differently if I did not think of it as a personal tool and instead as directly intended for group/cooperative play. I probably would have taken much more time to work on the user interface and removed the video feed entirely!
Cycle 2: MaxMSP Granular Synthesis + Isadora
Posted: November 26, 2023 Filed under: Arvcuken Noquisi, Final Project Leave a comment »For Cycle 2 I focused on working on the MaxMSP portion of my project: I made a granular synthesis patch, which cuts up an audio sample into small grains that are then altered and distorted.
2 demonstration clips, using different samples:
I had some setbacks working on this patch. I had to start over from scratch a week before Cycle 2 was due, because my patch suddenly stopped sending audio. Recreating the patch at least helped me better understand the MaxMSP objects I was using and what role they played in creating the granular synthesis.
Once I had the MaxMSP patch built, I added some test-sends to see if the patch will cooperate with Isadora. For now I’m just sending the granular synthesis amplitude through to an altered version of the Isadora patch I had used from Cycle 1. This was an efficient and quick way to determine how the MaxMSP outputs would work in Isadora.
I still have quite a few things to work on for Cycle 3:
- Router setup. I need to test the router network between my laptop (MaxMSP) and one of the ACCAD computers (Isadora).
- Isadora patch. I plan on re-working the Isadora patch, so that it’s much more responsive to the audio data.
- Interactivity. I’ll need to pilfer the MOLA closet for a good microphone and some sound-making objects. I want Cycle 3 to essentially be a sound-making station for folks to play with. I will have to make sure the station is inviting enough and has enough information/instructions that individuals will actually interact with it.
- Sample recording. Alongside interactivity, I will need to adjust my MaxMSP patch so that it plays back recorded samples instead of pulled files. According to Marc Ainger this shouldn’t be a challenge at all, but I’ll need to make sure I don’t miss anything when altering my patch (don’t want to break anything!).
Cycle 1: Connecting MaxMSP with Isadora (OSC)
Posted: October 29, 2023 Filed under: Arvcuken Noquisi, Uncategorized Leave a comment »Hello again.
For cycle 1 I decided to make a proof-of-concept test to get MaxMSP and Isadora to work together via OSC. I plan on using MaxMSP for live audio input which then gets transmitted to Isadora to impact visual output. I plan on using MaxMSP on one computer and Isadora on another – meaning that I will have to use OSC over a router network so that these two computers can communicate with eachother.
I first needed to know how easy/difficult it would be to make these two software work together.
To start I pulled a MaxMSP “Insta-theremin” patch from the internet. This patch creates an audio signal based on computer mouse location (x-axis pitch y-axis amplitude).
It took a lot of googling to figure out which MaxMSP objects and connections are necessary to send OSC. I considered using plugins such as ODOT, but eventually got the “udpsend” object to work without complications. I did not know that the OSC name had to specifically be /isadora/# for non-TouchOSC software to work with Isadora, but once I understood that it was very easy to transmit MaxMSP input to Isadora.
Here is a video of the patch at work (may be loud!):
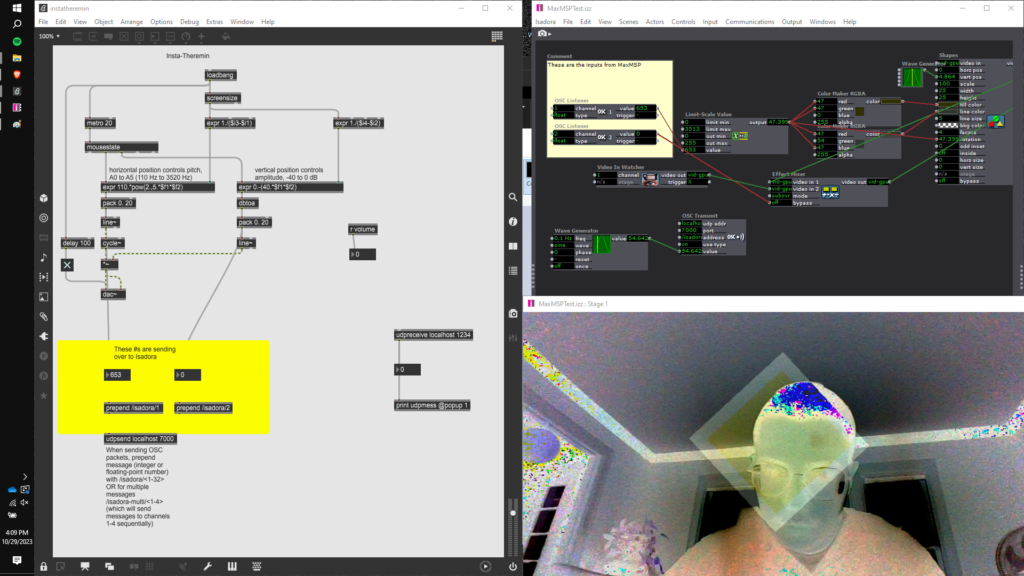
On the Isadora side, I used OSC listeners connected to “color maker RGBA” actors and the rotation input of a shape actor – I wanted to have multiple inputs so that I could instantly see whether or not the MaxMSP input is truly working. I also had a camera input mixed in with the shape, just to add a bit of complexity to the patch. I had 2 OSC input channels for the two axes of the theremin. X-axis (pitch) controls color and rotation, while y-axis (amplitude) enables and disables the “effect mixer” actor bypass (turning on and off the camera input). This made it very easy for me to tell whether Isadora was following my mouse location input.
Though the stream of numbers coming in to Isadora looks delayed at times, I could tell based on the stage output that there was essentially no latency over the localhost system. For my next cycle I will have to 1. test whether MaxMSP and Isadora can communicate with eachother across computers on a routing network and 2. start working on a more interactive audio input on MaxMSP, either using granular synthesis with microphone input or a sequencer which can be altered and changed by human input.
PP2/PP3: Musicaltereality
Posted: October 29, 2023 Filed under: Arvcuken Noquisi, Pressure Project 2, Pressure Project 3, Uncategorized Leave a comment »Hello. Welcome to my Isadora patch.

This project is an experiment in conglomeration and human response. I was inspired by Charles Csuri’s piece Swan Lake – I was intrigued by the essentialisation of human form and movement, particularly how it joins with glitchy computer perception.
I used this pressure project to extend the ideas I had built from our in-class sound patch work from last month. I wanted to make a visual entity which seems to respond and interact with both the musical input and human input (via camera) that it is given, to create an altered reality that combines the two (hence musicaltereality).
So here’s the patch at work. I chose Matmos’ song No Concept as the music input, because it has very notable rhythms and unique textures which provide great foundation for the layering I wanted to do with my patch.
Photosensitivity/flashing warning – this video gets flashy toward the end
The center dots are a constantly-rotating pentagon shape connected to a “dots” actor. I connected frequency analysis to dot size, which is how the shape transforms into larger and smaller dots throughout the song.
The giant bars on the screen are a similar setup to the center dots. Frequency analysis is connected to a shapes actor, which is connected to a dots actor (with “boxes” selected instead of “dots”). The frequency changes both the dot size and the “src color” of the dot actor, which is how the output visuals are morphing colors based on audio input.
The motion-tracking rotating square is another shapes-dots setup which changes size based on music input. As you can tell, a lot of this patch is made out of repetitive layers with slight alterations.
There is a slit-scan actor which is impacted by volume. This is what creates the bands of color that waterfall up and down. I liked how this created a glitch effect, and directly responded to human movement and changes in camera input.
There are two difference actors: one of them is constantly zooming in and out, which creates an echo effect that follows the regular outlines. The other difference actor is connected to a TT edge detect actor, which adds thickness to the (non-zooming) outlines. I liked how these add confusion to the reality of the visuals.
All of these different inputs are then put through a ton of “mixer” actors to create the muddied visuals you see on screen. I used a ton of “inside range”, “trigger value”, and “value select” actors connected to these different mixers in order to change the color combinations at different points of the music. Figuring this part out (how to actually control the output and sync it up to the song) was what took the majority of my time for pressure project 3.
I like the chaos of this project, though I wonder what I can do to make it feel more interactive. The motion-tracking square is a little tacked-on, so if I were to make another project similar to this in the future I would want to see if I can do more with motion-based input.
Bump: Ghosts in the Landscape – Mollie Wolf
Posted: September 11, 2023 Filed under: Arvcuken Noquisi, Assignments | Tags: bump Leave a comment »I really liked this entry, and how this individual talked through their thought process and work procedure. The methods of problem-solving discussed throughout this entry really depict flexibility and openness to new ideas based on the limitations or allowances of the programming software, which is relatable to my experience with developing film and electronic music performances. I liked how this person adjusted their design to fit within and around limiting parameters (such as the difference actor creating an outline of the moving people instead of showing the full person like they initially wanted). It’s interesting to think about devising experimental media systems as a constant dialogue with the tools we work with, constantly assessing the potential within these tools and building projects out of what is visibly possible to us…
PP1 – WIZARD VAN SPACE ADVENTURE .COM
Posted: September 10, 2023 Filed under: Arvcuken Noquisi, Pressure Project I | Tags: Au23, Isadora, Pressure Project Leave a comment »Hello. Welcome to the Wizard Zone. The Wizard will now show you more about his wonderful Isadora Pressure Project.

Just kidding. He doesn’t know anything about Isadora. Anyway. Here’s a video capture of the thing:
How I built it~
For this pressure project I wanted to extend beyond just shapes actors, and create something silly and personally entertaining. I use MaxMSP (and a bit of Pure Data) for my Sonic Arts major, so I am used to this type of interface for audiovisual coding. I knew I wanted to throw some wizards in this project, because that’s what I did for a lot of Marc Ainger’s MaxMSP projects in his class.
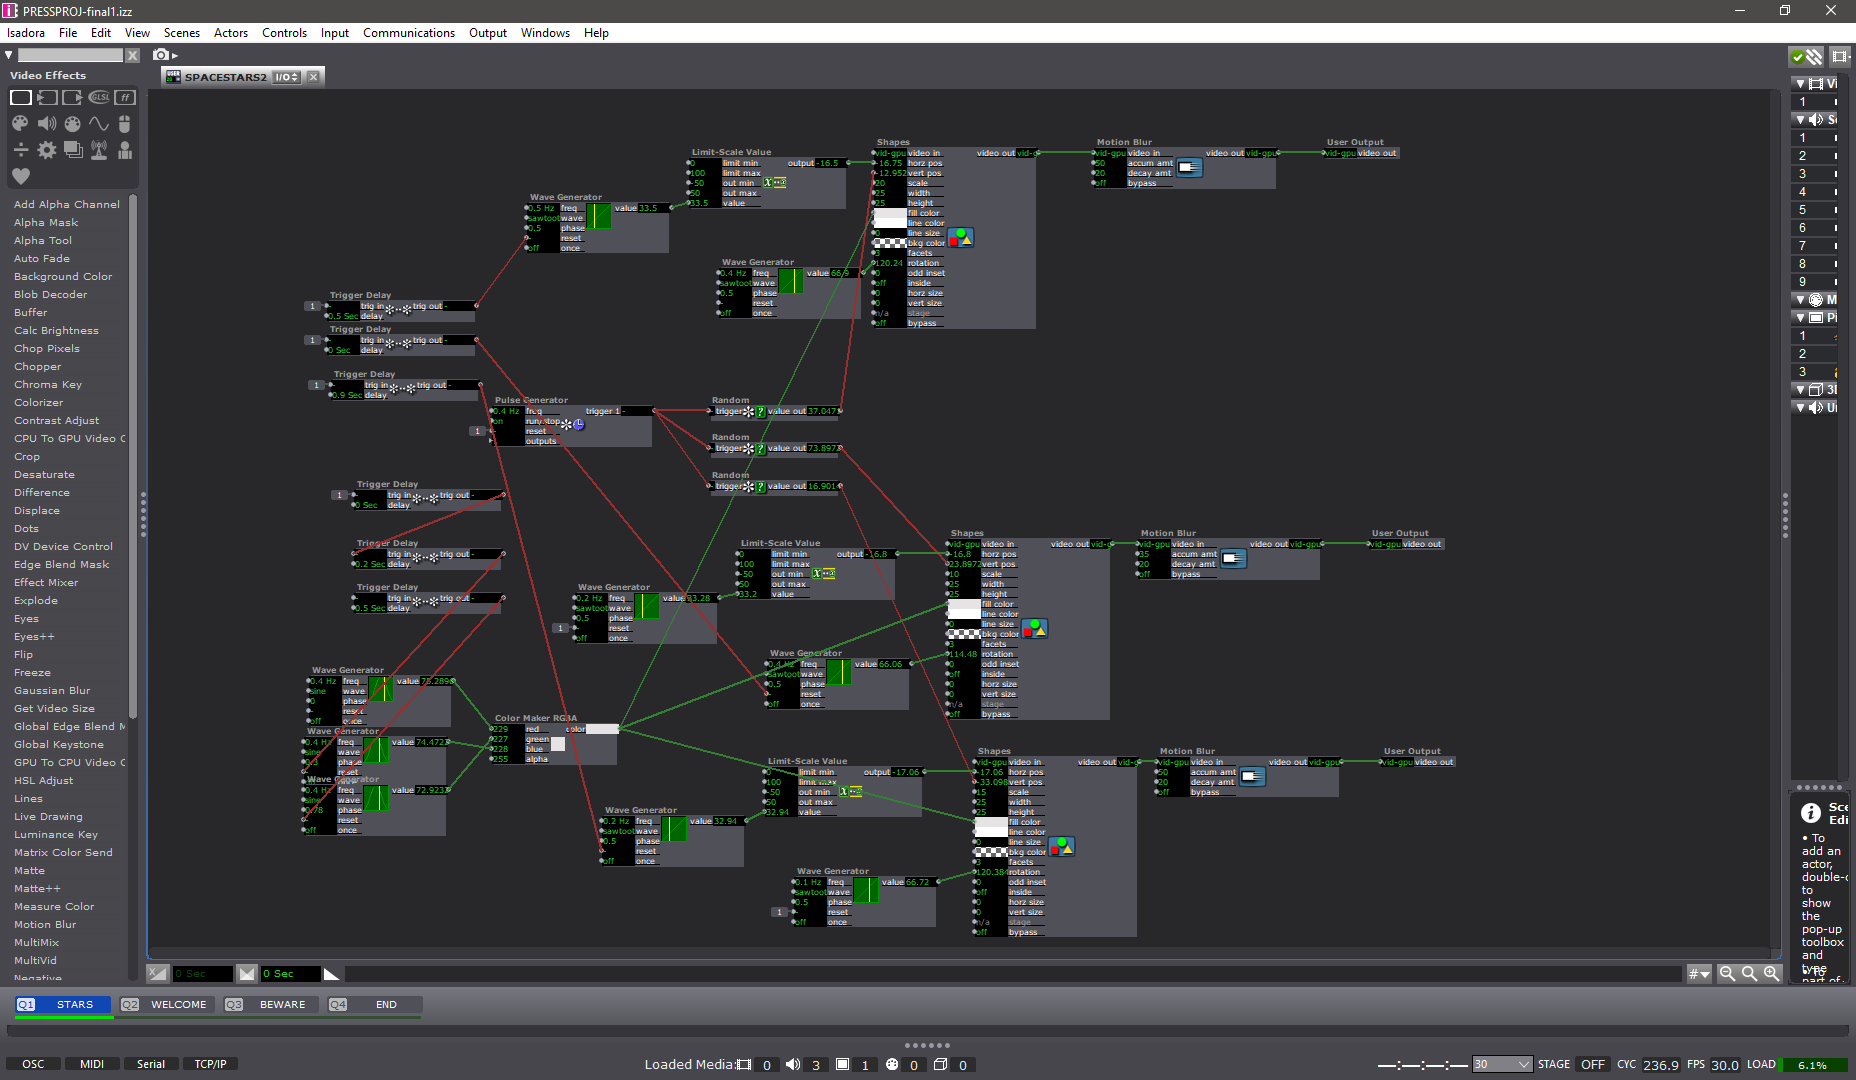

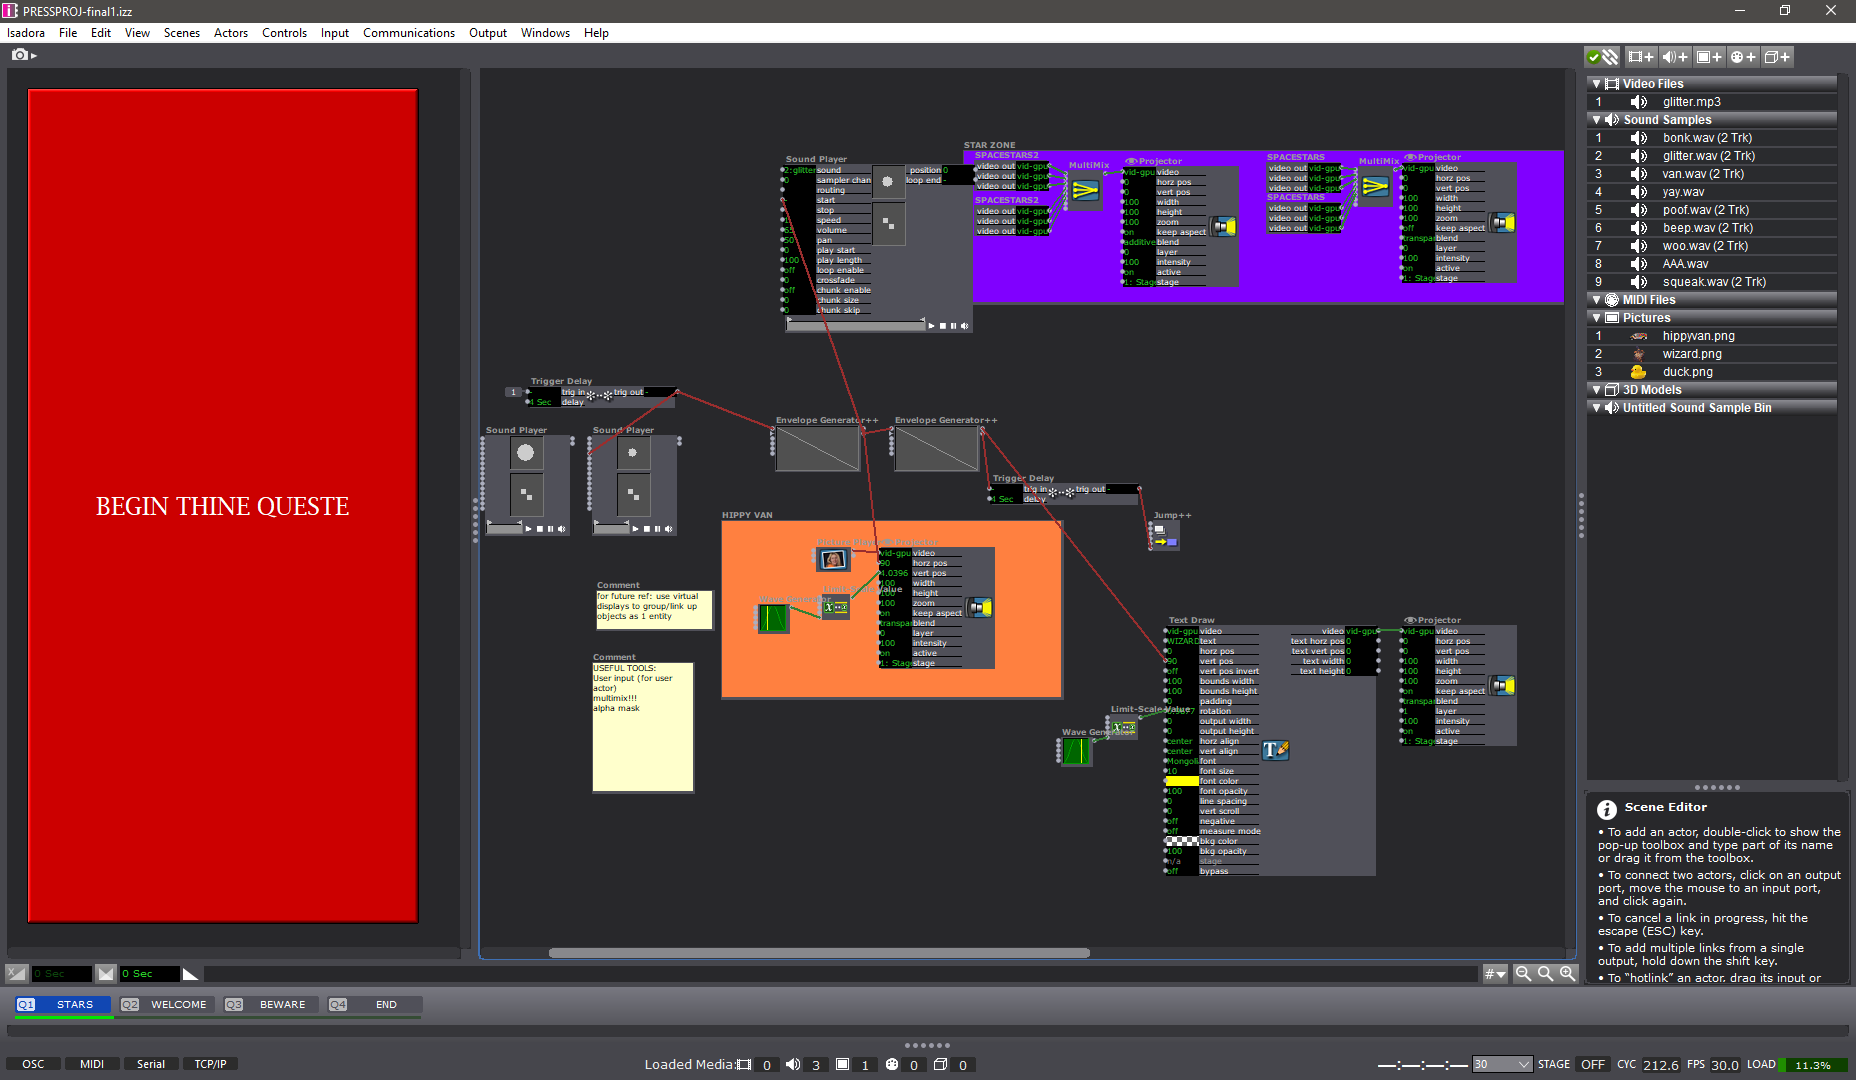
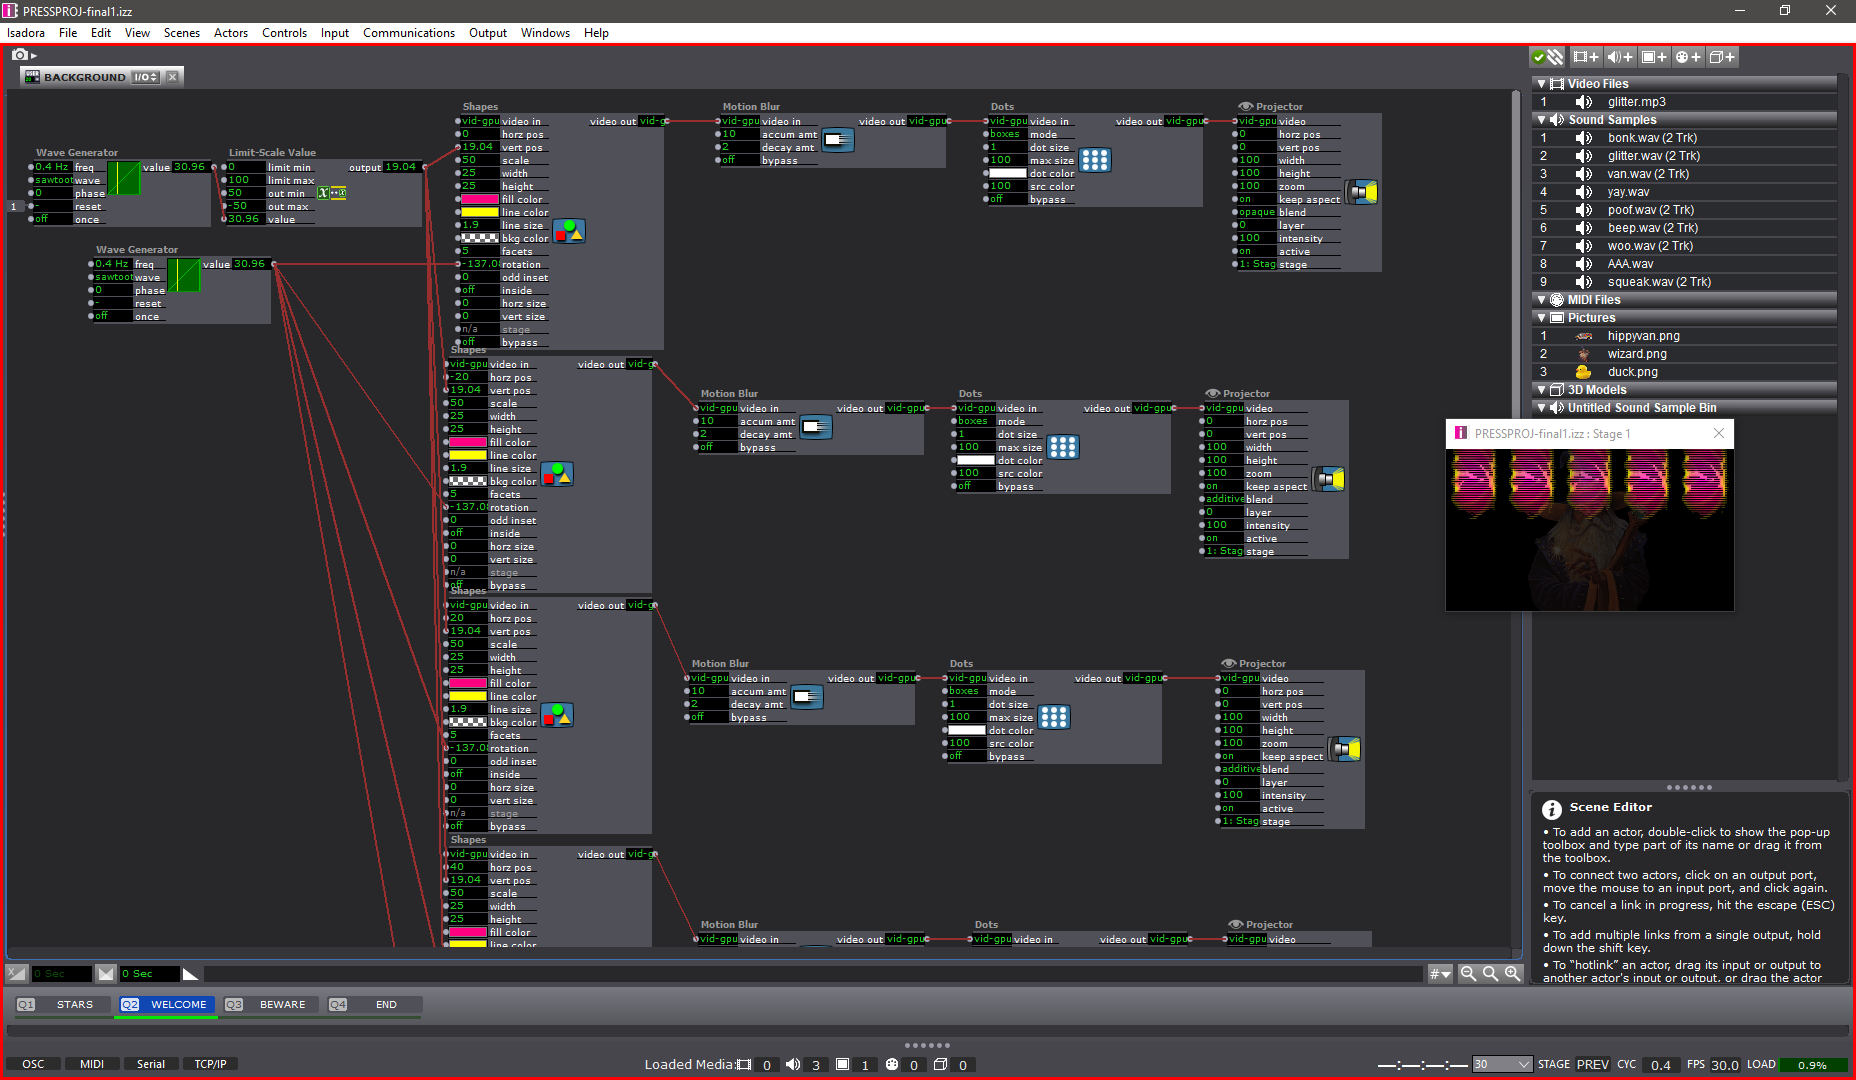
For the first hour of the allotted time, I followed the Isadora Guru videos to create a star-field backdrop. I used pulse and (sawtooth) wave generators to create rotating triangles which move left to right on the screen, before restarting at a different y-axis location and moving left-to-right again. I’m sure there is a much more effective way to produce this effect (so that the shapes reset at the right moment), but I found this to be a great start to immerse myself in the software. I threw the stars into user actors to clean up my first stage and create more stars without too much effort.
After that I started messing with images. I found some good PNGs to work with:


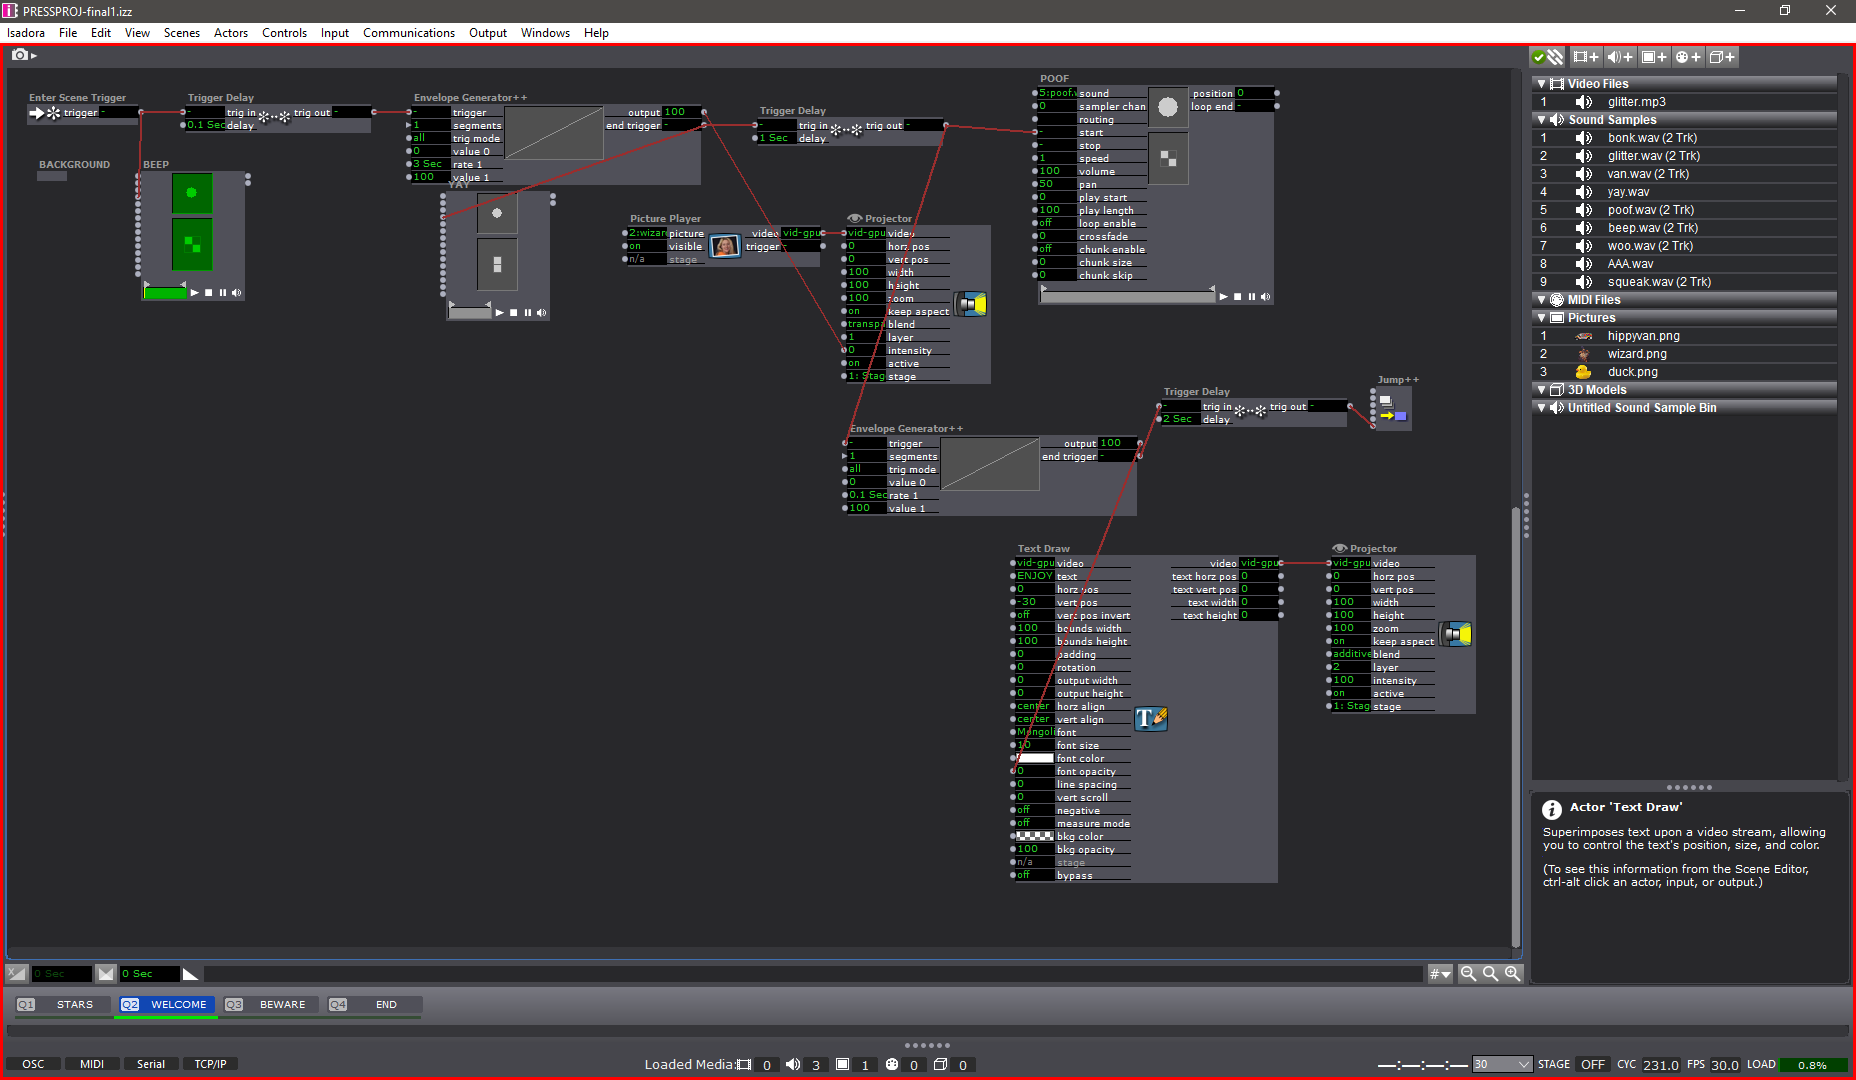
I used the picture playor actor with wave generators and limit-scale value actors to create movement for the PNGs, and I used envelope generators to make the PNGs appear, disappear, move in-and-out of frame, etc.. My process was just a lot of playing around and improvising. I added some text draw actors to my stage so that I could give the scene a little bit of absurd context. WIZARD VAN SPACE ADVENTURE .COM was just the first thing that came up in my head. I liked the idea of turning this whole thing into some kind of intro for the Wizard’s personal HTML/Adobe Flash site (rip Flash).

Stage 2 is the only other stage that has User Actors. I set up 5 rotating, falling pentagons which serve as a funky background for the Wizard to appear in front of. I threw on the dots actor to make them a little more retro. For future reference: the computer did not like this. Either do this more efficiently (virtual stages?) or record it as a video to use instead.
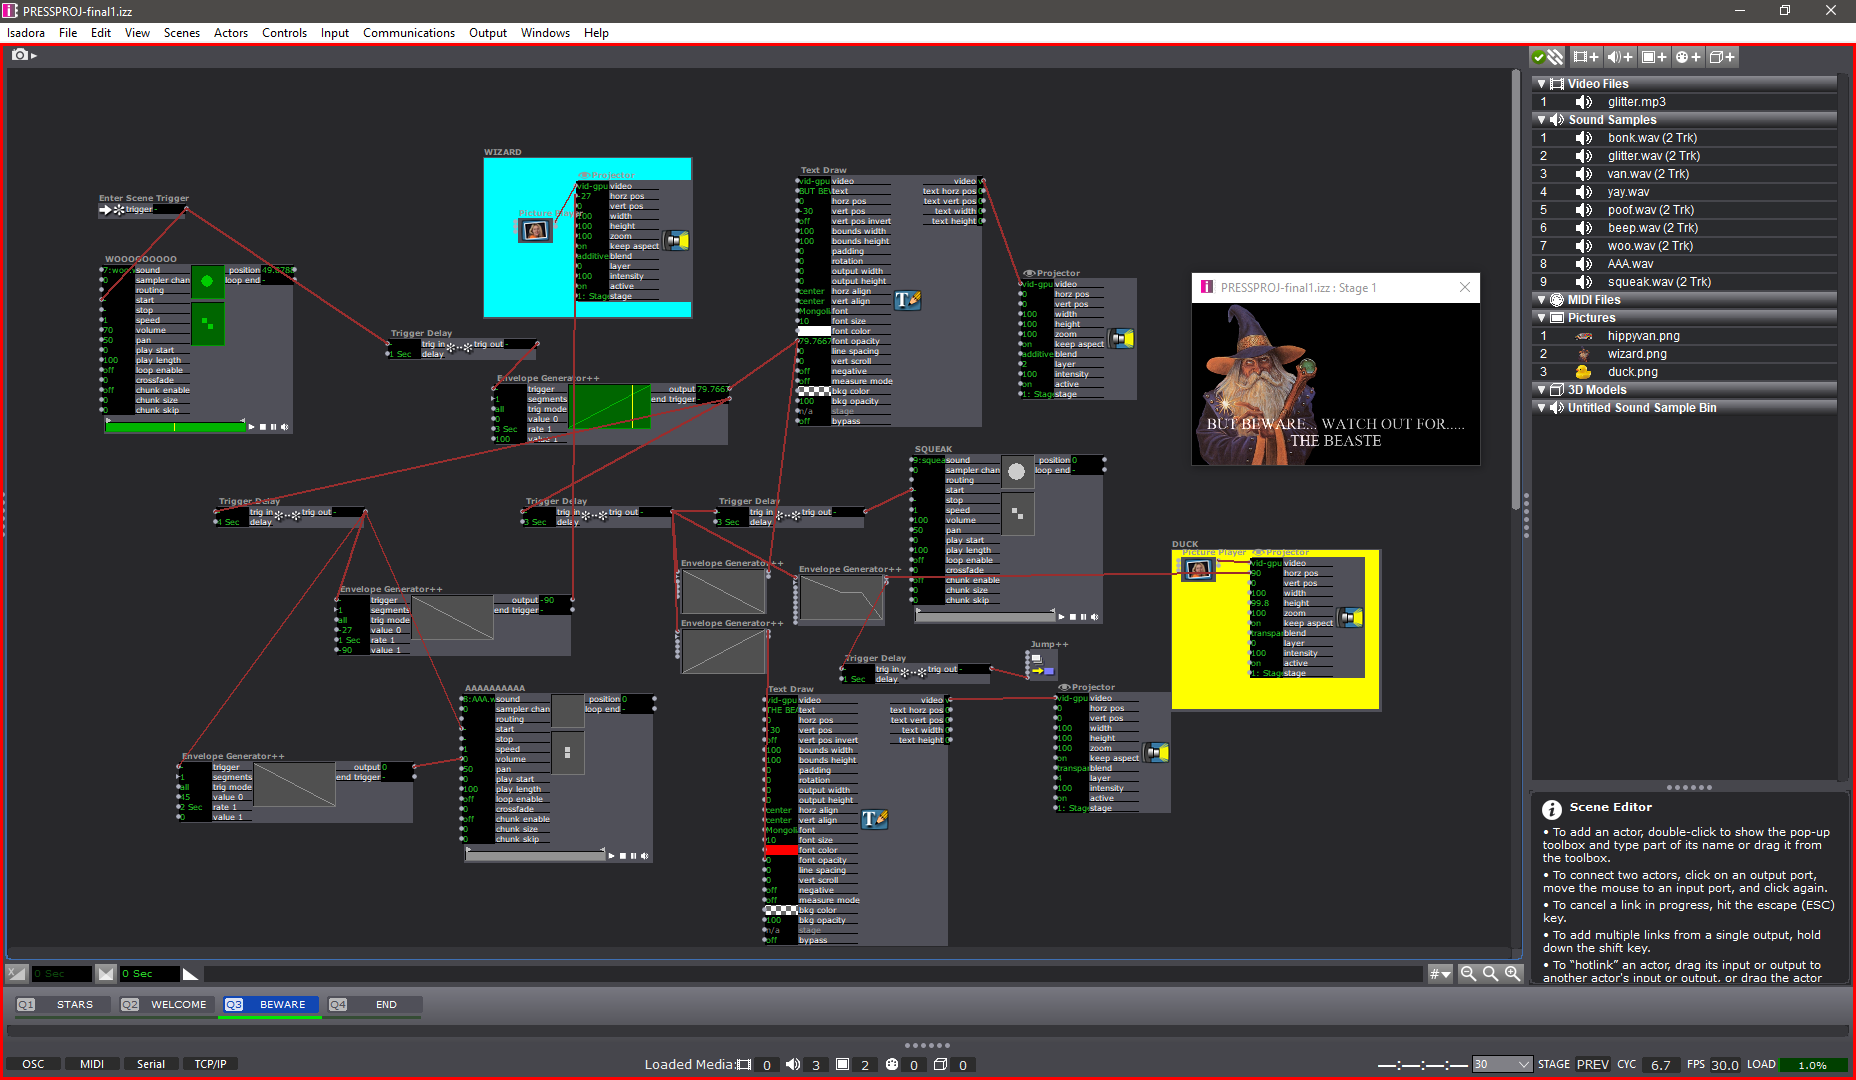
Stage 3 is the Chaos Zone. It was at this point that I was just plugging everything in to see what would work, with no regard for neatness. I used a ton of envelope generators for the text to appear then disappear, for the duck to slide in, for the Wizard to run away, etc.. Trigger delays really helped time things out, especially with the sounds…
THE SOUNDS
SOUNDS PRO-TIP: As far as I know your audio clips have to be in .WAV format in order to function properly. I tried using .MP3s and they showed up in a different non-sound-oriented actor. Beware.
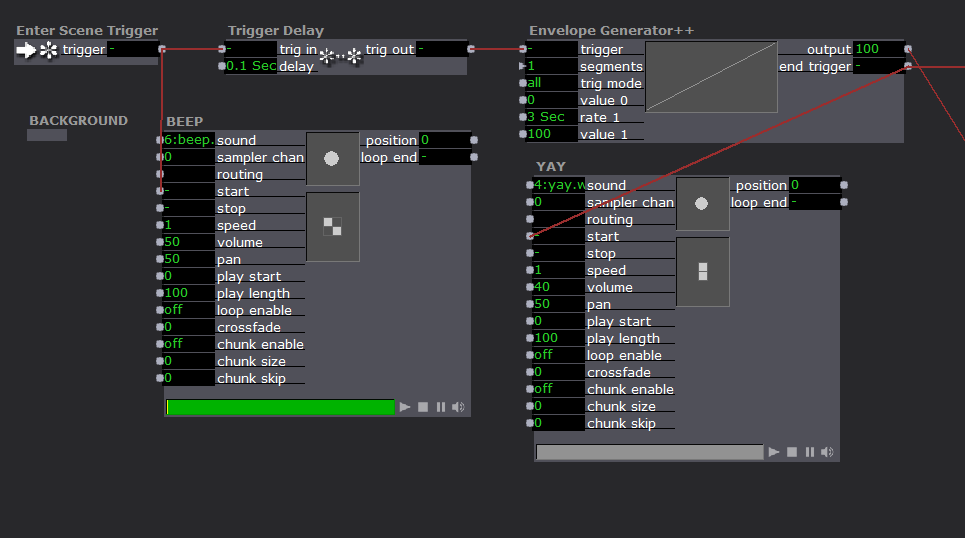
It felt like a bit of a cop-out, but I knew using sound effects would instantly improve the engagement of an audience with my project. I used a bunch of cartoon sound effect I recorded off YouTube. I needed a distinct voice for the Wizard, so I grabbed some .WAV files off the Team Fortress 2 wiki (Soldier’s dying scream 2 and “yaaay!” to be specific).
The sound player actor is fairly uncomplicated. You just need to plug a trigger into the “start” input. Throughout each stage, my sound player actors are plugged into either the end trigger of an envelope generator, or the trig out of a trigger delay. I’m curious about what more I could do with the sound player and its various inputs – whether I could stretch it to do some of the crazy sample things I can do with MaxMSP…
Reflection
During presentation I appreciated Alex’s comment about how my presence impacted the experience of the piece – I served as a cog in the media system, because I came up to the computer (in front of the TV screen), pressed the big red start button, speedwalked away, and came back to shut it off at the end. It was a purposeful decision to be active in the performance (via button-pressing) – it gives me greater control over the performance environment and adds a personable humor to the entire experience. It’s something I will be thinking about more as we have more pressure projects and work more with Isadora – how does the perceived presence (or absence) of a human person in a media system impact the audience’s enjoyment/experience of a piece? I suppose that difference can be demonstrated in the difference between my in-person presentation of this piece and how you experience it in my video recording shown above….