Pressure Project 2 (Maria)
Posted: February 27, 2021 Filed under: Maria B, Pressure Project 2 Leave a comment »After playing around with making a ‘graphite piano’ with the Makey Makey in class, I realized how fun creating sound through unique interactions was and wanted to try it out with the Leap Motion! The basic idea was to create a piano whose notes could be played by moving your hand back and forth through the air and had accompanying visuals for each note.
At first, I attempted to do a MIDI output from Isadora to play notes through a FL Studio plugin. I’ve never done anything with MIDI before so this was extremely confusing. I decided for the sake of time and usability on other people’s devices without additional software that it would be better to just import individual audio files. At first, I downloaded mp3 files but realized that Idadora interprets these as video files, and the functionality with video files is different than with audio files on Isadora. So I converted them to WAV files and Isadora was able to recognize them as sounds 🙂
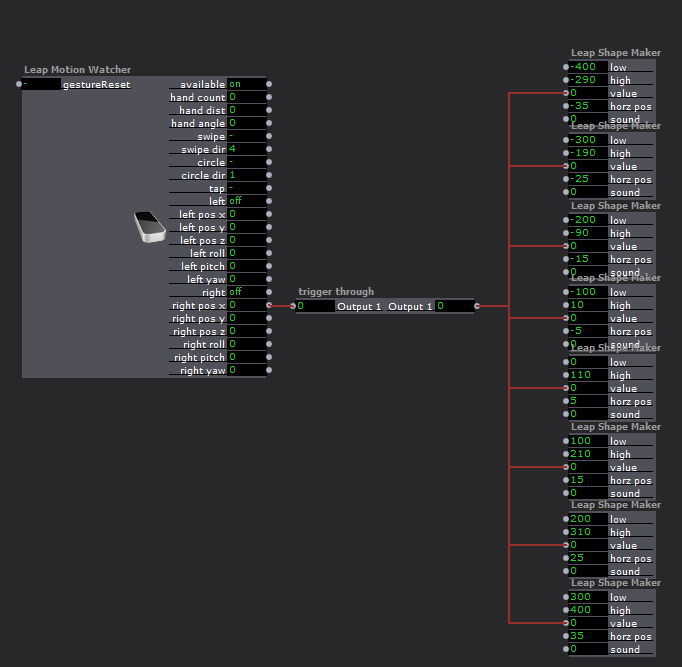
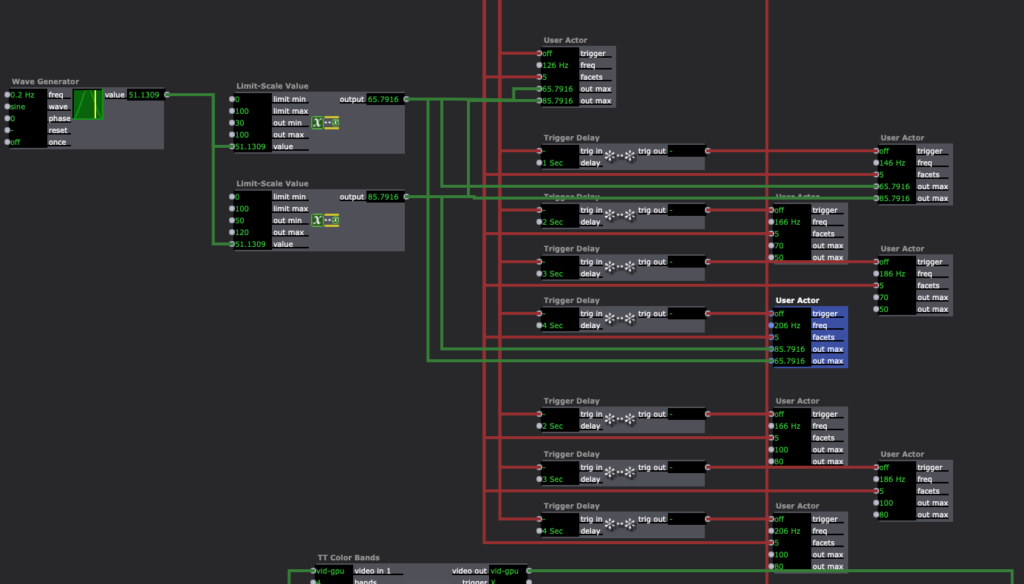
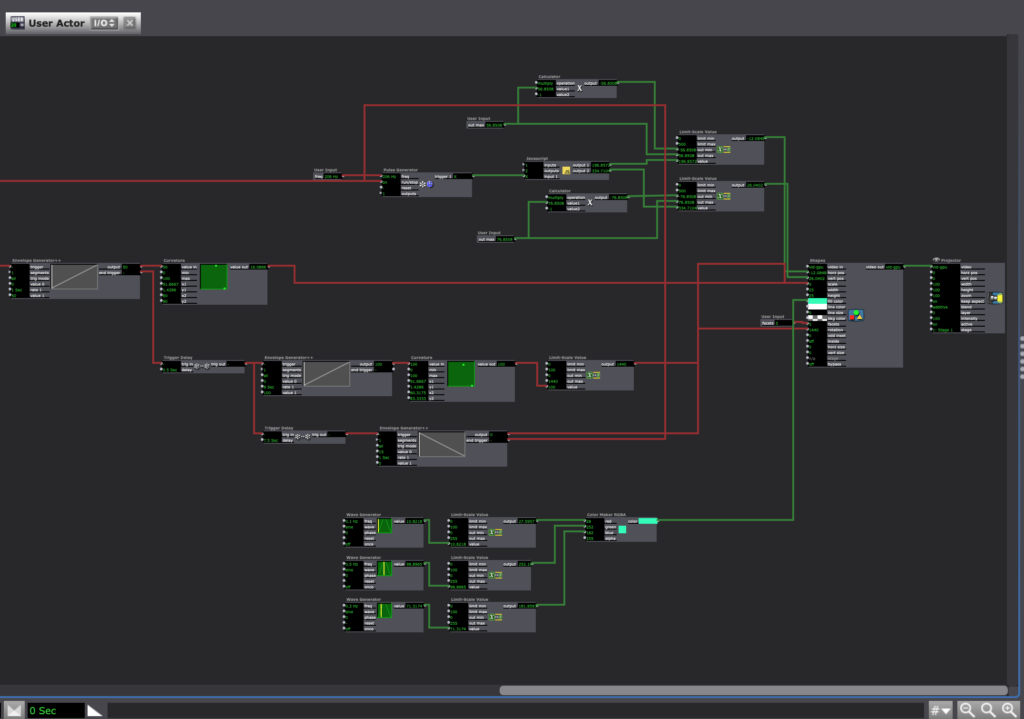
I started with programming the sounds to go with my movement with the intent to add in the visuals after. I made individual user actors for each note (see photos below) that trigger the note upon entering a certain number range. (Question: Is there a way to automate the entering of sequential numbers into a series of actors? For example if I wanted the range of the first actor to be 0-100, the next one 100-200 and so on, is there a way to do that without entering in all the values individually?)
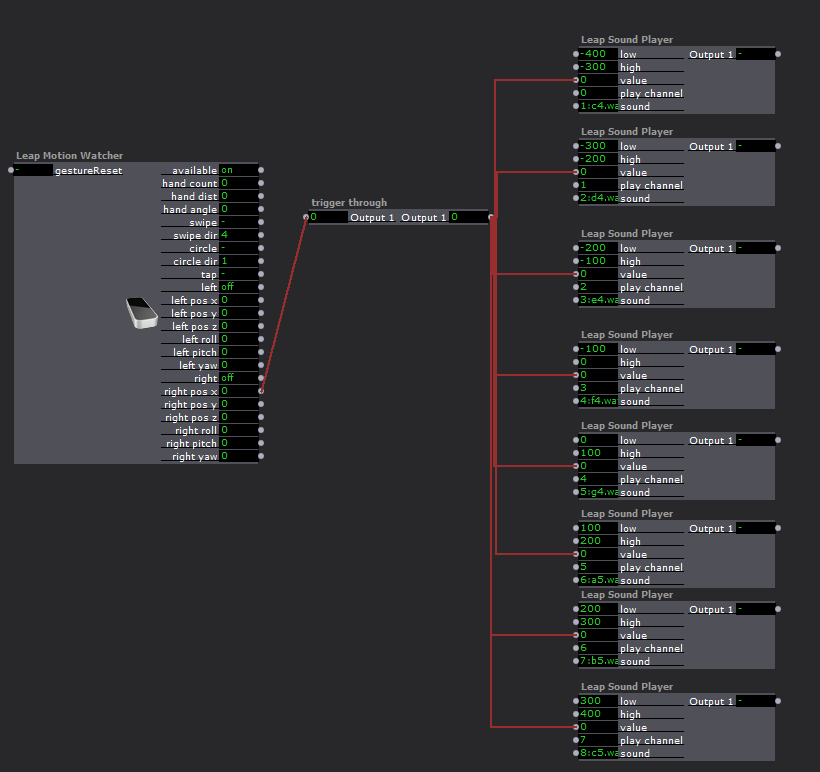
For whatever reason Isadora did not like what I was doing and decided to crash almost every time I tried to test it 🙁 I tried to change things around by adjusting the ranges to be wider (from 50 to 100) and tried putting the sounds on separate channels and not all on one. It didn’t change too much so I decided to build out the visuals separately so they could be played without the audio if I wasn’t able to get it to work during my presentation.
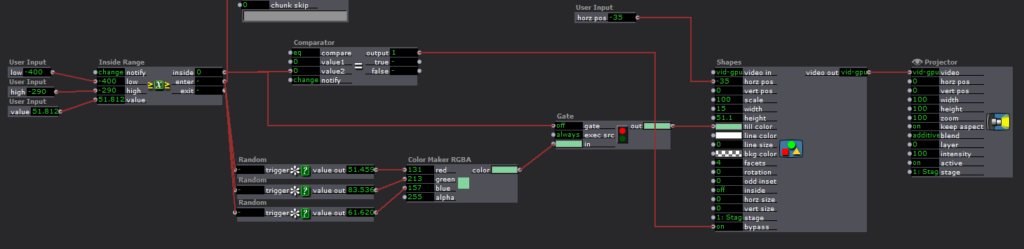
Similar to the sounds, I created a user actor with inputs I could use for the visual associated with each note. They were essentially randomly colored rectangles in a line that showed up when the right hand x pos was inside a specified range and dissapeared when it wasn’t. I had some fun figuring out how to finagle this using the comparator actor plugged into the bypass input of the shape. The output of the range actor was 1 when inside the range and 0 when outside the range, so connecting it straight to the bypass would make the bypass turn ON (turning the shape off) when I was inside the range, and I needed the opposite. I was able to set the comparator to send the ON, or 1, signal to the bypass (turning the shape off) when the output from the range actor was equal to zero!
I also set it so the color would change every time the shape appeared by plugging random triggers (activated when the value exited the range) into the values of a color-maker, that connected to a gate that was opened when the value entered the range.
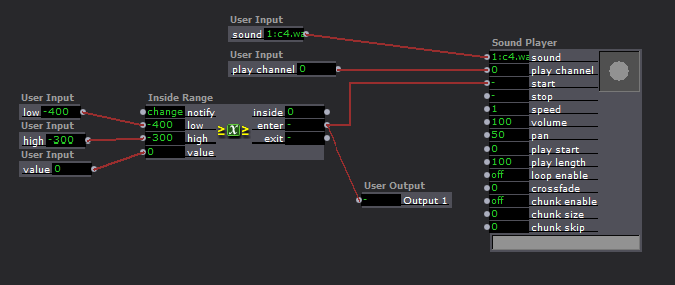
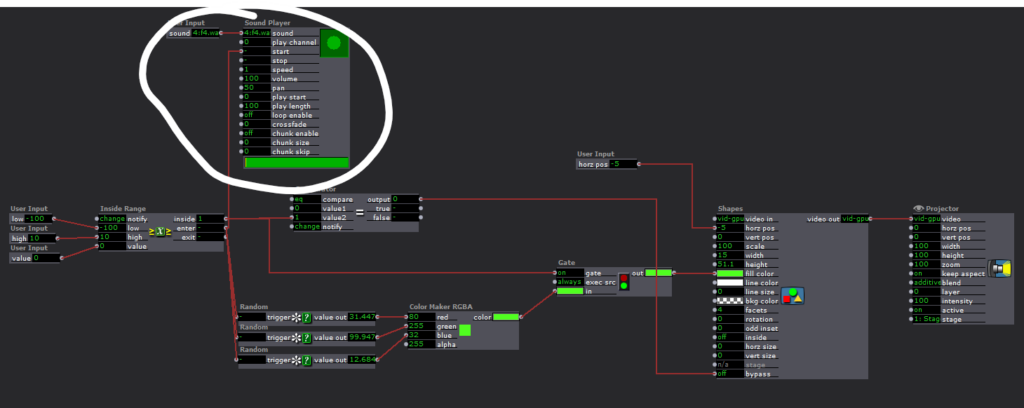
I then went back to experimenting with the sound to see if I could get it to work any better, and found that it didn’t freeze quite as much if I added the sound inside each shape actor.
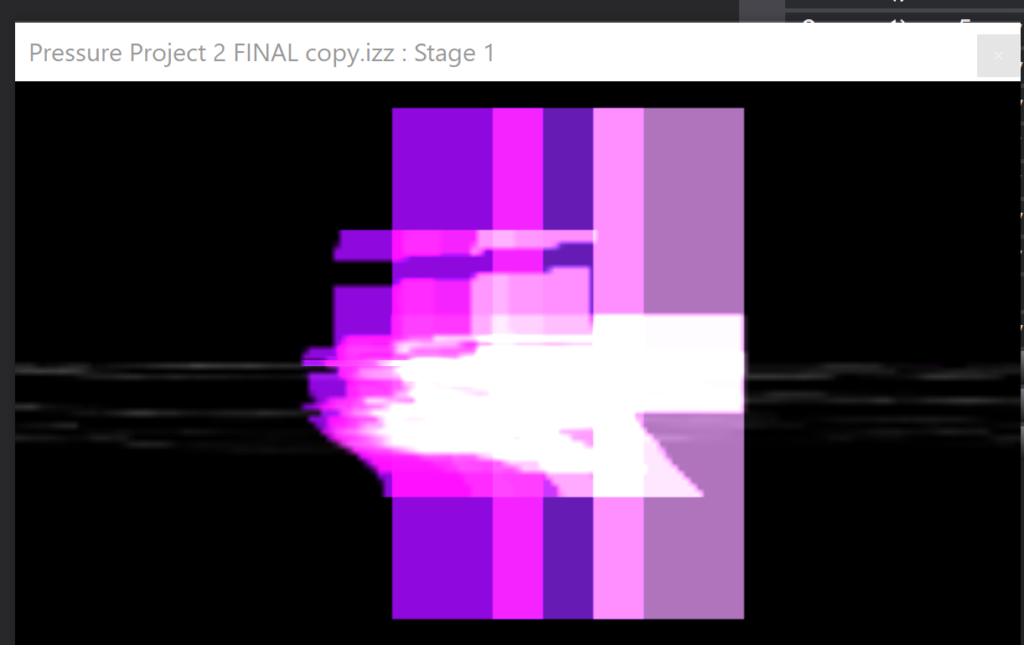
To top off the visuals, I added a TT Gamma Actor and a TT Grid Warp Actor that were influenced by the Y position of the right hand. It gave it a cool techno feel that I realized probably would’ve aesthetically fit better with a different sounding instrument, but figured it wasn’t worth it at that point to go back and change everything.

When it came to the in-class critique, there were still a few issues with crashing and Alex suggested I tried copying the scenes over into a fresh file to see if it would help. I did, and it didn’t do much, so there must just be something about the way I set up my actors that Isadora doesn’t like :/
Overall, this project got me really excited about the potential of sound in interactive experiences and has got me thinking about how I can take it further in the cycle projects!!
Pressure Project 2 (Sara)
Posted: February 23, 2021 Filed under: Assignments, Pressure Project 2, Sara C Leave a comment »After opening the project file for the first time in a week, I was mystified by how to even “read” what I had created so far. I found myself getting hot and panicky when I couldn’t get the Leap Motion to track my hand—it took me an embarrassingly long time to recall that I need to have the Leap Motion Visualizer program open at the same time while using the device.
As it turns out, I need to do a better job of documentation. Currently, my “documentation” is a mess of contextless screenshots and notes scattered across two separate notebooks I also use for my TTRPG campaigns. (Like with most things, this would not be the case Pre-Rona. Your girl is a dutiful note-taker in classroom settings. Alas.)
So, first things first, I went about bypassing, disconnecting, and reconnecting nodes to determine just what exactly everything does in my patch. Then, I commented everything out.
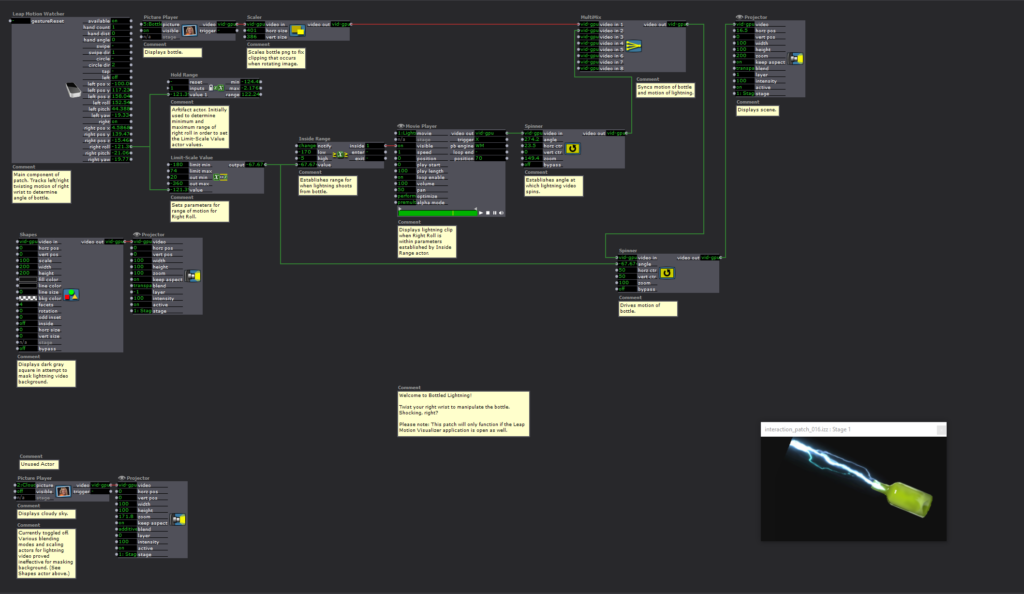
I’m pretty satisfied with the results. When the user twists their right wrist, lightning “shoots” out of the bottle when the angle of rotation is within established parameters. I can totally see this functionality being expanded into a sort of gamified wrist stretching exercise. “Hey, exhausted human who spends too much time at the computer! Twist your wrists to shoot the balloons out of the sky!” Perhaps that’ll be my final project if I can’t figure out how to develop a spooky Call of Cthulhu-esque Zoom UI?
Anyway, my biggest challenges with this scene entailed masking and image clipping. As the lightning activates, a low-opacity background appears. Additionally, the frame of the lightning clip is only so large, so the lightning cuts off before hitting the edge of the projector frame. When I ran into a similar issue with the bottle PNG being too small to rotate without clipping, Alex helped me add a Scaler actor. I thought the same method could both hide the sudden appearance of the background and scale out the lightning to the edge of the projector. Unfortunately, it seemed to only warp the clip. I managed to obscure the unwanted background with a dark gray square background, but I couldn’t find an answer to my lightning clipping issue.
I still had quite a number of hours to go to complete the 5-hour limit for this Pressure Project, and I was fresh out of ideas for what more to do with this Bottled Lightning patch for now. I began reviewing the mishmash of screenshots I mentioned previously. Lo and behold, I stumbled upon one I named “Leap Motion Clap Color Change.” I remembered Alex and Maria puzzling through this practice patch in class, but I hadn’t yet tried it out for myself. Apologies if I totally ripped off your idea here, Maria, but I figured I had enough time to kill to try my own spin on it.
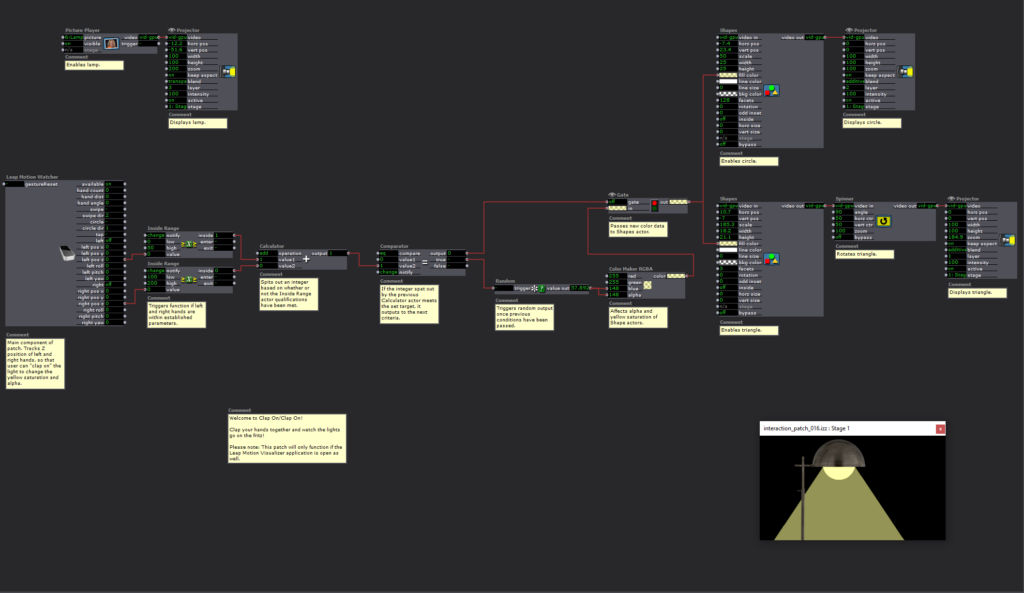
At first, I thought I’d try to do a “Clap On/Clap Off” lamp. When the hands were in range (i.e., clapping), the scene would illuminate. I even thought it might be neat to randomize the appearance of surprising/spooky/funny images.
Clap on!
“Oh, it’s a cute lil’ Shy Guy!”
Clap off!
[The lights turn off.]
Clap on!
“Ah! It’s the girl from The Ring! Clap off! Clap off!”
If you see the “TEST: Image Generator” scene in the file, you can see my attempts to sort out how to turn on and off Shy Guy.
I didn’t want to throw in the towel entirely, so I shifted to a “Clap On/Clap On” idea. In Maria and Alex’s original patch, they randomized the color of a square through a Comparator > Random > Color Maker RGBA actor sequence. Then, the same Comparator and Color Maker RGBA actors were plugged into a Gate actor that hooked up to the Shape actor. Spinning off of that, I tried to put a street light “on the fritz.” There was this unsettling path in the woods back in my William and Mary days where the lights would buzz, falter, and go out just as you happened to walk under them. I plugged the Random actor just into the blue and alpha channels to simulate that change in saturation and strength. Then, I dumped the whole thing into a shape actor, duplicated it, and scaled it down to make it look like a series of them.
In the Bottled Lightning scene, I was pleased with the Leap Motion functionality but a little vexed by the bare-bones appearance of the product. With this scene, the reverse proved true. It looked moody and evocative, but the clapping motion didn’t work as well as I would like. I’m not certain why this is the case, but I think it may have something to do with the values I input for the Inside Range actors.
Truth be told, this project felt a bit like a “sophomore slump” for me. My first project was a wacky, freeing, and free-wheeling exploration of what Isadora can do. This time around, I felt a self-imposed pressure to deliver something bigger and better. I’m still learning. I’ll keep at it and try again next time.
Pressure Project 1 (Nick)
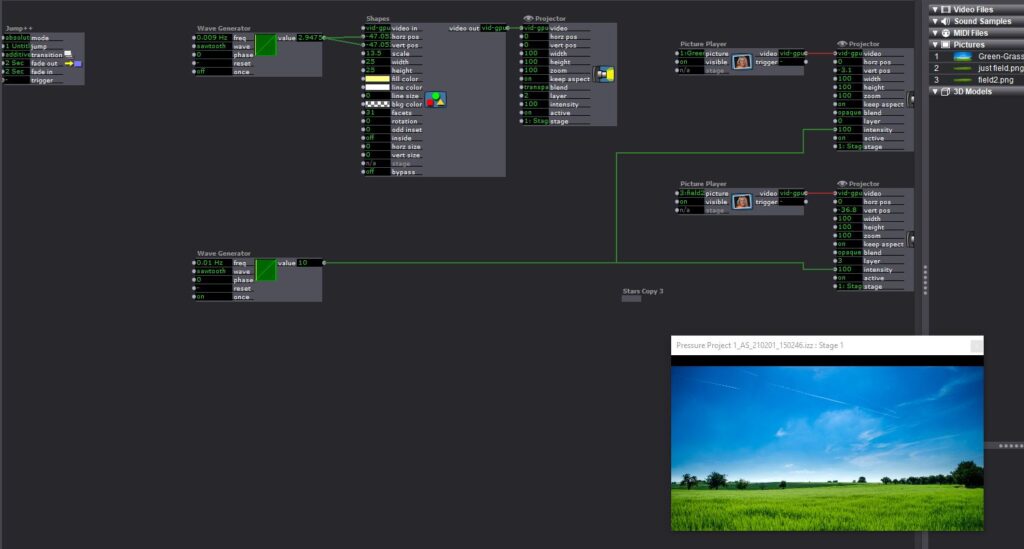
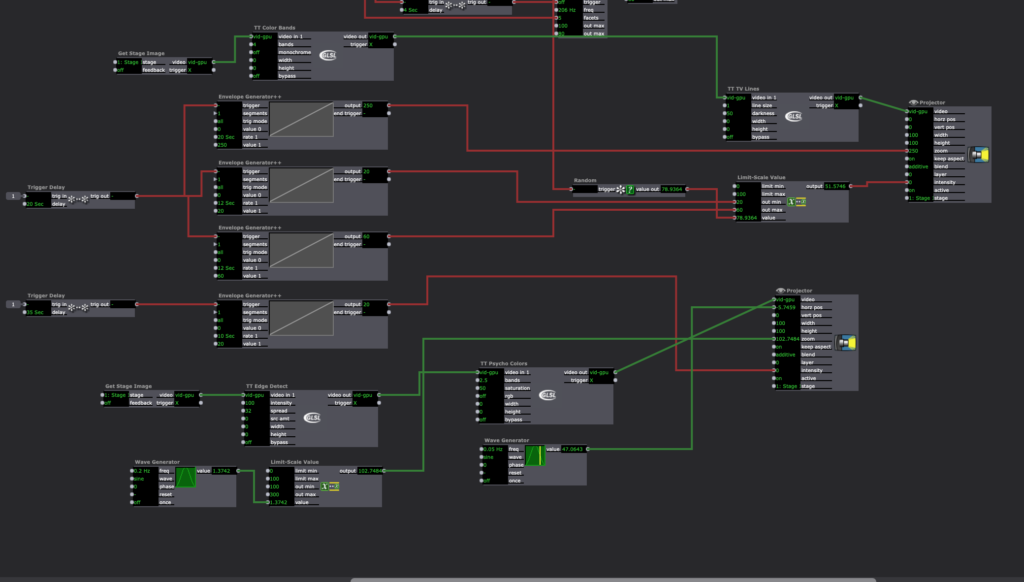
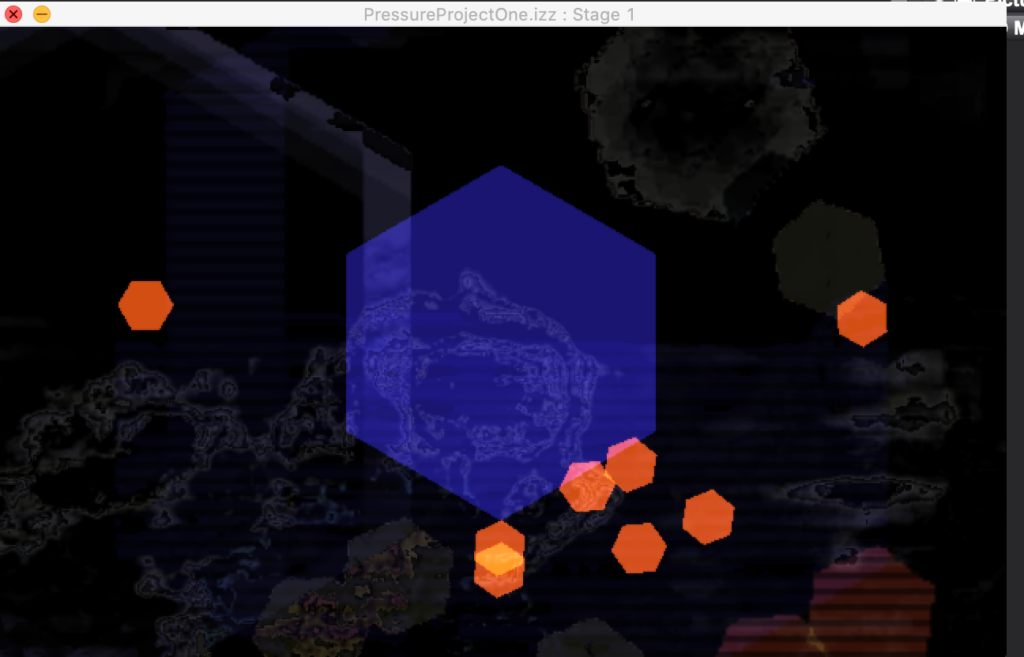
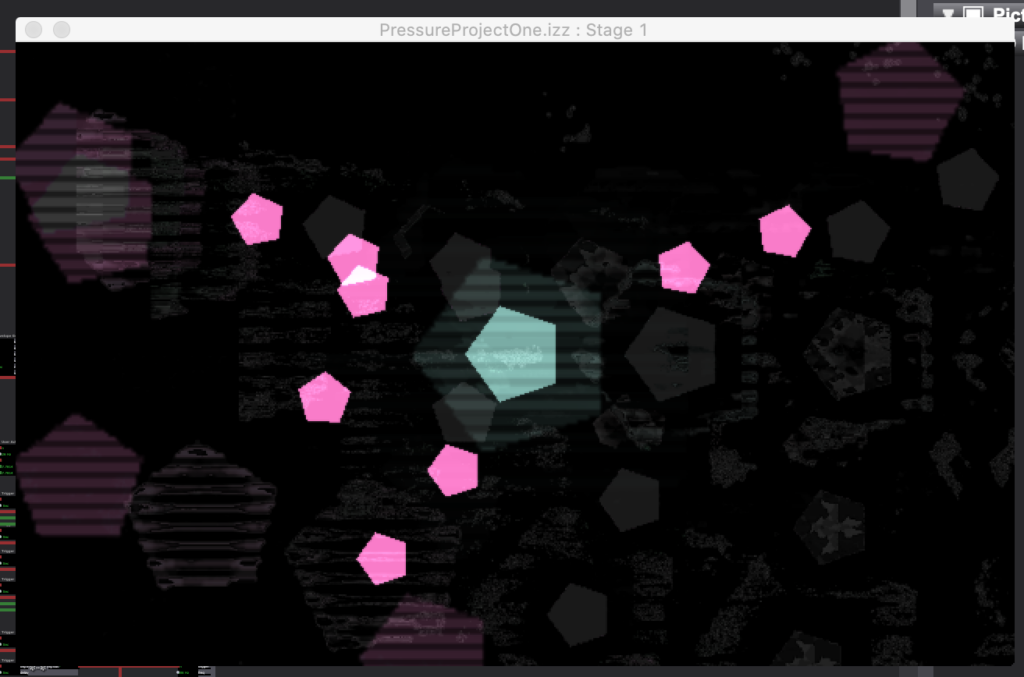
Posted: February 4, 2021 Filed under: Nick Romanowski, Pressure Project I Leave a comment »With this first pressure project, I was mostly interested in playing around with Isadora and seeing what I could accomplish with the actors we’ve worked with so far and a few extra that I was able to research and play around with. I was inspired by some of the example projects we played with in the first or second week that had mesmerizing/repeating patterns.
I decided to create this sort of large “breathing” shape that would enter and exit the scene and be immediately followed by smaller versions of it that moved in a sort of orbiting fashion. Coming from a motion background, I wanted my movements to be a bit smoother than what the envelope generator offers by default. I used the curvature actors to play with the speed values the envelope generator was pumping out. To create my orbiting shapes, I created a user actor that would make one of them, and then inside there I found javascript that I could put into the javascript actor that would make them move in an elliptical motion. The user actors were built with several inputs to influence their facets (to mirror the big shape) and their motion (different values to feed into the javascript creating their circular paths). Those littler shapes were all on trigger delays to allow the mama shape to do its thing first. 20 or so seconds in, two “get stage image” actors start to capture the stage and make things even more mesmerizing. I used TT color bands and TT tv lines to create an “echo” of everything that was going on onstage and then the tv lines make it feel as if it’s sort of like a broadcast. That broadcast idea is pushed further a second “get stage image” that uses an edge detect plugged into a projector with a wave generator driving its horizontal positions, creating a sort of phasing effect. The end result is a mesmerizing, cosmic, and occasionally extraterrestrial set of visuals.
Pressure Project 1 (Maria)
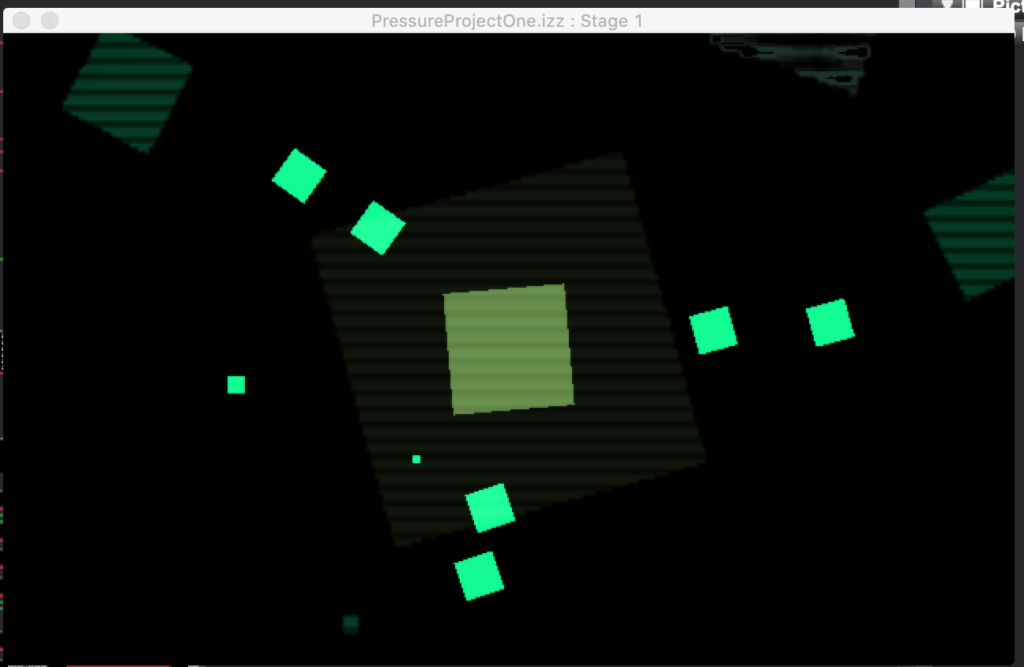
Posted: February 3, 2021 Filed under: Maria B, Pressure Project I Leave a comment »I used this first pressure project to get a better feel for the different actors in Isadora and how I could manipulate them to make weird and unique visual effects. It wasn’t inspired by anything in particular, but it was interesting to hear how different classmates interpreted its meaning and its stylistic resemblance to existing works.
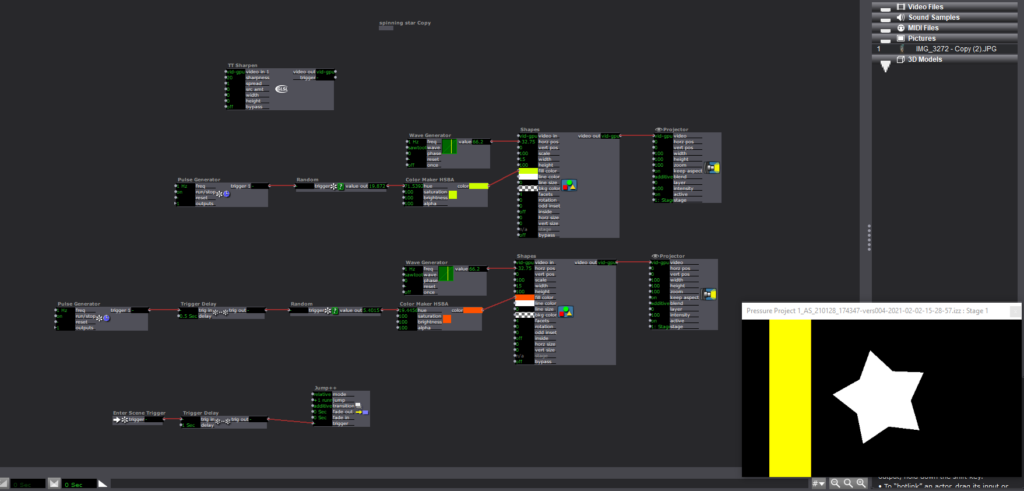
I started with a simple star shape and continued to riff off of it in subsequent scenes. I started by making it look like it was rolling by attaching a sawtooth wave generator to the star and adding rectangles moving by in the background.
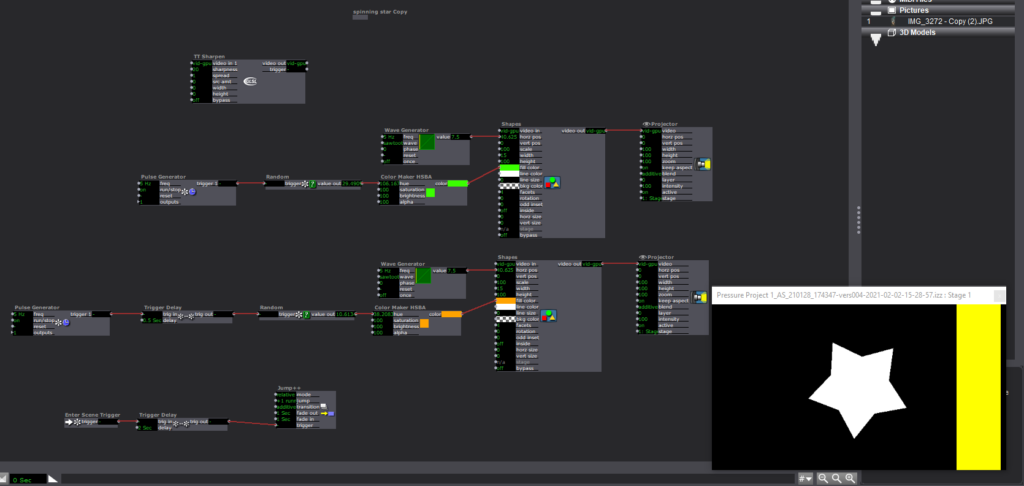
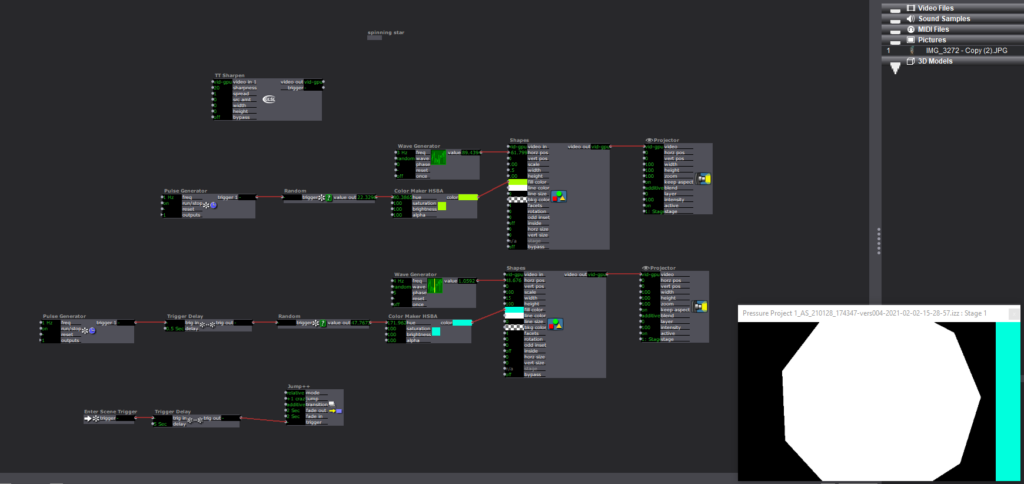
In the next scene the “plot” begins to escalate as the star moves faster and then, in the next scene, grows bigger and randomly changes # of facets (Pulse generator > random > facet input of shape actor).
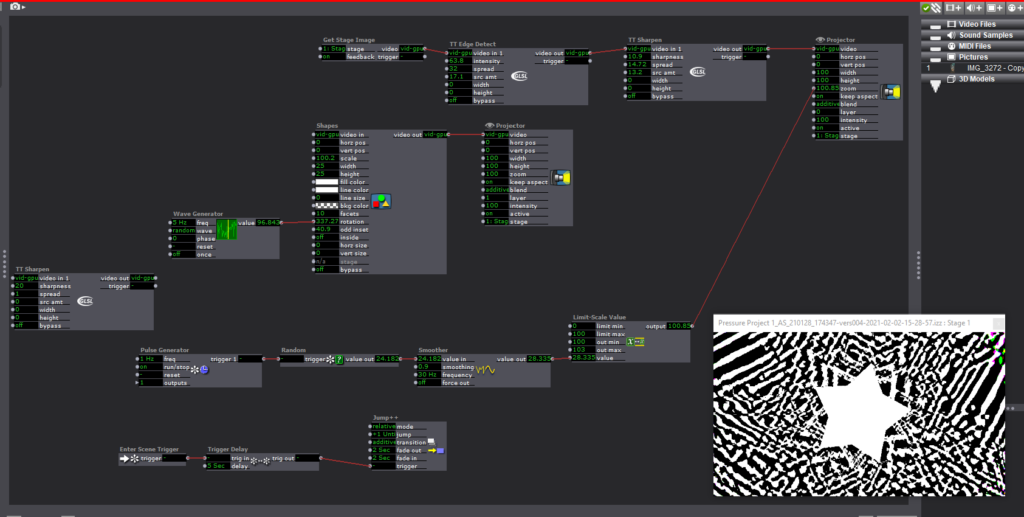
In the next scene, things start to get a little trippy. I experimented with both the TT edge detect and TT sharpen (not entirely sure what happens when these two are impacted by layering them, still need to play around with it more), and tried to find ways to make the visual effects more “random.” I’m sure there are a lot of ways to do this, but the best way I knew how was to mess with the zoom of the stage, which would then alter the stage image that the Get Stage Image actor was receiving. I used a pulse generator > Random > Smoother > Limit scale value > zoom input of Projector (this was a series of actors I found myself using a lot). A common issue I had with the smoother tool was limiting the scale of the output value without making the end result choppy. Typically I’m able to fix this issue by adjusting the min and max values within an actor input/output, but for some reason I was only able to get this one to work by using the limit scale value actor.
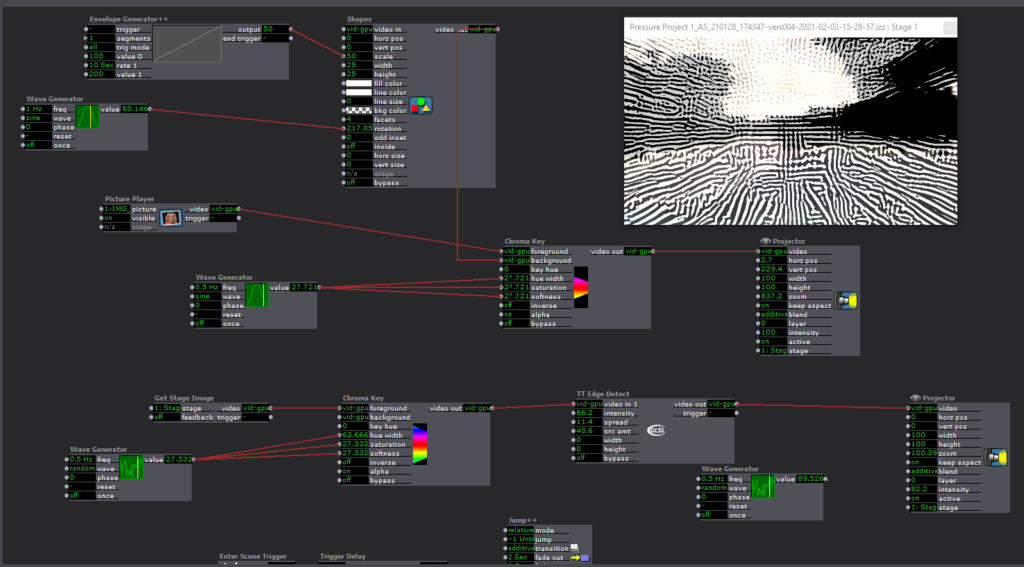
At this point, I ditched the star and starting messing around with adding cool effects to and manipulating a photo. I zoomed into a part of a picture with some interesting texture and color and experimented with using the chroma key and the TT edge detect and sharpen actors. The goal was to create an effect similar to the demo Alex did with the fractal photo, but I couldn’t really figure out/didn’t have the time to get there. One other thing I couldn’t figure out how to do was rotate the photo, which I thought might’ve had a cool effect on the TT Edge Detect and Sharpen Actors.
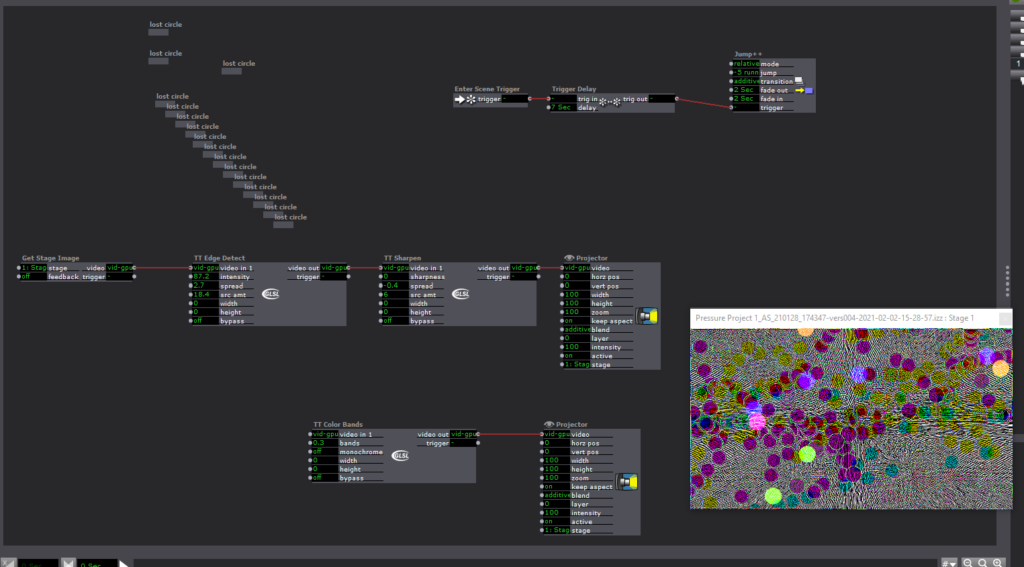

In this final scene, I wanted mess around with making a bunch of little shapes moving around the scene to see how much chaos I could create. I used a lot of the same actors and series of actors as in previous scenes, but it was interesting to see how different the final result turned out.
Looking Forward
I’m really looking forward to learning more about adding in interactivity via the motion and depth sensors we got in our kits for the class. I’m excited to see what doors it will open up for potential applications for this software and how I might be able to use it (or similar software) in the future.
I also want to improve the organization and labeling within scenes, because up to this point I’ve been doing things rather haphazardly and I don’t think things are going to go too well if I continue to do this in more complex projects.
Pressure Project 1 (Sean)
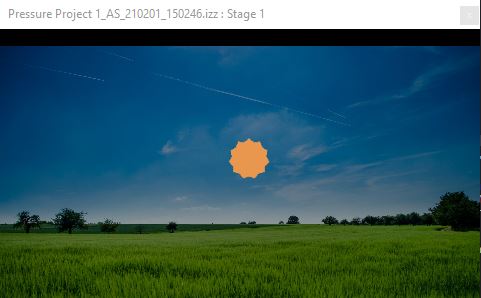
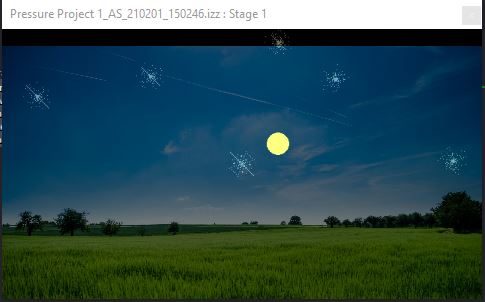
Posted: February 3, 2021 Filed under: Uncategorized Leave a comment »I used my time based pressure project to create a scene of the sun rise fading into a moon rise. I found an image of a big grass field with a few trees scattered around as a background. I had to do some photoshop work to layer the image so that the sun would appear to come up over the horizon and move across the sky. I played with the transparency and the opacity of the image to try and get it to appear as one.

This was really an opportunity to test what I thought I knew about Isadora and to try and recreate some of the actors we had covered in class. I began by playing with the Shapes actor to create the two celestial bodies that would move across the sky – the sun and the moon. I started by trying to figure out how to have them in the same scene and just follow each other, but then I was eating lunch and I had the idea I could make DIFFERENT scenes and that might just make the project more clean.
So I made two scenes. A sun rise and a moon rise. I adjusted the fascets and the odd insert setting on the shapes actor to create the sun and moon in different scenes. I knew that I wanted them to move with a deliberate slowness over the course of an extended duration. I messed quite a bit with the timing output of the wave generators to make them move across the sky at the tempo I desired.
Then next step was to synchronize the increasing and decreasing intensity of the background image to make it appear as thought the sun and the moon were rising. I found myself working again with the wave generator and learning how to change the min/max output and initilizing the setting so that the value when up or down how I wanted to see them
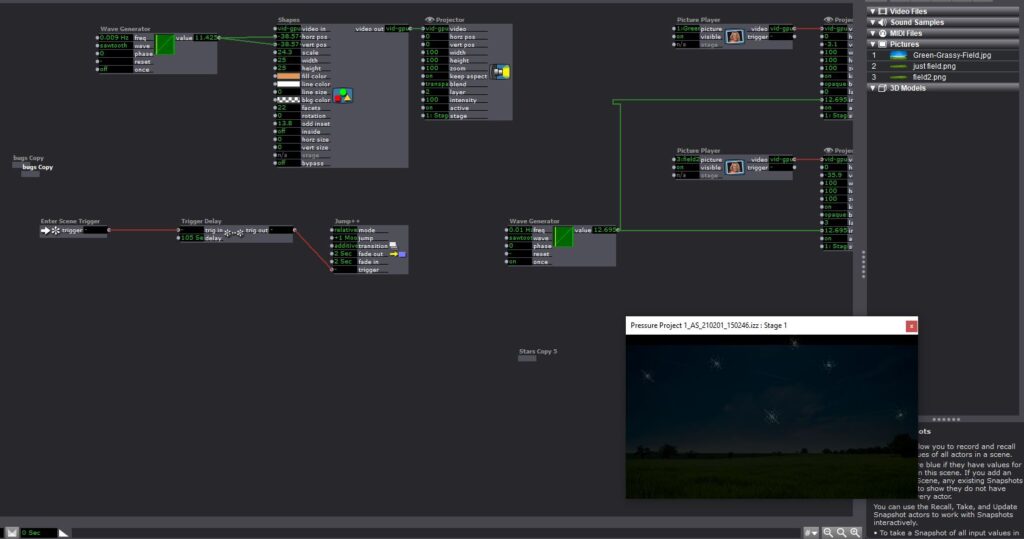
Next, I wanted to have some overlapping stars in the sky to create the illusion that they were contiguous scenes. Shapes actor again set the fascets and odd insert high. I used a random wave generator to give the stars a twinkling quality and used what I had learned about the inverting the value of the intensity to make them appear and disappear as the sun rose.
I was trying to create the effect of lady bugs in my daytime scene that would disappear as it got dark, but I couldn’t get them where I wanted them. We adjusted these settings in class and now I think I have a better understanding of how those actors were talking to each other and how to address that in the future.