Cycle 2 – Audio Game
Posted: November 25, 2019 Filed under: Uncategorized Leave a comment »For Cycle 2:
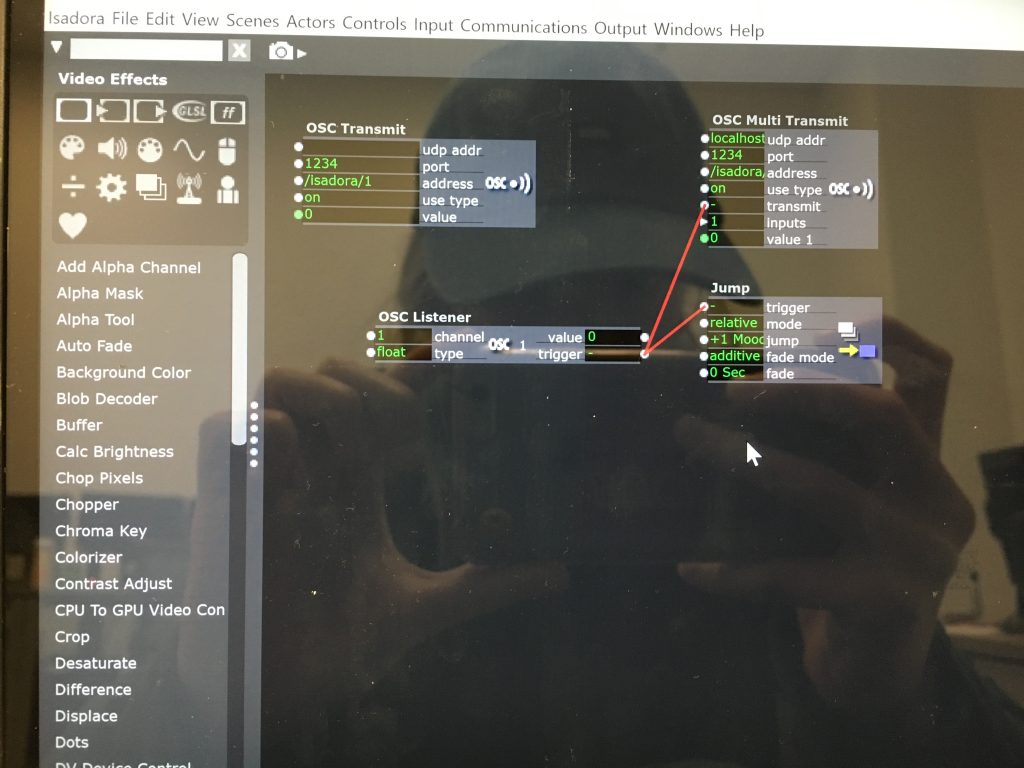
—I decided to completely abandon my idea of using this project as a means to push my thesis work forward, and decided to instead use this as a way to explore an audio-driven game. The game itself is an interactive piece that uses the body as a “human tuning-fork”. The programs that would be used are Isadora and Max/MSP. Isadora would send the messages via an OSC message to Max, and would therein transmit a sound based on those OSC messages. My intentions are to use the body tracking from a Kinect, or Orbbec, to tune a pitch to match another “fixed” pitch (this would also be sent to Max).
To begin:
—I drew out my initial idea on a whiteboard of how the experience would start. This included:
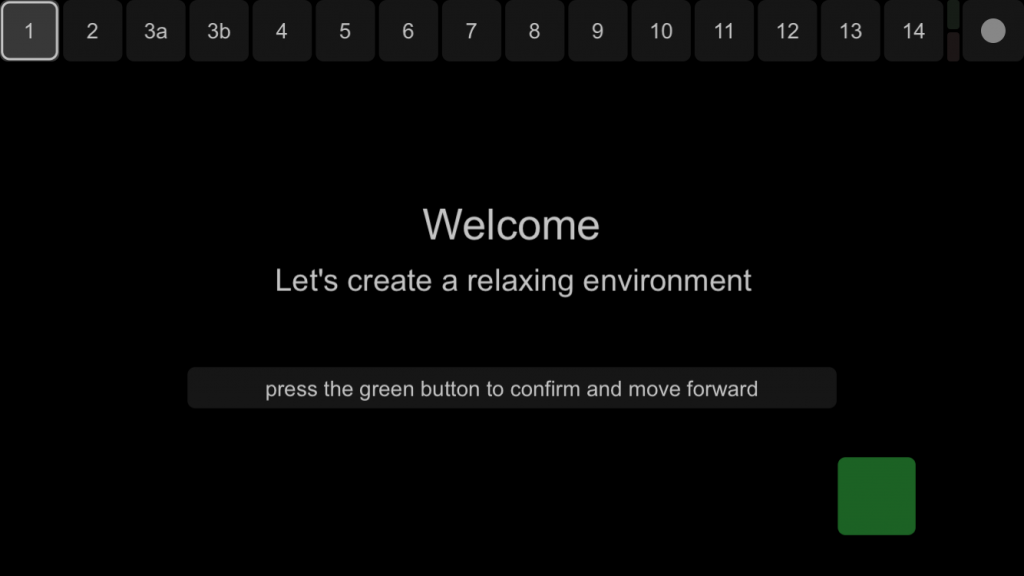
- Making a “Welcome” Screen.
- Having the welcome screen introduce the concept of using your body to tune the pitch to match the fixed tone.
- Introducing the concept of making it into a game
- Showing the visuals for the game
- Giving parameters for how the game will keep score, and how much time is allotted for each round.
- Game-play screen with proposed visuals
- Some math for how the determinate pitch will be associated with the fixed pitch

Welcome Screen 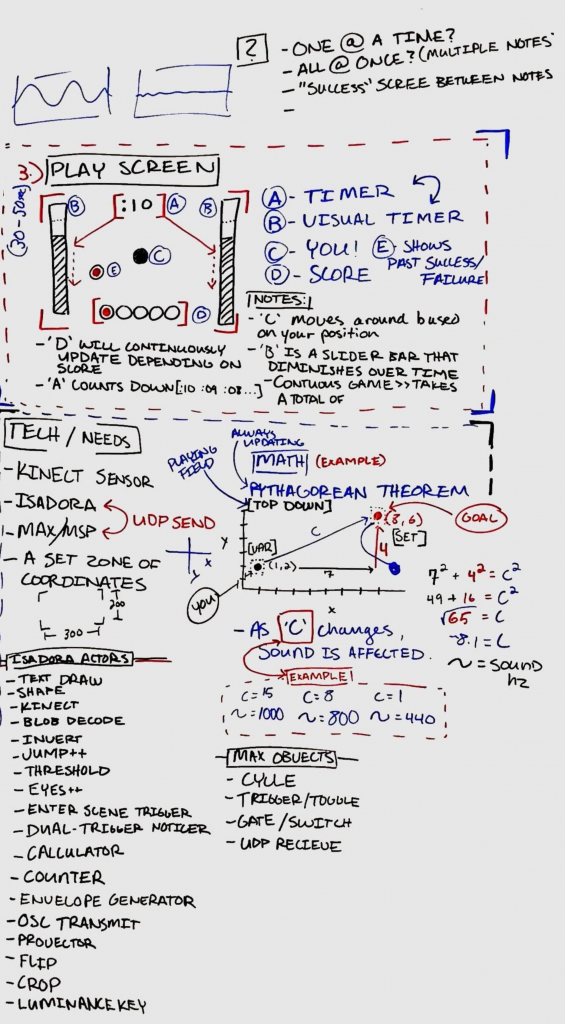
Gameplay
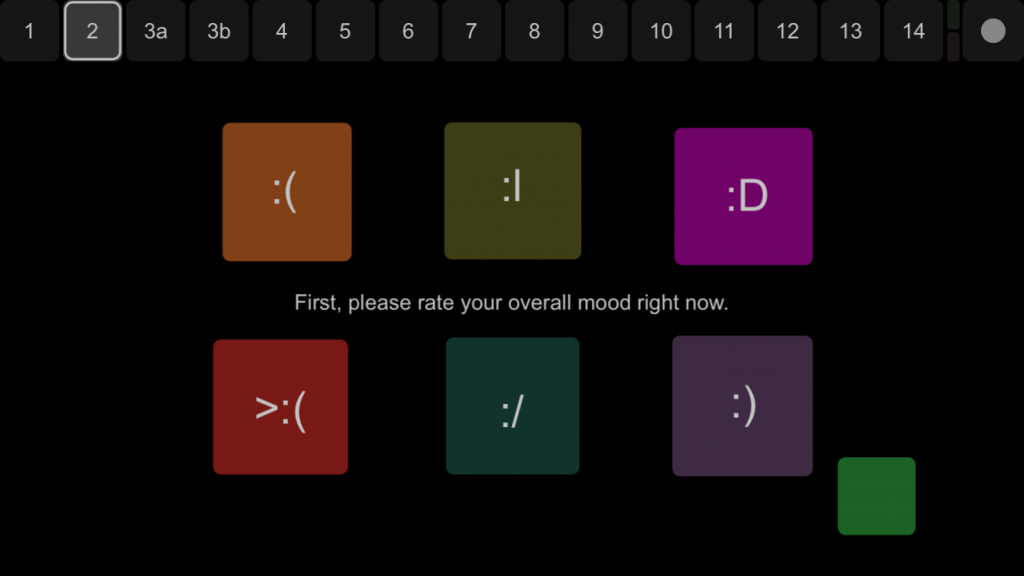
—For now there are 3 screens: Welcome, Goals, and Game-play. The welcome screen includes all of the introductory information for the game, including how the experience will play out and a small example. The goals screen shows what the player needs to do; it’s a 3-out-of-5 win/lose gambit. The game-play screen shows the timer, a visual representation of the countdown, and where the player has won/lost a round.
—To elaborate upon this, I proposed the idea to the group and had some feedback/questions in terms of game-play, visuals. The setup thankfully made sense to the group (and myself). The comments are as follows:
>>Game-play:
- Do you get to choose the pitch you want to listen for?
- How will you know when you’ve gained a point?
- Is the pitch always the same? Or does it change?
- Is our pitch lower or higher than that of the initial pitch to begin?
>>Visuals:
- Will there be visual indicators of how close/far you are from the desired pitch?
- How will these visuals be shown? Through a sine-wave graph? Through a visual bar?
- Does the player have a visual to notate where they are in the space?
- Is it necessary to have a timer AND a visual for the time? Is this too much? How could the screen space be used in a better way?
- Is there a way that the X & Y coordinate could be represented as visual? As in: if I am on the correct X/Y coordinate, something would show this correlation?
—My next steps include (in order, hopefully):
- Making the screens for each section
- Making the interactivity between Isadora and Max/MSP function correctly.
- Using a “Mouse Watcher” actor as the means to test the game-play.
- Using the math (Pythagorean theorem) to create the game-play screen pitch sounds. Distance from goal == pitch (scaled).
- Making the game-play function correctly; points, movement, etc.
- Using the top-down kinect/orbbec depth sensor and the blob-tracking function to take the place of the “mouse-watcher” actor.
-Taylor Olsen
Cycle 2, Stress Relief Environment
Posted: November 19, 2019 Filed under: Uncategorized Leave a comment »For cycle 2, I wanted to clean up my Touch OSC program and make sure it communicated robustly with Isadora. I worked with Alex on how Isadora could send messages back to OSC touch. This was so useful because it allowed me to change the page of the OSC interface with the scene of Isadora…essentially allowing the participant to easier follow along with the program.
Also during cycle 2, I collected most of my content for the music choice and background sound choice. This wasn’t hard, but was really time consuming as I tried to accommodate to various different preferences of relaxing music.
I wasn’t able to present my program as I had hoped for cycle 2 because I am currently struggling on finding a common network for my laptop and my OSC interface to work through. Thankfully, I will most likely get them to run on a separate router for cycle 3 and the final!
Cycle 2
Posted: November 19, 2019 Filed under: Uncategorized Leave a comment »Booo tech sucks. Not really, but I was really excited for this cycle because I figured out the most technologically advanced thing I’ve ever done thus far in my life to implement into this cycle only to have my presentation be hampered by significant tech problems from sound to video quality. I think everyone was able to get the gist of my ideas though, so not the end of the world, but still disappointing.
Nevertheless, I was super proud of myself for learning basic electrical engineering and how to close MakeyMakey circuits to use in my Isadora patch. Phase 3 of my project brings three videos of my mom and I at home (or rather will as I’m making those videos over Thanksgiving Break when I go home.), and participants will be able to toggle between the three videos by interacting with one of my dolls (also to be retrieved from home! Shoutout to Baby Jesus for standing in for us from Brianna Rae Johnson’s desk) and various Black hair products that I have set up on a table. They doll and products outfitted with MakeyMakey buttons connected to keyboard watcher actors in Isadora, allowing it to switch between each of the three video playing scenes.
I learned a lot about Isadora and actors in constructing these mechanics, and while after spending two hours figuring out to make Isadora switch between three videos at random all from within the same scene, Alex came to me at the next class with a much simpler option, which is how we ended up putting them in separate scenes and using a keyboard watcher to trigger a Jump++ actor to move forward and backward between scenes.
Once I figured out the patchwork, making the buttons was quite simple. I just used some pieces of packing cardboard that was in a box from a recent Ikea purchase, wrapped them in foil, and clipped alligator head end of the wire to the foil. Baby Jesus (which will be one of my own Barbies in C3) served as the ground, so by picking up the doll and one of the hair products, you could switch the video that was playing.
One additional change that I made was removing the written option for the “Thank a Black Woman” phase that opens the experience. I thought it would better streamline entry inside the space. A “thank you” is how you gain access to the space.
Feedback was still very good. The “thank you” section continues to resonate deeply. There were more people in the space thanks to guests from the Sonder film that was visiting, so the playback moment was longer, which was really great. I’m still towing around with the idea of pre-recording thank yous to intersperse throughout Phase 3.
Things I Need to Do/Make for Cycle 3:
* Make larger “Thank a Black Woman” signage for entrance by microphone
* Projection map videos
* Enhance hair product station (table cloth, pictures, etc) and make instructional signage
* Shoot film of my mom and I and edit/compile footage
Cycle 1, Stress Relief Environment
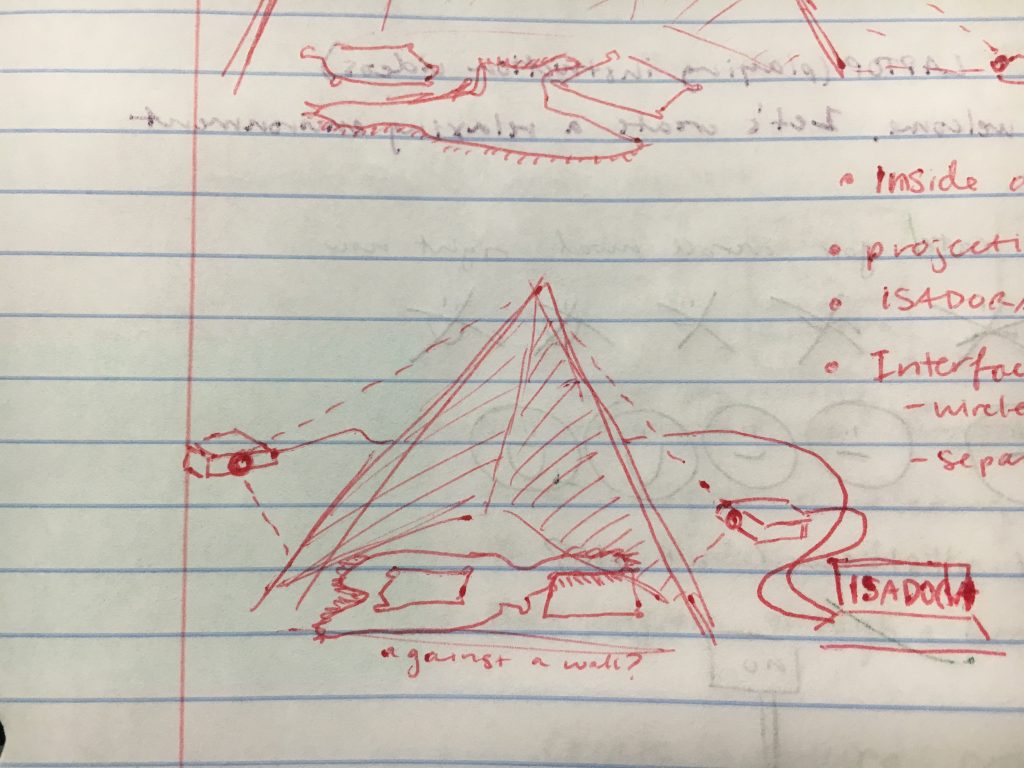
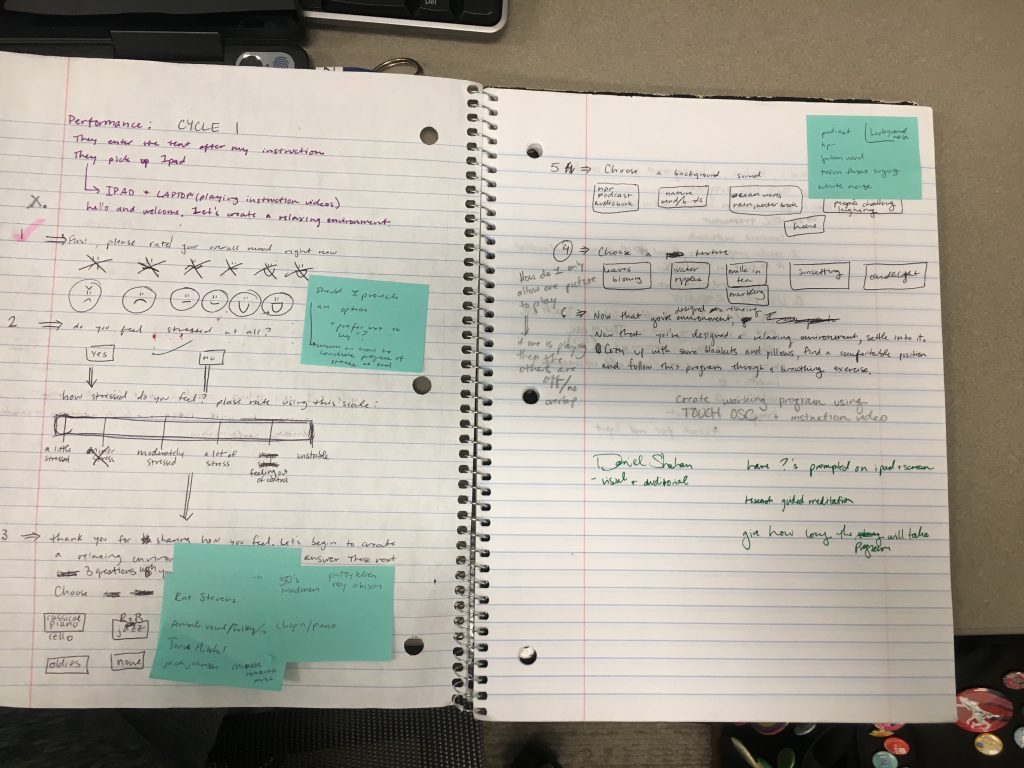
Posted: November 19, 2019 Filed under: Uncategorized Leave a comment »I am developing an installation that leads a participant through a “create your own” stress relief environment and guided meditation. The concept of this project is to provide a brief escape from the stresses of daily life to help individuals recenter and allow themselves a break. This will be possible by creating a Touch OSC interface on an iPad that communicates with Isadora through the relaxation program I will develop. The program will prompt the participant questions that will allow them to choose music, calming videos, and a nature sound/background noise. I envision the program to be played inside a fort or tent installation with comfy pillows and blankets for a better sense of security and privacy from the outer world.
During cycle 1, I set out to begin creating the Touch OSC program that communicates with Isadora. I successfully created the Isadora patch and was able to figure out how to get OSC to communicate with Isadora. The most helpful feedback gave insight on how to prompt the questions to the participant. Instead of projecting the questions and using the OSC to respond, causing the participant to constantly look up and down to know what to do… my classmates suggested that the questions and OSC interface could have both to make it easier to understand.
In addition, I realized that I needed Isadora to send messages back to OSC to have a more robust program. This was something I knew I needed to figure out for cycle 2.
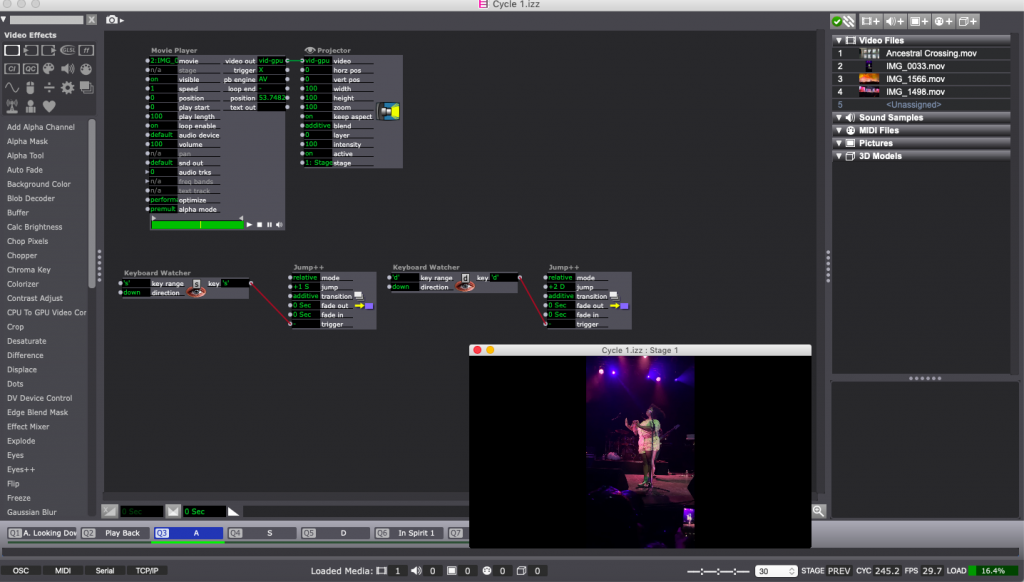
CYCLE 1: Dancing Club
Posted: November 18, 2019 Filed under: Uncategorized Leave a comment »In cycle 1, I did a “Dancing Club” through which the relationship of the digital body and the actual body was experienced. I hope people can put focuses on their bodies under this relax and casual club atmosphere.
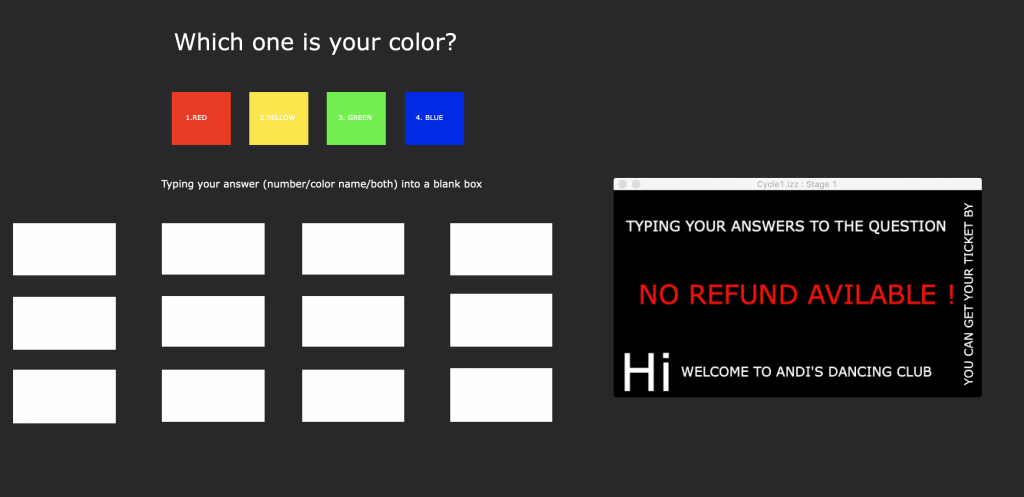
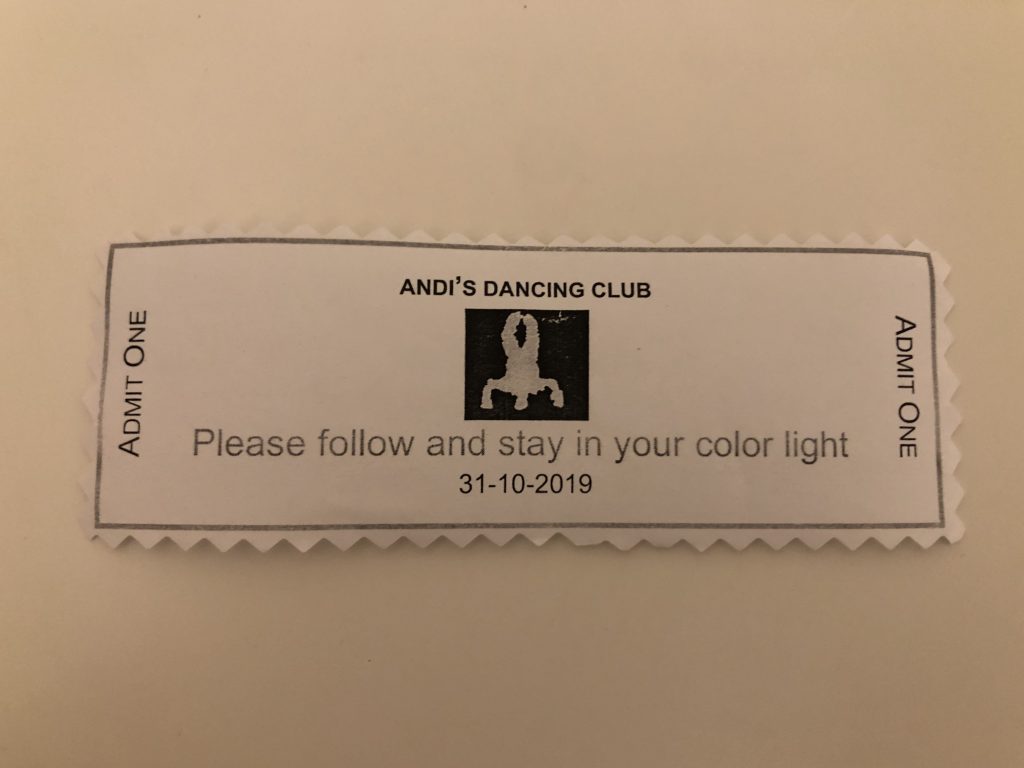
There was an entrance for people who had the ticket to go into the Club. To get a ticket, people had to choose one color and type into the Isadora Interface.
When people arrived at the club (Stage), the projector started to play the video that combined my Pressure Project1 and movement choreographed by me. I didn’t mean to let people learn these dance phrases, but they did.
As the instruction on the Ticket, people had to follow and stay in their color light. This means I “hired” and lighting designer manually control four light: Bule, Yellow, Red, and Green. When the light changed, people had to walk to the new spot.
With the music and video fade out, the last scene was people improvisation. I used Connect Sensor to capture people who dance in the stage and project them at the same time. They gradually recognized that it was themselves on the projection screen and started to play with it. And still, they had to take care of the change of their color light.
Cycle 1 – Anim. Driven Spatialized Audio
Posted: November 7, 2019 Filed under: Uncategorized Leave a comment »–This week of Cycle 1 I progressed more towards using this time to develop my thesis work. I decided to show the class the progress of the work and an example of how the project is progressing towards a ‘finalized’ project.
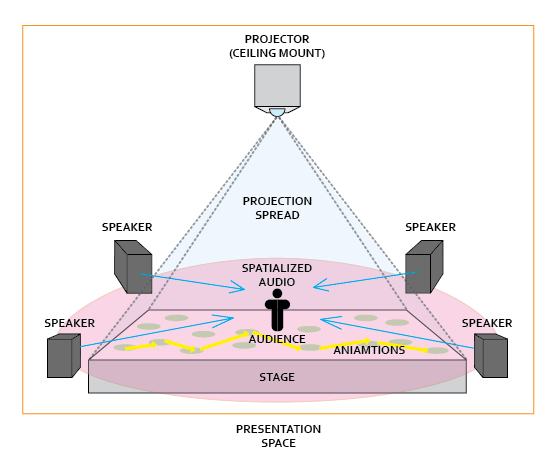
–My goal for this project is to be able to have the visuals projected towards the ground plane, and have the audio also reactive to the visuals being produced. Giving the viewer an audio-visual experience of animation beyond that of just watching it projected on a screen.


–For the moment, the patch works as an interface that 4 separate instances of utilizing visuals to drive audio. The proposed 4 separate sources are as follows:
1. Video
2. Image
3. Live
4. Multi-Touch
–Currently the only piece that I have invested time into showcasing is the “video” source. For the sake of effort and how much time it takes to connect all of the separate pieces that entail the position based object orientation, the GUI setup, and the prototyping, I have decided to stick with the work of making the video portion the main focus.
–Beyond this, I have been having considerations of changing the viewing experience from a viewing experience on a screen to a top-down projection onto the floor. I proposed a series of questions for the sake of generating a conversation around the piece as well:
- What would you imagine if the image was projected onto the ground?
- If color is incorporated, what do you expect to happen?
- I have the ability to derive a color palette from live imagery – would you all imagine that this affects all the sounds? Or ones from specifically tracked objects?
Feedback from the class (from what I could write down in time) entailed:
- Give us the understanding that based on the visuals, the audio data is being pulled out of the visual space itself.
- Explain that the video is live and the audio is being directly reactive from such.
- What kind of understanding should be gained through working with the experience? What can we experience/learn from it? Or is it purely something to enjoy?
- What do you want us to notice first? Audio? Visuals?
- Where would this piece actually be located? Within a museum? Open space?
- How do you project the visuals to give us more of an audio-visual sensation that drives our understanding?
- How does the curiosity of the audience aware that it wasn’t just pre-composed?
What I want to accomplish moving into next week:
- Work with the projector in the MoLab to have the animations play on the ground.
- Work with the audio in the MoLab to have the speakers setup in a way that is conducive to having the correct audio spatialization.
- Find patches/online resources that help with transferring different pieces of audio between different speakers.
Cycle 1 – DroidCo. Backend Development
Posted: November 6, 2019 Filed under: Uncategorized Leave a comment »For cycle 1, I built the backend system for a game I’ve been referring to as “DroidCo.” The goal of the game is to give non-programmers the opportunity to program their own AI in a head-to-head “code-off.”
The game starts with both players in front of sets of buttons (either digital or physical via makey makey). The buttons have keywords for the DroidCo. programming language. By pressing these buttons, both players build a program that each of their team’s droid will run. Here’s what a program might look like:
BEGIN
   IF-next-is-enemy
      hack
   END
   WHILE-next-is-empty
      move
   END
END
In addition to BEGIN and END, here are the keywords for the DroidCo. language:
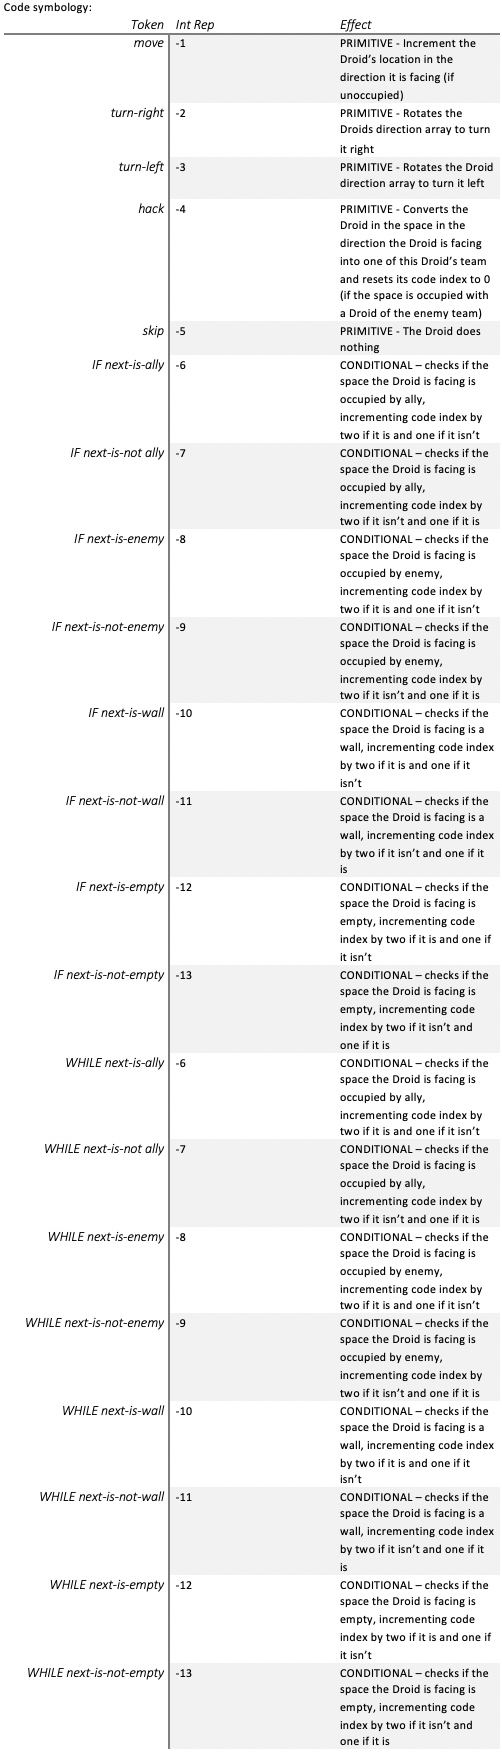
After both players have completed their code, the second phase of the game begins. In this phase, a grid of spaces is populated by droids, half of which belong to one player and the other half belonging to the other player. Each second a “turn” goes by in which every droid takes an action determined by the code written by their owner. One of these actions could be “hack” which causes a droid to convert an enemy droid in the space it is facing into an ally droid. The goal is to create droids that “hack” all of your opponent’s droids, putting them all under your control.
The backend development is sorta an involved process to explain, so I may put the gritty details on my personal WordPress later, but here’s a boiled down version. We start with a long string that represents the program. For the sample program above it would be: “BEGIN IF-next-is-enemy hack END WHILE-next-is-empty move END END “. We give this string to the tokenizer that splits it up into an array of individual words. Here’s the tokenizer:
function tokenizer(tokenString){
	var tokens = [];
	var index = 0;
	var nextSpace = 0;
	while(index < tokenString.length){
		nextSpace = tokenString.indexOf(" ", index);
		tokens[tokens.length] = tokenString.substring(index, nextSpace);
		index = nextSpace+1;
	}
	return tokens;
}
This array is then given to the code generator, which converts it to a code “roadmap” in the form of an array of integers. Here’s the code generator:
function codeGenerator(code, tokens){
	var startIndex = code.length;
	var nextToken = tokens.shift();
	var dummy;
	var whileloop;
	while (tokens.length > 0 && nextToken != "END"){
		switch (nextToken){
			case "BEGIN":
				break;
			case "move":
				code[code.length] = -1;
				break;
			case "turn-right":
				code[code.length] = -2;
				break;
			case "turn-left":
				code[code.length] = -3;
				break;
			case "hack":
				code[code.length] = -4;
				break;
			case "skip":
				code[code.length] = -5;
				break;
			case "IF—next-is-ally":
				code[code.length] = -6;
				dummy = code.length;
				code[code.length] = -100;
				codeGenerator(code, tokens);
				code[dummy] = code.length;
				break;
			case "IF-next-is-not-ally":
				code[code.length] = -7;
				dummy = code.length;
				code[code.length] = -100;
				codeGenerator(code, tokens);
				code[dummy] = code.length;
				break;
			case "IF-next-is-enemy":
				code[code.length] = -8;
				dummy = code.length;
				code[code.length] = -100;
				codeGenerator(code, tokens);
				code[dummy] = code.length;
				break;
			case "IF-next-is-not-enemy":
				code[code.length] = -9;
				dummy = code.length;
				code[code.length] = -100;
				codeGenerator(code, tokens);
				code[dummy] = code.length;
				break;
			case "IF-next-is-wall":
				code[code.length] = -10;
				dummy = code.length;
				code[code.length] = -100;
				codeGenerator(code, tokens);
				code[dummy] = code.length;
				break;
			case "IF-next-is-not-wall":
				code[code.length] = -11;
				dummy = code.length;
				code[code.length] = -100;
				codeGenerator(code, tokens);
				code[dummy] = code.length;
				break;
			case "IF-next-is-empty":
				code[code.length] = -12;
				dummy = code.length;
				code[code.length] = -100;
				codeGenerator(code, tokens);
				code[dummy] = code.length;
				break;
			case "IF-next-is-not-empty":
				code[code.length] = -13;
				dummy = code.length;
				code[code.length] = -100;
				codeGenerator(code, tokens);
				code[dummy] = code.length;
				break;
			case "WHILE-next-is-ally":
				whileloop = code.length;
				code[code.length] = -6;
				dummy = code.length;
				code[code.length] = -100;
				codeGenerator(code, tokens);
				code[code.length] = whileloop;
				code[dummy] = code.length;
				break;
			case "WHILE-next-is-not-ally":
				whileloop = code.length;
				code[code.length] = -7;
				dummy = code.length;
				code[code.length] = -100;
				codeGenerator(code, tokens);
				code[code.length] = whileloop;
				code[dummy] = code.length;
				break;
			case "WHILE-next-is-enemy":
				whileloop = code.length;
				code[code.length] = -8;
				dummy = code.length;
				code[code.length] = -100;
				codeGenerator(code, tokens);
				code[code.length] = whileloop;
				code[dummy] = code.length;
				break;
			case "WHILE-next-is-not-enemy":
				whileloop = code.length;
				code[code.length] = -9;
				dummy = code.length;
				code[code.length] = -100;
				codeGenerator(code, tokens);
				code[code.length] = whileloop;
				code[dummy] = code.length;
				break;
			case "WHILE-next-is-wall":
				whileloop = code.length;
				code[code.length] = -10;
				dummy = code.length;
				code[code.length] = -100;
				codeGenerator(code, tokens);
				code[code.length] = whileloop;
				code[dummy] = code.length;
				break;
			case "WHILE-next-is-not-wall":
				whileloop = code.length;
				code[code.length] = -11;
				dummy = code.length;
				code[code.length] = -100;
				codeGenerator(code, tokens);
				code[code.length] = whileloop;
				code[dummy] = code.length;
				break;
			case "WHILE-next-is-empty":
				whileloop = code.length;
				code[code.length] = -12;
				dummy = code.length;
				code[code.length] = -100;
				codeGenerator(code, tokens);
				code[code.length] = whileloop;
				code[dummy] = code.length;
				break;
			case "WHILE-next-is-not-empty":
				whileloop = code.length;
				code[code.length] = -13;
				dummy = code.length;
				code[code.length] = -100;
				codeGenerator(code, tokens);
				code[code.length] = whileloop;
				code[dummy] = code.length;
				break;
		}
		nextToken = tokens.shift();
	}
}
This code is then given to the server, which stores both players’ codes and controls the game-state. Since the server is over 300 lines of code, I wont be posting it here. Nonetheless, each turn the server will run through the droids, allowing each of them to take an action to modify the game-state. Once they have all acted, it outputs the new game-state to both the display actors and back into itself so it can run the next round.
Cycle 1: Collaborative Performance
Posted: November 6, 2019 Filed under: Uncategorized Leave a comment »With my initial thoughts about building a “supportive system”, I set my cycle 1 as a collaborative performance with the help of the audience. I make people into three groups: performer, lighting helper, and audience member. The performers will feel free to dance on the center stage space. The lighting helper will help me trigger the lighting cues to keep the dance going.
Actually the mission for the lighting helpers are heavier. I have a connect capture the depth data of the lighting helpers. They will run and then land on the marked line I preset on the floor so that they will appear in the depth sensor capture area to get a brightness data. When the brightness data bigger than a certain number, it will trigger my lighting cue. Each lighting cue will fade in dark after a certain amount of time, so my helpers will keep doing the “running and land” movement action to keep the performance space bright so that audience members can see the dance.
Also, I have a lighting cue which uses five different lights to shine one by one. I set this the same function as a count down system. This cue is for the lighting helper to notice that they are going to be ready, and run after this lighting cue is done.
I want to use the human’s body movement to trigger the lighting instead of press the “Go” button on the lighting board so that audience members can be involved into the process and be interactive. However, I found the performer seems become less and less important in my project since I want the audience members to help with the lighting and really get a sense of how lighting works in the performance. I want to build a space where people can physically move and contribute to the lighting system. And I think I want to develop my project as a “tech rehearsal”. I will become the stage manager to call the cues. And my audience members will become my crew members to work all together to get the lighting board run.
Mission 2: Cycle 1
Posted: November 5, 2019 Filed under: Emily Craver Leave a comment »
It is a rare and wonderful gift to perform a piece again and again as you build. I’m so used to slamming a piece together and allowing for the spontaneity to provide some additional content.
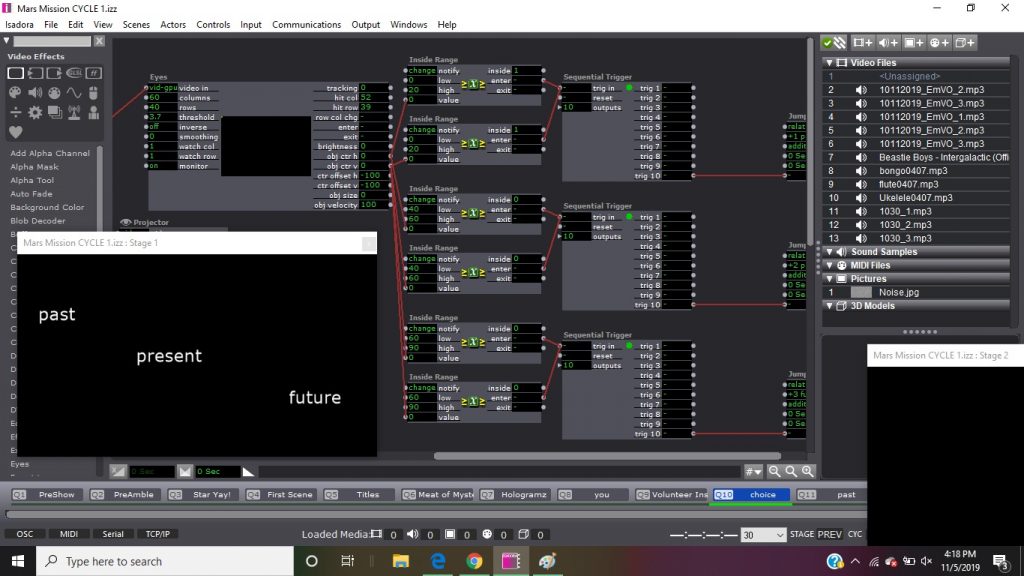
For cycle 1, I took my Mars Mission Murder Mystery and altered it into the beginnings of a live performance/interactive adventure. This means that in addition to the exciting possibilities of the technology available within this course, there is then also the overwhelming possibilities of live performance interaction. Additionally, what are the needs in terms of story-telling within an interactive performance? Similar to a choose your own adventure story/Black Mirror Bandersnatch situation, will the narrative suffer is the interactivity lies at the center of the maker’s proorities?
Cycle 1 saw an added preamble in which my live performers will be introduced as four space travellers//in this rendition, I performed as the unit. There was also an addition of a piece of paper on a string sliding across the stage asking PLEASE READ ME. Playing with both analog and digital//tangible and programmed interests me in this project.
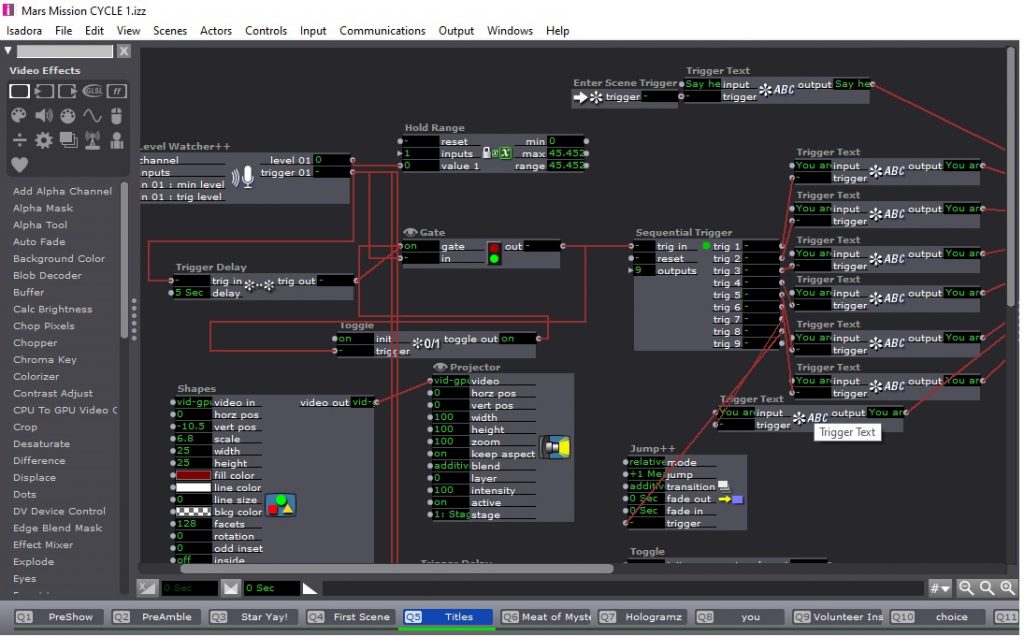
With the addition of a gate, trigger delay, and toggle, as well as a connected shapes actor, the character choice section became slightly more accurate. My audience participants afterward had lovely suggestions relating to perhaps finding space to play within these characters. How are they related? What are their jobs? Is there an interactive game that could bring them all together/tear them apart?
A live pretend hologram then warns the players that things are not as they seem. A random actor chooses a spotlight in order to pick a human to act as representative. This person then must choose how to continue. Should you look at a scene from the travellers’ past, present, or future?
Cycle 1
Posted: November 5, 2019 Filed under: Uncategorized Leave a comment »Cycle 1 went really well, and I am very excited to continue working on this project. My work centers Black women and moves from Black women at large in the lives of my audience to my own specific experience as a Black woman.
I was very intentional about wanting to craft an environment in the MOLAB, so I used the white scrims to create a circle in the middle of the room onto which I projected my video. However, before the participants could enter the space, they were met with my “Thank a Black Woman” station, which invited them to thank a Black woman by name that is in their own lives or give a thank you to Black women at large. They had the option to speak their thank you into the microphone that was set up, write the woman’s name on a sticky note and post it to the poster board that was set up on the table, or do both. Once they had recorded their thank you, they could enter the space.
I used an updated version of my patch from PP3 to capture the audio from the recording (whoops, I switched the camera to movie to be completely manual and forgot to enter the patch right at the top) and so they could see the flashes of the shapes and colors moving on the walls of the circle they stood inside of. After everyone said their thank you and entered the space, the play back of the voiced thank you’s played. This moment was very meaningful; everyone stood in the space along the outside edges making a circle and listened to each other. It was very powerful to hold space for Black women in this way… for women who are too often over looked to be given their flowers for once.
The next scene of the patch is meant to be a “Black women at home” segment, showing me and my mom doing things like washing and doing our hair (often a shared experience between Black mother’s and daughters across the globe) and caring for ourselves and our homes. I don’t have that footage yet so I was unable to show. However, I plan to bring in some physical objects into the space that will be connected to a Makey Makey to open and close circuits to switch between various video feeds.
The last scene speaks to me and my Black womanhood most specifically and is a 3 minute clip of a movement exploration of a research I am calling “ancestral crossings” in which I seek to bring about a kinesthetic shift to spirit through movement in order to shift the temporal planes between past and present so that I might commune with my ancestors once again. The last minute includes a pre-recorded spoken text narrated by me. The audience spread out and watched as the video was played on the the three individual scrims. They commented on the texture of having to watch my movement through another person.
As the video came to a close, everyone settled again onto the periphery, further solidifying the circularity of the space which felt important to me as circles and circularity carry a great deal of meaning in Black culture and life across the diaspora. The feedback I received was really spectacular. I was particularly interested to know how the “Thank a Black Woman” station would be received, and it was exciting to hear that my classmates wanted that moment to go on for even longer. I’m now considering ways to incorporate more by perhaps pre-recording the some thank you to have playing in the background intermittently throughout the third scene.
It was an immense pleasure to have another Black woman in the room when I presented, as we are who I do my work for. Sage Crump of Complex Movements, a Detroit based artists collective that was in residency at ACCAD last week came to visit with our class after she heard about the work that we were doing. It was an honor and a privilege to be in her presence and to hear her thoughts on not only my own work, but also that of my classmates. Thank you for your time and energy, Sage.
You can listen to the thank you’s at the download link below.