Pressure Project #2
Posted: February 27, 2025 Filed under: Uncategorized Leave a comment »For Pressure Project 2, my strategy was to work on exploring some of the actors we’d been introduced to in class and think about applications. I also wanted to make something that I could see be extrapolated out into other uses, and I think that was successful. I chose to let the “mystery” be the mechanics (though I ended up making them more straightforward than originally planned), as well as how the thing itself was structured. I also wanted to focus on creating something that was smoother and ran in a more finished way by setting some attainable goals for myself, even though that is somewhat counter to the way we’re supposed to be thinking in this class, I think. I wanted the user facing side to look more finished than the programming that was holding it together (Figure 1, because everything is theatre). I tried not to spend as much time on story, this time, while still allowing for some kind of simple, cohesive structure to hold the project together. Moving forward, I’m trying to be more focused on creating interesting visuals with just enough story to hold them together, rather than being very story heavy at the expense of slightly more complex visuals (though I still think it worked well for Pressure Project 1).
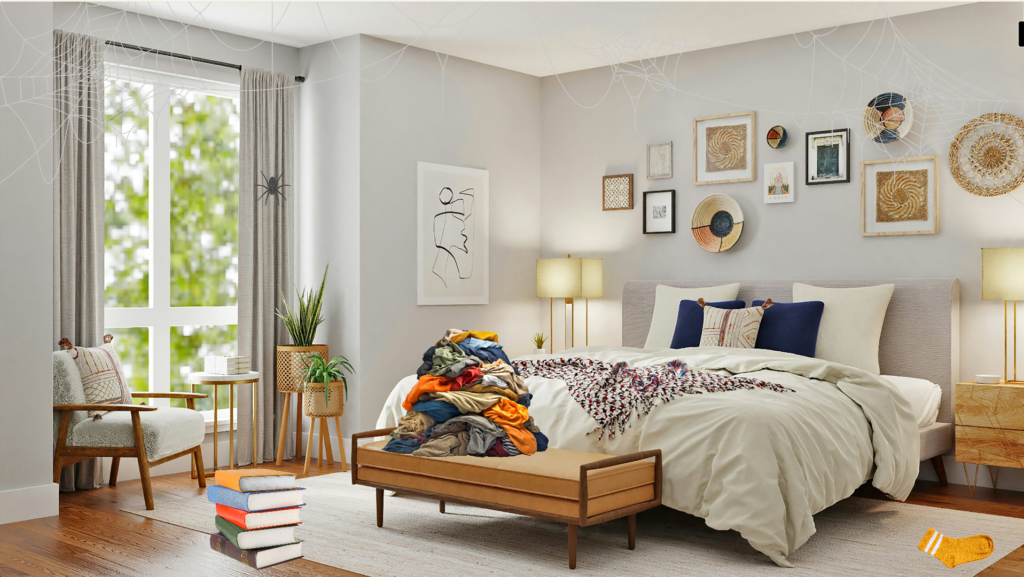
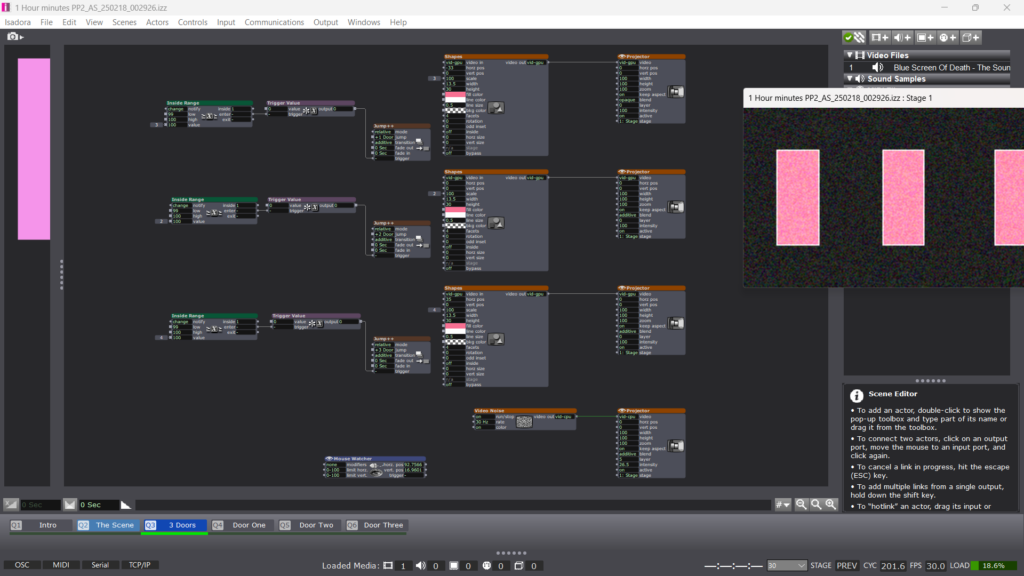
Figure 1: Tape, Glue, and Paint
I spent some time working with the Stage Mouse Watcher and a lot of time with triggers. I used them as both switches within the game, as well as, ultimately, a way to reset the scene, rather than manually turning all the projectors and effects on and off each time I wanted to test things. I wish I had thought of that much earlier in the process, but at least I have that under my belt for next time, now. I also explored Gates so that my sequential trigger wouldn’t keep firing and kick the project to the next scene prematurely. I felt especially good when I figured out how to implement that, as it made the unrolling of the game itself possible. At one point, the stars that replaced the items in the room triggered if you just moved the mouse over the correct spot. Late in the process, I decided to change it to clicking on the item. The mechanic felt like it make more sense, and I’m not sure why I didn’t think of it in the first place. I worked hard to keep my workspace neat and organized. Not that it really matters in the way the thing functions, but it helped me see the patterns and try to sus out when something wasn’t working correctly and then make the necessary changes across various actors. I realized after I built everything that there might have been a better way to use User Actors and simplify things/make the initial workspace neater, but ultimately, I didn’t really mind seeing everything laid out together. I think really cleaning up my workflow is a problem for later, when I’m faster at creating and fixing things. (Figure 2 and Figure 3)
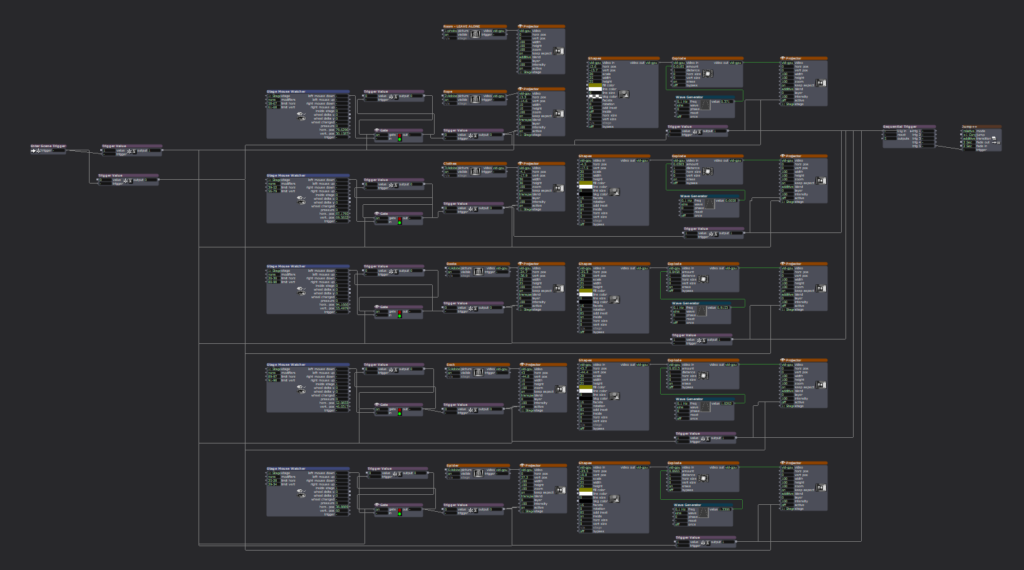
Figure 2: The Mess Behind the Scenes
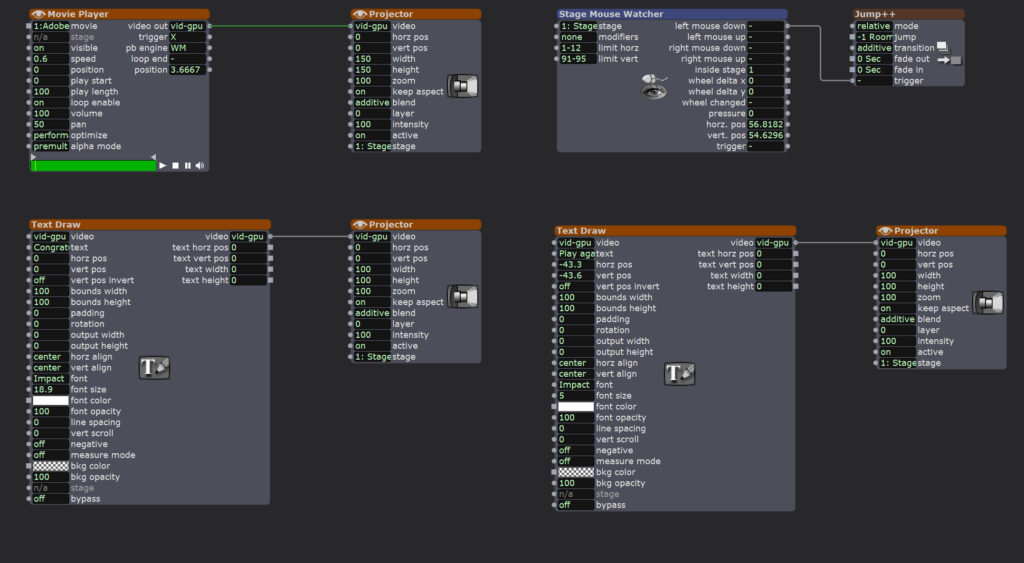
Figure 3: A Cleaner Scene 2
The thing I really ran out of time for, and, I admit, I ran over on time in general, was the controller. I had a better, more designed idea, but the connections between the wires and buttons wasn’t strong enough to be consistent, and I was more interested in a smooth experience at the expense of the look of the controller. To that end, at the presentation, it felt like the controller was easy to use and understand, which pleased me. I didn’t want the mechanics of use to take away from the experience itself, so that was a win. In the things I’m creating, I’m interested in a level of engagement that doesn’t require training or too much figuring out; I want it to be easily playful and, therefore, usable for a wider array of folks.
If I’d had more time, I would have added more items to the room, though the cleanliness of the mess seemed to appeal to the users. I think there’s something to be said for a streamlined interface and screen, especially where play is involved. Users also noted that sound would have enriched the experience, and I definitely agree with that note/wish I’d had time to think of and include that. It’s, admittedly, the last aspect on the priority list, below making my project work, but something I will certainly try to leave time for in the future. This points to a need, in general, for me moving forward, which is to think through all the pieces I need to figure out for a project and make sure to leave at least some time to address them, even if it’s a little frankensteined.
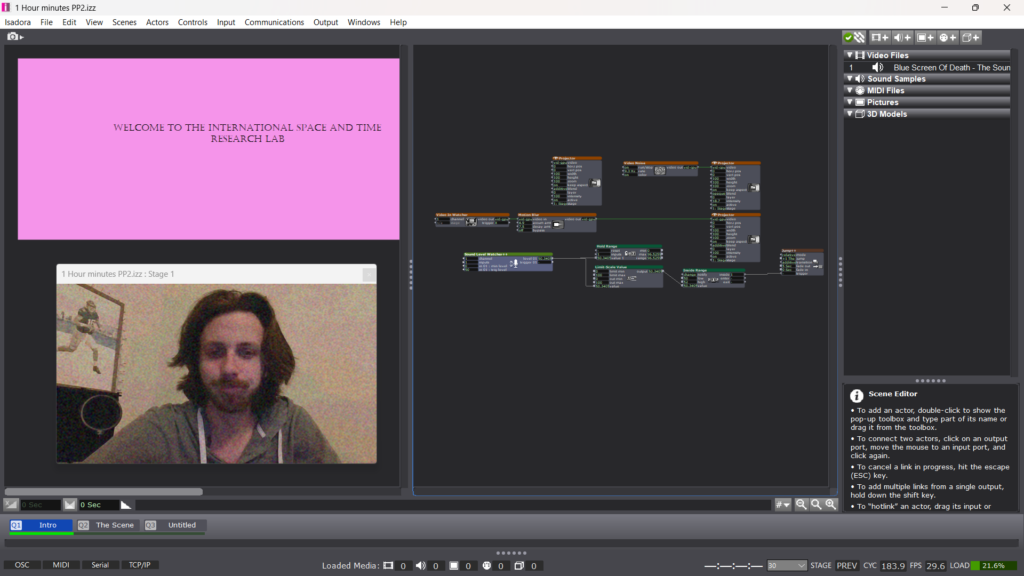
I think there are uses to the things I figured out for this project, especially in relation to gate and triggers. I can see this being very useful as I move into my Cycles and the way I’m thinking about creating an experience and having interactions work in that experience. (Figure 4)

Figure 4: Success!
Figure 5: Video of Final Project
Pressure Project 2: Creating an Escape
Posted: February 25, 2025 Filed under: Uncategorized Leave a comment »For this second pressure project, I had seven hours to design an interactive mystery without using a traditional mouse and keyboard. Based on feedback from my first project—which felt like the start of a game—I decided to fully embrace game mechanics this time. However, I initially struggled with defining the mystery itself. My first thought was to tie it into JumpPoint, a podcast series I wrote about time travel, but I quickly realized that the complexity of that narrative wouldn’t fit within a three-minute experience. Instead, I leaned into ambiguity, letting the interaction itself shape the mystery.
My first hour was spent setting up a live video feed that would give the user questions regarding their current state and environment. To achieve this, I utilized actors such as video noise and motion blur. My initial concept was to have the experience activated via depth sensors, something I had actively avoided in my first project. I set this up, only to realize that to ultize both my high quality web cam as well as the makey makey, all my USB drives were being utilized. So I pivoted to a sound level watcher which would activate the experience.
My second Cue titled “The Scene” serves as my soundbed for the experience. There is an enter scene trigger that gives the appearance of bypassing this in real time, with the 3rd scene utilizing an Activate Scene actor to trigger the music.
If you view the next screenshot, you will notice that the project says One Hour mark, this is not true. This is also your reminder to save early and save often as twice in this experience, I had the misfortune of having about a half hour of work, each time, disappear.
So between hour one and hour two, I set up what would be the meat of the experience. 3 doors with no clear path behind each. This is where I intended to really incorporate the makey makey as the first cue is activated off of sound. In the control panel, I created 3 sliders and attached them to each shape actor in addition to an inside range actor. What I would achieve by this, is creating the appearance that the door is coming closer if you choose to “open” it, while also creating a number which, when hit, would activate a trigger to a jump ++ actor to take the user to either Door 1, 2, or 3’s outcome. A mouse watcher was also added to track the movement from the Makey Makey, which at this point, I had not decided how it would be arranged.
Over the next hour, I would set up the outcomes of doors 1 and 3. Wanting to unlocked the achievement of “expressing delight”, I decided that Door 1 would utilize a enter scene trigger for 3 purposes. 1. To Deactivate the Sound bed. 2. To Activate a video clip to start. The video clip is from Ace Ventura: Pet Detective where Ace, dishelved, comes out of a room and declares “WOO, I would NOT go in there!!”. For the 3rd purpose of the enter scene trigger, I inserted a trigger delay for the duration of the clip to a Jump++ actor to go back to the three doors.
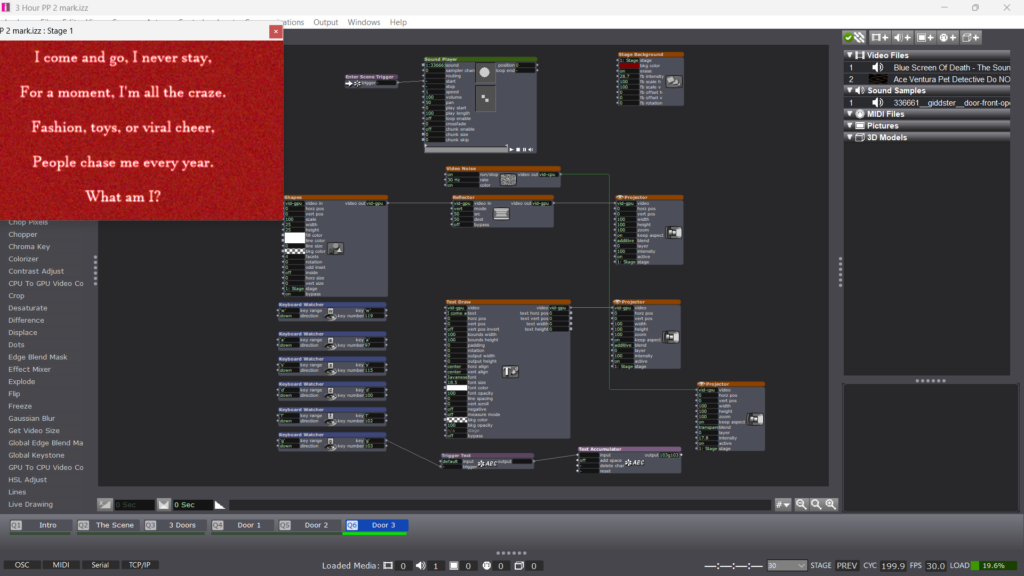
Behind Door 3, I decided to set up a riddle or a next step.To set this up, I utilized a text draw that would rise via an envelope generator. You’ll observe a few other actors, but those were purely for the aesthics. I wanted users to be able to use the Makey Makey in another capacity, so I utilized serval keyboard watchers to hopefully catch every letter being typed. I had made several attempts to figure out how exactly that I needed to inventory each letter being typed before emailing my professor who helped out big time!
While I awaited a response, I spent about half an hour experimenting with the makey makey testing it’s robustness with and without playdough, which I intended to be the conduit for the experience. Please ignore the messy desk, a mad scientist was at work.

Hour 5 is where my pressure project went from being a stressor to being REALLY fun. (Thanks Alex!) Instead of a keyboard watcher, I created 6 text actors to coordinate with WASDFG. Those text actors would connect to a text accumulator which was attached to 2 additional actors. A text draw, which would put it on screen as I intended and a text comparator, which, when it matched the intended answer, would take send a trigger to take the actor to another scene. Instead of using the WASDFG inputs of the makey makey, I stuck to the directional and click inputs that I played around with earlier and instead created those keys with buttons on the control panel. This would still give the user the experience of typing their answer without having to add 6 additional tangible controls. As hour five drew to a close, I set up the outcome of door two which mirrors features and actors of the other two doors.
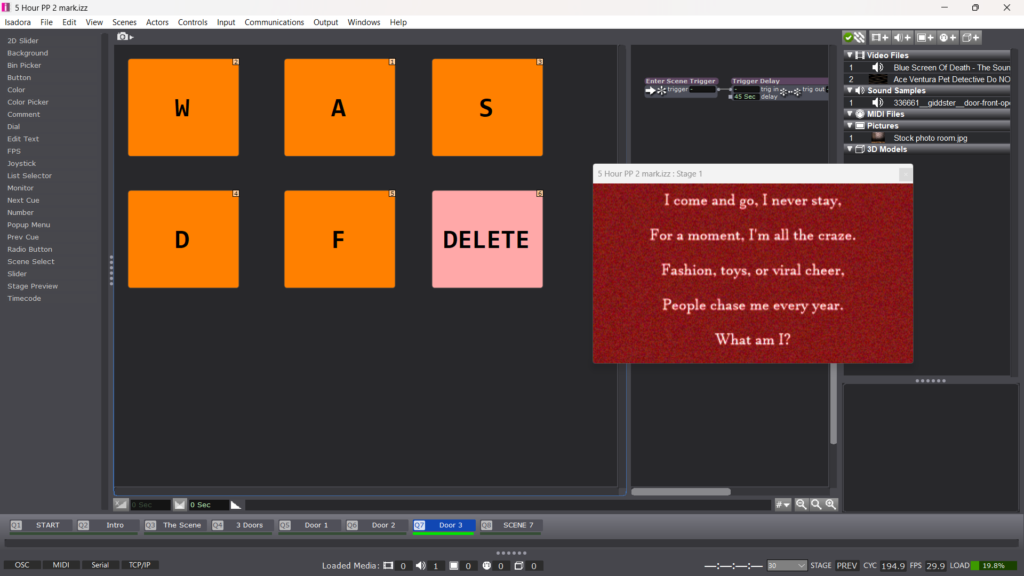
With the high use of the text draw actor, I was unintentionally creating a narrative voice for the piece. So in the 6th hour I worked on the bookend scenes to make it more cohesive. I added a scene at the top which included a riddle to tell the user the controls. I also used an explode actor on the text to hopefully instill the notion that the user needed to be quiet in order to play the game (which they would have to do the opposite on the live video, a fun trick). I created a scene on the backend where I felt that a birthday cake was an interesting twist that didn’t get too dark in plot. I liked the idea of another choice, so I simply decided to narrow down from 3 options like the doors, to 2. Still utilizing buttons in the control panel.
It was also in this sixth hour that I realized I didn’t know how this mystery was going to end. I had to spend a bit of time brainstorming, but ultimately felt that this experience was an escape of some kind, but to avoid going a dark direction, I decided that the final scene would lead to an escape room building.
My final hour was spent on 2 things. 1, establishing the scenes that would lead to the escape room end and setting up the experience in my office and asking a peer to play it so I could gauge the level of accessibility. Feeling confident after this experience, I brought my PP to class where I received positive feedback.
Much like an escape room, there was collaboration in both the tangible experience of controlling the escape room as well as decision making. I did observe that the ability to discern which parts of the control were the ground and the click wasn’t clear. In the future, I would like to distinguish these a bit more through an additional label.
Something else that occurred was the live video scene instantly bypassed due to the baseline level of volume in the room. So in the future, I would utilize the actor to update the range in real time as opposed to the hold range actor that I used as a baseline.
With how much jumping was occurring through scenes, I struggled throughout with ensuring the values would be were I wanted them upon entry of each scene. It wasn’t until afterwards that I was made aware of the initialized value feature on every actor. This would be a fundamental component if I were to work on this project moving forward.
Pressure Project 1
Posted: February 13, 2025 Filed under: Uncategorized Leave a comment »For pressure project one I was inspired by the original Isadora template to keep things simple and looping indefinitely as opposed to creative a narrative. My original instinct was to animate the patch with random positions and shape patterns to create something that was consistently changing to keep the viewer’s attention. Thankfully, Isadora’s license was not valid on my first attempt so I was unable to save my work. On my second attempt, I challenged myself to be a bit more intentional about my choices and work within the scope of the assignment. Knowing that we had the option to use a camera input as a sensor, I began the process of adding some video feedback and interaction to the patch.
Adding the video to the squares was easy enough. From my previous experience with Isadora, I already knew how to add a new user input to the user actors, so it was a simple process. However, I quickly realized that the incoming aspect ratio was rectangular and the shapes we were given were square. In the spirit of simplicity and symmetry, I choose to crop the video to a square. This led to the image having a border and combining the projectors gave the effect of a color filter which I thought was a bit retro and fun. This basic foundation gave me the inspiration for the rest of the patch.
The square image with a thick border remined me of a photo booth and I was off to create an experience that could capture that magic into an interactive experience. I wanted to essentially “take a snap shot” at the same time as the colored square appeared. I found the freeze actor worked perfectly for this. Adding the same trigger as the projector activation synced everything up nicely.
I wanted to refine the images a bit more by changing the way they appeared and disappeared. For this, I wanted to create the effect of turning over a card or picture to reveal what is underneath. I have never tried this in Isadora before so I experimented a bit before I found the 3D projector. The setting on this actor are quite different from the normal projector, but I was quickly able to figure out what most of the options did. To rotate the image, I added a ramp to the Y rotation so it would flip into place when the projector became active. This worked as you might expect, but I did discover there were some artifacts and lines that would tear into the image as the effect was taking place. I played around with the blend modes and layer heights, but nothing seemed to work. Finally I found the “depth test” setting that made the transition smooth and looked good. I would have liked to flip the image back over when it disappeared, but I ran out of time and figuring out the timing and trigger delays was not as important to me as getting a good image.
One of the goals for me on this project was also to explore new actors and refine my methods of using them. I have used the eyes++ actor many times, but with limited success. Recently I have tried filtering the input with a chroma key to isolate faces which has worked fairly well. This technique worked well for trying to essentially “zoom in” on the users face when taking the “photo”. I had to guess what actors to use to do the cropping and centering of the image on the “Blob” but I was able to get something that worked reasonably well.
When it was time to present, I quickly realized the camera tuning I had done in my office at home was producing the same results in the classroom. I was able to franticly changes some setting to get it working again just before our presentations began. For the presentation itself, I choose to display the stage on the classroom TV. This was similar to how I had programmed everything in my office with second display. I was excited to see how others would react and I was pleased that most people seemed to enjoy the experience. One thing I did notice was that at some point people started to back away from the screen. This was partially to give others space, but I think it was also because the camera was essentially following them and they didn’t want their picture taken. For a future iteration I might try to limit the range of the camera so it only interacted with people at a certain range and distance.
Overall, I enjoyed working on this project and I’m happy I was able to keep most of the original programming intact.


Pressure Project 1: Building a Galaxy
Posted: February 4, 2025 Filed under: Uncategorized Leave a comment »Deviating from the original self-generating patch to create something unrecognizable was a process of playing with the shape and wave actors tucked inside of each 50-50 box. Although my patch made several leaps from the original source, this was ultimately an exercise in the unpredictability of not only pattern but challenge. The process of experimenting, problem-solving, and making creative choices based on trial and error allowed me to develop something unique. Each step in the project introduced new discoveries, frustrations, and moments of inspiration that shaped the final product.
I worked on this project in intervals that felt manageable for me. Whenever I could pop the thumb drive in, as long as I wasn’t becoming frustrated, I could keep trucking forward. The moment I’d hit a wall was when I found value in stepping away and coming back with a fresh perspective. Allowing myself space to breathe through the creative process kept me from overworking certain ideas or becoming too attached to one solution. I created drafts at the following intervals: 1 hour, 1.5 hours, 3.25 hours, 4.5 hours, and 5 hours. Each session built upon the last, adding layers of depth and refinement to the patch.
My first hour consisted largely of two things: playing around with different shapes and patterns that were visually appealing to me and organizing the 50-50 boxes onto virtual stages to ensure I was adjusting the correct parameters on the patches. This initial exploration allowed me to get comfortable with the software and begin to establish an aesthetic direction. I decided to take the second 50-50 box and duplicate these hexagon shapes, as evident in the video. I considered having a blinking hexagon of another color travel through the lines of hexagons to give the illusion of movement. Initially, I intended to duplicate this pattern across the whole screen, but as the hour passed, I realized this approach would be too meticulous for what I was looking to accomplish in the given timeframe.
For the first 50-50 box, I experimented with some video actors. I inserted the explode actor between the shape and projector while also adding a wave generator to the vertical position, giving the illusion of a bouncing ball. This small animation gave me my first taste of how dynamic movement could be implemented within the patch. The interplay between controlled movement and randomization became an interesting area to explore.
The next 30 minutes would get interesting as the black void of the stage became strikingly apparent to me. I wanted to texture the space a bit to avoid a completely flat background. I found a background color actor that fixed this problem, but I didn’t like how flat it felt. To enhance the visual complexity, I used the explode actor to create a grain-like texture behind my shape actors. Additionally, I decided to see if I had any audio on my computer to throw in for inspiration. I landed on an ’80s-style synth instrumental. The combination of this music with the textured background inspired me to create an outer-space-style scene. Wanting to reinforce this theme, I focused on making shapes appear to be floating or traveling. I took my bouncing ball from before and added a wave generator to the horizontal parameters, which gave the illusion of flight. However, at this point, I noticed that the projector crop was cutting off the shape along the horizontal base, creating an unexpected limitation that I would need to address later.
In the fourth 50-50 box, which I renamed Box 4, I added a wave generator and a limit scale value actor to the facet’s parameter of the shape. I decided to limit these values between 3 to 6 to keep the shape sharp and prevent it from becoming too rounded. Additionally, I thought it would be fun to implement the same actors to the projector zoom, but this time keeping the values between 100 and 400. This gave the illusion that the shapes were not only increasing in facets but also in size. The unexpected interplay of these parameters created a more organic transformation, making the visuals feel dynamic rather than rigid.
Over the next hour and 45 minutes, I focused on giving my stage actors and parameters that made the piece feel not only like space but something alive. I experimented with my background color and explode actors to create movement when I discovered an actor called Video Noise that resolved this issue beautifully. I also added a subtle stage background actor to adjust the color beneath the noise.
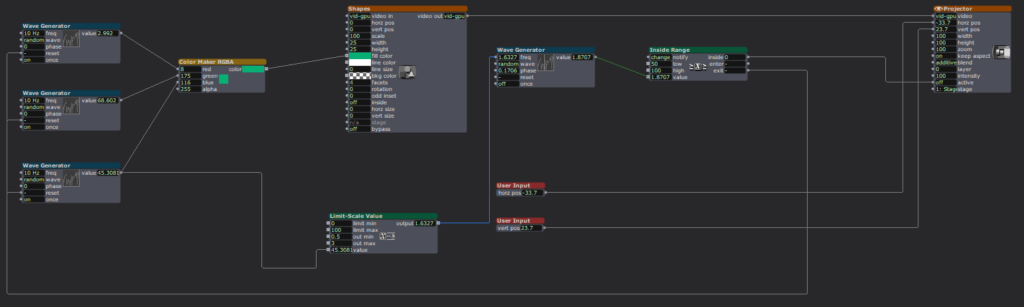
Additionally, as I became more comfortable utilizing Inside Range actors, I decided to base some sort of cue off the music. I connected an Inside Range actor to the position parameter of the movie player, which tracked the number of seconds in the song. Unsure if I could maintain attention for more than 30 seconds, I aimed for something around the 20-second mark. I set my low at 20 and my high at 21, which would then trigger a wave generator. I connected the sawtooth wave generator to two limit scale value actors—one to set the scale position and another to set the vertical position of a shape actor that I envisioned as a planet. I originally attempted to create something that resembled Saturn with a ring around it, but eventually, I realized I was spending too much time refining this one parameter. I ultimately settled on creating dimension via a line size.
Over the next hour and fifteen minutes, I primarily focused on two elements. First, I organized my patch as it was now becoming necessary due to its increasing complexity. Second, I worked on establishing a “night sky” transition. I copied the base 50-50 box and tried to create an explosion that would become the primary layer. Initially, I tried to trigger this effect four seconds after the initial planet would rise, but that didn’t work. I then tried adding an Enter Scene trigger with a trigger delay set for about 24 seconds. This was when I realized the hurdles of real-time rendering, so I created a second scene, which was blank, to flip back and forth between and determine whether my actors were behaving as intended
My final 30 minutes focused on going back to basics and trusting what was working. I scrapped my night sky idea but repurposed the box to return to the galaxy tear concept. I took the night sky and created a shape that resembled the planet. I then used the explode actor and a random wave generator to trigger varying horizontal ranges, creating the illusion of a dying planet.
At this point, the rapid shape actor I had developed in the first hour and a half was feeling stale. To add texture, I introduced the dots actor. However, I wanted to maintain an unpredictable pattern, so I connected the established Inside Range actor to a toggle actor that would turn the dots actor on and off whenever the range from the random wave generator fell between 50 and 100. This was one of my proudest moments, as it allowed me to create something far from the original patch.
At this point, my work was done. I was proud of myself for creating a fun visual that accomplished my goal of creating an outer-space-like scene. This project was a great exercise in evaluation—identifying which actors and elements were useful and which needed to be discarded. Some core ideas were thrown out only to return in new forms, such as the galaxy tear transforming into a dying planet.
During my presentation, I was nervous about whether the piece would hold interest for more than 30 seconds. However, my peers provided valuable feedback. Due to the planet shifting around 20 seconds in, they expected more to happen. This small movement not only shifted expectations but also broke the pattern completely. Additionally, they mentioned that the project felt like the start screen of a video game, meaning my music choice and visuals were in harmony. In the future, I would tackle one box at a time rather than jumping around, which would improve organization and efficiency.
Pressure Project 1
Posted: February 4, 2025 Filed under: Uncategorized Leave a comment »For Pressure Project 1, my key strategy was to find a story and see if I could successfully shape abstract visuals to convey that story, or some semblance of a story line with a clear beginning, middle, and end (Figure 1). I recognize that I struggle to make art that doesn’t tell a story (and struggle even more, perhaps, to make up that story myself, being an artist who makes art that expresses stories created by other people), so initial attempts to create something visually interesting without a central framework around which to form it did not go very far for me. I was able to start to brainstorm ways I might alter the initial patch to at least create visual interest and then used those initial alterations to build other iterations. I ended up working from the center of my scenes outward, alternating working toward the beginning and then toward the end without a clear plan but rather as ideas came to me or I thought of ways to advance the visual story. Working in first one direction and then the other gave me something to work toward (I won’t say goal!) and allowed me to explore how to get from point B to points A and C respectively. I wanted to challenge myself to explore actors I hadn’t had a real opportunity to implement before, as well as try to get a stronger handle on how the ones in the initial patch were functioning. I think I only minorly succeeded in this endeavor, but I did feel that, overall, I was able to gain some amount of facility with the tools I was using.
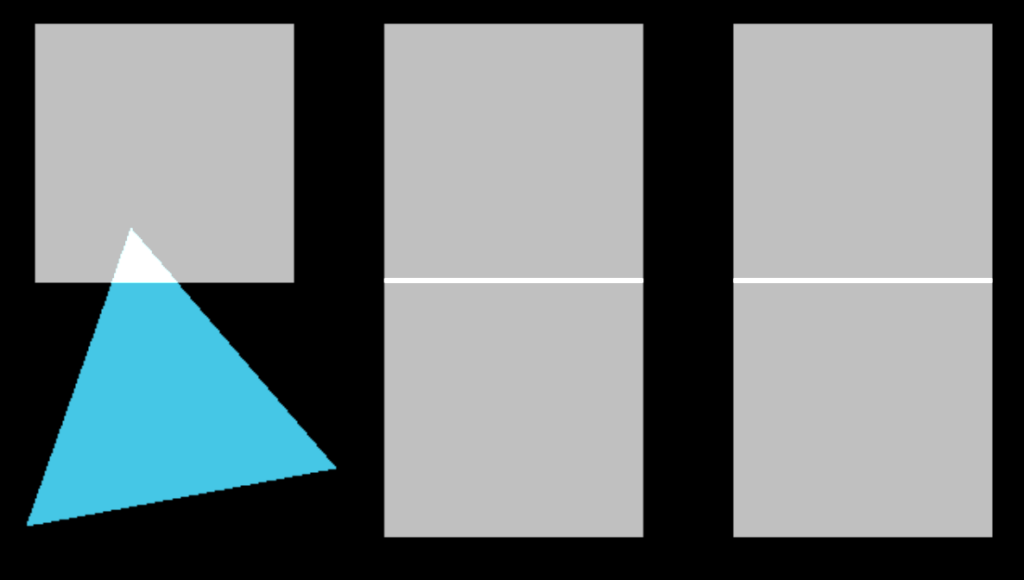
Figure 1
I played a lot with the Wave Generators (Figure 2) and the User Actors, mostly trying to get a better handle on the latter. At one point, this somewhat inadvertently led to me recreating the initial patch from scratch with some alterations, but I’m chalking that up to valuable time spent playing and learning (Figures 3 and 4). I also tried out the Movie Player actor and started messing around with the Play Start and Play Length fields. I also dipped my toe into the effects, like Explode, and know that I have a lot more exploring to do there.
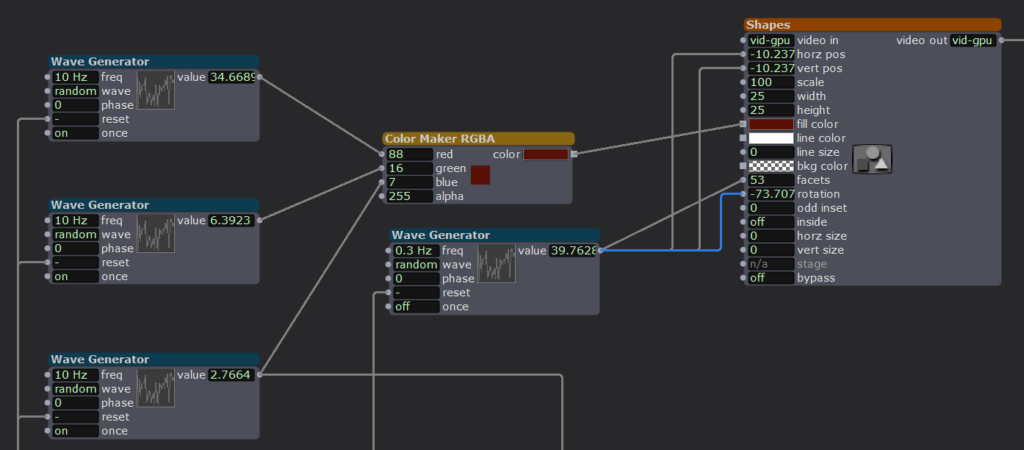
Figure 2

Figure 3
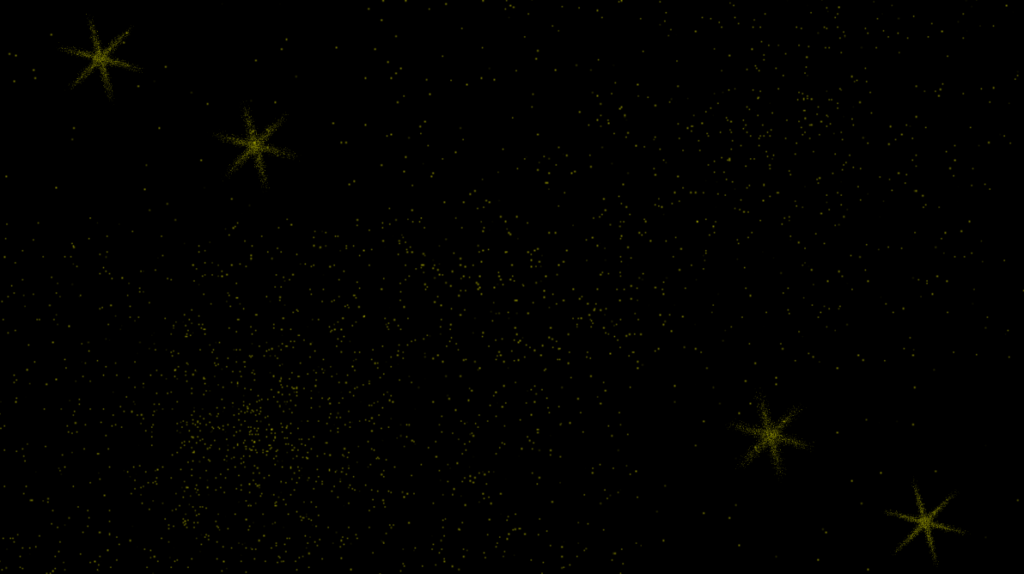
Figure 4
The main challenge for me, I think, is just that I am very much a novice with this type of work and, as I said before, struggle to design if I don’t have a clear framework (i.e. a story) around which to base my work. I’m struggling, in general, to put the pieces together and remember how things work, but spending my time breaking and repairing some of the things in the initial patch helped with that a bit. This speaks less to this project in particular and more to a large issue, but it also took me a decent amount of time to find assets such as music and video to use, once I decided to use them, and I had to settle for watermarked material, which was fine if not a little annoying (Figure 5). Related to all this, at some point I had to just decide to use this as practice and try to play to my beginner-level strengths; my challenge here and moving forward will be to be satisfied with where I am, skills-wise, and to find ways to create things with those limited resources, for now, growing the resources as I can but also knowing that it’s ok to create within what you have.
While my project went a wildly different direction than those of my classmates, I think it was relatively well-received. Where after staring at it over and over again I had become concerned with the pacing, based on feedback, it seemed like, while it was a little slow, the pace ultimately supported the arc of the project if you didn’t know how it was going to play out. That was my aim, but it had become hard to discern whether or not that was being achieved after watching it over and over again for the last hour or so of my time spent on the project. I appreciate, too, that I have a ways to go in terms of presentation and how to do it in a way that looks more finished; I had no idea that you could make the window bigger and block out the scenes! Additionally, while I did finally figure out how to make a video of my presentation (below), I cannot figure out how to also make it have sound. I assume there is a way, but maybe there isn’t… something to explore, I suppose!
All-in-all, I was pleased with how my project turned out. I think I set attainable aims for myself and achieved those, so I’m also quite pleased with myself for being able to realistically assess my abilities/resources. I think that will serve me quite well as we continue through the semester.
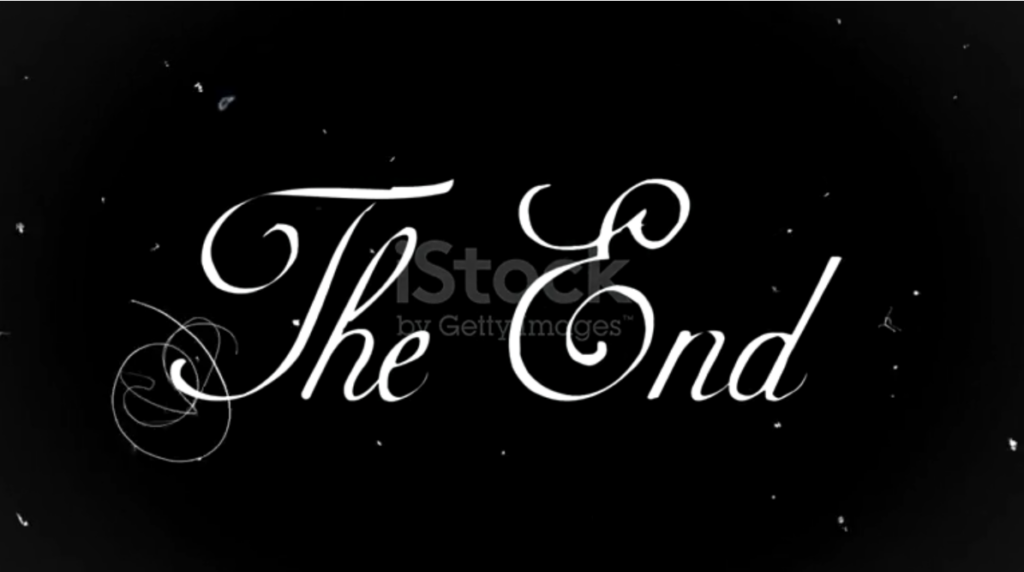
Figure 5
Pressure Project 1 – Interactive Exploration
Posted: February 4, 2025 Filed under: Uncategorized | Tags: Interactive Media, Isadora, Pressure Project Leave a comment »For this project, I wanted to prioritize joy through exploration. I wanted to create an experience that allowed people to try different movements and actions to see if they could “unlock” my project, so to say. To do this, I built motion and sound sensors into my project that would trigger the shapes to do certain actions.
Starting this project was difficult because I didn’t know what direction I wanted to take it, but I knew I wanted it to have some level of interactivity. I started off small by adding a User Input actor to adjust the number of facets on each shape, then a Random actor (with a Limit-Scale Value actor) to simply change the size of the shapes each time they appeared on screen. Now it was on.
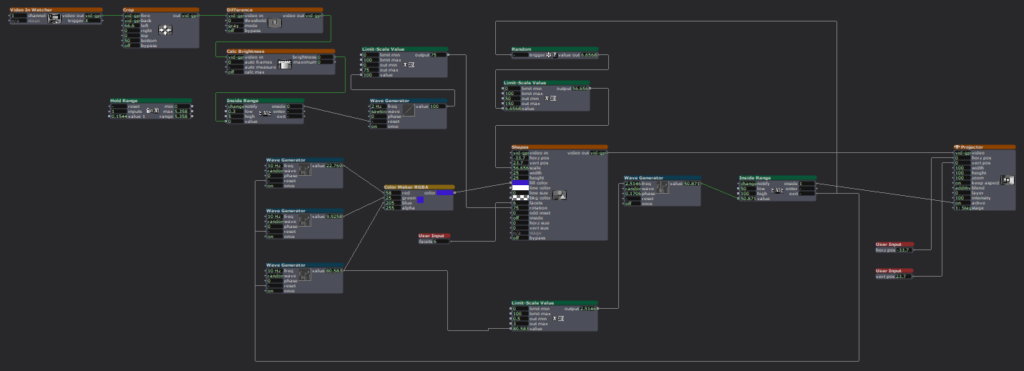
I started building my motion sensor, which involved a pretty heavy learning curve because I could not open the file from class that would have told me which actors to put where. I did a lot of trial-and-error and some research to jog my memory and eventually got the pieces I needed, and we were off to the races!
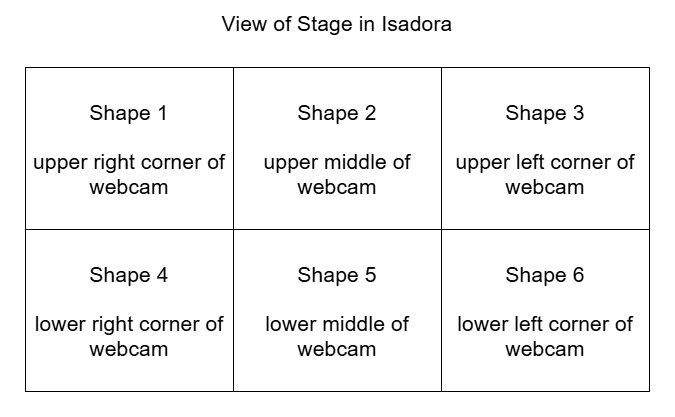
A mockup diagram of which section of the motion sensor is attached to each shape. The webcam is mirrored so it is actually backwards, which made it difficult to keep of which portion of the sensor attached to which shape.
Figuring out the motion sensor from scratch was just the tip of the iceberg; I still needed to figure out how to implement it. I decided to divide the picture into six sections, so each section triggered the corresponding shape to rotate. Figuring out how to make the rotation last the right amount of time was tricky, because the shapes were only on-screen for a short, inconsistent amount of time and I wanted the shapes to have time to stop rotating before fading. I plugged different numbers into different outputs of a Wave Generator and Limit-Scale Value actor to get this right.
Then it was time to repeat this process five more times. Because each shape needed a different section for the motion detector, I had to crop each one individually (making my project file large and woefully inefficient). I learned the hard way how each box interacts and that not everything can be copied to each box as I had previously thought, causing me to have to go back a few times to fix/customize each shape. (I certainly understand the importance of planning out projects now!)
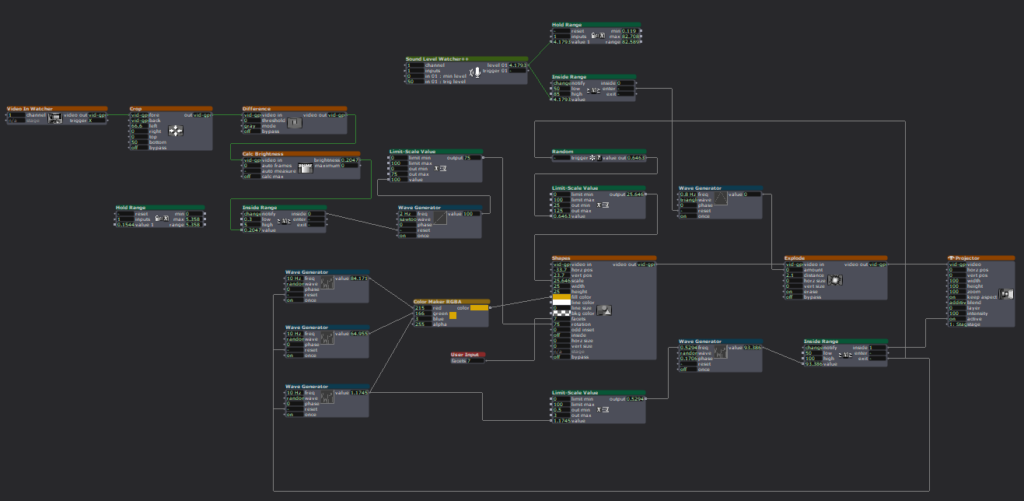
I had some time left after the motion sensor was done and functional, so I revisited an idea from earlier. I had originally wanted the motion sensor to trigger the shapes to explode, but realized that would likely be overwhelming, and my brain was melting trying to get the Explode actor plugged in right to make it work. Thus, I decided on an audio sensor instead. Finding the sweet spot to set the value at to trigger the explosion was difficult, as clapping and talking loudly were very close in value, so it is not a terribly robust sensor, but it worked well enough, and I was able to figure out where the Explode actor went.
I spent a lot of time punching in random values and plugging actors into different inputs to figure out what they did and how they worked in relation to each other. Exploration was not just my desired end result; it was a part of the creative process. For some functions, I could look up how to make them work, such as which actors to use and where to plug them in. But other times, I just had to find the magic values to achieve my desired result.
This meant utilizing virtual stages as a way to previsualize what I was trying to do, separate from my project to make sure it worked right. I also put together smaller pieces to the side (projected to a virtual stage), so I could get that component working before plugging it into the rest of the project. Working in smaller chunks like this helped me keep my brain clear and my project unjumbled.
I worked in small chunks and took quick breaks after completing a piece of the puzzle, establishing a modified Pomodoro Technique workflow. I would work for 10-20 minutes, then take a few minutes to check notifications on my phone or refill my water bottle, because I knew trying to get it done in one sitting would be exhausting and block my creative flow. Not holding myself to a strict regimen to complete the project allowed me the freedom to have fun with it and prioritize discovery over completion, as there was no specific end goal. I think this creative freedom and flexibility gave me the chance to learn about design and creating media in a way I could not have with a set end result to achieve because it gave me options to do different things.
If something wasn’t working for me, I had the option to choose a new direction (rotating the shape with the motion sensor instead of exploding them). After spending a few hours with Isadora, I gained confidence in my knowledge base and skill set that allowed me to return to abandoned reconsidered ideas and try them again in a new way (triggering explosions with a sound sensor).
I wasn’t completely without an end goal. I wanted to create a fun interactive media system that allowed for the discovery of joy through exploration. I wanted my audience to feel the same way playing with my project as I did making it. It was incredibly fulfilling watching a group of adults giggle and gasp as they figured out how to trigger the shapes in different ways, and I was fascinated watching the ways in which they went about it. They had to move their bodies in different ways to trigger the motion sensors and make different sounds to figure out which one triggered the explosions.
Link to YouTube video: https://youtu.be/EjI6DlFUof0