Body as Reservoir of Secrets, DEMS Cycle 1
Posted: October 31, 2023 Filed under: Uncategorized Leave a comment »I see the body as a reservoir of ancestral secrets. I have been coaxing out /imaging these secrets as an abstract painter, through gestures and paint. However, gesture is only one vector in this exploration. The body generates streams of data in addition to gesture that can be harnessed and imaged- such as breath, heartbeat, voice.
I am devising a system that extracts these features and maps them accordingly to the movement/color/scale of visual elements, triggering video or image files. These visual elements come together in compositions that will then have video and print outputs, via the capture stage to image and video actors.
In Cycle 1, I mostly concentrated on figuring out isadora-OSC/gyroscope communications and tuning hardware like webcams and lavalier microphones for feature extraction. The outcome was somewhat successful, but I have generated too many input data streams and are lacking variables to plug these inputs. Feature extraction for hearbeat is not very effective using a lavalier microphone.
For Cycle 2, I intend to:
- Focus on creating more variables to plug the generated inputs into.
- Develop greater flexibility in the visuals generated, so that there is more variance in the composition- composition can range from very simple and very complex.
- Include a contact microphone for heartbeat extraction
- Start to integrate costume into mix.
For Cycle 3, I intend to:
- Develop a clarified live performance dimension to the work
- Figure out how to feed the captured jpegs to a printer
Reflection on Cycle 1
Posted: October 31, 2023 Filed under: Uncategorized Leave a comment »I set up my goal in this class at the end of the semester as “connecting Isadora and Arduino” and “using a webcam as a sensor to operate a motorized object”.
The first step=my goal of Cycle 1 was just simply connecting Arduino to Isadora.
I researched on the web (there are some helpful articles and forums) and found that an application called “Firmata” can play a role to connect Arduino to many kinds of software including Isadora.
This article explains what Firmata is and how to get/use it.
https://www.instructables.com/Arduino-Installing-Standard-Firmata/
We normally need to write a code to operate Arduino, but with Firmata, I can send output signals to or receiving inputs from Arduino without coding process.
I downloaded a protocol code called “StandardFirmata” and uploaded on my Arduino.
Here’s the test of Firmata; by clicking High/Low on Firmata window, I can turn on/off a LED connected to Arduino.
Then, I downloaded “Arduino Firmata Actor” which is an Isadora plugin to Arduino.
https://community.troikatronix.com/topic/7176/arduino-firmata-actor
Now I’m ready to connect the two.
I opened Isadora and set up Arduino Firmata Actor (and also some port connection settings) to connect to my Arduino.
Here, I can turn on/off LEDs on Isadora window (so I’m sending output signals from Isadora to Arduino).
Another test; an input signal from a photoresistor (a sensor detects brightness of light) connected to Arduino is being received by Isadora (sending signals from Arduino to Isadora).
I connected this input to a width of a square, so it’s interacting with light.
This very simple connection test was a very big step for me. The two big magics (Isadora and Arduino) are now syncing!
The next step (Cycle 2) will be connecting a servo motor (and/or a stepper motor??) and trying to operate it from Isadora. Then, I can connect it to a webcam as a sensor, just like we did in PP2 and 3.
Cycle 1: Connecting MaxMSP with Isadora (OSC)
Posted: October 29, 2023 Filed under: Arvcuken Noquisi, Uncategorized Leave a comment »Hello again.
For cycle 1 I decided to make a proof-of-concept test to get MaxMSP and Isadora to work together via OSC. I plan on using MaxMSP for live audio input which then gets transmitted to Isadora to impact visual output. I plan on using MaxMSP on one computer and Isadora on another – meaning that I will have to use OSC over a router network so that these two computers can communicate with eachother.
I first needed to know how easy/difficult it would be to make these two software work together.
To start I pulled a MaxMSP “Insta-theremin” patch from the internet. This patch creates an audio signal based on computer mouse location (x-axis pitch y-axis amplitude).
It took a lot of googling to figure out which MaxMSP objects and connections are necessary to send OSC. I considered using plugins such as ODOT, but eventually got the “udpsend” object to work without complications. I did not know that the OSC name had to specifically be /isadora/# for non-TouchOSC software to work with Isadora, but once I understood that it was very easy to transmit MaxMSP input to Isadora.
Here is a video of the patch at work (may be loud!):
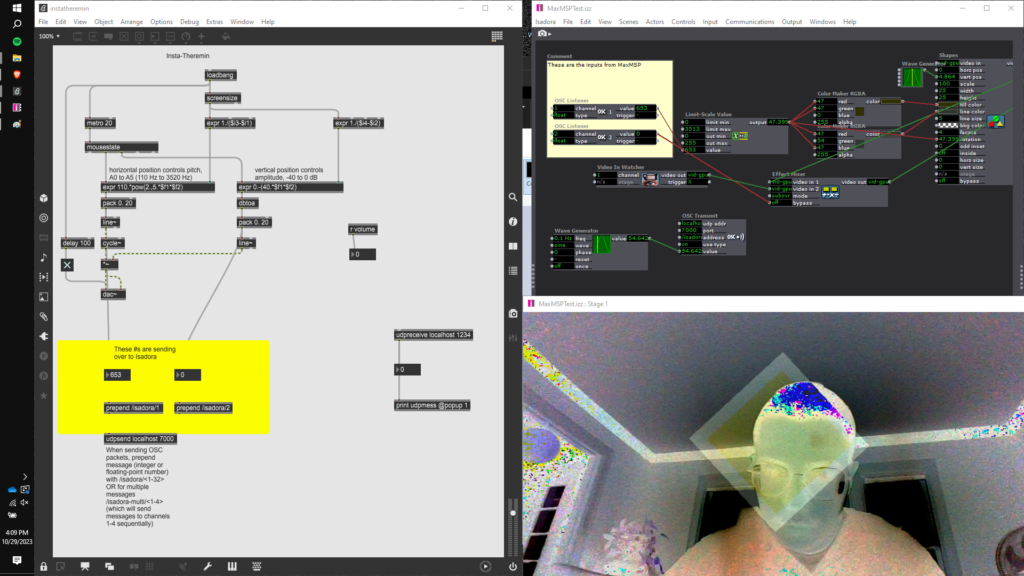
On the Isadora side, I used OSC listeners connected to “color maker RGBA” actors and the rotation input of a shape actor – I wanted to have multiple inputs so that I could instantly see whether or not the MaxMSP input is truly working. I also had a camera input mixed in with the shape, just to add a bit of complexity to the patch. I had 2 OSC input channels for the two axes of the theremin. X-axis (pitch) controls color and rotation, while y-axis (amplitude) enables and disables the “effect mixer” actor bypass (turning on and off the camera input). This made it very easy for me to tell whether Isadora was following my mouse location input.
Though the stream of numbers coming in to Isadora looks delayed at times, I could tell based on the stage output that there was essentially no latency over the localhost system. For my next cycle I will have to 1. test whether MaxMSP and Isadora can communicate with eachother across computers on a routing network and 2. start working on a more interactive audio input on MaxMSP, either using granular synthesis with microphone input or a sequencer which can be altered and changed by human input.
PP2/PP3: Musicaltereality
Posted: October 29, 2023 Filed under: Arvcuken Noquisi, Pressure Project 2, Pressure Project 3, Uncategorized Leave a comment »Hello. Welcome to my Isadora patch.

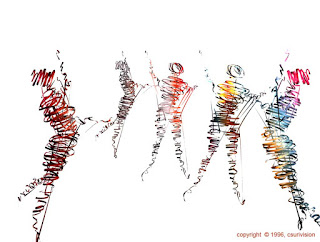
This project is an experiment in conglomeration and human response. I was inspired by Charles Csuri’s piece Swan Lake – I was intrigued by the essentialisation of human form and movement, particularly how it joins with glitchy computer perception.
I used this pressure project to extend the ideas I had built from our in-class sound patch work from last month. I wanted to make a visual entity which seems to respond and interact with both the musical input and human input (via camera) that it is given, to create an altered reality that combines the two (hence musicaltereality).
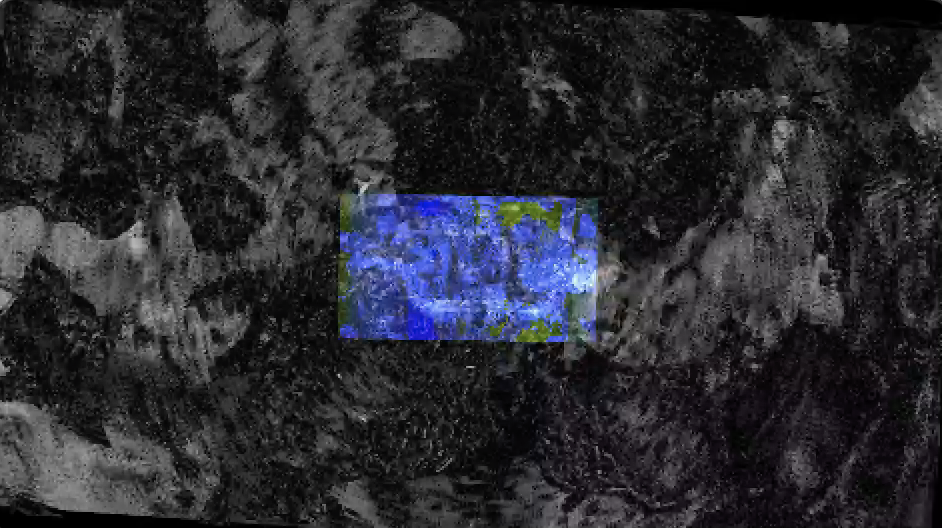
So here’s the patch at work. I chose Matmos’ song No Concept as the music input, because it has very notable rhythms and unique textures which provide great foundation for the layering I wanted to do with my patch.
Photosensitivity/flashing warning – this video gets flashy toward the end
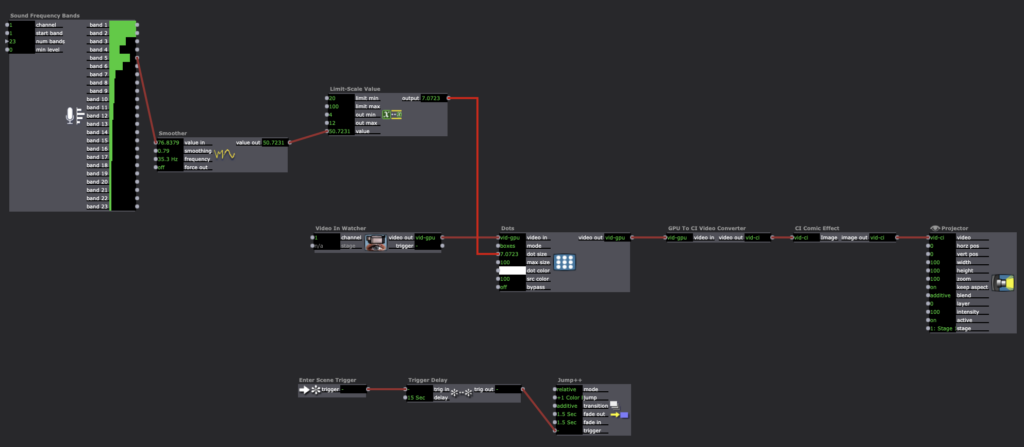
The center dots are a constantly-rotating pentagon shape connected to a “dots” actor. I connected frequency analysis to dot size, which is how the shape transforms into larger and smaller dots throughout the song.
The giant bars on the screen are a similar setup to the center dots. Frequency analysis is connected to a shapes actor, which is connected to a dots actor (with “boxes” selected instead of “dots”). The frequency changes both the dot size and the “src color” of the dot actor, which is how the output visuals are morphing colors based on audio input.
The motion-tracking rotating square is another shapes-dots setup which changes size based on music input. As you can tell, a lot of this patch is made out of repetitive layers with slight alterations.
There is a slit-scan actor which is impacted by volume. This is what creates the bands of color that waterfall up and down. I liked how this created a glitch effect, and directly responded to human movement and changes in camera input.
There are two difference actors: one of them is constantly zooming in and out, which creates an echo effect that follows the regular outlines. The other difference actor is connected to a TT edge detect actor, which adds thickness to the (non-zooming) outlines. I liked how these add confusion to the reality of the visuals.
All of these different inputs are then put through a ton of “mixer” actors to create the muddied visuals you see on screen. I used a ton of “inside range”, “trigger value”, and “value select” actors connected to these different mixers in order to change the color combinations at different points of the music. Figuring this part out (how to actually control the output and sync it up to the song) was what took the majority of my time for pressure project 3.
I like the chaos of this project, though I wonder what I can do to make it feel more interactive. The motion-tracking square is a little tacked-on, so if I were to make another project similar to this in the future I would want to see if I can do more with motion-based input.
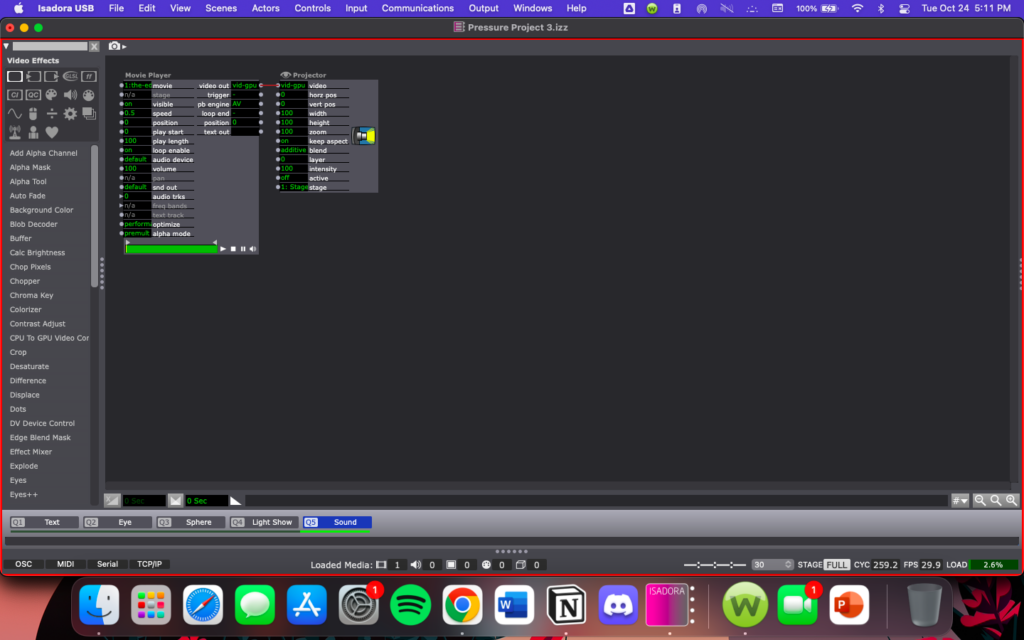
Pressure Project 3
Posted: October 25, 2023 Filed under: Uncategorized 1 Comment »Pressure project 3 was a continuation of pressure project 2. We were given an additional 8 hours to iterate on pressure project 2 in preparation for the Chuck Csuri open house at ACCAD.
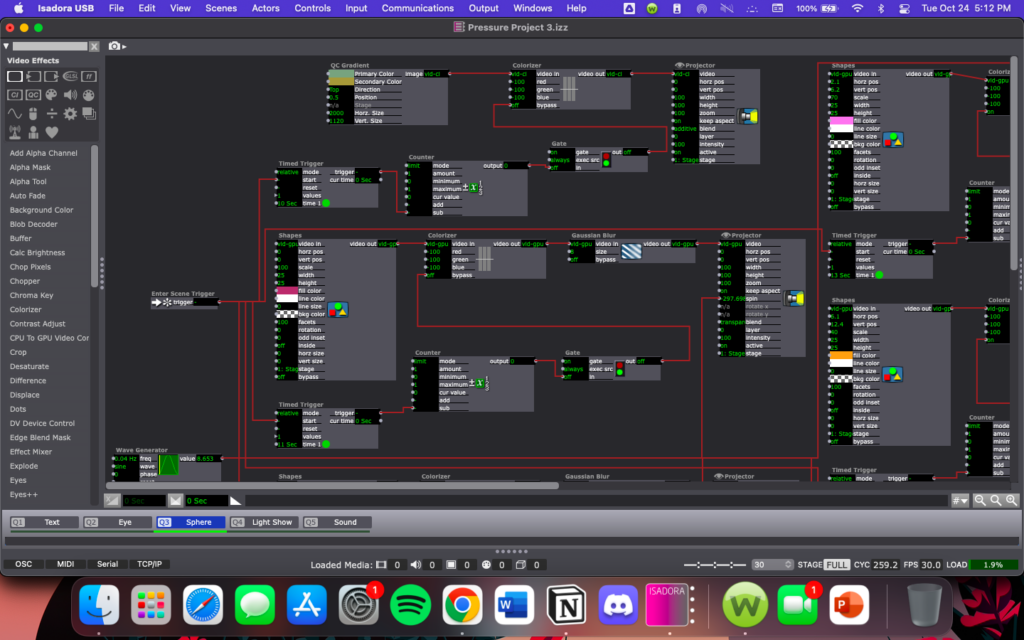
For pp3 I changed the third scene of my project to transition from the spinning ball into a color-changing “light show”.
The ball slowly changing to a black screen is not triggered by motion, but is just a series of timers that are triggered when the scene starts. The background and all four elements of the circle are connected to their own timer, with the first triggering at 10 seconds and the next triggering a second after the first, and so on until the ball is gone. To change the color, I connected each Timed Trigger to a Colorizer so that when each went off, the Colorizer would turn on.


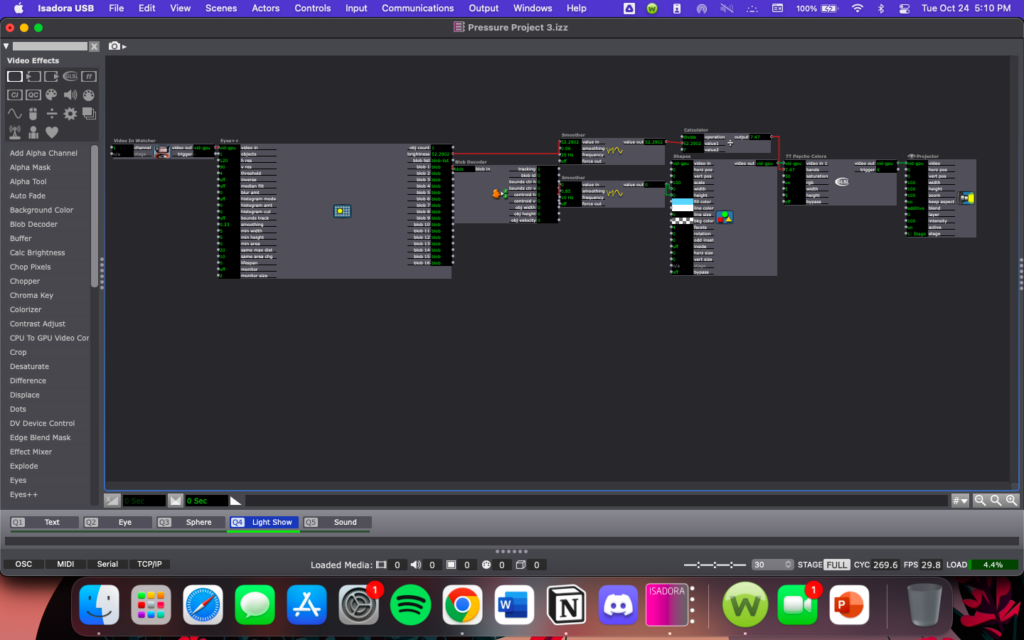
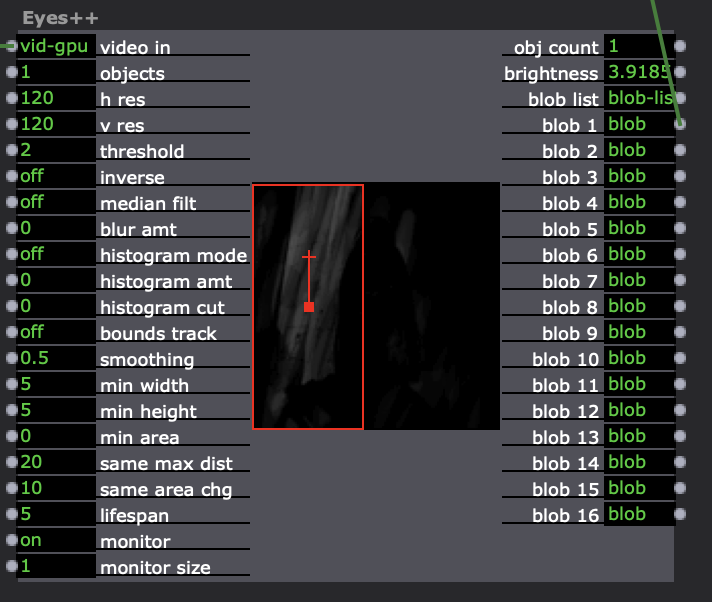
The “light show” scene I added after the spinning ball is motion controlled and uses the Video In Watcher and Eyes++ actors to track the users motion. I used a TT Psycho Colors actor, with the brightness output from the Eyes++ actor controlling the bands and the first blob output controlling the width and height of the shape, with both passing through a smoother in an attempt to get the color changes to be more of a gradual change. This works unless there is lots of rapid movement by the user, in which case the colors shift more suddenly, which could negatively impact users with photosensitivity.

The last thing I added in PP3 was sound playing through the whole experience. To do this I placed my sound file (MP3) connected to a projector in a separate scene, then in each of the scenes I wanted to play music in, I placed a listener actor connected to a projector. This approach did not work with a WAV file.
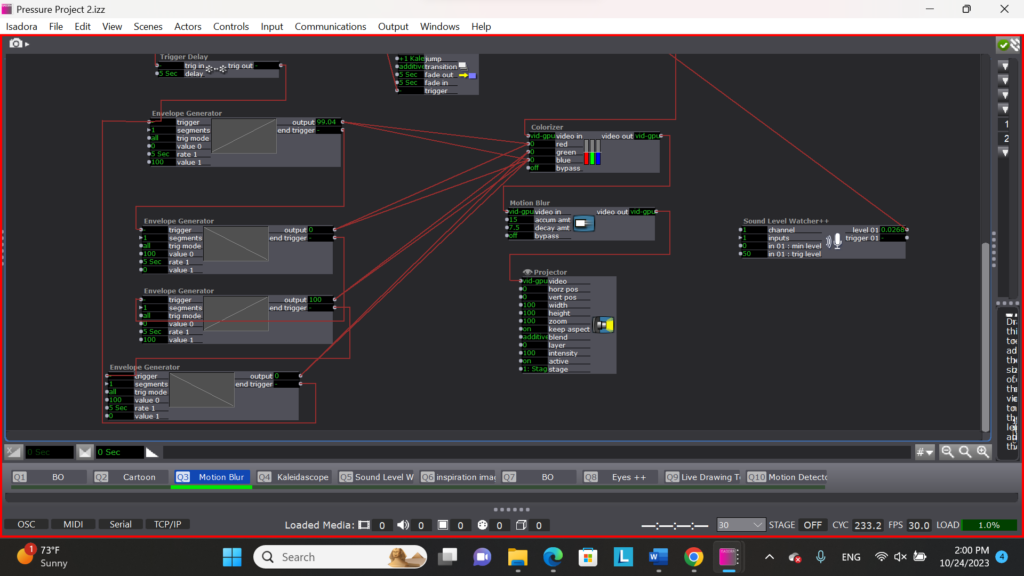
Lawson: PP2 Inspired by Chuck Csuri
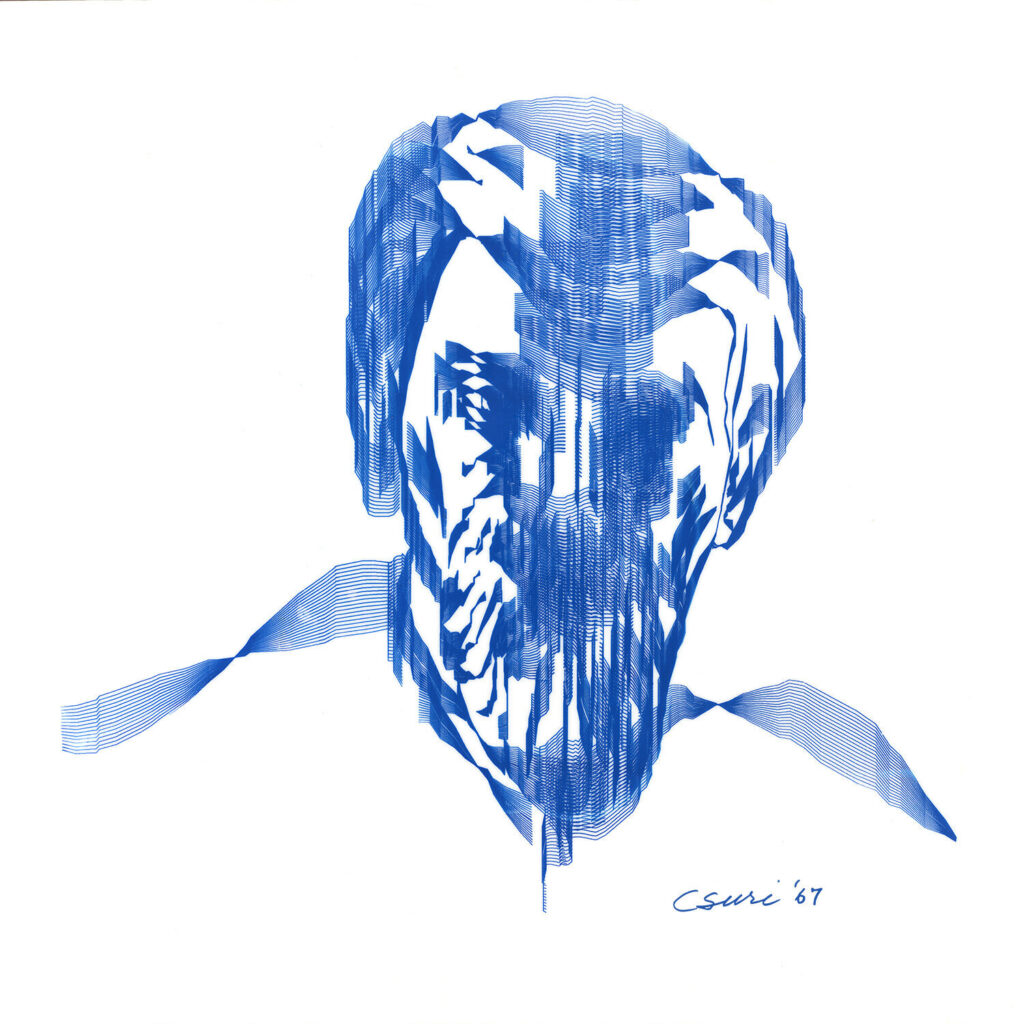
Posted: October 24, 2023 Filed under: Nico Lawson, Pressure Project 2 | Tags: Chuck Csuri, Isadora, Pressure Project Leave a comment »My second pressure project is inspired by the two Chuck Csuri works below: Lines in Space (1996) and Sign Curve Man (1967). I love the way that each work takes the human form and abstract it, making it appear that the figures melt, warp, and fray into geometric shapes and rich, playful colors.
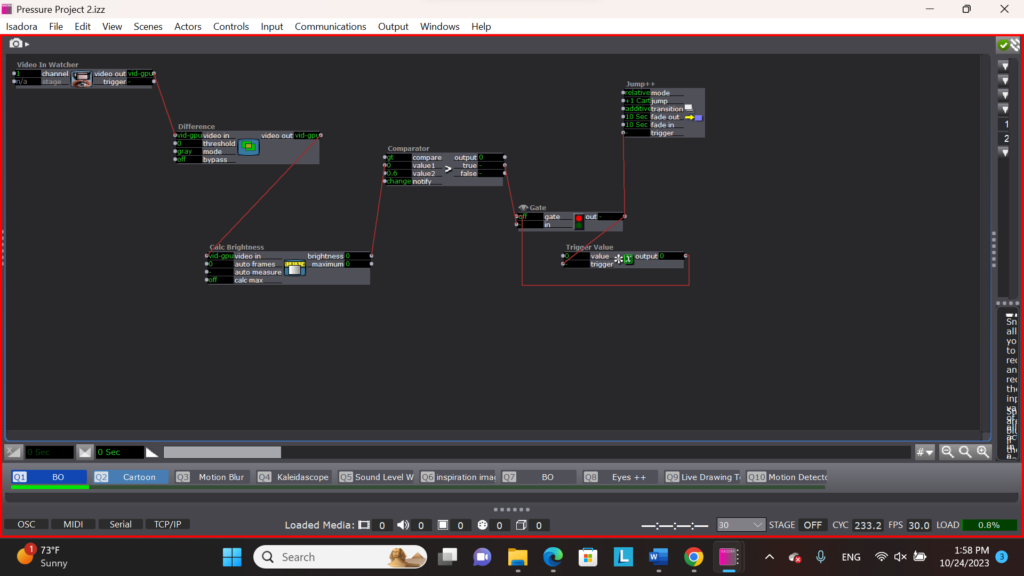
For my project, I wanted to allow the audience a chance to imitate Csuri’s digital, humanoid images in a real time self-portrait. I also wanted to build my project around the environmental factors of an art gallery – limited space in front of each art work, a mobile audience with split attention, and ambient noise. In addition to the patch responding to the movement of the audience, I wanted to introduce my interpretation of Chuck Csuri’s work in layers that progressively built into the final composite image. You can see a demonstration of the Isadora self-portrait below.
To draw the audience’s attention to the portrait, I built a webcam motion sensor that would trigger the first scene when a person’s movement was detected in the range of the camera. I built the motion sensor using a chain of a video-in watcher, the difference actor, a calculate brightness actor, the comparator to trigger a jump scene actor. If the brightness of the webcam was determined to be greater than 0.6, the jump scene actor was triggered. So that the jump actor would only be triggered once, I used a gate actor and trigger value actor to stop more than one trigger from reaching the jump actor.
Once the patch had detected a person in the range of the webcam, the remainder of the patch ran automatically using chains of enter scene triggers, trigger delays, and jump scene actors.
To imitate the colored banding of Csuri’s work, I filtered the image of the web came through a difference actor set to color mode. The difference actor was connected to a colorizer actor. In order to create the fluctuating colors of the banding, I connected a series of envelope generators to the colorizer that raised and lowered the saturation of hues on the camera over time.

In the next scene I introduced the sense of melting that I experienced in Csuri’s work by adding a motion blur actor to my chain. At the same time, I attached a soud level watcher to the threshold of the difference actor to manipulate it’s sensitivity to movement. This way the patch is now subtlely responsive to the noise level of the gallery setting. If the gallery is noisy, the image will appear brighter because it will require less movement to be visible. This visibility will then fluctuate with the noise levels in the gallery.
In the next scene I introduced the warping and manipulation I observe in Csuri’s work. I wanted to play with the ways that Csuri turns real forms into abstract representations. To do this, I introduced a kaleidoscope actor to my chain of logic.
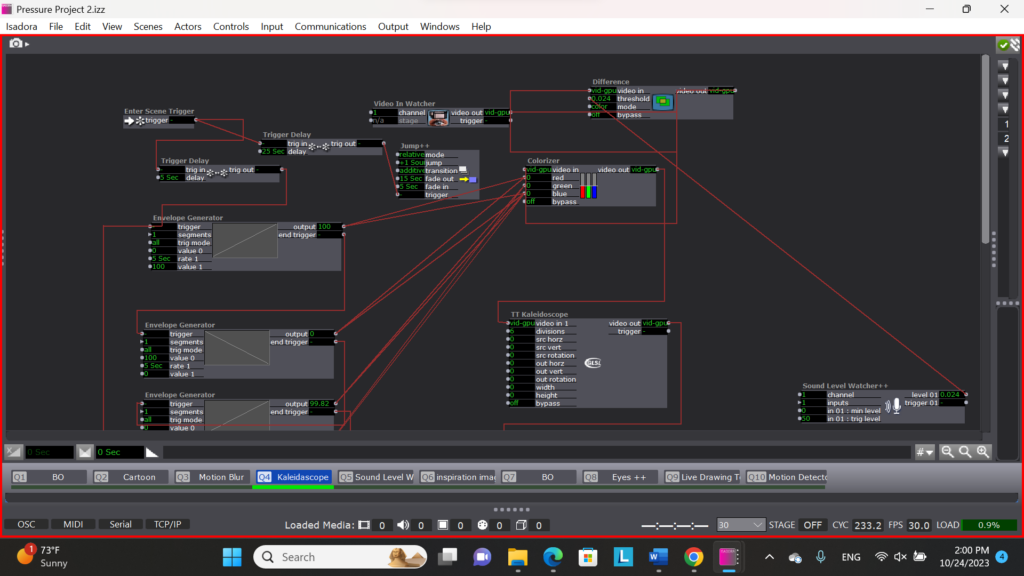
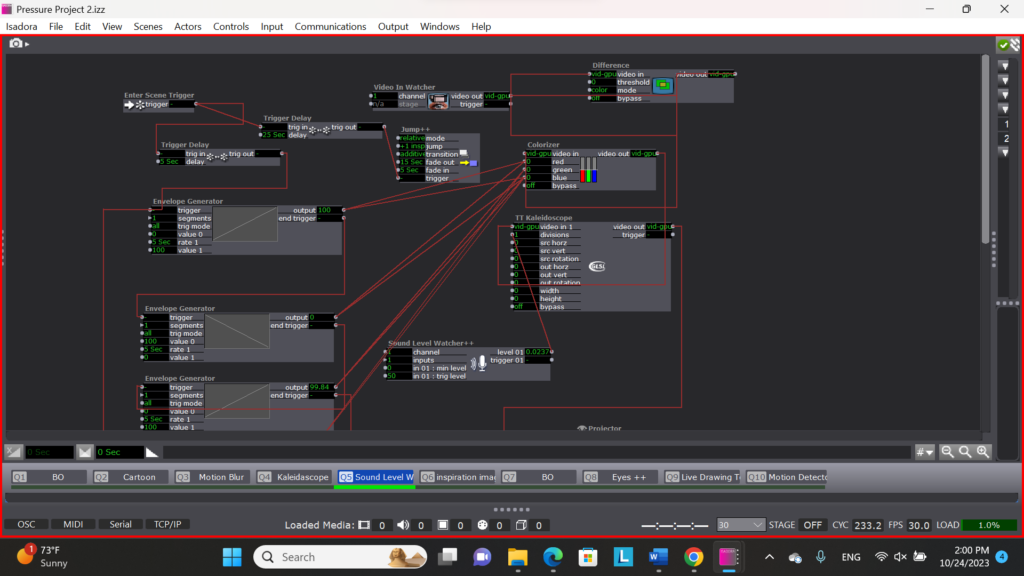
My final play scene is a wild card. In this scene, I connected the sound level watcher to the facet element of the kaleidoscope actor. Instead of the clarity of the image being dependent on the noise level of the gallery, the abstraction or warping of the image would be determined by the noise levels. I consider this scene to be a wild card because it’s effectiveness is dependent on the audience realizing that their talking or silence impacts their experience.
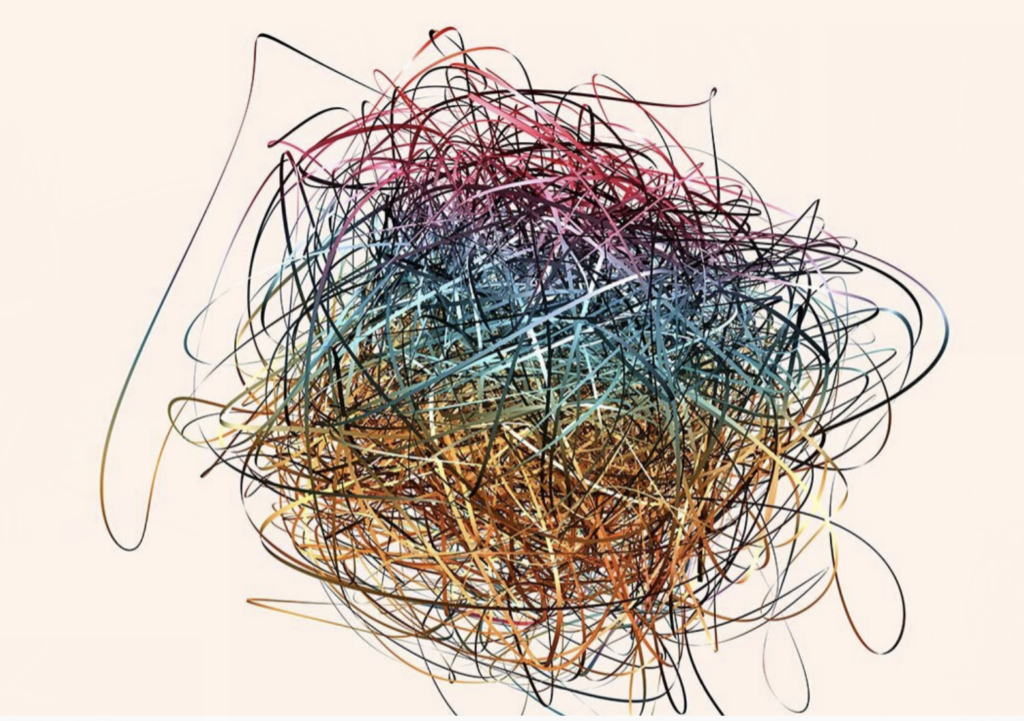
The patch ends by showing the audience my inspiration images and then resetting.
In thinking about improving this patch for Pressure Project 3, I want to consider the balance of instructions and discoverability and how to draw in and hold an audience member’s attention. I am unsure as to whether my project is “obvious” enough for an audience member to figure out what is happening without instructions but inviting enough to convince the audience member to stay and try to figure it out. I also know that I need to calibrate the length of my black out scenes and inspiration image scenes to make sure that audience members are drawn to my installation, but also don’t stay so long that they discourage another audience member from participating in the experience.
Reflection on PP3
Posted: October 24, 2023 Filed under: Uncategorized Leave a comment »For PP3, I focused more on “interactive-ness” and built a very simple structure which viewers can feel how a projection interacting with them easily.
In PP2, I made a big spiral shape in a monitor in which colors interacting viewers’ motion run through. While I liked it, I felt that a huge static spiral made a sort of a psychological barrier against viewers just like a big abstract painting standing in front of them.
So, for this project, I stepped back to my original inspiration from Charles Csuri’s Hummingbird—joy of seeing transition of shape through digital computation on a monitor—and just put a single transforming shape.
Changes of form and color is the same feature as my PP2 idea, but I also added a sound interactive (alpha value changes along with sound) to make it more playful.
As my interest is building the interactive relationship between an object and viewers, working with a webcam through PP2 & 3, and also watching everyone’s joyful projects, were really meaningful for me.
PP3: Etch-a-Sketch Iterated
Posted: October 23, 2023 Filed under: Uncategorized Leave a comment »For pressure project 3, I used my pressure project 2 patch as a starting point and both added and updated scenes to make them work more intuitively when users interact with them. From the PP2 performance, there were certain errors within the original patch that would cause scenes to skip through before the user had prompted them to change.

Above is a screenshot of part of my “split screen” scene patch. I added most of this part of the patch for PP3 to ensure that the scene only jumped ahead after the user stayed still for around 2 seconds after the text had appeared to explain that as the way to move forward. I added the gate and enter scene values specifically to keep the triggers from enabling.
Below is a screenshot of Csuri’s work I used as inspiration. I wanted to encourage the user to create and draw live, like in some of Csuri’s pieces. This piece specifically relates to the final scene in my project, the “etch-a-sketch,” in which the user draws and is able to create a canvas similar to this one:
Above is Csuri’s piece, and below is an example of my etch-a-sketch after some movement.

I also added music to this version, as I thought that might encourage movement from the user. I used the activate scene actor to activate the music in its separate scene at the end of the sequence. This also inspired a scene early on in which the user interaction doesn’t trigger movement on the screen, rather it’s the music that controls it. Below is a screenshot of the patch containing this scene.
I enjoyed getting to iterate on a past project, especially because I enjoyed the point I got to when working on PP2. I found the performance interesting as well, as the rest of the class already knew what to expect in a way. I think I learned more from the performance of PP2, but I still enjoyed getting to show the class how I implemented and took into account their feedback and interaction with the patch. Below is a .zip file of my entire PP3 patch:
PP3: Living and Alive!
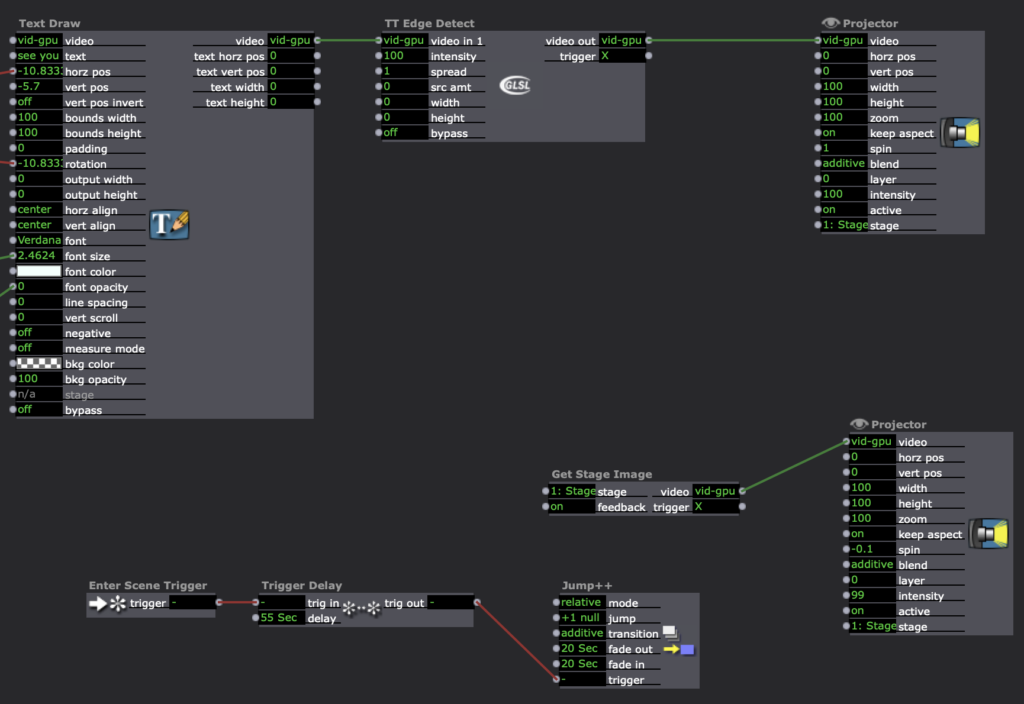
Posted: October 19, 2023 Filed under: Uncategorized Leave a comment »Inspired by Csuri’s use of feedback, duplication and circular repetition, as well as the ‘Nervous Tick’ animation, I continue developing the idea of living typography with an added sound-reactive element.
In addition to the motion sensor in the first scene, there is a sound trigger that leads us into the next scene. This was an idea I had for the first iteration but could not achieve without Alex’s help (thanks Alex!) So, the motion sensor triggers a text that says ‘Clap Clap Clap for me!’ which tells the audience to make sound, which in turn triggers the next scene to enter.


The sound element was an exciting new element to work with. Unlike the motion sensor, a clap is very energetic. Suddenly, the room was filled with life, which fueled the appetite of the creature. In scene 2, claps (or the sound-reactive element) altered the size of the creature, allowing it to emerge from the depths each time sound was detected. After watching it with the class, I had hoped I re-exported the video clip to be on black background and added a fade to the movement so that there was an overlapping effect between each clap and the rectangular edges wasn’t so clear.
In the next scene, I introduced a new sound-reactive only animation. Built using heavy feedback, I wanted to create a portal that also activated based on claps or sound engagements from the audience.
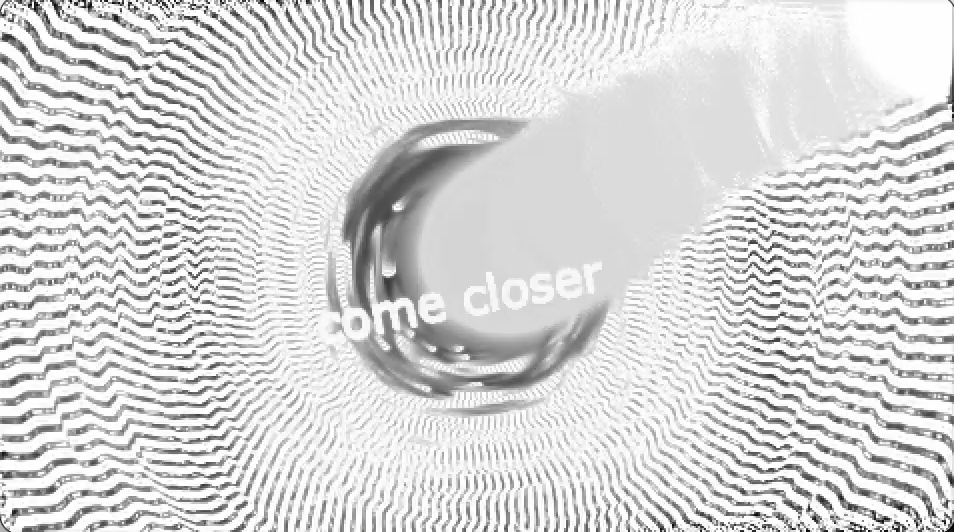
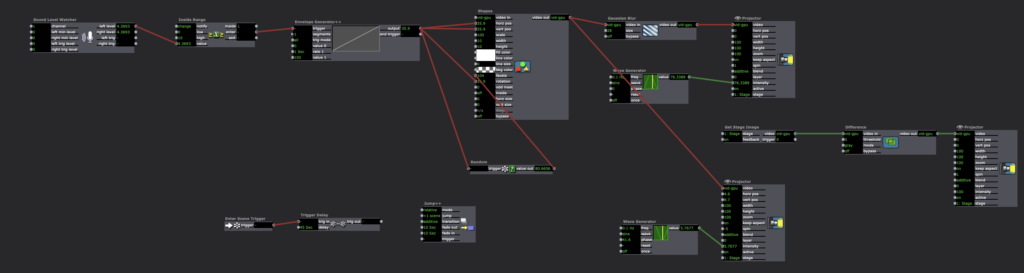
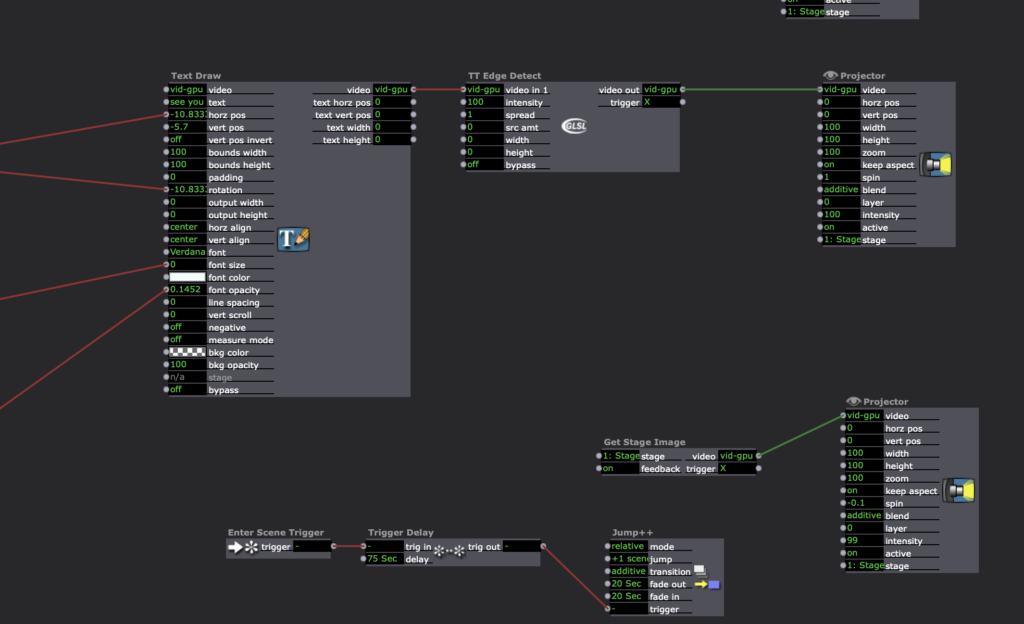
Programming-wise, the new elements in this scene includes an audio-reactive shapes actor and double feedback through ‘Get Stage Image’ using text. I’m not sure exactly how I created this look, so there was a lot of experimenting going on. In this scene, I felt visually creative for the first time using Isadora and would like to explore the combination of these actors further.
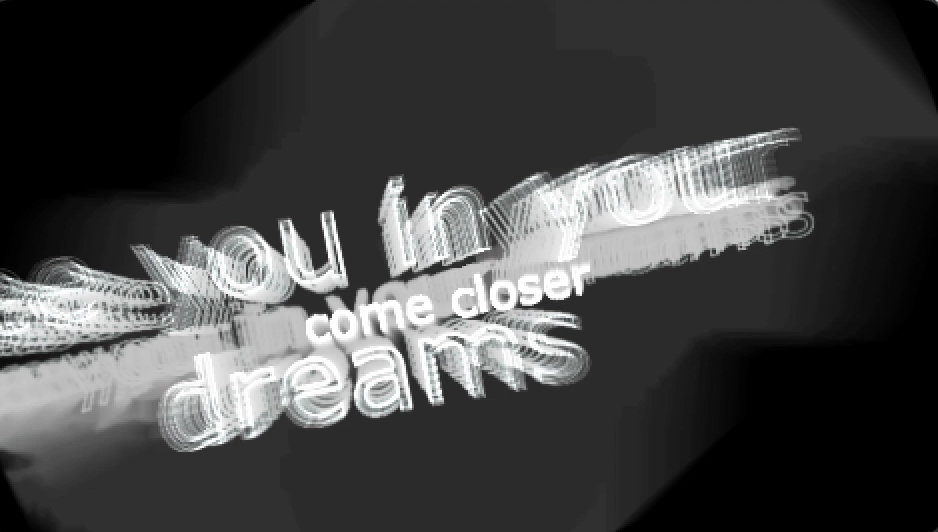
To finish off, we use ‘come closer’ through audio detection to return to ‘See you in your dreams’ which goes back to motion detection. Overall, I’m very satisfied by all the rabbit holes I managed to hop into with this project. It felt like a cohesive piece and each experiment was really fun and exciting!
PP2: Living Typography
Posted: October 19, 2023 Filed under: Uncategorized Leave a comment »The inspiration for this project was ‘Nervous Tick,’ an animation by Chuck Csuri. I loved the way the shapes felt ‘alive’ in their movements, almost reacting to those watching them. I also wanted to give the computer presence a voice through the use of typography. The interaction between image and viewer was my impetus for creating this work.
Everything in this first iteration is motion triggered and set off through time delay. Using a webcam, filtered through the ‘Difference’ and then ‘Eyes++’ actor, the motion sensor in it detects movement, which sends triggers for text to appear. One motion sensor actor (above) has a longer delay time and allows for a smoother interaction from human movement to text output. The second motion sensor is set up to be quick and jittery. I did this to give emotion to the creature.
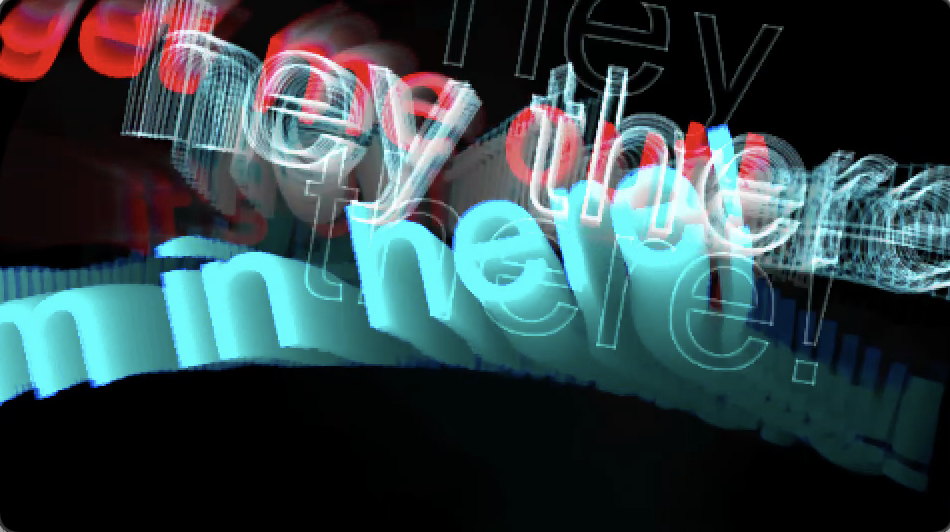
Text in the first scene includes ‘Hey There!’, ‘I’m in here!’, ‘It’s dark..’, ‘Let me out!’
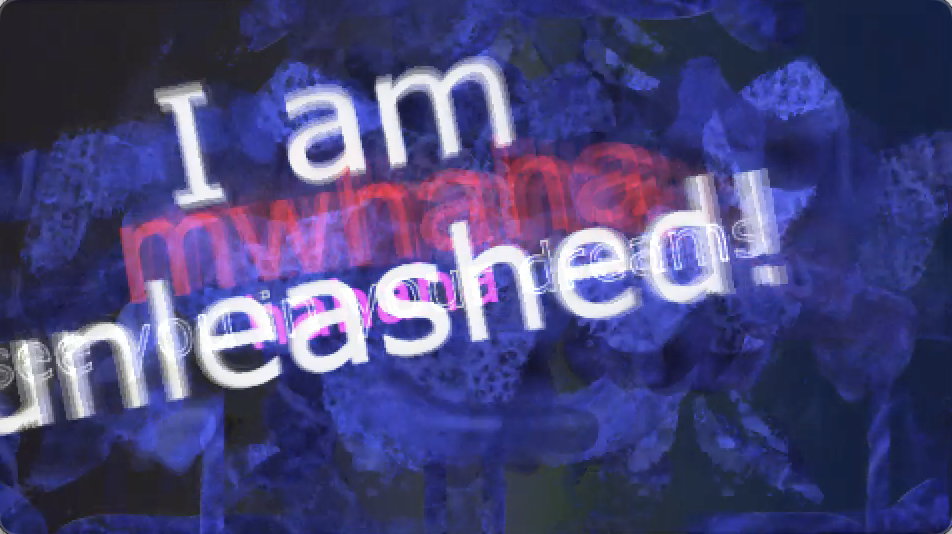
At first, the viewer is not sure whether the character is innocent. From audience reaction, I gathered people thought the creature was the victim. It is revealed in the next scene that it is an unpleasant virus looking thing that has been unleashed and will ‘see you in your dreams.’

A new element in this project is the use of feedback through the ‘Get Stage Image’ Actor plugged into Projector. It creates a melting effect similar to datamosh that really gave it an organic feel.