Cycle 3
Posted: December 14, 2023 Filed under: Uncategorized Leave a comment »After I studied connecting Isadora to Arduino and experimented its potentials in Cycle 1 and 2, I focused on considering what type of experience I could create with that technology in Cycle 3.
Feedbacks from everyone in Cycle 2, that just a tiny motion of small servo motors and its fuzzy structure could have its own quality, really inspired me.
I decided not to make such a “well designed” machine but just collected found objects and combined them with mechanics.
It was like installing an electric life in dead objects; how static objects get its another life as an interactive/kinetic machine.
Reactions from viewers (not only in our class but I also showed it to Art grad students and faculties) exceeded my expectations; the interactive motion which responds to viewers but still keeps a certain unpredictability made the sense of life (this object is living its own life) in each of viewers.
While its rule of interaction is very very very simple (just chasing and responding to a viewer in front of a webcam), viewers grows the sense and the meaning of that object in their own way…it was my discovery through this Cycle 3.
It could be a powerful potential of such an interactive project a creator doesn’t need fill out all the concept and meaning but viewers would find and grow it through the relationship with that object.
Cycle 2
Posted: November 28, 2023 Filed under: Uncategorized Leave a comment »Cycle 2
I achieved connecting Isadora and Arduino for Cycle 1 and made just a simple Arduino project like blinking LEDs.
So, I set up my goal for Cycle 2 to try to operate motor(s) by Isadora using a webcam as a motion sensor.
I firstly tried a servo motor. Fortunately, Arduino actor on Isadora already had a feature to control servos so I could easily connect them.
I made a webcam as a motion sensor like we had played in PP3 and made an instant “interactive servo robot” whose arm chases a viewer’s motion.
I also tried a stepper motor. I was a little bit tricky for me as Arduino actor on Isadora doesn’t have a stepper motor operating feature.
So, I re-checked a tutorial Arduino code to control a stepper motor and made the same work flow on Isadora (blinking Low/High to make a magnetic motor spin).
Its motion was not smooth, but it worked!
Probably I need to adjust an interval time between Low/High or some other things to operate a stepper motor smoothly, but anyway I decided to use servo motors for Cycle 3 as I should focus on building a final output now (and servos are easier to control for my project).
But operating a stepper motor by Isadora taught me many things like the idea of translating a written code into an Isadora chart.
My Cycle 3, the final output, would be a small interactive robot using webcam, Arduino, servos, and Isadora for sure.
Feedbacks from the class during Cycle 2 inspired me to make a small but very organistic interactive robot; as I usually make spatial or sculptural scale works, I considered my small Arduino test project (like a tiny servo) just as a small mock-up, but everyone’s reaction suggested me that a small scale thing could have its own communicativeness which a large sculpture doesn’t have. This would be my direction to achieve Cycle 3.
Reflection on Cycle 1
Posted: October 31, 2023 Filed under: Uncategorized Leave a comment »I set up my goal in this class at the end of the semester as “connecting Isadora and Arduino” and “using a webcam as a sensor to operate a motorized object”.
The first step=my goal of Cycle 1 was just simply connecting Arduino to Isadora.
I researched on the web (there are some helpful articles and forums) and found that an application called “Firmata” can play a role to connect Arduino to many kinds of software including Isadora.
This article explains what Firmata is and how to get/use it.
https://www.instructables.com/Arduino-Installing-Standard-Firmata/
We normally need to write a code to operate Arduino, but with Firmata, I can send output signals to or receiving inputs from Arduino without coding process.
I downloaded a protocol code called “StandardFirmata” and uploaded on my Arduino.
Here’s the test of Firmata; by clicking High/Low on Firmata window, I can turn on/off a LED connected to Arduino.
Then, I downloaded “Arduino Firmata Actor” which is an Isadora plugin to Arduino.
https://community.troikatronix.com/topic/7176/arduino-firmata-actor
Now I’m ready to connect the two.
I opened Isadora and set up Arduino Firmata Actor (and also some port connection settings) to connect to my Arduino.
Here, I can turn on/off LEDs on Isadora window (so I’m sending output signals from Isadora to Arduino).
Another test; an input signal from a photoresistor (a sensor detects brightness of light) connected to Arduino is being received by Isadora (sending signals from Arduino to Isadora).
I connected this input to a width of a square, so it’s interacting with light.
This very simple connection test was a very big step for me. The two big magics (Isadora and Arduino) are now syncing!
The next step (Cycle 2) will be connecting a servo motor (and/or a stepper motor??) and trying to operate it from Isadora. Then, I can connect it to a webcam as a sensor, just like we did in PP2 and 3.
Reflection on PP3
Posted: October 24, 2023 Filed under: Uncategorized Leave a comment »For PP3, I focused more on “interactive-ness” and built a very simple structure which viewers can feel how a projection interacting with them easily.
In PP2, I made a big spiral shape in a monitor in which colors interacting viewers’ motion run through. While I liked it, I felt that a huge static spiral made a sort of a psychological barrier against viewers just like a big abstract painting standing in front of them.
So, for this project, I stepped back to my original inspiration from Charles Csuri’s Hummingbird—joy of seeing transition of shape through digital computation on a monitor—and just put a single transforming shape.
Changes of form and color is the same feature as my PP2 idea, but I also added a sound interactive (alpha value changes along with sound) to make it more playful.
As my interest is building the interactive relationship between an object and viewers, working with a webcam through PP2 & 3, and also watching everyone’s joyful projects, were really meaningful for me.
Reflection on PP2
Posted: October 8, 2023 Filed under: Uncategorized Leave a comment »The final piece for this project became a spiral color transition interacting with viewers’ motion.
But originally, I started from shapes floating in a monitor along with motion. By using x, y coordinates or speeds of blobs on Eye actor, I tried to make transformations happening on a screen which are generated by a computational process; this idea came from Charles Csuri’s Hummingbird (1967).
This piece could be the final output, but I found Get Stage Image actor can multiply transforming images on screens. I make a spiral structure which creates “echoes” of image transition by spinning the projector.
It totally changed the visual of my original plan, but I was satisfied that this structure created the relationship with the “past” actions which has just done a second before; a more time-transitional motion.
Audio Project
Posted: September 26, 2023 Filed under: Uncategorized Leave a comment »My goal for this short project was just simply playing with audio related actors.
I randomly picked up multiple values from Sound Frequency Bands actor, and connected them to many kinds of outputs such as shapes, positions, and colors transitions/transformations.
Even there was no order in those many connections between input and output values, the final video shows synchro with the music (of course, as inputs come from the music).
Especially, the intro part of Blue Train by John Coltrane clearly shows it (as it has the rhythm of the peak and the silence).
I really enjoyed the project, and got the sense of how I can deal with sound actors to use audio data as input or trigger.
Reflection on PP1
Posted: September 12, 2023 Filed under: Uncategorized Leave a comment »One of my goals for this project was to create an automatic transformation that keeps changing its shape randomly. So, my agenda was how to build a loop circuit which never repeat the same motion.


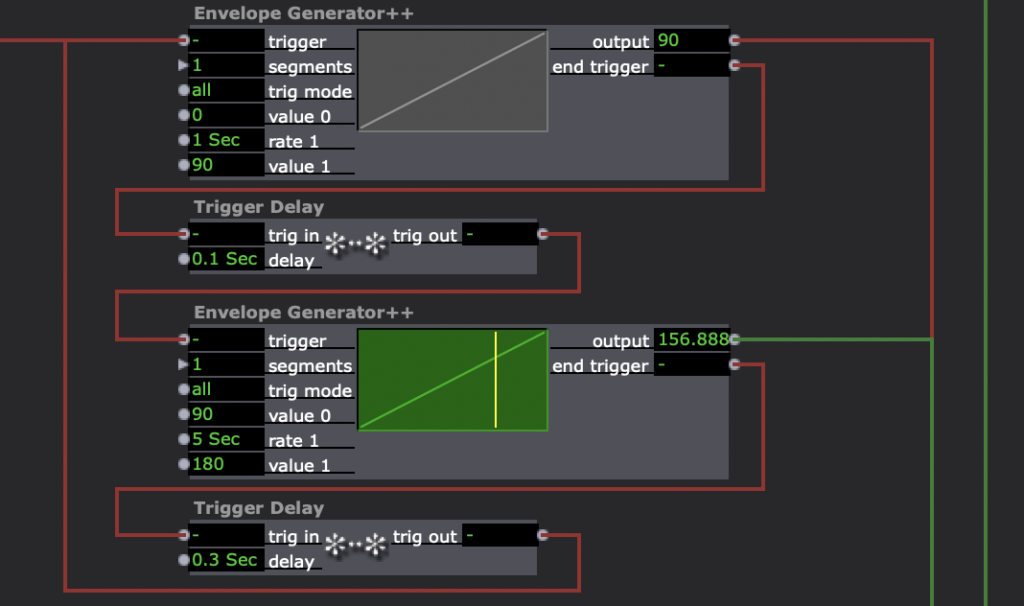
Firstly, I made some looping structures; Wave actor automatically loops so it was useful. Envelope actor has the ending point, but I found that if I connect end trigger to start trigger, it forms a loop circuit. Then, I can put Trigger Delay or the other Envelope actor to make the loop more complex.
Here’s an example of a looping part.
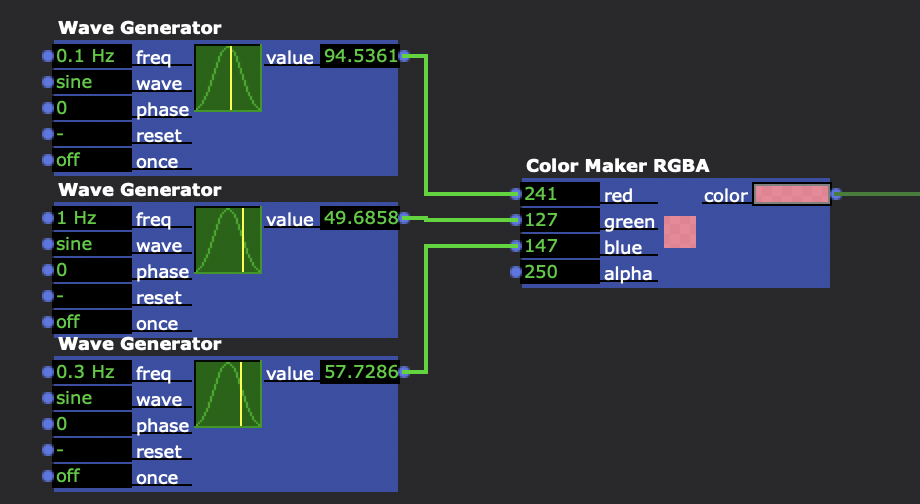
The next task was to insert some randomness. Random actor was one of the solutions, for sure. But I also used the differences between frequencies to make transitions seems random (it’s not actually random as different pitches make a long period loop, but it behaves like random on our eyes at least).
Here’s example; I used three Wave actors to change RGB values. As each frequency is different, the whole color transition seems random.
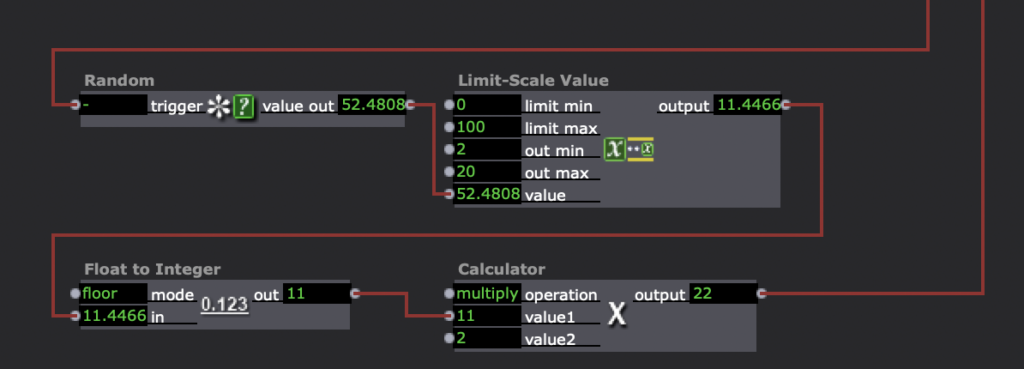
I found some actors to adjust values. For example, to make a star shaped polygon (an offset regular polygon) whose facets randomly change, I had to convert values generated by Random actor into integer even numbers. I used Float to Integer actor to get integer numbers and connect it to Calculator actor which multiplies it by 2 to make even numbers.
Throughout those process, I slowly realized that what Isadora’s chart of actors actually represents is definitely coding; accepting triggers, convert input values into outputs, and send values or signals to the next lines.
Also, it reminded me of building an electric circuit; make a loop of multiple signals by connecting modules.
For me, rather than a final output on Stage monitor (I’m certainly satisfied with it for sure), the realization of this sense (Isadora is coding/circuit building) was the biggest achievement.
Bump: “Cycle 3: Puzzlr Final” by Juan Torres Brenes LaRoche
Posted: September 12, 2023 Filed under: Uncategorized Leave a comment »This project really captured my interests as its bridge between digital programing and physical action (puzzle game) is what I want to pursuit in my creation.
The article describes the author’s struggles and achievements in designing and building puzzle units which had to contains electric components while it works as puzzle plates.
As I work on building robots or machines in my art, I could understand how it was difficult to make it functional both physically and electrically (and aesthetically!).
The author’s idea and realization of synching the physical puzzling action at a player’s hands and the reflected image on a monitor is fascinating because it beautifully bridges the relationship between the body of a player and a digitally designed system.