Cycle Three: A Collective Sound Explorer
Posted: May 6, 2026 Filed under: Uncategorized Leave a comment »As I alluded to in the previous cycle, I wanted to really focus on creating an experience for multiple people in this cycle, as part of my original goal was to do something for a group of people. As the ideas I was exploring in cycle two didn’t work out so great, I pivoted to creating an experience with several different kinds of sound manipulation, as opposed to one “instrument” that everyone could interact with at once. The different systems I picked to include in this cycle were: the 2D movement-based sound explorer from my first cycle, a patch that resynthesizes from a mic input using the Data Knot package, a FM theremin also using motion tracking, and an iPad connected to parameters of the different instruments using Max’s MiraWeb package.
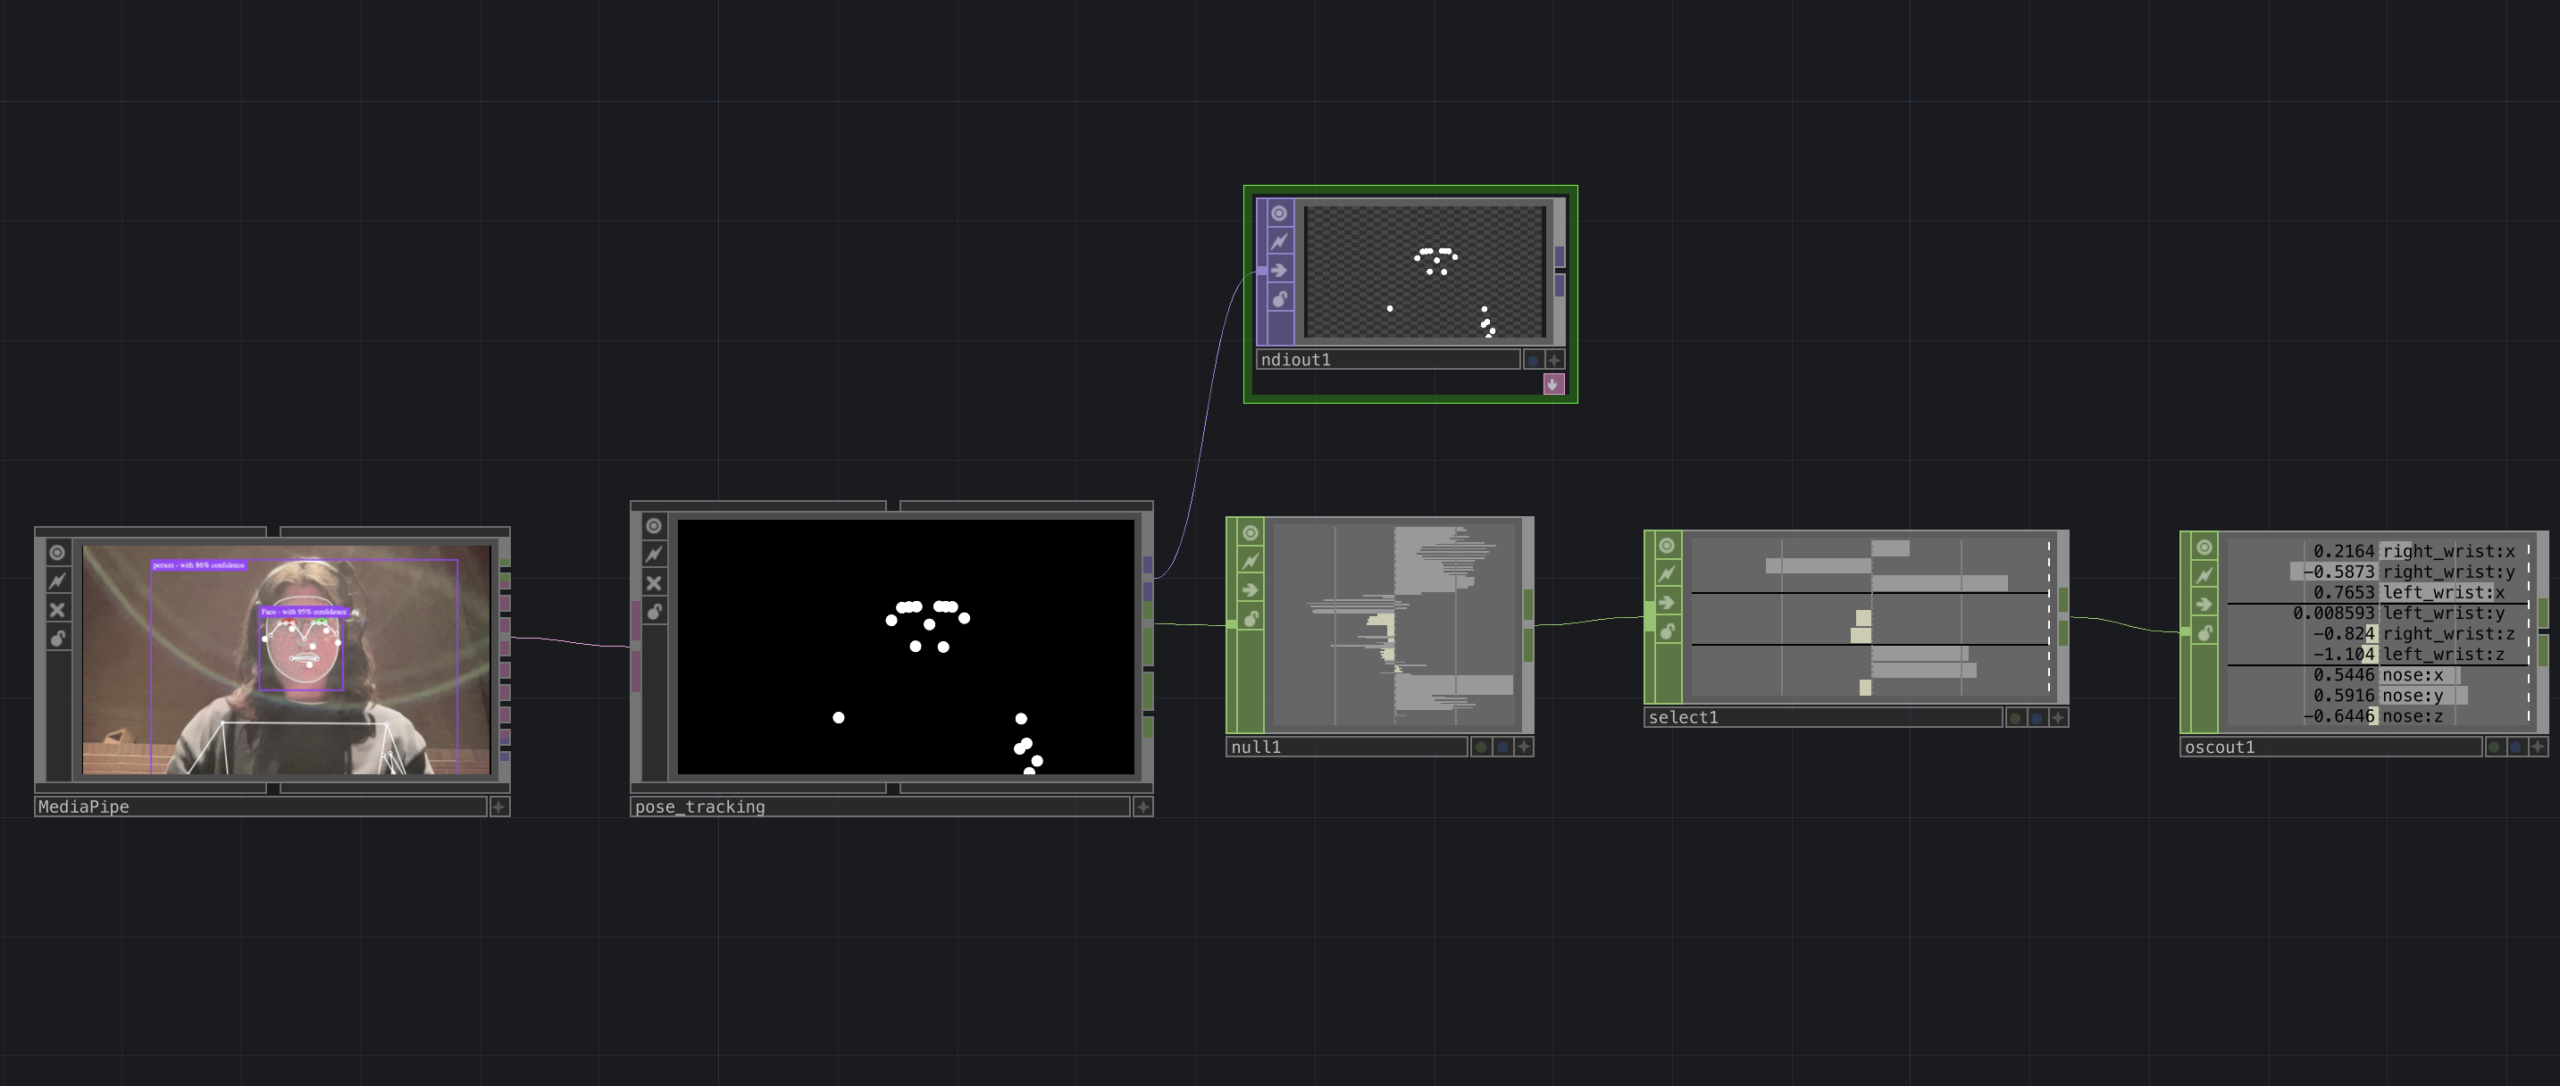
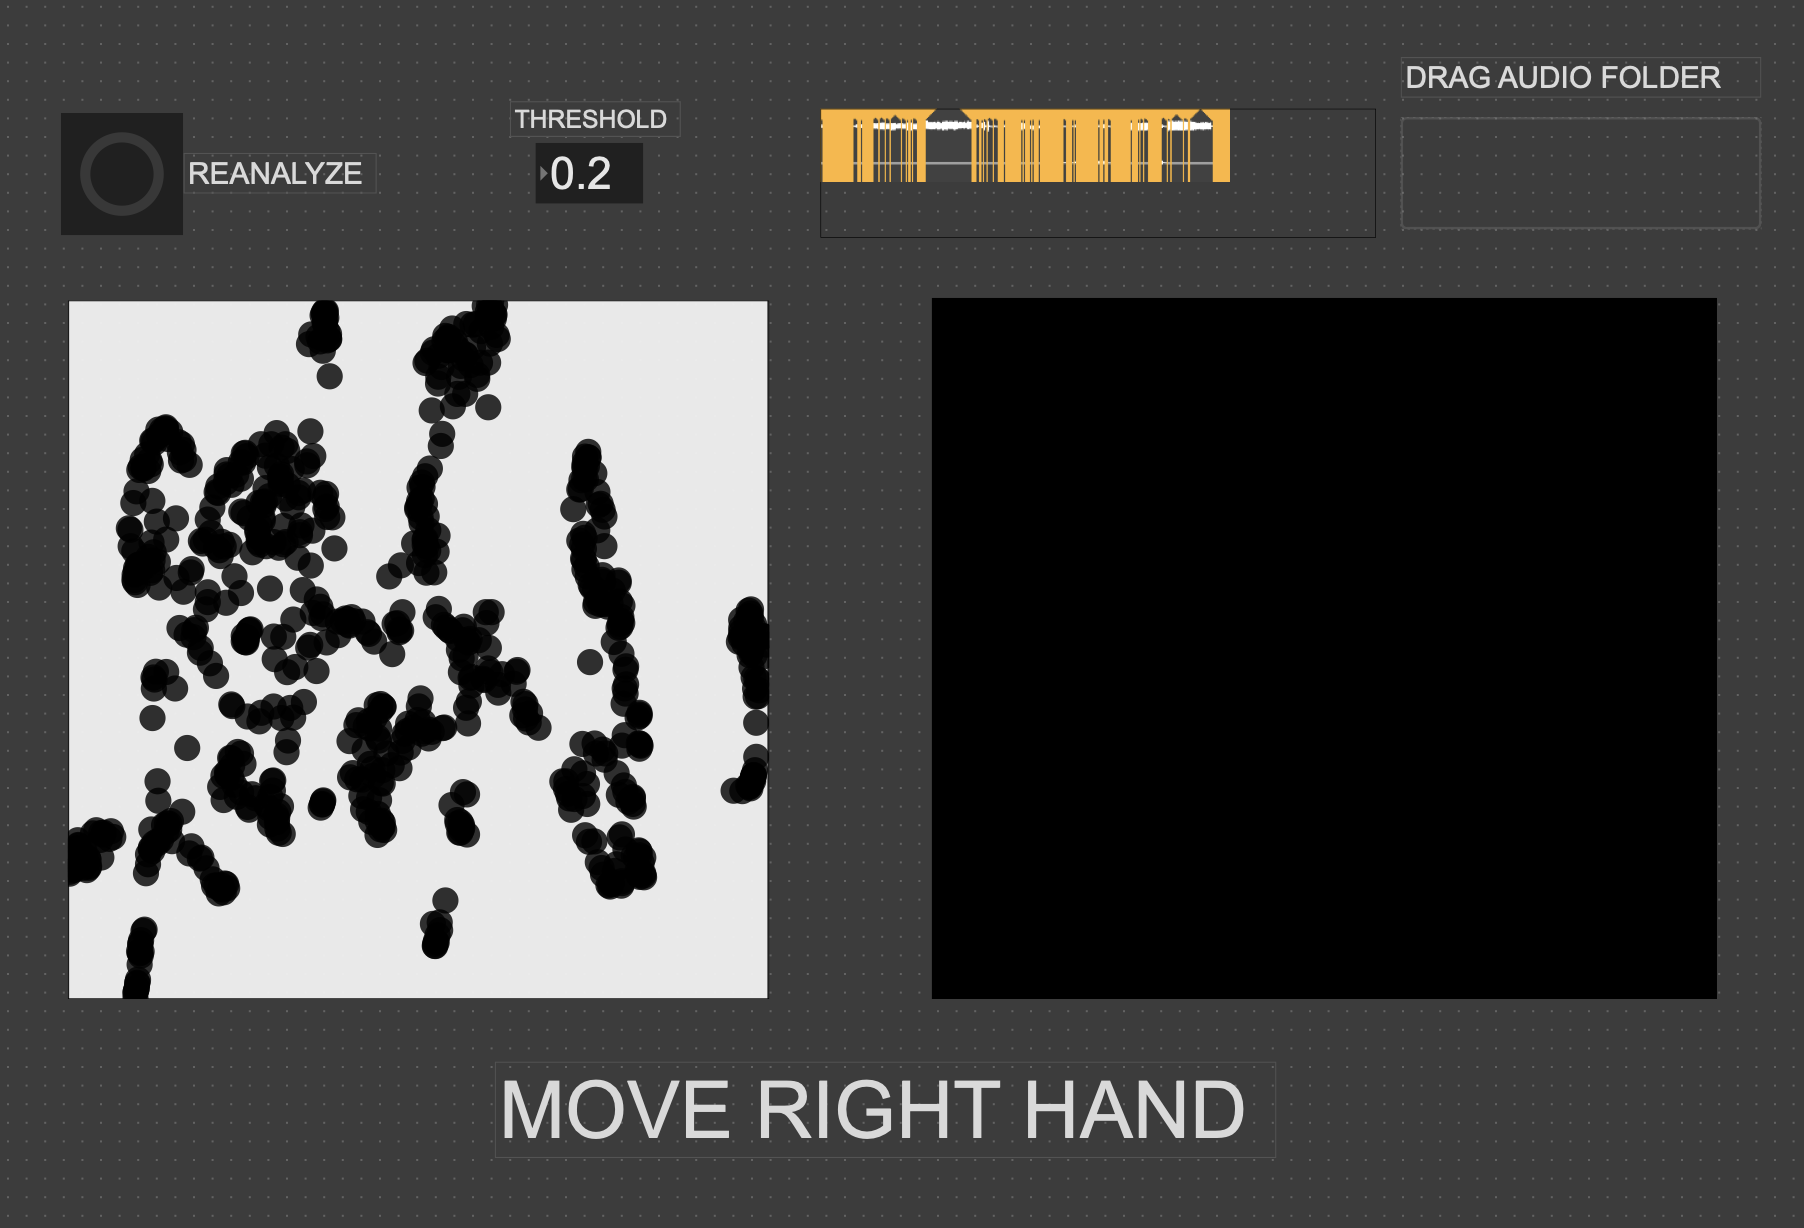
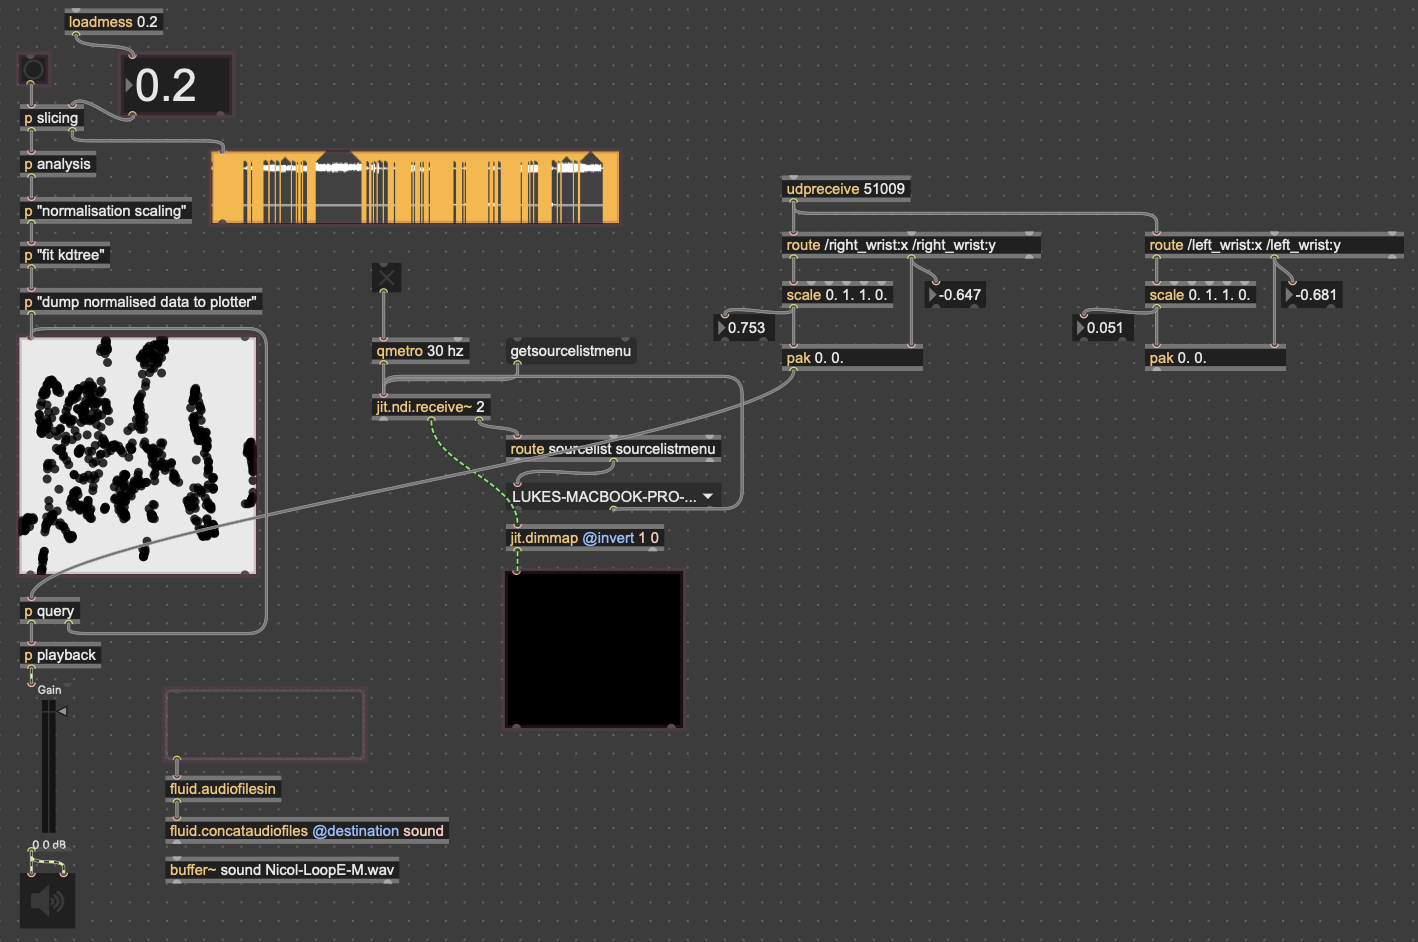
Since the 3D version had some large issues, I chose to go back to the 2D version, since it was much easier to interact with. While the the code didn’t change much in regard to how it was working, I expanded the control capabilities for more “natural” input. In both cycles one and two, people found it unintuitive that only one hand had any effect on the sound, so for this time, I wanted to get two handed control working. I did this by just duplicating the original FluCoMa code, basically creating two “voices” for the instrument. I then mapped the coordinates of each wrist (received from MediaPipe in TouchDesigner over OSC) to a voice. By analyzing the sample folders with different thresholds for detection, I was able to create two different corpuses for the wrists to move through.
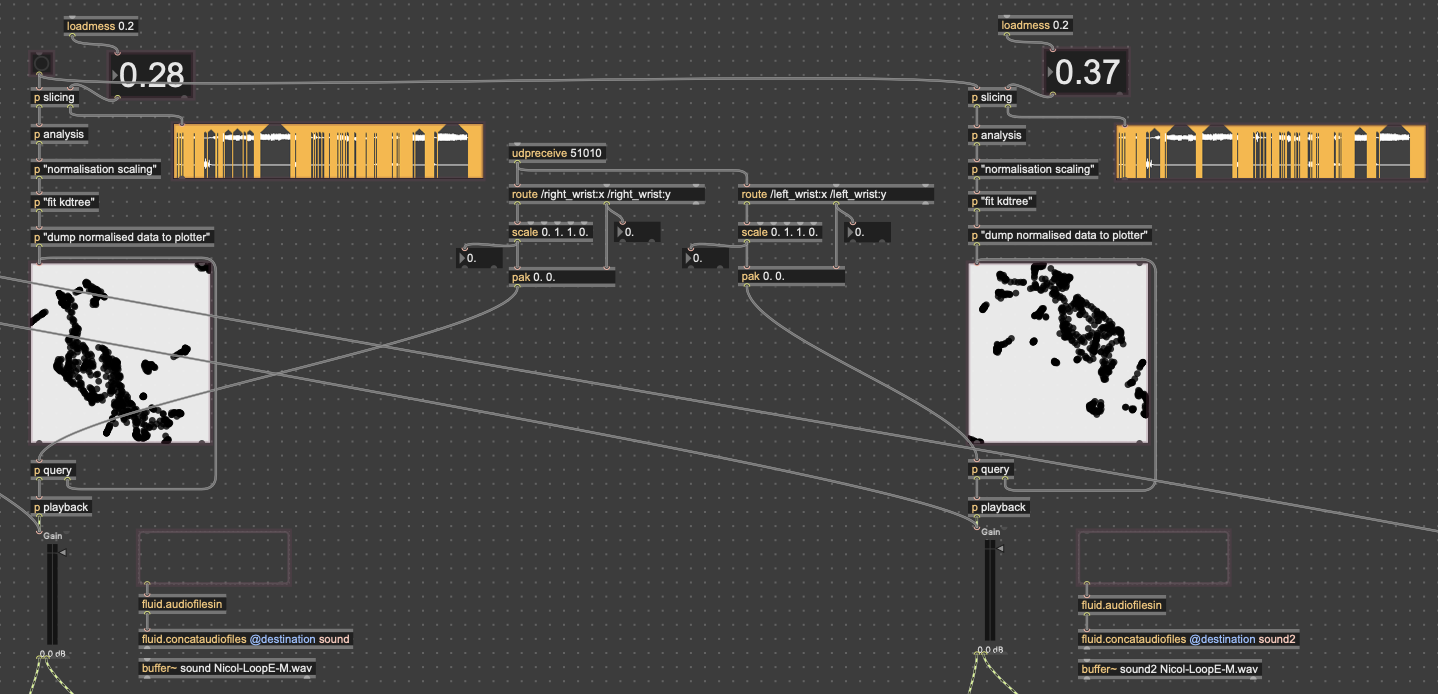
As I mentioned earlier, the mic input resynthesis was done using the package DataKnot for MaxMSP, which is used for real time audio analysis and processing, based in FluCoMa’s tools. The patch I used takes the signal from the microphone, looks for the onset of a sound (determined by a dB threshold) and triggers waves resynthesized from the most present pitches in the original. The signal onset detection also randomly triggers some strumming and “shaking” noise. While this instrument isn’t controlled with a camera, I did put a camera in front of the microphone, so that the user could still create visuals.
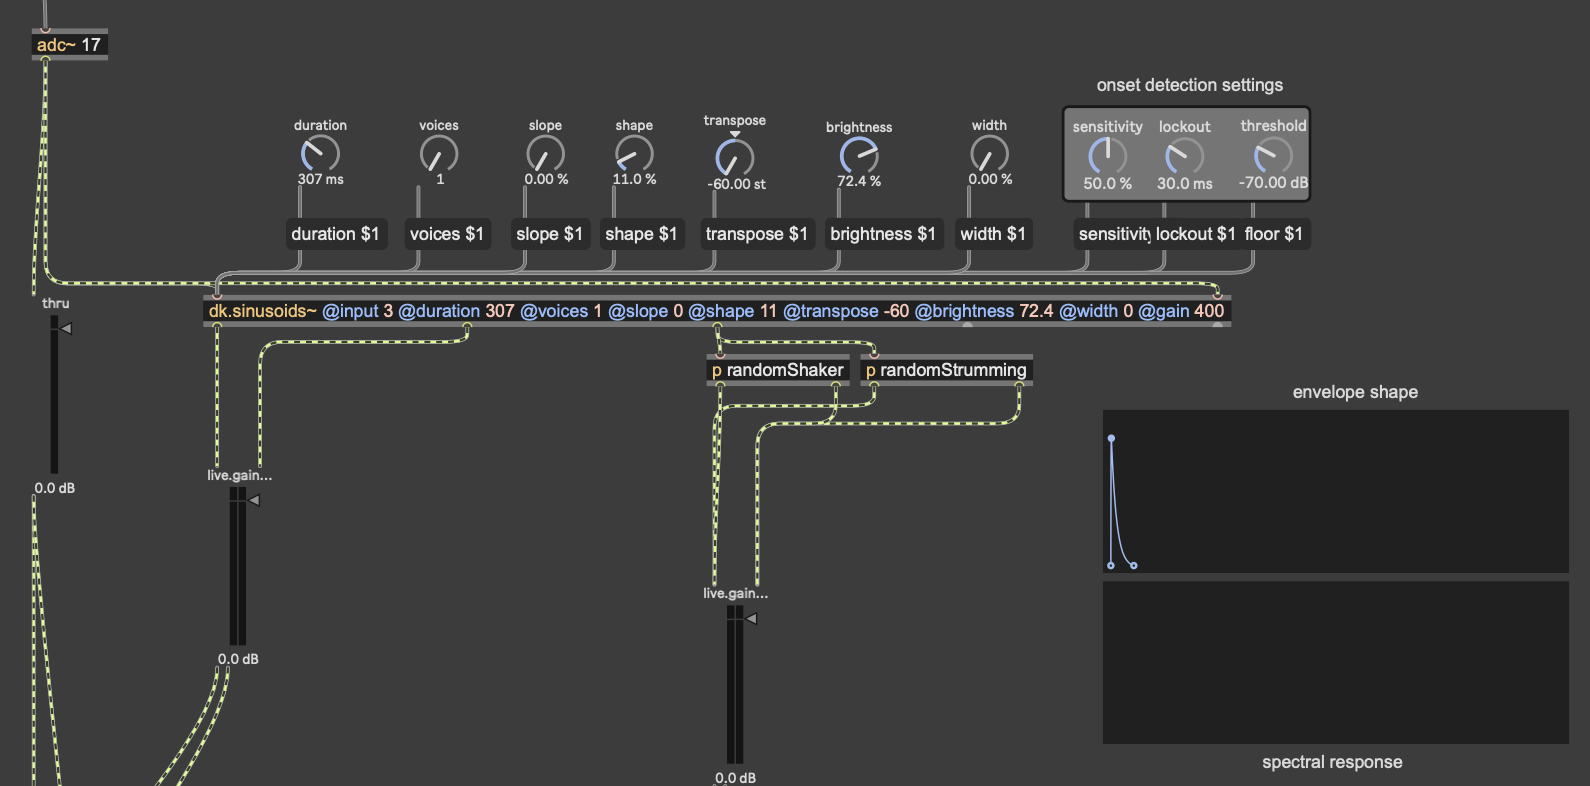
The theremin portion of the patch was done with a simple FM synth patch I have (fmcore~.maxpat). The y-values of the left wrist controlled the volume of the wave being played, while the y-values of the right wrist controlled the pitch. I had to smooth out the pitch values with zl.stream and zl.sum, taking the average of the most recent 5 values in order to prevent the pitch from wobbling around from unstable data.

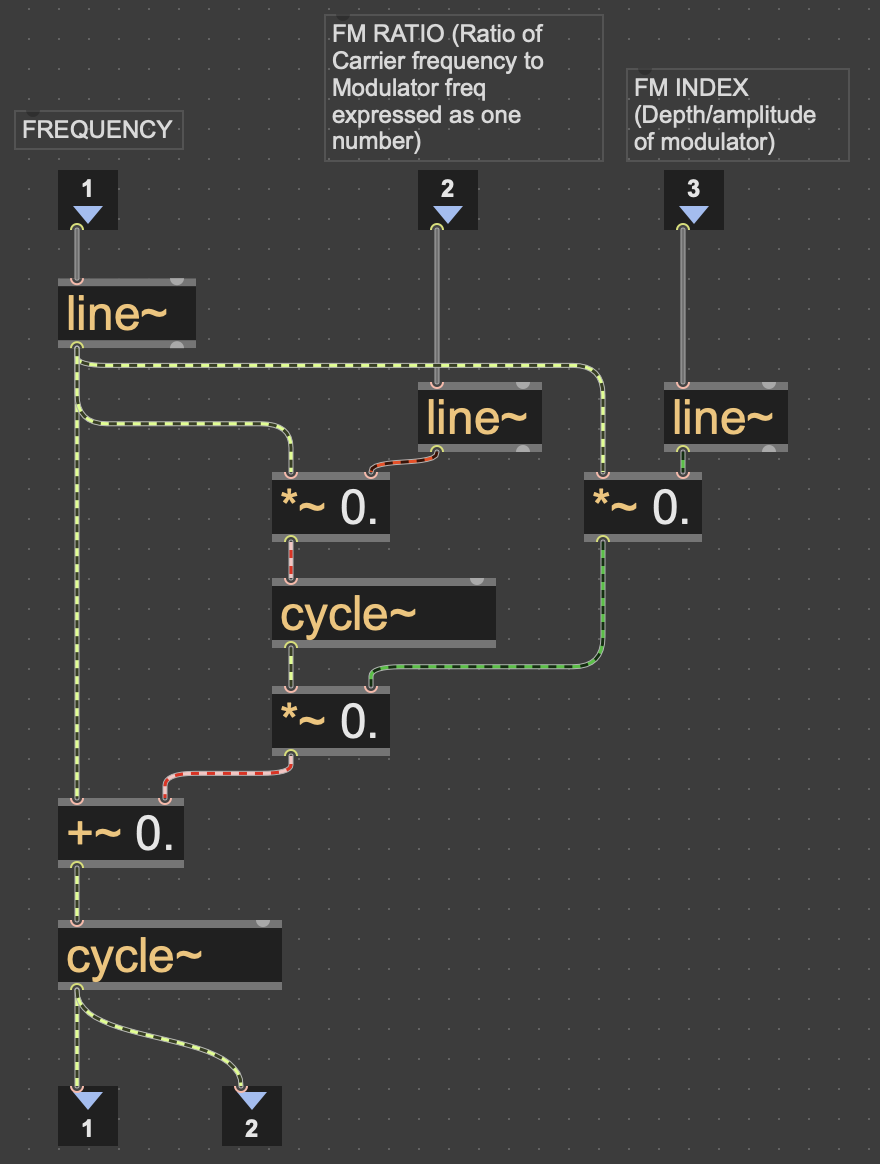
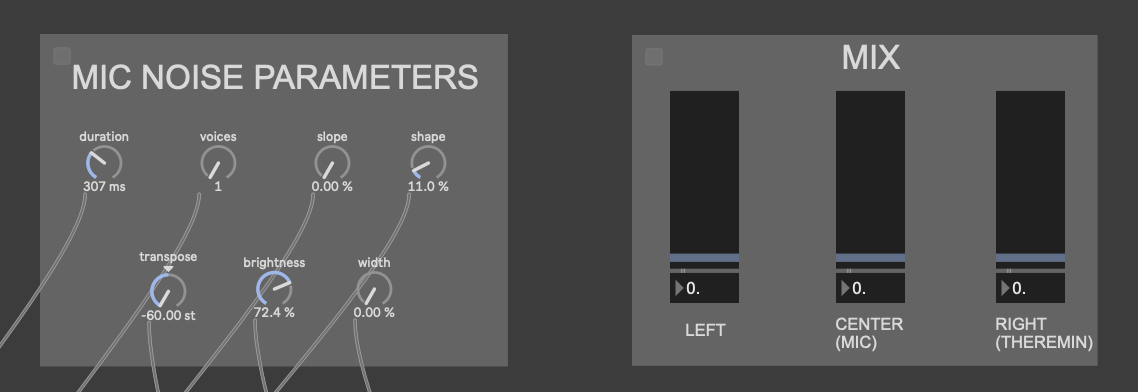
The little grey box with the “FM THEREMIN” header in those pictures is where I connected the patch on my computer to an external iPad for parameter control. I did this with Max’s built-in package Mira, which allows you to connect a device on the same network to a Max patch. In addition to the pitch, FM ratio and depth of the theremin, I also gave the iPad user seven parameters for the Data Knot processing, as well as a mixer for all of the instruments
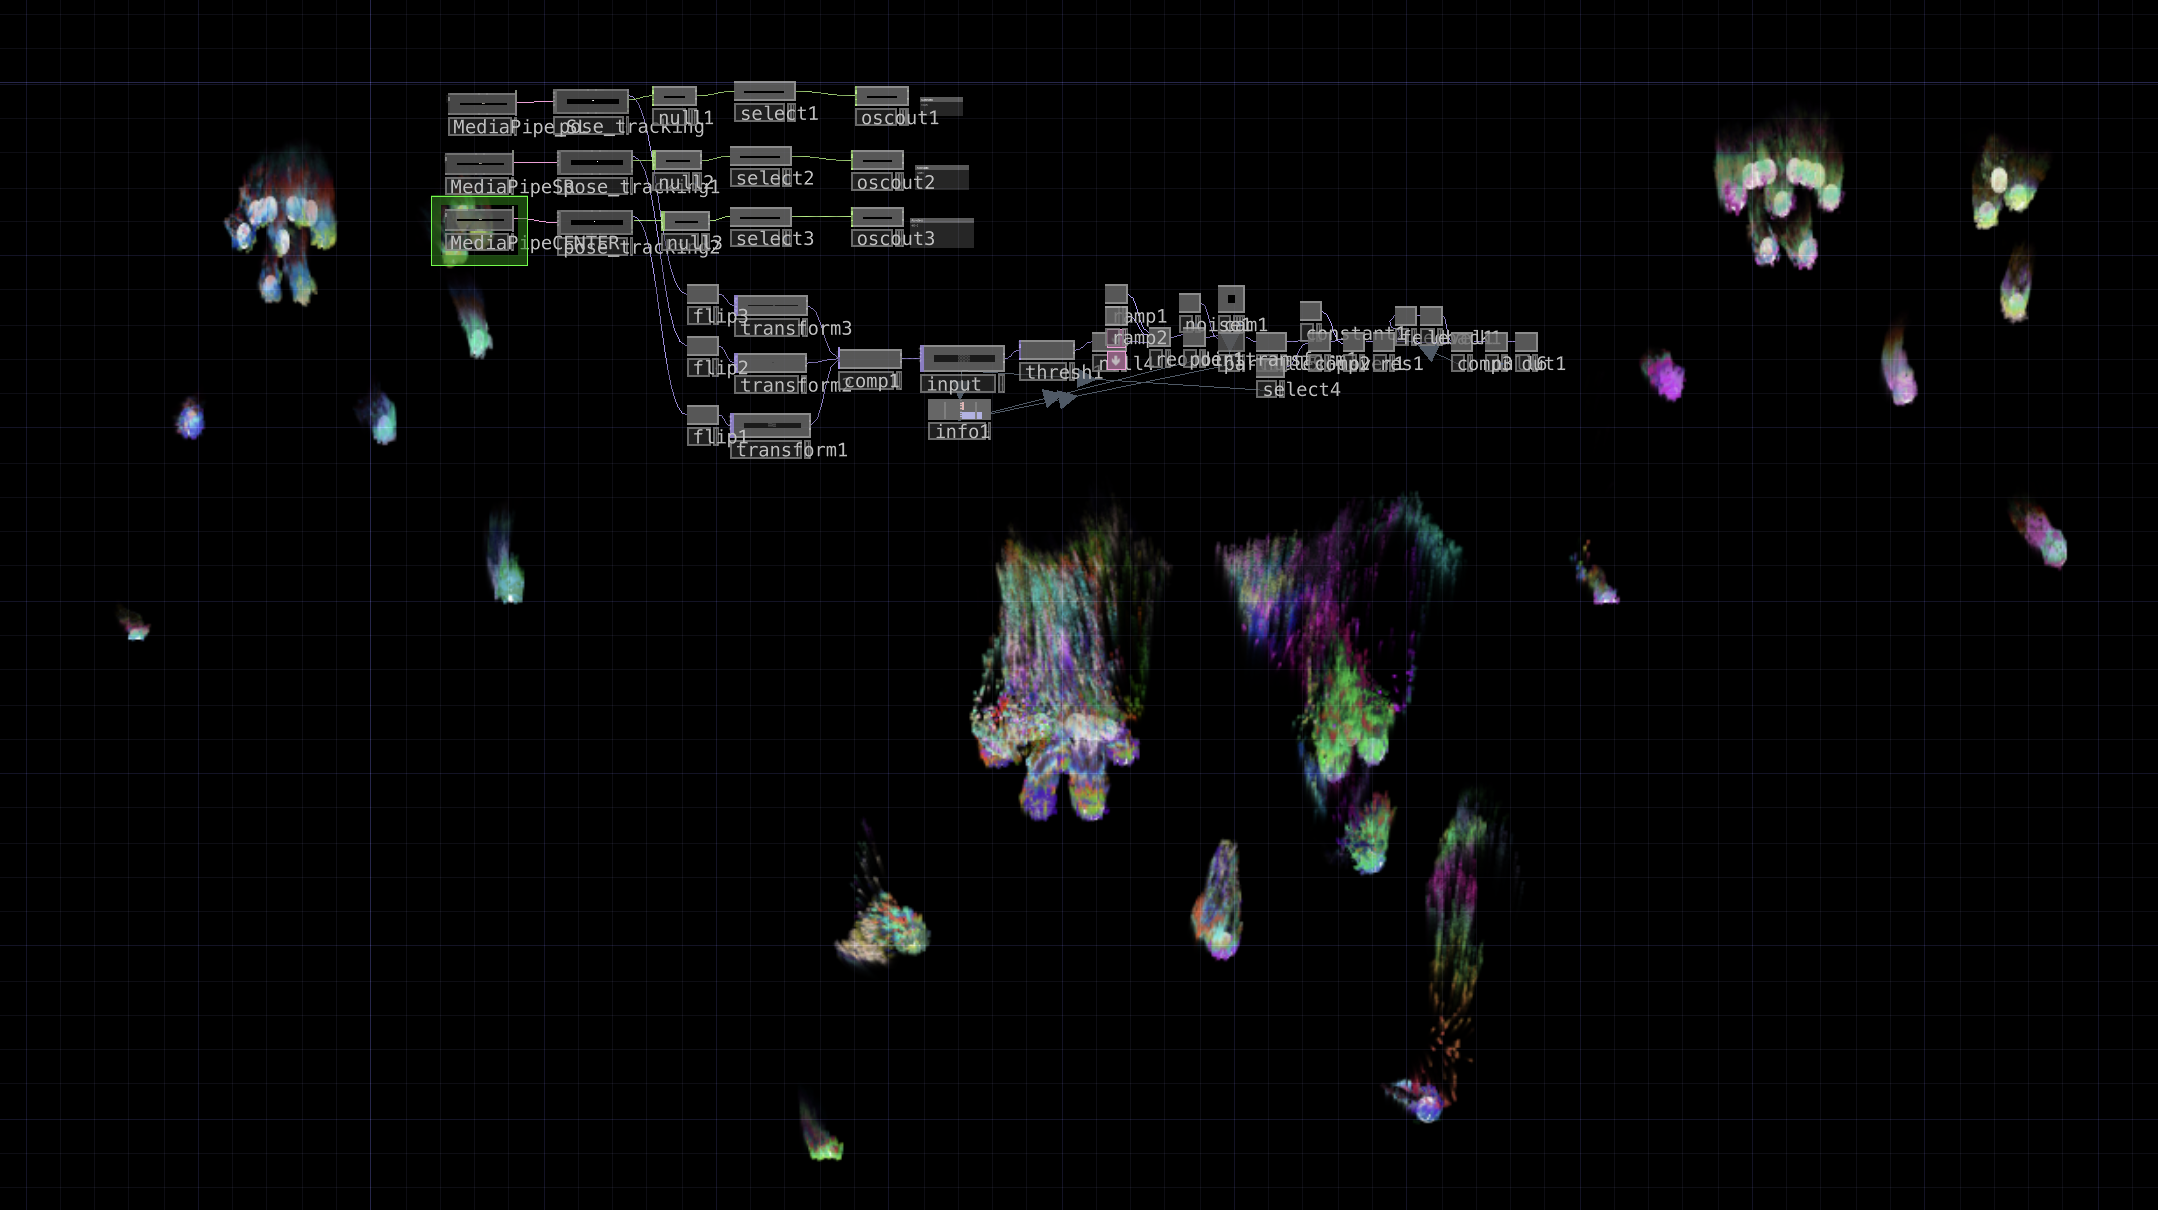
In addition to this, I also expanded upon my original TouchDesigner patch–which was handling the motion capture via Google MediaPipe–to create some particle visuals based on the landmark skeleton from MediaPipe. First, I went copied the code for one video stream into three, to capture data for all three instrument users. I mostly followed this tutorial to create them, as I’m not the best at TouchDesigner, but I took a couple of my own liberties. The two largest of those were that I used the skeleton video feed out of MediaPipe as input for the particles, and I also used noise to generate colors instead of the input video, as the skeleton is only white. Lastly, I placed the three skeletons in different spots on the screen in relation to where each station would be set up in the motion lab. Code is posted below.

Results
While there were some oversights I made when creating my patches, as well as when I presented this cycle, I overall feel that this was a very successful experience. People seemed really interested in the sounds the experience made, as well as in making them themselves. With the two camera-controlled parts, people seemed to understand their movement was controlling something right away, which was another goal of mine. I think that the sounds that the system made were quite interesting as well once every station had someone providing input. People also enjoyed the visuals, and seeing the particles flow with their movements.
While my mistakes in this cycle weren’t too numerous, they definitely detracted from the experience a considerable amount. In terms of presentation, I didn’t explain much about how to use each station. Part of this was deliberate, as I wanted to see how first-time users could pick up on the controls. However, there were still a few basic instructions that I should’ve given, such as how far to stand from the cameras, as well as that the camera by the microphone was not controlling any sound, just the mic. I also made a mistake by making the volume sliders on the iPad full range, as it just resulted in the instruments getting turned down too quiet. I think people also had a hard time understanding what the iPad was controlling in the first place, as some of the terms used for the knobs were jargon-y.
I think if I were to continue this into a cycle 4, I’d focus much more on making things more easily understood by the user. This class has taught me that the most effective interactive systems are made to create potential for experiences, not designing the experience itself. My ultimate goal with things like this is to create something that anyone can walk up to, interact with, and make something cool sounding regardless if they know every detail of how it works or if they haven’t even played an instrument before. While I think that these three cycles have shown a lot of progression towards that goal, I still have a lot of work to do.
Longer video from Michael pending
Cycle Two: A 3D Movement-Based Sound Explorer
Posted: May 5, 2026 Filed under: Luke Buzard | Tags: Cycle 2, FluCoMa, MaxMSP, MediaPipe, touchdesigner Leave a comment »Going into cycle two, I immediately knew that I wanted to take the ideas I had done in 2 axes of movement in cycle one and translate it to 3D. In order to do this, I needed to rework the analysis portion to plot all the samples in 3 dimensions, as well as figure out a new way for the user to see their movement within the corpus of sounds. For several days, I tried to do the analysis section on my own, but found myself unable to figure out how to plot them in a 3D space as I’m not great with Jitter, Max’s visual package. However, just about when I was getting ready to give up, I found someone who had already done exactly what I was trying to do.
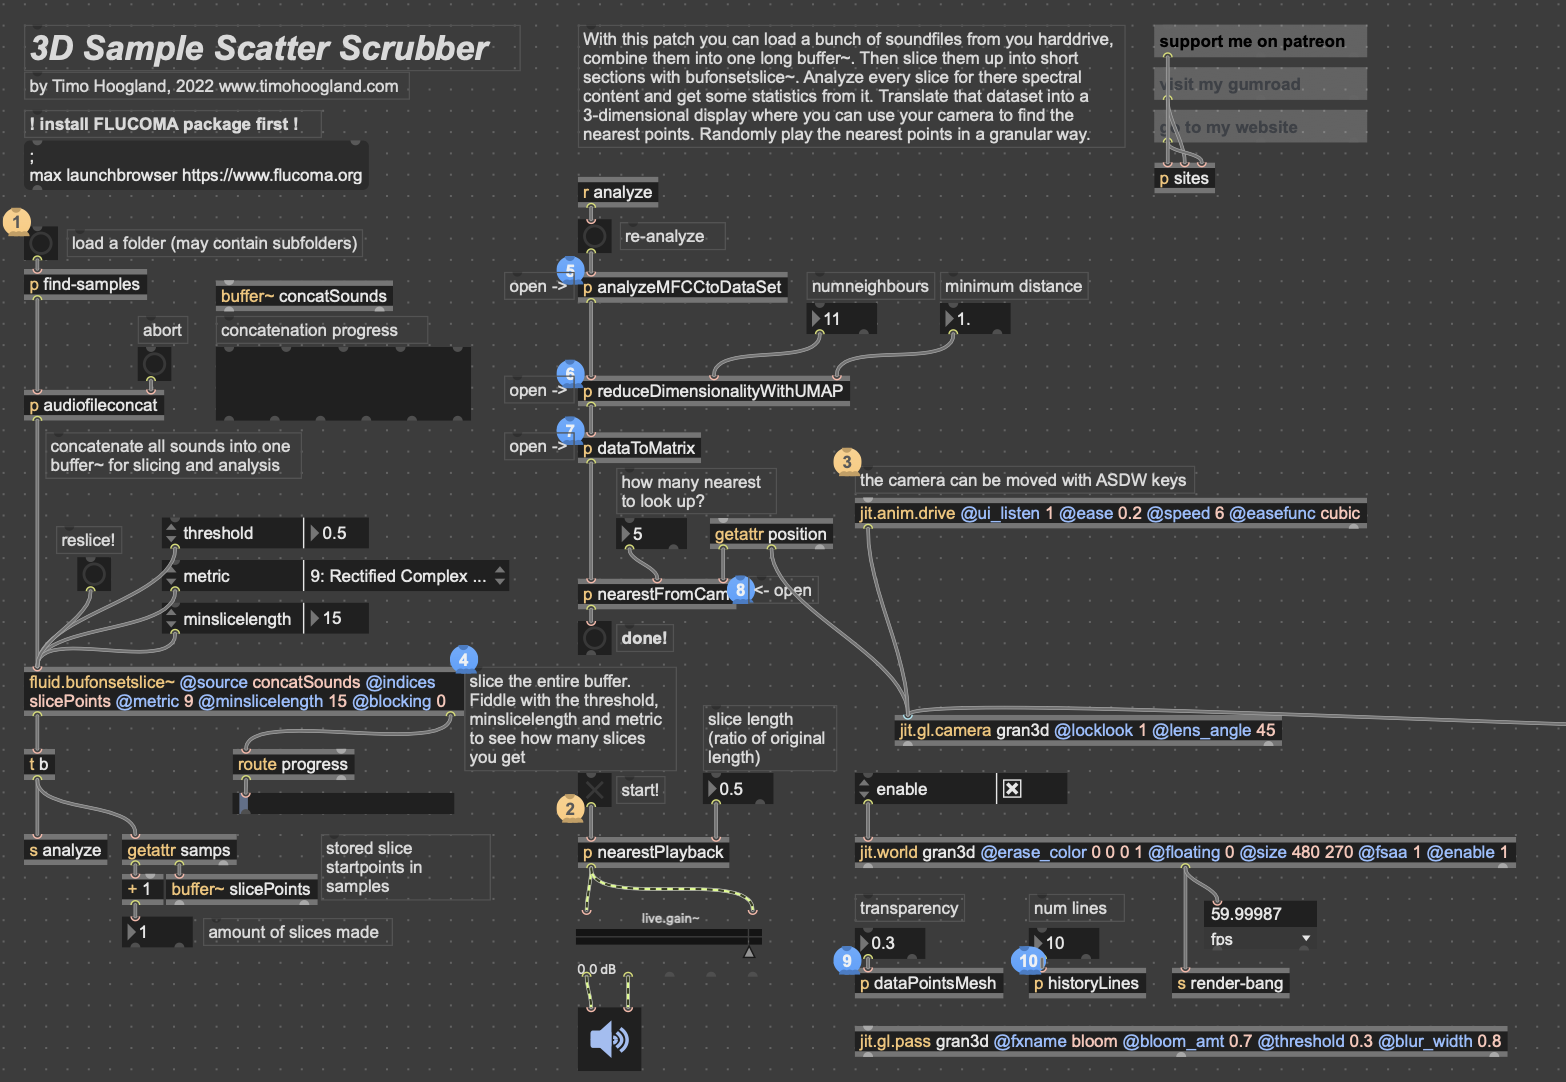
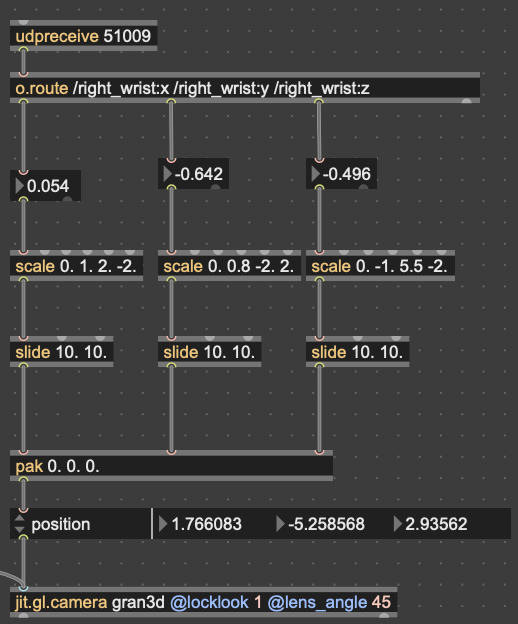
I won’t get too in-depth on how this works. But in short, it reduces the MFCC analysis data to 3 dimensions, as opposed to 2 in cycle 1, unpacks all that data into a matrix with 3 dimensions, and then that matrix data is used to generate an OpenGL environment with all the samples plotted in a 3D space. Then, depending on whatever point the camera is closest to in the Jitter window, the sample that correlates with that point is played back. This camera, however, was driven with WASDQZ, so I had to implement a new system of control that allowed this 3D corpus explorer to interface with the Google Mediapipe data I was receiving from TouchDesigner. I did this by scaling the data to the 3D space, smoothing it out some, and sending it a as list into the position attribute of the jit.gl.camera object.
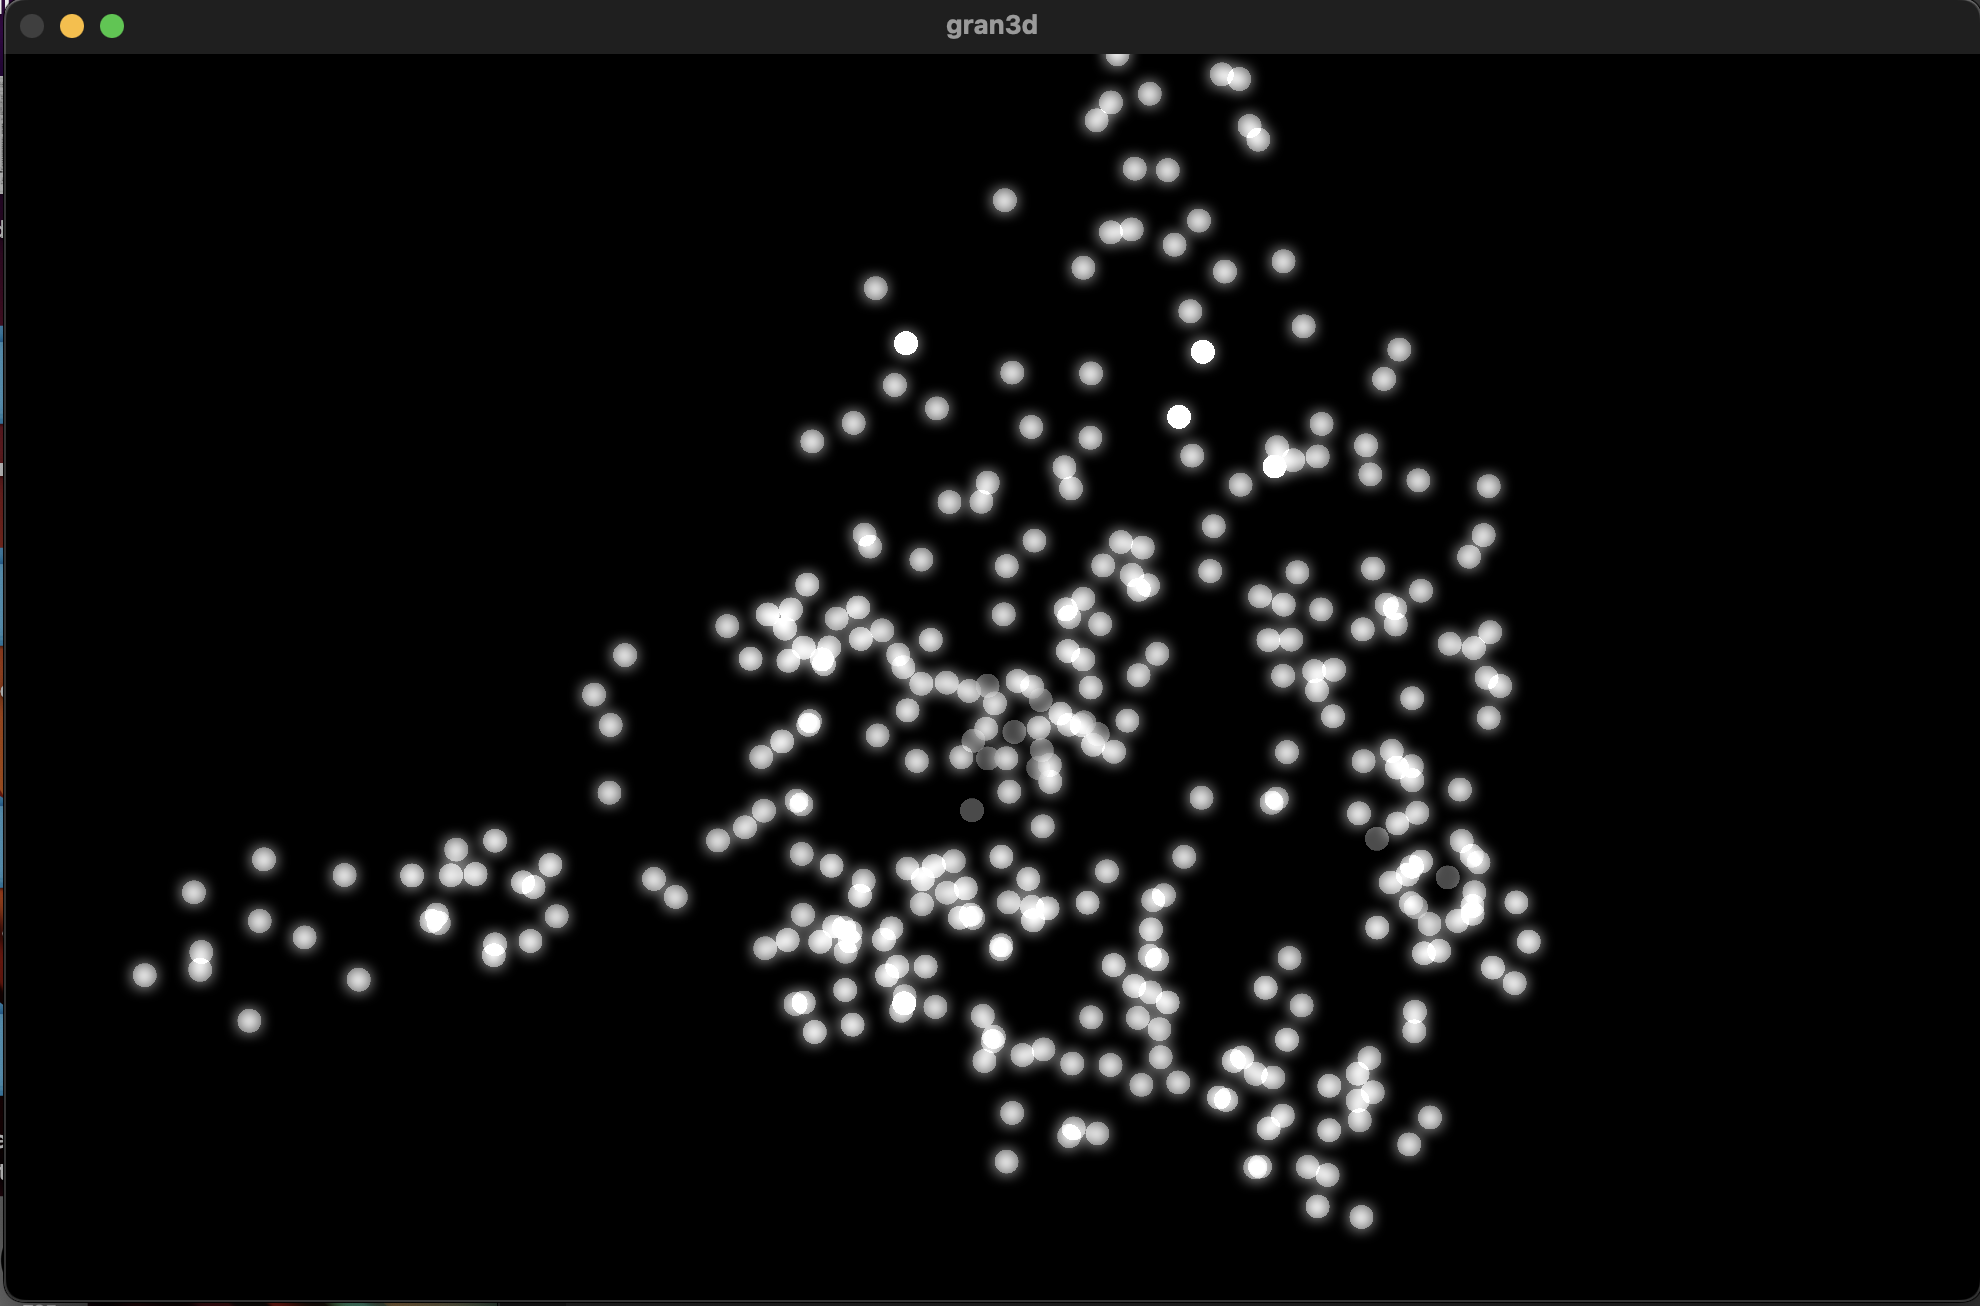
Zoom-out of the 3D corpus space, each dot represents a sample; dimmer dots are deeper on the Z-axis
Results
Unfortunately, I don’t think my vision for this cycle translated to reality as well as I’d hoped it would. One of my biggest issues was that I left on an option that locked the camera to (0,0,0) in the space. This caused a major decorrelation between the movements of anyone using it and the movement in the space. Everyone seemed to struggle with “navigating” the corpus space much more than in the 2D iteration. Once I got rid of this attribute during our discussion afterwards, people understood what was happening better right away. I think the camera was also just a little glitchy since MediaPipe isn’t the *best* at detecting depth, which caused it to jump around wildly. I think if I were to continue with this 3D idea, I would have to incorporate a depth sensor in some way so that all 3 dimensions are accurate.
In my first cycle, I also included the MediaPipe landmark camera feed in the projector image as a sort of monitor for movement. In this one, I made the decision not to include it, as I’d hoped the movement in a 3D space would translate more intuitively to the user. However, I was really surprised that most everyone actually missed its presence. I think the playfulness of the little dot stickman moving around on screen must have provided a nice counter to the cacophony of sound. For this reason, I made a point to include the landmark skeleton in the final version.
Here’s a short recording of Alex using the system. As you can see, it was not very precise. Additionally, something in the analysis created a lot of sample points with that shrill high pitch sound that frequently plays. I don’t know where this came from, but it taught me to always check the samples when I’m working with tools like FluCoMa.
While this cycle was a bit of a fail in meeting the goals I had, I think it actually gave me a chance to step back afterwards and examine what the goals I wanted to achieve with these cycles were. Out of all of them, the largest was to create a group experience. This setback caused me to really narrow in on that idea for the 3rd cycle, which I think worked out much better in the long run.
Cycle One: The Movement-Based Sound Explorer
Posted: April 13, 2026 Filed under: Uncategorized | Tags: cycle 1, FluCoMa, MaxMSP, MediaPipe, touchdesigner Leave a comment »As I began thinking about what I wanted to make my cycles about, I found myself gravitating towards a question I had previously been interested in when beginning to work on my senior project at the beginning of the year: How might technology allow for the creation of new modes of musical interface, where the relationship between audience and performer is almost entirely dissolved?
My primary resource was Max/MSP, as I know it best of all the computer music softwares, and I find it very useful for the development of new ways of making music.
Going into this cycle I knew one of the central resources that I could use to help me answer this question was Google MediaPipe–a real time motion capture software that uses webcam input as opposed to dedicated hardware/software that requires mo-cap suits. This allows for systems which anyone can easily interact with, even without knowing how the system works or what each mo-cap landmark is controlling. I handled this part of my patch in TouchDesigner, as the Max integration of MediaPipe has some difficulties I don’t have time to get into here.
My main goals for this cycle were to create an interface to interact with sound that was fun, interesting, but also left room for potential emergent behavior when left in the hands of different users.
The second major piece of software I used was the Fluid Corpus Manipulation (FluCoMa) toolkit for Max/MSP (also available in SuperCollider and Pure Data). This toolkit uses machine learning software to analyze, decompose, manipulate, and playback a large collection (or corpus) of samples. I initially chose this piece of software as one of its modes of playback is a 2D plotter which can map two different aspects of the sample analysis on to an X and Y axis. I thought this would be a perfect interface for MediaPipe control as the base 2D plotter uses mouse input, which I found to be detrimental to using it as an “instrument.”
I had initially wanted to expand the idea of the 2D plotter to a 3D one, as I felt being able to interact with the patch in a 3D space would be much more natural. However, I found expanding the logic to work in 3 dimensions was a much more difficult task than I’d thought, so I decided to stick with the 2D plotter for this cycle.
Results
I thought that I was mostly very successful with the goals I set out to accomplish. Everyone wanted to try out the patch, which I thought was a testament to the “fun” and “interest” aspects of it. The controls were also quickly picked up on, which was a goal of mine, as I’m interested in systems that audiences can interact with regardless if they’re conscious of the mechanics of that interaction or not. I was most interested to see how different people had their own unique ways of interacting with it as well. Chad, for example, was really trying to make something rhythmic and intelligible out of it, while others were going all over the place, or looking for specific sounds.
Some missed opportunities that I want to expand on in future cycles is the use of the Z dimension in controlling the playback of samples, as well as the use of multiple limbs to control playback. As you can see in the video, users were somewhat restricted in how they could control the patch by the Z direction not doing anything, as well as the fact that only the right hand could trigger sounds. By expanding this idea to 3D, instead of two, and allowing for the use of multiple limbs, I think it’ll give people more freedom in how they interact with the corpus of sounds.
This was the first real project I’ve done with FluCoMa, and thus I learned a ton about its mechanisms, particularly the storage of non-audio data in buffers. This is a concept used a lot more in environments like SuperCollider or Pure Data, as Max has some other objects for storing that kind of information. However because of the way the machine learning tools in FluCoMa work, it needs to store all of the information it may need in RAM. This was also the first project I’ve done sending OSC data between different apps on my computer, which had a bit of a learning curve as I discovered OSC data sends as strings, instead of floating point numbers. This didn’t create any real difficulty, as the conversion took no time, but it did make me aware of an important aspect of using OSC (particularly with Max, as certain objects process strings/floats/integers differently).
Pressure Project 2 – The Flipper
Posted: March 3, 2026 Filed under: Uncategorized Leave a comment »Description
The Flipper is a TouchDesigner patch that uses an audio input to create video, and uses a video input to create audio. When used in a network this “cell-block” acts independently by creating entirely new audio and video, instead of just modifying the audio and video it receives. Its modularity lies in its ability to provide other users in the cell-block network with new sources of audio and video, that are themselves generated from other audio and video over the network.
Collective Documentation
Pending
Individual Documentation
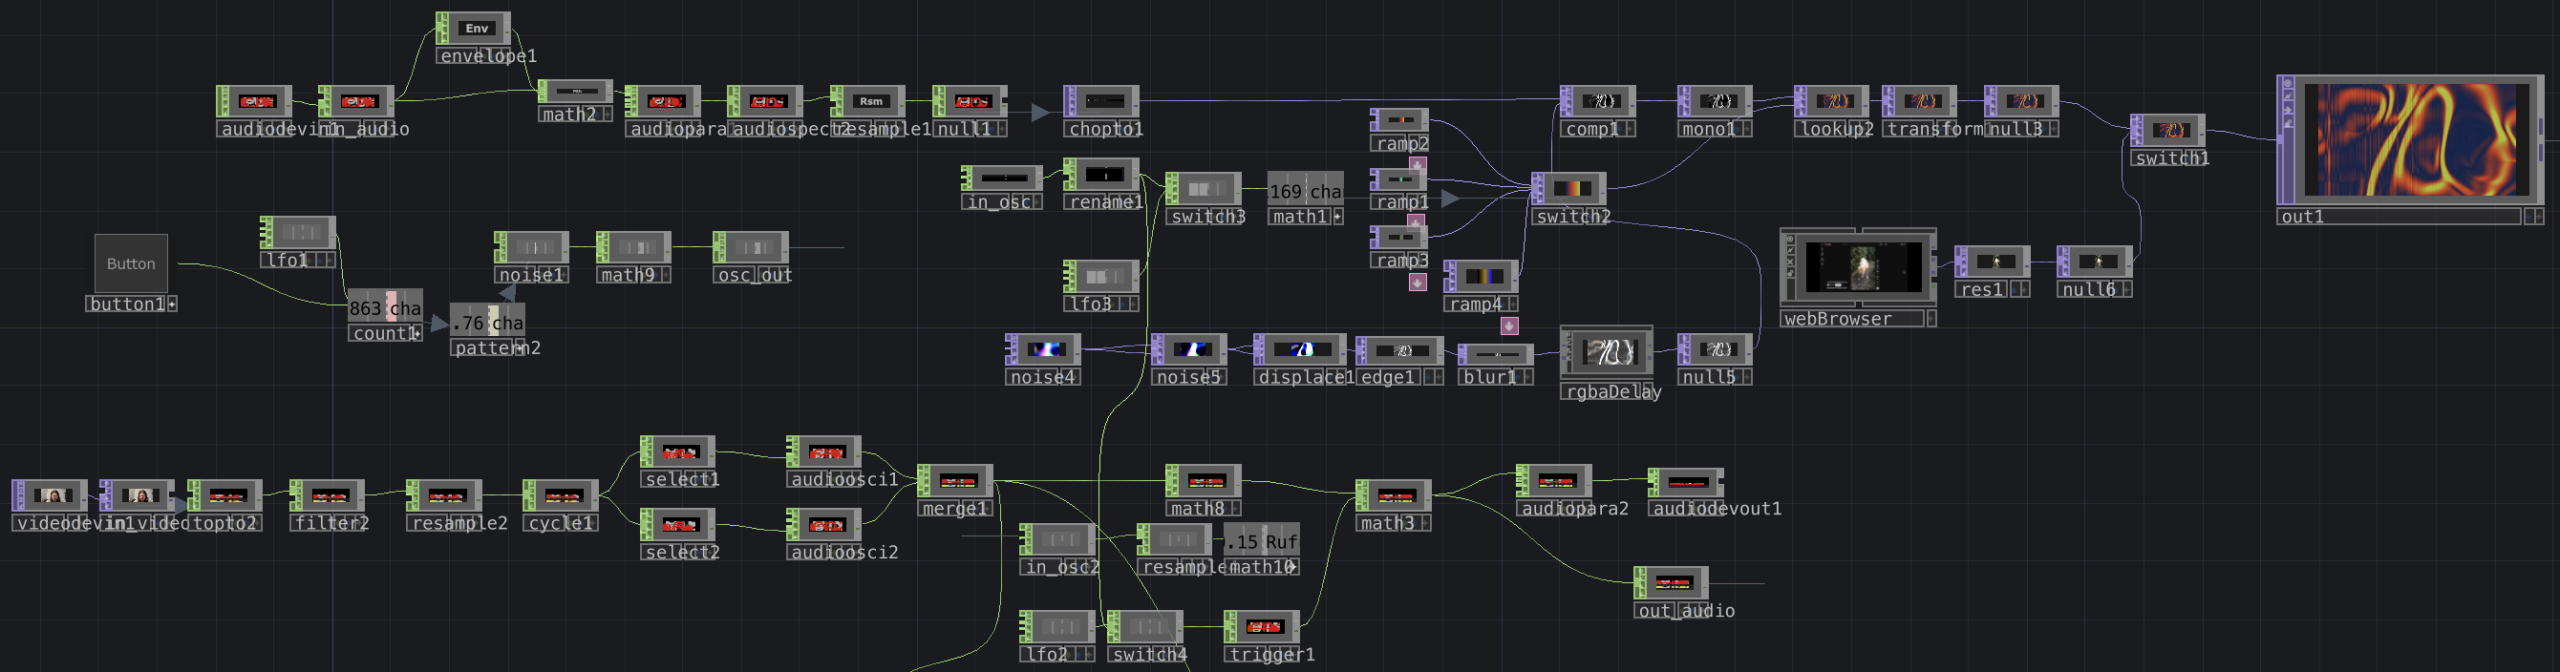
Overview of my cell-block’s network. This is connected to three inputs and outputs on the outside of the container, which connect to other cell-blocks on the network. While there’s a lot on screen, it breaks down into a few simple sections.

This portion of the network takes in audio from over the patch through the in_audio CHOP. The envelope, math, and audioparaeq objects slow the stream of data and boost high frequencies, respectively. This then is turned into a spectrogram and is sent directly to a chopto TOP.
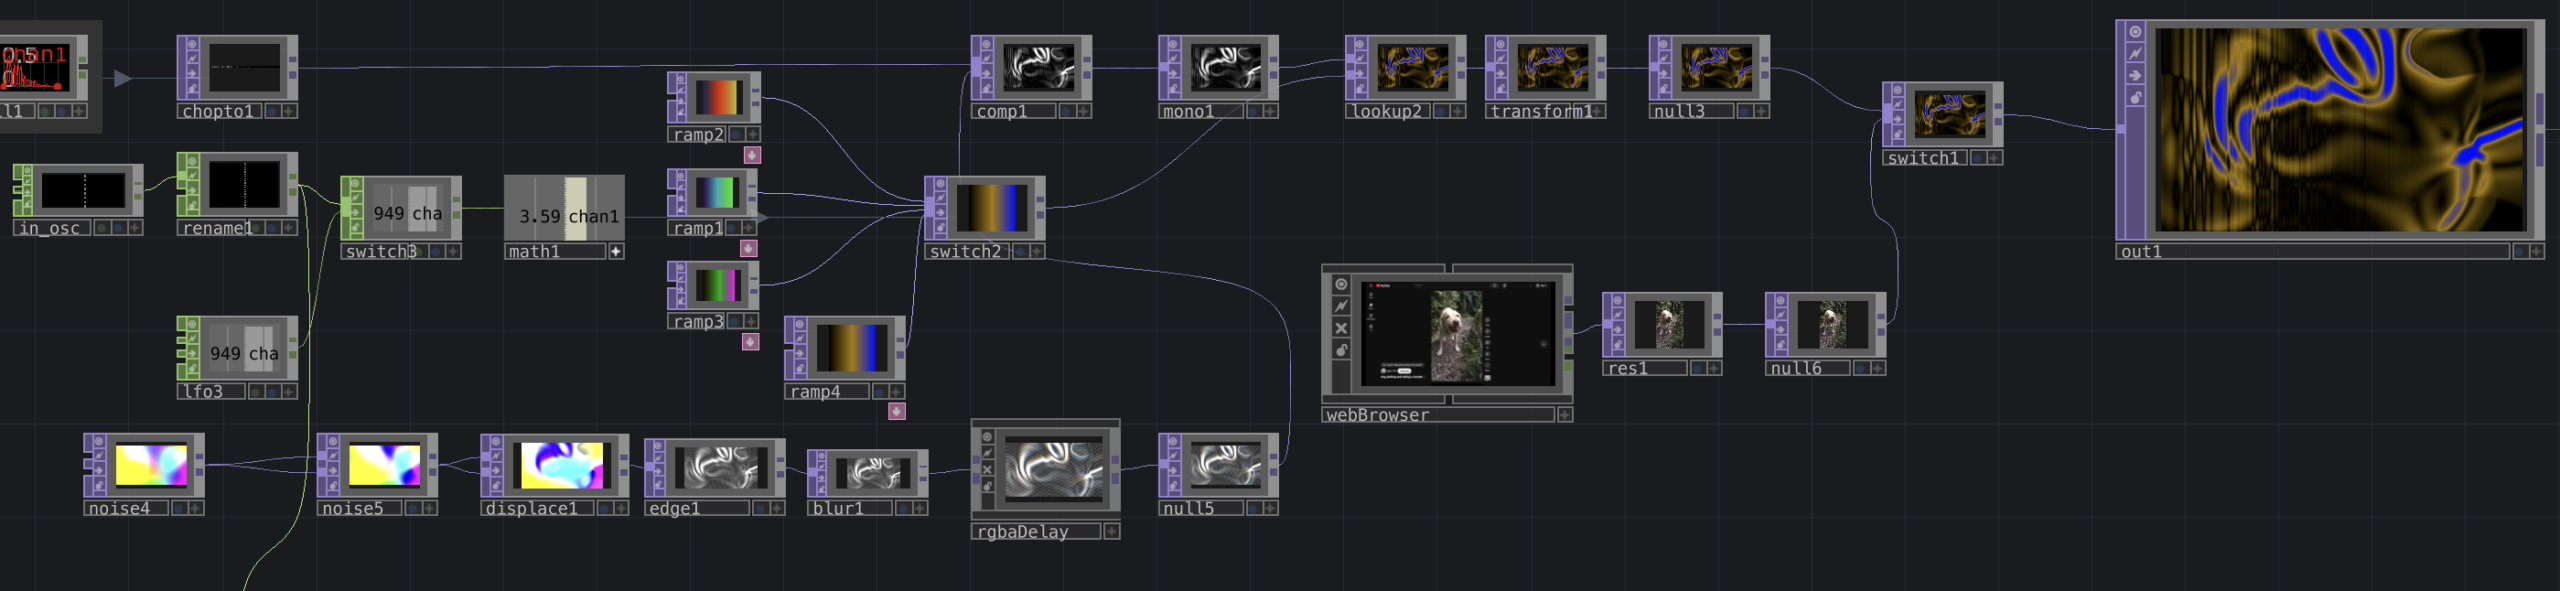
This portion processes that audio spectrum into a new visual. Starting in the bottom left, I use a series of TOPs to create a flow-like visual, which is then composited with the spectrum. This new visual is colored using a series of ramps and a look up TOP. The ramps are cycled through using either an LFO or an input from in_osc over the network. An example of the visuals this produces is below.
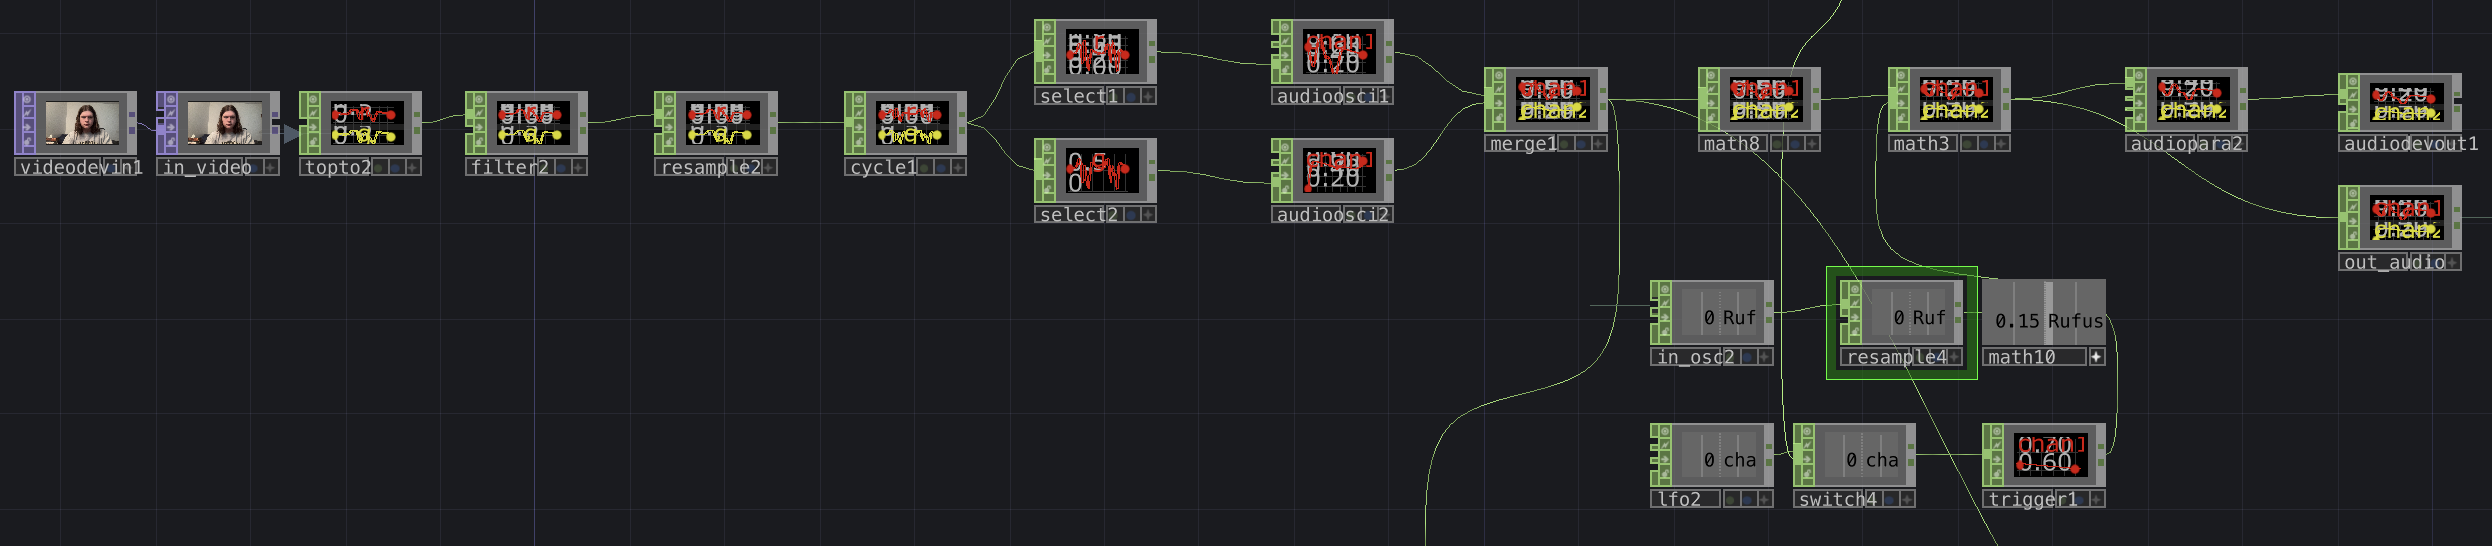
Lastly, this portion of the patch processes video received over the network from the in_video TOP (or in this case, a camera input) into audio. While I didn’t get quite as interesting an audio output as I wanted, I still think I was effective in transforming video to audio. The video that is received gets sent directly to a topto CHOP, which reads RGB values over the X and Y planes of the video. the following objects then reduce the amount of data, and turns those waves into a stereo audio signal by the merge CHOP. This wave is given an envelope by the math objects (I attempted to control this with another osc input but failed to make it work) and is sent out over the network. An example of audio is included below.
Reflection
Since I knew I wanted to flip the audio and video signals inside my patch, the independence of the cell-block was semi-inherent the entire time I was working on it. In order to ensure it was connectable with others, however, I needed to ensure that whatever the patch did was interesting enough, while still clearly using audio and video to influence the opposite output, so that it didn’t just seem like I was generating something entirely new.
I made choices about what to include and exclude primarily by trying to figure out what I could accomplish that was reasonably within my ability, but still interesting. For example, I’ve worked with spectrogram imagery in the past, so I knew I would be able to incorporate that the easiest. On the opposite end of that, I attempted to integrate FM synthesis into the audio part of my patch to get some more interesting sounds. However, with my inexperience in TouchDesigner, I found it really difficult to make FM work, so I chose to exclude it.
One thing that surprised me was how even if cell-blocks didn’t work “perfectly” together, they still were able to have some sort of interaction, even having unexplainable interactions. I was also a bit surprised how underutilized the OSC data we were sending was. I know I was personally having difficulty in doing something interesting with the OSC signals, but it was interesting that it was a widespread problem. I think this might come from the fact that the other signals we were working with were both very tangible. Since the OSC input was just a number, I think we were a bit less motivated to find an interesting way to use it, as opposed to the audio and video, which we could immediately do interesting things with.
I think we didn’t have quite enough time to experiment with combining our cell blocks in different ways for a lot of emergent behavior to emerge. But one that I enjoyed seeing was how the visuals would layer together through 2, 3 or 4 cell-blocks. I thought that all of the cell blocks were interesting on their own, but the most interesting visuals were created through the combination of several together. This relates to Halprin’s cell-block framework through the idea that we can each create our own module that does its own thing, but the most exciting behaviors only emerge once we begin to combine the different cell-blocks, and experiment with how they feed into each other.
Download Patch
Pressure Project 1: The Musical Spiral
Posted: February 13, 2026 Filed under: Uncategorized Leave a comment »Description
The musical spiral is a self-generating patch that randomly generates shapes at different sizes and positions, and spins them in a random direction for a random-length cycle. When these shapes cross a line, they (are supposed) to trigger a random musical note.
Documentation
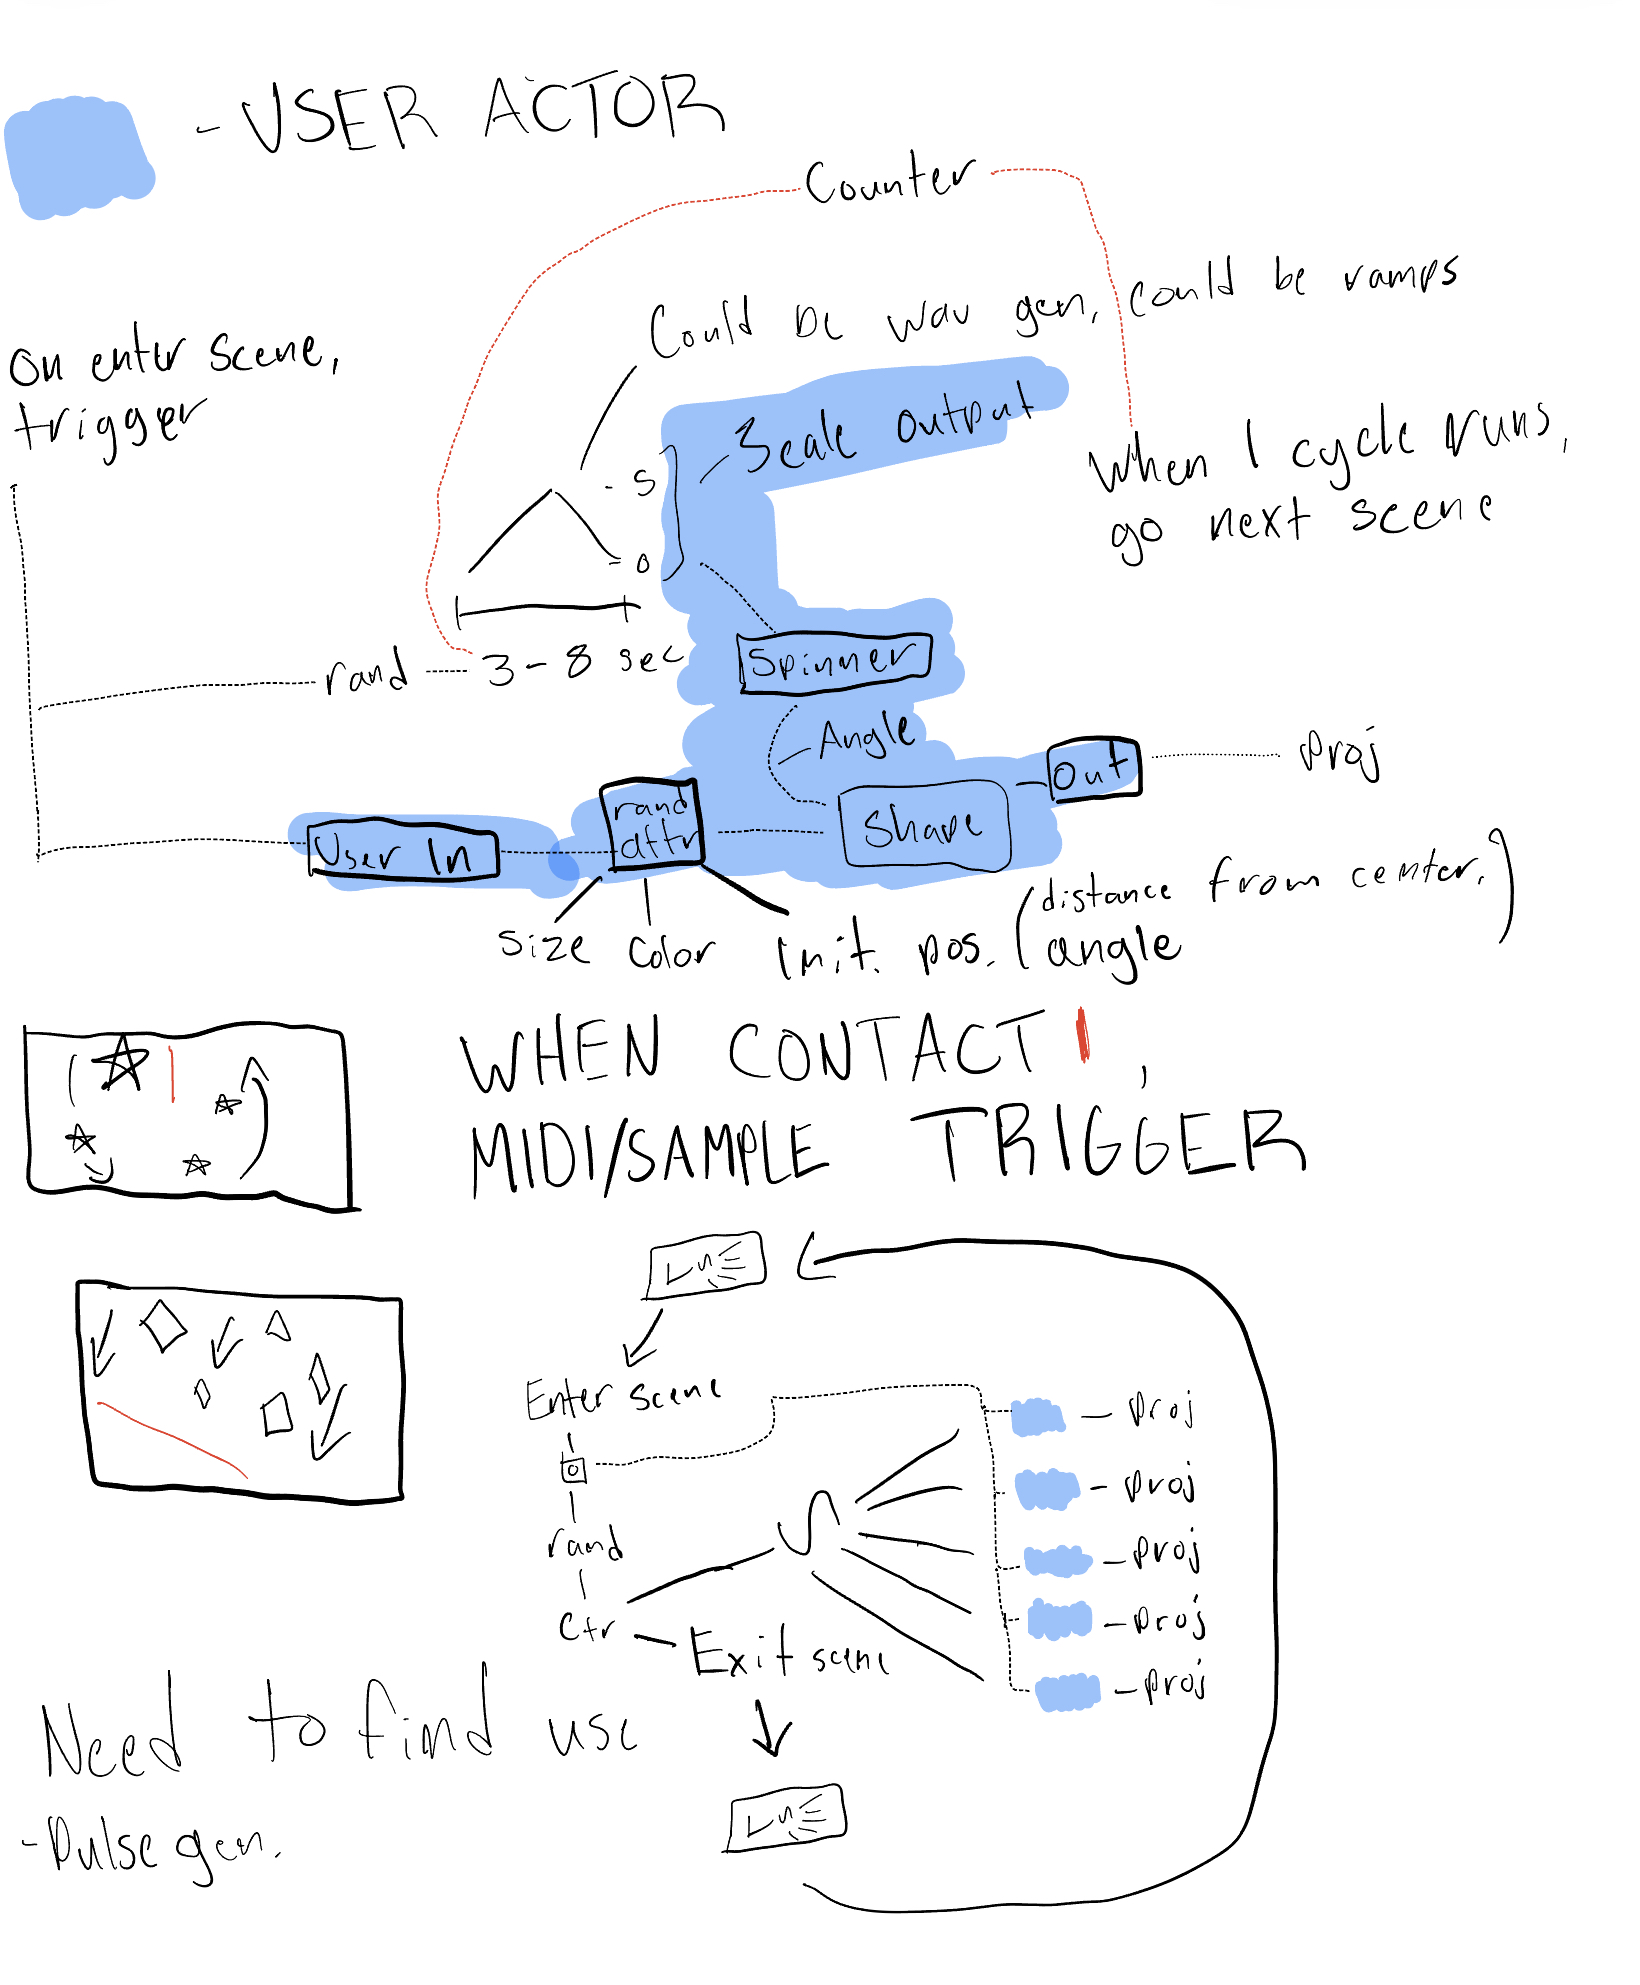
Before starting to code my patch, I did a quick sketch for my idea of what I generally wanted the patch to do to help me save time later. While I had to change and add a bit outside of this, this essentially became the outline of what my code would look like.
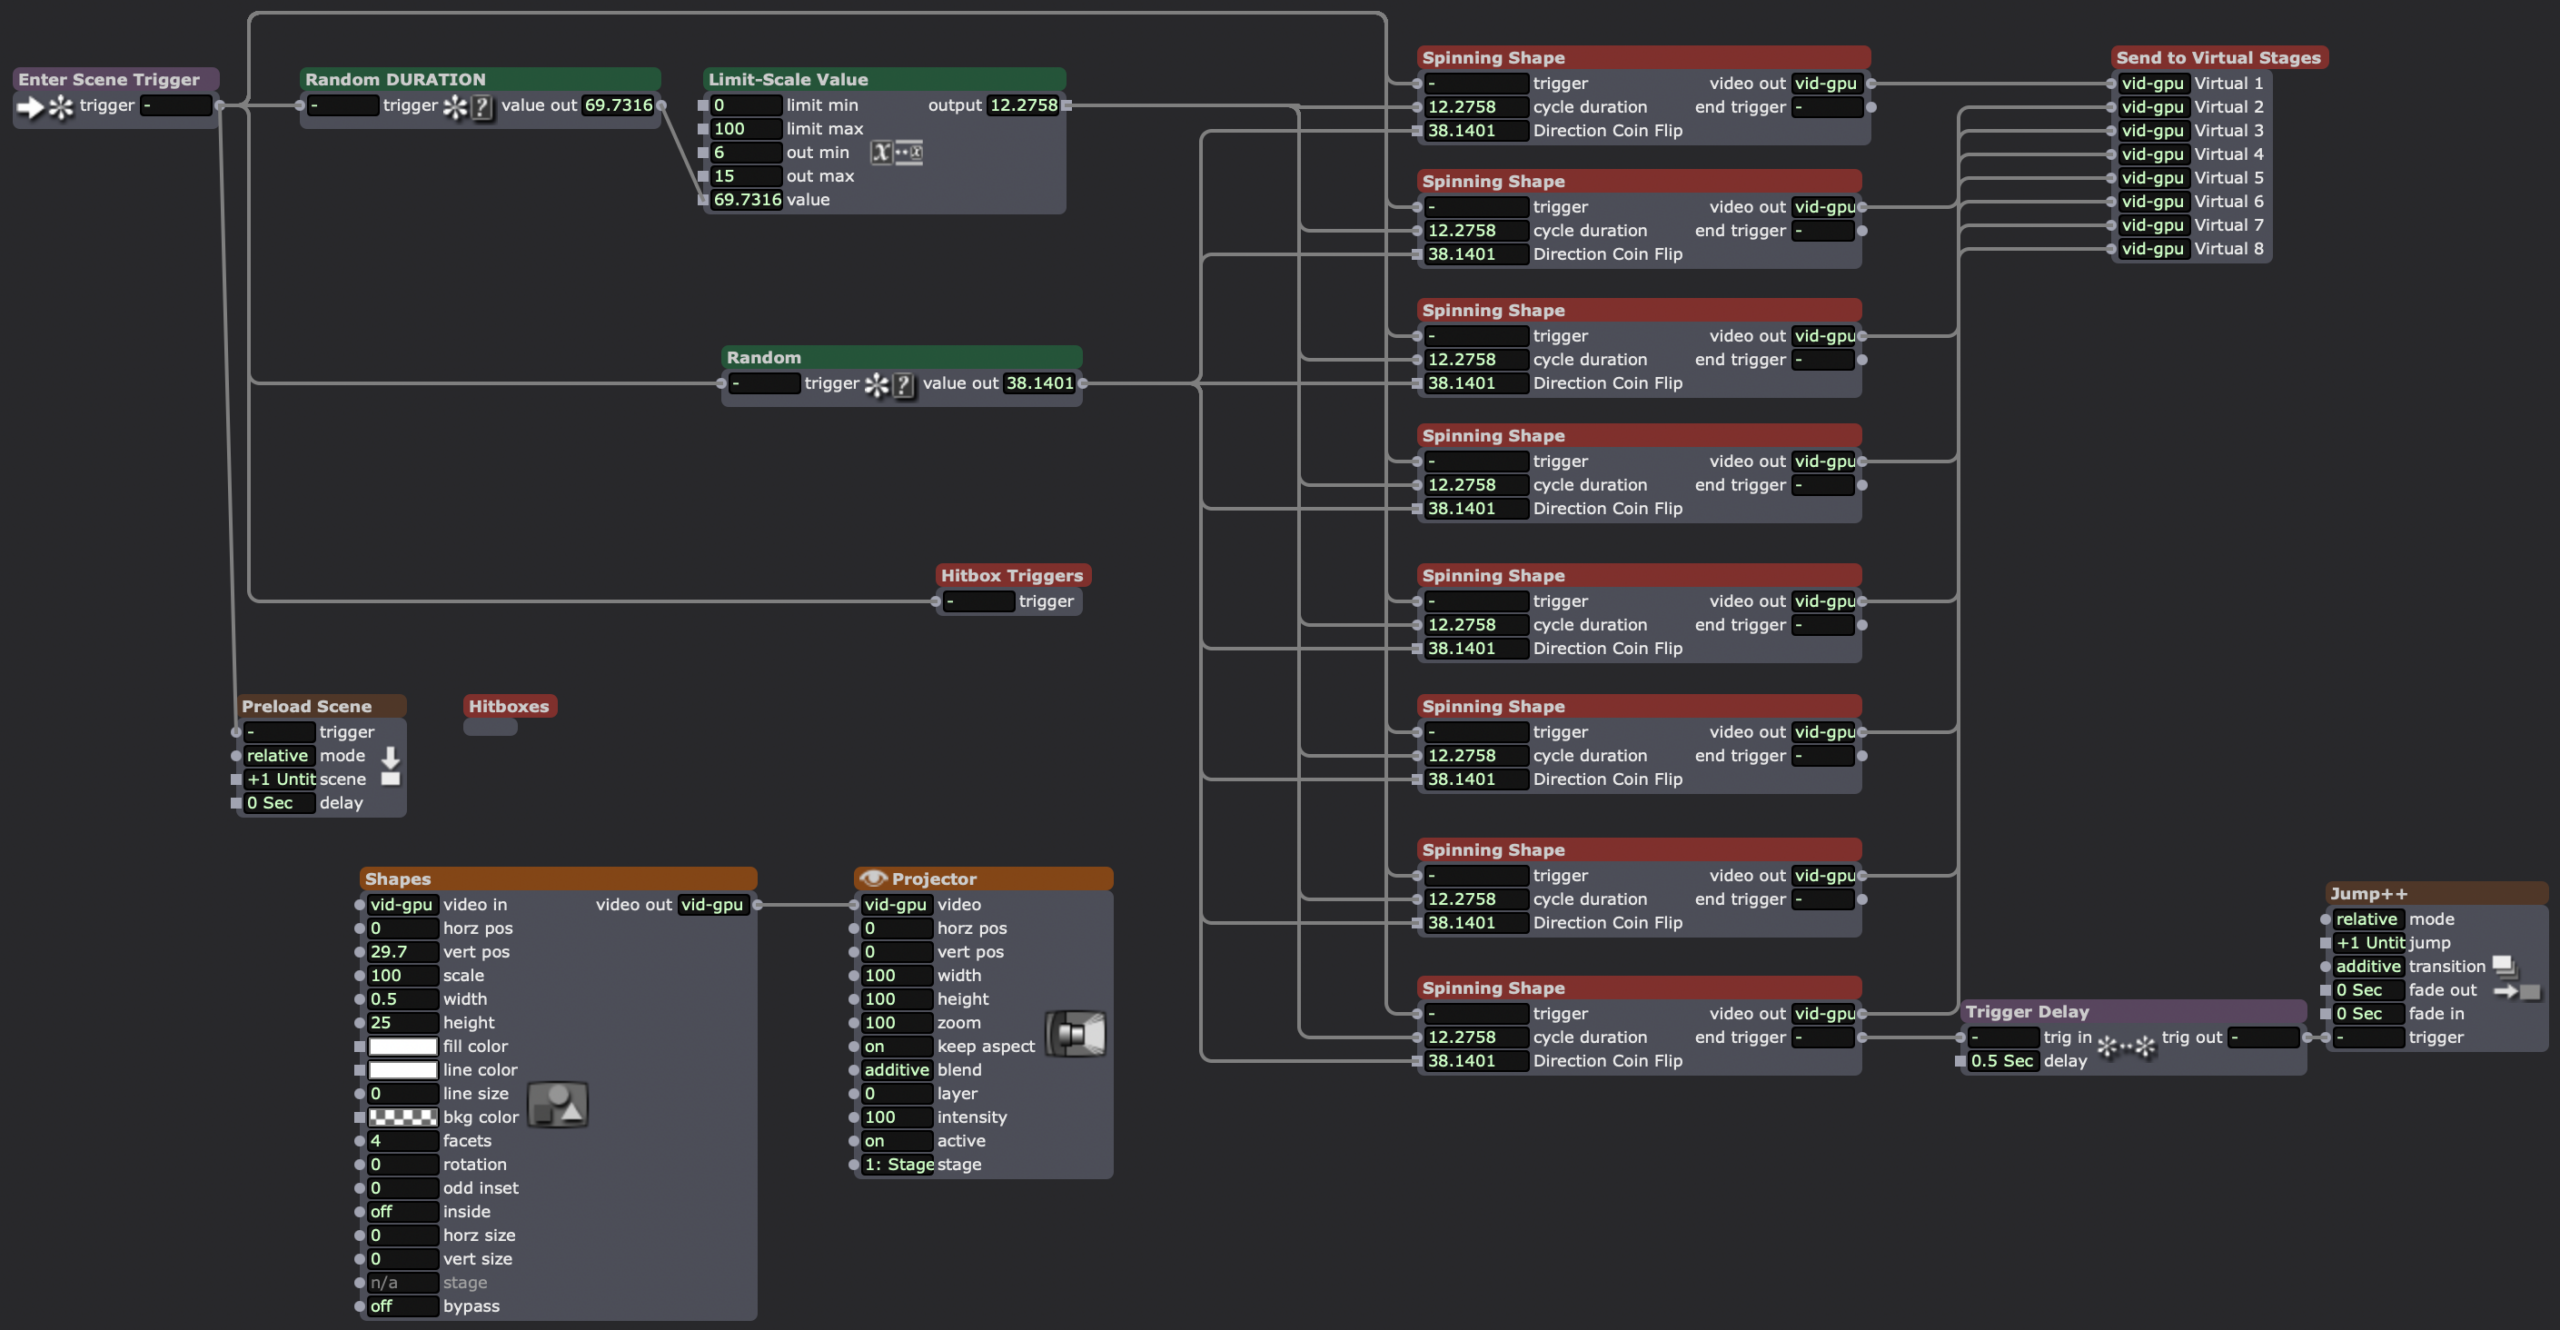
The overview of my patch, upon entering the scene, the random numbers for duration of the cycle and the direction of the spin are generated, since they’ll be applied to all of the shapes. When the cycle ends, the spinning shape user actor sends a trigger to the Jump++ actor, going to a duplicate scene, which jumps back to the first scene.
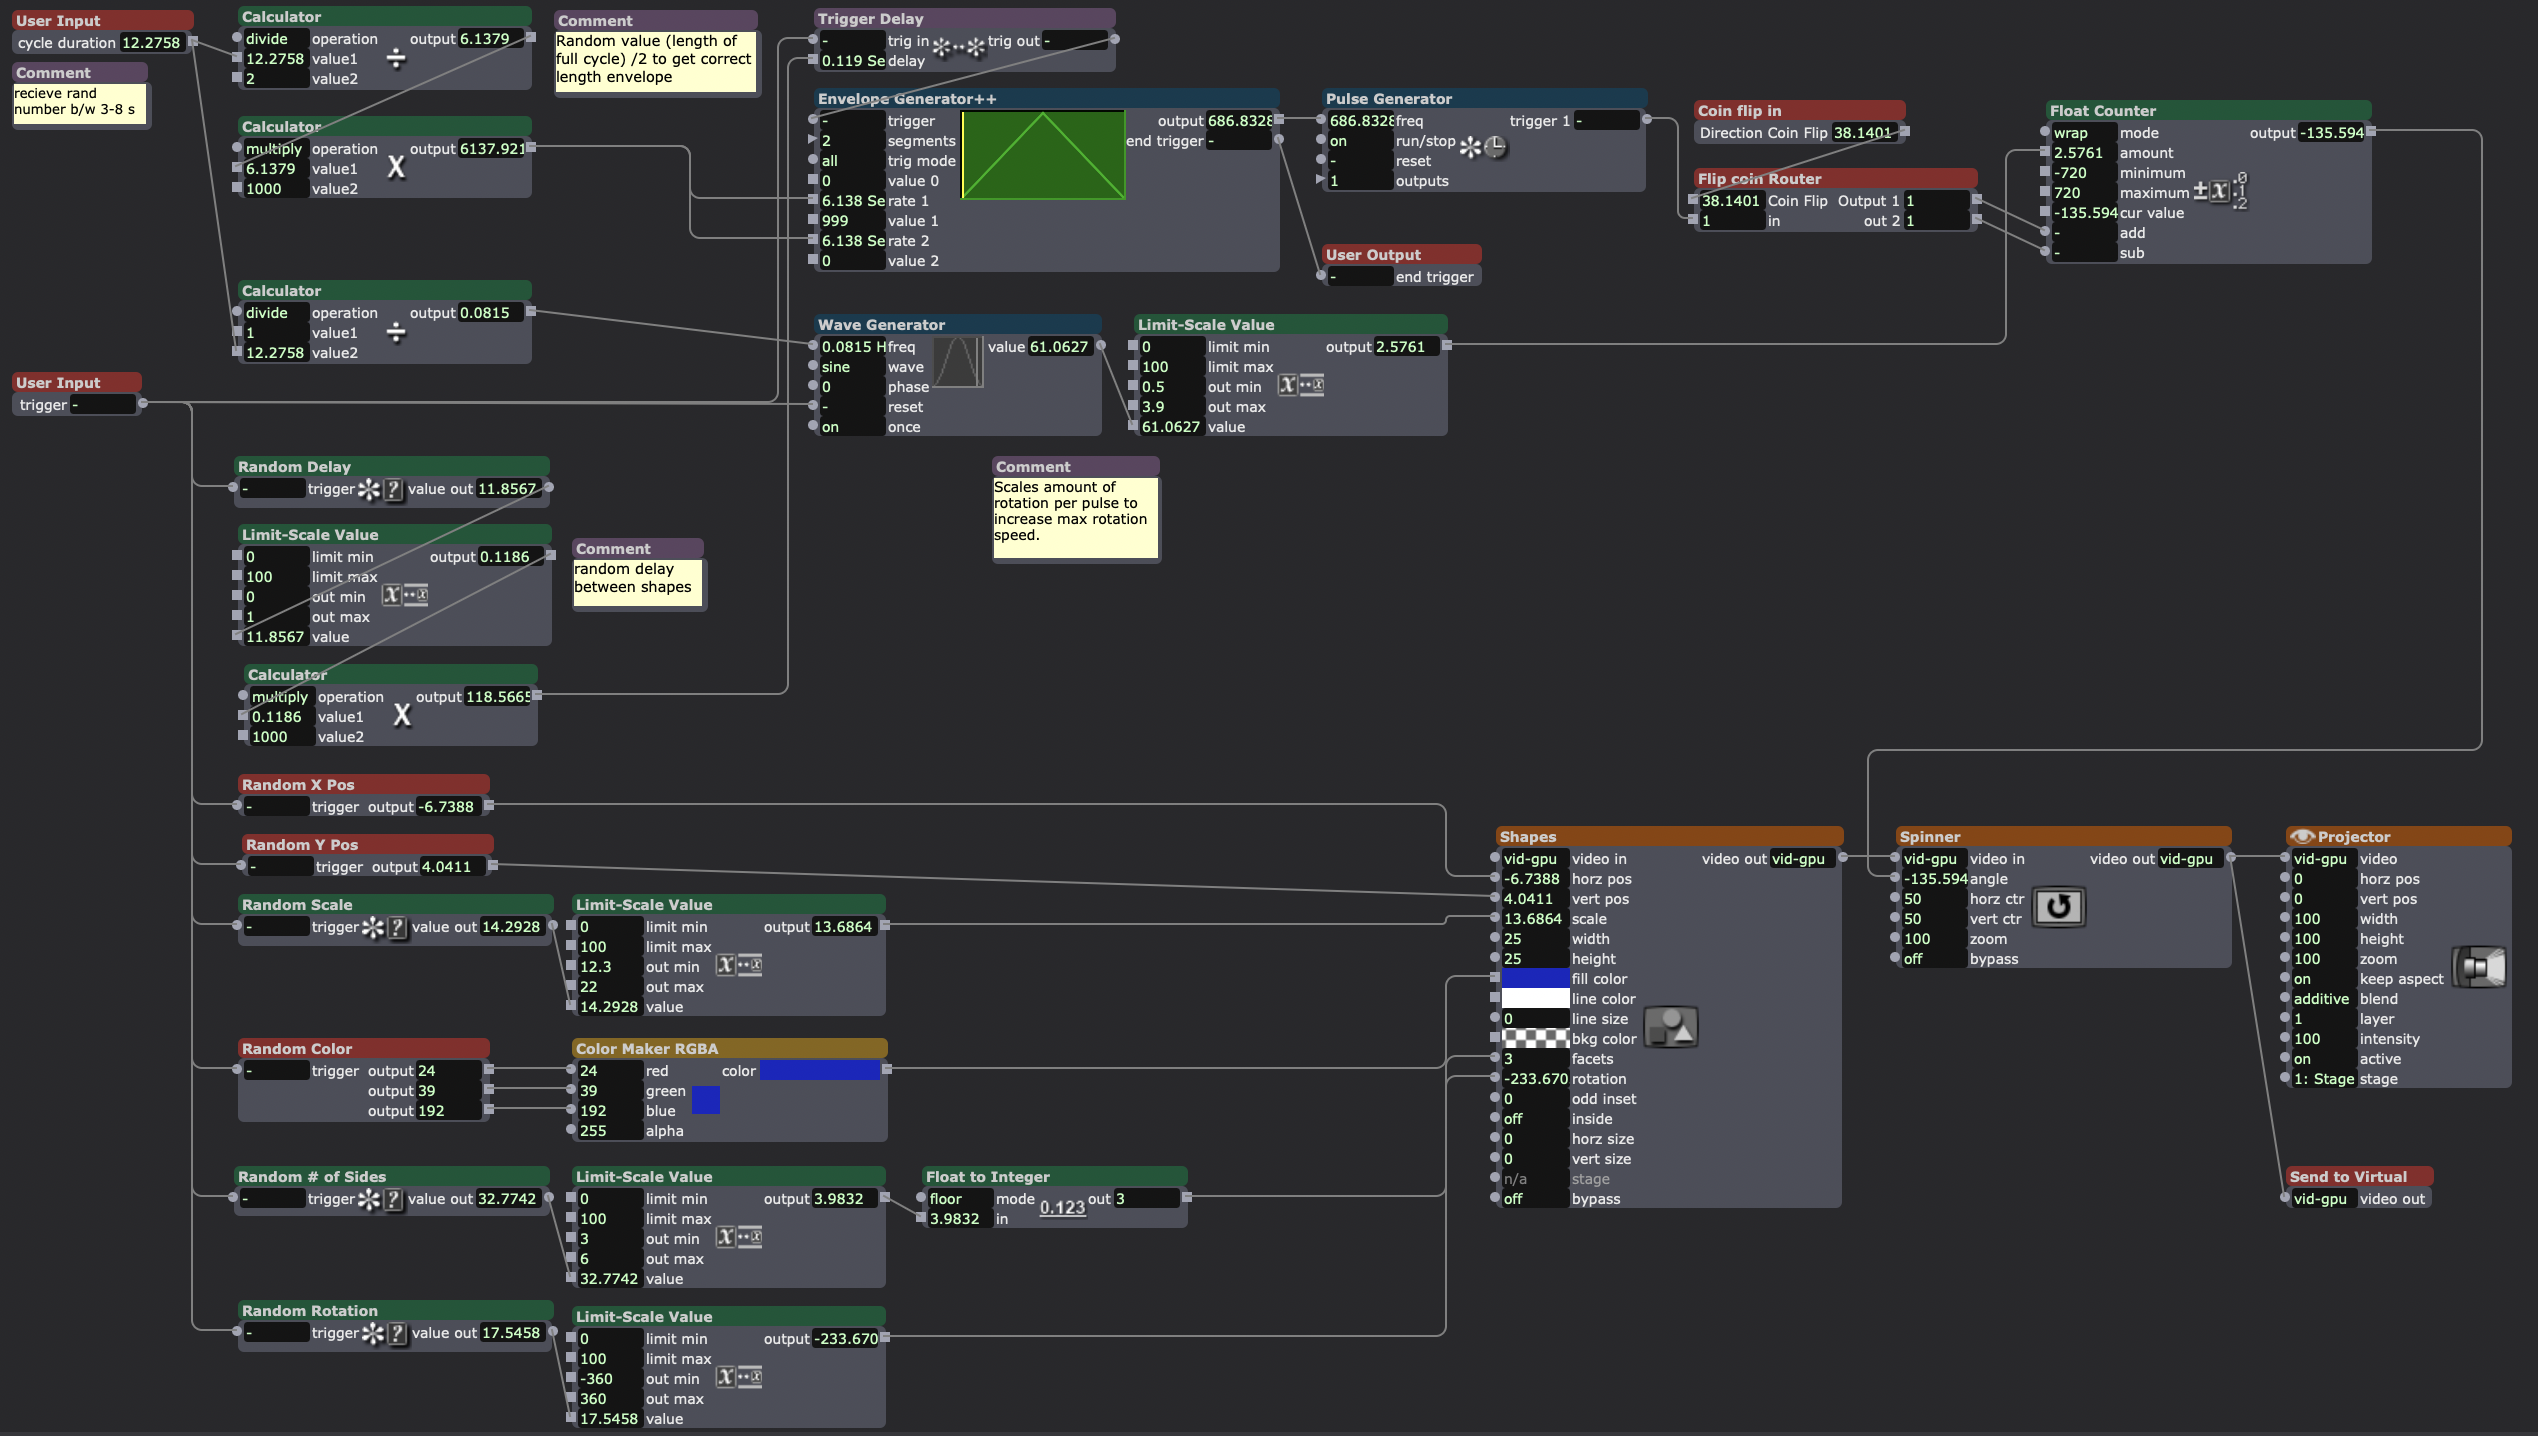
Inside my “spinning shape” actor, the final result of my original user actor sketch. The bottom 2/3rds of the screen contains the actors randomizing the attributes of the shapes actor. The top 3rd deals with spinning the shape clockwise or counter-clockwise (decided by the “flip coin router” user actor) for a cycle of random length with a random delay from shape-to-shape.
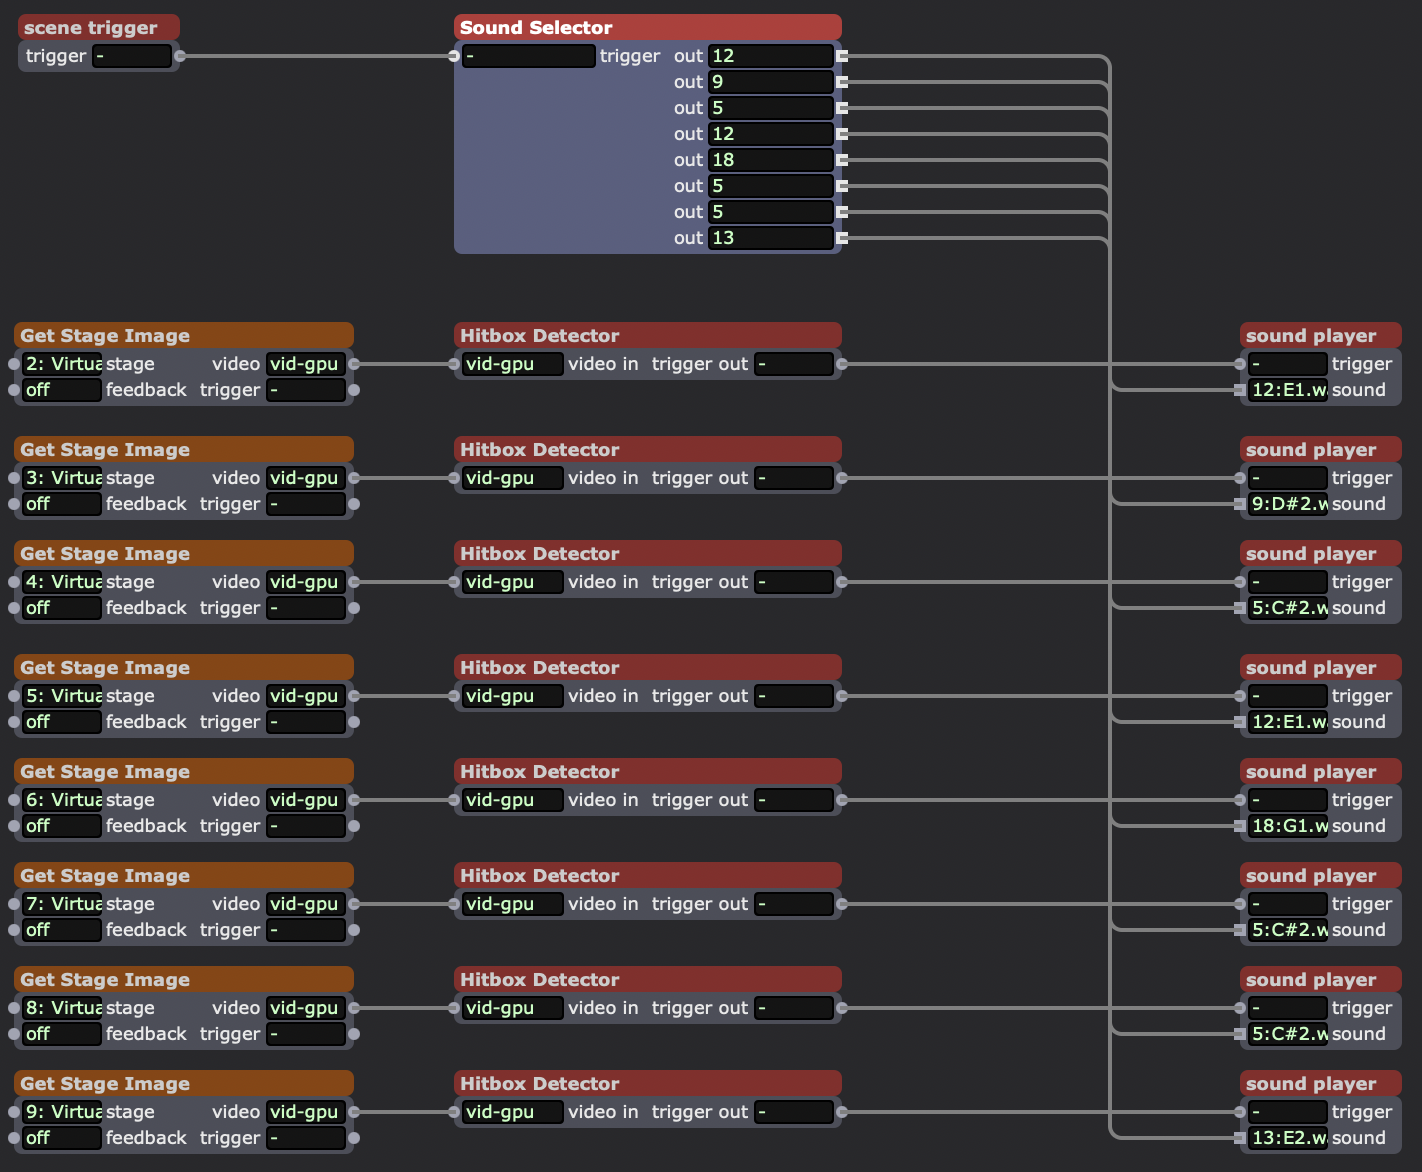
Inside my “hitbox trigger” user actor. This actor takes each shape (which has been sent to its own virtual stage) and looks for when it makes contact with a small white rectangle I sent to every virtual stage in the “hitboxes” user actor. When it makes contact, it was supposed to trigger a random sound in the “sound player” actor.
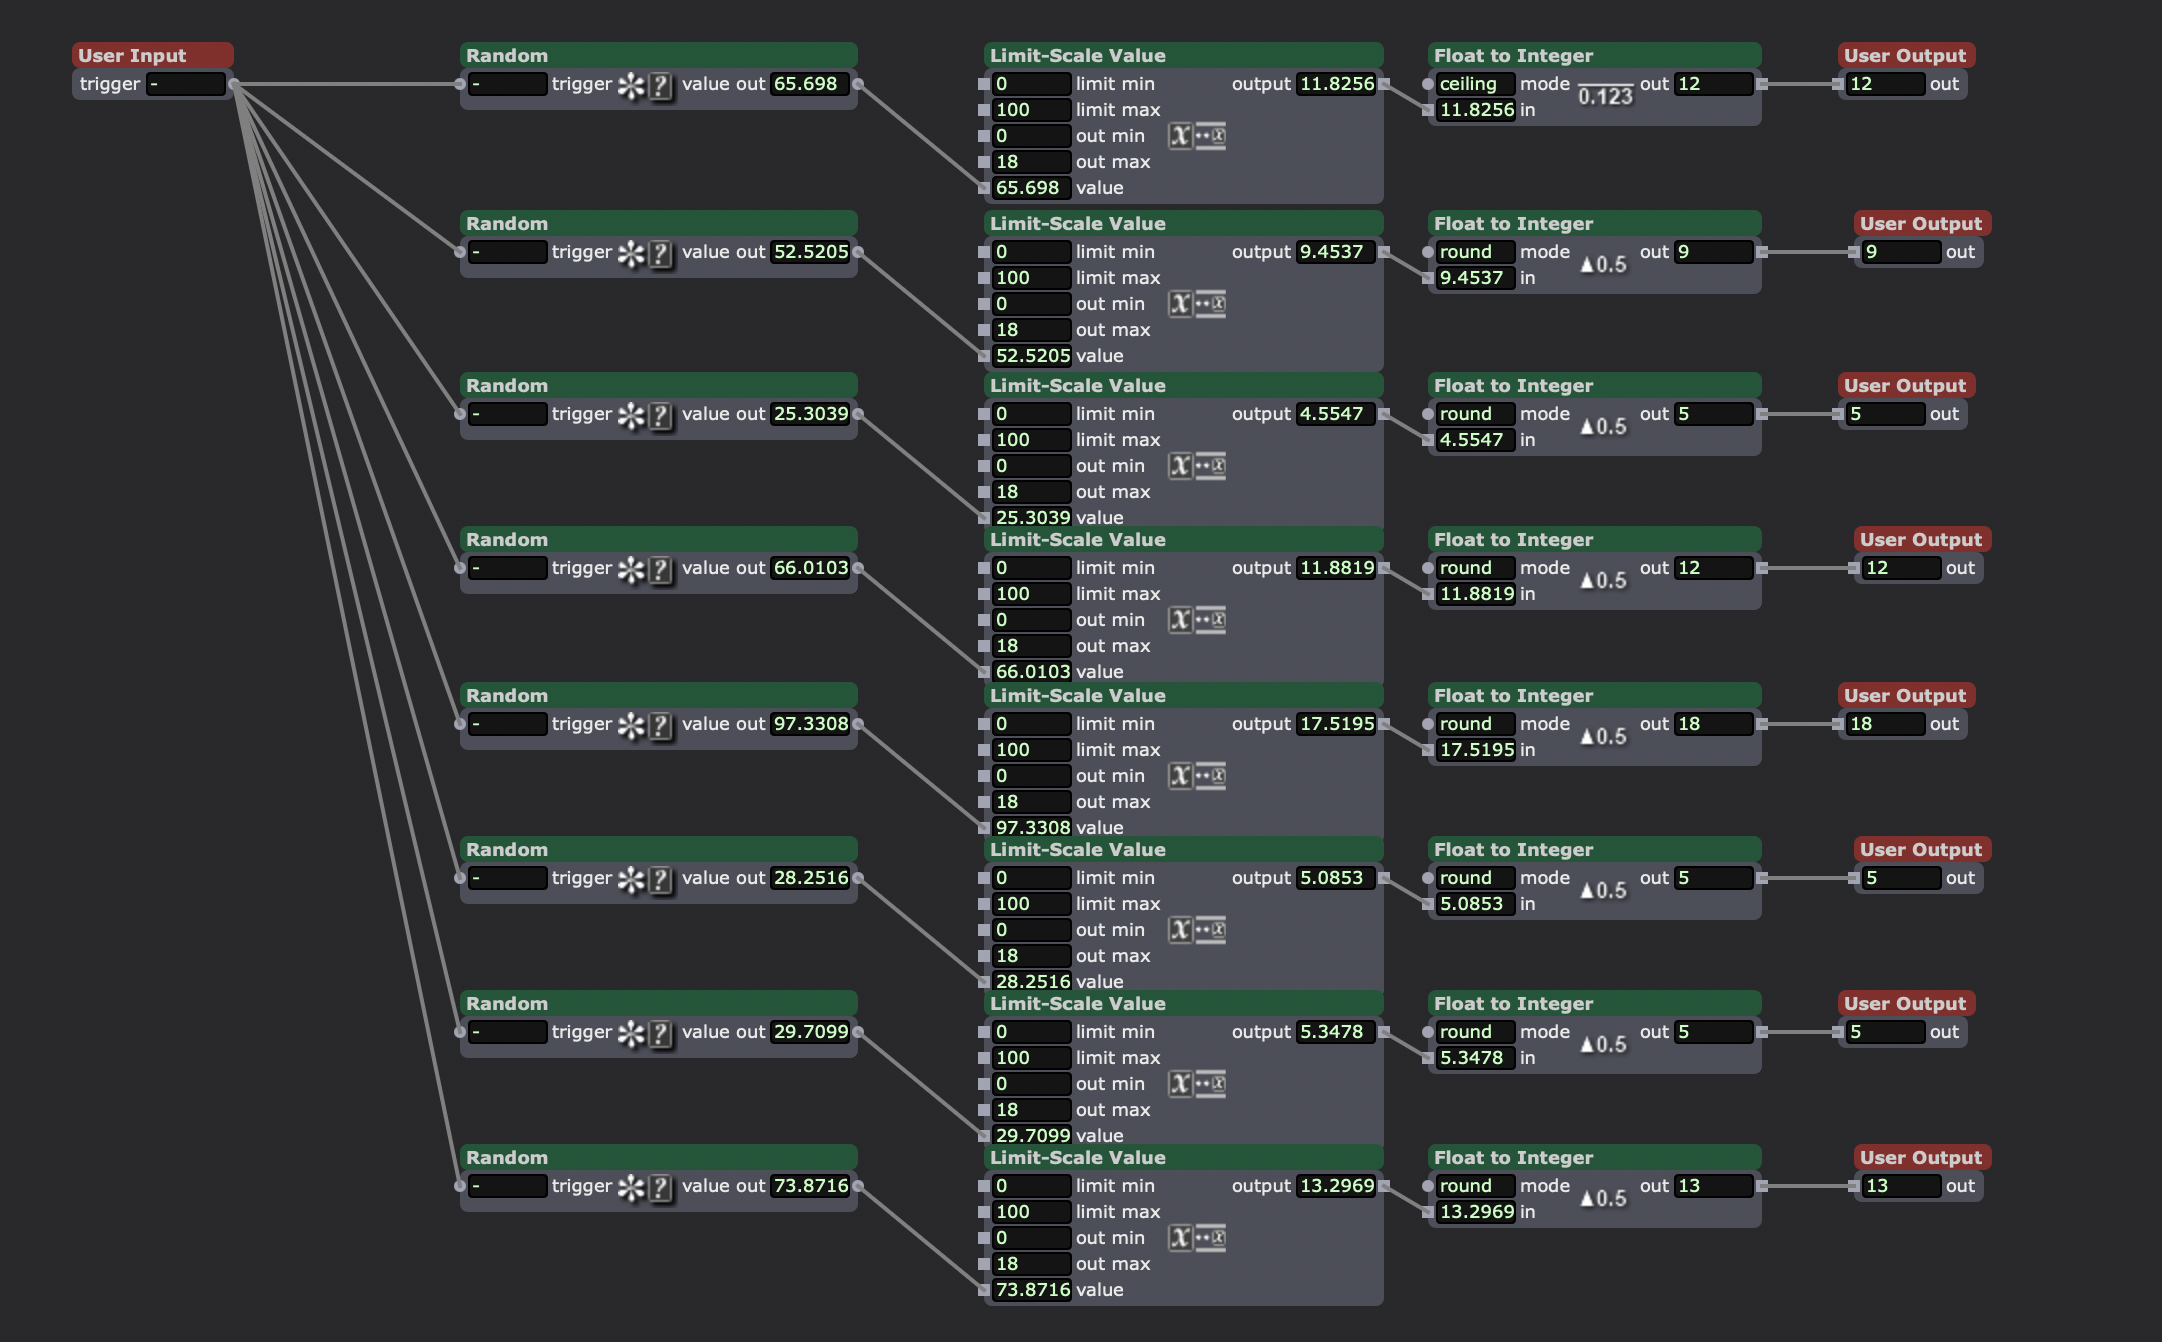
Random selection of 18 short samples of single notes. Chromatic from C3-F4.
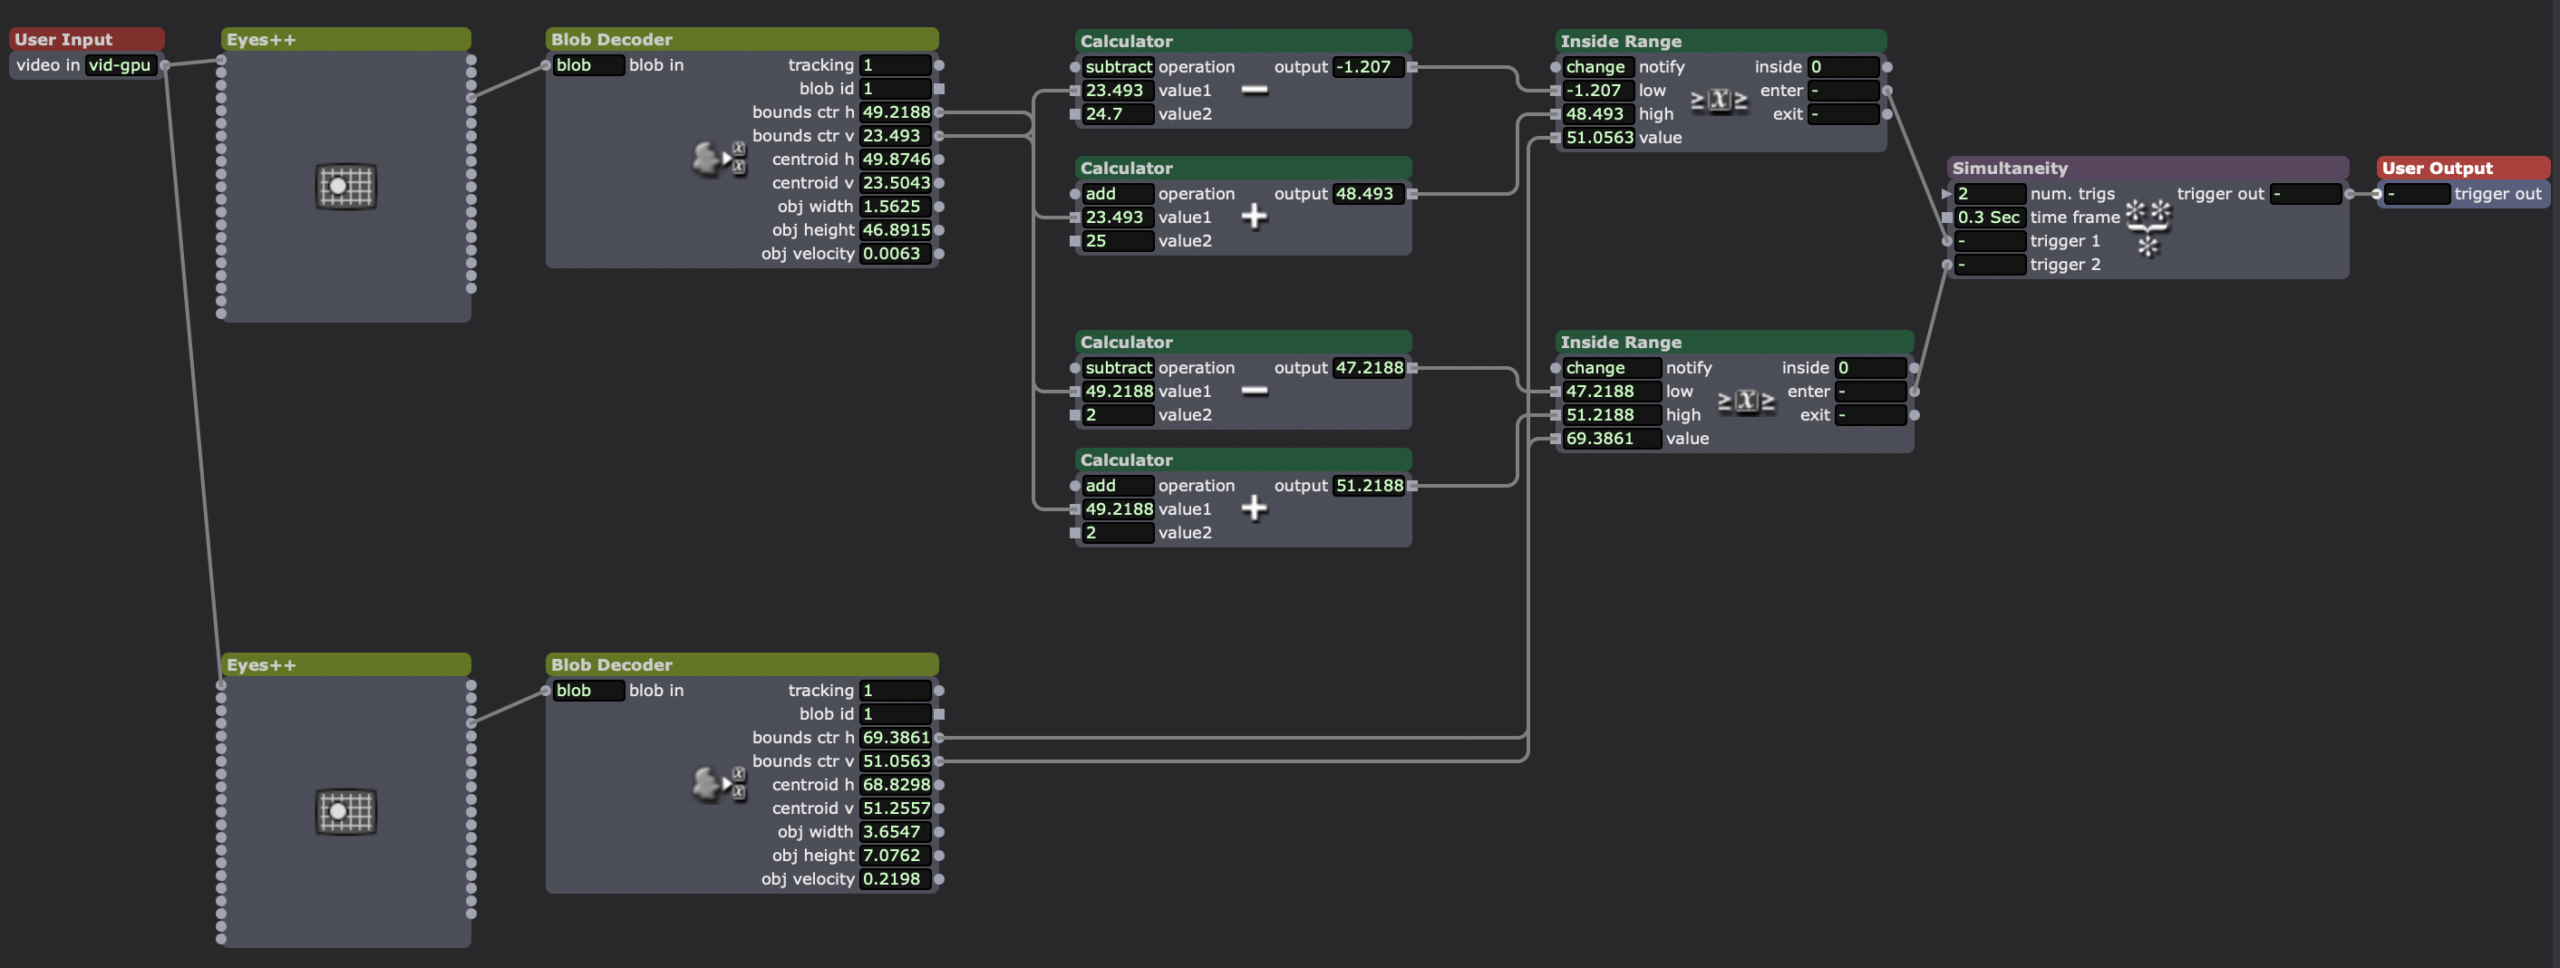
How I checked if one of the spinning shapes was inside the same area as the hitbox, sending a trigger when they “made contact.”
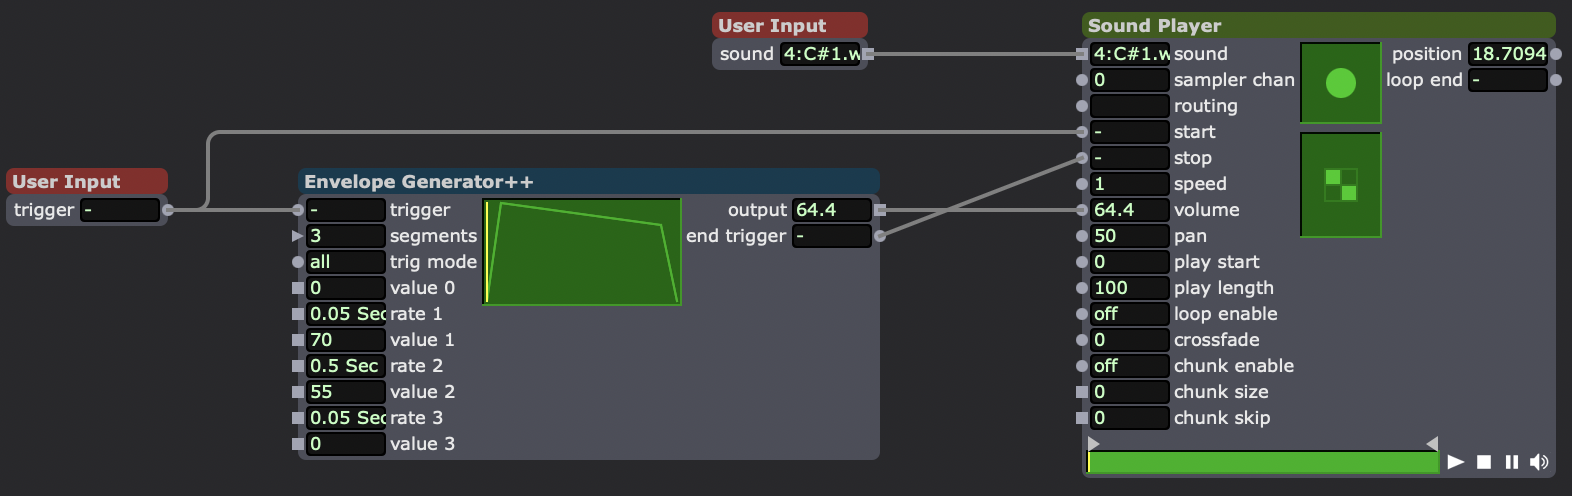
Sound playback user actor.
A sample of how the final version of the patch behaved. The white line (actually smaller than the hitbox) was left on screen to provide a reference for when the sound was supposed to trigger (despite it not working that way due to the high load of the patch).
Reflection
One of the best ways I managed the 5-hour time constraint was to make the sketch of my idea as seen earlier in this post. By working backwards from my initial idea to solve the problem the best I could on paper, I gave myself a framework to easily build off of later when problems or changing ideas arose. It also meant that I had a general idea of all the different parts of the patch I would need to build before I actually started working on it. This also guided what I would include/exclude in the patch.
While my patch didn’t end up working the way I wanted it to (sounds were supposed to trigger immediately when the shapes crossed the line, unlike what is seen in the above video) I was very surprised how this didn’t “ruin” the experience, and how it even created a more interesting one. With the collision of the shapes and the white line being decorrelated from the sounds, the class became seemingly became more curious about what was actually going on, especially when the sounds would appear to trigger with the collision after all. I was also interested to see the ways people “bootstrapped” meaning on to this patch. For example, Chad had noticed that in one of the scenes, the shapes were arranged in a question mark sort of shape, leading him to ask about the “meaning” of the arrangement and properties of the shapes, despite them being entirely random.
During the performance of the patch, I unlocked the three achievements concerning holding the class’s attention for 30 seconds. I did not make someone laugh, or make a noise of some sort, as I think the more “abstract” nature of my patch seemed to focus the room once it started.
AI Expert Audit – The Elder Scrolls
Posted: February 5, 2026 Filed under: Uncategorized Leave a comment »Source Material
Since for my topic, I chose to pick a game which already has a wealth of in-universe literature written, my primary source was a pdf of every book that exists in the series, found at LibraryofCodexes.com. I also chose to upload a small document I found giving a general timeline of the series and its history, as well as a short video covering the history of the world.
I chose this topic as over the course of the last 10 years, I’ve likely played up to (or over) 1000 hours of these games over 3 different games. Even more so, I’ve listened to countless hours of videos doing deep-dives on the world’s lore as background videos while working or driving. I think the reason I find myself so drawn to it is the relationship between world-building and experience in RPGs. As I learn more about the world, the characters I play can have more thought out backgrounds and motivations, improving my experience, which makes me want to learn more about the universe. I was also interested to see how the AI would handle sources not about the game itself, but rather about a range of topics that exist *inside* the game.
The AI-Generated Materials
Podcast
Prompt: Cover a broad history, honing focus on the conflict between men and elves
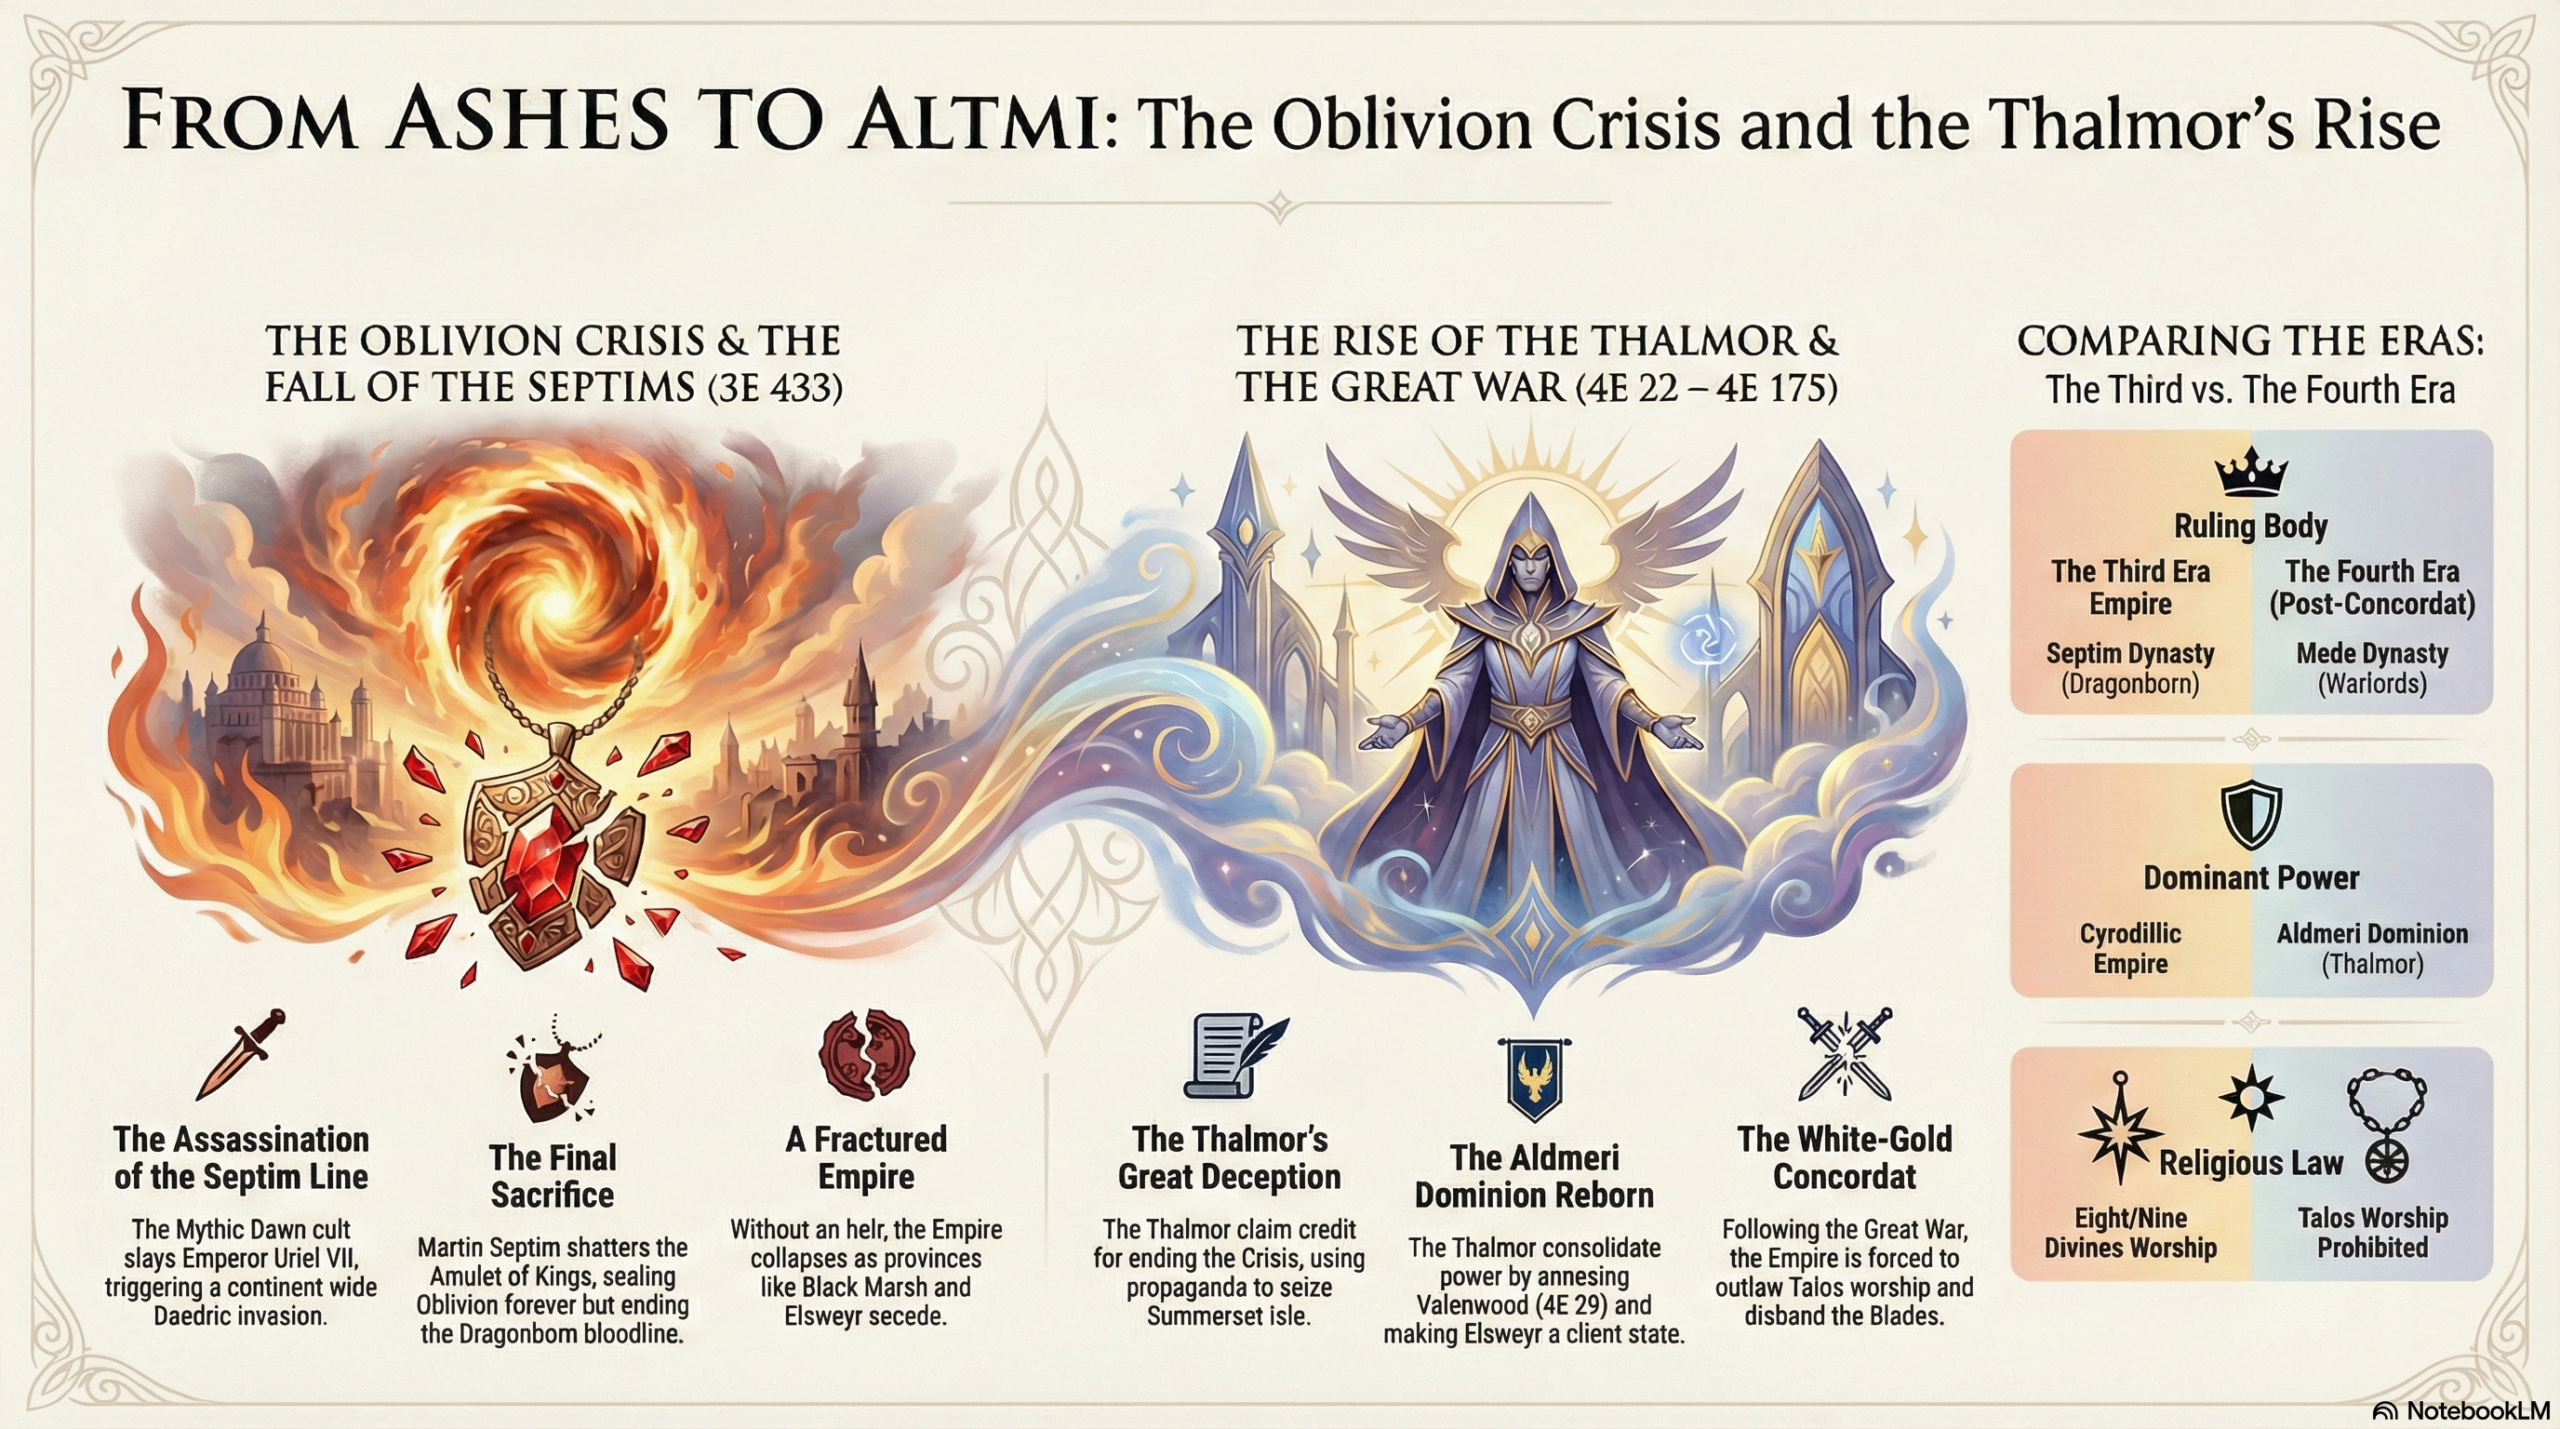
Infographic
Prompt: Make an infographic about the Oblivion Crisis and how the High Elves capitalized on it.
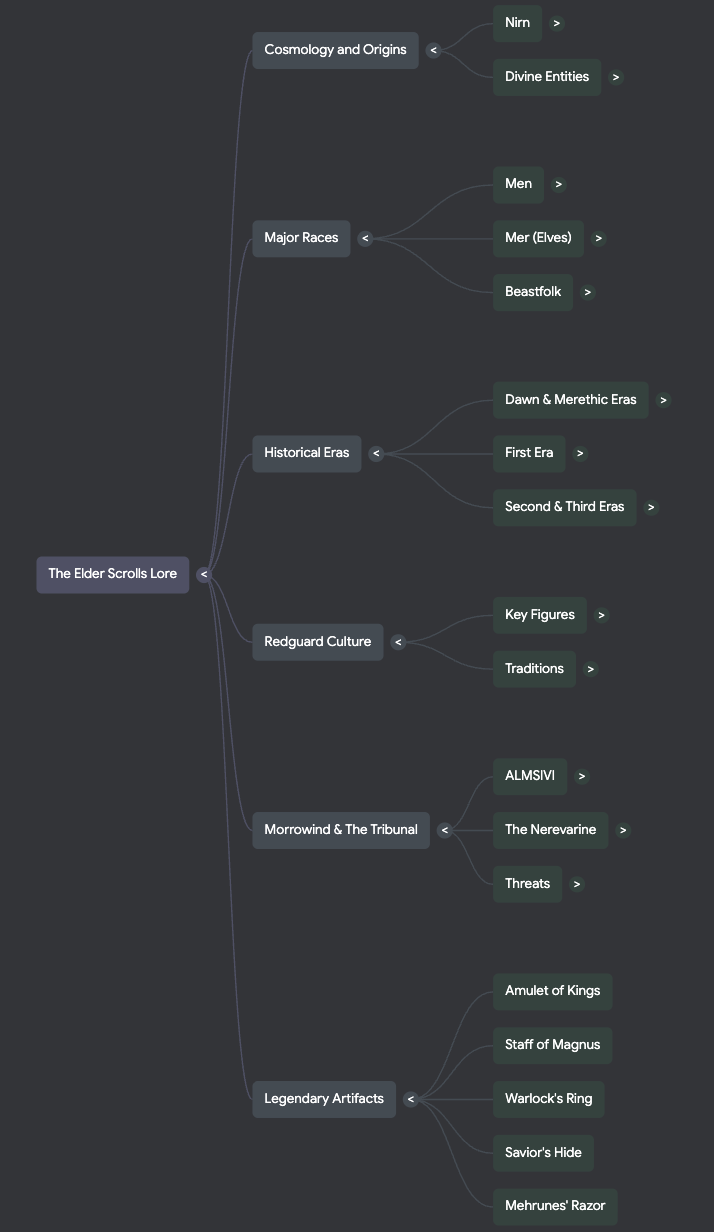
Mind Map
Audit
1. Accuracy Check
Overall, the AI got a lot right about the historical origins and monumental events in the world of the game. There are some topics that are somewhat confusing that I was surprised it got mostly right. It didn’t get much wrong, but it did make a few strange or even incorrect over-generalizations. For example, in the podcast it said that the difference between the two types of “gods” in this world is “the core takeaway for how magic works”, which it is not. Even weirder, it got the actual origin of magic in the games correct later on.
2. Usefulness for Learning
I do think that these sources would be incredibly useful for someone with no prior knowledge of this series to easily learn about the world they exist in. The podcast does a good job at simplifying the most important events for understanding what’s happening and the motivations of different factions. However there are a lot of nuanced ideas that it completely misses, which could be due to the length being set to normal. The mind map does a really good job at connecting important ideas of the universe together. However, it also places too much importance on certain topics, such as a handful of weapons, only one of which has any real importance to the larger plot. Lastly I thought that the infographic did a nice job at laying out the events that I prompted it to, but there were a few spelling errors.
3. Aesthetics of AI
One of the strangest things I encountered doing this was the ways that the AI would try to make itself sound more human during the podcast. For instance, it would stutter, become exasperated at certain abstract topics, and even make references to memes not found in the sources. The AI definitely has a certain voice to it. I don’t know how to exactly describe it, but in the podcast it seems to talk like everything it mentions is the most important thing ever, and the other AI “voice” always seems to be surprised at what the other one is saying. I actually thought that the AI did a pretty good job at emphasizing the same things a human expert would. However it somewhat glosses over the actions of the player characters during the games, which I think a person would focus a bit more on.
4. Trust and Limitations
From this, I would probably warn a person against trusting the importance the AI might place on certain topics as well as the connections it makes between topics in generated educational materials. It also seems to avoid any sort of speculative ideas whatsoever, which I found odd since there were books in the sources which do theorize on certain unknown events or topics. I’d say the AI seems the most reliable in taking the information you give it and organizing it into easily consumable chunks. However, this only seems to be at a surface level, and when it tries to draw conclusions about topics, it tends to fall flat or make incorrect assumptions. I think in this case, you’d be better off just watching a video someone has already made on the games.