Cycle 1: Big Rainbow Piano
Posted: April 6, 2025 Filed under: Uncategorized Leave a comment »For Cycle 1, I started by identifying a few resources I wanted to explore. Since attending the Touch Designer workshop at the beginning of the semester, I have been searching for an opportunity to utilize the software and explore the tools that were provided to us from Sudo Magic. I was able to get my hands on the “Geo Zone Detector” Comp which allows you to easily draw a rectangular volume and use the point cloud data from a depth sensor to detect when a person or object is occupying that zone.
I decided to use the basic framework of a human sized piano keyboard to test this system. I began by drawing the “geo zones” in the Comp to be approximately the size of a person, one meter by two meters by three meters. This was roughly the width and height of the person with enough length to occupy a human sized “key”. Then the next step was to align the depth sensor in the Motion Lab. As part of the “patch lab” in the Touch Designer workshop, I learned to use the point transform Top to orient the pint cloud to the Motion Lab x,y,z coordinate system.

Once I had the point cloud and spatial trigger boxes aligned and working in unison, I tried to attach a specific sound frequency to each “geo zone”. I started by using the audio oscillator chop. This produced a pure sine wave that I could dial in the exact frequency of each note on the piano. Getting this to work with the Geo Zone Comp was straight forward, but I did have to alter the settings for zone “trigger threshold” so that it would detect only an arm of a leg and not just the whole person.
The pure sine wave was able to prove that the concept was working. However, I was disappointed in the tonality of the sound and I wanted to find a way to trigger an actual piano. I wanted to find a solution that wasn’t too complicated and did not require too much additional hardware. I have dabbled with Garage Band for many years and I was well aware of the plethora of virtual instruments available in the software. My previous experience with a MIDI keyboard lead me believe this would be a plug and play type of solution.
Unfortunately, the world of MIDI and Apple drivers is not exactly “plug and play” but there is a pretty easy to use “audio midi setup” app that allows you to see the devices plugged into your computer. A few google searches led me to the IAC or inter-application communication driver. This allows one software program to send MIDI messages to another without the need for MIDI hardware attached. This is exactly what I needed. However, the MIDI out Chop in Touch Designer does not fill in the necessary coding to talk directly to other devices. A few additional google searches led me to the simple channel plus note syntax. Once I inserted all of the triggers in this format, the Geo Zone Detector was triggering a MIDI keyboard in Garage Band. Success! I spent over an hour listening to different synths and virtual instruments before I landed on “Gritty Bells” which had a pleasant tone, but also a rhythmic component that essentially “played a song” when you hit different notes together.

In an effort to connect the Isadora skills I had already learned, I wanted to draw some graphical boxes similar to the “shapes” actor. I found the “rectangle” sop to be essentially the same thing. You can draw a box and also define a line color, fill color and line weight. This process created the “keys” of the keyboard. In addition to triggering MIDI notes, I connected the same triggers to the ”fill” parameter of the boxes. The end result was the key lighting up and playing the notes simultaneously.
Finally, I projected the boxes on the ground and tweaked the keystone to line up with the boxes already defined in the Geo Zone Detector. I decided to roll out a strip of white Marley to help the top down projection reflect off of the floor and then refined the keystone and geo zones further so they aligned. This was a bit of a trial and error operation. The Marley was a fixed size so I started by aligning the projections and then scaled the Geo Zones to match. I could easily tweak each section, or the entire point cloud using the point transform Top.
When it came time to present, I added some color projection on the MOLA cylinder scrim. These scrims were already in place for Noah’s cycle 1, So I decided at the last minute to add a rainbow gradient projection onto the cylinder. I had this idea previously and I got lucky having just enough prep time to quickly make the gradient match the keyboard and load it into Resolume utilizing a previous projection map (resource).
I made everyone leave the lab before they saw the finished cycle 1. This helped to reset the vibe after the somewhat chaotic setup process. Some people had already seen the basic setup before but there were also some new guests that have never experienced the installation or the motion lab. Everyone seemed to timidly approach the installation but once the were all there, everyone took turns playing notes and testing the reactivity of the “piano”. Some people tried to play a song and others were trying to find the limits of the depth sensor to see how little of their presence triggered a note and how high or low their foot or hand needed to be.

The feedback I received was generally positive. People enjoyed the colorful and playful nature of the setup as well as the pleasant tones emitted my the speakers. Someone said it reminded them of a Fischer Price Xylophone, which I must admit, was not something I was going for, but unintentionally recreated almost exactly! Some of the other feedback I received was that they enjoyed that they could step back and watch others interact and play since there were essentially a “play” space on the Marley, and a “observer” space outside the rectangle. Some others commented that more interactive possibilities would have been interesting, such as a different response to the height of your hand or foot that triggered the notes.
For Cycle 2 I plan on using the same basic concept but abstract the entire field to be a little less rectangular and obviously a type of piano. I have been experimenting with a spatial synthesizer that can utilize the immersive sound system in the Motion Lab. I also plan to add more “geo zone” boxes to increase the sensitivity and interactive possibilities.
Cycle One: Immersive Theatre
Posted: April 3, 2025 Filed under: Uncategorized | Tags: adobe, cycle 1, immersive theatre, Isadora, premiere pro, theater, theatre Leave a comment »For cycle one, I wanted to take the tools I had been equipped with over the first half of the course and utilize them in a theatrical context.Knowing that I would only be working with a bite sized chunk of work, I decided to revisit a play I had developed in a composition class my first year. It was a 20-ish minute play called The Forgotten World of Juliette Warner. It is a piece that juxtaposes the heroine’s journey with the stages of Alzheimer’s diseases. A theatrical convention of this piece in its initial construction was an ever changing set, meant to reflect the mind of the titular character where nothing is truly settled. Having actor’s move literal mats and blocks constantly was a barrier when establishing the suspension of disbelief. So recently trained in projection mapping, I developed a score around mapping the environments and bringing the audience inside the world.
My original score:
Resources Needed:
- Software: Isadora
- Hardware: Projector, long HDMI cables
- Space & Physical Elements: MOLA access, boxes, rolling boards, or curtains
Steps to Achieve This:
- Organize blocks, rolling boards, or curtains in the MOLA space as the base setup.
- Map the projector to these surfaces.
- Design and program projections to depict the shifting realities of Juliette’s world.
- Create a control board in Isadora for ease of access.
- Source actors.
- Rehearse.
- Present.
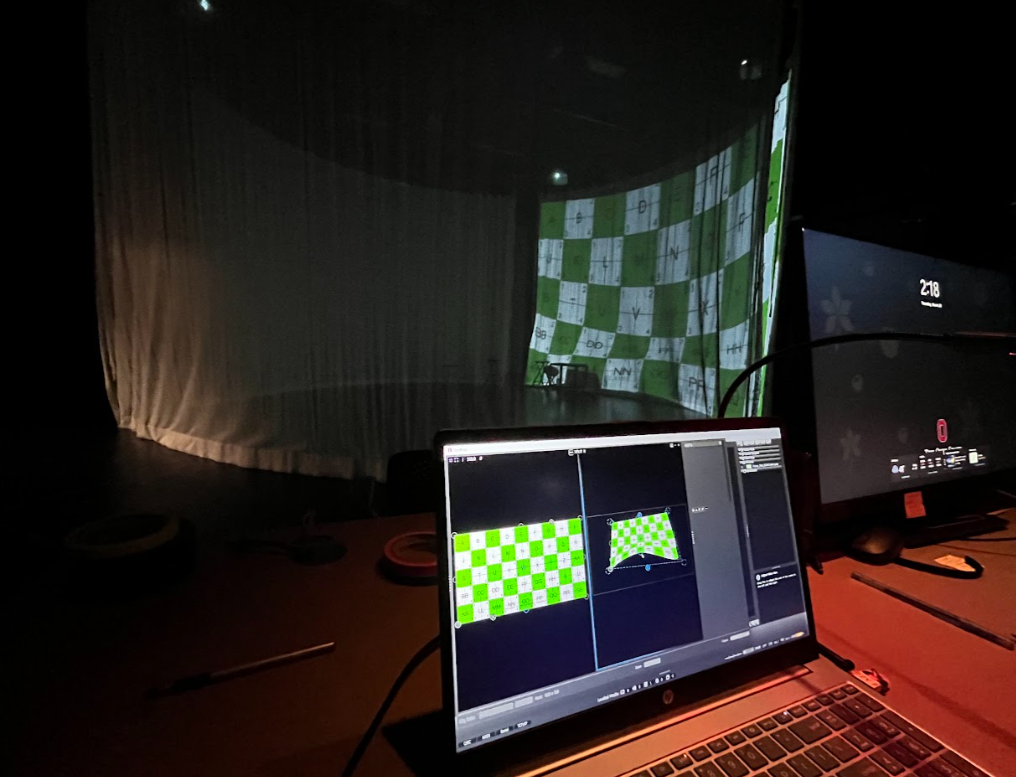
In my original score, I had anticipated projecting onto flat surfaces and possibly a curtain. But after our Motion Lab Demonstration, I observed a track for curtains that ran circular which I was immediately drawn to. So the first two days, with the gracious help of my peer Michael, I worked to understand routing NDI sources to 3 projectors in the motion capture lab. Through trial and error, we overcame a major barrier on day 2. When sending an NDI signal over a closed internet connection, many computers such as mine, will not send the signal if a firewall is enabled. After disabling the firewall, I was off to the races.
In IsaDora, I utilized EJ McCarthy’s focus grid to understand how to canvas the curtains properly. This was a meticulous effort that took nearly a whole class. I find that I can often get so focused on the specifics of the work, that I forget to take a step back and look at the big picture. So towards the end of class, I threw up some stock footage on all 3 curtains and to my surprise, I found that nearly everything is more forgiving than the focus grid.
With my surfaces properly mapped for projection, it was time to turn to the script. This piece has always been one that makes me nervous because I want to handle this difficult subject matter with as much care as possible. So to avoid alienating my peers/the audience, I selected a brief snippet that occurs earlier in the play that revolves around a repeated daily occurrence, grabbing coffee. I felt that both the environment and the interaction would be familiar enough to put audiences at ease while also providing a great opportunity to show the evolution of Juliette’s mind. When writing this scene, I found that this scene occurred at these stages of the heroine’s Journey/Alzheimer’s development:
STAGE 3 – Noticeable Memory Difficulties (3A.The Awakening)
STAGE 4 – More Than Memory Loss (3B.Preparing for The Journey)
With one day left in class to work on this project, it was time to generate. Although I did not have this software initially in my score, I decided that Adobe Premiere Pro would be the best canvas to create this scene. I sourced stock footage and audio from both Adobe and Pixabay (an EXCELLENT source if you haven’t checked it out).
I had to source footage that could suggest a coffee shop without needing to be in full focus, I didn’t want the projections to be a focal point for the audience. I eventually settled on a nice loopable clip and to make the transition gradual, I then started the scene with a circular gaussian blur at the center and over the course of the 2 and half minute scene allowed it to encompass the entire video. I then created a sound design based on stock noises. With the audience being on the inside of the curtains, I felt it was important to not only surround them visually, but sonically. I utilized surrounding reverbs and panning to allow sounds to come from specific points in the room.
I moved this scene into my ISADORA file where it replaced the focus grid and easily projected on all 3 surfaces.
On the cue line “my mind” I set up a second scene in Isadora which would be the Doctor’s office. I used a similar approach to the coffeeshop, but reversed the blur effect. I did this to intentionally throw off the audience, to tell them that we were somewhere different, somewhere with much more sterile light, but slowly allowed that to be revealed over time.
With my projections designed, it was time to implement actors. I did source a few actors who agreed to take part in a staged reading of the scene. Given the nature of a class project, all my actor’s eventually backed out which led me to scramble for new actors. When I presented the piece in class, I was only able to give my actor’s their given circumstances and the instruction to follow their impulses. This created a sense of a scene, but led to some confusion in character dynamics and audience attention. For my personal taste, it created some clunky staging, but I was so thankful to have 2 actors who were gracious enough to jump in and with a brief rehearsal, we could have ironed this out.
In the feedback, which was extremely valuable, I learned that there was room to go further with the visual design. While the current projections and sound designs were immersive according to my peers, the same visual on all 3 surfaces created an uncanny blend that actually kind of takes the audience out of it. That being said, I did receive feedback that my approach was tasteful and the blur effect, while discrete, was noticed. Perhaps my biggest takeaway from the feedback was that there is a real opportunity to continually define and redefine the audience relationship. The coffee shop very much sent the message “I want you to be a part of this”, but the doctor’s office provides an opportunity to flip that on its head and push the audience out. When I continue to work with this project in cycle 3, I will explore how lighting can be a tool for achieving this effect. My question I will investigate is, “When can I afford to truly leave the audience in the dark”.
Overall, I am happy with the shape this project took. While it did not look at all how I originally intended, I was pleased to expand my muscles with NDI AND projection mapping at the same time while providing a unique theatrical experience for the audience. I laid the groundwork for a compelling piece and with an updated score and a bit more time, I can lean into the aspects of this project that were lost to time.
Cycle 1: It Takes Two Magic Mirror
Posted: April 1, 2025 Filed under: Uncategorized | Tags: cycle 1, Interactove Media, Isadora, magic mirror Leave a comment »My project is a magic mirror of sorts that allows for interaction via an XBox One Kinect depth sensor. The project is called “It Takes Two”, because it takes two people to activate. In its single-user state, the background and user’s shadow are desaturated with a desaturation actor linked to the “Bodies” output of the OpenNI Tracker BETA actor. When the sensor only detects 1 body (via an Inside Range actor), it puts the saturation value at 0. When a second body is detected, it sets the saturation value at 100. I have utilized envelope generators to ensure a smooth fade in and fade out of saturation.

The above patch was added onto the shadow mechanism I created. I did some research on how to achieve this, and experimented with a few different actors before concluding that I needed an Alpha Mask. The LumaKey actor was one I played with briefly but it did not do what I needed. I found a tutorial by Mark Coniglio, which is how I ended up in alpha-land, and it worked beautifully. I still had to tinker with the specific settings within the OpenNI Tracker (and there is still more to be fine-tuned), but I had a functional shadow.

My goal with Cycle 1 was to establish the base for the rest of my project so I could continue building off it. I sectioned off my time to take full advantage of lab time to get the majority of my work done. I stuck to this schedule well and ended Cycle 1 in a good position, ready to take on Cycle 2. I gave myself a lot of time for troubleshooting and fine-tuning, which allowed me to work at a steady, low-stress pace.
I did not anticipate having so much difficulty finding colorscape videos that would provide texture and contrast without being overwhelming or distracting. I spent about 45 minutes of my time looking for videos and found a few. I also ended up reusing some video from Pressure Project 2 that worked nicely as a placeholder and resulted in some creative insight from a peer during presentations. I will have to continue searching for videos, and I am also considering creating colored backdrops and experimenting with background noise. I spent about 20 minutes of my time searching for a sound effect to play during the saturation of the media. I wanted a sound to draw the users’ attention to the changes that are happening.
Overall, the reactions from my peers were joyful. They were very curious to discover how my project worked (there was admittedly not much to discover at this point as I only have the base mechanisms done). They seemed excited to see the next iteration and had some helpful ideas for me. One idea was to lean into the ocean video I borrowed from PP2, which they recognized, causing them to expect a certain interaction to occur. I could have different background themes that have corresponding effects, such as a ripple effect on the ocean background. This would be a fun idea to play with for Cycle 2 or 3.
The other suggestions matched closely to my plans for the next cycles. I did not present on a projector because my project is so small at the moment, but they suggested a bigger display would better the experience (I agree). My goal is to devise a setup that would fit my project. In doing so, I need to keep in mind the robustness of my sensor. I needed a very plain background, as it liked to read parts of a busy background as a body, and occasionally refused to see a body. Currently, I think the white cyc in the MOLA would be my best bet because it is plain and flat.
The other major suggestion was to add more things to interact with. This is also part of my plan and I have a few ideas that I want to implement. These ‘easter eggs’, we’ll call them, will also be attached to a sound (likely the same magical shimmer). Part of the feedback I received is that the sound was a nice addition to the experience. Adding a sonic element helped extend the experience beyond my computer screen and immerse the user into the experience.
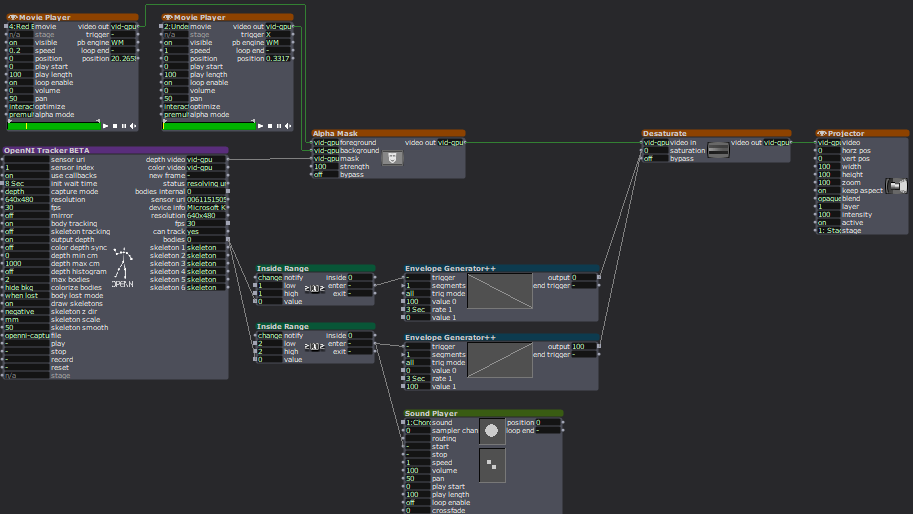
This is a screen recording I took, and it does a great job demonstrating some of the above issues. I included the outputs of the OpenNI Tracker actor specifically to show the body counter (the lowest number output). I am the only person in the sensor, but it is reading something behind me as a body, so I adjusted the sensor to get rid of that so I could demonstrate the desaturation. Because it saw the object behind me as a body, Isadora responded as such and saturated the image. The video also shows how the video resaturates breifly before desaturating when I step out and step back in, which is a result of the envelope generator. (The sound was not recording properly, please see above for sound sample.)
My score was my best friend during this project. I had it open any time I was working on this project. I ended up adding to it regularly throughout the process. It became a place where I collected my research via saved links and tracked my progress with screenshots of my Isadora stage. It helped me know where I was at with my progress so I knew what to work on next time I picked it up and how to pace myself across this cycle by itself and all three cycles together. I even used to to store ideas I had for this or a future cycle. I will continue to build on this document in future cycles, as it was incredibly helpful it keeping my work organized.