Cycle II – Bar: Mapped by Alec Reynolds
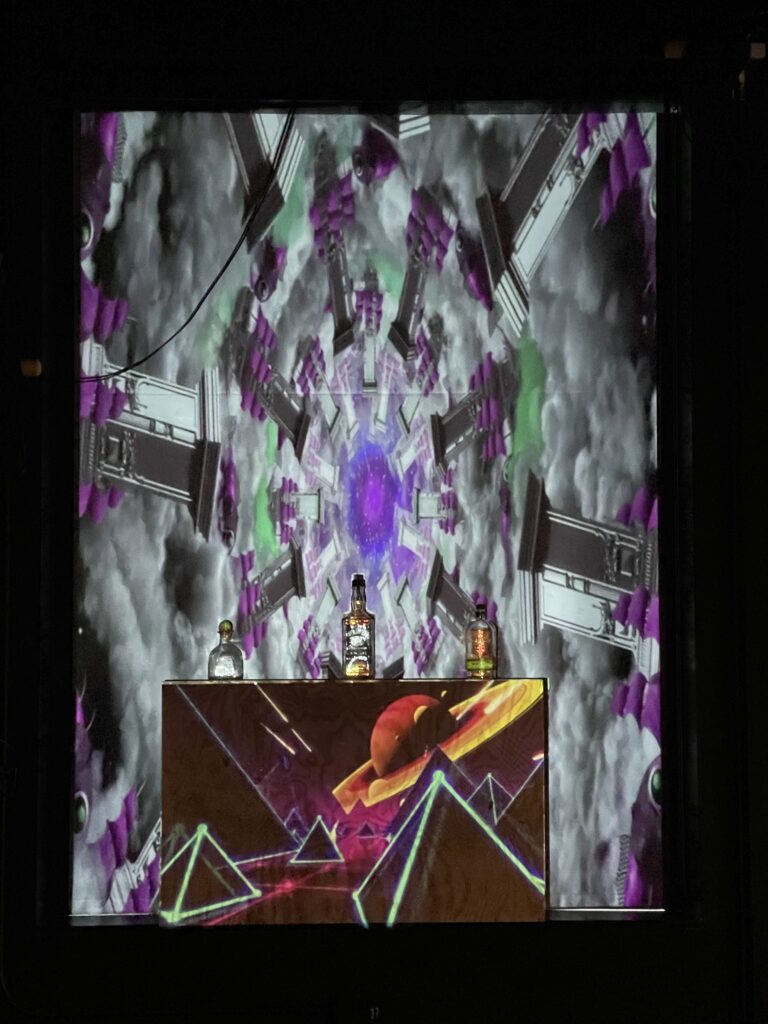
Posted: April 12, 2022 Filed under: Uncategorized Leave a comment »This iteration of the project was the realization of the first cycle, with physical assets, the framework of the Izzy patch, and actual mapped graphics. More specifically, a section in the ACCAD Motion Lab was selected for its large backdrop (which happens to be a blackout curtain), and versatile lighting opportunities.
There are multiple pieces of this larger projection mapping project:
- Physical Assets: These are the physical pieces that require a mapping and will have a digital projection placed on them uniquely (bottles, screen, box)
- Mapping: The manipulation of content on the software side so that it assimilates the shape of the physical asset
- Communication: Using the effective TouchOSC software, I was able to create a communicating menu that could interact with Isadora and the project patch
- Reaction: The spectacle that occurs to emulate a specialty themed cocktail being ordered.
The projection actor in Isadora is a powerful projection mapping tool and lets you create quick and simple maps for a performance. Bar: Mapped features upwards of 7 maps with unique content going to each different layered asset.
The menu is the device by which each reaction is triggered. TouchOSC channels are enumerated in my Isadora patch, through which OSC listening actors attend to any input from my menu. When a drink is “ordered” it triggers the specific reaction.
The purpose of the project is to create an atmosphere of a nightclub with music in the background and attention drawn to the bar. During the cycle II performance, critical information and feedback was gathered. The volume of the background music is important so as not to drown out the effects of the reactions. It will also be necessary to manipulate the location of the background music so that it creates more of an atmospheric effect versus grabbing a users attention in a distracting way.
Moving into next cycle the following changes will take place:
- Decrease the length of a reaction (~20 sec for Cycle III)
- Paint physical assets white
- Have a louder audio source for reactions
- Modify position of background music
- Add club-like lighting
- Other secret additions…
The cycle III documentation will host a full breakdown of how the Isadora patch works, along with design choice insights.
Cycle 2 – Ashley Browne
Posted: April 10, 2022 Filed under: Uncategorized Leave a comment »For cycle 2, I wanted to start thinking about how the experience could be multiplayer and how both players would have to work together to create an end goal. In this current stage, one player is using the video synthesizer to pass a signal to the screen while player 2 is directly altering the image using the Makey Makey as a controller. The Makeymakey uses the arrow keys to increase the scale of each sphere or color on screen. The video synthesizer can affect the clarity of the image and its hue and contrast.
Overall, I think this was a great step towards the next iteration of the project. Some of the feedback I received was about introducing sound and how that could connect to both players having specific goals in the experience. Also, I need to continue stress testing the unity file because after a while it seemed to have bugs.
For cycle 3, I want to finalize what the audio may be like and figure out what the 2nd video input will be for the synthesizer. I also will be finalizing the hardware for the synthesizer, using parts that are sturdier for multiple uses– to prepare for the open house.
Cycle 1 Project
Posted: April 10, 2022 Filed under: Uncategorized Leave a comment »For my cycle 1 project I wanted to keep with the element of reveal. My intrests live in earth wisdom and agricultural knowledge rooted in the unseen. Within this iteration of the project I wanted to reveal some of the gems the Black growers in my community are graciouly sharing through interviews with me. My graduate studies are based in bridging dance, agricultural, and technology (D.A.T). I am working from a quote from Nikki Giovanni “If trees could talk what would they say?”
I am continously insired by the soil and its ability to generate life, transmute energy and produce healing to humans. The soil in this work is central to the grounding for the entire experience. My goal is to connect and ground the participant in the moment to be present with the images and the knowledge provided by the growers.
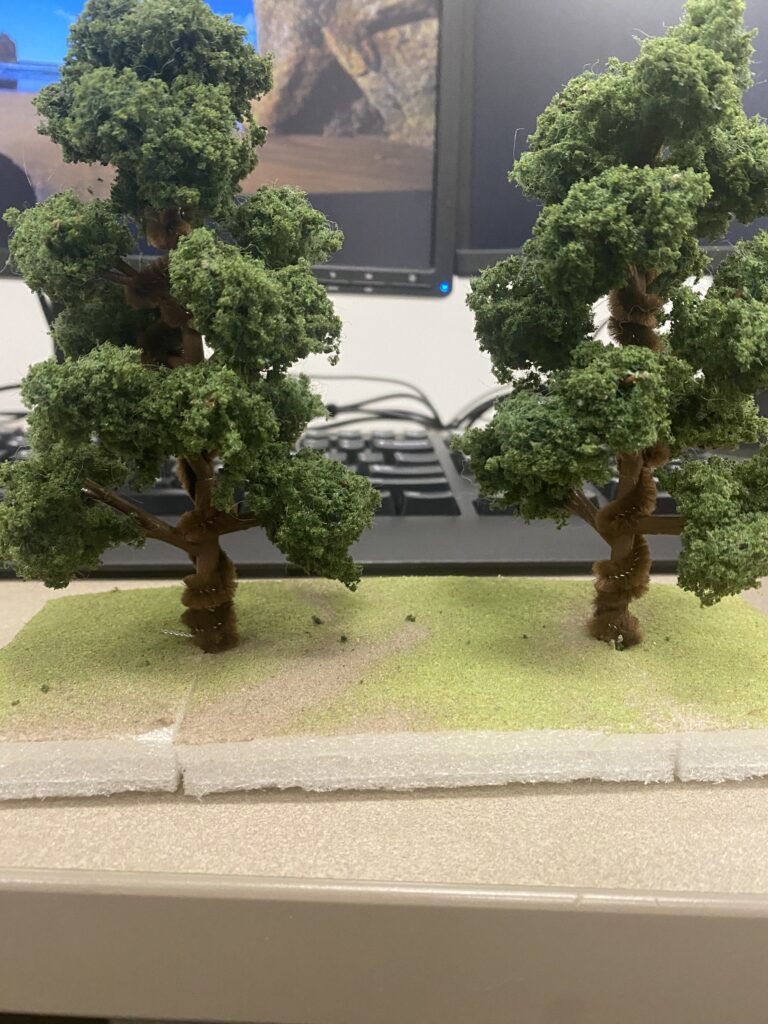
My set up consists of the Makey Makey, soil, and two tree models for the participates to touch indicating the wisdom held in trees/people in my community. I wrapped brown pipe cleaners around the interior of the plastic “tree bark” to conduct an eletrical current to set off the digital engagemet with the Makey Makey. As participants touch the bark of the tree model, their hand must be grounded, touching the soil. This connection reveals an image of the growers and activates the interviews.
I realized in this cycle I needed to cut the interviews down to about 30 seconds each because I imagine this as a gallery installation. I watched the bodies in the room shift and kind of zone out as they tried to listen to the stories being told. Audio seems to be key for the experience to translate how I intend. I would like the experience to be so that the participate knows when the experience begins and ends. I got feedback that there should be a more engaging componet. This comment came from a dancer which I agree. In the future I plan to work with the kinetic sensor to provide a movement based engagement for the participants to embody agricultural knowledge to evoke ecomemories. For my second cycle I plan to project four growers and their stories. I would like to add two more trees and create an environment where each grower can be heard and engaged with simultaniously in a green space.
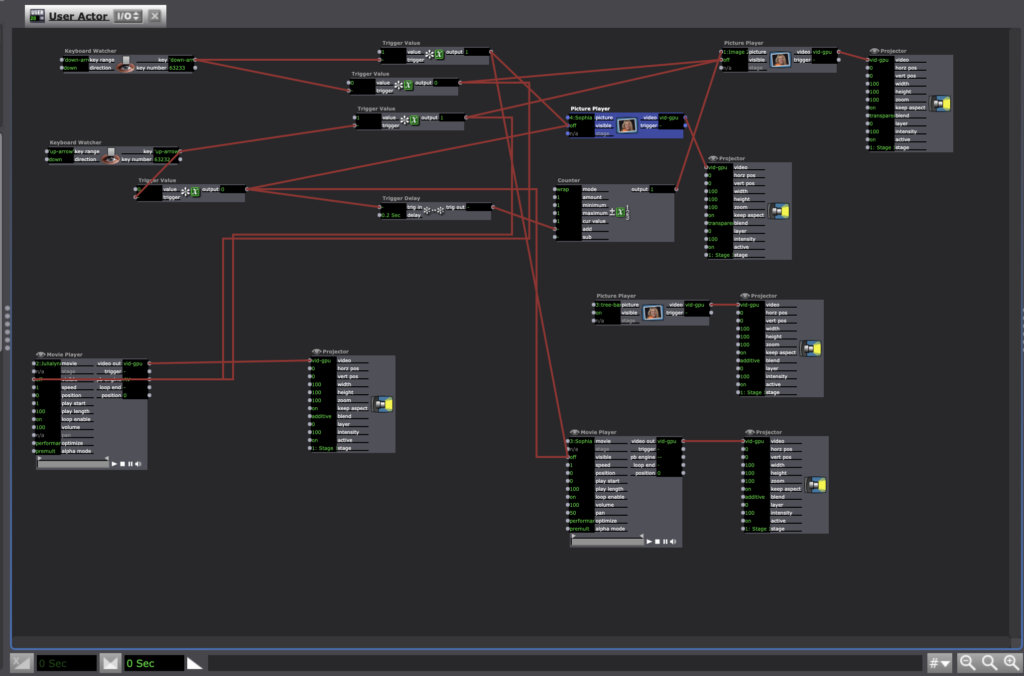
Here are the inner workings of my Isadora patch.
Cycle 2 – Seasons – Min Liu
Posted: April 9, 2022 Filed under: Uncategorized Leave a comment »For this cycle, I wanted to create interactive virtual environments that contribute to embodied learning. I chose Seasons as the theme of this project. Participants can interact with nature things in specific seasons using their bodies. For example, spring & flowers, summer & rain, autumn & falling leaves, winter & snow.
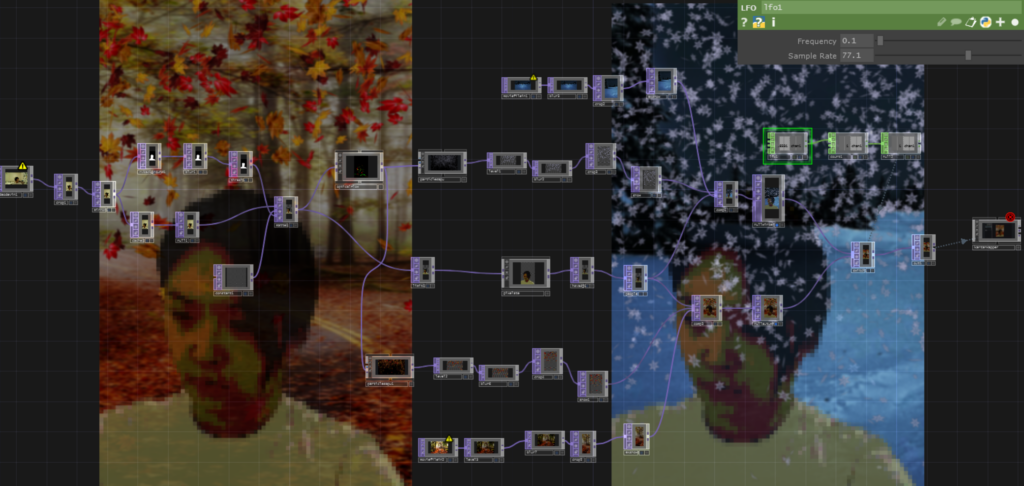
I worked with Touchdesigner this time since Isadora was not friendly to what I wanted to do. I used webcam as the input device. In Touchdesigner, the NVbackground actor can remove the background and the Optical flow actor can track body movements. By ParticleGup, different kind of interactive particles can be created. Since I was not familiar with Touchdesign, I spent a long time figuring out how to transit from one scene to another in time order which is very easy to realize in Isadora. In this cycle, I only created the autumn and winter scenes. I am still learning about other interactive visual effects using different body languages, and how to trigger sound by movements in Touchdesigner. This is the Touchdesigner patch:
I was excited to install it in the motion lab. To avoid shadow, Oded told me that I could project the image onto the back of the screen, and people stand in front of the screen to interact with virtual environments. It’s magical to me seeing both digital figures and human shadows reflected on the curtain from people standing before and behind the curtain.
Participants were happy to interact with snows and leaves. But due to the limitation of the webcam, they must stand in a specific area, or they were out of the screen. I will try Kinect next time to see if I can solve the problem. I also learned that lighting is important because it decides the quality of the real time input video.
Shadrick gave me some nice advice to further develop this learning system. First, I can add some fun filters to digital figures, like wearing them hats in winter. Second, different countries have different climates characteristics. I can build environments based on different regions. For the next cycle, I will also combine media-enhanced objects and environments together.
Here is the recording of the experience:
Circle 2 – Yujie
Posted: April 8, 2022 Filed under: Uncategorized Leave a comment »For the circle 2, I was going to add the composition of multiple projection screens and audience interaction.But I spent too much time on some technical issues. I end up having little progress on these two things. But I did try something new. I add a viewing experience that aims at defamiliarizing what we see every day as “real” experience. Especially, when we perceive things according to already-made categories. I ask the viewers to invert their iPhone to negative mode. Then they can choose to (or not) use their negative mode camara to see the performance. When they look at the dancer, they will see that she is invert to negative, while when they look at the projection (parts of the body in negative), they will see the normal images. I hope that in consistently seeking to “see”, the viewers will reflect on their own subjective viewing experience and on what they can really “see.”
Here is the recording of the circle 2 showing:
For the circle 3, I will continue what I have left from circle 1 and I will add voice recording of the dancer
1. Develop multiple projections
2. Audience presence in the performance
3. voice recording of the dancer
Cycle 2–Allison Smith
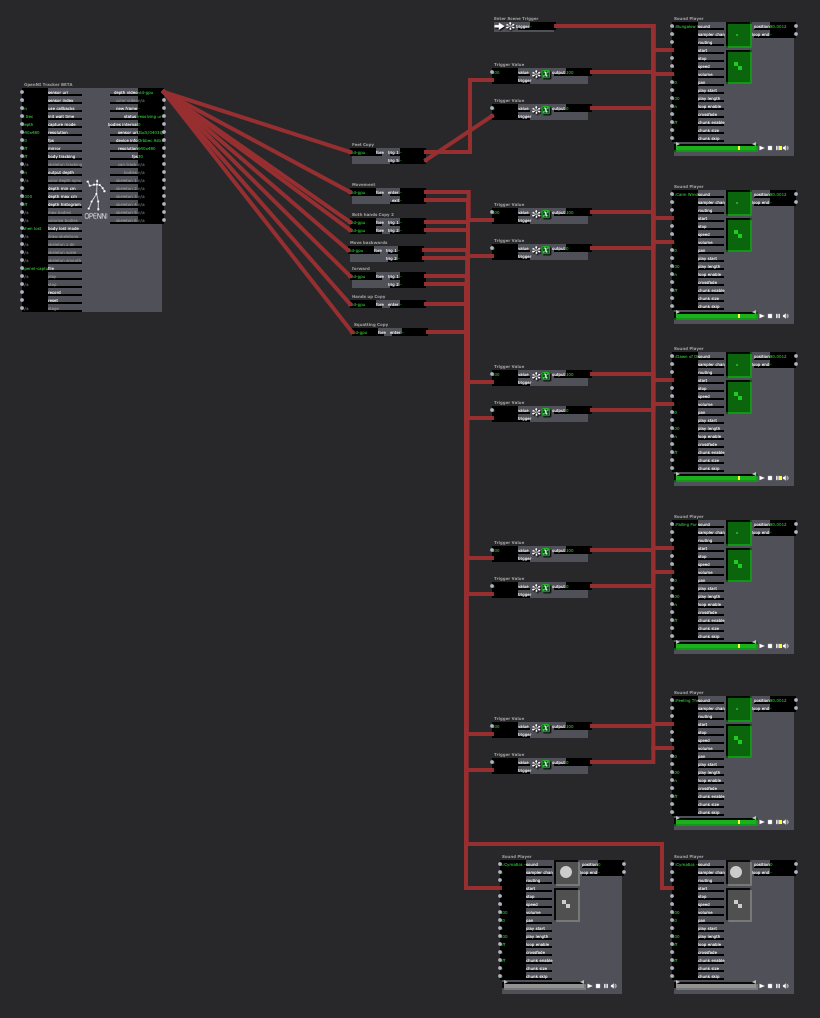
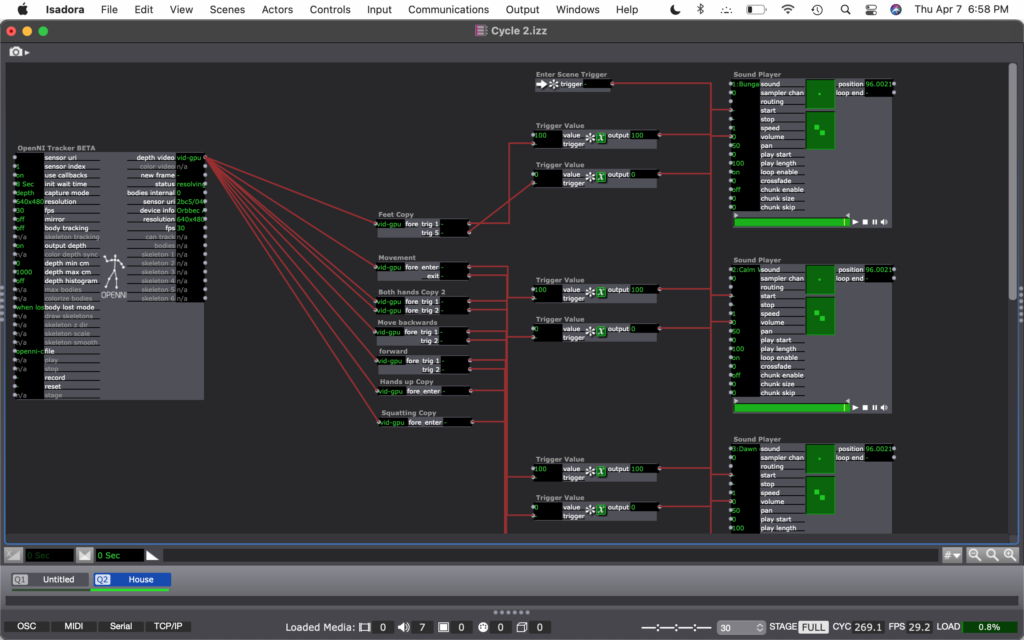
Posted: April 7, 2022 Filed under: Uncategorized | Tags: Cycle 2, dance, Interactive Media, Isadora Leave a comment »For my cycles, I’m working on practicing different media tools that can interact with movement. For this cycle, I chose to work with the interaction of movement and sound. Similar to my PP2, I had a song with several tracks playing at the same time, and the volume would turn up when it’s triggered. The goal was to allow a space to play with movement and affect the sound, allowing that to affect the movement.

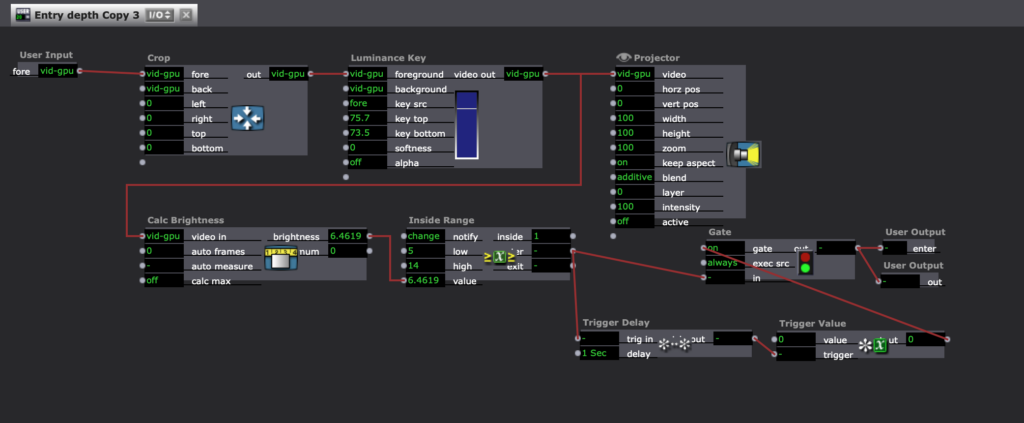
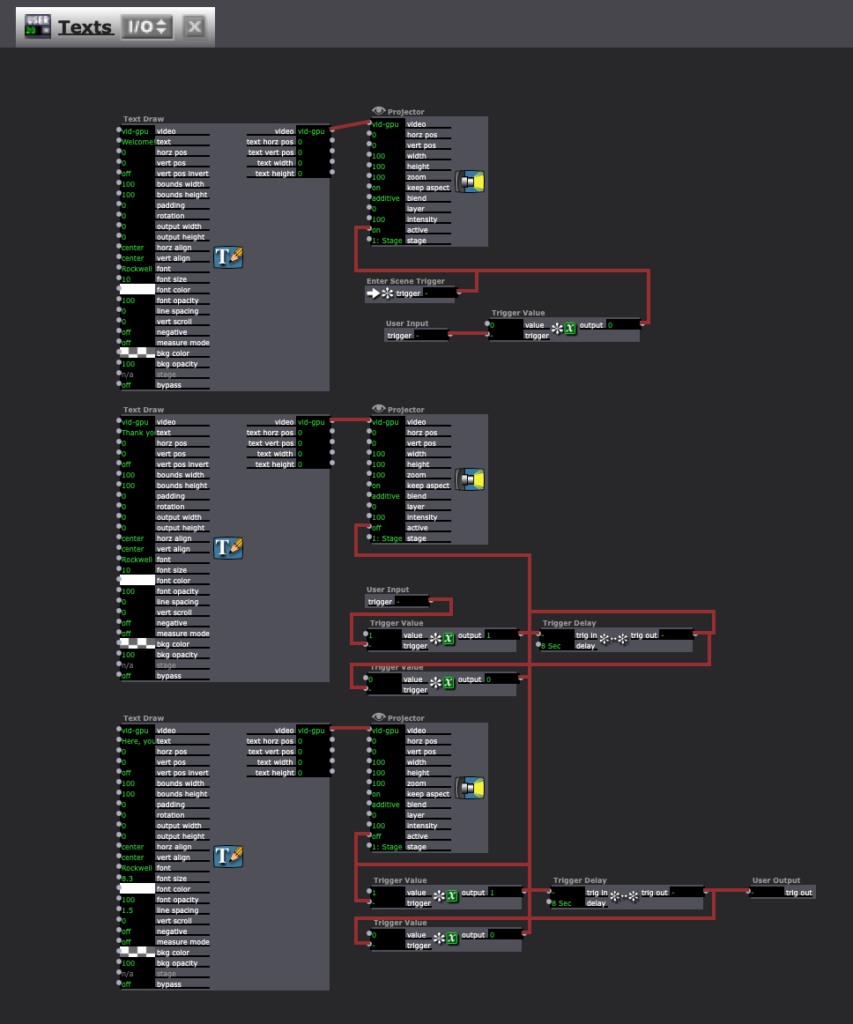
I had two possible audiences in mind for this. The first audience I was considering was people who don’t typically dance, and who find this in a type of installation and want to play with it. Like I mentioned at the beginning, I’m curious about how completing an activity motivated through exploration will knock down inhibitions that are associated with movement. Maybe finding out that the body can create different sounds will inspire people to keep playing. The other audience I had in mind was a dancer who is versed in freestyle dance, specifically in house dance. I created a house song within this project, and I inspired the movement triggers based on basic moves within house dance. Then, the dancer could not only freestyle with movement inspired by the music, but their movement can inspire the music, too.
For this demo, I chose to present it in the style for the first audience. Here is a video of the experience:
I ran into a few technical difficulties. The biggest challenge was how I had to reset the trigger values for each space I was in. The brightness of the depth was different in my apartment living room than it was in the MOLA. I also noticed that I was able to create the different boundaries based on my body and how I would move. No one moves exactly the same way, so sounds will be triggered differently for each person. It was also difficult to keep things consistent. Similarly to how each person moves differently from each other, we also don’t ever move exactly the same. So when a sound is triggered one time, it may not be triggered again by the same movement. Finally, there was a strange problem where the sounds would stop looping after a minute or so, and I don’t know why.
My goal for this cycle was to have multiple songs to play with that could be switched between in different scenes. If I were to continue to develop this project, I would want to add those songs. Due to time constraints, I was unable to do that for this cycle. I would also like to make this tech more robust. I’m not sure how I would do that, but the consistency would be nice to establish. I am not sure if I will continue this for my next cycle, but these ideas are helpful to consider for any project.
Cycle 2, Gabe Carpenter, 4/6/2022
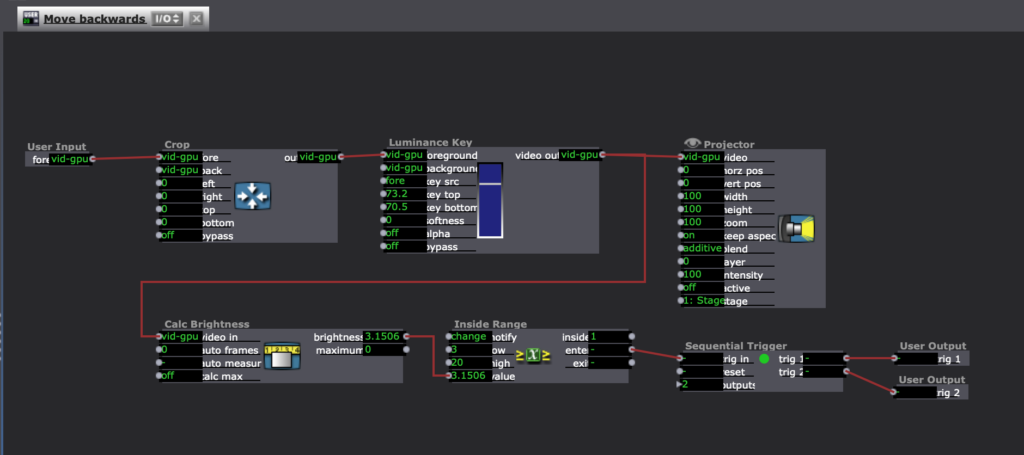
Posted: April 6, 2022 Filed under: Uncategorized Leave a comment »This phase of my project is focused on creating the media aspects of my final project. There are no physical controls involved with this stage, as those were demonstrated in cycle 1. I plan to combine both of these phases in the final project. I began this project by creating my room in Maya. I modeled all of the assets used in the game from scratch and rendered the footage using a render farm and the Deadline system. Below are a few screenshots of the work done in Maya
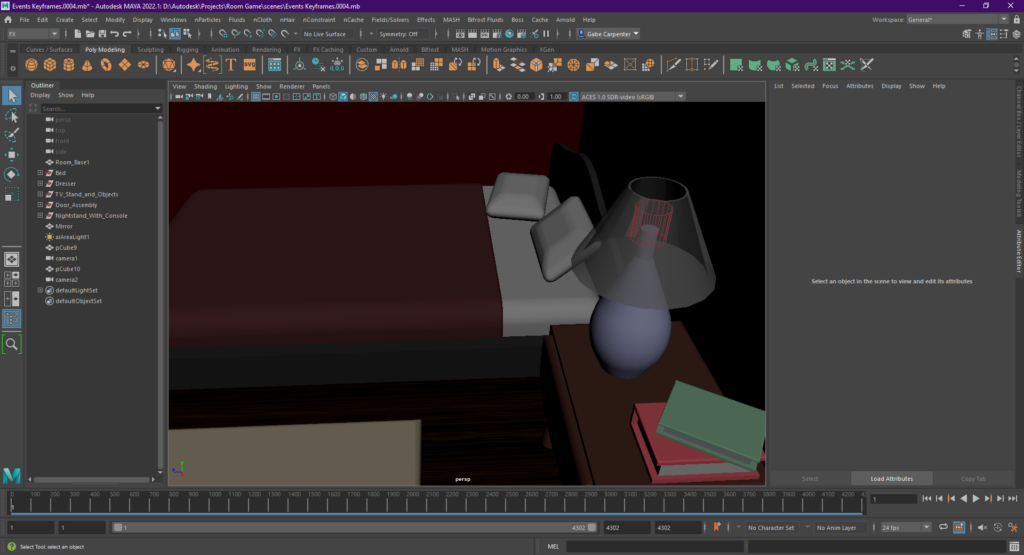
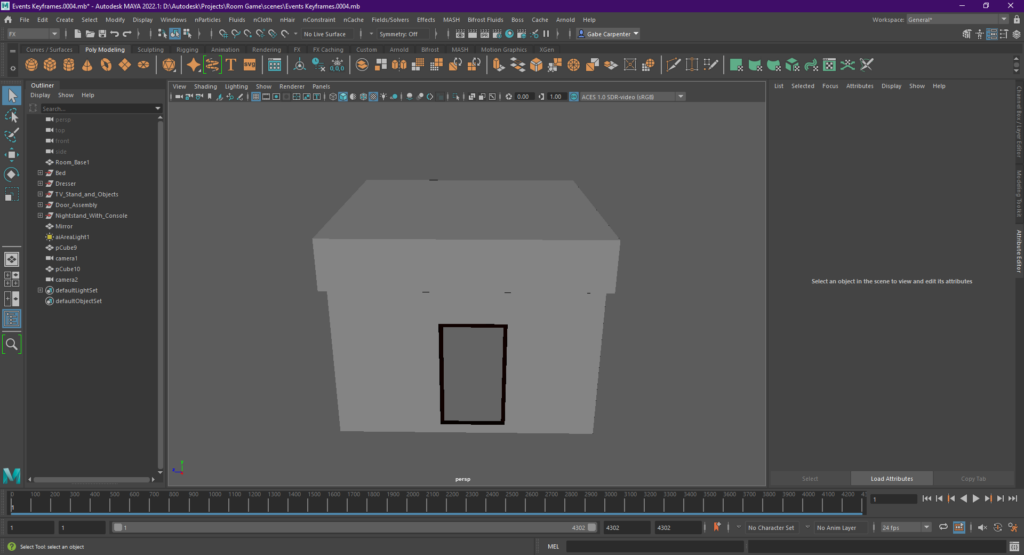
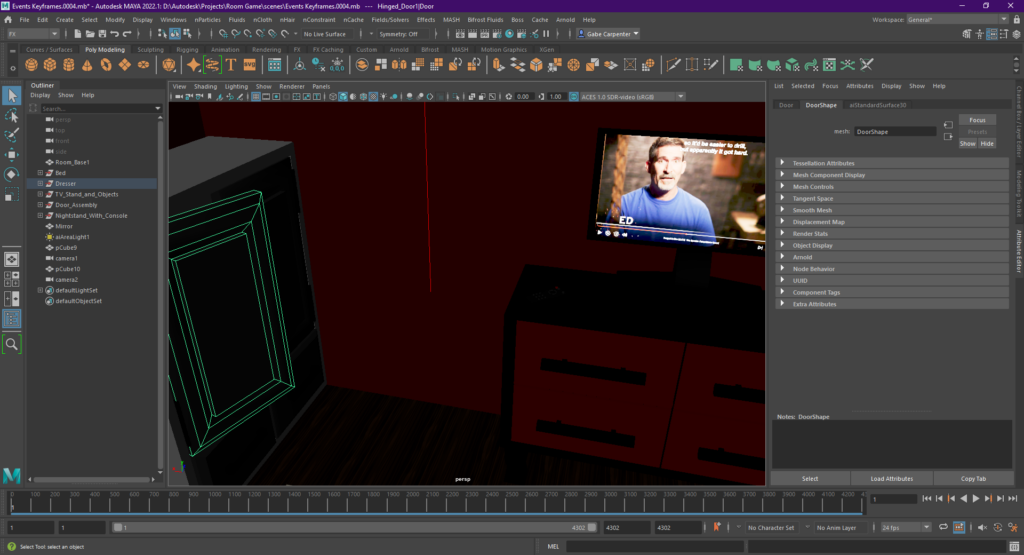
The next portion of the project involved creating the Isadora patch, which I will link here.
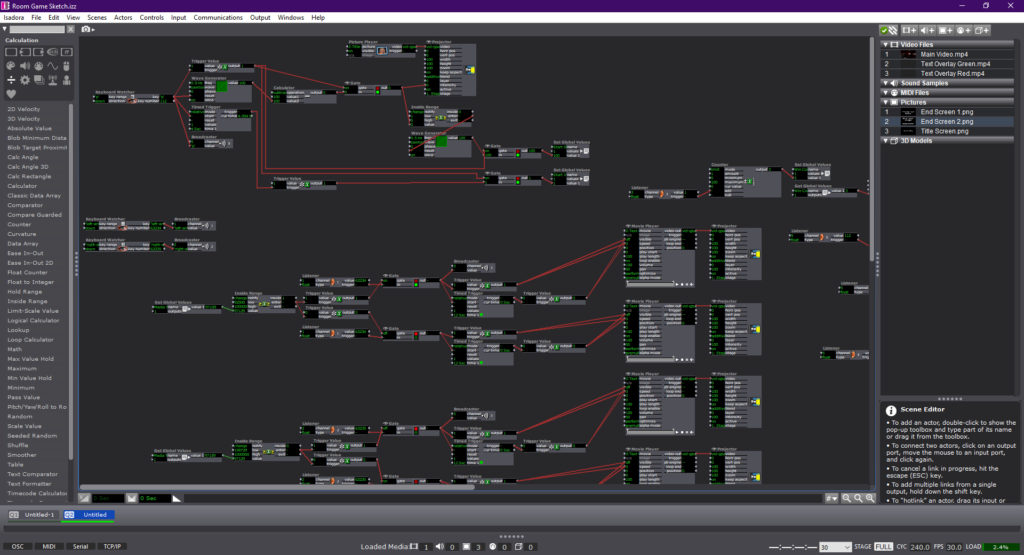
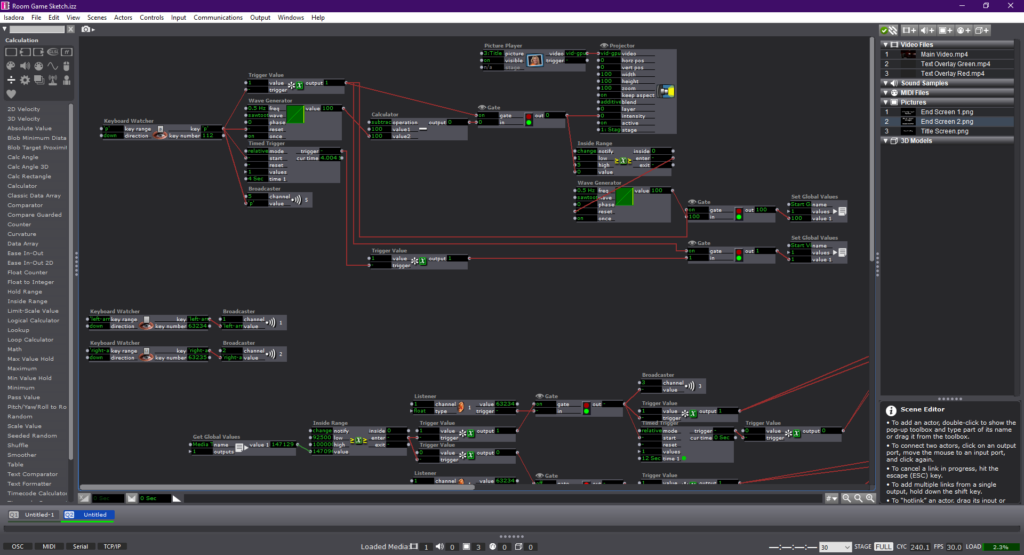
The experience is roughly 4 minutes long, includes a pass/fail ending system, and dynamically responsive choices throughout the game.
Cycle 1
Posted: March 29, 2022 Filed under: Uncategorized Leave a comment »Concept: Following the 20th presidential election in Korea, I wanted to portray beauty of democracy and its hidden dark side. My goal was to articulate the irony of the rigid dichotomies between left and right, old and young, and Southeastern and Southwestern Korea balancing the power of the nation and protecting our democracy. With the emergence of social media, people began to access and believe in different information whether it’s true or not. The nation has become more polarized, and the politicians took advantage of the situation, disuniting the nation to gain more votes. With all the socioeconomic, generational, and regional conflicts and hatred, the polarization became uncontrollable to the point where the very purpose of the governance and elections degenerated into the survival of the party. No matter a plan was good or bad for the nation, each side would disagree with whatever the other side carried forward. One of the few times they agreed upon was when they wanted a pay raise. I got sick of the politicians having double standards towards each other(In Korea, we call this 내로남불, which means, “If I do it, it’s a romance, if you do it, it’s an infidelity.) and disuniting the nation, so I wanted to let my audience be aware of the danger of unconditional support towards certain political party which hinders the self-purification. In order to make rational decisions as voters, I thought it would be important to build mutual gratitude towards each other for bringing prosperity and democracy to the nation.
Methodology: Besides articulating my political thoughts, I wanted to explore the possibilities of texture and layering with the projections. Oded helped me install two projectors facing each other with a scrim in between them. I gathered videos of the poverty after the Korean war, Miracle of the Han River, the military dictatorship and the Democratization Movement, and Korea today with direct elections and added textures that would support the ideas. There was a live camera capture to individualize and highlight citizen power. It ended with intertwining red and blue waves which represents two political sides.
Next step: I think for the first cycle, I understood how to set up the layering of projections, how to add textures to them, and what effects they create. I think for the next step, I would like to add audio so the audience can follower and understand my intentions with the piece. I also want to explore interactivity with motion capture.
Cycle 1 – Analog Video Synthesizer – Ashley Browne
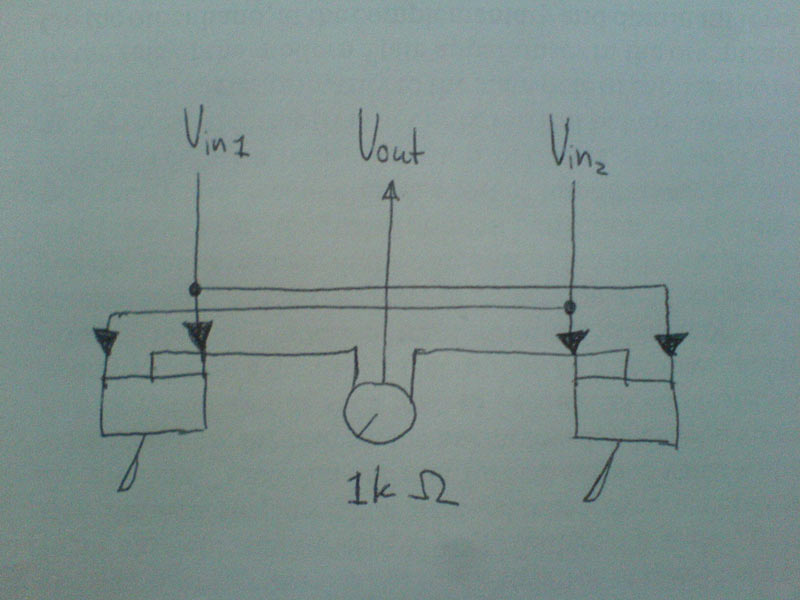
Posted: March 29, 2022 Filed under: Uncategorized 1 Comment »For the cycle 1 project, I fabricated an analog video synthesizer that would allow the user to mix two separate video inputs into one. I knew that I wanted this chance to experiment with CRTs and live video, so I used a video camera as one input, which was directed towards the audience and the other was from a video sourced online. When mixing the two, I had to be deliberate in the videos chosen so that they would be able to overlap one another on the television screen– it had to have enough negative space for the second video input to show through.
For the physical material, I wanted the housing to resemble a controller or something small enough to be held with both hands. I enjoyed a lot of the feedback received from my classmates– many of them mentioned it felt nostalgic and that the challenge of using the video synthesizer seemed to fit the aesthetic that was happening.
Here is the schematic I used, from Karl Klomp:
http://www.karlklomp.nl/wp-content/uploads/2018/12/index.html

And documentation of the synthesizer and video output:
For cycle 2, I’d like to build another video synthesizer with different toggle switches so that it’s a bit easier to use. I’d also like to focus more on the content of the work and think closely about which two video inputs are being used and how that may affect audience participation and reception. For the 3rd cycle, I’d imagine it coming together as a two player interaction, where player 1 uses the video synthesizer and player 2 uses another apparatus that also affects what is happening on screen. It would also be interesting to see how I can incorporate projection or consider different kinds of installation setup moving forward.
Cycle 1 – Tomatoes – Min Liu
Posted: March 26, 2022 Filed under: Uncategorized Leave a comment »My research interest is designing for joint and interactive educational experience for family visitors in informal learning environment like museums and zoos. In this project, I explored how physical and digital materials can work together to enhance sense-making, and how individual and collaborative interaction can motivate learning.
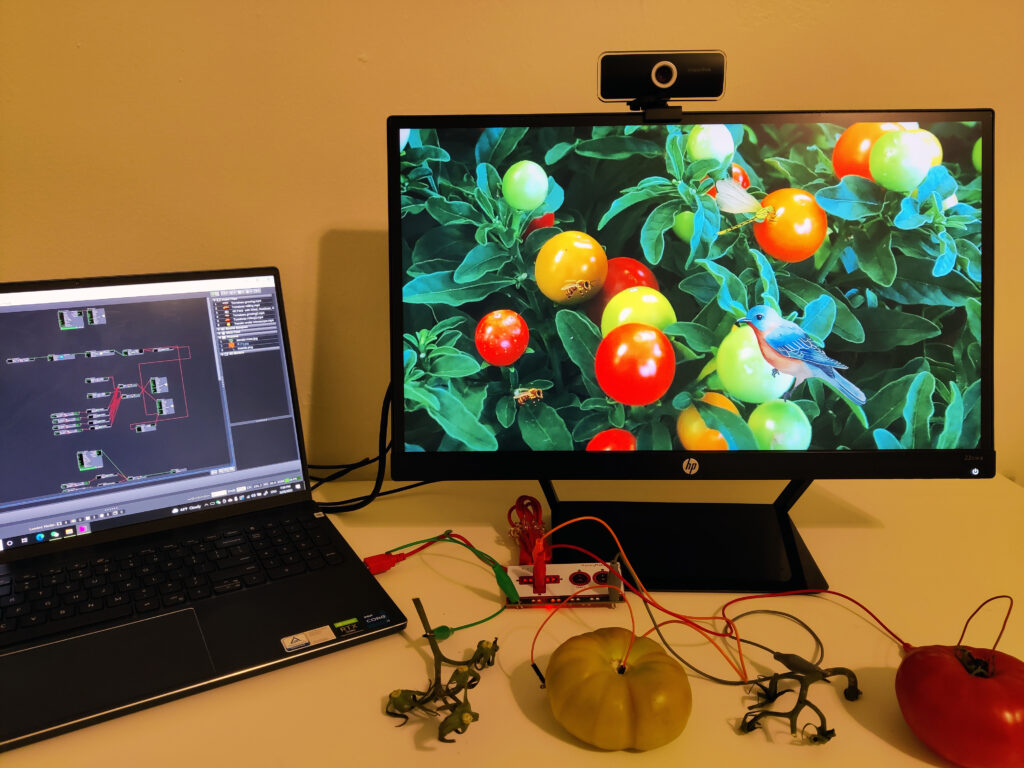
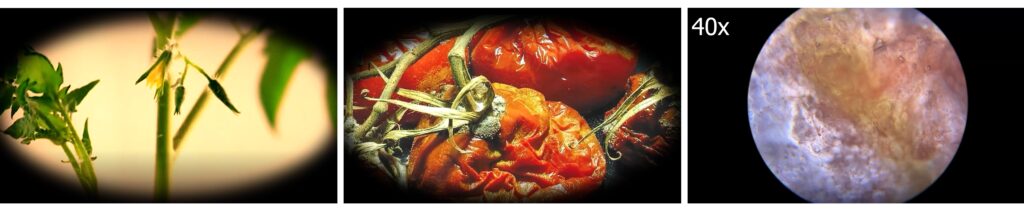
I chose tomato as the learning theme. In the default scene, participants will see a tomato garden with birds and some insects. They can wave their hands to get rid of the animals. A background music of nature winds, insects and chimes is on. A green tomato, a red tomato and two leaves (one is fresh, and one is dry) are controllers. I hope this can create a sense for participants that they are in a tomato garden holding tomatoes. When the participant holds the green tomato and a leave, he/she will see the growing process of tomatoes. When the participant holds the red tomato and a leave, there shows the rotting process. When two participants hold different tomatoes together, they will see microscopic structures of tomatoes.
In the test in class, players were surprised when they triggered different video clips about tomatoes. They thought these clips were interesting and well-chosen. One participant said that the rounded style of videos makes the experience intimate. Players needed to keep touching the tomatoes along their watching the video. I wished this setting could stimulate people to make some connections between the sense of touching physical materials and the digital contents on the screen. However, the feedback was that the connections were not strong there. Players just concentrated on the videos and separated the touch sense. So, how to design integral interactions with physical and virtual materialities needs further exploration.
I tested the system again with a ten-year-old kid at home. To be honest, I failed to act as a good guidance and companion. I couldn’t help telling him what to do to trigger things and explaining the system mechanism. During the experience, the boy told me that he had watched a similar video before at school. It’s about a seed growing into a big tree. When the boy and I held the two tomatoes and watched the video together, he asked me questions like which part of the tomato is observed under microscope. This system is successful in establishing conversations between children and adults.
In the next cycles, I will keep exploring: 1. How can participants interactive with the system autonomously without verbal or written instructions? 2. How to build the connection between physical and digital materials? 3. Other creative learning and collaborative interaction ways. 4. Installations in big space.