Check-In update
Posted: October 3, 2024 Filed under: Uncategorized Leave a comment »My pressure project is coming along well. I’m finally able to set a vision and execute it in Isadora. The RSVP framework has been really helpful in contending with the time limits. The imposed time limit forces me to recognize how heavily I rely on the ability to overwork. With the imposed time limit, I am constantly reassessing my resources (R) and score (S) when I run into hurdles – what can I substitute or drop to expedite my process without compromising the core values (V)? I am a bit nervous about how it will present, as I haven’t yet had an opportunity to try it out in the space. I worked off of a very low fidelity model of the space and I’m hoping that it translates in the performance. I have to conserve time to come in and incorporate the on-site resources, but I really want to continue developing my idea.
I might make a branch for further development so that I can continue to build a more robust media experience (just for my own self-gratification) while honoring the 10 hour cap on my official performance. From a valuation perspective, I tend to value both rules and vision very highly branching seems like a way to allow my efforts to fully explore both.
A point for self-inspection is that I seem to value both of those things higher than my own time, which I recognize may be a severe miscalculation from the lifetime perspective. The manifest goal of this project is to become a grade in a grade book, and the return on investment for my time will reach a point of diminishing returns on that metric. There are other benefits of course. I will become a better designer through the repetitions, which is a lasting effect. I will receive the gratification of seeing my efforts translated to an immersive experience, which is cool, but ultimately ephemeral. I suppose the fact that I enjoy what I’m doing may be enough to justify the use of time, but there are probably other investments of my time that are likely to result in happiness now and in the future. I’m not going to figure it out in this blog post, but it’s well worth further investigation.
I hope everyone’s projects are coming along well.
Mirror Lake Pressure Project 1
Posted: September 10, 2024 Filed under: Uncategorized Leave a comment »
Mirror Lake holds a rich history stretching through pre-university time. Once a sprawling body of water, the original lakebed dried due to a mishap during the construction of the sewer system. The modern lake was subsequently installed as a token reminder of the lake’s former glory.
Human development continues to intrude on the experience of visiting Mirror Lake. Noise pollution from the adjacent streets and helicopters en route to the nearby medical center render full immersion impossible. Motorized traffic from food delivery robots and occasional rule breakers on motor scooters present an annoyance that can quickly turn unsafe when met with pedestrian traffic. Rather than a quick escape from the urban environment into nature, Mirror lake provides constant reminders of the human drive to re-shape nature for commerce and efficiency.
My proposed changes address many of these issues.
Old growth trees provide canopy cover to absorb overhead noise pollution, while a hedgerow absorbs street noise and, from the basin of the lake, obscures sight lines to street traffic and the adjacent sidewalks. Removing the paved walkways in favor of natural (dirt, grass, gravel) not only allows pedestrian traffic while dissuading motorized traffic, but also stores less heat making for a more pleasant experience on hot days. Finally making use of underground tunnels for robotic delivery transit improves the speed and efficiency of these services (thereby improving the potential carrying capacity), but also provides added privacy for students and faculty whose faces can no longer be scanned during their jaunts on campus. The underground tunnels are outfitted with stickers on the ground to support navigation without the need for upward facing cameras (an additional security and privacy measure inspired by our in-class discussion).
Pressure Project I
Posted: September 9, 2024 Filed under: Uncategorized Leave a comment »For our first pressure project, I deeply appreciated that this was an opportunity to focus on design. As a choreographer, I have frequently regarded visual design as something deeply unknown to me. This is perhaps revealing of my narrow definition of design as so much of choreography lives within spatial design and revels in enacting movement amongst and between bodies thus producing tensions and eliciting questions for audiences.
In considering spatial design of space, I found myself observing the common areas of the dance department particularly the green room and its close proximity to the dance studios, restrooms and the water dispenser. The water dispenser is such a deeply important aspect of the dance department—in between classes and during class break times, a line tends to gather as everyone refills their water bottles.

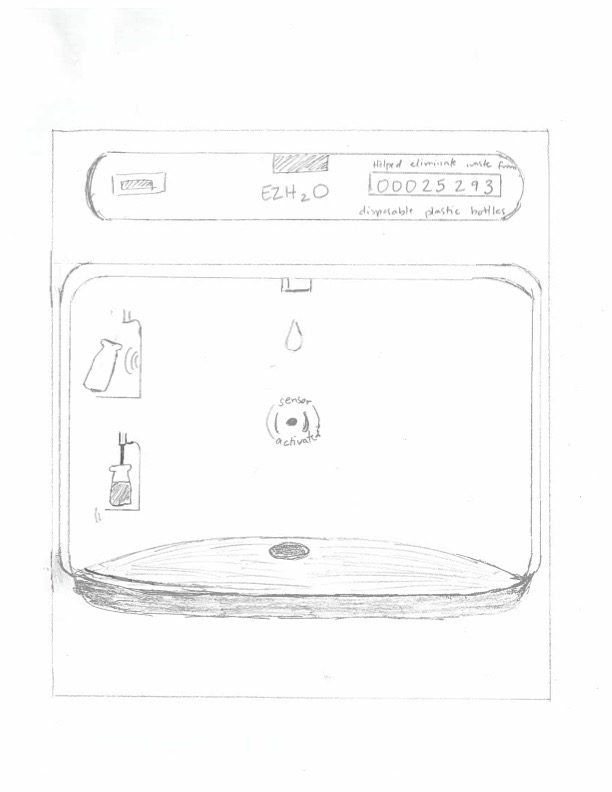
As evidenced by the diagram, the water dispenser is directly across the hall from studio 370 which allows for easy access. In the visual design of the water dispenser, I noticed that I always watch the number count. There is something so deeply satisfying about seeing the numbers change and to know that your water bottle is responsible for that change.
From this moment, I was intrigued by this form of positive reinforcement by the water dispenser and I found myself wondering how there could be other forms of positive reinforcement.
To offer both a heroic and villainous design suggestion for the dispenser, I imagined the water dispenser as having the ability to either sing joyfully or to roast you as it fills up a water bottle. Fundamentally, the water dispenser would have the ability to sense if a water bottle was placed either from the right or left hand side of the dispenser. If a water bottle is placed from the right hand side, the dispenser would sing a joyous jingle. If a water bottle is placed from the left hand side, the dispenser would roast you for not filling up your water yet, asking if you were skipping class, or if you had met your daily water count.
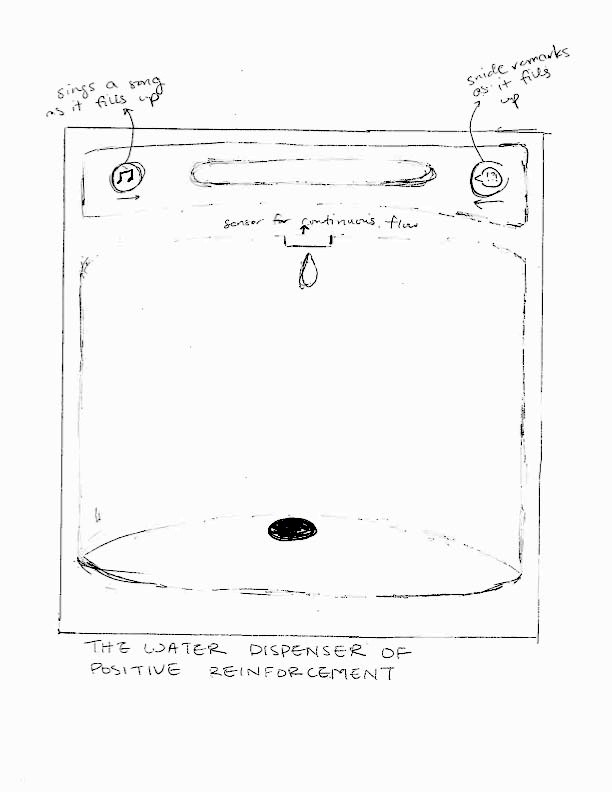
Both options offer a form of positive reinforcement where the singing or roasting offer a form of added stimuli to the action of filling up a water bottle. I wonder how this experience might linger for users of the water dispenser. Would the users sing the water dispenser jingle long after they left Sullivant Hall? Would they be terrified by the roasting and avoid ever using that particular water dispenser?
After our group conversation and feedback, it is very clear that water dispensers are deeply important and have the potential to activate strong feelings and reactions. The sensory act of drinking water activates a shift in awareness in our corporeal bodies and I find myself curious how that experience can become even more sensorial through the inclusion of various sounds in a water dispenser.
Pressure Project 1
Posted: September 9, 2024 Filed under: Uncategorized Leave a comment »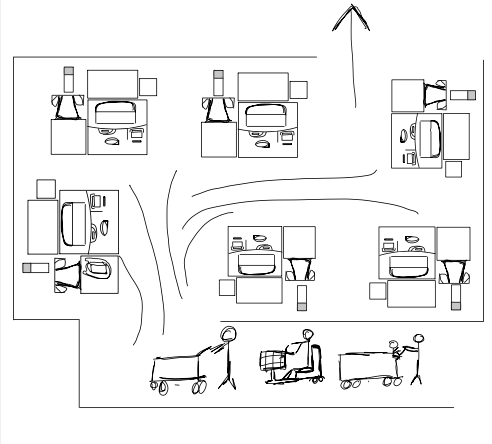
Self-checkout is a machine that allows customers to complete their own transactions. Multiple people can checkout at once in a given area. There are typically lights to indicate if a self-checkout machine is free or a worker may direct customers to the next available machine.
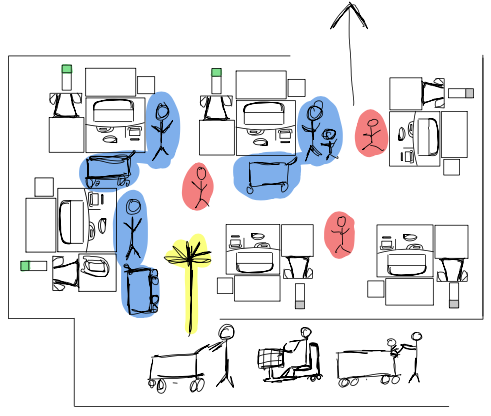
With staff (red) and customers (blue) using multiple available self-checkout machines, it can be difficult to navigate through the area. Customers may not be able to see the available self-checkout machines, know which machine takes cash, or be able to maneuver through the crowd.
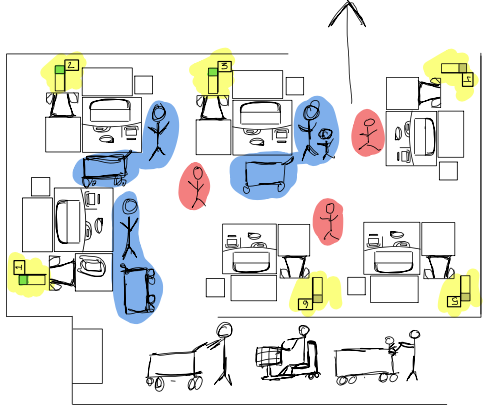
A designated number should be given to each self-checkout machine so that once a machine becomes available and the light turns green, the number and whether or not it takes cash should be announced. An announcement will allow for less confusion, and people will not have to reenter the line or wait in the middle of the self-checkout area if the machine they went to doesn’t accept cash.
Example 1: “Self-checkout machine 7 is available for card only.”
Example 2: “Self-checkout machine 3 is available for cash and card payments.”
makey makey
Posted: September 9, 2024 Filed under: Uncategorized Leave a comment »Cool Makey Makey Idea
Posted: September 9, 2024 Filed under: Uncategorized Leave a comment »https://www.youtube.com/watch?v=dN0bNBUGHJA
Pressure Project 1
Posted: September 9, 2024 Filed under: Uncategorized Leave a comment »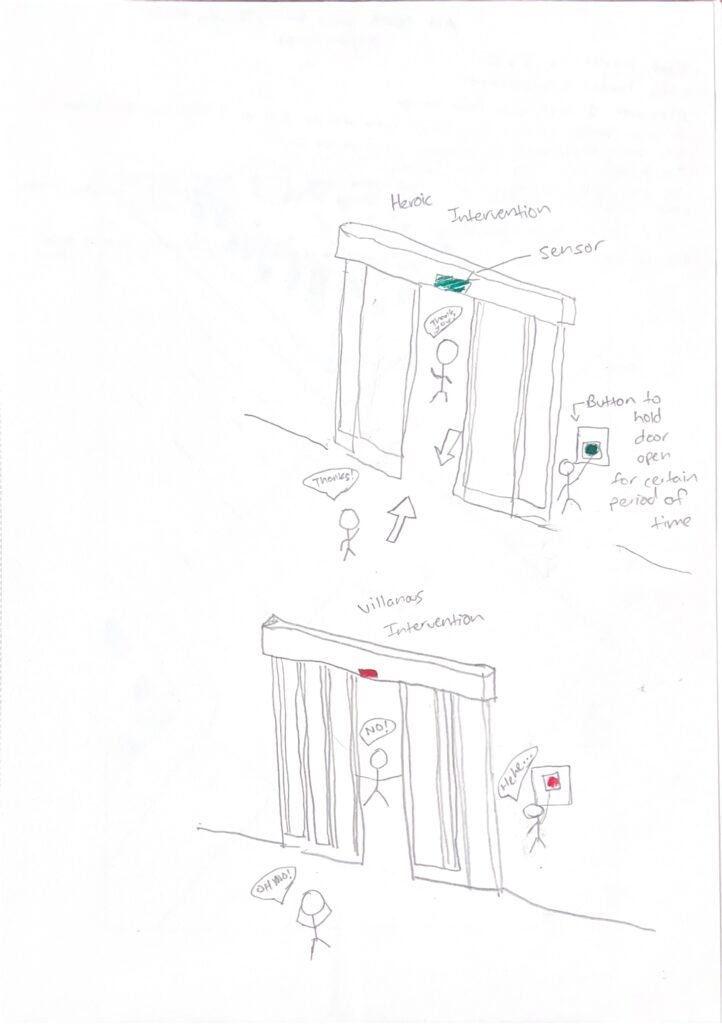
For my pressure project 1, I chose to do the automatic door system at Kroger because it’s a familiar and accessible technology that me and many other people interact with daily. I have been working at the Deli for around 3 years and that gives me a unique perspective on how people use the doors. The view from where I work allows me to see people walking in and out of the automatic doors.
The ideas that I had for a heroic intervention was to have a button that someone could hold that would keep the door open for longer periods of time and allow disabled people to enter and exit more easily. You could also have a motion sensor with a camera that can detect whether or not a person is disabled. Another idea could be that there is a remote operator where the person with a remote can keep the doors open longer from a further distance, similar to the button method.
If I were to choose the villainous route, it would basically be all of the heroic ideas but the opposite. For instance, the button in this case would instead keep the doors closed and not let people in or even make the doors close on people. The motion sensor in this scenario would not let disabled people in and the remote operator would close the doors from a further distance.
Pressure Project 1
Posted: September 9, 2024 Filed under: Uncategorized Leave a comment »Pressure Project 1:
I want to start off by saying that this project had a few more complications than I was intending to run into. The biggest being the idea of spending an hour in a public place (and then sketching what was happening around me – especially when it involved people). I guess I didn’t really realize how few spaces actually exist in public where it isn’t weird or frowned upon to stand/sit there staring at people.
For example, I thought about looking at checkout lines at the grocery store, but couldn’t find a feasible way to explain why I was sitting there watching people pay for things without seeming sketchy. Then I thought about going to the library and looking at the book checkout system there, but thought I might get security called on me for being creepy for not reading or anything that I should have been doing in a library. It was too hot outside to feasibly sit outside and do this assignment, so I wanted to find a place indoors where it wouldn’t seem weird to spend long periods of time watching things and people.
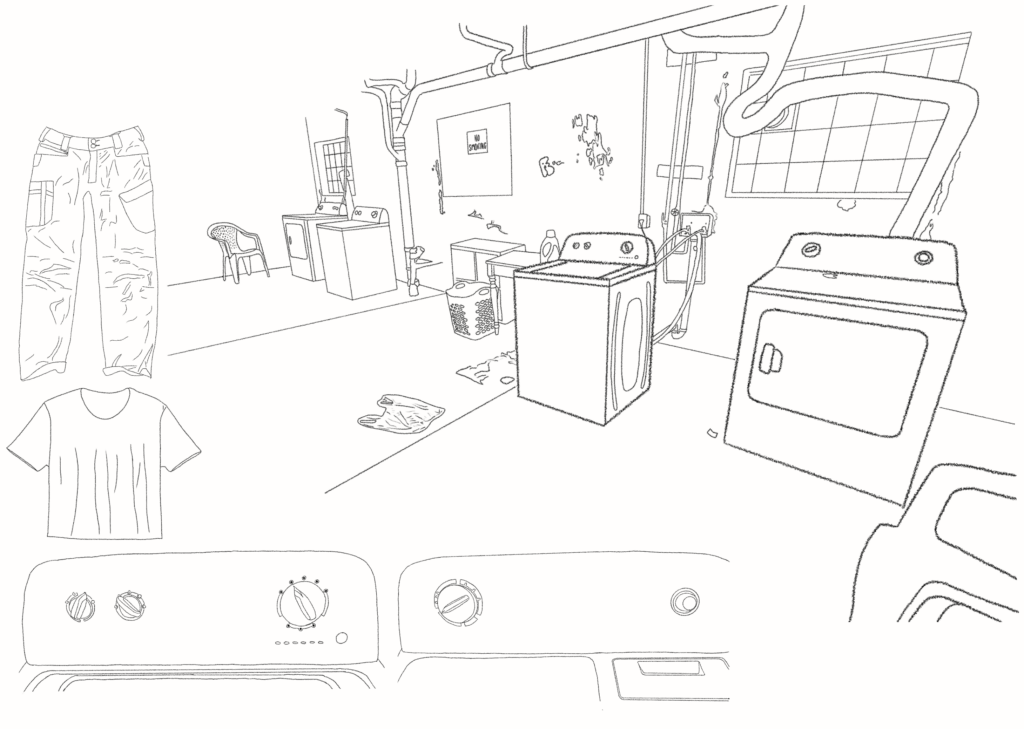
That being said, for this pressure project, I chose to look at the laundry room and machines in the basement of my apartment building. These machines, while intended to be helpful, probably contain more flaws than working parts.
Each washer and dryer are different brands or models, which means that there are four different machine systems at any given time. Each washer and dryer has a handful of different options that you can choose from when wanting to clean your clothes. After washing my laundry myself and watching others in my building do so, I determined that the settings don’t really mean anything.
For example,
- Setting the dryer to low/medium heat, really means that there will be no heat applied at all and they will just tumble around in the dryer.
- Setting the timer option of the dryer also doesn’t work and actually calculates any time you set it at as three times longer than intended.
- The washing machines attempt to weigh the clothes and will run the cycle of cleaning them based on that weight. This, however, is a problem because none of the machines have time remaining on them. So it’s really a mystery when clothes will be finished.
I have watched half a dozen people come into the laundry room expecting their clothes to be finished only for the cycle to still be happening. Or the cycle will be complete but their clothes won’t be clean or will still be sopping wet. Or in retaliation against the machines taking an unknown amount of time, will leave their clothes in for hours after they are finished.
I watched people throw clothes onto the ground and place them in different places around the dark dingy basement. I also noted that there were clothes in a washer already finished being clean when I arrived. No one came to pick them up in the hour that I sat in the basement. The clothes were also still there in the machine when I came down later in the evening to get reference photos for my diagrams. I haven’t been back down there since this experience, so it is entirely possible that the clothes remain there to this day.
When doing my own laundry, I’d also like to note that the knob on the dryer I was using was possibly broken. It was connected to the machine, but it sort of seemed like the wrong knob was added onto the machine because it didn’t fit or turn right. After using another machine that required you to pull out the knob and press it in to start it, I repeated those steps on this machine and accidentally took off the knob. I don’t think it was supposed to do that. I put it back on but it didn’t really align right. I take no responsibility for what has happened here.
It should also be noted that I have only drawn the inhabited side of this creepy unfinished basement. The other half of the room doesn’t get any light to it and looks like something straight out of a horror film.
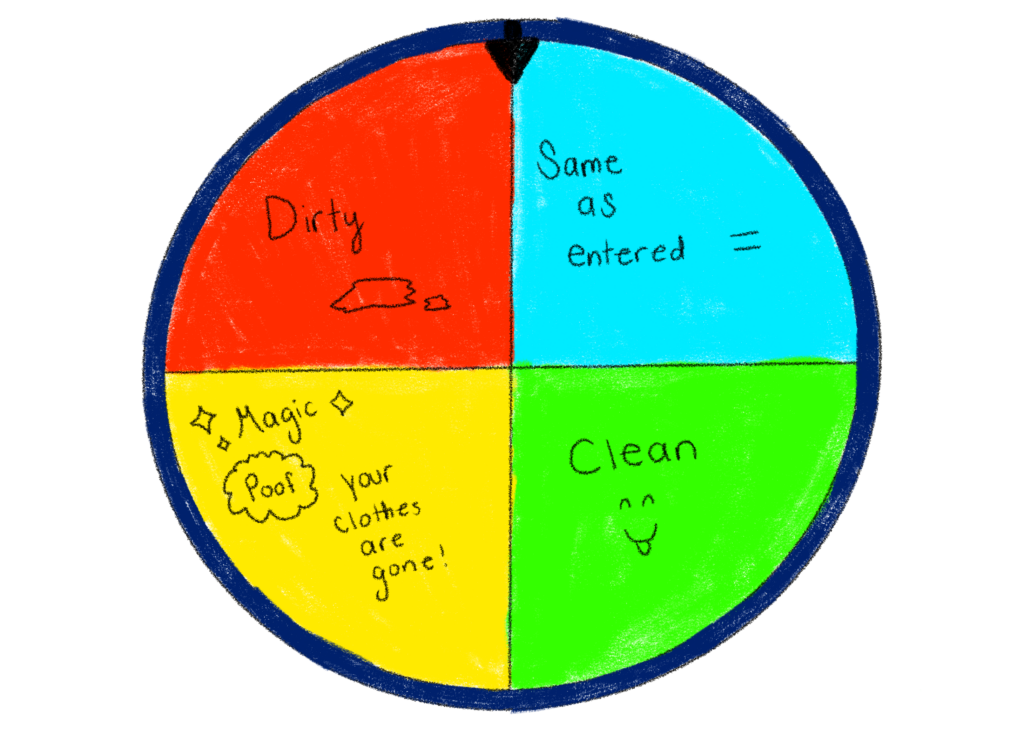
To me, the solutions to these problems seem easy. There are clear things that could be addressed to making the clothes cleaning process easier. But to be honest, addressing these things doesn’t sound fun in the slightest. I’m choosing to assume that since the landlords haven’t fixed these things, that there is a reason. I’m not a professional laundry room manager afterall; there must be a reason things are designed this way. So… in the name of understanding and empathy toward my landlords, I have chosen chaos.
- The first thing that obviously has to happen is some sort of pay system. Right now, it is free to use the machines. Clearly, that was an oversight on their part and needs to be remedied immediately.
- But why stop there? MICROTRANSACTION GAMIFICATION of the washing machines! It could be a pay to win system with loot boxes where you have to pay in order to spin a wheel, and whatever you land on gives you things like:
- Wash time?
- Water temperature?
- How many clothes are you allowed to put in?
- How clean are the clothes going to come out?
- Obviously, you have to keep spinning in order to get the options that you want and clearly, each spin will cost you additional money.
- But why stop there? MICROTRANSACTION GAMIFICATION of the washing machines! It could be a pay to win system with loot boxes where you have to pay in order to spin a wheel, and whatever you land on gives you things like:
- In order to counteract all of the broken knobs and buttons on the machines, I propose that we make the system fully digital in the basement with no wifi or reception.
Pressure Project 1
Posted: September 9, 2024 Filed under: Uncategorized Leave a comment »Annelise Duque
For Pressure Project 1 I thought about ways to disrupt the “score” people follow to enter Sherman Studios on West Campus. As a 3rd year MFA student in the Art Department, I’ve been given 24/7 access to a studio in the building to do my work. However, I’ve identified a key issue that inhibits my productivity, which is there are too many other people that come into the building who become for me, as a chatty person, appealing objects of distraction that keep me away from my work. I know from decades of being myself that it’s impossible to change my distractible personality, so instead I have to change the easy access to the building.
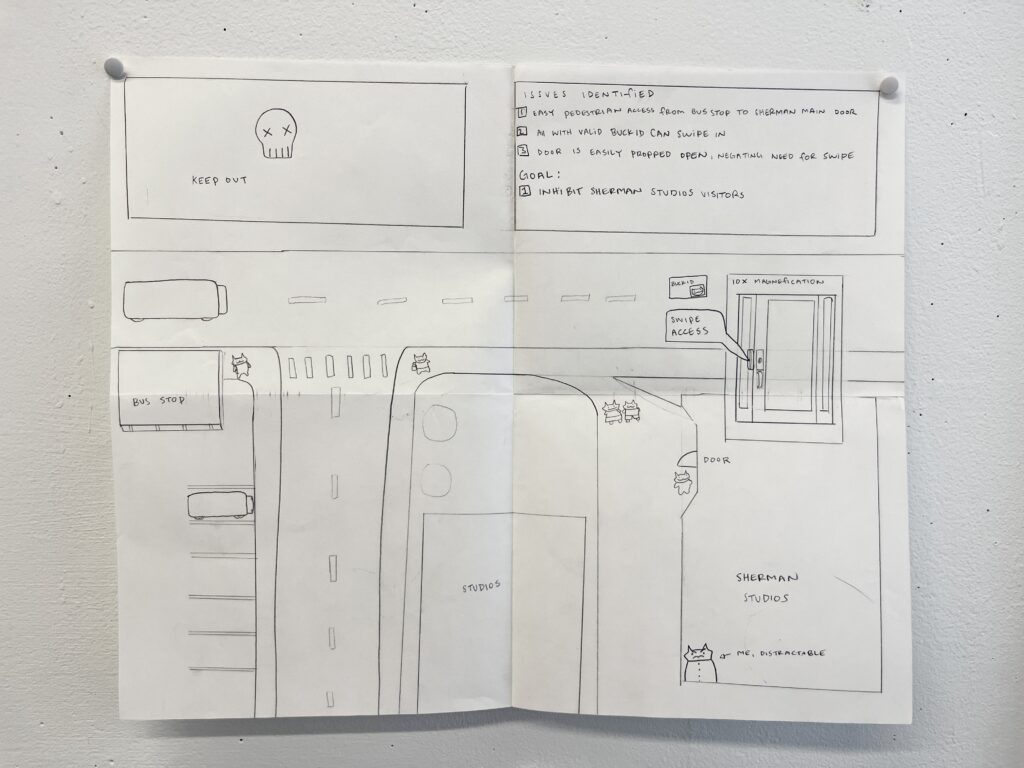
Here is the score that visitors desiring to enter Sherman tend to follow.
- They are dropped off by a CABS bus at a bus stop that is in easy walking distance from the building.
- Some people also cross from the parking lot located beside the bus stop.
- They cross the helpful cross-walk that leads onto the sidewalk that then leads into the building.
- They maneuver through the main door, which is behind a swipe lock.
- Anyone with a valid BuckID is able to swipe in
- The door is easily propped open and often is during typical school hours.
I noticed that there are not only sensors they interact with in order to enter the building through the swipe lock, but that there are also a number a physical infrastructures that contribute to the ease of accessing the building. As it is a school building, this is understandable, but for my purposes completely unacceptable.
I devised the following diagram that I think would really help limit the amount of students coming to the building.
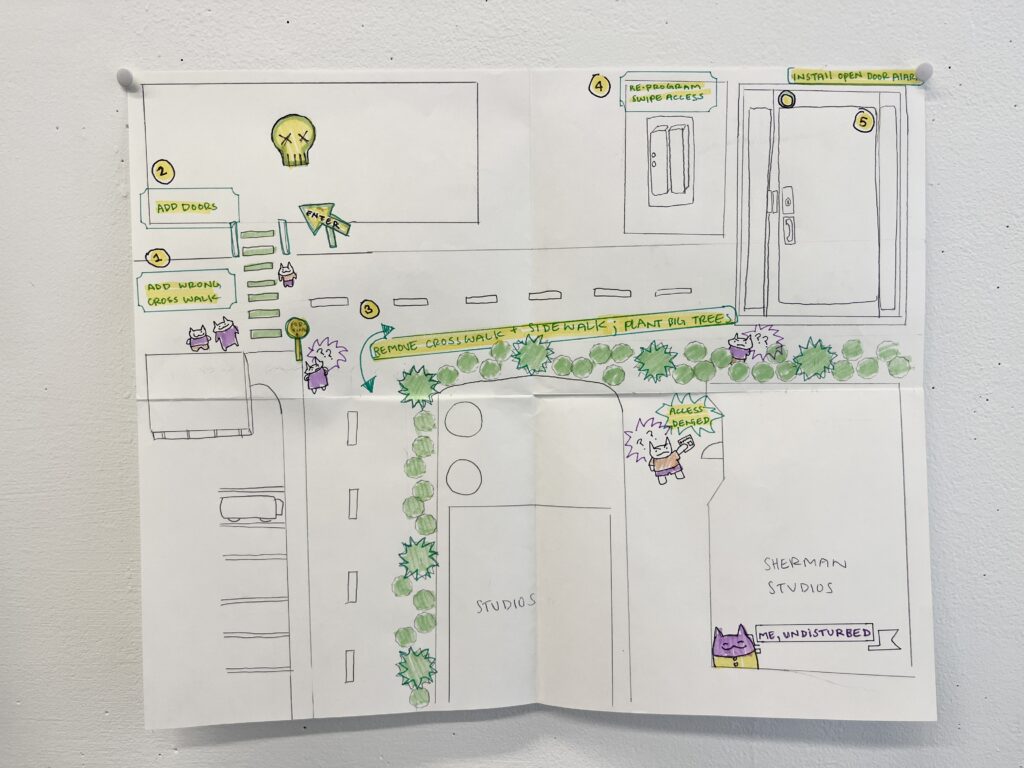
- Short of destroying the CABS system altogether, I think a key issue is the crosswalk, which provides a helpful direction to follow. I would first add in a crosswalk that goes a different way (towards a large dangerous looking electrical structure).
- The structure is currently behind tall fences, so I would need to add doors that are directly across from the new crosswalk.
- Remove the existing crosswalk with blacktop, or powerwash the paint away.
- Plant a thick privacy wall consisting of dense trees and bushes.
- Re-program the swipe access to only allow me swipe entrance.
- Add a door sensor that sends an alarm code if the door is propped open.
After talking to the class about my plot, I realize that I made a lot of really physical changes to the area. I think as a visual artist, a lot of the aspects like swipes and door sensors are mysterious to me, so it was easier for me to understand how to design more physical challenges to accessing the building. It was also pointed out to me that I didn’t address the parking lot, or really show how it would be possible for me to make it through the shrubbery. These are good points. I think ultimately it would be necessary to remove this bus stop, and frankly also the parking lot. The prices of West Campus parking passes could also be increased, as they are temptingly low cost compared to other passes. I also think I could do some easy sabotage by simply changing the building name on the front sign! It’s already almost impossible to find the building when doing a googlemaps search, so if it was physically mislabelled that would further confuse. Especially because I’m not sure how to make the trees move for me alone. Maybe I could install a fence with vines that completely obstruct the view of the building that has a hinged door. I could also install a camera at the door and do some data collecting, and only come to my studio during off-peak hours of activity in the building.
Also, as I actually want this building to be easily accessible because I unfortunately do want students to be able to make art in the building, there are the things I would do to make it easier to enter and use the building.
- Add more sidewalks. The front of the building only has a sidewalk leading into it from North, and none from the South. Students that park further away, or who walk from that direction, have to walk in the street which is dangerous and unpleasant during the winter.
- There should be a swipe access door on all sides of the building, rather than just that main entrance. This would make it easier for everyone to head straight to their destination rather than having to walk through the whole building.
- The main swipe door also isn’t ADA approved, as the only swipe is directly in front of the door at a high height, and the door opens out rather than in. There isn’t enough room for a person using a wheelchair to swipe and move away from the door so the button can swing the door open.
- There should be a hands free way to open the door. This could be a tap lock rather than a card swipe.
- The building currently doesn’t have air conditioning, and since it is a building with a hot-shop in the glass studio and a forge in the metal-working area, the building gets much too hot for safe use.
- The building needs a water-bottle refilling station rather than just drinking fountains. Because of the stuffy interior and physical nature of the work students make, they get really dehydrated.
I enjoyed this project. It made me appreciate the ways it is easy to work in my building, and also notice the ways it’s difficult for me and others. I appreciate there are certain ways to fix the user experience of the building that are out of budget, and that propping the door open at all times allows for those with mobility impairments to enter the building without needing to swipe in. However, propping the door open is not a viable solution during the cold wet winter. I haven’t used this space in the winter yet, so I’m interested to see how the people that use this building adapt during seasonal changes.