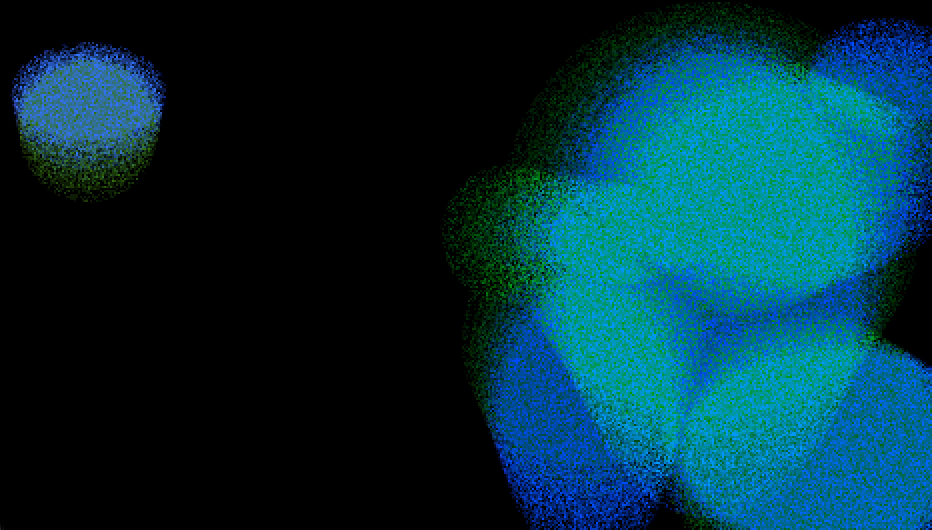
Otherworldly Experience
Posted: February 8, 2024 Filed under: Uncategorized | Tags: Pressure Project, Pressure Project 2 Leave a comment »This room is one of the first rooms I experienced. It is immediately after the room that Rick rolls guests and allows them to mess with other guests throughout the facility. It is a dimly lit room with three ominous human sized capsules. They all surround a giant sphere suspended in the air with what looks like wires from each of the capsules leading into it.

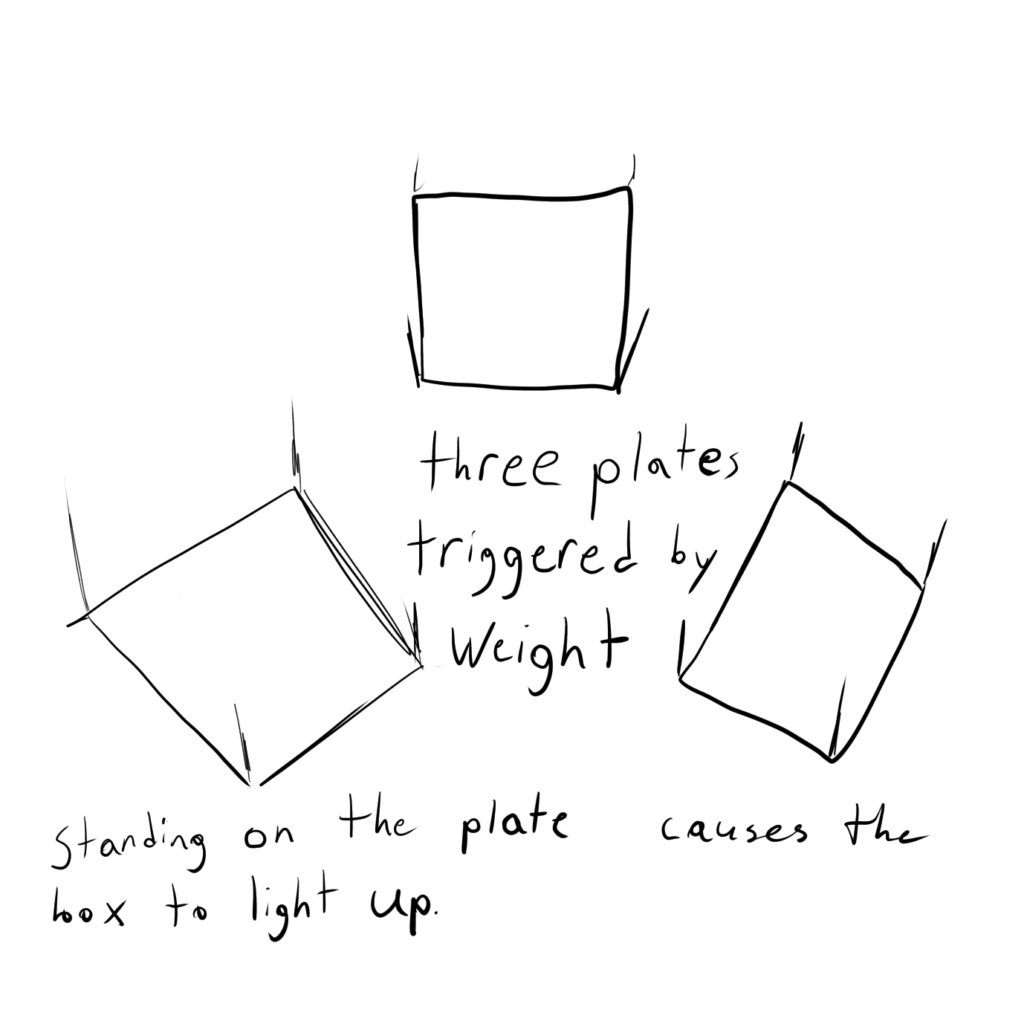
The capsules are really eye catching so many guests that entered the room immediately walked into them to check it out. Then they hear a noise in the pod and can see the side light up. This prompted nearly all of them to go looking for other people nearby to fill the other two pods to see what may happen. Once three people are standing in the pods They begin to flash black and white as well as the lights leading to the orb. At the same time a noise that sounds like static electricity is whirling around the room. Finally, the room goes dark and all is quiet then the guests standing in the pods are sprayed with gusts of air. Caught off guard, the guests let out a scream or flee from the container.
There is not much I would want to redesign with how the system is able to capture people’s attention and clearly convey what needs to be done to activate. So, what I would add would be some sort of fog like effect that is also ejected with the puff of air as well as maybe tone down the air pressure, but keep it spraying for longer. This would hopefully make it a bit less of a jump scare and make it seem cooler when the guest leaves the pod.
Pressure Project 2
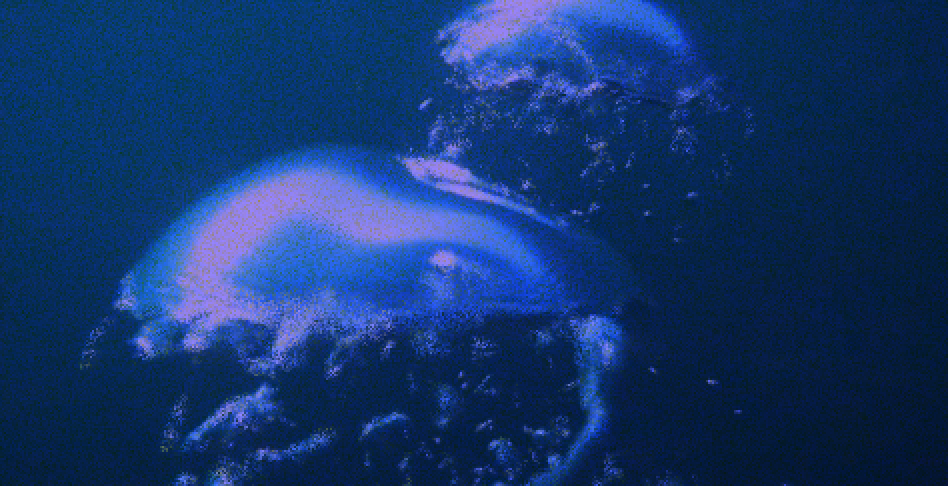
Posted: February 7, 2024 Filed under: Uncategorized Leave a comment »Other World was quite an experience, I was intrigued from the start, there was a fractal projection surface outside of the exhibit spaces that I didn’t notice until light hit the surface and revealed the perfectly projection mapped textures on each triangular piece. I knew I was in for a treat.
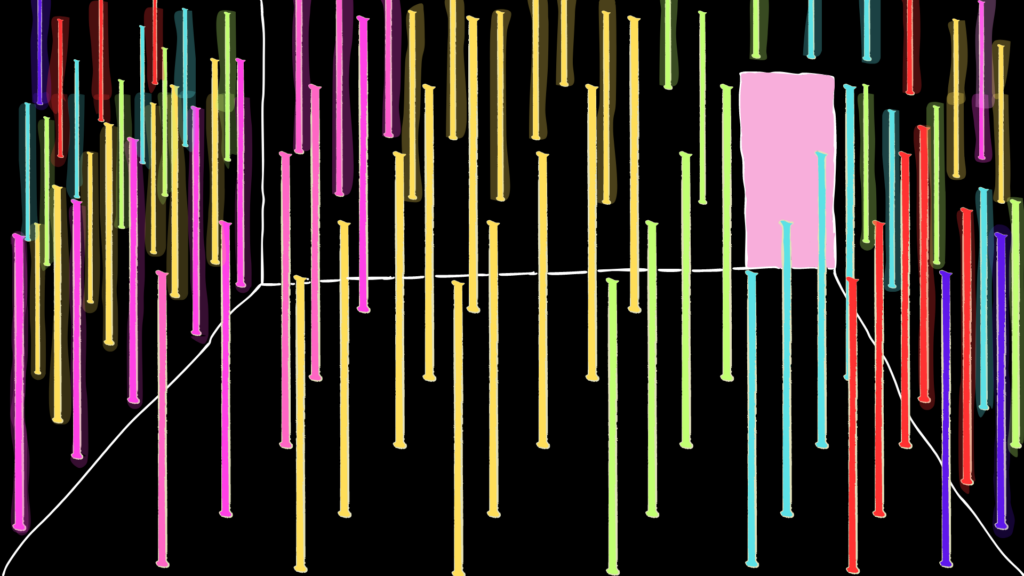
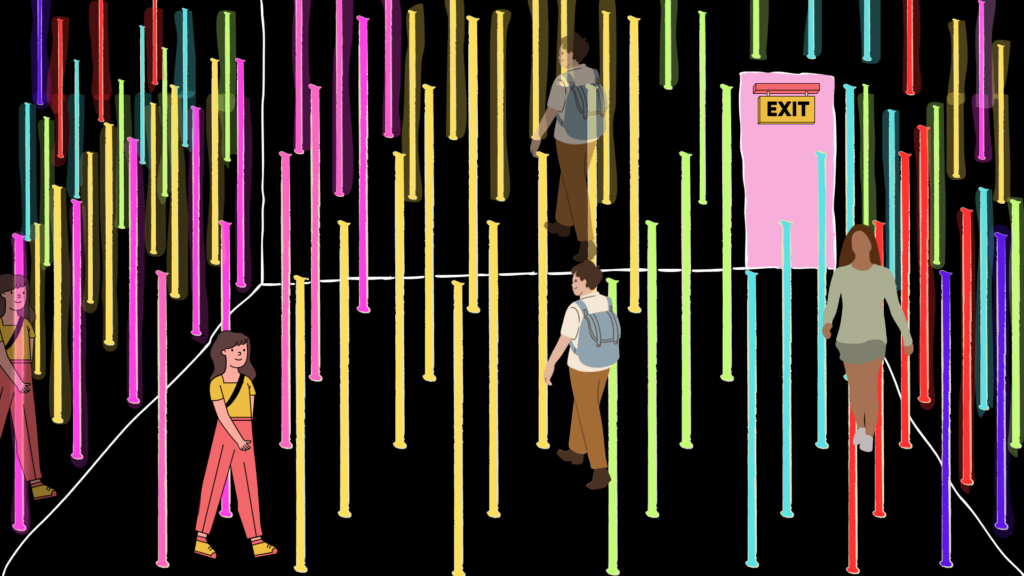
I was particularly interested in the spaces that felt like a portal and infinite almost like a forest. The room that caught my attention was what I would call the infinite light forest. There were mirrors on all of the walls in the room with poles of light that were about 8 to 10 feet tall and shifted colors. There was also an ambient space like musical track playing from hidden speakers, that sparked a sense of curiosity As I took a closer look there were individual wires above connected to each light for power and signaling the light change. When I first entered the room I thought touching the poles initiated some part of the experience, as I observed, I noticed other folx thought the same. This exhibit turned out to be an ongoing light show that could seemingly go on forever.
People moved in-between the lanes of light and around the light pole fixtures. There was no particular pattern or path for one to take within this experience. I enjoyed how you were able to journey at your own pace to take in the vastness of the moody space.
I started to think about how I would reimagine this space if it were my project. I would shift the space into a digital tree forest.

First, I would change all of the light fixtures to trees and keep the mirrors for the infinite effect and add an interactive touch element to the bark that you must stay connected to, to learn facts about native trees in the state. In constructing the space I would source the energy and wires from below like a root system verses above. Second, I would shift the sound in the space to wind blowing through trees and sounds of leaves crunching under your feet. For my last augmentation of the space I would add a motion sensor to active wind/a fan as people move through the space to feel as if they are in a surreal natural environment.
Pressure Project 2
Posted: February 5, 2024 Filed under: Uncategorized Leave a comment »For Pressure Project 2 the assignment was to go to Other World or some place where you could interact with something. I decided to go to Other World because i had never been and was intrigued with what I was going to experience. The instructions were:
– Choose one of those rooms and take notes/ pics
– Evaluate how the interaction is happening. How do I think it works?
– Observe what people are doing and how they are interacting with it/ experiencing it
– Suggest a an EVIL or GOOD option to it (tweak the system/ twist their design)
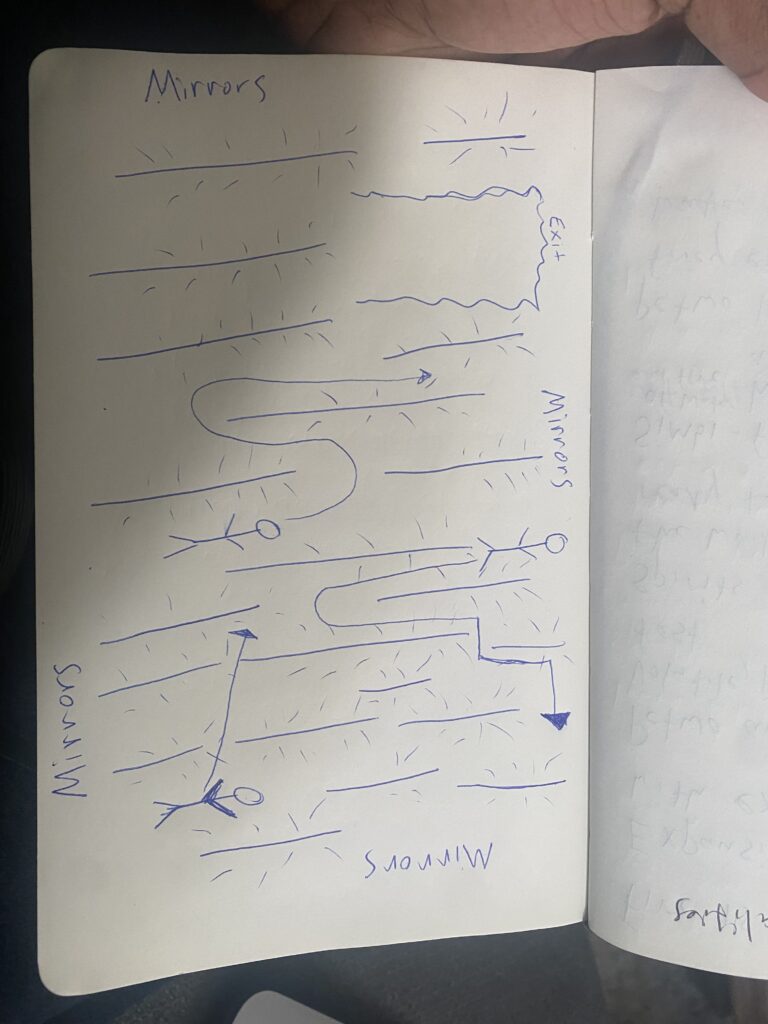
I chose one of the first rooms I walked into and that was a room full of colorful light poles with mirrors on each wall. There may have been 50 poles in the room, all the same size that gradually changed colors. The wall being a mirror made it look like there was an infinite amount of light poles in the room. I couldn’t quite figure out the interactivity of the light poles other than people walking through the space. At first I thought there was a correlation between walking past the light poles and the colors change, but it wasn’t obvious enough for me to believe in that theory. This is my drawing of the room.
As a suggestion for this room, I have a few things.
- I would add a reactive device to the poles that can detect body heat or movement. If someone walks past that pole the color of the pole drastically changes and/or changes to white when you’re near it.
- It would be cool to add a fan to the light poles so that when you pass through a lane of poles, you feel a gust of air on your skin (I wold do this similarly with a light mist too!)
- Lastly I would add a heat and/or touch reactor to the light poles, so if you touch the light pole it gradually changes color. However when you let go of the pole it goes back to its originally light.
PP2 | Otherworld Luminous Mushroom Garden
Posted: February 5, 2024 Filed under: Uncategorized Leave a comment »Of the numerous interactive environments at Otherworld, the exhibit which caught my interest most was what I interpreted to be a mushroom garden. This occurs prior to entering the exhibit with the mechanical feeding room for the bull with pyramid shaped utters and groans at you when you enter the wrong feeding sequence. This room consists of an elegant three starred archway with three groupings of mushroom capped surfaces sitting above planters. All of these illuminated surfaces are animated by overhead projectors carefully placed, angled and programmed to giving the environment a feeling that it is alive and in motion. This is not unique as most of the exhibits at otherworld rely on projection mapping techniques; however, what stood out to me was its interactivity.
As demonstrated in the videos below, there are spinning colored discs mapped outside each mushroom cap, which when stepped on, cause a flood of color to spill outwards onto the floor. The structure reminds more of gas diffusion such as smoke, flames, or fog due to the speed of expansion, geometric structure and color. Although I could not tell precisely how the system worked, I imagine there was some element of camera or other sensing which could detect the area of color detected on those spinning disks. When your foot covers the disc, it triggers the color to flow – so I presume the system has a threshold at which it detects shadows present on the disc spot. Further, each flow pattern was unique meaning that no two times that you stepped on the disk would there be the same structure / flow observed. To me this means there must be some random variable detected from the environment which governs how the light will flow. I am familiar with these types of flow generation techniques such as this reaction-diffusion generator made by Karl Sims https://www.karlsims.com/rdtool.html based on mathematical models of physical phenomena https://en.wikipedia.org/wiki/Reaction%E2%80%93diffusion_system. While they probably don’t have as complex of a mathematical model as described above, it still serves to suggest that there is some math involved to compute how the light will flow across a surface based on some initial random variable.
As a study in natural interaction, I observed several people as they entered the room and played around. For most, they seemed impressed by the scenery and were engaged visually by the Moire like pattens visible on the mushrooms. I could tell this by how the setting drew in their attention. However, most people didn’t notice the interactive element as they didn’t step on the spinning light discs. There was one person who did realize the hidden interactivity and chose to step on all of the discs. I found it interesting that she chose to jump from one disc to the next as they were spaced within hopping distance. This reminded me of games I’d play with my sister as a child which we called the floor is lava and we would try to move through a room only stepping on furniture and not the carpeting. As a benevolent alteration to this interactive design, it’d be interesting to account for tracking of human movement from one disc to the next. Perhaps if the person can jump from one end of the room to the next while triggering each of the discs, that the room will acknowledge this accomplishment as is done in the next room when the right sequence is fed to the bull utters. This may be technically challenging given the short detection time allowed for a sensor when someone is hopping quickly through an environment. Secondly, there would be a challenge in synchronizing detection of events from multiple cameras; yet, I bet there is already a centralized media server acting as the master to its various child projectors and sensors.
Pressure Project 1 – Fireworks
Posted: January 30, 2024 Filed under: Uncategorized | Tags: Interactive Media, Isadora, Pressure Project, Pressure Project One Leave a comment »When given the prompt, “Retain someone’s attention for as long as possible” I begin thinking about all of the experiences that have held my attention for a long time. Some would be a bit hard to replicate such as a conversation or a full length movie. Other experiences would be easier as I think interacting with something could retain attention and be a bit easier to implement. Now what does that something do so people would want to repeat the experience again and again and again? Some sort of grand spectacle that is really shiny and eye catching. A fireworks display!
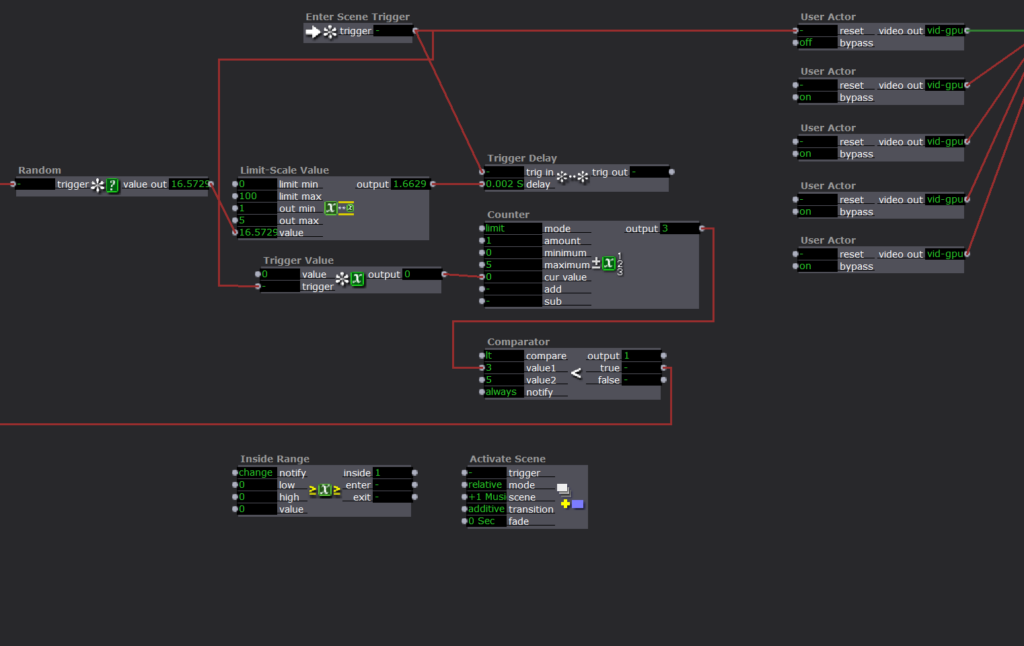
The Program
The first scene is setting up the image that the user always see. This is the firework “barrels” and buttons to launch the fire works.
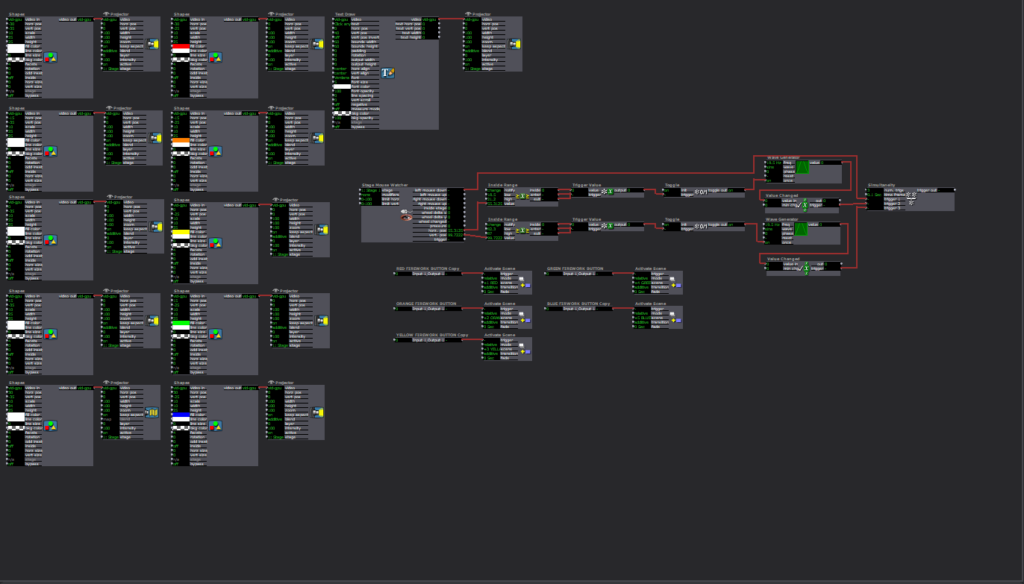
The buttons were made as a custom user input function. I did not know there was a control panel that already has preset buttons programed. If I had known that I could have saved myself 2 hours of experimenting. So how each button works is the Stage Mouse Watcher checks the location of the mouse in the stage and if the mouse clicks. Then two inside range actors are used to check where the mouse is in the x and y axis. If the mouse is in preset range it triggers a Trigger value actor that goes to a Toggle actor. The toggle actor then turns a wave generator on and off. The wave generator then sends its value to a Value Changed actor. If the in the x bounds, the y bounds, and the mouse clicks triggers activate all at once, then the scene is moved to launch a firework.
The scenes that the buttons jump to is set up to be a unique firework pattern. The box will launch a firework to a set location and after a timer the sparkle after effect will show. Then after it ends the scene ends.
Upon reflection, one part that could have helped retain attention even longer would have been to randomize the fireworks explosion pattern. This could have been done with the random number generator and the value scalar actors to change the location of where the sparkle explosion effect ends up and with how long they last in the air.
Pressure Project 1 | Neon Fragmentation
Posted: January 30, 2024 Filed under: Uncategorized Leave a comment »This piece was inspired by my personal interests in jazz, feedback systems, and media archeology. I’ve played saxophone for 10+ years and look highly upon jazz musicians as fearless explorers of sonic harmony, melody, and rhythm. Their artform requires a fine-tuned motor pathway system connecting the brain and fingers to enable quick musical decisions within an improvisatory ensemble of horns, drums, pianos, and strings. The interactions between musicians in an ensemble are unique and require a auditory feedback to create an artform bigger than any one contributor. In addition to jazz, I’ve worked with electronic feedback systems and learned to respect the impact their discovery has had on much of modern technology. These technological systems form an ecological relationship with human culture which too is receptive to feedback. The process of media archeology can help to scrutinize and analyze dominant narratives about technology and their relationship to culture.
For this project, a computational multimedia software called Isadora was used to devise an audiovisual feedback loop. This system inputs a video file undergoing several stages of video mixing and feature analysis to synchronize low and high frequency audio tone generation with video splitting. Computer vision plugins were used to detect relative motion and color within the inputted video frame. The intensity of motion detected was used to drive the quantity and frequency of video splitting in the XY directions. Additionally, the RGB color proportionality drove emission of audio tones where red produced frequencies between 30 – 400 Hz and green and blue produced frequencies between 1-2kHz.
This piece takes influence from early 1920s Montage film technique including Fernand Leger’s Ballet Mecanique. The affects of the industrial revolution are visualized through mechanical systems held at the same level of authorship as humans. Humans are depicted with cyclic motions such as a woman on a swing evoking the image of a pendulum. The rapid frame changes are also accompanied by a frenetic sound track which is synchronized to the rhythm of industry. The rapid montage clips remind me of jazz because of its quick delivery of stimulus transcending the traditional mental faculties of comprehension. It seems to me that Leger is playing around with visual Jazz in the form of semiotics. When passed through my generative media system, the quick color and shape changes lend themselves well when converted into high and low frequency tones. To the right set of ears, its difficult to tell the difference between abstract jazz and machine noises.
The assembly line style of interaction between humans and machines during and after WWII, is then expressed by a 1950s supermarket film. The women in the store is surrounded by an array of homogenous consumables which funnel smoothly down a conveyor belt, into her car, and then presumably into the home. There is an element of time ticking in the store from the machine noise pressing of keys on the cash-register to the conducting of cars via neon traffic light systems. This exchange of information and household goods all flows to the beat of machine inputs and outputs.
Human-machine stimulus and interaction is even more pronounced in the situation of the 1970s Las Vegas strip. Suburban tourists have gathered in neon wild west in search of cowboys and gold nuggets. Immersed in an ecosystem of electric light and casinos, tourists can at a safe distance engage in a symbolic exchange of money and neon. Grande advertising spectacles erected in the desert now being closer in association to sinful redlight districts than with their initial connotation of technological optimism.
I hope that this piece brings attention to interrelations of human and machines in the 20th century. The aesthetic of multivid splitting by computer vision and foreign sounds helps bring these media artifacts into the vantage of the modern algorithmic viewer. Just as machines influenced human perception and behavior, so too are algorithms.
Media artifacts:
Pressure Project 1: Circles
Posted: January 30, 2024 Filed under: Uncategorized Leave a comment »I approached this assignment without a specific goal in mind, focusing on actors that had caught my interest during our initial exposure to the software, such as the Movie Player, Shimmer, and Wave Generator. My aim was to experiment with these actors and explore the various variables I could manipulate. That served as my starting point.
Additionally, I considered actors recommended for experimentation, like the Shape actor and Video In Watcher. Before delving into the patch, I sought visual inspiration by looking at how designers and artists utilized patterns in their work and how they went about animating them. The images I explored influenced my creative process.
After gathering inspiration, I experimented with the Shapes tool and the Wave Generator to create and animate patterns in Isadora. Upon completing my first scene, I searched for a video to use with the Movie Player actor, choosing one supplied by a classmate featuring water and bubbles. To maintain engagement, I aimed for playing with the different perceptions of circles—moving from repetitive motion to free-flowing, organic visuals, and interactive movement.
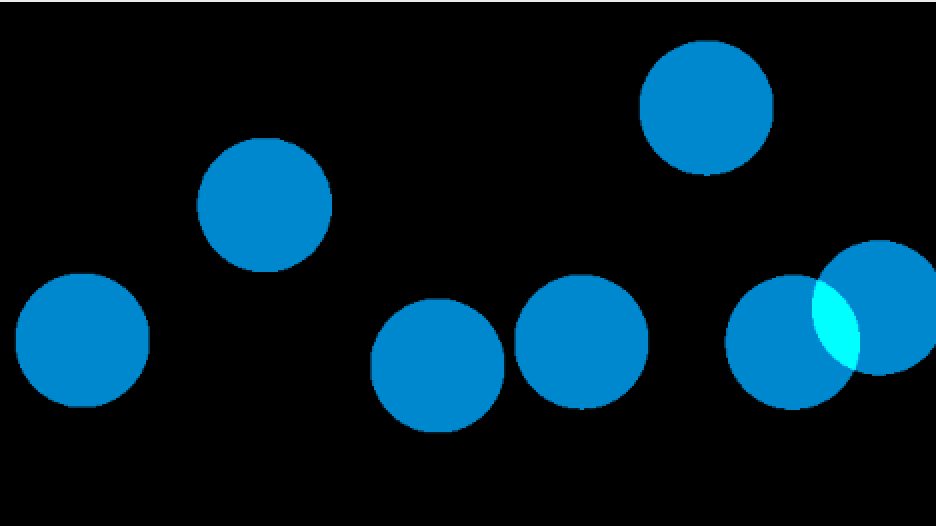
While interactivity wasn’t a requirement, I implemented the Mouse In Watcher to grant users control over variables like shape dimensions, sound volume, and Shimmer effects intensity. The Movie In Watcher, paired with the Dots effect, facilitated circle movement using light, shadows, and colors captured from the camera input.
See screen recording below (does not include sound 🙁 ).
One aspect I wanted to incorporate was computer vision, intending for movement captured by the Video In Watcher to influence the music volume. Although I couldn’t achieve this before the presentation, I learned how to make it work afterward.
I’m pleased that viewers stayed engaged with the patch, and achieving interesting transitions was a success. A classmate even mentioned enjoying the evolution of circles from spacious and mobile to tight and grid-like in the final scene, a detail I hadn’t initially considered but found satisfying upon reflection.
While I don’t regret adding interactivity, my future goal is to master using actors to autonomously manipulate variables for a more self-generated patch, aligning with the requirements of the assignment.
Pressure Project 1 – Generative Dark Patterns
Posted: January 30, 2024 Filed under: Uncategorized Leave a comment »I wasn’t really sure what I wanted to do for this project at first. We were tasked with creating something self-generating and almost unpredictable, which was daunting to me in a new software. I figured the best way to create something was to just begin though.
HOUR 1
Within my first hour I started playing around with some of the different actors in Isadora. I wanted to see what would happen if I plugged the wave generator into various parts of the shapes actor. I noticed that when I put a sine wave into both the horizontal and vertical positions my default square kind of bounced around the screen, but not in a way that I felt was interesting. When I changed the wave type to a triangle though I noticed that the square started to bounce in a very familiar way, almost like an old screensaver (I was specifically reminded of the screensaver on my old family Gateway computer, both the bouncing logo and the pipes). Moreover, if I added multiple shapes on top of each other and messed with the phase there was a nice additive effect when shapes crossed that I liked.
HOUR 2
I wanted to randomize the different shapes going around my space. After looking through a few tutorials and posts I happened across this post talking about using a counter being used to select different timecodes: https://community.troikatronix.com/topic/6399/answered-using-a-list-of-timecodes-to-trigger-events-in-this-case-lights-through-midi. This was interesting to me, and I figured I could do something similar to create a loop that would activate different shapes at once. After trying for a little bit, I couldn’t get my loop to work, however I got very close. My logic kept short-circuiting.
I figured I would give up on this and just manually make my randomized entrances. I still had no clue what I wanted to do though, and I was getting a bit worried. Had I squandered all this time? Was I going in the right direction?
EPIPHONY
I started musing on the part of this project about grabbing people’s attention. What was it about Conway’s Game of Life or bouncing screen savers that had people staring at them for hours? For Game of Life surely there are emerging patterns and self-generating complexity, something obviously compelling to me, but why was a bouncing logo just as enthralling? I remembered that I used to try and predict when that logo would get caught perfectly in a corner of the screen. It never would, but it got so close so many times, and that’s why I kept watching. There’s something about being so close to perfection that is strangely alluring.
While we were discussing the second reading by Hari and Thanassis, I had a thought. We got on the topic of dark patterns, specifically within games like Candy Crush, and I was reminded of those horrible mobile ads that I would get occasionally. The idea is that they would set up what looked like really easy gameplay but whoever was playing would purposefully play badly and fail to get you to download the game. It’s a very sneaky tactic that acts as a gateway into games with even more dark patterns. I was also reminded of several trends a year ago on TikTok and YouTube where content creators started putting gameplay from popular games into the bottom or corner of their videos (Subway Surfers particularly became a huge meme). The idea was that to keep people from scrolling off of an otherwise dull video, more lively footage was added to retain peoples’ attention, which would in turn increase revenue since watch time was inflating.
These emerging patterns intrigued me, as they were real evolving trends built on the foundation of retaining attention. They were just as unpredictable to me as Conway’s Game of Life, just as captivating, and just like one of those tiles, the trend disappeared, as do many. I wanted to make something that was a commentary on this, tying it all together with the earliest and simplest attention grabber I remembered, that being the bouncing screen saver.
HOUR 3
I spent the next hour collating and integrating several different clips of gameplay from various titles I saw used in the trends I talked about earlier, and I will link those sources below:
- Mobile ads: Mobile game ads (youtube.com)
- Subway Surfers Gameplay: Subway Surfers Gameplay (PC UHD) [4K60FPS] (youtube.com)
- Minecraft Parkour: 11 Minutes Minecraft Parkour Gameplay [Free to Use] [Download] (youtube.com)
- Temple Run Gameplay: Temple Run 2 (2023) – Gameplay (PC UHD) [4K60FPS] (youtube.com)
- Fortnite Gameplay: Fortnite Gameplay 4K (No Commentary) (youtube.com)
I took each video and trimmed them down to 1 minute in Adobe Premiere (for the footage of different mobile game ads, I selected a few ads that I felt were most emblematic of my own experiences). After that I created separate scenes for each clip that I would load in below my screen saver squares using Activate Scene and Deactivate Scene.
I also figured out that you have to multiply any randomized values by 1000 before inserting them into time-based inputs because of the way Isadora treats seconds versus normal floats.

HOUR 4
I created a user actor for each of my little bouncing shapes and for the instantiation of those shapes, as well as adding more randomized elements like the phase (which would affect where the shapes bounced), the color, and the timing at which they appeared.
HOUR 5
In the final hour I took time to polish and organize. I created some quick logic that would look at the vertical and horizontal positions of several shapes, compare them, and load/unload gameplay footage based on those values. I also took the time to add a piece of music that I felt captured the feel of my experience. The piece is called Cascades by Disasterpiece and it’s from one of my favorite games, Hyper Light Drifter: https://youtu.be/bKkl9iRB9-c?si=jy81Xwh1ZtegPbJJ.
SHOWTIME
People reacted differently from what I expected but I’m really glad they did. Everyone caught onto the fact that the experience was probably some critique or was representative of some trend, which I thought was great. Nathan immediately recognized the DVD screensaver-like bouncing of the shapes which I also appreciated, and Orlando said that the footage has YouTube tutorial vibes, which wasn’t a connection I drew at first but is incredibly apt. Nick made a comment about a moment where it appeared that the shapes filled in this black section of the screen and footage came up all around, which I thought was cool and pretty close to getting at how the footage is activated. There was a lot of talk about how the piece reflects on me as an artist which was great and people noted that music seemed like it wasn’t looping, which helped build anticipation because it made the cut harder to distinguish. There was also a question as to whether the music was diegetic or not, which is not something I considered at all, but I can’t stop thinking about it now.
Overall, I’m glad to have heard people’s reactions and what meanings they drew, as well as emotions. I’m also happy with what I got done in the amount of time I had. I was worried at first but once I figured out some intent behind what I wanted to do things went smoothly.
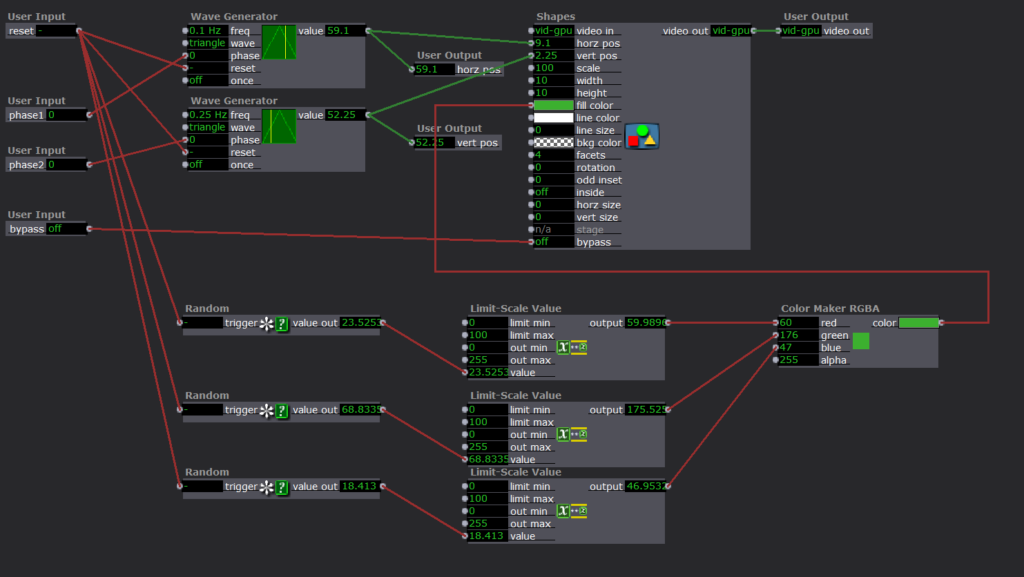
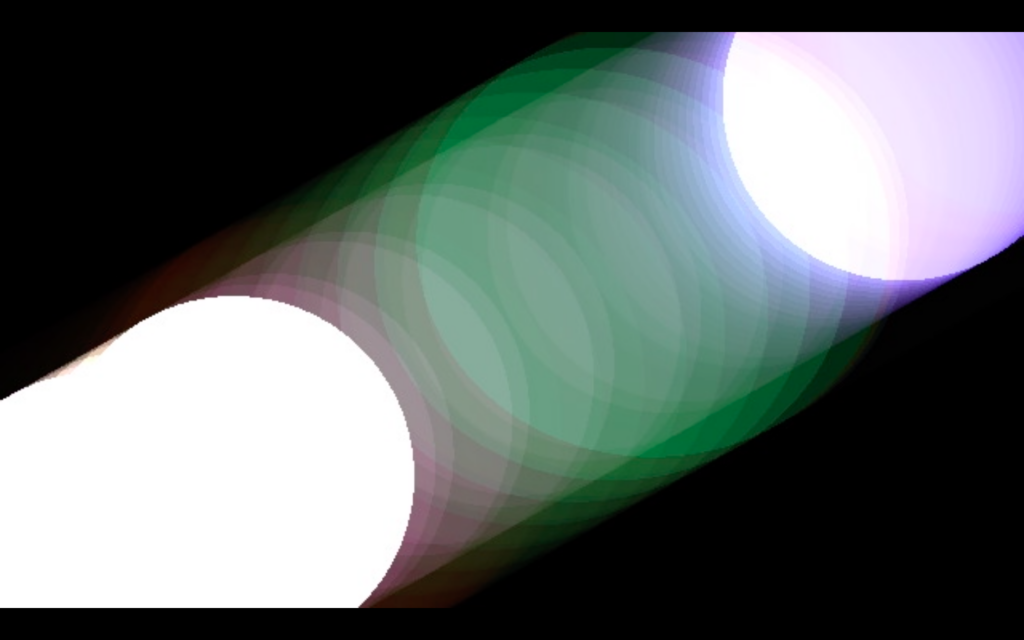
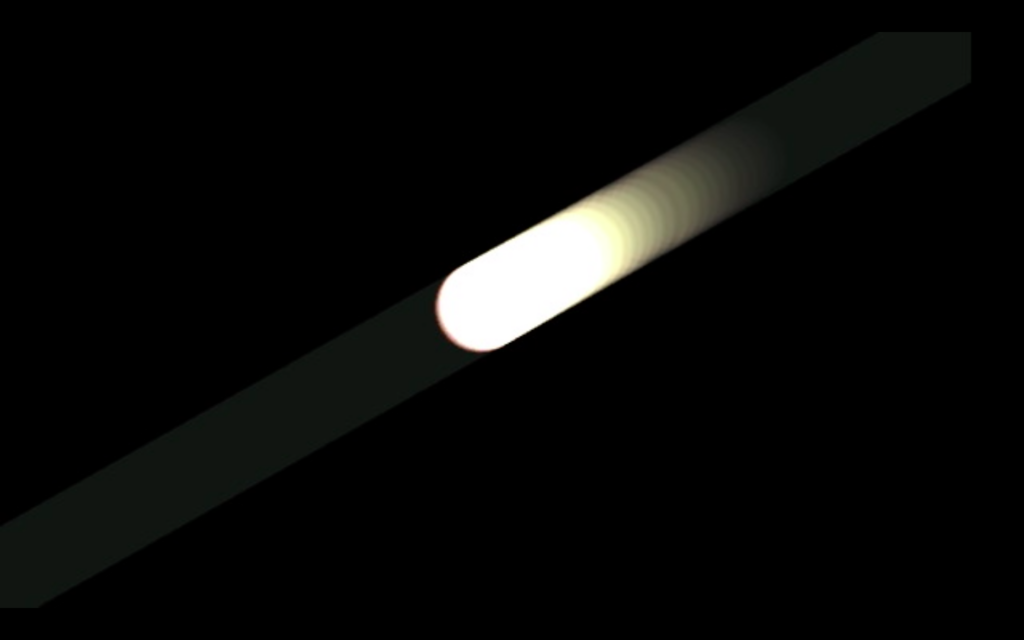
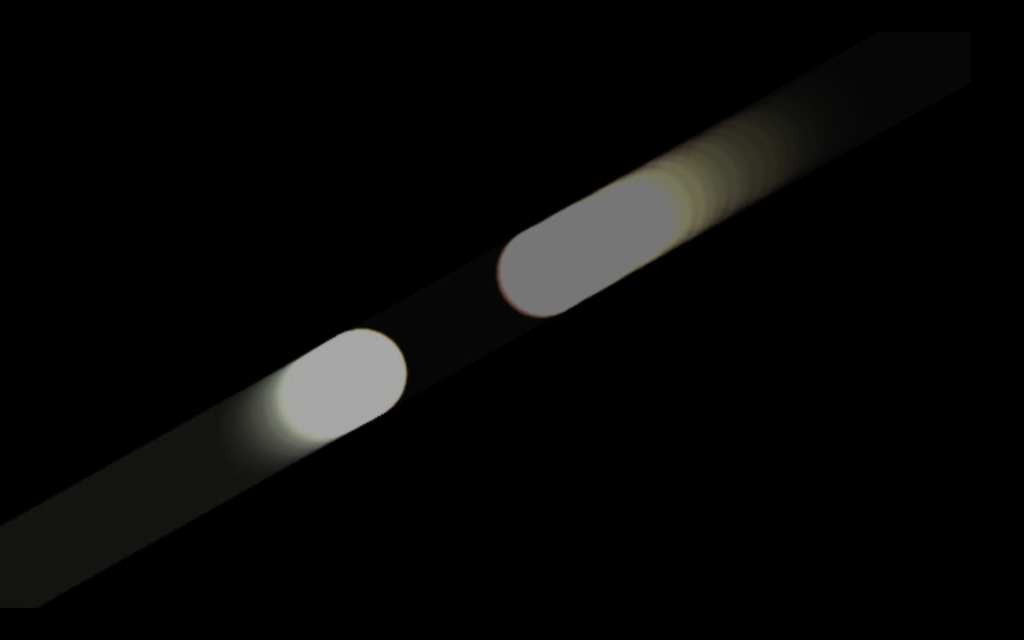
Pressure Project 1- The Aura of Circles
Posted: January 29, 2024 Filed under: Uncategorized Leave a comment »For this pressure project we were assigned to devise something that can hold your attention for as long as possible. For the first two hours of working on this project I was simply clicking through all of the options of what Isadora offered. I wanted to start simple and play with circles. As I continued to discover more things in Isadora I had an idea to create multiple circles with a trailing color of that shape as they move.
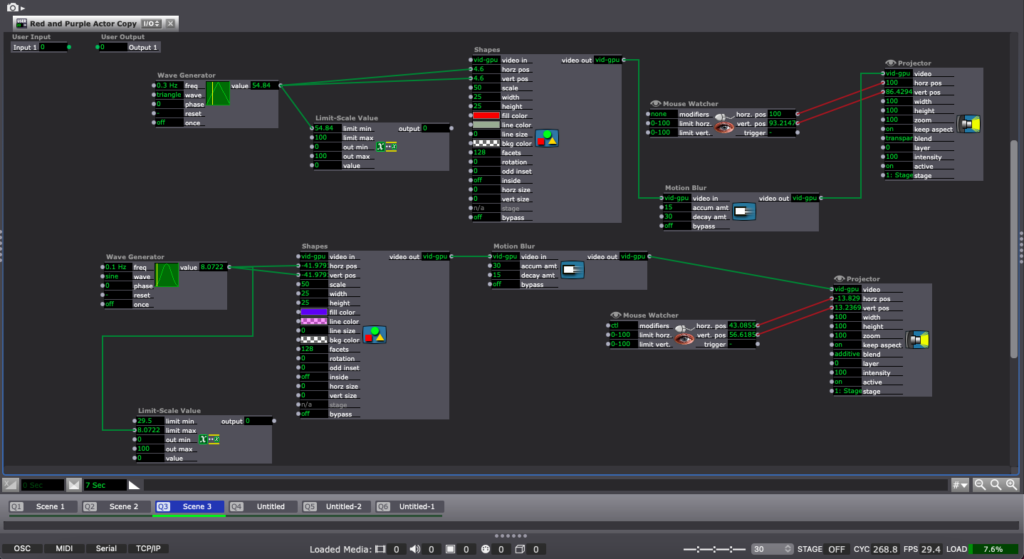
I was inspired by auras and the idea behind someone or something holding a distinctive atmosphere or quality. I grappled with what all can Isadora do and specifically how do I create a colorful trail. Thankfully I found motion blur and that’s what ignited my idea. I started to click through shapes and motion blur (specifically messing with color) and somehow created a colorful trail. Unfortunately I have no idea how I did that. I created 6 scenes and in each scene I used a “User Actor(s)” except for the last scene. I also had a 7 second transition between each scene.
SCENE 1 (4 user actors, different colors moving is a diagonal)
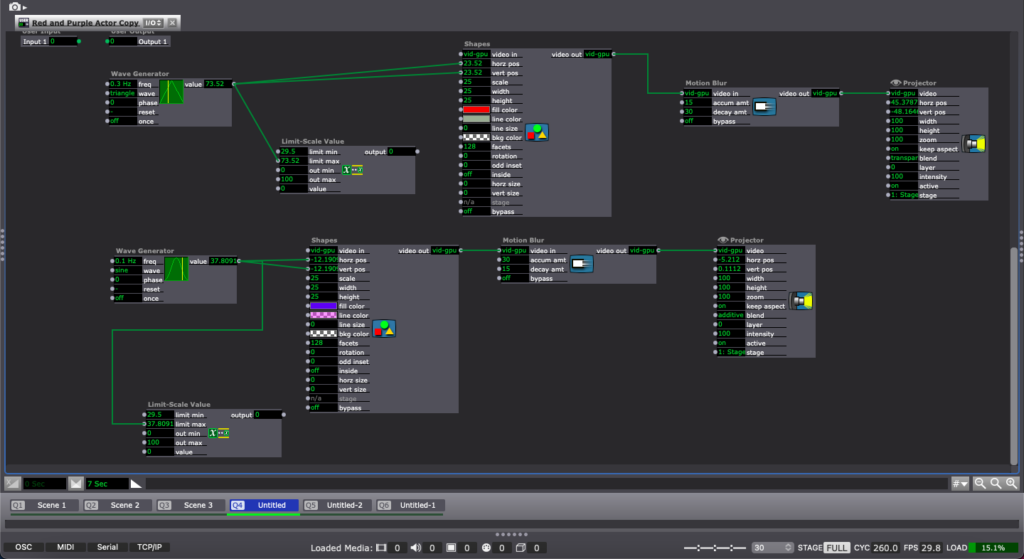
SCENE 2 & 3 (2 user actors, different colors and scale moving diagonally on the screen)
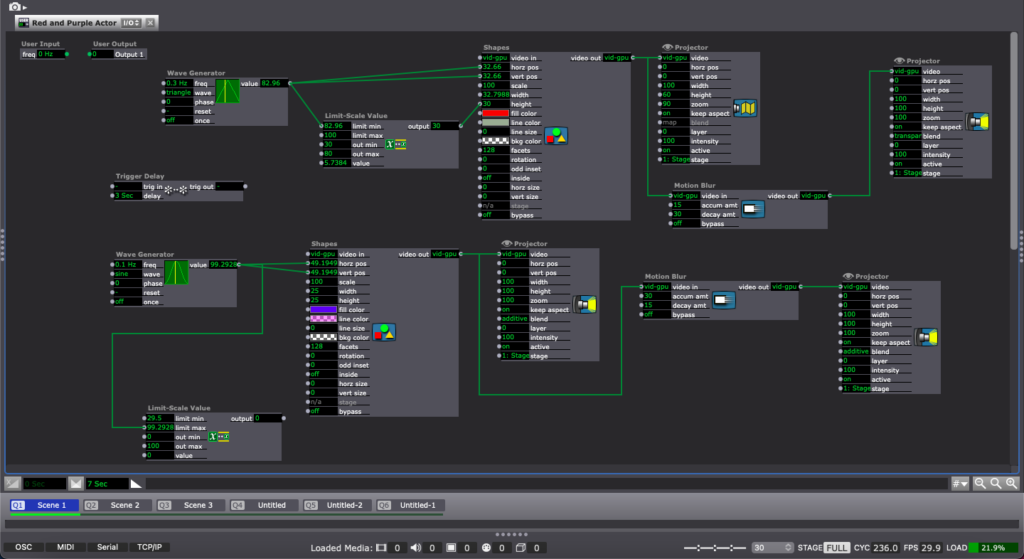
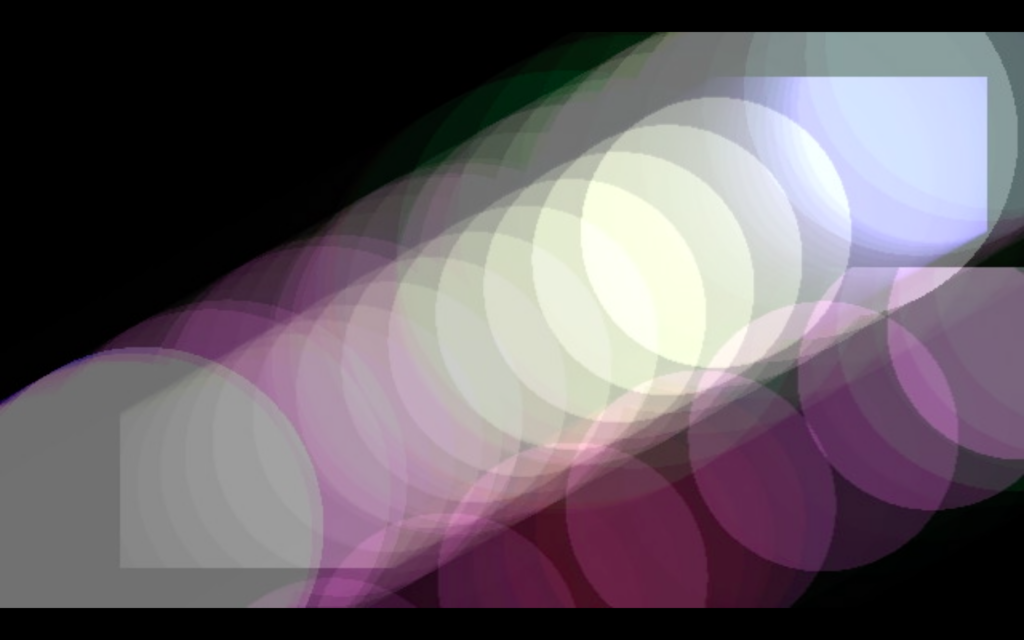
SCENE 4 I wanted the circles to start moving all over the screen and I discovered Mouse Watcher! Mouse Watcher allowed me to move the designated circles around wherever i dragged my mouse on the screen. I’m now curious about how I can get each circle to move in its own pattern without me dragging my mouse.
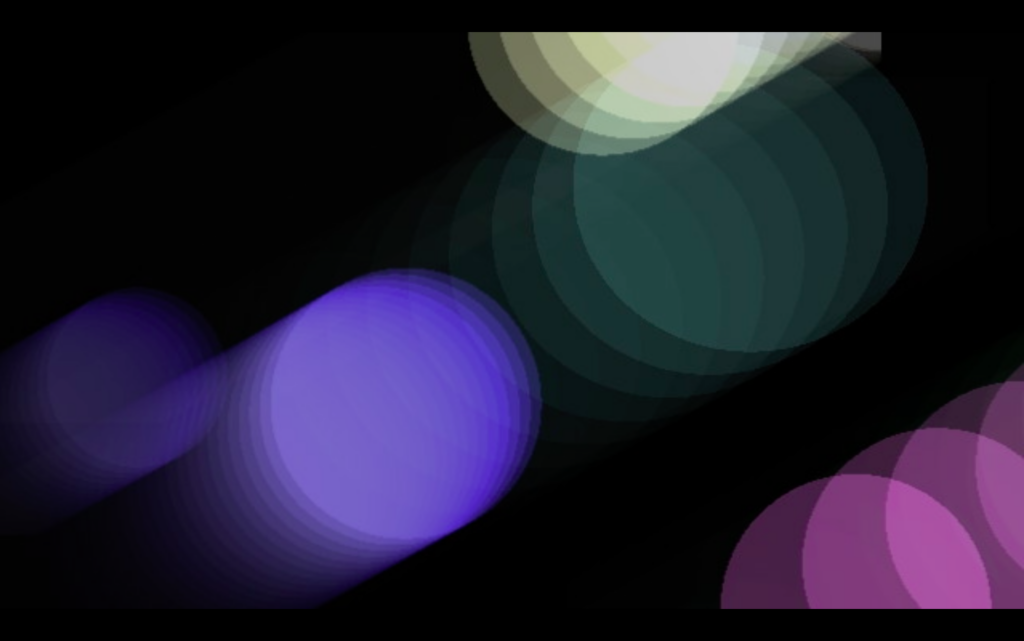
SCENE 5 I became intrigued about what happens when al of the color circles come together. What would it look like? What color trail would it leave?
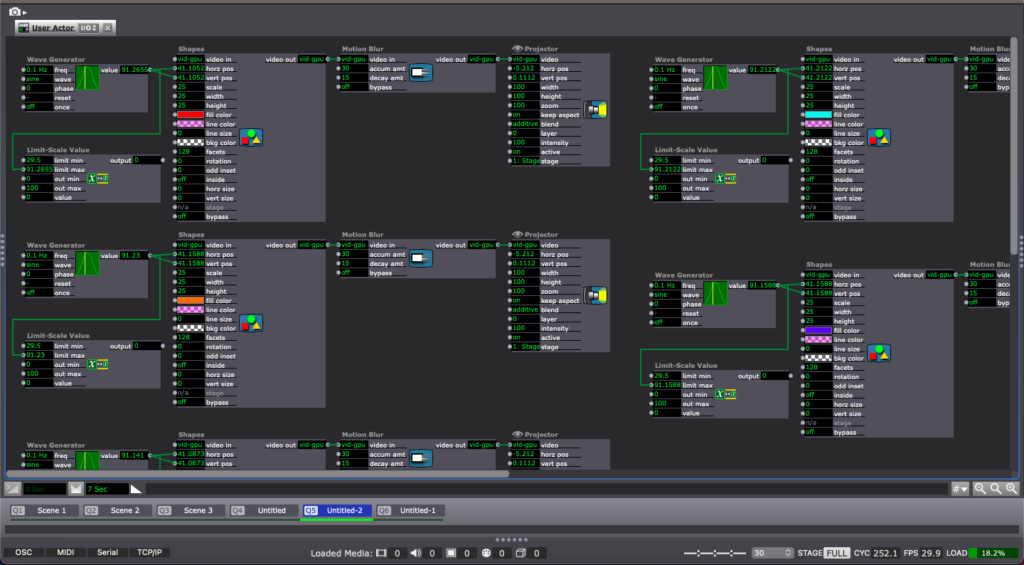
SCENE 6
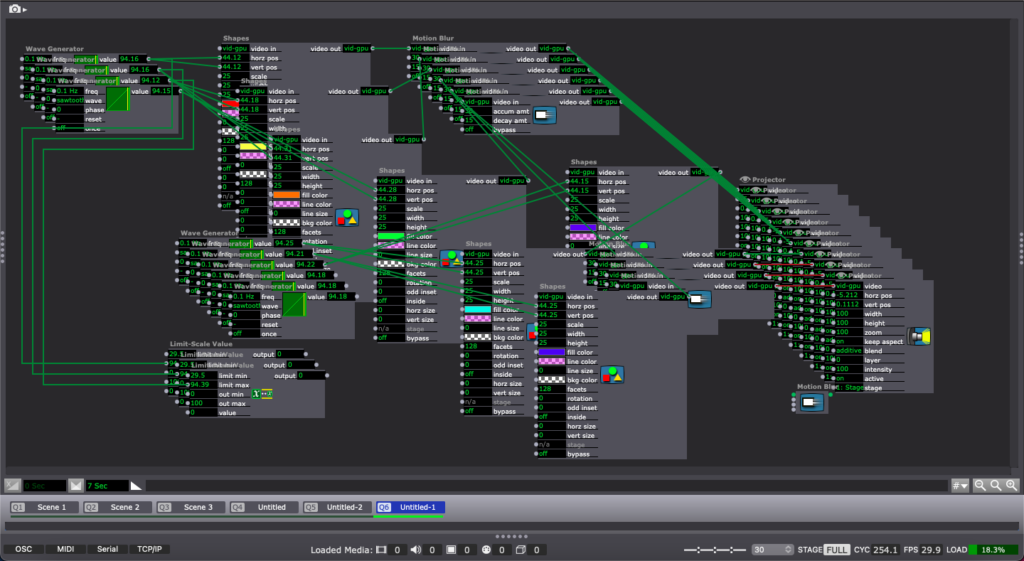
By the 5 hour mark this is what I settled on. I wasn’t able to incorporate a “trigger” or “jump++” actors, however I’m proud of what I was able to accomplish. I’m interested in how the circles or pathways of circles could be affected by audio or some kind of sound. I also see this idea going beyond shapes and possibly looking at body movement and having the aura of that body trail/ track the movements/ dancing.
Class Feedback:
My project reminded my classmates of:
- a lens flare
- movie intro logo
- rainy car crash scene in a movie
- someone shining a light in your face as you’re waking up
- moving particles
- the trail of the color gives the black background texture
Orlando’s Bumped Article
Posted: January 23, 2024 Filed under: Uncategorized Leave a comment »https://dems.asc.ohio-state.edu/?m=202212