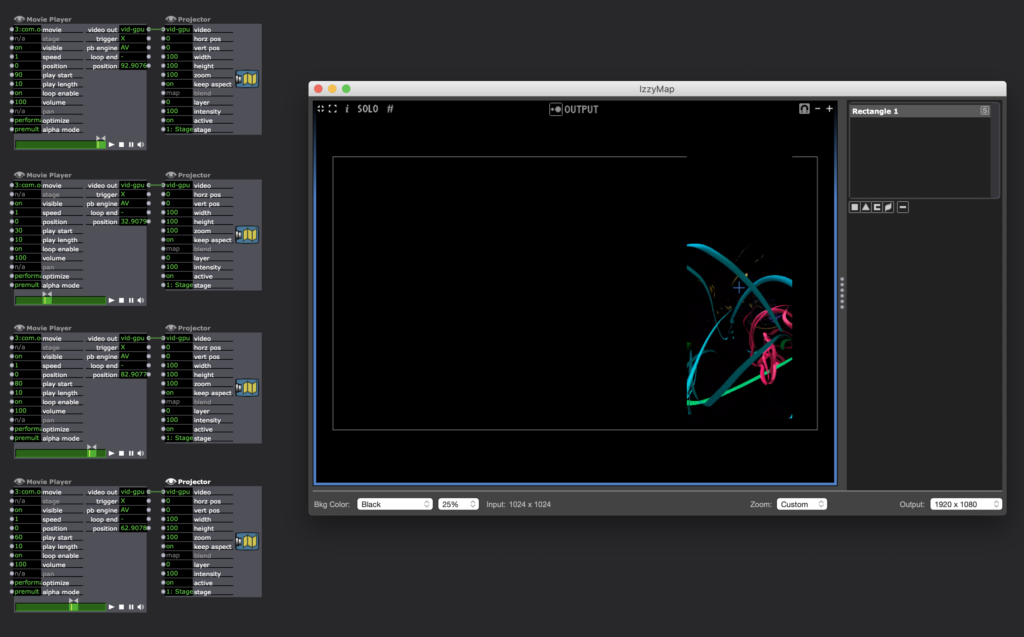
Cycle Project 3
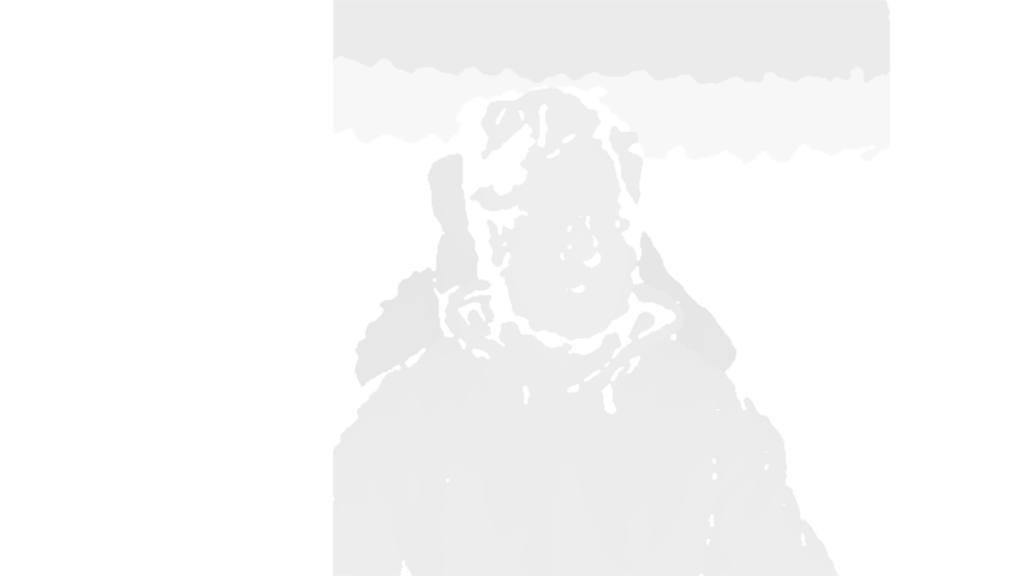
Posted: December 10, 2020 Filed under: Uncategorized Leave a comment »In my Cycle 3 project, I wanted to get a bit better filter with a harder edge to edit out the background of the images. Alex and I worked together and added some TT Sharpen effects, Gauzian blur and TT Sorbel Edge Detection. These filters stacked on top of each other allowed me to get my entire body cut out from the background. I think if I had something like a green screen in the background, the effect would be even more precise.

My major goal for the third iteration of the project was adding some things to make the user experience more interesting. I added some sound effects when buttons were pushed on the makey makey, as well as some short animations that would play after the user took a picture with a hat on.
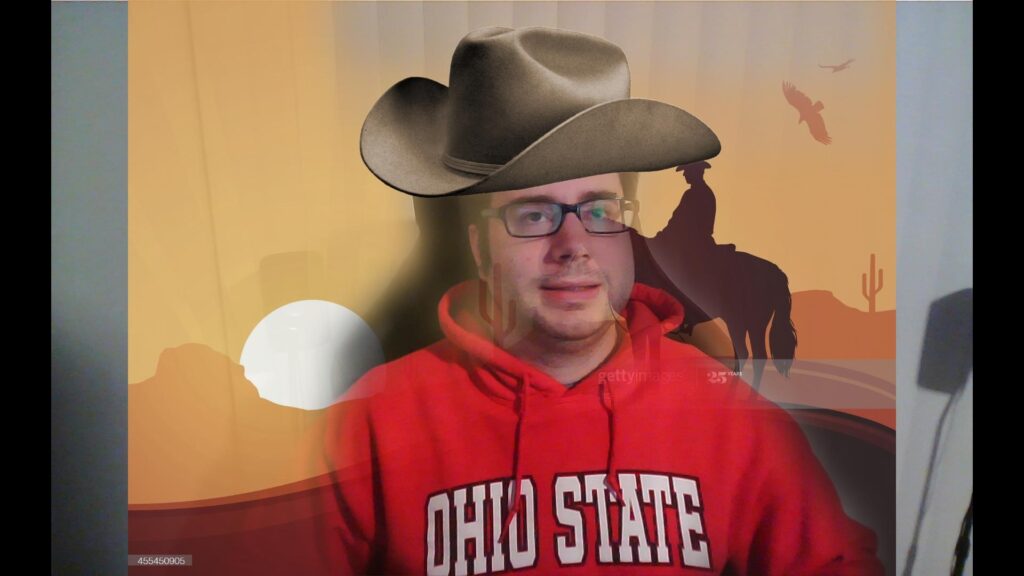
I also added a third environment, which is a party scene. Overall, this project allowed me to synthesize many of the tools we were working with during the class. I used the makey makey as the interface. I also used the Leapmotion hand sensor to allow users to rotate and resize an image.
Much of my work on this project involved compositing, as I used the depth camera to capture the image of the user as well as the filter that would allow for the removal of the background.
If I were to continue on this project further, I would want to take the composited image of the user with the hat and put them into a game like situation, perhaps something like some of the games that came with the game boy camera software. I found that I really enjoyed designing experiences that users would interact with and trying to figure out what would make them clear and easy to use.
Cycle 3 Isadora patch
https://1drv.ms/u/s!Ai2N4YhYaKTvgbYSo1Tsa-MdTV2ZGQ?e=EmjBNh
This is a recording of me showing the different parts of my cycle 3 project
https://1drv.ms/u/s!Ai2N4YhYaKTvgbYctMNYMgWOb7P3Sg?e=5hRoqY
Cycle Project 2
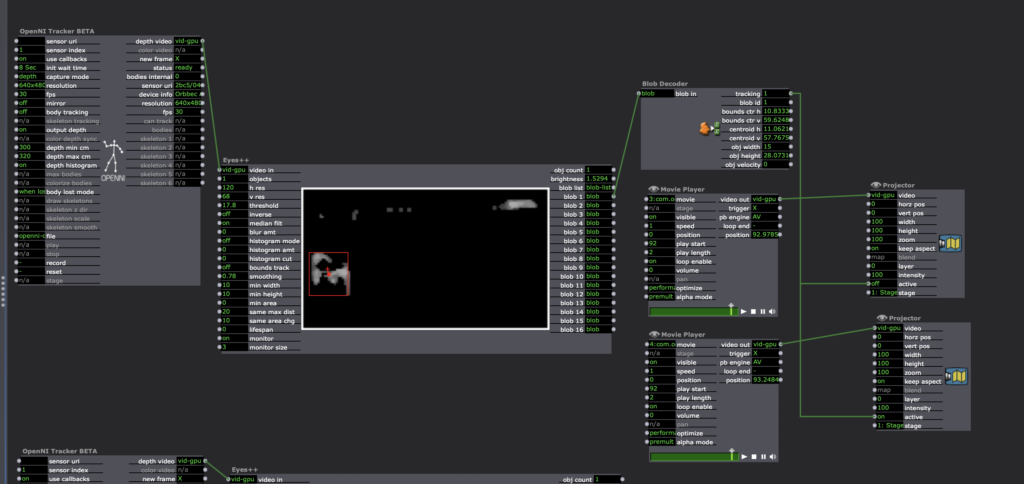
Posted: December 10, 2020 Filed under: Uncategorized Leave a comment »As the next step in the photo booth project, I wanted to switch from using my webcam to the Orbecc Astra camera so that I could capture depth data while I was capturing the image. With the depth data, I would use a luminance key to filter out the background portion of my image.
One of the difficult parts of this project was the resolution of the Astra camera. It incorrectly detected some parts of my face, so they became transparent when run through the luminance key. In order to combat this, I added a gauzian blur, but it was not quite the tight filter I was looking for with my project.
https://1drv.ms/u/s!Ai2N4YhYaKTvgbYWfqACckMc8dOFkg?e=wsLF3P
This is a link for my code for cycle 2
https://1drv.ms/u/s!Ai2N4YhYaKTvgbYbCQq_7ZQ6ZIghtg?e=CXGBWk
This is a link to a video file of my cycle 2 presentation.
Cycle Project 1
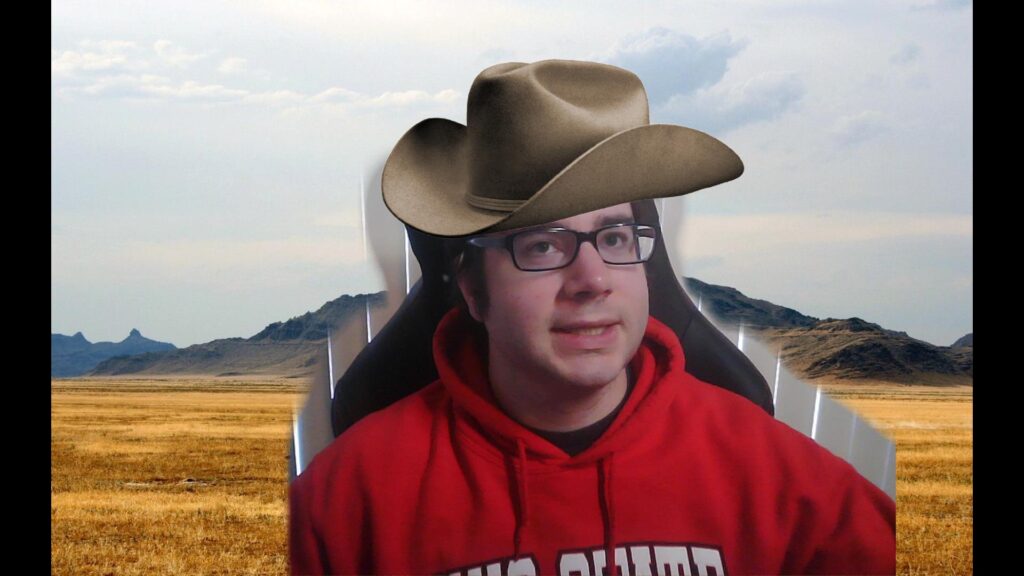
Posted: December 10, 2020 Filed under: Uncategorized Leave a comment »For this project I wanted to synthesize some of the work I had done on my previous projects in the class. I wanted to create a kind of photobooth. Users would operate the booth by the makey makey and then Isadora would capture a webcam image of the user. From there the user can select different environments to add hats. For this iteration of the project, I offered a choice between a Western theme and a space theme.
After selecting the desired theme, the users could adjust the size of the hat by pressing a button on the makey makey interface. From there, they could use the Leapmotion controller and reposition and rotate the hat as well as resizing it.
One of the most difficult parts of this project for me was figuring out the compositing using virtual stages. Additionally, I spent a lot of time trying to find ways to make the prompts (which appeared over the image) disappear before the image was taken.
This is a link to my code for the project.
https://1drv.ms/u/s!Ai2N4YhYaKTvgbYVl0LiupCRh2PFdg?e=wuKpZm
Here is the link for my class presentation.
https://1drv.ms/u/s!Ai2N4YhYaKTvgbYaMqgJRuOsmjBMog?e=rDAOMd
Depth Camera CT Scan Projection System
Posted: December 5, 2020 Filed under: Uncategorized Leave a comment »by Kenneth Olson
(Iteration one)
What makes dynamic projection mapping dynamic?
Recently I have been looking into dynamic projection mapping and questioned what makes dynamic projection mapping “Dynamic”? I asked Google and she said: Dynamic means characterized by constant change, activity, or progress. I assumed that means for a projection mapping system to be called “dynamic” something in the system would have to involve actual physical movement of some kind. Like the audience, the physical projector, or the object being projected onto. So, what makes dynamic projection mapping “dynamic” well from my classification the use of physical movement within a projection mapped system is the separation between projection mapping and dynamic projection mapping.
How does dynamic projection mapping work?
So, most dynamic projection systems use a high speed projector (meaning a projector that can project images at a high frame rate, this is to reduce output lag). Then an array of focal lenses and drivers are used (to change the focus of the projector output in real time). A depth camera (to measure the distance between the object being projected onto and the projector) and then a computer system with some sort of software to allow the projector, depth camera, and focusing lens to talk to each other. After understanding the inner workings of how some dynamic projection systems work I started to look further into how a depth camera works and how important depth is within a dynamic projection system.
What is a depth camera and how does depth work?
As I have mentioned before, depth cameras measure distance, specifically the distance between the camera and every pixel captured within the lens. The distance of each pixel is then transcribed into a visual representation like color or value. Over the years depth images have taken many appearances based on different companies and camera systems. Some depth images use gray scale and use brighter values to show objects closer to the camera and darker values to signify objects further in the distance. Each shade of gray would also be tied to a specific value allowing the user to understand visually how far something is from the depth camera. Other systems use color, while using warmer versus cooler colors to measure depth visually.

How is the distance typically measured on an average depth camera?
Basically most depth cameras work, the same way your eyes create depth through “Stereoscopic Vision”. For this Stereoscopic Vision to work you need two cameras (or two eyes) in this top down diagram (pictured above), the cameras are the two large yellow circles and the space between them is called the interocular (IN-ter-ocular) distance. This distance never changes, however, this ratio needs to be at a precise distance because if the interocular distance is too close or too far apart the effect won’t work. On the diagram the dotted line shows the cameras are both looking at the red circle. The point at which both camera sight lines cross is called the zero parallax plane, and on this plane all objects are in focus. This means every object that lives in front and behind the zero parallax plane is out of focus. Everyone at home can try this, If you hold your index finger a foot away from your face, and look at your finger, everything in your view, except your finger, becomes out of focus, and with your other hand slid it left and right across your imaginary zero parallax plane, with your eyes still focused on your finger you should notice your other hand is also in focus. There are also different kinds of stereotypes, another common type is Parallel, on the diagram, the two parallel solid lines coming from the yellow circles point straight out. Parallel means these lines will never meet and also mean everything will stay in focus. If you look out your window into the horizon, you will see everything is in focus, the trees, buildings, cars, people, the sky. For those of us who don’t have windows, Stereoscopic and parallel vision can also be recreated and simulated inside of different 3D animation software like Maya or blender. For those who understand 3D animation cameras and rendering, if you render an animation with parallel vision and place the rendered video into Nuke (a very expensive and amazing node and wires based effects and video editing software) you can add the zero parallax plane in post. This is also the system Pixar uses in all of its animated feature films.
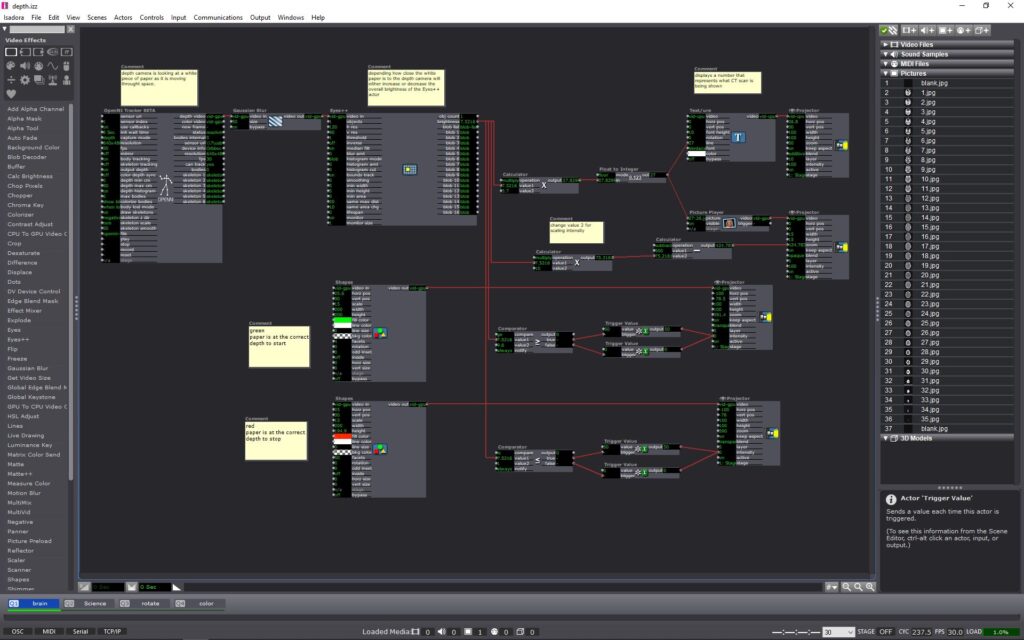
Prototyping
After understanding a little more about how depth cameras work I decided to try and conceive a project using an Astra Orbbec (depth camera), a pico projector (small handheld projector), and Isadora (projection mapping software). Using a depth camera I wanted to try and prototype a dynamic projection mapping system, where the object being projected onto would move in space causing the projection to change or evolve in some way. I ended up using a set of top down human brain computed tomography scans (CT scans) as the evolving or “changing” aspect of my system. The CT scans would be projected onto regular printer paper held in front of the projector and depth camera. The depth camera would read the depth at which the paper is at in space. As the piece of paper moves closer or further away from the depth camera, the CT scan images would cycle through. (above is what the system looked like inside of Isadora and below is a video showing the CT scans evolving in space in real time as the paper movies back and forth from the depth camera) Within the system I add color signifiers to tell the user at what depth to hold the paper at and when to stop moving the paper. I used the color “green” to tell the user to start “here” and the color “red” to tell the user to “stop”. I also added numbers to each ST scan image so the user can identify or reference a specific image.
Conclusion
The finished prototype works fairly well and I am very pleased with the fidelity of the Orbbec depth reading. For my system, I could only work within a specific range in front of my projector, this is because the projected image would become out of focus if I moved the paper too far or too close relative to the projector. While I worked with the projector I found the human body could also be used inplace of the piece of paper, with the projected image of the SC scans filling my shirt front. The projector could also be projected at a different wall with a human interacting with the depth camera alone, causing the ST scans to change as well. With a more refined system I can imagine this could be used in many circumstances. This system could be used within an interactive medical museum exhibit, or even in a more professional medical setting to explain how ST scans work to child cancer patients. For possible future iterations I would like to see if I could incorporate the projection to better follow the paper, having the projector tilt and scale with the paper would allow the system to become more dynamic and possibly more user friendly.
Cycle 2 – Stanford
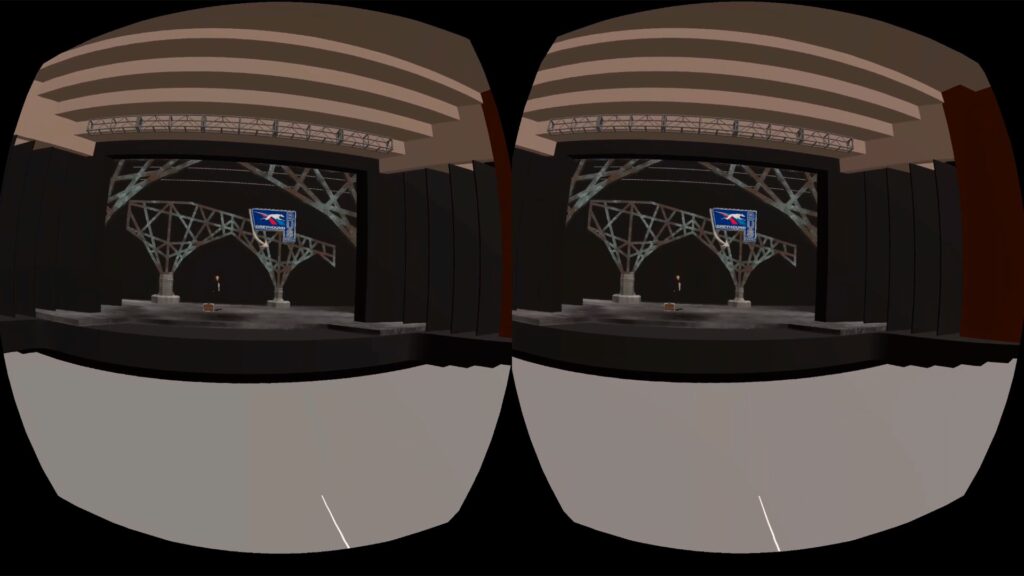
Posted: November 30, 2020 Filed under: Uncategorized Leave a comment »I the Sketchup file I had been working on and put it in VR. I did this using a program called Sentio VR. After I created an account, I was able to install a plugin for Sketchup that allowed me to export scenes. Once the scenes were exported, I could go to the app on the Oculus Quest and input my account code to view my files.
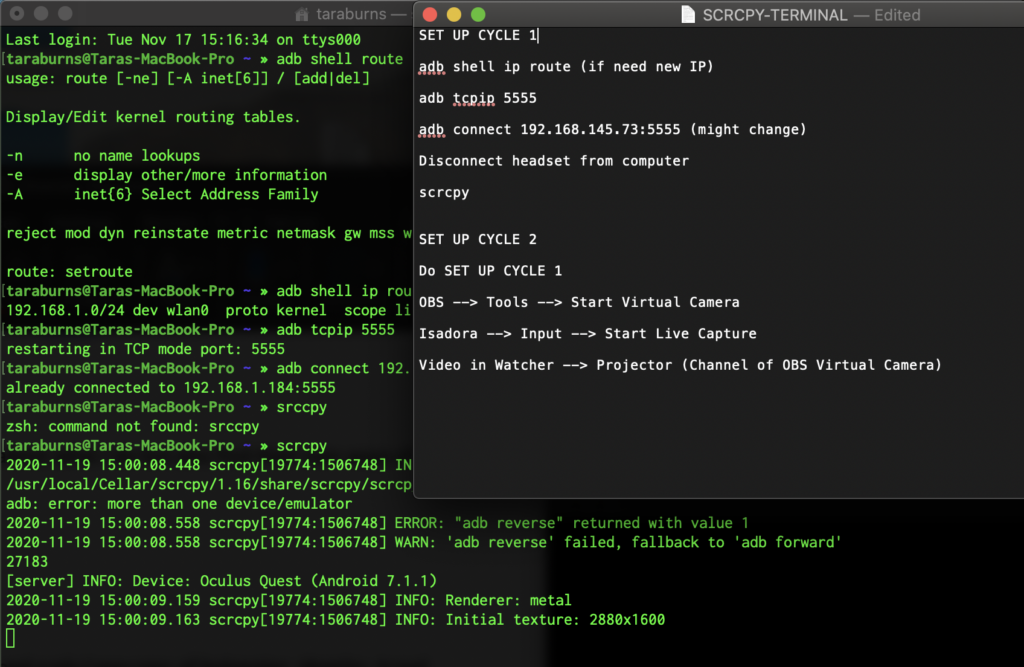
I also had to find a way to mirror the Quest to my MacBook. I used the process outlined by the link below.
https://arvrjourney.com/cast-directly-from-your-oculus-quest-to-macbook-e22d5ceb792c
This gave me a mirrored image, but the result was not what I was looking for. I did not want to see two circles of image, so after I recorded the video, I cropped it to give a better product.
Cycle 1 – Stanford
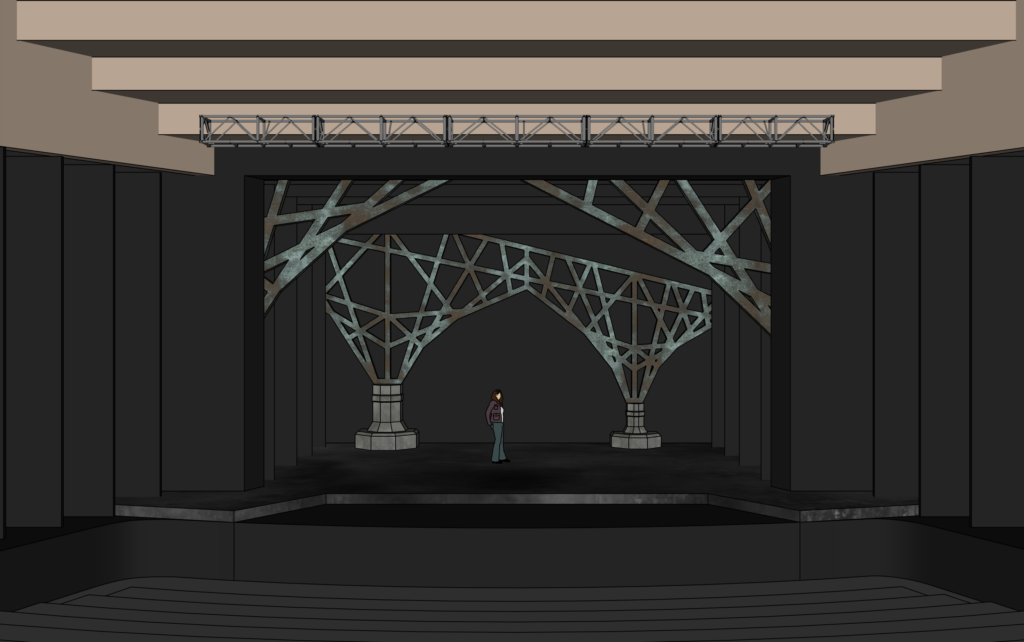
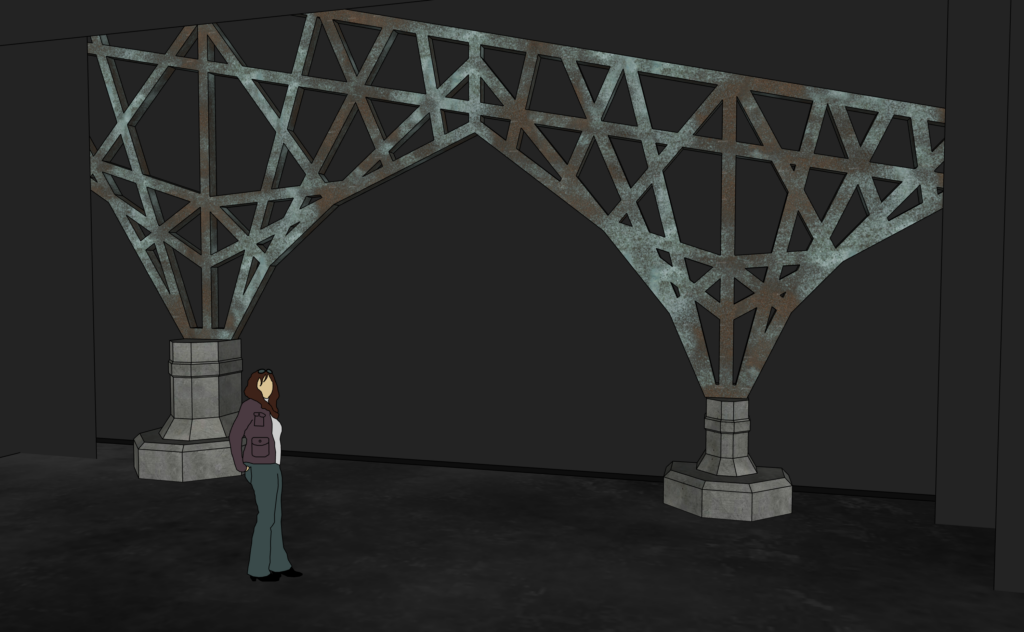
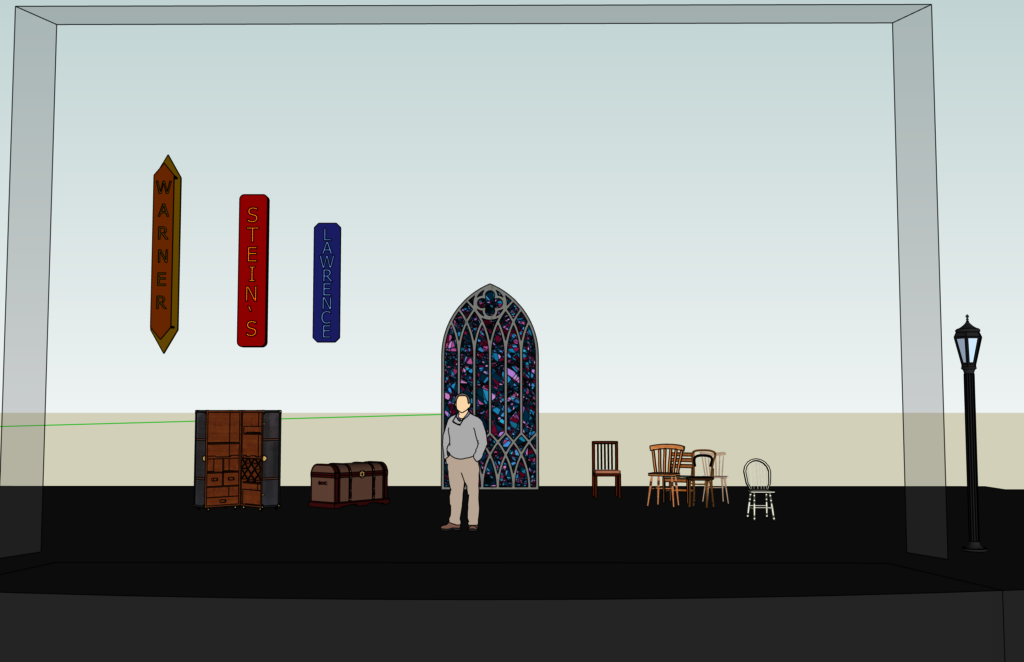
Posted: November 30, 2020 Filed under: Uncategorized Leave a comment »My final project is to create take a design (scenic) that I had done in the past and put it in VR so that you can walk around it and see it from both the audience and actor view. I focused on my Sketchup file for the first cycle.
The design is for a show called Violet. It is a musical set in the South in 1964. It is about a woman named Violet that has a huge scar across her face and she is traveling by bus to see a TV preacher in hopes that he can heal her.
I started from a base Sketchup file that had the Thurber already created.
PP2 – Stanford
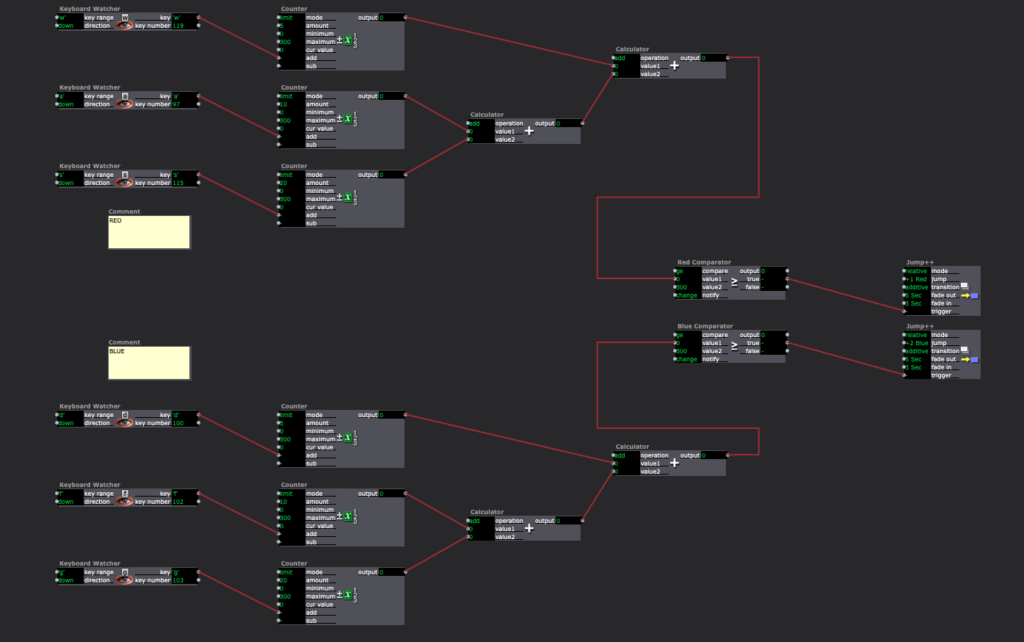
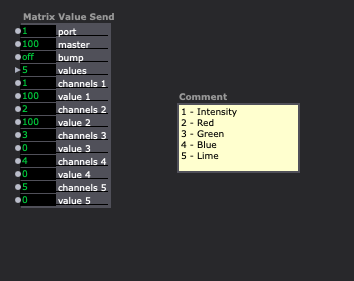
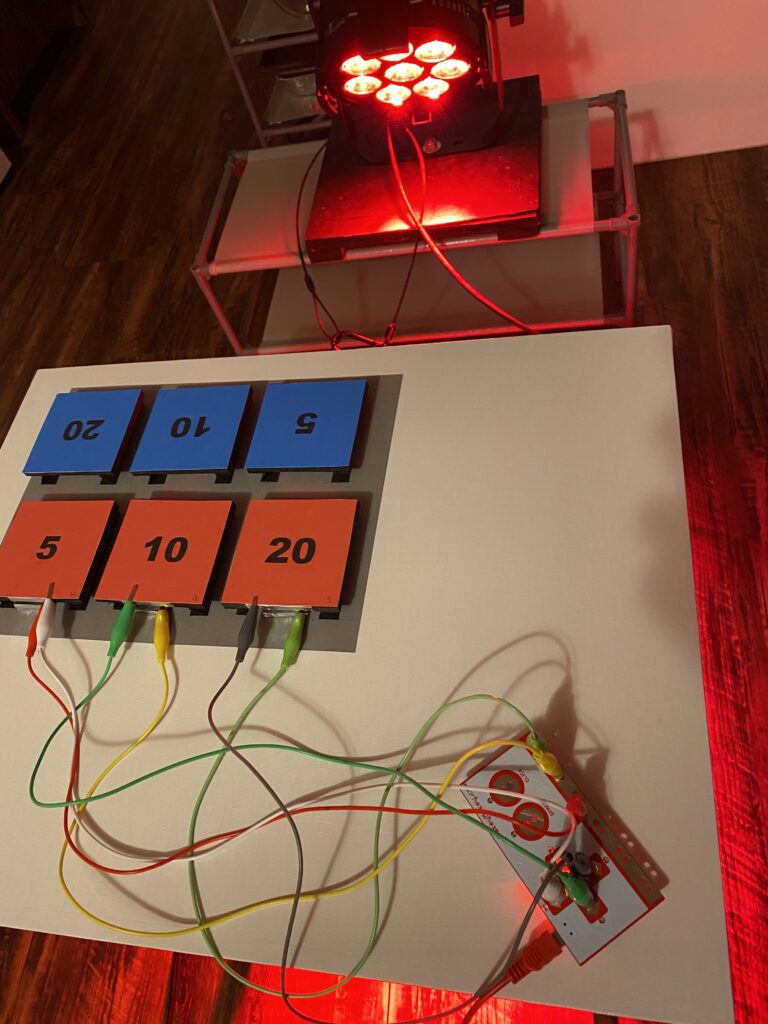
Posted: November 30, 2020 Filed under: Uncategorized Leave a comment »For this assignment, I used the Makey Makey to count the points of a card game. I created 3 buttons for each team with the labels 5, 10, and 20. These are the point values of the cards in the game. My goal was to have Isadora count the points for each team and when one reached the winning amount, a light would light up in the winning team’s color.
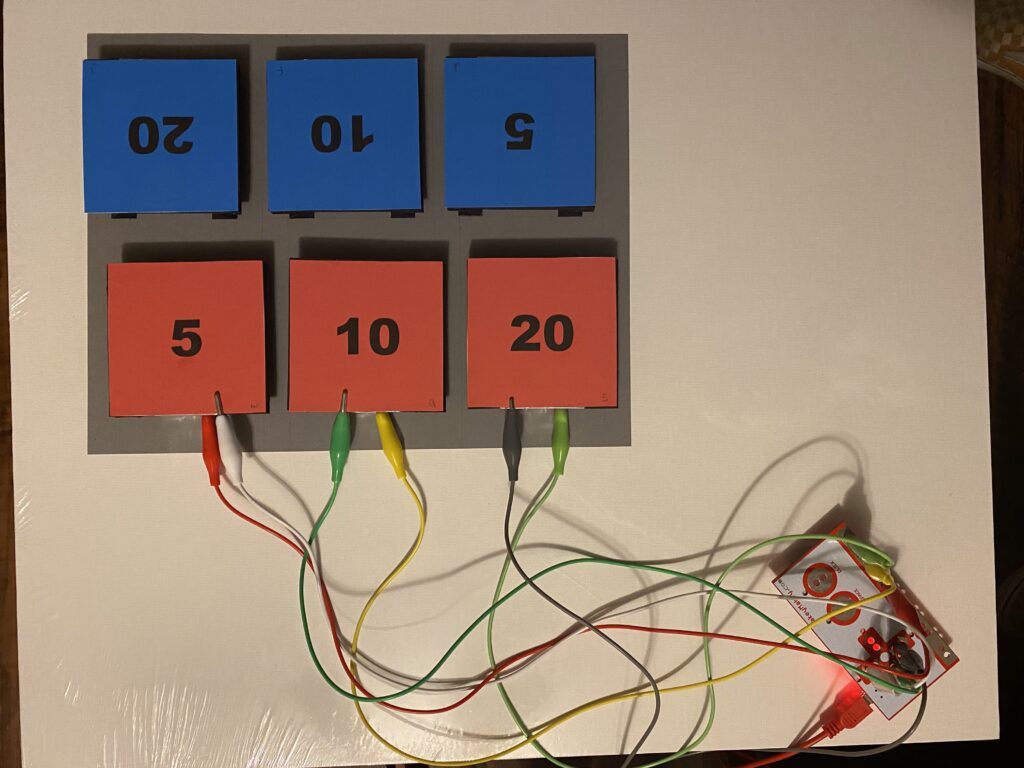
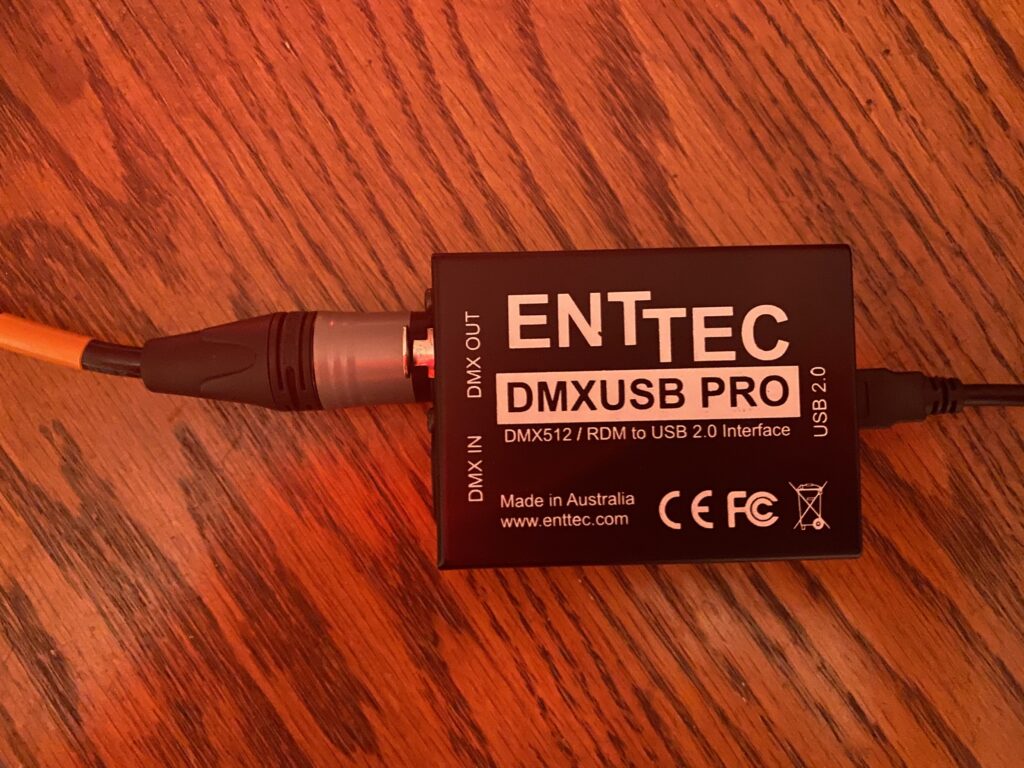
In addition to the Makey Makey, I used an ENTTEC Pro. This allowed me to send a signal to an LED fixture from my computer.
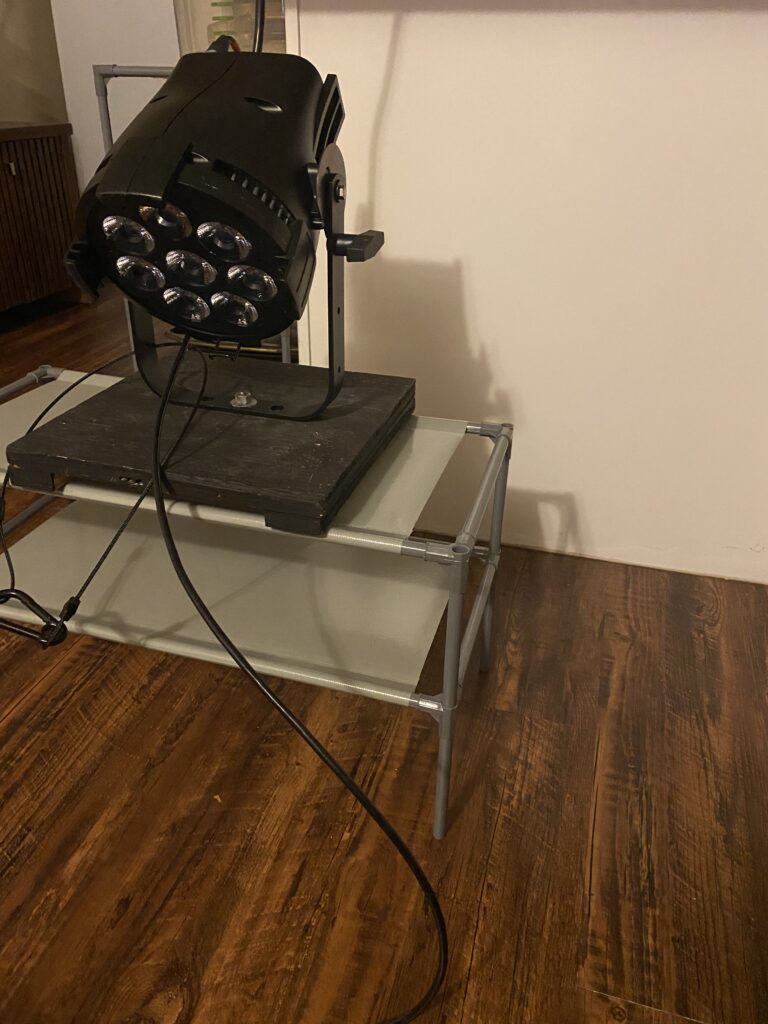
Each of the buttons were assigned a different letter on the Makey Makey. My patch used each letter to count by the value of the button it was associated with. It then added each team’s values together and a comparator triggered a cue to turn on the light fixture in either red or blue when a team reached 300 points or more.
Tara Burns – Cycle Two
Posted: November 27, 2020 Filed under: Uncategorized Leave a comment »Goals
– Using Cycle 1‘s set up and extending it into Isadora for manipulation
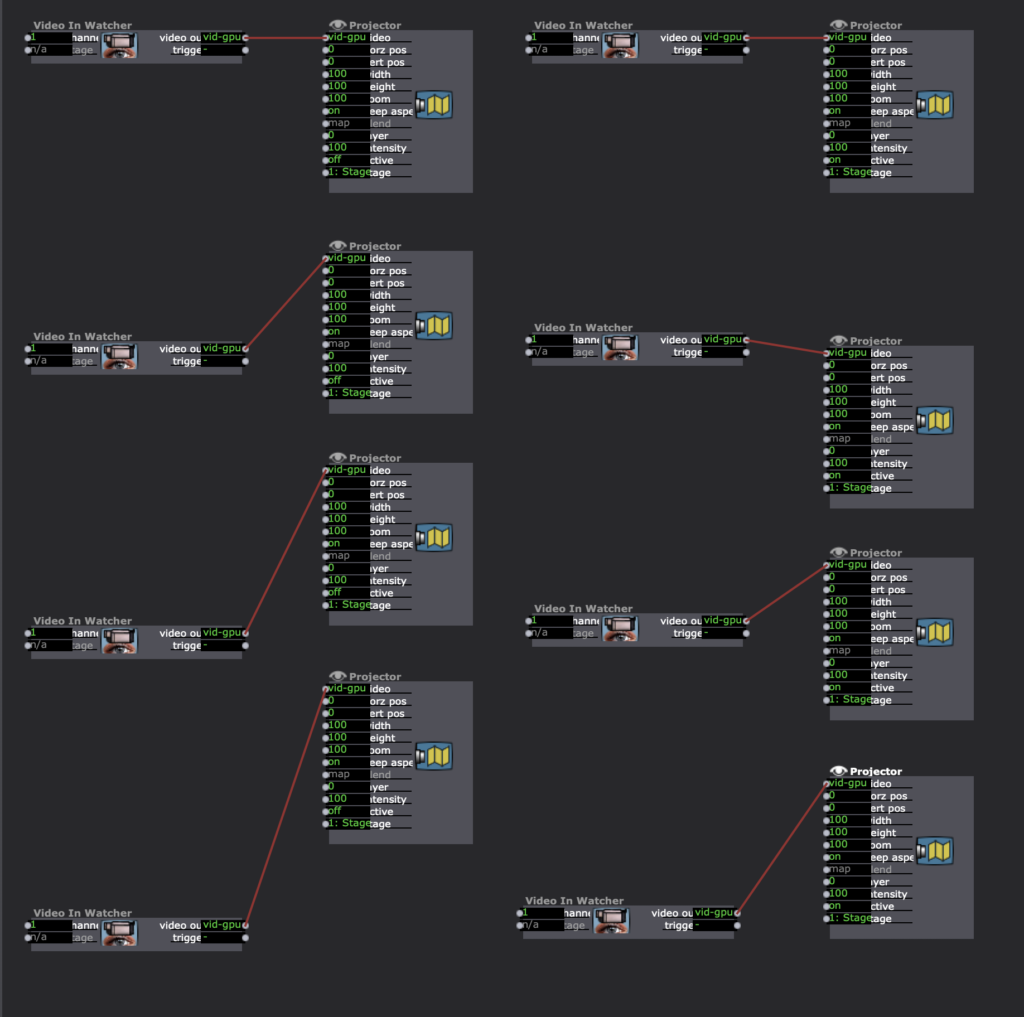
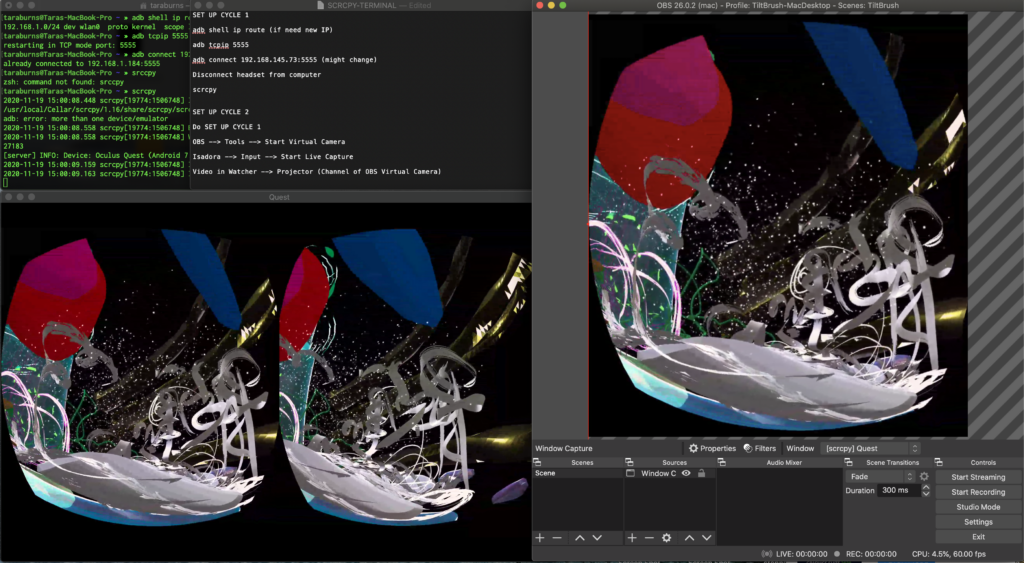
– Testing and understanding the connection between Isadora and OBS Virtual Camera
– Testing prerecorded video of paintings and live streamed Tilt Brush paintings in Isadora
– Moving to a larger space for position sensitive tracking through Isadora Open NDI Tracker
– Projection mapping
Challenges and Solutions
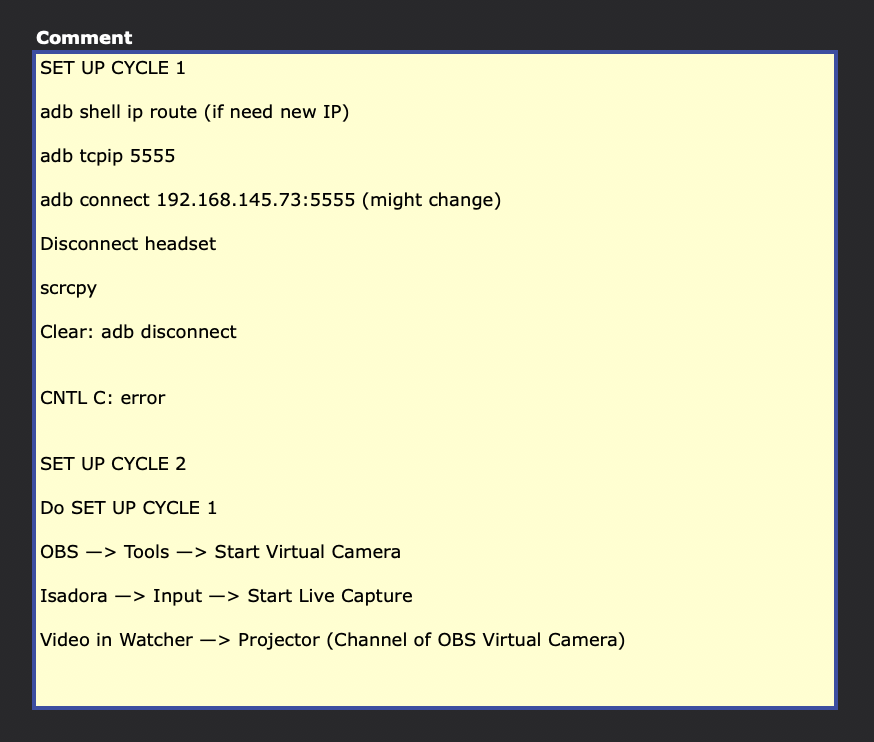
– Catalina Mac OS doesn’t function with Syphon so I had to use OBS Virtual Camera in Isadora
– Not having a live body to test motion tracking and pin pointing specific locations required going back and forth. I wouldn’t be able to do this in a really large space but for my smaller space I put my Isadora patch on the projection and showed half the product and half the patch so I could see what was firing and what the projection looked like at the same time.
– Understanding the difference between the blob and skeleton trackers and what exactly I was going for took a while. I spent a lot of time on the blob tracker and then finally realized the skeleton tracker was probably what I actually needed in the end.
– I realized the headset will need more light to track if I’m to use it live.
Looking Ahead
The final product of this goal wasn’t finished for my presentation but I finished it this week which really brought about some really important choices I need to make. In my small space, if I’m standing in front of the projection it is very hard to see if I’m affecting it because of my shadow, so either the projection needs to be large enough to see over my head or my costume needs to be able to show the projection.
I am also considering a reveal, where the feed is mixed up (pre-recorded or live or a mix – I haven’t decided yet) and as I traverse from left to right the paintings begin to show up in the right order (possibly right to left/reverse of what I’m doing). Instead of audience participation, I’m thinking of having this performer triggered; my own position tracking and triggering the shift in content perhaps 3-4 times and then it stays in the live feed. Once I get to the other side, it is a full reveal of the live feed coming from my headset. This will be tricky as the headset needs light to work (more than projection provides), which is a reason I switched to using movies in my testing as I didn’t have the proper lights to light me so the headset could track and you could see the projection. I also was considering triggering the height of the mapped projection panel (like Kenny’s animation from class) and revealing what is behind that way. Although I do want to keep the fade in and out.
Movement Meditation Room Cycle 2
Posted: November 24, 2020 Filed under: Uncategorized Leave a comment »Cycle 2 of this project was to layer the projections onto the mapping of each location in the room. I started with the backgrounds which would fade in and out as the user moved around the room. A gentle view of leaves would greet them upon entering and when they were meditating, and when they walked to the center of the room it shifted to a soft mossy ground. This was pretty easy because I already had triggers built for each location so all I had to do was connect the intensity of the backgrounds to a listener that was used for each location. The multiblockers were added so that it wouldn’t keep triggering itself when the user stayed in the location, they are timed for the duration of the sound that occurs at each place.
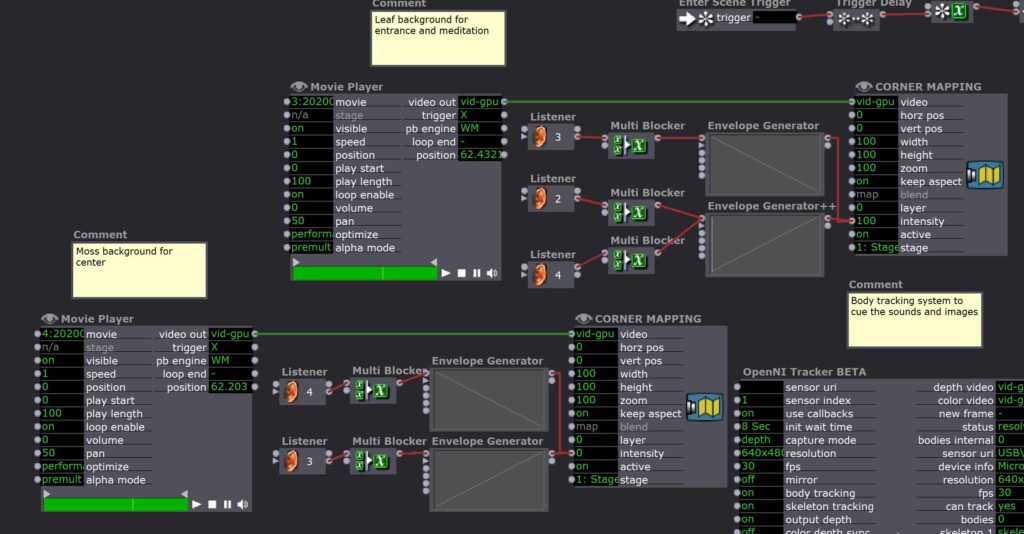
The part that was more complicated was what I wanted for the experience in the center. I wanted the use to be able to see themselves as a “body of water” and to be able to interact with visual elements on the projection that made them open up. I wanted an experience that was exciting, imaginative, open-ended, and fun so that the user would be inspired to move their body and be brought into the moment exploring the possibilities of the room at this location. My lab day with Oded in the Motion Lab is where I got all of the tools for this part of the project.

I rigged up a second depth sensor so that the user could turn toward the projection and still interact with it, then I created an alpha mask out of that sensor data which allowed me to fill the user’s body outline with a video of moving water. I then created an “aura” of glowing orange light around the person and two glowing globes of light that tracked their hand movements. The colors change based on the z-axis of the hands so there’s a little bit to explore there. All of these fade in using the same trigger for when the user enters the center location of the room.
I am really proud of all of this! It took me a long time to get all of the kinks out and it all runs really smoothly. Watching Erin (my roommate) go through it I really felt like it was landing exactly how I wanted it to.
Next steps from here mean primarily developing a guide for the user. It could be something written on the door or possibly an audio guide that would happen while the user walks through the room. I also want to figure out how to attach a contact mic to the system so that the user might be able to hear their own heartbeat during the experience.
Here is a link to watch my roommate go through the room: https://osu.box.com/s/hzz8lp5s97qw5q47ar32cgblh5hus8rs
Here is the sound file for the meditation in case you want to do it on your own:
Tara Burns – Iteration X: Extending the Body – Cycle 1 Fall 2020
Posted: November 19, 2020 Filed under: Uncategorized Leave a comment »I began this class with the plan to make space to build the elements of my thesis and this first cycle was the first iteration of my MFA Thesis.
I envision my thesis as a three part process (or more). This first component was part of an evening walk around the OSU Arboretum with my MFA 2021 Cohort. To see the full event around the lake and other projects click here: https://dance.osu.edu/news/tethering-iteration-1-ohio-state-dance-mfa-project
In response to Covid, the OSU Dance MFA 2021 Cohort held a collaborative outdoor event. I placed my first cycle (Iteration X: Extending the Body) in this space. Five scheduled and timed groups were directed through a cultivated experience while simultaneously acting as docents to view sites of art. You see John Cartwright in the video above, directing a small audience toward my work.
In this outdoor space wifi and power were not available. I used a hotspot on my phone to transmit from both my computer and VR headset. I also used a battery to power my phone and computer for the duration.
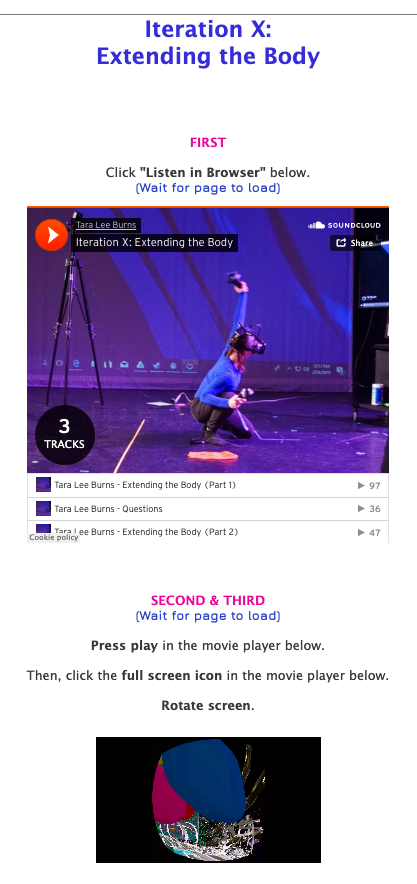
Iteration X: Extendting the Body asked the audience to follow the directions on the screen to listen to the soundscape, view the perspective of the performer, and imagine alternate and simultaneous worlds and bodies as forms of resistance.