Cycle 1 documentation – Dynamic Cloth – prototype
Posted: October 27, 2022 Filed under: Uncategorized Leave a comment »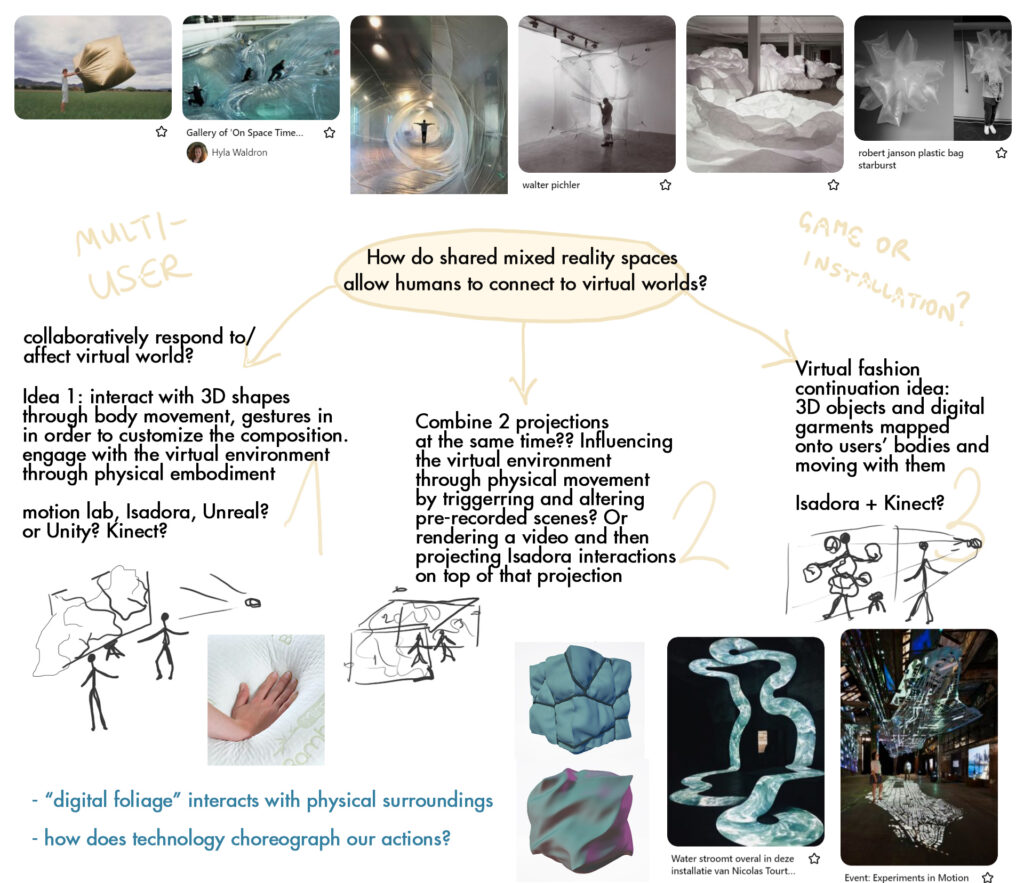
Since my research is based on how shared mixed reality experiences help us relate to virtual worlds, I wanted to use this project to create an experience where users can collaboratively affect/respond to digital cloth shapes through body movement tracking in the Motion Lab. I love creating experiences and environments that blend both physical and virtual worlds, and so I thought this would be a good way to explore how physical surroundings and inputs impact virtual objects, and I also thought this project direction would be an interesting way to explore how interactive technology creates performative spaces.
Since at the time (and now) I was still a beginner in Isadora I didn’t really have an idea how to go about doing this, and I didn’t know if Isadora is even the right software to use or should I just be using Kinect in a game engine. My goal is to have the users affect the virtual cloth in real time, but not knowing how to do this, in the beginning I was thinking an option could also be pre-rendering the cloth simulations and then use the Kinect inputs to trigger different animations to create this dynamic effect. However, after learning how to import 3D models to Isadora and affect lighting, I realized that I will be able to trigger real time changes to 3D shapes, without using pre-made animations. I might still use animations if I think they can benefit the experience, but after the progress I’ve made so far I realized that I have a sense of how to make this work in real time.
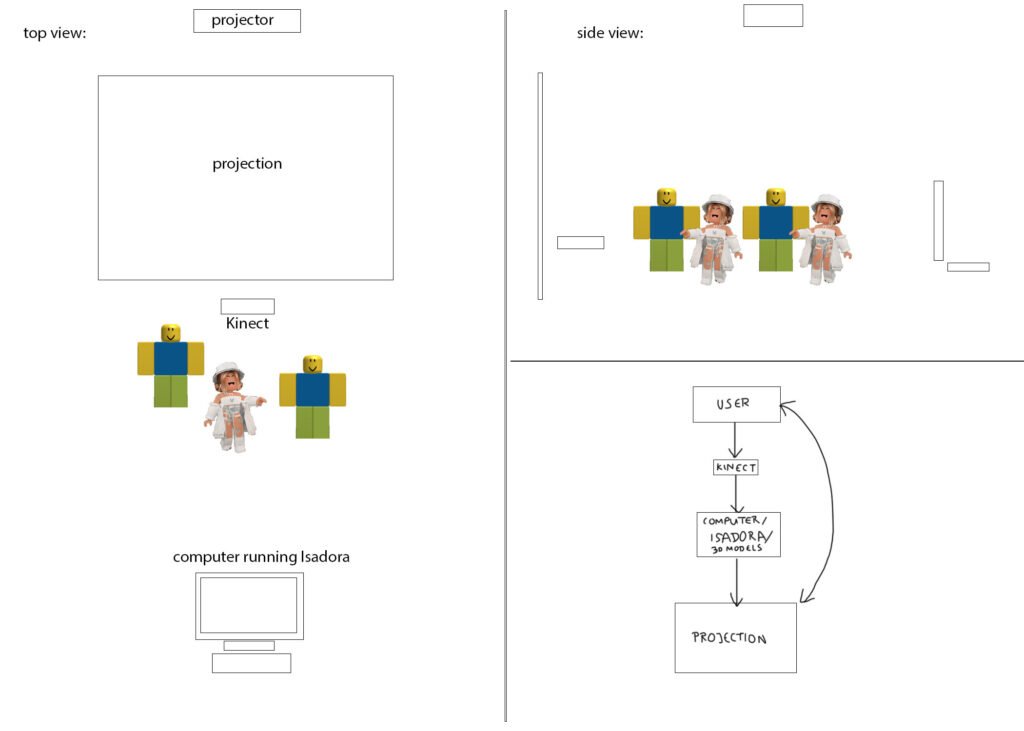
After deciding I need Kinect and Isadora for this experience, I needed some help from Felicity to install the drivers for Kinect on the computer in the classroom, so I can begin working on an early prototype. After that was setup, I first learned how to import 3D models in Isadora because I didn’t figure that out during PP1. I was able to import a placeholder cloth model I made a few months ago and use that to begin figuring out how to cause dynamic changes to it using Kinect input. Initially, I hooked the Kinect tracking input to the 3D light orientation and I was already happy where it was going since it felt like I was casting a shadow on a virtual object through my movement, but this was just a simple starting point:
After this, I wanted to test changing the depth of the shape through positions and motion, so I thought a good initial approach would be plugging the moving inputs into the shape’s size along the y axis, to make it seem like the object is shrinking and expanding:
I took this approach to the previous file and currently I have the Kinect input impacting the lighting, orientation, and y-axis size of the placeholder cloth shapes. In the gif below I plugged in the movement inputs to the brightness calculator, and when I’m further away from Kinect and when more light is being let in, the shapes expand along the y axis, but when I get closer and it gets darker, the shapes flatten down, which feels like putting pressure on them through movement:

I’m happy that I’m figuring out how to do what I want, but I want this to be a shared experience with multiple users’ data influencing the shapes simultaneously, so the next step is to transition from the computer where I made the prototype into the Motion Lab where I want the experience to be. Currently I need the Isadora on the Motion Lab computers to be updated to the version we are using in class, so I will remind Felicity about that. After the setup is done again both with Isadora and Kinect, I will keep working on this in the Motion Lab and modifying the patch based on that environment, since they are going to be interdependent. I also finally managed to renew my Cinema 4D license yesterday so this upcoming week I also want to make the final models (and animations?) I want to use for this project and replace the current placeholders.

Feedback from the presentation:
I appreciated the feedback from the class, and the patch I currently have seemed to produce positive reactions. The comments I got included that it was intriguing to see how responsive and sensitive the 3D cloth model was. It was nice to see that a lot of people wanted to interact with it in different ways. I realized I need to think more about the scale of the projection since it can impact how people perceive and engage with it.
Apollo 11 Launch Sound Experience
Posted: October 25, 2022 Filed under: Uncategorized Leave a comment »
Preparing For Launch
The Moon. Arguably one of the greatest achievements in the history of space travel. It’s wild to think that people have been on that little circle of cheese in the sky, and even wilder that we’re going back. Space has always been a huge passion for me. So much so that one of my most cherished childhood possessions was my little season pass to the Burke Baker planetarium at the Houston Museum of Natural Science; whenever there was a new film or experience, my mom and I would go and spend the day gazing at the stars.
My love for science and space travel continued to high school, where I have vivid memories of afternoons with my science teacher Dr.Cote, talking about rockets and the latest NASA news, we even set up a watch party when the Curiosity rover landed back in 2012. All of these events and interactions with the wonders of space have stayed with me for my whole life. So, for the sound experience project, I choose the monumental event of the Apollo 11 Moon Landing.
Mission Log
As soon as I started the project I knew I wanted to use a piece from the Interstellar soundtrack. It is hands down my favorite movie of all time, and I absolutely love the soundtrack created by Hans Zimmer. The core style of the soundtrack gives me chills every time I hear it, and it sparks a truly unique sense of wonder and curiosity.
The problem I now faced was which song should I use. If you’ve seen Interstellar, then you’re probably picturing the film in your head, thinking of some core moments throughout the movie. As I did this myself, I remembered that the track I play most often is Cornfield Chase. This is the scene where Cooper, Murph, and Tom are chasing after a mysterious drone through rows and rows of corn. Take a listen below:
With my song selected I got right to work collecting sound artifacts relevant to the launch. I knew that nasa kept audio recordings of a lot of famous missions, so I started downloading and trimming to get the very best bits.
I also wanted a sort of preface to the mission recordings, something that could spark wonder and simulate that same fuzzy feeling I get when I watch the film and think about Space. After perusing through the events that led up to the launch, I remembered that John F Kennedy’s Rice University speech would be perfect for the job. I trimmed the speech and extracted this memorable line:
A couple more audio bits were collected to form a short chronological story into the Apollo 11 launch. My goal was for listeners to feel like they were progressing through this historic event, just as humanity progressed after JFK’s speech. I cut together countdown audio as well as some other famous lines from the astronauts themselves.
But instead of giving you more tidbits, listen to the full experience for yourself. Make sure you’re sitting down because you may get some intense goosebumps.
Mission Successful
I really loved the outcome of this project. It helped me experiment with audio like I never had before. I also have a strong interest in accessibility so getting to do a project like this helped me flex my universal design muscles. In addition to the audio experience, I also created a visual component because I wanted to include some enhancements to the audio if people chose to view it. Sorry in advance for the weird aspect ratio!
I wouldn’t change anything about my final product. I love this audio experience and I plan on posting it somewhere to share with the other kids that have a season pass to the Planetarium. Experiences like this are what sparked my love for space, and I can only hope to do the same for others.
PP3 Sound project
Posted: October 25, 2022 Filed under: Uncategorized Leave a comment »For this project my first idea was to work with a story that I always remember first when thinking of books/stories that stuck with me when I was younger. The story I chose to represent through sound is from the book called Palle Alone in the World by a Danish writer Jens Sigsgaard. Since I never read this book in English I know the book as “Pale sam na svijetu” and I always remembered the look of this cover because I liked the illustration style in the book:

Since my perception and understanding of the book has always been based on the visual, I thought it will be interesting to imagine what the events in the book would sound like. I always associated the book with happy memories but just thinking about recreating it through sound I could tell that it is probably going to sound kind of daunting and portraying overall a stressful experience. In the book, the boy Palle discovers he is totally alone in the world and so he goes on doing whatever he wants without any restrictions, he tries driving cars, he even crashes a car, he steals money from the bank, he eats all the food he can eat in the grocery store… The approach I took in the project was to depict the sounds of his actions and experiences in the order that they occurred, condensed in 3 minutes, and I also overlayed some slow piano music to create a dreamlike mood, since at the end of the book we find out that this was all just a dream.
I used the sound level watcher in Isadora to listen to the sound of the piece and use that to distort the picture of the book cover. I did this because as I was working on this project and listening to what’s happening in the book, my perception of the book and how it would feel to be Palle started to change.
Just the visual:
On the day we were showing the projects, I couldn’t use my Isadora file on the Motion Lab computers because I was using some of the effects that I previously had to install as plugins on the classroom computer I have been using, so I didn’t end up showing the visual portion during the experience. I wish I could have but it was still very interesting to hear the reactions people were having even without the visual. The visual was still quite abstract not knowing it’s a book but I think the picture does provide some context of “children’s book”, and it also gives further flow since it is constantly moving. Maybe I also thought this because I personally prefer to have something to look at, but I realized that’s not a universal preference. Based on the comments I got, a lot of people understood the moods and the narrative I was trying to convey which was good to hear. The comments included the observations that the events are linear, occurring in a specific sequence, and happening right after one another not in a way you would normally expect but it also still feels continuous, interpreting the sound through child’s perspective, the feeling of uneasiness, and getting invested in some sounds more than other like the sound of eating, walking on the grass, or unwrapping a chocolate bar. Another interesting aspect of the experience was being able to add and manipulate the lighting as the audience was listening to it, which is something I haven’t thought of before because I was not planning initially to show it in Motion Lab but I decided to after hearing how immersive the other sounds were in there.
I also remember thinking of this book sometimes when Covid first started when I had a very bad experience being stuck in a house with toxic and insane roommates and not being able to see my friends, so for me this book also relates to this time period.
PP2 – QuakenShake – Katie O
Posted: October 25, 2022 Filed under: Uncategorized Leave a comment »For Pressure Project Two, the assignment was to choose a moment that was culturally impactful for you and tell its story 99% through sound. I chose to do some research on the 1964 earthquake that hit Alaska, which my mom lived through, and pair it with the recent 2018 earthquake that hit right outside of Anchorage. I found clips from the news sources that covered both earthquakes and bounced back and forth between the two as they described the details of the quake and the impact it had on the land and the community.
I put up a variety of photos from both events that were collaged together, showing the buildings and roads that had been destroyed. I felt curious about how distant humanity has become to natural disaster events as we see many of them in the media but do not necessarily experience them ourselves. I remember not thinking that hard about the 1964 earthquake while my mom described her experience, but once I lived through the 2018 earthquake, I began to see the 1964 in a different light. My empathy grew.
Although the recordings were of two different news sources, the audience said they couldn’t necessarily tell until closer to the end that it was bouncing between the two different earthquake experiences. I’m guessing a visual would have supported that side of it, but the audience seemed to eventually put it together with just the image of the old cars and grainy quality.
I received feedback that, although I mentioned my mom and I story at the beginning of the experience, they would have liked to hear more and possibly end it with our story as well. I had plans and notes to give more information, but to be honest and human, I couldn’t quite handle being on a microphone that day. I can also feel a sensitivity to feedback in class right now, which I’m hoping will shift as I continue to get to know the class better. I knew I would be able to hold critique of the piece, but I did not feel confident I could hold critique of my own voice, and I wasn’t sure how deep the group would go that day.
I’m glad we did this project. I like sound and don’t give it the time I wish I would, so I’m glad I was pushed into it. I think we covered some important aspects of experience while creating and participating in this project.
PP2: Inviting Intimacy through Sonic Storytelling – Mollie Wolf
Posted: October 25, 2022 Filed under: Uncategorized Leave a comment »For this pressure project, I wanted to work toward my project for cycle 1, building the sonic storytelling element I’m been imagining. The idea I have in mind is to have some sort of cornered off/walled off space that feels private. Perhaps there will be a comfy chair here, perhaps there will be a small screen, playing a personal film for one person at a time, perhaps it will just be an area surrounded by plants, with only the sonic storytelling happening. The point is to create a sense of intimacy. A time when one audience member at a time can experience something between them and their real/imagined environment.
I used a few different sound recordings I have of Frankie Tan (my friend/collaborator whom I traveled to Malaysia with this summer) telling a story she wrote about herself and her relationship to the jungle in Penang. I decided that as time goes on, I wanted the sense of intimacy to increase, so I started with a recording of her speaking aloud, then slowly, by the time we reach the end of the story, she has transitioned into whispering to her listener. My plan is to play Frankie’s voice/story on a small, local speaker that only the one listener can hear – so that this truly is a moment that they alone get to experience.
Here is a recording of Frankie’s story (I started this audio at 3:57 when I did the presentation).
Then, I looped a sound recording I have of the Penang jungle at night to play through out a larger space, to really surround the listener (the individual one, as well as others in surrounding areas) with the sounds of the jungle that Frankie’s story references.
Here is a recording of the Penang jungle.
When I presented the story to my peers, I didn’t let them know about my goal of intimacy, and I presented it to all of them at once. I placed the Bluetooth speaker with Frankie’s story nearby where my audience was sitting, and played the jungle sounds through the whole room.
Here is a recording of the two playing together, in the same space.
I was pleased to know that the sense of intimacy was apparent to my audience. Some of them mentioned wanting to be closer to the speaker and having the impulse to ‘lean in.’ One of my peers said that the content of the story felt like an intimate conversation between this person (Frankie’s character, Noon) and the forest.
Alex mentioned that there was more than just intimacy, but also tension – he noticed the word ‘hate.’ I appreciate this as well, because it is purposeful. So much of my thesis project in general is about this – the concept of ‘the wild,’ this simultaneous allure and repulsion that we feel about the natural world, and the behaviors and concepts we have been socialized into that create a distance between ourselves and nature. There is a love/hate present. There is an internal struggle for the Western body between desire, responsibility, and ignorance when it comes to ‘the wild,’ so absolutely yes, the tension in this story is purposeful. Intimacy does not mean a lack of tension.
Feedback that I want to keep in mind from my peers is that it was confusing, or hard to follow, or distracting when I had Frankie’s voice layer over itself. I wonder if there is a way I can either play with it more, so it feels like it’s okay that you’re not catching every word, or if I should just not layer her voice at all…
PP2: Audio storytelling/Wall Fall
Posted: October 24, 2022 Filed under: Pressure Project 2, Tamryn McDermott | Tags: audio, Pressure Project 2, storytelling Leave a comment »I chose to focus only on the audio for this pressure project. In hindsight, after viewing/listening to the other projects, I wonder if having an image of the Berlin wall surrounding us in the motion lab on the white scrims would have been helpful to site the work so there wasn’t a period of guessing for listeners.
My initial goal was to immerse the listener in the experience of the sound of construction and destruction of the Berlin wall. Having grown up in Germany during this point in history, I have a personal experience with this site and my traveling to and from the site by train was a part of it. That part of the story was lost in my layering process. I think that if I were to do this project again, I would pull back and focus in more on some of the powerful moments. Letting them sit with the listener more and not overwhelm them with so much information that is hard to unpack, especially if one is trying to figure out what the story is about.
I appreciated the feedback and want to think more about how we can tell personal stories that also convey meaning for others, for them to find their own way into the story and a connection to it as well.
In my other work outside of this class, I am struggling to translate from text into audio in a non-linear fashion and provide space for a participant in the work to find both their own entry point and way of navigating the space. Also as a way of connecting with the researcher. Thinking about presenting research as a relational experience. How do I challenge the linear and impersonal format of a dissertation, book, or academic text in a way that provides a valuable alternative experience of the story? I have been using a map as one form to explore, but that is also limiting and has boundaries and borders. I am also thinking about the relationship between printed, read text and verbal, spoken word. Preparing this pressure project helped me think about presenting my own process/experience in a way that is not too overwhelming and has some clarity for those participating in engaging with it. This is an ongoing struggle in my process.
PP1: Breathing the text – Tamryn McDermott
Posted: September 12, 2022 Filed under: Pressure Project I, Tamryn McDermott | Tags: Pressure Project, Pressure Project One 1 Comment »For this project, I decided to use some of the digital assets I created (video and audio) for a project I did in the motion lab last spring. I did not know Isadora at the time and so this provided me the opportunity to set up in Isadora from scratch and play with the assets in a new way without relying on someone else to set it up for me.
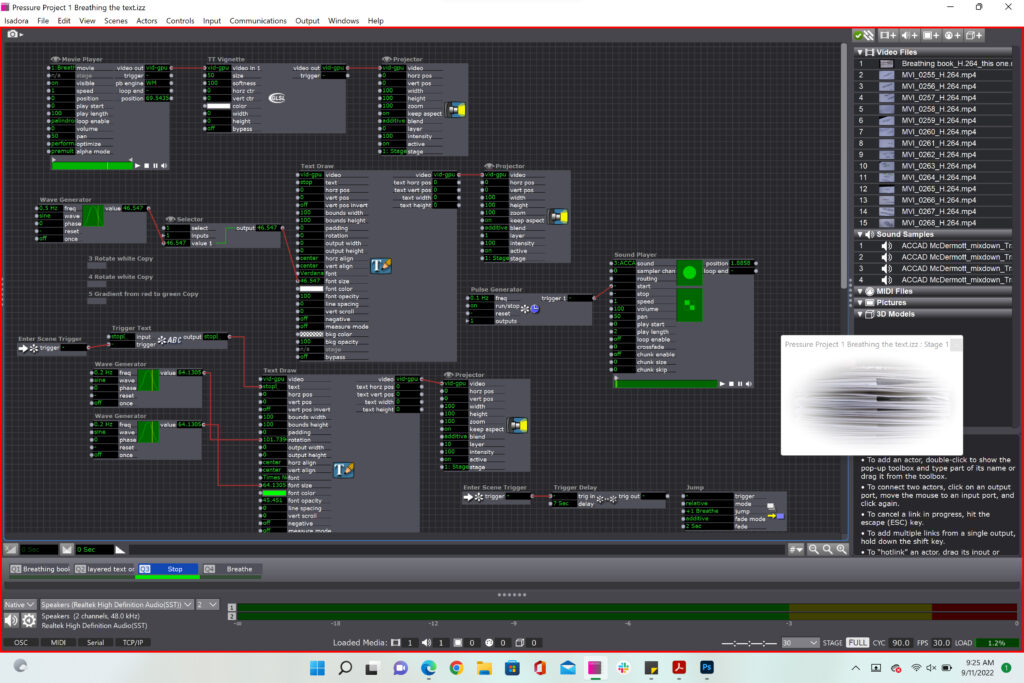
Initial structure and approach: four scenes, use Text Draw actor, play with integrating video, text, and audio, use pacing in an attempt to affect and engage viewer
Scene 1: Introduce breathing book structure and layer in shape actors with random movement and scale
In scene one, I had challenges with getting the different shape actors to actually show color variations in the final output even though I had them set up within different user actors. The color remained white no matter what in the final stage display. The layering and actors worked well here although I would have liked to include more randomness in the scene and possibly integrate some of new randomness techniques based on video sensors into the scene.
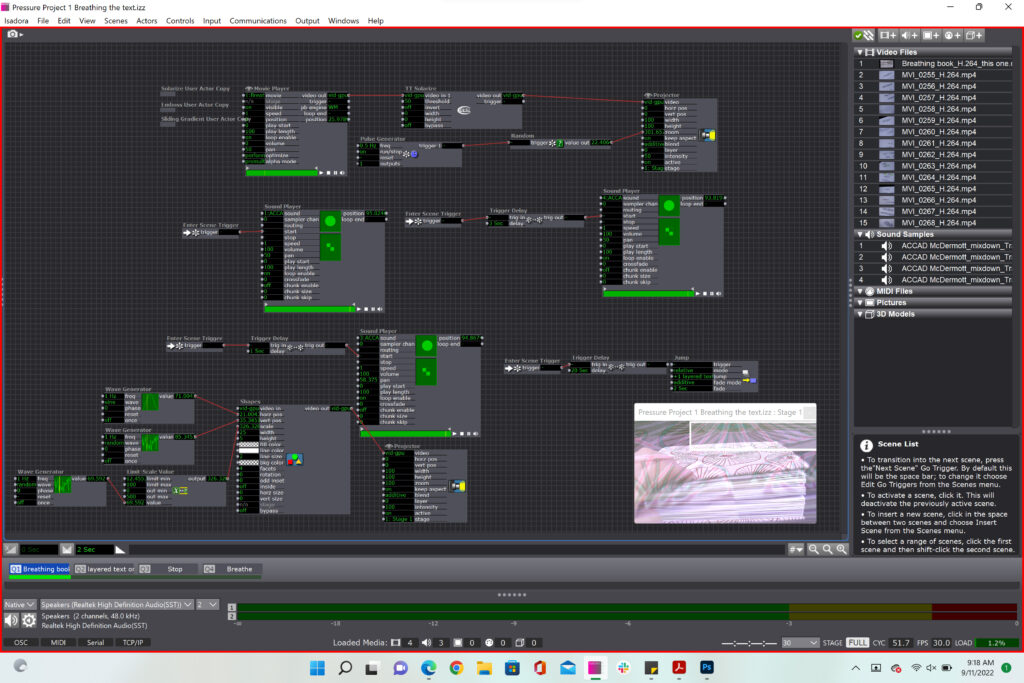
In this scene I used the random actor to select between 14 different videos that would be layered in pairs and change positions, however the random actor favored the number 15 for the video selection field and so most of the time video 15 layered over itself from varying starting positions. Again, with more time, I would have introduced another method of selecting random numbers between 2 – 15. I think it would have been cool to have the audio files trigger this in some way, but I would have to think about this more to figure out the best approach.
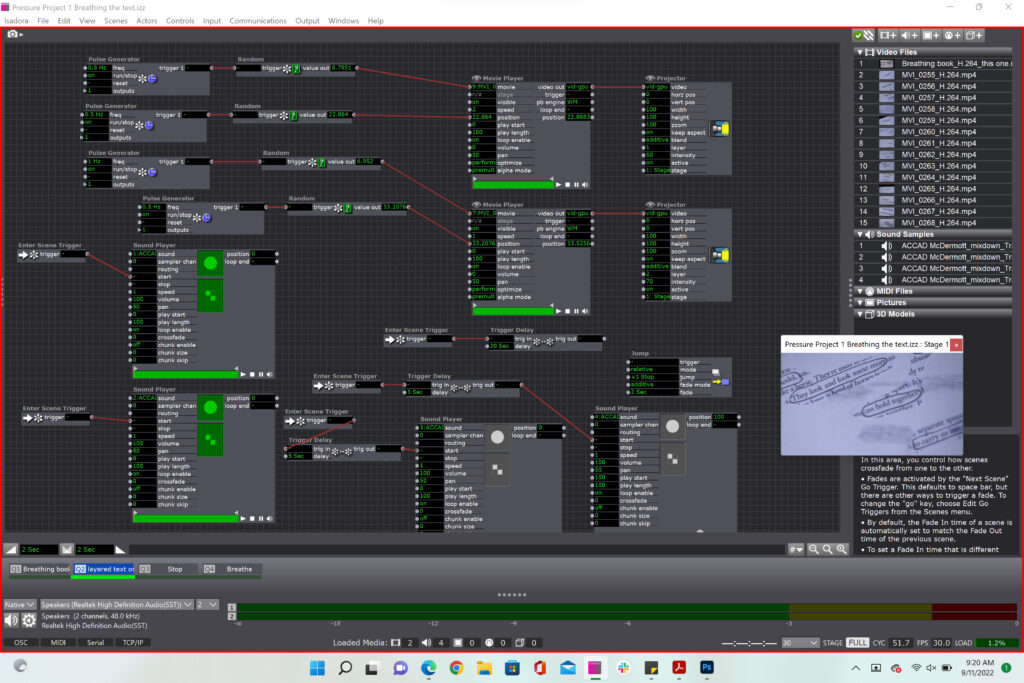
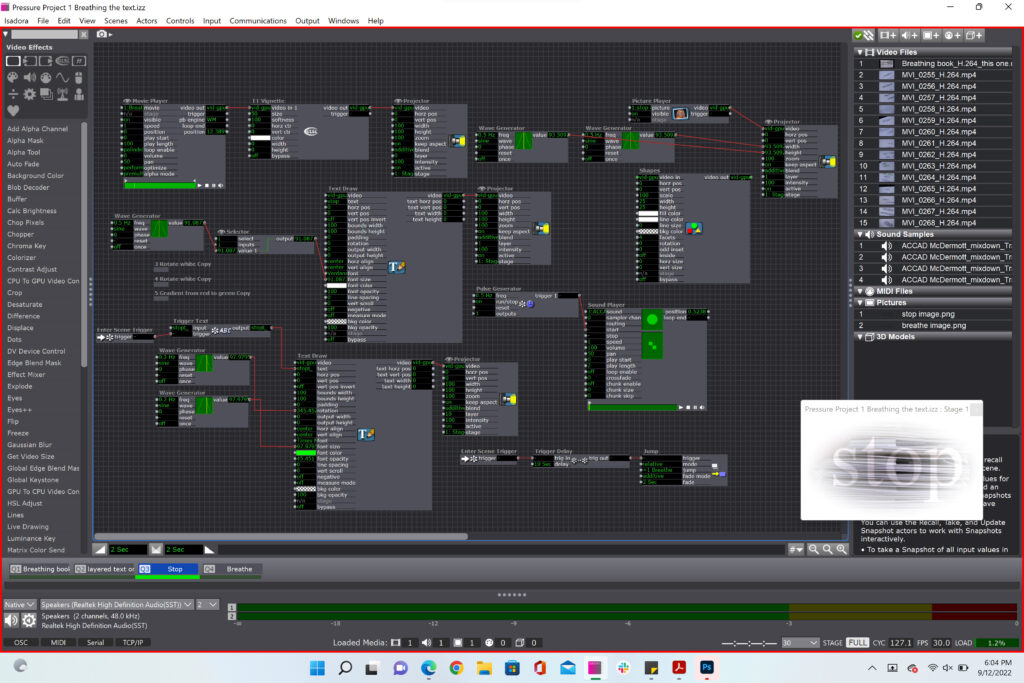
In the screenshot below the text draw actors are not working. I had to create workarounds since none of these actors would show up when I exited the scene and returned. There was a bug that prevented it from working on both my laptop and the ACCAD lab computers. Only the video would display on the stage. As a workaround, I generated a .png of the text “stop” and then used that as a shape actor and animated it to correspond with the repeated “stop” audio file. Below are the screenshots from the first and second patches, the second one being the working one.
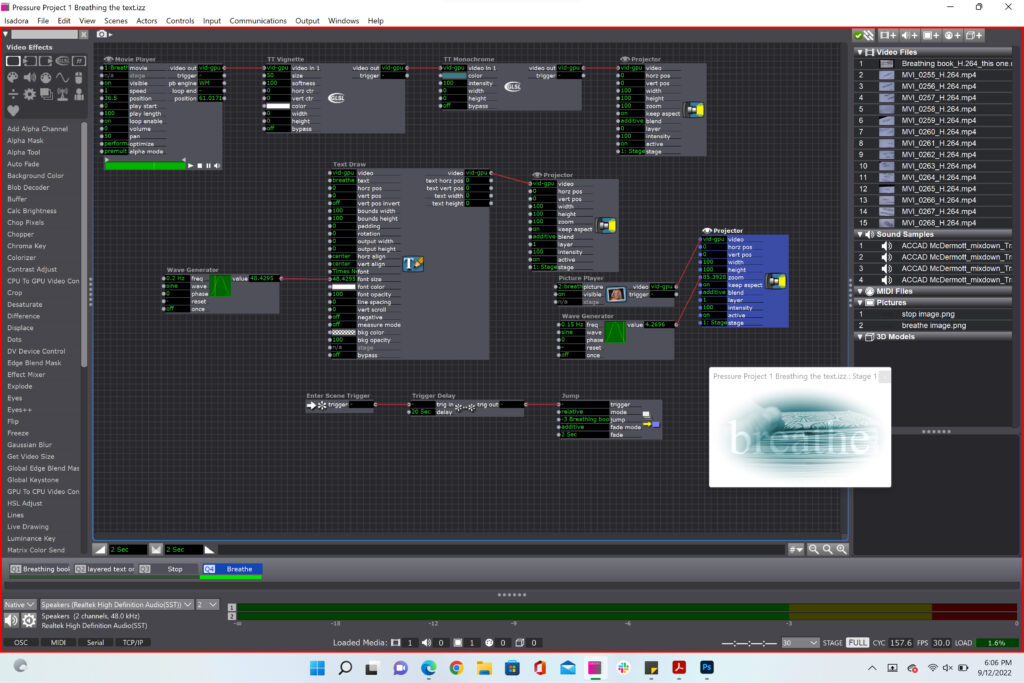
Below is the working scene with the substituted image of the word “stop” I wanted to animate.
Finally, in the last scene I wanted to end on a calming note after the stop scene so here is the final scene with again, the text inserted as an image that I animated since the text draw actor did not work for me.
I learned a lot from this project and hope to be able to get a response from the Isadora team on the text draw actor bug I ran into. I also want to experiment with sensors and introduce more randomness into my work.
PP1 Playing with Randomness – Mollie Wolf
Posted: September 11, 2022 Filed under: Uncategorized Leave a comment »For this pressure project, I decided to use continue using the random shapes demo we worked on together as a class, and layered onto it/made it more complex.
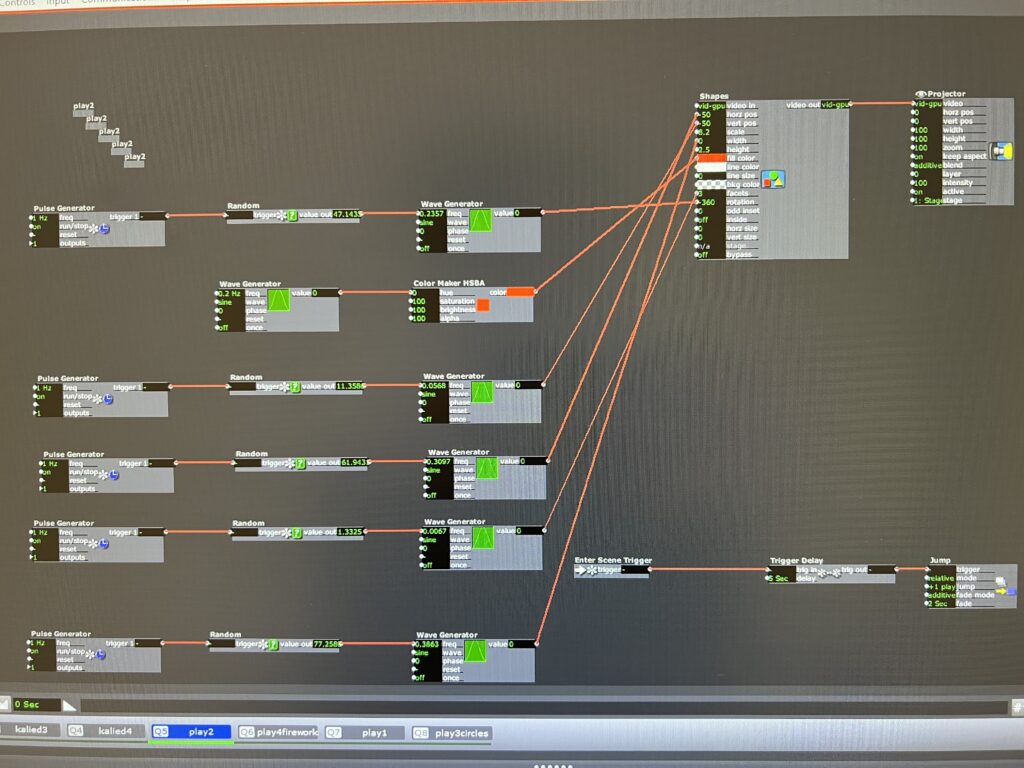
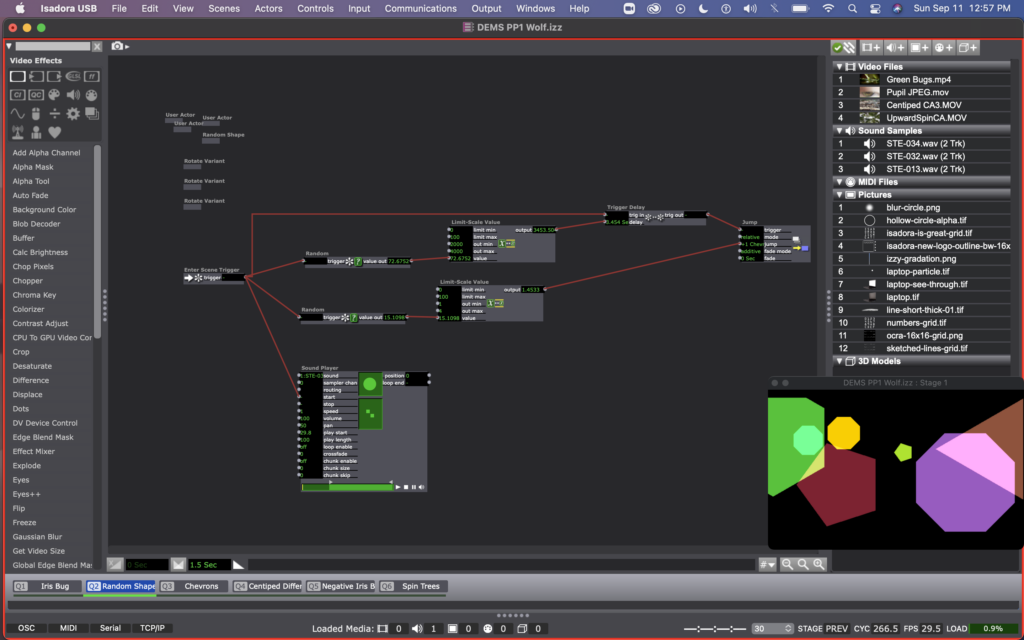
I leaned into the randomness prompt quite a bit, and decided to use random actors to decide how long the patch would stay in each scene, as well as which scene it would jump to next. You can see this clearly in this photo of Scene 1, where one random actor is determining the delay time on a trigger delay actor, and another random actor is hooked up to the jump location on the jump actor. I repeated this process for every scene in order to make it a self generating patch that cycles through the scenes endlessly in randomized order.

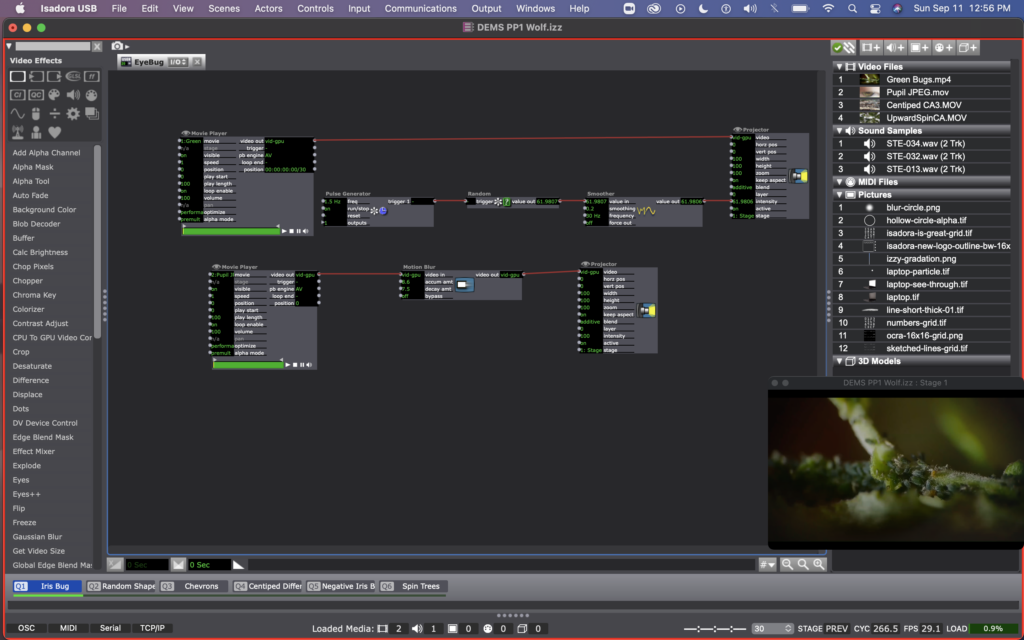
In scene 1, I was playing with the videos that Mark included in his guru sessions. I used a pulse generator, random actor, and smoother to have the intensity of the bugs video fade in and out. Then I used a motion blur actor on the pupil video to exaggerate the trippy vibe that was happening every time they blinked or refocused their eye.
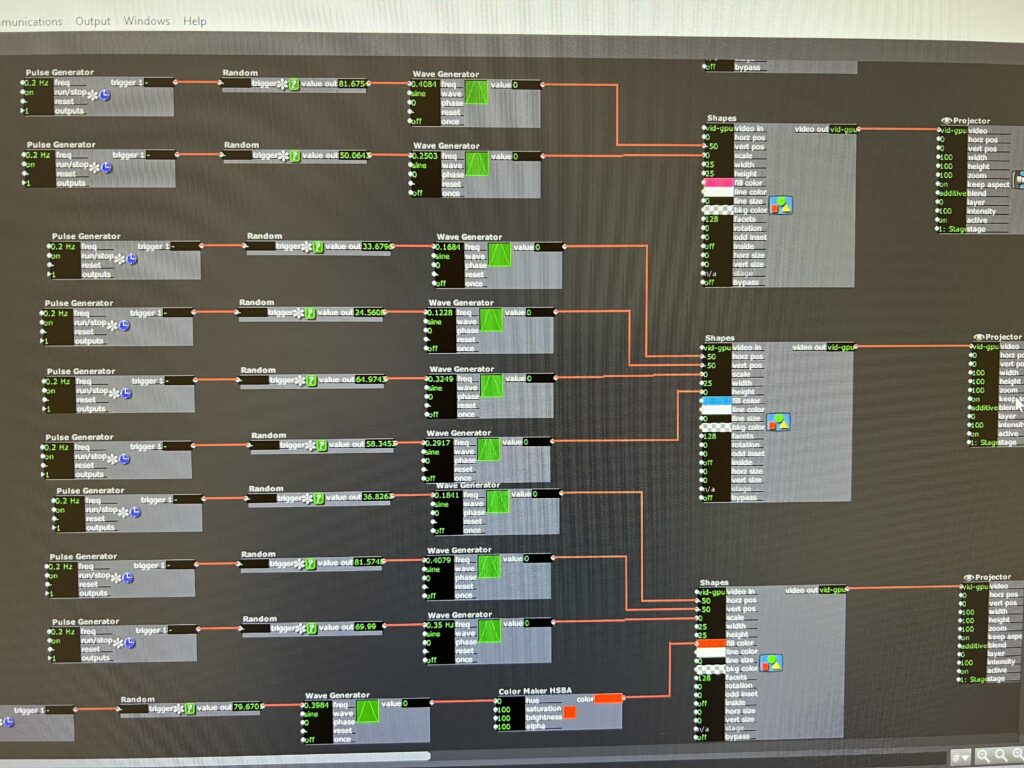
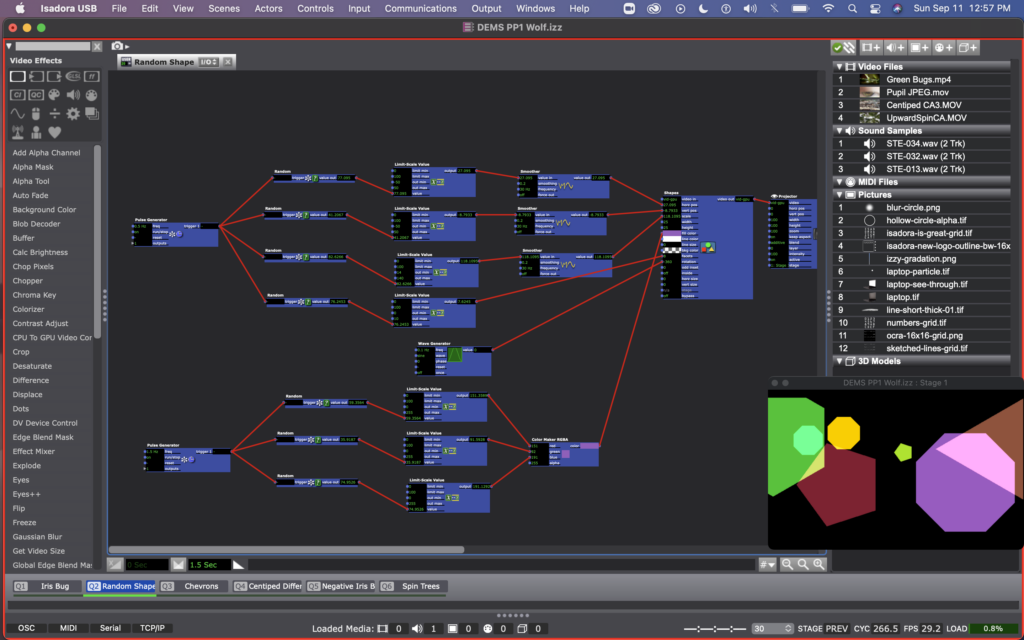
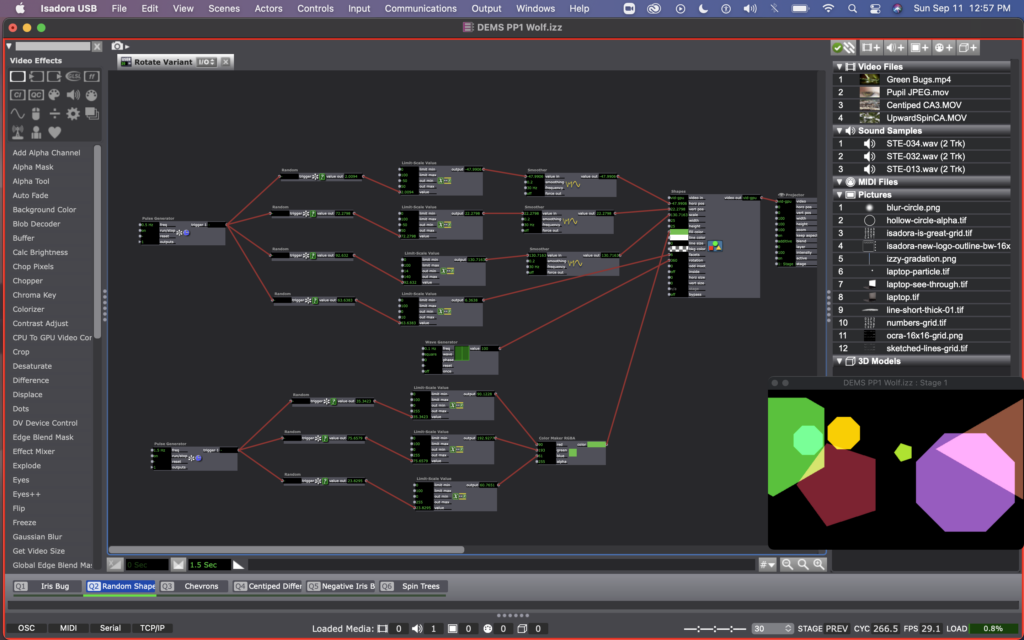
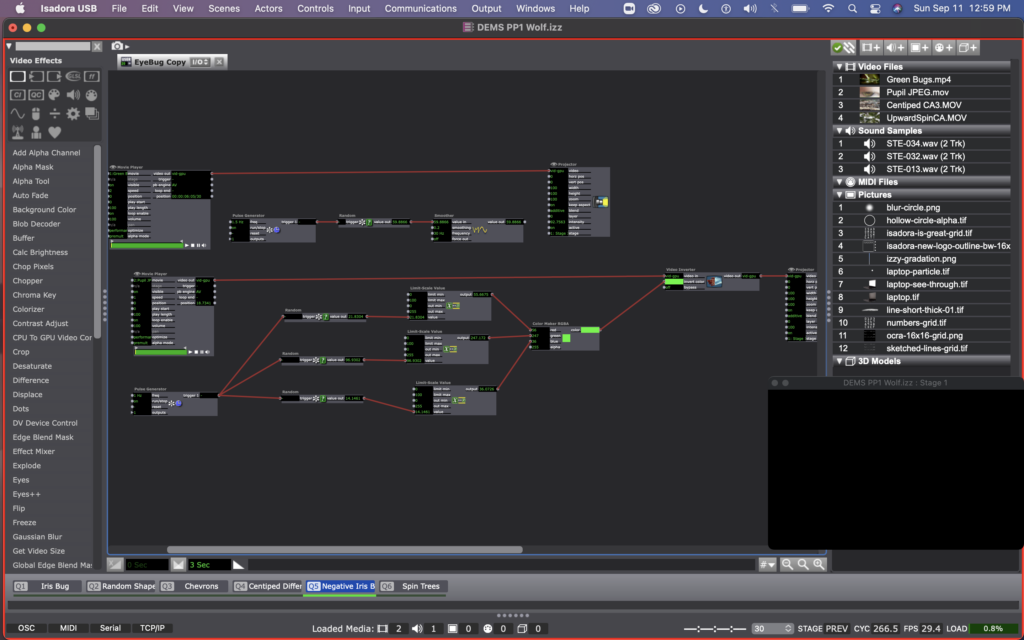
I kept the shape user actors I was playing with in class last week in two of my scenes (Q2 & Q3). With these shapes I was experimenting with a variety of things – all determined still by using random actors. In the shapes created be the user actor called “Random Shape,” random actors are determining the facet number, color, and position of the shapes, and a wave generator is determining the rotation of them. I like the effect of the smoother here so that the shapes looking like they are moving, rather than jumping from place to place. At one point I noticed that they were all rotating together (since they all had the same wave generator affecting them, so I created a variant of this user actor, called “Rotation Variant” with a different wave generator (square rather than sine).
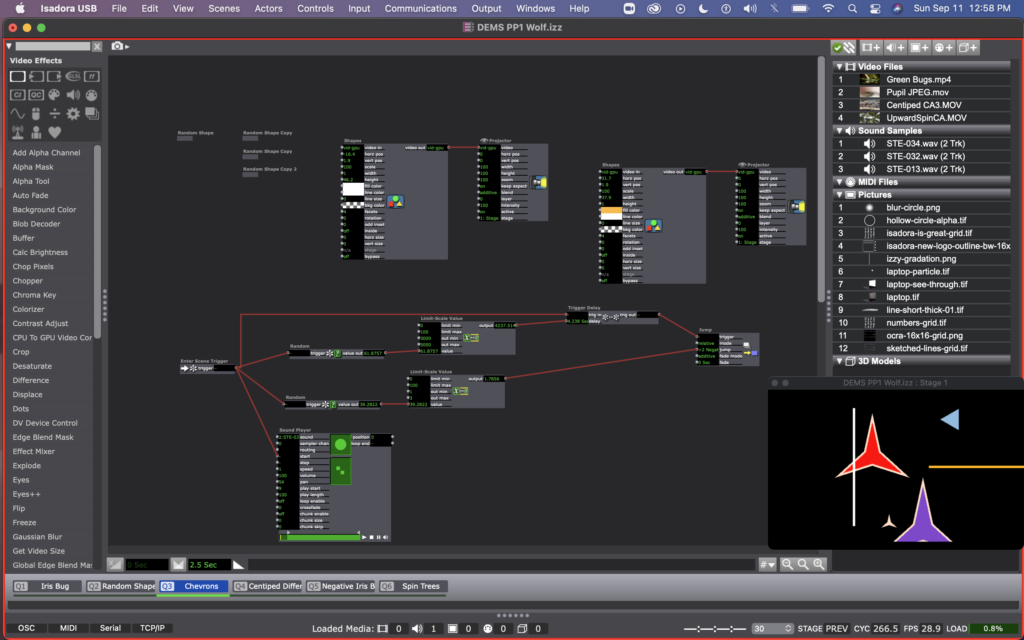
In scene 3, I edited these user actors further. I made a variation of this user actor, called “Random Shape Copy,” in which all the shapes have 6 facets (making a chevron-esc shape), and are using the sawtooth wave generator for rotation. And just so not all the shapes in this scene were rotating in unison, I created a copy of of this user actor, called “Random Shape Copy 2” that used a triangle wave generator for rotation instead. I also added a couple static lines with shape actors in this scene so that the shapes would look like they were crossing thresholds as they moved across the stage.


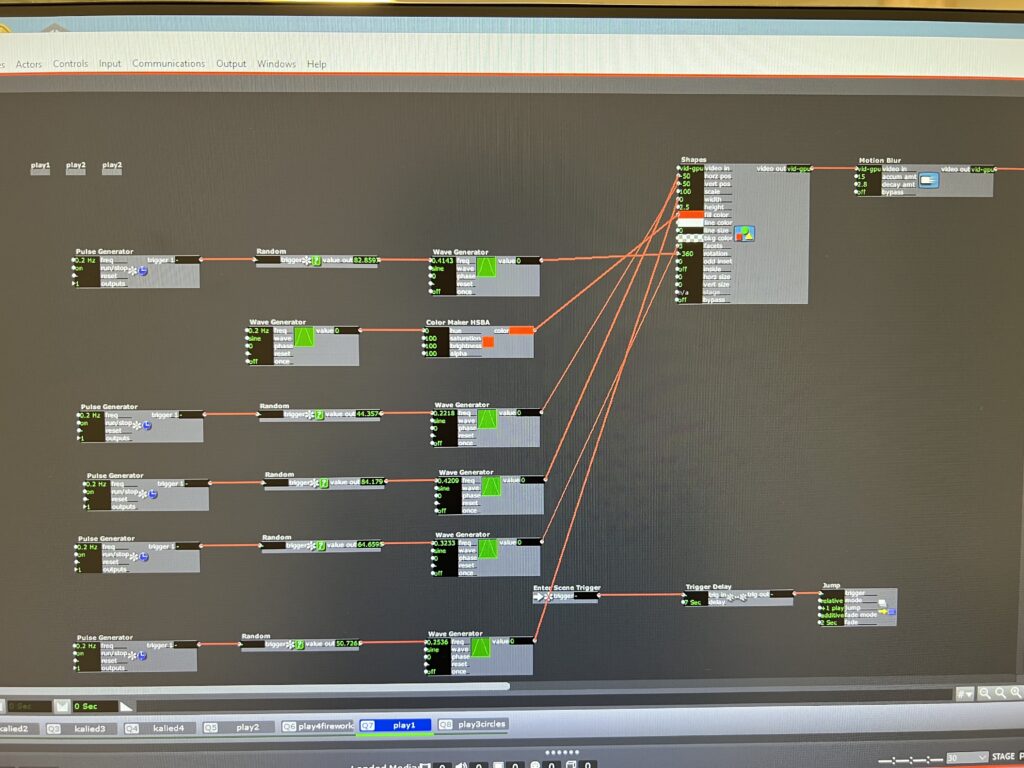
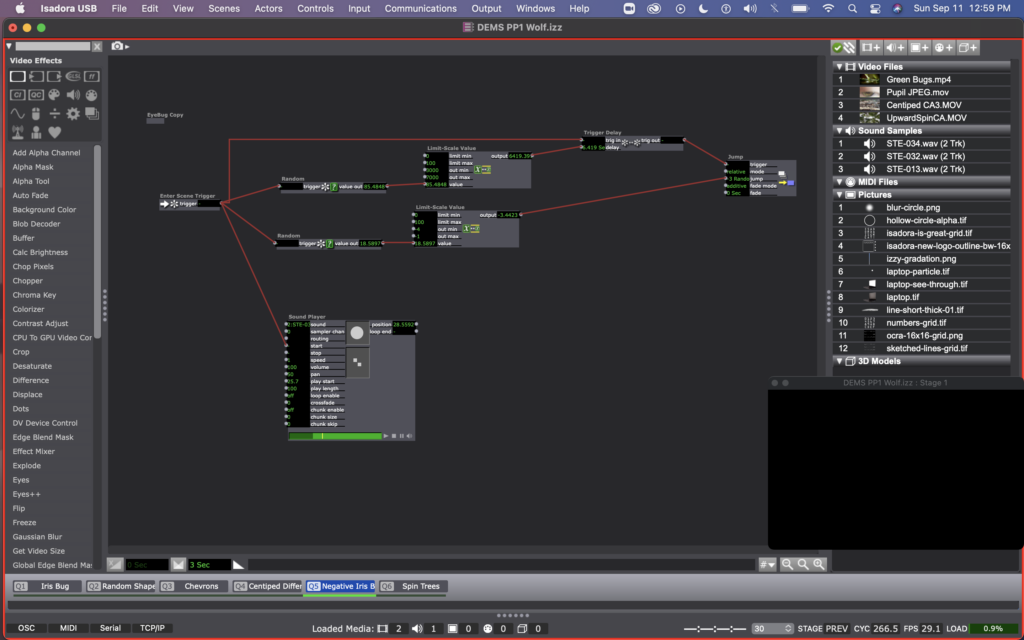
Once I figured out how to jump between scenes, I decided to experiment with some footage I have for my thesis. You can see me starting this in scene 4, where I used a difference actor to create an X-ray esc version of a video of a centipede crawling. I also started to add sound to the scenes at this point (even going back and adding sound to my previous 3 scenes as well). The sound is triggered by the enter scene trigger and has a starting point that is individual for each scene (determined by the arrows on the sound player actor).

For scene 5, I copied the user actor I created in scene 1, calling the copy “EyeBug Copy.” Here you can see that I inserted a video inverter between the movie player and projector for the iris video. Then, I used random actors and a pulse generator to determine and regularly change the invert color. I added a sound file here – the same that I used in other scenes, but set the start location for a sound bit that mentions looking into the eyes of a shrieking macaque, which I thought was an appropriate pairing for a colorized video of an eye.
For scene 6, I have two video layers happening. One is simply a movie player and a projector, looping a video I took while spinning and looking up at the sky in the middle of the redwoods this summer. I wanted it to feel a little more disorienting, or even to make it feel like there was some outside force here, so I added a picture player and used the blurry circle that Mark included in the guru sessions. I used a random wave generator, limit-scale value, and smoother on the projector zoom input to make the blurry circle grow and shrink. Then I used a wave generator and a colorizer to have the circle change between yellows and blues.
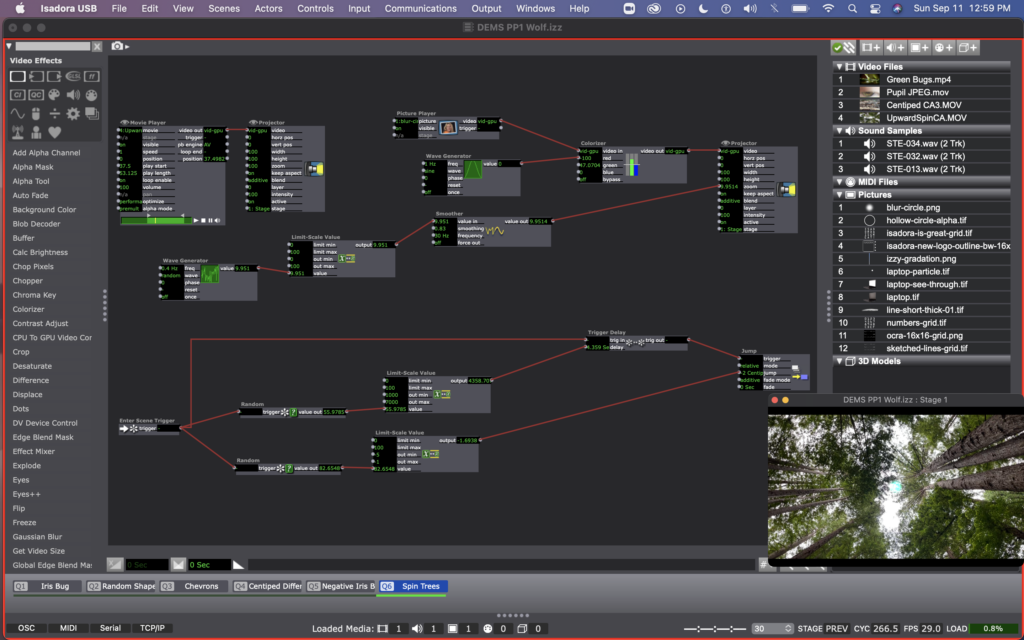
Here’s a video of what it ended up looking like once complete:
I enjoyed sharing this with the class. It was mostly just an experiment, or play with randomness, but I think that a lot of meaning could be drawn out of this material, though that wasn’t necessarily my intention.
Of course everyone laughed at the sound bit that started with “Oh shit…” – it’s funny that curse words will always have that affect on audiences. It feels like a bit of a cheep trick to use, but it definitely got people’s attention.
Alex said that it felt like a poetic generator – the random order and random time in each scene, especially matched with the voices in the sound files made for a poetry-esc scene that makes meaning as the words and images repeat after one another in different orders. I hadn’t necessarily intended this, but I agree and it’s something I’d like to return to, or incorporate into another project in the future.
PP1 documentation + reflection
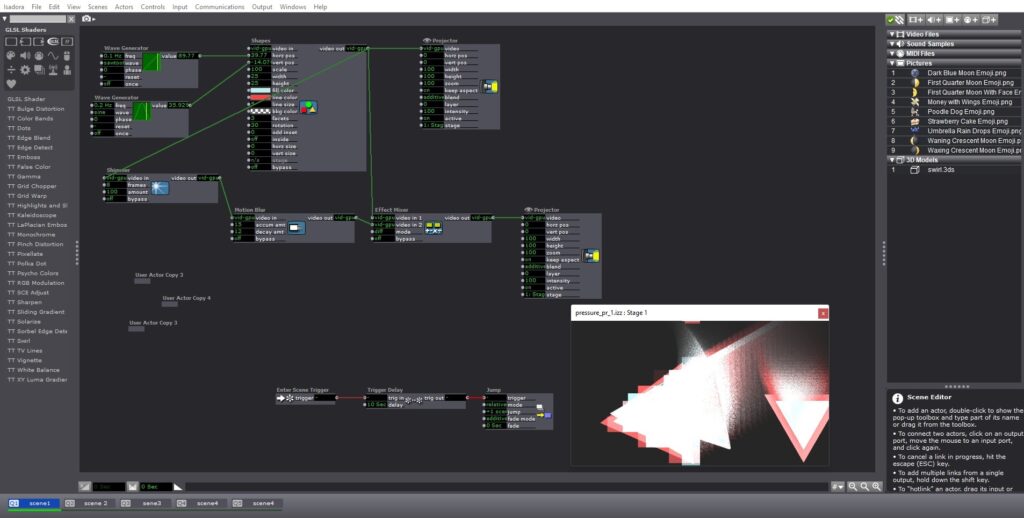
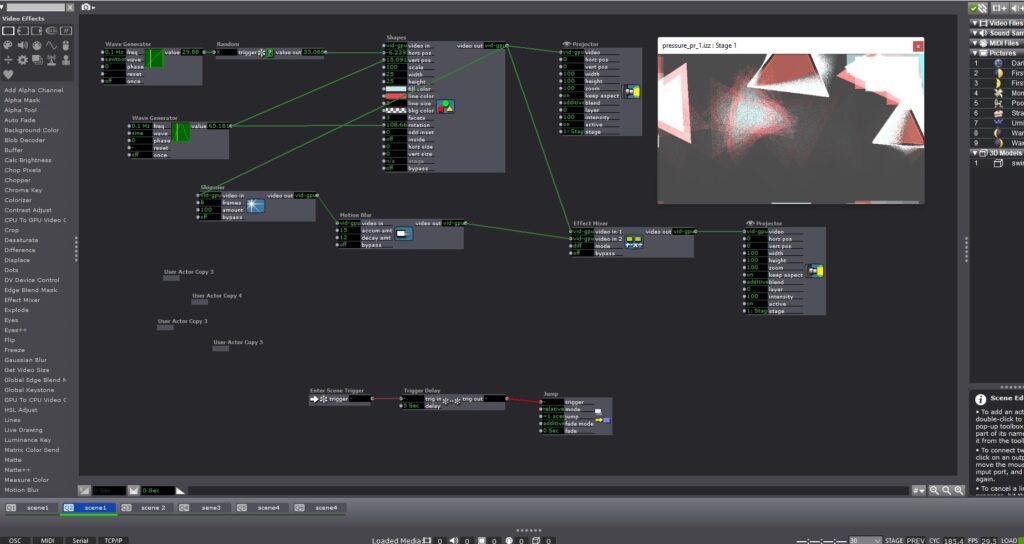
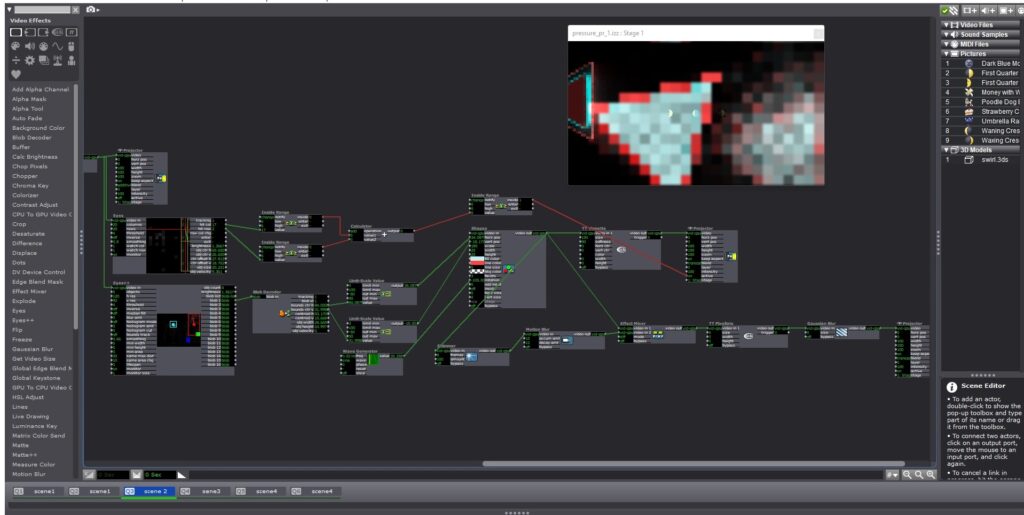
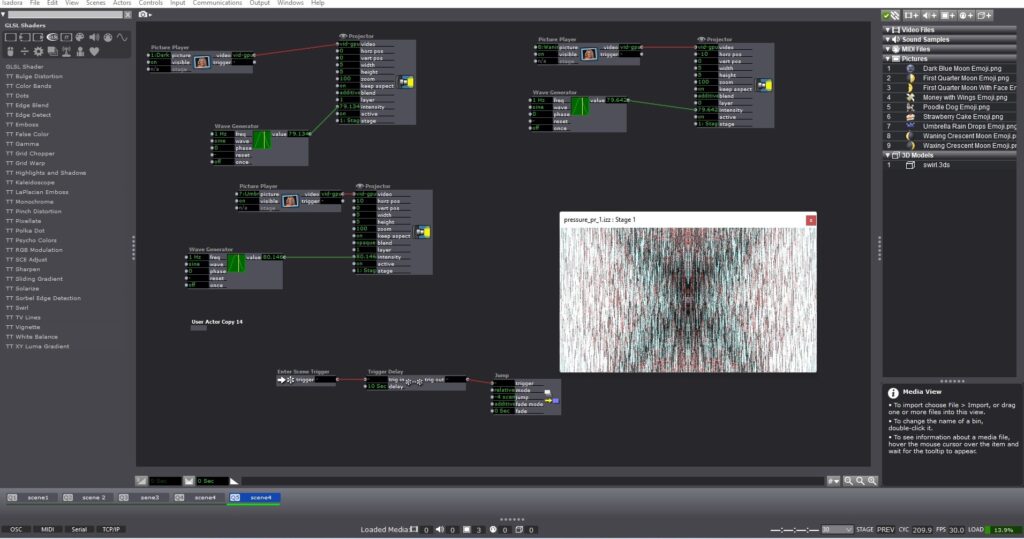
Posted: September 10, 2022 Filed under: Uncategorized Leave a comment »I took this project as an opportunity to experiment with what I learned about the program so far and also scratch more surfaces with what can be done in Isadora in order to inspire future projects. I used shapes, blend modes, and various actors to alter their states and my starting point and visual goal was creating a sequence of events that will make the shapes get more chaotic gradually.
I liked that I got to play with using Isadora’s features to create a sense of texture from flat 2D shapes. Initially, I was going to start with a 3D model but I had trouble getting it to appear in Isadora, so one of my next steps will be to watch the guru session on 3D. I didn’t have a strong conceptual idea in mind when I started working on this project as I mainly wanted to experiment with the program while trying to create a surprise and laughter factor, so when I liked where the first scene was headed, I took it up from there for the future scenes where I focused on creating surprises in the intensity of the visuals and also inserting live capture interactions in one of the scenes after learning about that in class.
It is hard for me not to focus on the visual aspect even though I knew that art wouldn’t be judged, so it was very good to hear that some viewers found it mesmerizing to look at.
I wanted to take a funny twist on the randomness of the patch so I decided to throw in what I thought were pretty random emojis and make them small (I wish I made them even smaller) so they motivate the people to come closer and start a discourse on their role, and also hopefully laugh. I was glad that both of those happened in critique! It was interesting to listen to what everyone thought was the meaning behind them and also make their own meanings of them, although the emojis were just random.
During the critique I was disappointed that people didn’t realize they can control the movement of one of the shapes but it totally made sense why, and I think very good feedback is to put the scene with small emojis before that one so that viewers are already drawn to be closer to the screen and then after that it’s easier to realize they can interact with the content in the following scene.

My presentation was also a good learning opportunity because while making this project I considered the first scene the beginning of the experience and the last scene the end, and I was expecting everyone to judge what they experienced from ‘beginning’ to ‘end’. But for the sake of critique, I put it on loop and that altered how everyone experienced it because a repeating pattern could be recognized. So, that was beneficial or me to observe since that one simple decision made an impact on how everyone experienced the project even though I had my own expectations of ‘beginning’ and ‘end’ to it.
Overall I am really satisfied with the experimentation in Isadora and I feel more confident trying out new things with it and I’m excited about what I could do with future projects.
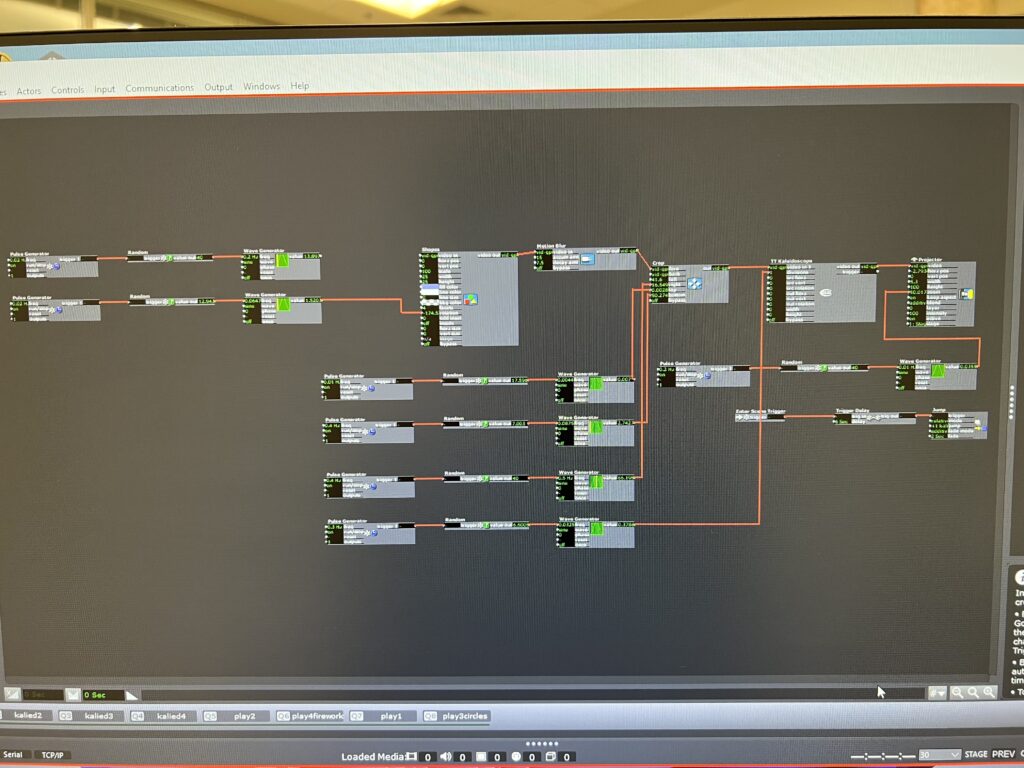
Stars Kaleid – PP1
Posted: September 9, 2022 Filed under: Uncategorized Leave a comment »For this pressure project, I wanted to take the time to play with the actor kaleidoscope++, practice triggering randomness and scene jumping, work on how to grow and expand an image smoothly and add videos into the patch.
Unfortunately, about 2 of the hours I spent working with my personal video I didn’t end up using because Isadora didn’t like the codec and I didn’t realize it in time. Isadora eventually just started freezing and not registering the video, and occasionally crashing.
After I gave up on trying to keep working on the video issues, I returned to the scenes where I had played with different shapes to create textures and images. Because I liked how the video gave the kaleidoscope a lot of movement, I added wave generators to the shape and crop actors to give the same kind of effect.
Even though there were hair pulling moments and I had to ditch some of my work, I still enjoyed the process of just connecting different actors and trying different number patterns to see how it affected the image. I ended up playing so much with the star that when I was asked how I did it, I couldn’t remember.
Right now, Isadora feels endless and limitless and intimidating. I’m grateful for this project just to give me time with the software in a low stakes way so I can experiment and begin to feel more confident. Keeping a clean interface seems to help my brain out as I’m working, so my goal is to not get into the habit of connecting actors every which way.
As I was building this patch, I was dreaming of how the body could be incorporated. I was imagining sketches and snapshots of hands, eyes, ribs showing up in the kaleidoscope as it transitioned randomly. For the next time, I will probably not use as much randomness. I liked it, but I craved a little more structure towards the end. Working with the kaleidoscope also got me imagining infinity loops, so I’m hoping to play with something like that in the future.