Lawson: Cycle 1
Posted: November 14, 2023 Filed under: Nico Lawson, Uncategorized | Tags: cycle 1, dance, Interactive Media, Isadora Leave a comment »My final project is yet untitled. This project will also be a part of my master’s thesis, “Grieving Landscapes” that I will present in January. The intention of this project is that it will be a part of the exhibit installation that audience members can interact with and that I will also dance in/with during the performances. My goal is to create a digital interpretation of “water” that is projected into a pool of silk flower petals that can then be interacted, including casting shadows and reflecting the person that enters the pool.
In my research into the performance of grief, water and washing has come up often. Water holds significant symbolism as a spirit world, a passage into the spirit world, the passing of time, change and transition, and cleansing. Water and washing also holds significance in my personal life. I was raised as an Evangelical Christian, so baptism was a significant part of my emotional and spiritual formation. In thinking about how I grieve my own experiences, baptism has reemerged as a means of taking control back over my life and how I engage with the changes I have experienced over the last several years.
For cycle 1, I created the Isadora patch that will act as my “water.” Rather than attempting to create an exact replica of physical water, I want to emphasis the spiritual quality of water: unpredictable and mysterious.
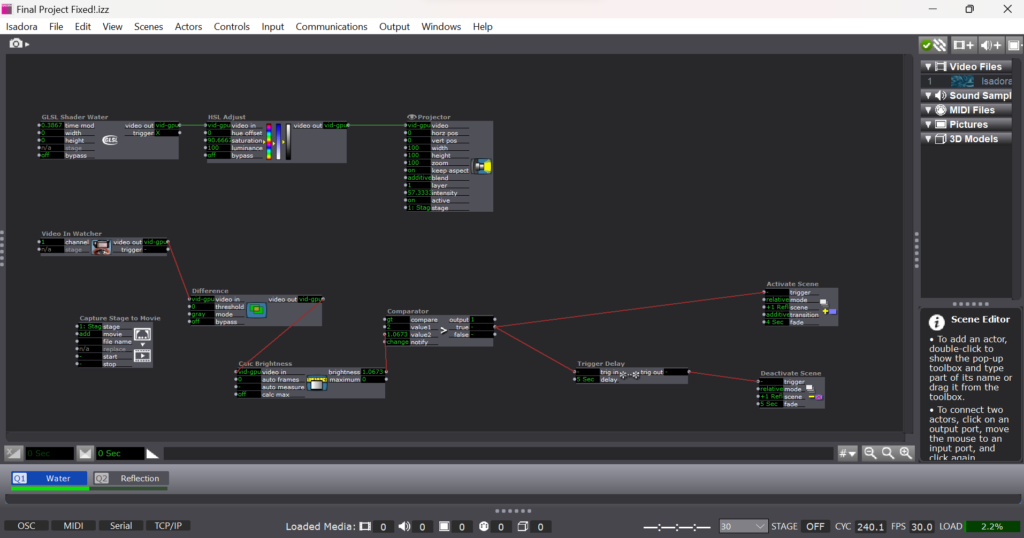
To create the shiny, flowing surface of water, I found a water GLSL shader online and adjusted it’s color until it felt suitably blue: ghostly but bright, but not so bright as to outshine the reflection generated by the web cam. To emphasize the spiritual quality of the digital emanation, I decided that I did not want the watch to be constantly projecting the web cam’s image. The GLSL shader became the “passive” state of the patch. I used difference, calculate brightness, and comparater actors with active and deactive scene actors to form a motion sensor that would detect movement in front of the camera. When movement is detected, the scene with the web cam projection is activated, projecting the participant’s image over the GLSL shader.
To imitate the instability of reflections in water I applied a motion blur to the reflection video. I also wanted to imitate the ghostliness of reflections in water, so I desaturated the image from the camera as well.
To emphasize the mysterious quality of my digital water, I used an additional motion sensor to deactivate the reflection scene. If the participant stops moving or moves out of the range of the camera, the reflection image fades away like the closing of a portal.
The patch itself is very simple. It’s two layers of projection and a simple motion detector. What matters to me is the way that this patch will eventually interact with the materials and how the materials with influence the way that the participant then engages with the patch.
For cycle 2, I will projection map the patch to the size of the pool, calibrating it for an uneven surface. I will determine what type of lighting I will need to support the web camera and appropriate placement of the web camera for a recognizable reflection. I will also need to recalibrate the comparater for a darker environment to keep the motion sensor functioning.
Lawson: PP3 “Melting Point”
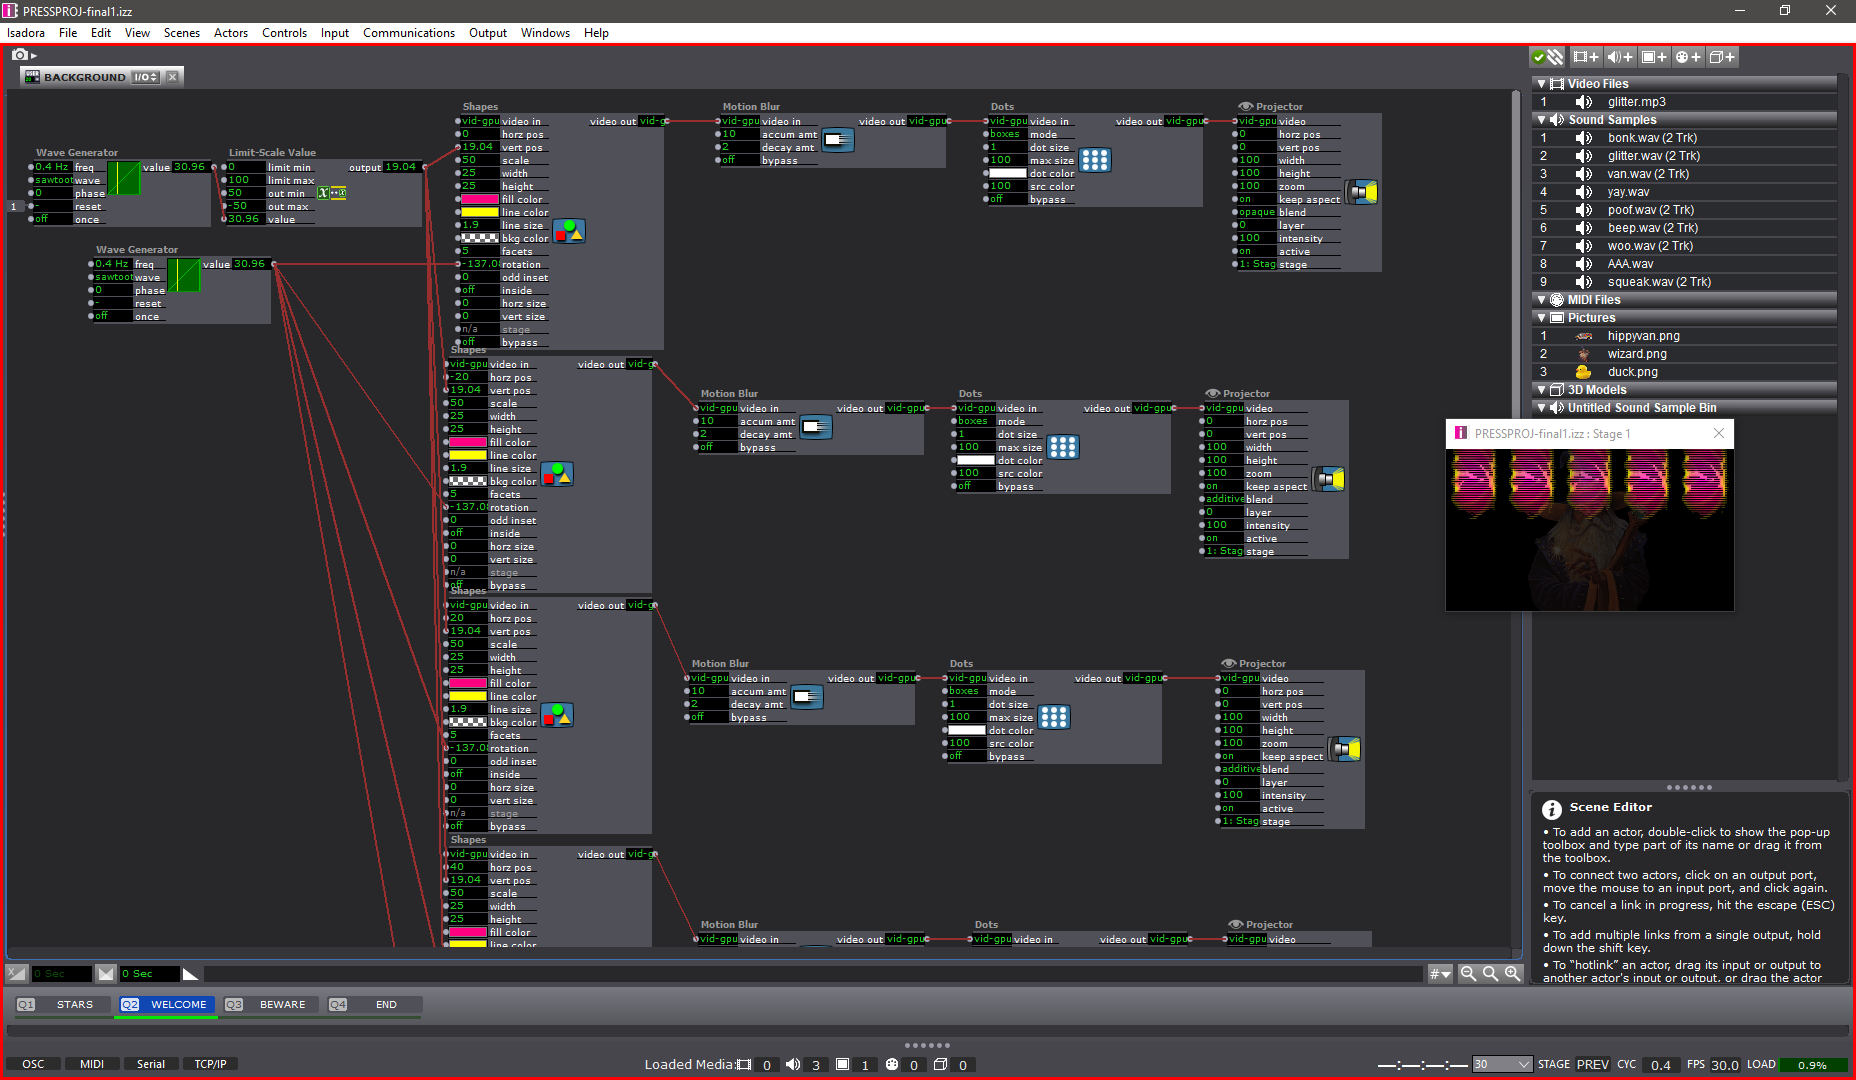
Posted: November 14, 2023 Filed under: Nico Lawson, Uncategorized | Tags: Interactive Media, Isadora, Pressure Project Leave a comment »For Pressure Project 3, we were tasked to improve upon our previous project inspired by the work of Chuck Csuri to make the project suitable to be exhibited in a “gallery setting” for the ACCAD Open House on November 3, 2023. I was really happy with the way that my first iteration played with the melting and whimsical qualities of Csuri’s work, so I wanted to turn my attention to the way that my patch could also act as it’s own “docent” to encourage viewer engagement with the patch.
First, rather than wait until the end of my patch to feature the two works that inspired my project, I decided to make my inspiration photos the “passive” state of the patch. Before approaching the web camera and triggering the start of the patch, my hope was that the audience would be curious and approach the screen. I improved the sensitivity of the motion sensor aspect of the patch so that as soon as a person began moving in front of the camera, the patch would begin running.
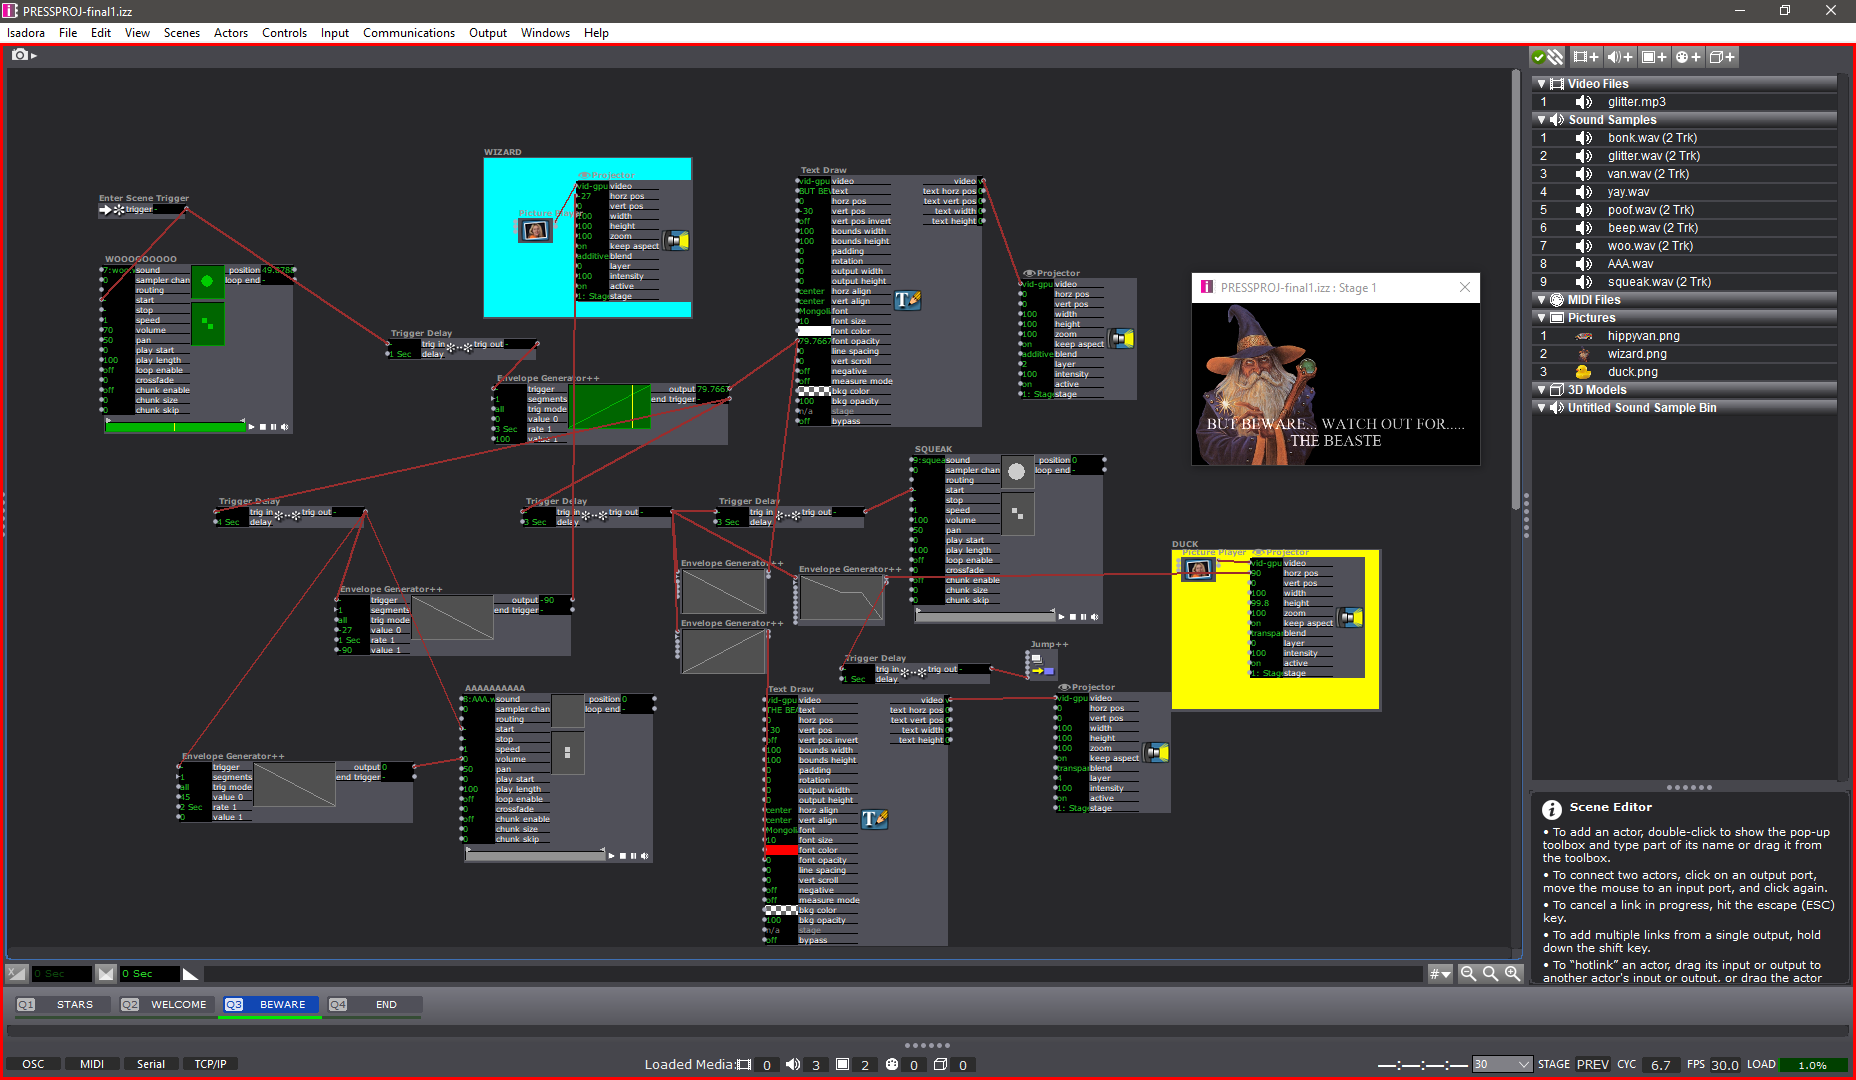
When the patch begins running, the first scene that the audience sees is this explanation. Because I am a dancer and the creator of the patch, I am intimately familiar with the types of actions that make the patch more interesting. However, audience members, especially those without movement experience, might not know how to move with the patch with only the effects on the screen. My hope was that including instructions for the type of movement that best interacted with the patch would increase the likelihood that a viewer would stay and engage with the patch for it’s full duration. For this reason, I also told the audience about the length of the patch so audience members would know what to expect. Additional improvements made to this patch were shortening the length of the scenes to keep viewers from getting bored.
Update upon further reflection:
I wish that I had removed or altered the final scene in which the facets of the kaleidoscope actor were controlled by the sound level watcher. After observing visitors to the open house and using the patch at home where I had control over my own sound levels, I found that it was difficult to get the volume to increase to such a level that the facets would change frequently enough for the actor to attract audience member’s attention by allowing them to intuit that their volume impacted what they saw on screen. For this reason, people would leave my project before the loop was complete seeiming to be confused or bored. For simplicity, I could have removed the scene. I also could have used an inside range level actor to lower the threshold for the facets to be increased and spark audience attention.
Lawson: PP2 Inspired by Chuck Csuri
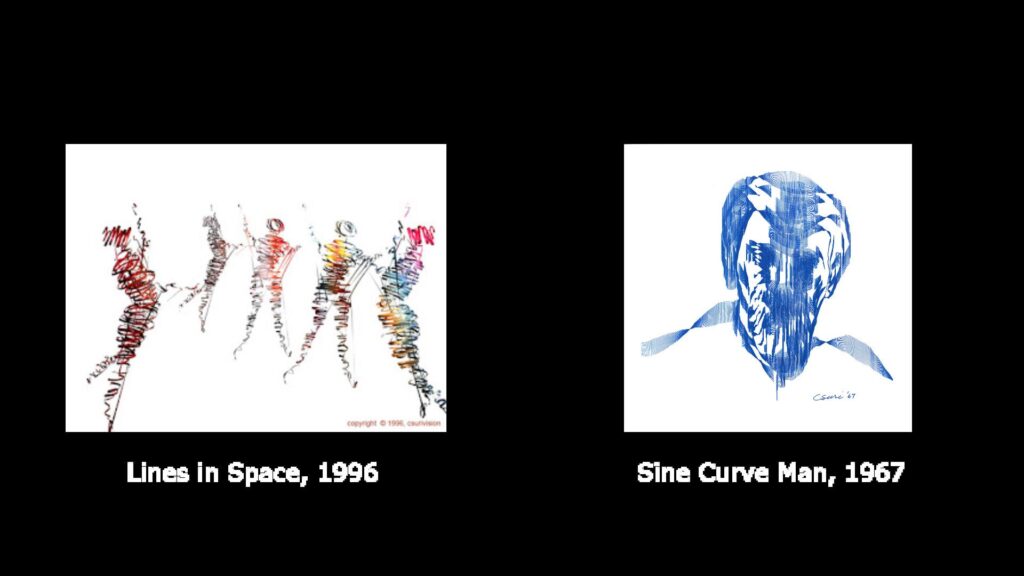
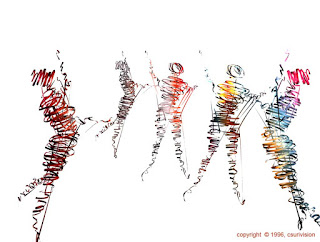
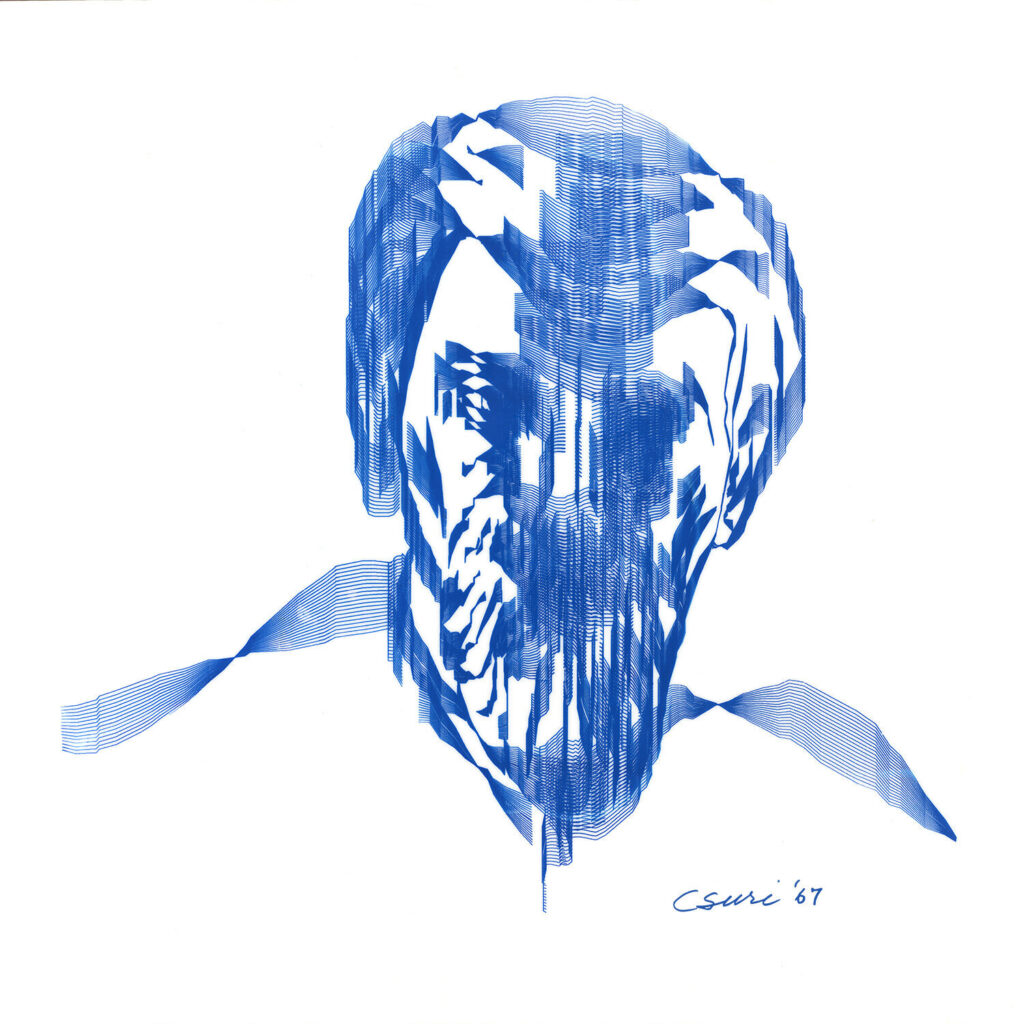
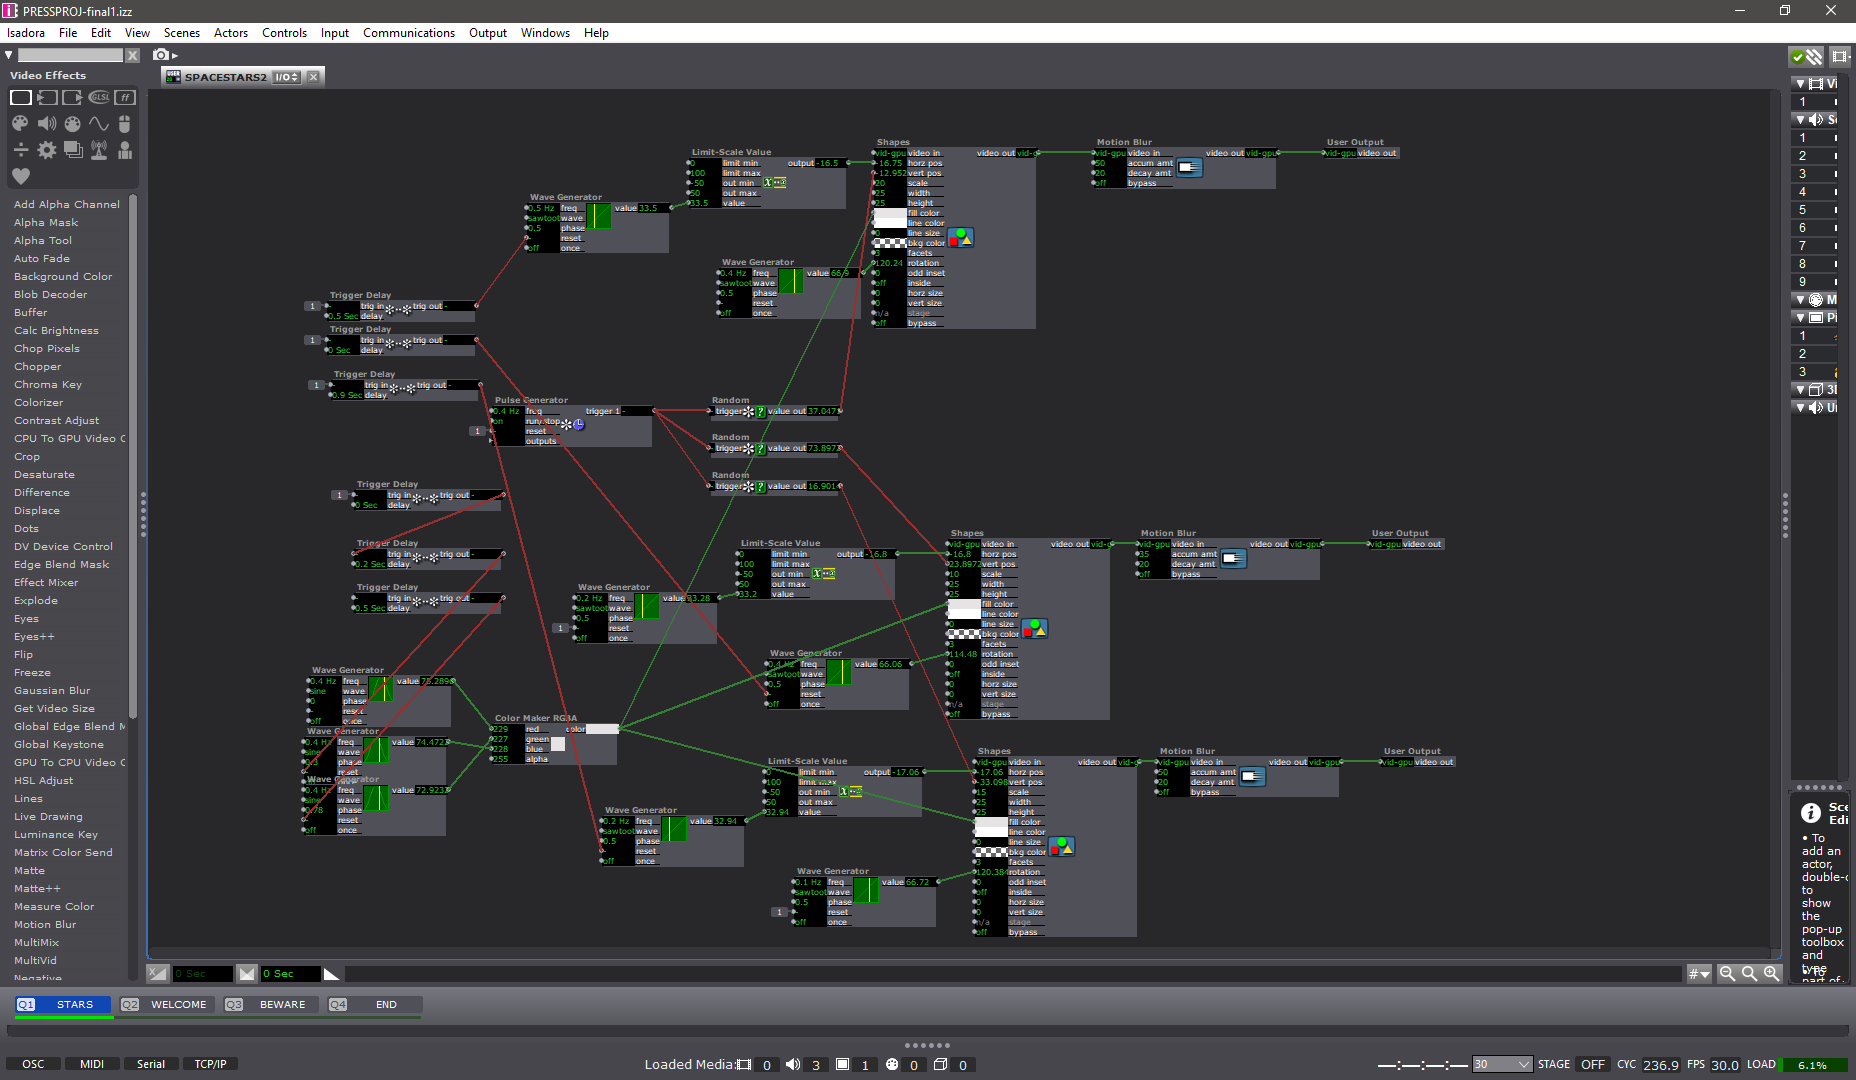
Posted: October 24, 2023 Filed under: Nico Lawson, Pressure Project 2 | Tags: Chuck Csuri, Isadora, Pressure Project Leave a comment »My second pressure project is inspired by the two Chuck Csuri works below: Lines in Space (1996) and Sign Curve Man (1967). I love the way that each work takes the human form and abstract it, making it appear that the figures melt, warp, and fray into geometric shapes and rich, playful colors.
For my project, I wanted to allow the audience a chance to imitate Csuri’s digital, humanoid images in a real time self-portrait. I also wanted to build my project around the environmental factors of an art gallery – limited space in front of each art work, a mobile audience with split attention, and ambient noise. In addition to the patch responding to the movement of the audience, I wanted to introduce my interpretation of Chuck Csuri’s work in layers that progressively built into the final composite image. You can see a demonstration of the Isadora self-portrait below.
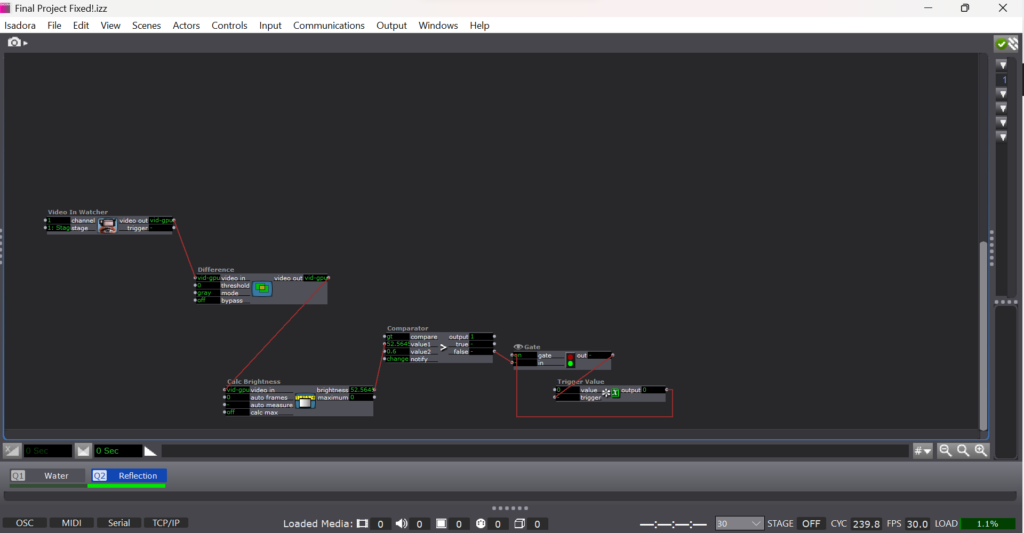
To draw the audience’s attention to the portrait, I built a webcam motion sensor that would trigger the first scene when a person’s movement was detected in the range of the camera. I built the motion sensor using a chain of a video-in watcher, the difference actor, a calculate brightness actor, the comparator to trigger a jump scene actor. If the brightness of the webcam was determined to be greater than 0.6, the jump scene actor was triggered. So that the jump actor would only be triggered once, I used a gate actor and trigger value actor to stop more than one trigger from reaching the jump actor.
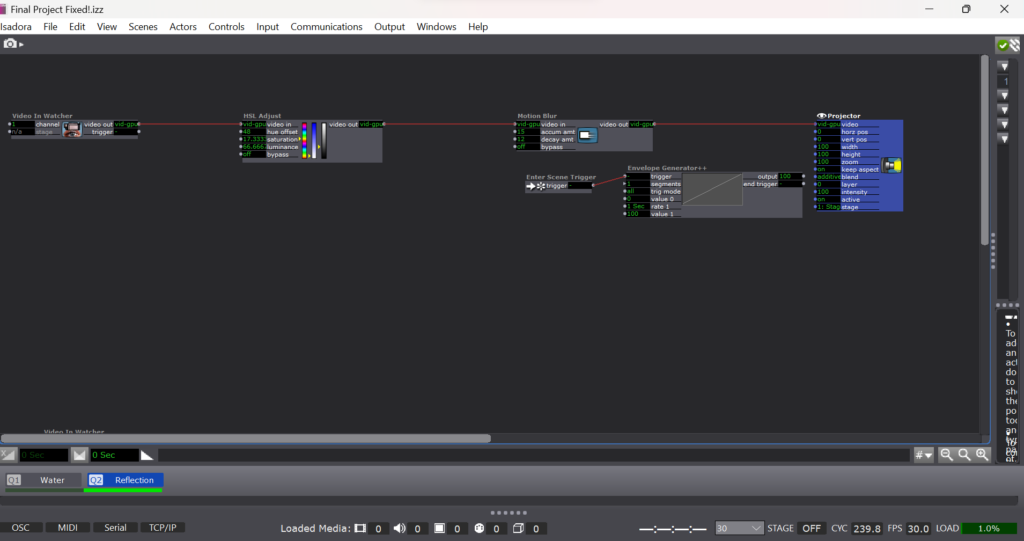
Once the patch had detected a person in the range of the webcam, the remainder of the patch ran automatically using chains of enter scene triggers, trigger delays, and jump scene actors.
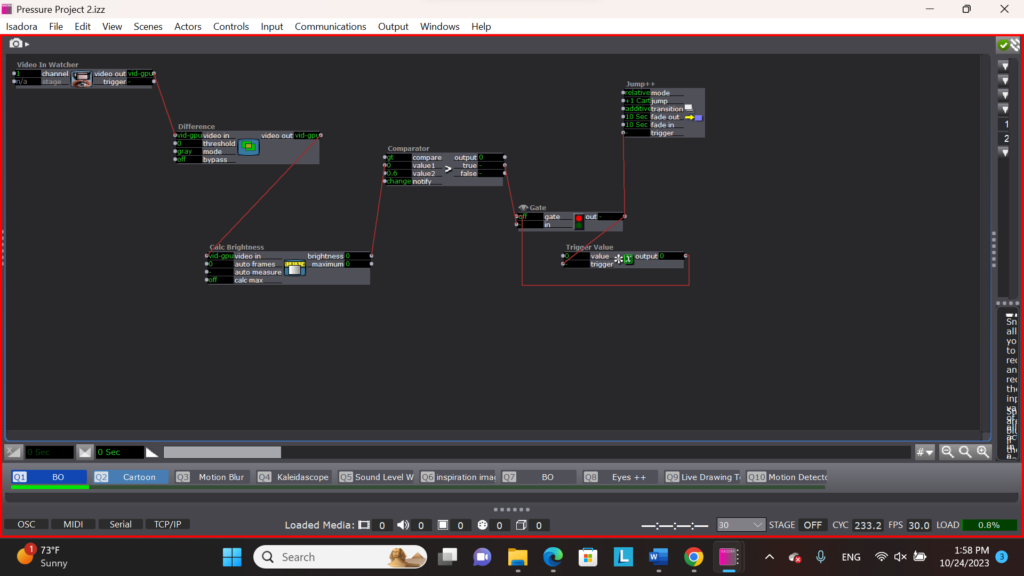
To imitate the colored banding of Csuri’s work, I filtered the image of the web came through a difference actor set to color mode. The difference actor was connected to a colorizer actor. In order to create the fluctuating colors of the banding, I connected a series of envelope generators to the colorizer that raised and lowered the saturation of hues on the camera over time.

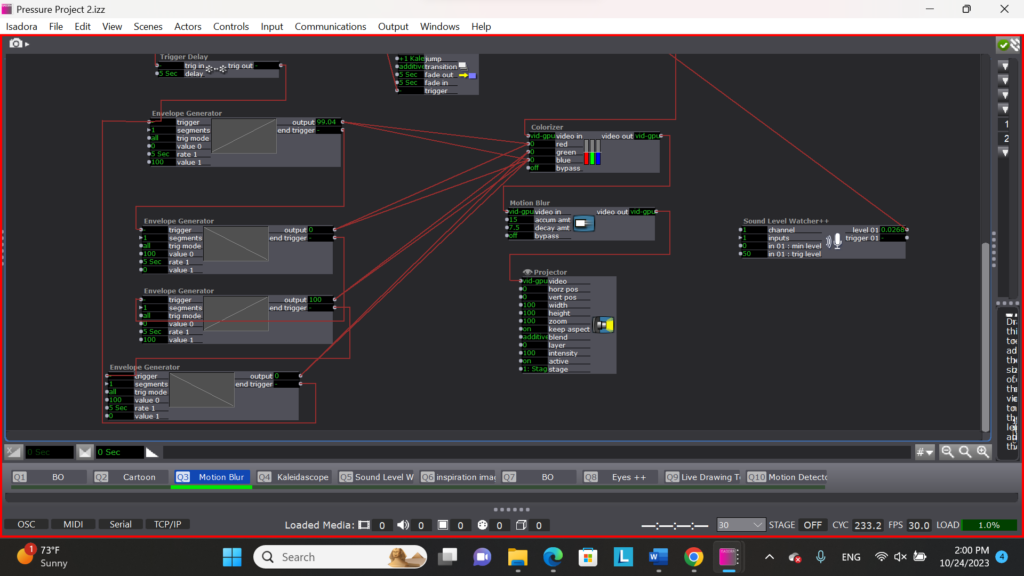
In the next scene I introduced the sense of melting that I experienced in Csuri’s work by adding a motion blur actor to my chain. At the same time, I attached a soud level watcher to the threshold of the difference actor to manipulate it’s sensitivity to movement. This way the patch is now subtlely responsive to the noise level of the gallery setting. If the gallery is noisy, the image will appear brighter because it will require less movement to be visible. This visibility will then fluctuate with the noise levels in the gallery.
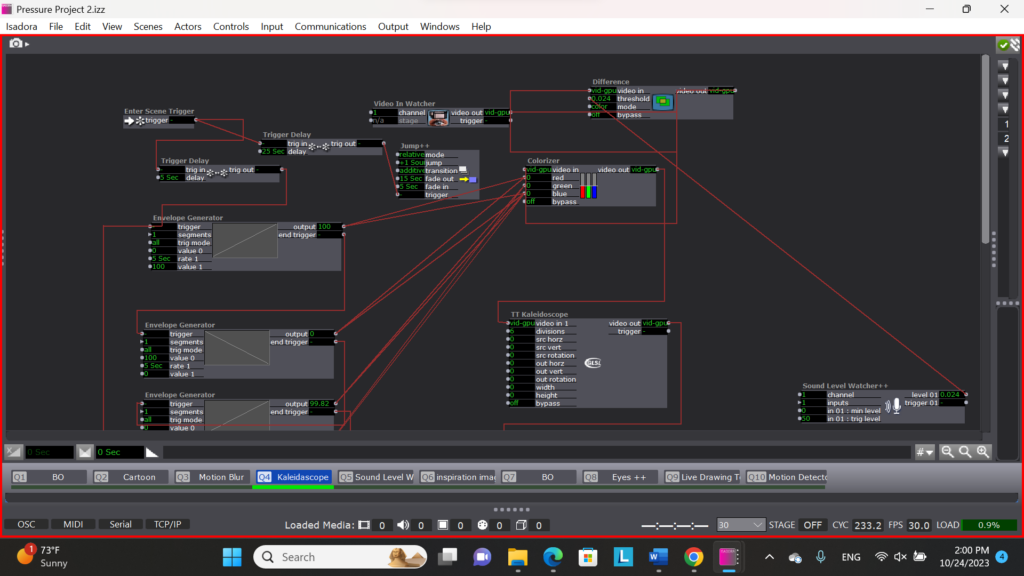
In the next scene I introduced the warping and manipulation I observe in Csuri’s work. I wanted to play with the ways that Csuri turns real forms into abstract representations. To do this, I introduced a kaleidoscope actor to my chain of logic.
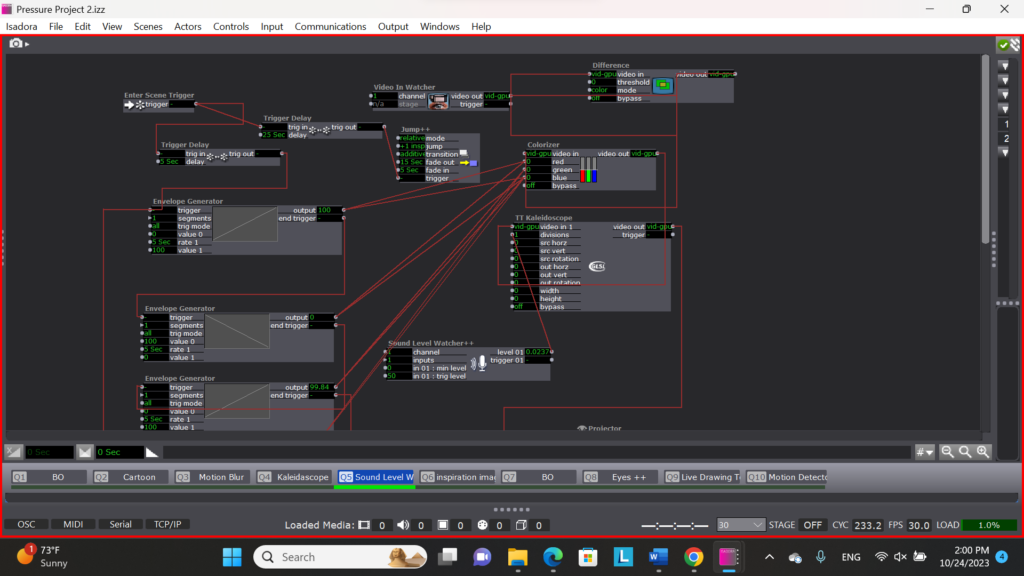
My final play scene is a wild card. In this scene, I connected the sound level watcher to the facet element of the kaleidoscope actor. Instead of the clarity of the image being dependent on the noise level of the gallery, the abstraction or warping of the image would be determined by the noise levels. I consider this scene to be a wild card because it’s effectiveness is dependent on the audience realizing that their talking or silence impacts their experience.
The patch ends by showing the audience my inspiration images and then resetting.
In thinking about improving this patch for Pressure Project 3, I want to consider the balance of instructions and discoverability and how to draw in and hold an audience member’s attention. I am unsure as to whether my project is “obvious” enough for an audience member to figure out what is happening without instructions but inviting enough to convince the audience member to stay and try to figure it out. I also know that I need to calibrate the length of my black out scenes and inspiration image scenes to make sure that audience members are drawn to my installation, but also don’t stay so long that they discourage another audience member from participating in the experience.
Pressure Project 1: “About Cycles”
Posted: September 13, 2023 Filed under: Isadora, Pressure Project I | Tags: Au23, Isadora, Pressure Project, Pressure Project One Leave a comment »Recording of the Pressure Project:
Motivations:
- Learn about Isadora
- General features/ways to create in Isadora
- Ways to organize objects in Isadora
- Ways to store information in Isadora
- Control flow
- Engage with the subject of “Cycles”
- This class uses cycles as an integral component of its processes. Therefore, focusing on the idea of cycles for this first project seemed fitting.
- Because this project encouraged the use of randomness to create something that “plays itself” (once you start it) and holds the viewer’s attention for some time, playing with indefinite cycles seemed appropriate.
- Find a “Moment of Joy”
- The “Side Quest” for this project was to invoke laughter or a moment of joy.
- When I started my 6 hours for this project, I was in a little bit of a bad mood. Consequently, I was not in the mood to create something joyful. Therefore, I decided to challenge myself to take something negative and turn it into something positive—since this artwork would feel more authentically “joyful” to me if that “joy” came from a genuine determination to find that joy within an honest acknowledgement of both the good and bad.
How the Project Supports those Motivations:
- The Storyline
- The beginning portion employs Sisyphean imagery to convey feelings of being trapped in cycles and not making any noticeable progress.
- I experimented with the number of times this scene would play to try to play it just enough times that the viewer could think that this scene was all there would be—a psychological trick that would hopefully invoke negative feelings corresponding to this theme.
- Since the animation was relatively abstract (there was no person figure included, for example), I was glad to hear from the people who watched it in class that they realized that this reference was being made.
- Eventually, it is revealed that the rocks that are rolling backwards are rolling backwards into somewhere new and exciting.
- The rock is traveling to these new places over bridges created by other rocks that had arrived there before. (I am not sure from the audience response whether this part came through, consciously or subconsciously. If I were to continue working on this project, I would change what the rocks look like to make it more obvious that the bridge is made of those rocks specifically.)
- This animation of the traveling rock cycles indefinitely, with the background effects randomized each time. (This, combined with the effect of the Sisyphean section of changing the location after the viewer starts to think that section will be the only one, had the interesting effect of causing the in-class audience to not be sure for some time that this section would repeat indefinitely. While this has some obvious drawbacks, it does arguably complement some of the themes of this piece.)
- While I want each viewer to come to their own personal interpretation of this piece, I am hoping it can encourage viewers to consider the idea that, even if we cannot see it, in the cycles in our lives we are stuck in—even the ones where the negative effects far outweigh the positive ones—we still get something each time, even if that is just a little bit more knowledge that we can use to get just a bit further next time.
- The beginning portion employs Sisyphean imagery to convey feelings of being trapped in cycles and not making any noticeable progress.
- The Technical Aspects
- This project did give me the opportunity to experiment with a variety of Isadora “Actors.” My favorite one (which this project used for special effects and textures) was the “Explode” Actor.
- I used User Actors (which I found could be used similarly to classes from more traditional object-oriented coding languages) frequently to keep things more organized and to limit the amount of copied and pasted Actors.
- I experimented with Global Values (which have some similarities to global variables from more traditional programming), the Calculator Actor, the Comparator Actor, Actors that handled Triggers, and the Jump++ Actor for control flow, especially to repeat Scenes.
- I tried to automatically set the Global Value at the start of the show, but some unknown aspect of my logic was incorrect, so I did have to remember to manually set it each time I played the show.
- Much of the control flow resulting in the final effect on the Stage could have been accomplished with just the Counter Actor, Actors that handled Triggers, and the Jump++ Actor. However, I specifically wanted to learn about Global Values using this project, and there is some symbolism involved in the fact the Scene itself truly does fully repeat (rather than just a set of steps within the Scene). This does raise an interesting question about how the way something is done can in itself be part of an artwork—but is that worthwhile when it takes more time, is less clean, and ultimately results in the same user/viewer experience?
Isadora File Documentation/Download:
WORK > PLAY > WORK > PLAY >>>
Posted: September 12, 2023 Filed under: CgRyan, Isadora, Pressure Project I, Uncategorized | Tags: Isadora, Pressure Project, Pressure Project One Leave a comment »My goals for Pressure Project #1 were to deepen and broaden skills working in Isadora 3 and to create a motion piece that could hold attention. The given Resources were 6 hours and a minimum of using defined Actors: Shape, Projector, Jump++, Trigger Delay, and the Envelope Generator, and that would auto-play.
PROCESS
Pressure Project 1: TAKE 1 took 3 hours, and though I learned the basics of scene transition and shape control and video placement, I was not satisfied with how the scenes progressed and connected: I had not taken the time to create a defined concept. (When feeling “time pressured” I sometimes forget what one of my most respected design teachers at ArtCenter said “To save time, take the time to create a concept first.”)
Pressure Project #1 – TAKE 1
CONCEPT
I am both a designer and an artist, and creating a balance between personal work [PLAY] and paid client projects [WORK] has been an ongoing battle over my careers. I decided I wanted to symbolize this “dance” between WORK and PLAY in my motion piece. Conceptually, I think of WORK as a rectangle, or a “frame” that defines the boundaries of both Resources and what the Valuation criteria are. When I think of PLAY, I think of circles, more open and expansive, and playful. When I think of the combination of these 2 concepts, I see a choreography between grace and collision, satisfied expectations and for serendipity. When deciding on the pacing and transitions of the whole, I wanted to create an “endless loop” between WORK and PLAY that symbolized my ubiquitous see-saw between the two poles. An endless loop would represent “no separation” between WORK and PLAY: my live-long goal of to have work that feels like PLAY, and to WORK meaningfully at my PLAY so that it is worth the currency of my life force: time and energy.
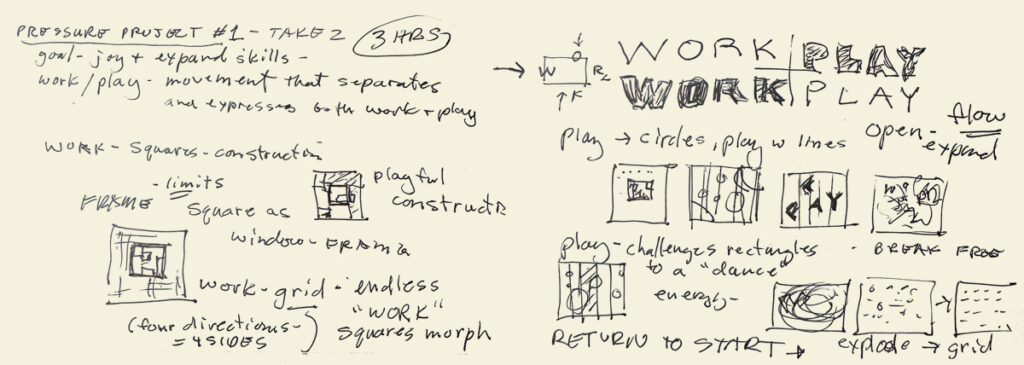
Concept: WORK > PLAY sketch
ADDITIONAL TUTORIALS
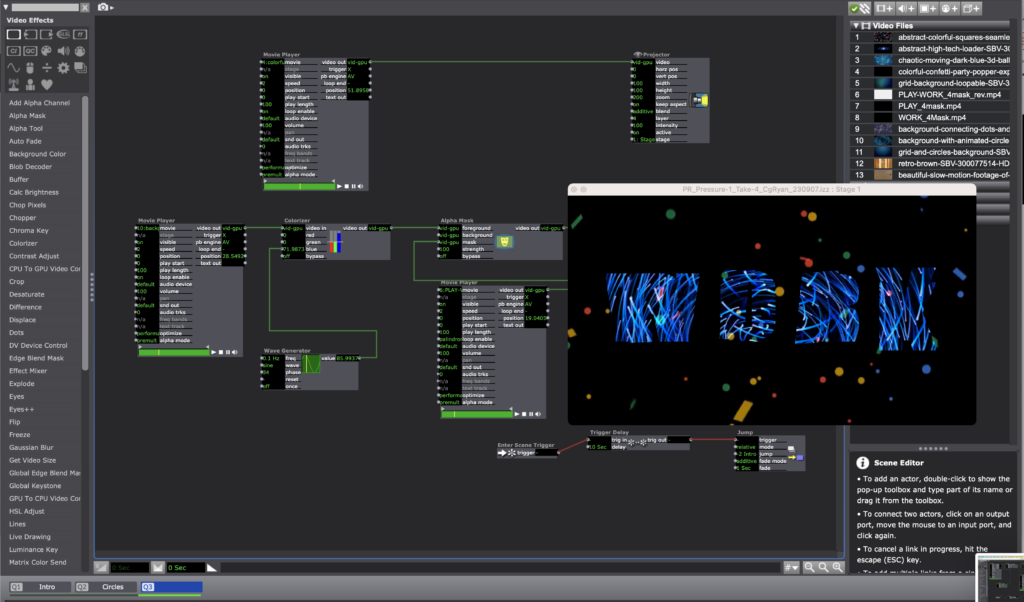
I found an additional Isadora tutorial “Build it! Video Porthole” by Ryan Webber that demonstrated skills I wanted to learn: how to compose video layers with masking and alpha channels, and another demo of the User Actor. From this tutorial, I was inspired to use the Alpha Mask actor to make the WORK > PLAY > repeat cycle explicit. I decided to use the letters of the two “four letter words” to explicitly to represent my history as a communications designer, and to alternate between a more structured motion path using the squares and a more playful evolution as the piece transitioned to circles, then a finale of a combination.
LIMITED REMAINING TIME: 2.5 hours
To respect the time limit of the project, I used an application that I use in both personal art “play” and client work, After Effects, to quickly create three simple animations with the WORK + PLAY letters to use with the Alpha Mask actor.

After Effects alpha masks
To save additional time, I used a combination of motion pattern videos I have used in earlier projection mapping projects. I used the Shapes and Alpha Mask actors in Isadora to combine the elements.

Scene 1 – 3 stills: videos in alpha masks
To create the endless “loop” transitions between the three scenes, I used the Trigger Delay actor on each of the three scenes, using the jump value of “-2” to return to scene one.
Scene 3: Trigger Delay and Jump++ to return to Scene 1: “-2”
To export the Isadora project to video to post online, I used the Capture Stage to Movie actor. I look forward to the next Pressure Project!
Lawson: Pressure Project 1
Posted: September 12, 2023 Filed under: Nico Lawson, Pressure Project I, Uncategorized | Tags: Isadora, Pressure Project, Pressure Project One Leave a comment »For pressure project one, I was inspired to create a narrative as opposed to an infinite loop. I have recently been interested in outerspace and interstellar processes and decided to create an animation of a supernova, albeit in a simple, geometric representation.
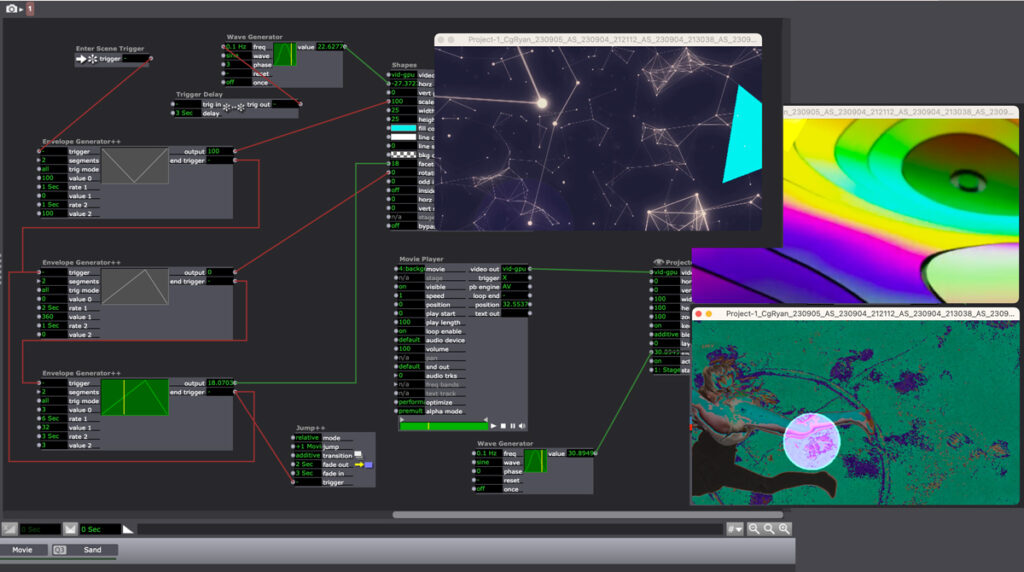
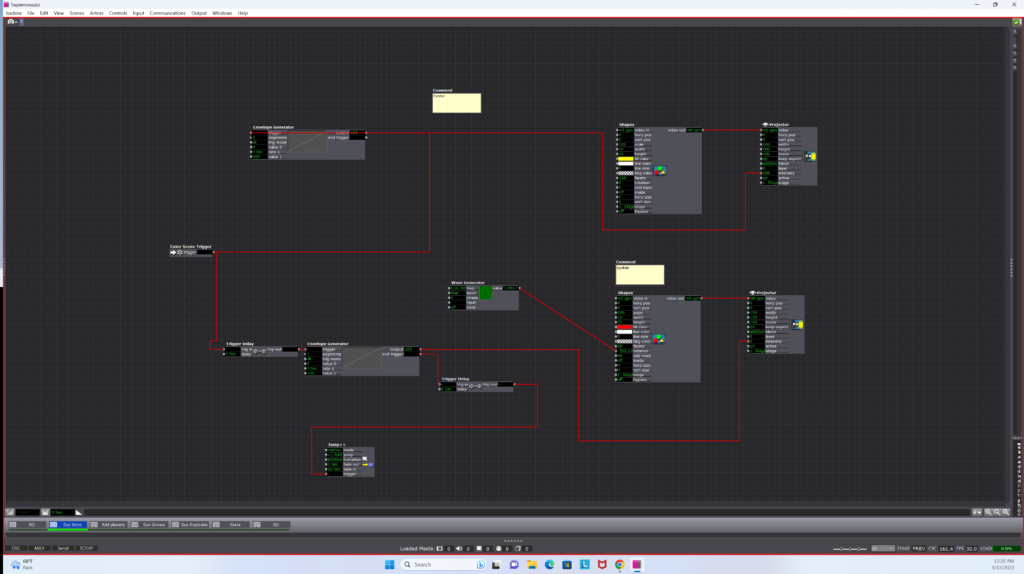
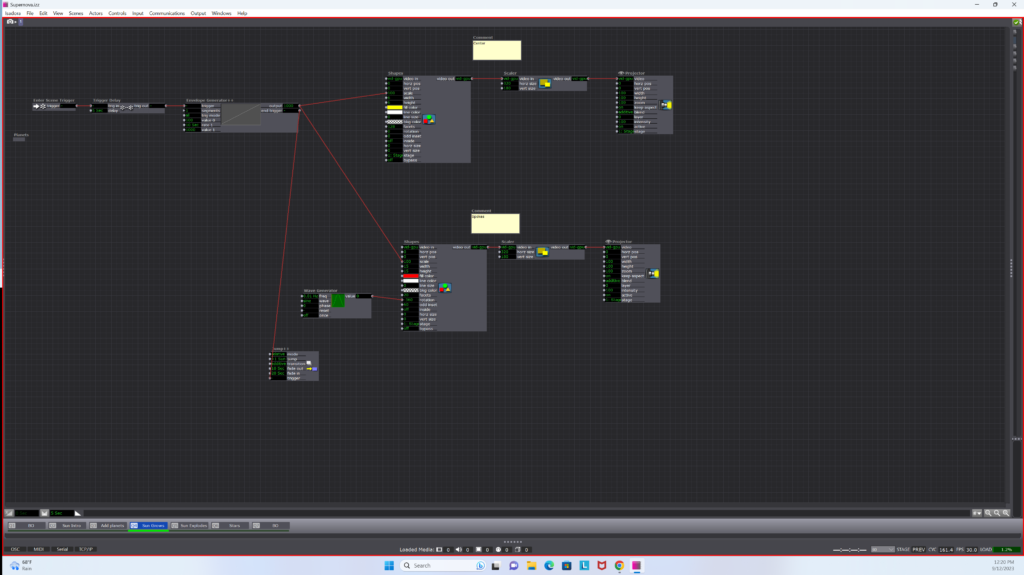
To create a sense of time and scale, I played with trigger delays, envelope generators, and the fade in/fade out aspects of the jump++ actor. Playing with the fade in and fade out aspects of the jump scene actor helped me to create the perception of a camera zooming out to show the entire solar system. Trigger delays and envelope generators allowed me to establish movement of particular elements and create a sense of passing time. Because I did not yet know about the spinner actor I used a wave generator to manipulate the planet shapes’ horizontal and vertical positions long an elliptical pathway. To prevent them from traveling together in a straight line, I gave each planet a different scale limit and used trigger delays to offset the initiation of the planets’ pathways. For this reason, the planets appear to move in a random pathway across the screen, rather than circular orbits.
To create the sun’s “explosion,” I used an envelope generator to increase it’s scale over 10 seconds. In the next scene I used the shimmer actor to disrupt the pointed red shape and the dots actor to disrupt the yellow circle. The seeming “fizzling” of the sun was achieved through the cross-fade between scenes.
If I was to improve this patch, I would want to first, reduce the load on the Isadora program and offset the limited power of my computer’s processor, and second, create an orbit for my planets using the spinner actor. I might also use the explode and particle actors to create a “real” explosion of the sun rather than the illusion that I created using the shimmer actor. Additionally, I think that I could use the layer functions and blend mode of the projector actors to allow the planets to disappear and reappear around the sun, rather than showing up as bright spots when the images overlap.
Upon further reflection…
From a storytelling and pacing standpoint, I wish that I had allowed the scene in which the planets appear to stay longer. For me, the scene jumps to quickly after the last planet appears, rushing the story rather than establishing the presence of a solar system. For similar reasons, I wish that I had used a similar strategy of trigger delays and envelope generators to allow the stars to appear at the end of the story. I think that the narrative would have had a more satisfactory ending had I allowed the stars to slowly establish themselves rather than appear all at once. It would have also been a more satisfying final image if I had used a particle generator to create a background of smaller stars- this would have created significantly more depth to the screen.

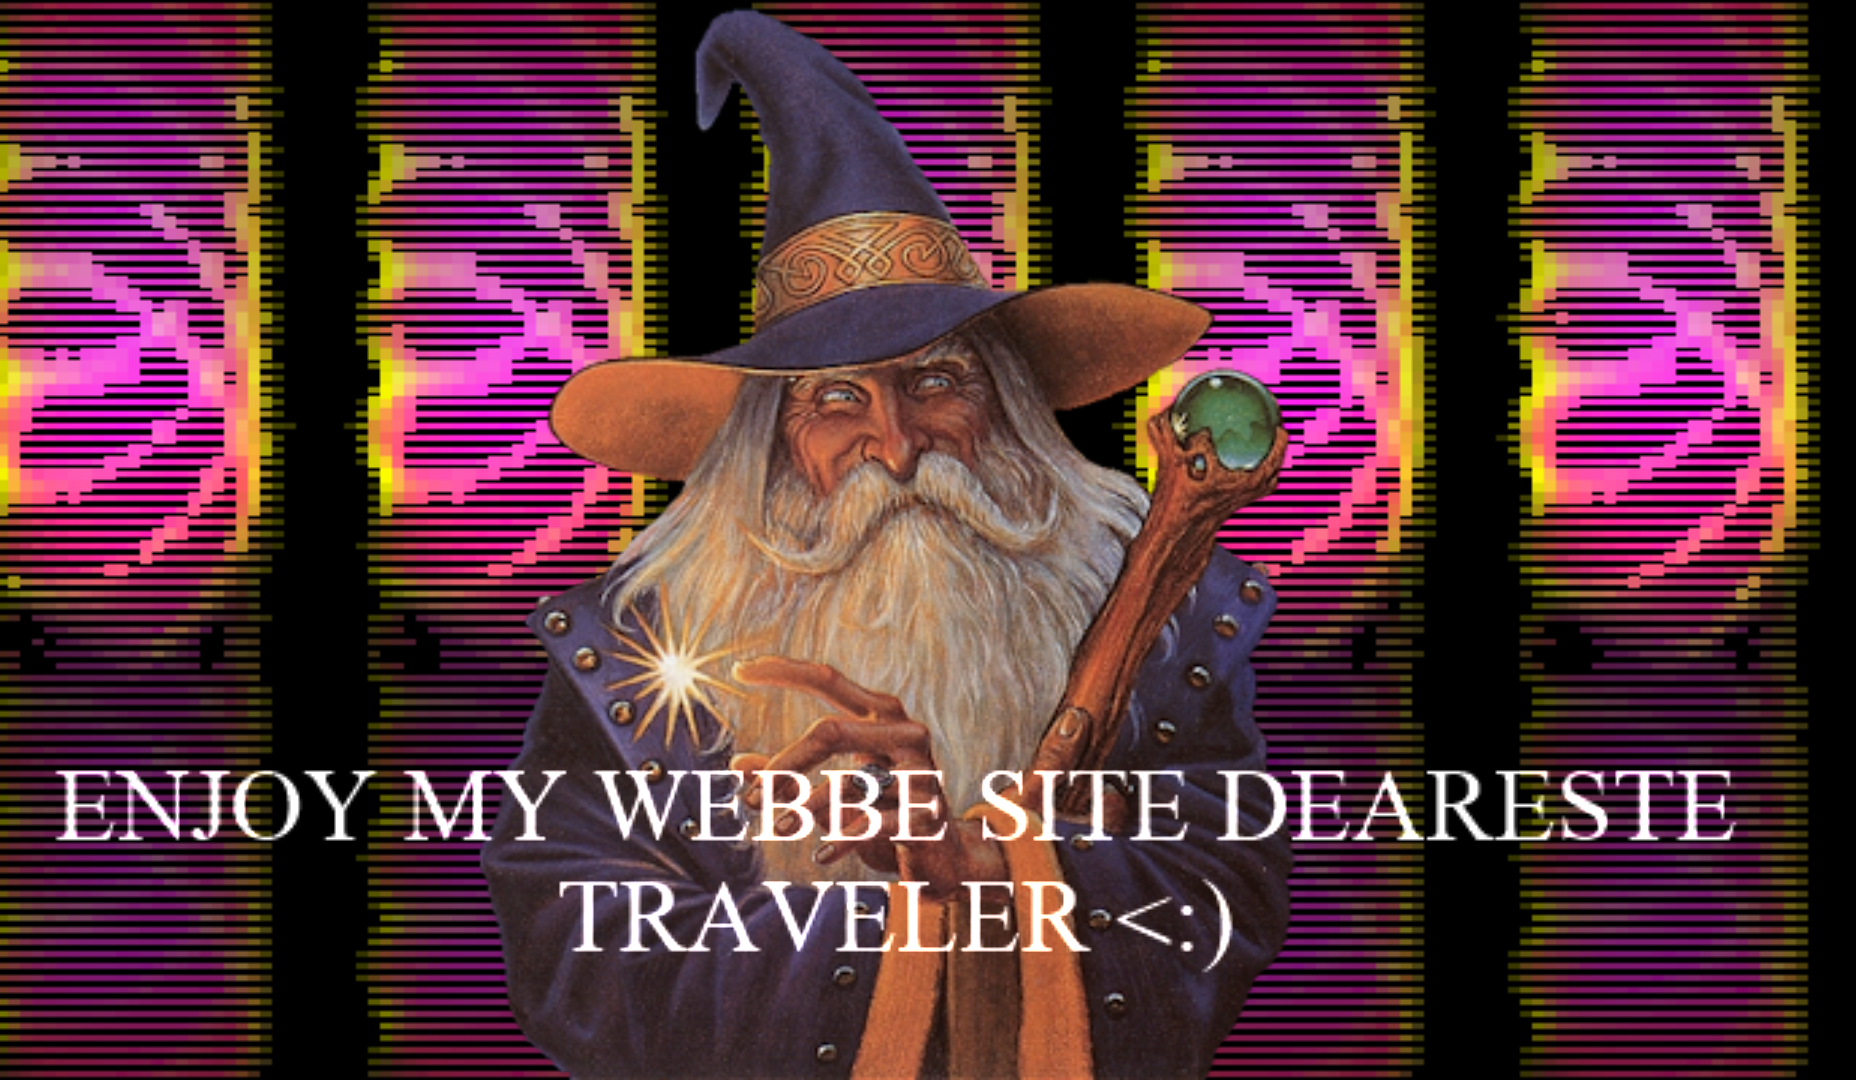
PP1 – WIZARD VAN SPACE ADVENTURE .COM
Posted: September 10, 2023 Filed under: Arvcuken Noquisi, Pressure Project I | Tags: Au23, Isadora, Pressure Project Leave a comment »Hello. Welcome to the Wizard Zone. The Wizard will now show you more about his wonderful Isadora Pressure Project.

Just kidding. He doesn’t know anything about Isadora. Anyway. Here’s a video capture of the thing:
How I built it~
For this pressure project I wanted to extend beyond just shapes actors, and create something silly and personally entertaining. I use MaxMSP (and a bit of Pure Data) for my Sonic Arts major, so I am used to this type of interface for audiovisual coding. I knew I wanted to throw some wizards in this project, because that’s what I did for a lot of Marc Ainger’s MaxMSP projects in his class.

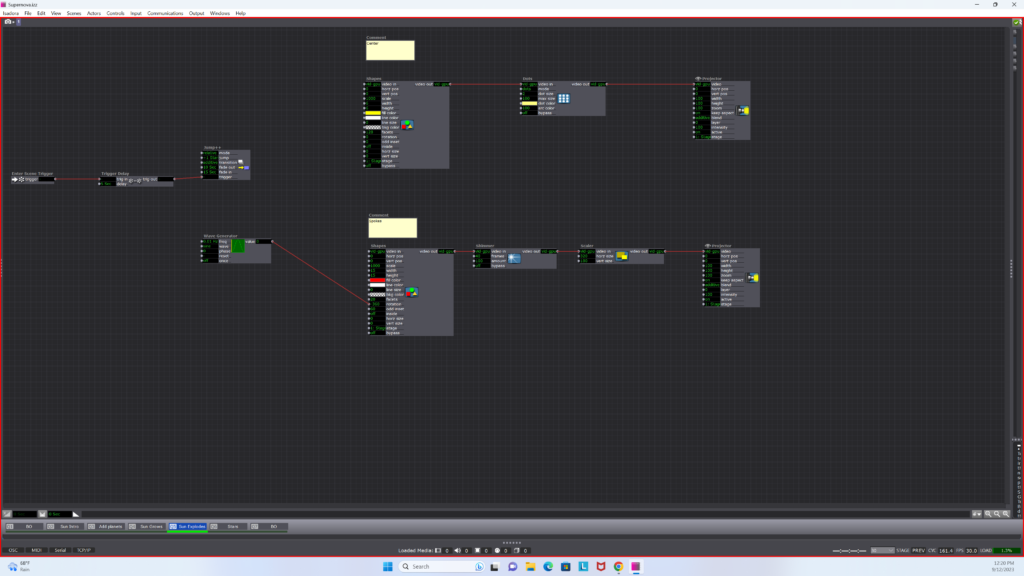
For the first hour of the allotted time, I followed the Isadora Guru videos to create a star-field backdrop. I used pulse and (sawtooth) wave generators to create rotating triangles which move left to right on the screen, before restarting at a different y-axis location and moving left-to-right again. I’m sure there is a much more effective way to produce this effect (so that the shapes reset at the right moment), but I found this to be a great start to immerse myself in the software. I threw the stars into user actors to clean up my first stage and create more stars without too much effort.
After that I started messing with images. I found some good PNGs to work with:


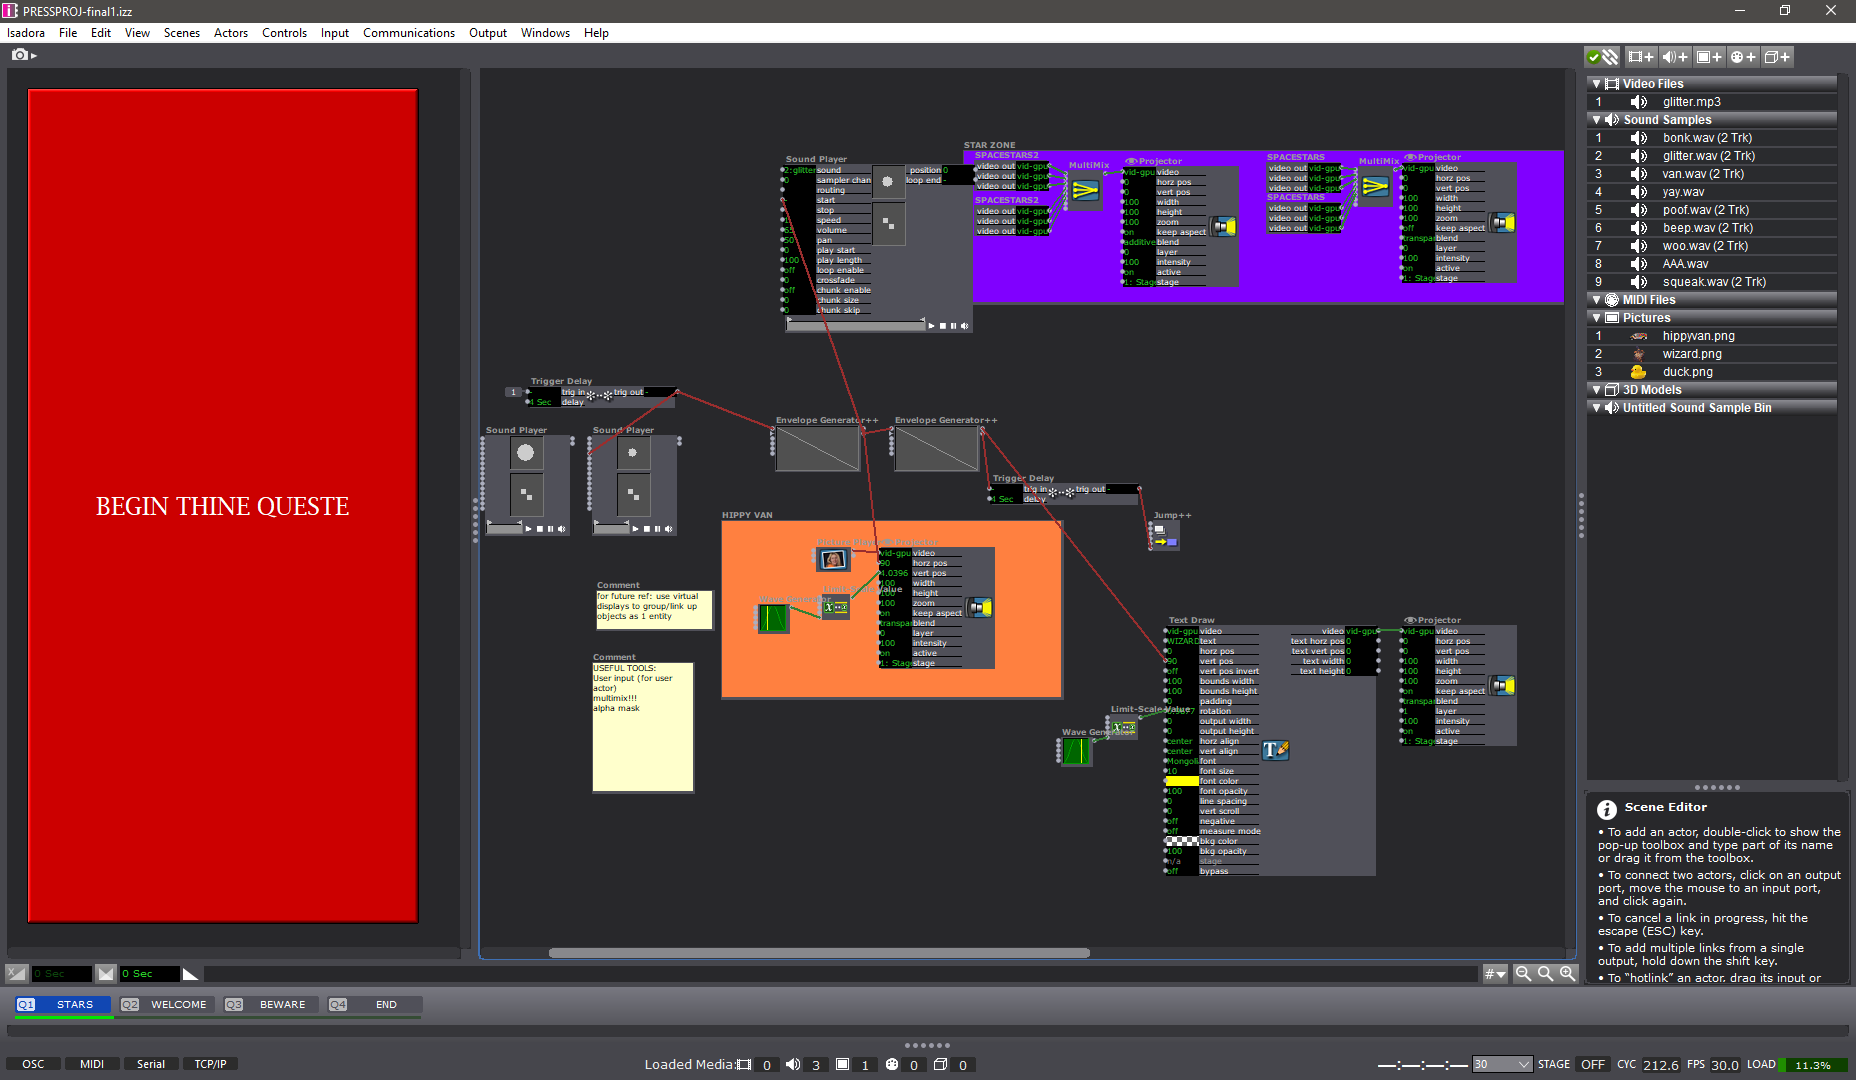
I used the picture playor actor with wave generators and limit-scale value actors to create movement for the PNGs, and I used envelope generators to make the PNGs appear, disappear, move in-and-out of frame, etc.. My process was just a lot of playing around and improvising. I added some text draw actors to my stage so that I could give the scene a little bit of absurd context. WIZARD VAN SPACE ADVENTURE .COM was just the first thing that came up in my head. I liked the idea of turning this whole thing into some kind of intro for the Wizard’s personal HTML/Adobe Flash site (rip Flash).
Stage 2 is the only other stage that has User Actors. I set up 5 rotating, falling pentagons which serve as a funky background for the Wizard to appear in front of. I threw on the dots actor to make them a little more retro. For future reference: the computer did not like this. Either do this more efficiently (virtual stages?) or record it as a video to use instead.
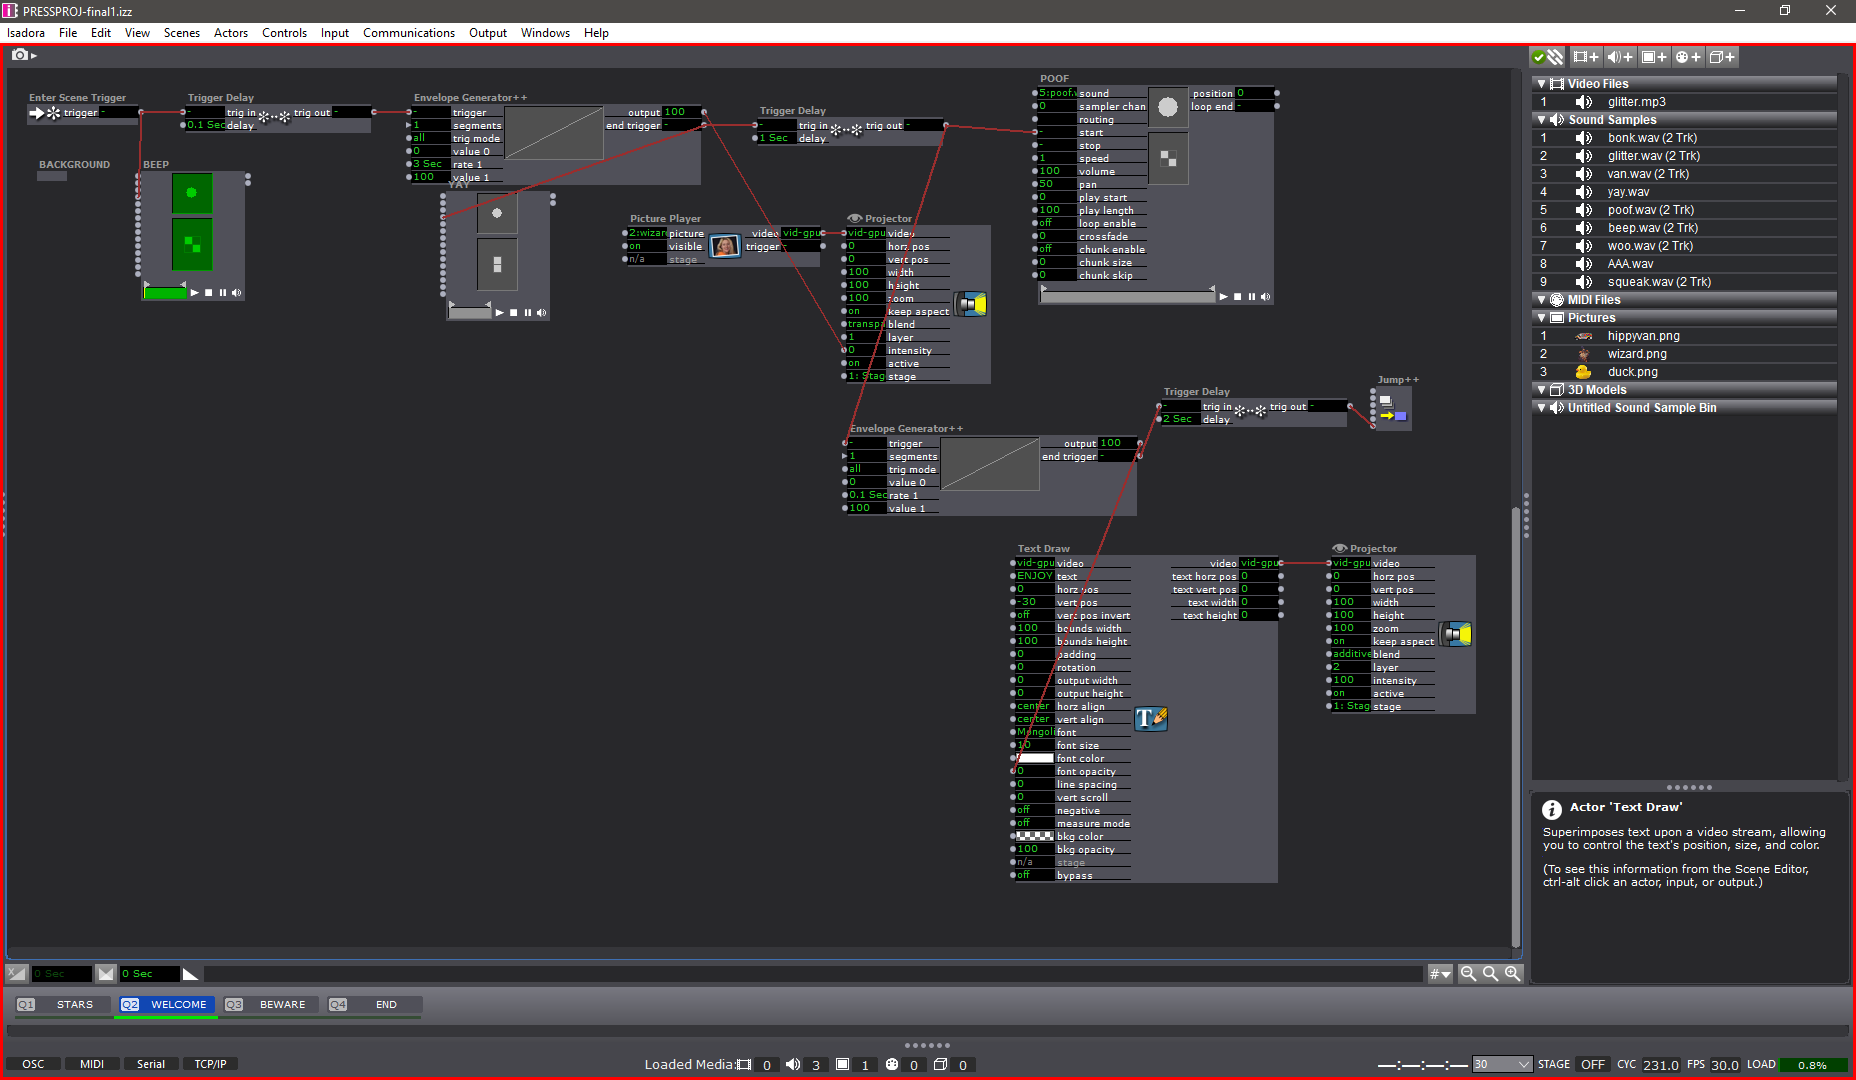
Stage 3 is the Chaos Zone. It was at this point that I was just plugging everything in to see what would work, with no regard for neatness. I used a ton of envelope generators for the text to appear then disappear, for the duck to slide in, for the Wizard to run away, etc.. Trigger delays really helped time things out, especially with the sounds…
THE SOUNDS
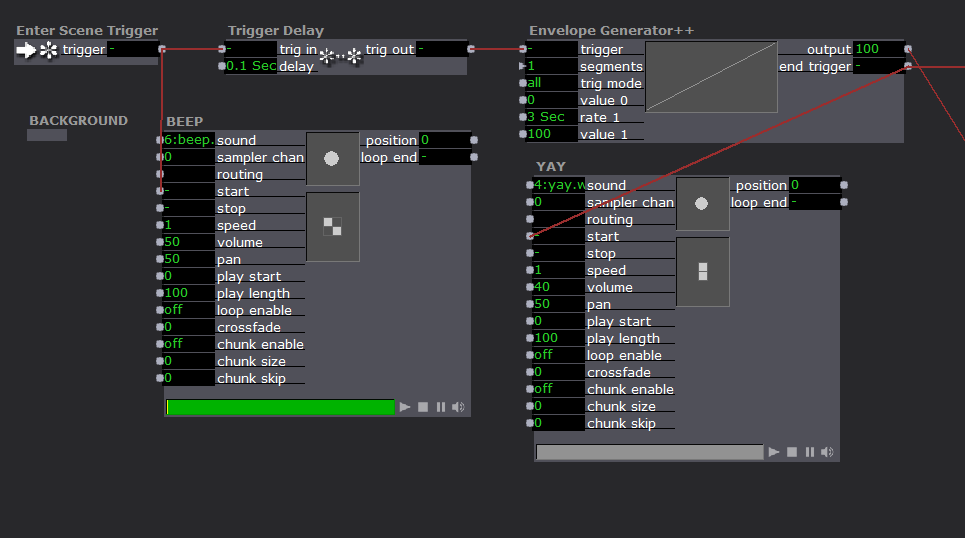
SOUNDS PRO-TIP: As far as I know your audio clips have to be in .WAV format in order to function properly. I tried using .MP3s and they showed up in a different non-sound-oriented actor. Beware.
It felt like a bit of a cop-out, but I knew using sound effects would instantly improve the engagement of an audience with my project. I used a bunch of cartoon sound effect I recorded off YouTube. I needed a distinct voice for the Wizard, so I grabbed some .WAV files off the Team Fortress 2 wiki (Soldier’s dying scream 2 and “yaaay!” to be specific).
The sound player actor is fairly uncomplicated. You just need to plug a trigger into the “start” input. Throughout each stage, my sound player actors are plugged into either the end trigger of an envelope generator, or the trig out of a trigger delay. I’m curious about what more I could do with the sound player and its various inputs – whether I could stretch it to do some of the crazy sample things I can do with MaxMSP…
Reflection
During presentation I appreciated Alex’s comment about how my presence impacted the experience of the piece – I served as a cog in the media system, because I came up to the computer (in front of the TV screen), pressed the big red start button, speedwalked away, and came back to shut it off at the end. It was a purposeful decision to be active in the performance (via button-pressing) – it gives me greater control over the performance environment and adds a personable humor to the entire experience. It’s something I will be thinking about more as we have more pressure projects and work more with Isadora – how does the perceived presence (or absence) of a human person in a media system impact the audience’s enjoyment/experience of a piece? I suppose that difference can be demonstrated in the difference between my in-person presentation of this piece and how you experience it in my video recording shown above….
Cycle 3: Dancing with Cody Again – Mollie Wolf
Posted: December 15, 2022 Filed under: Uncategorized | Tags: dance, Interactive Media, Isadora, kinect, skeleton tracking Leave a comment »For Cycle 3, I did a second iteration of the digital ecosystem that uses an Xbox Kinect to manipulate footage of Cody dancing in the mountain forest.
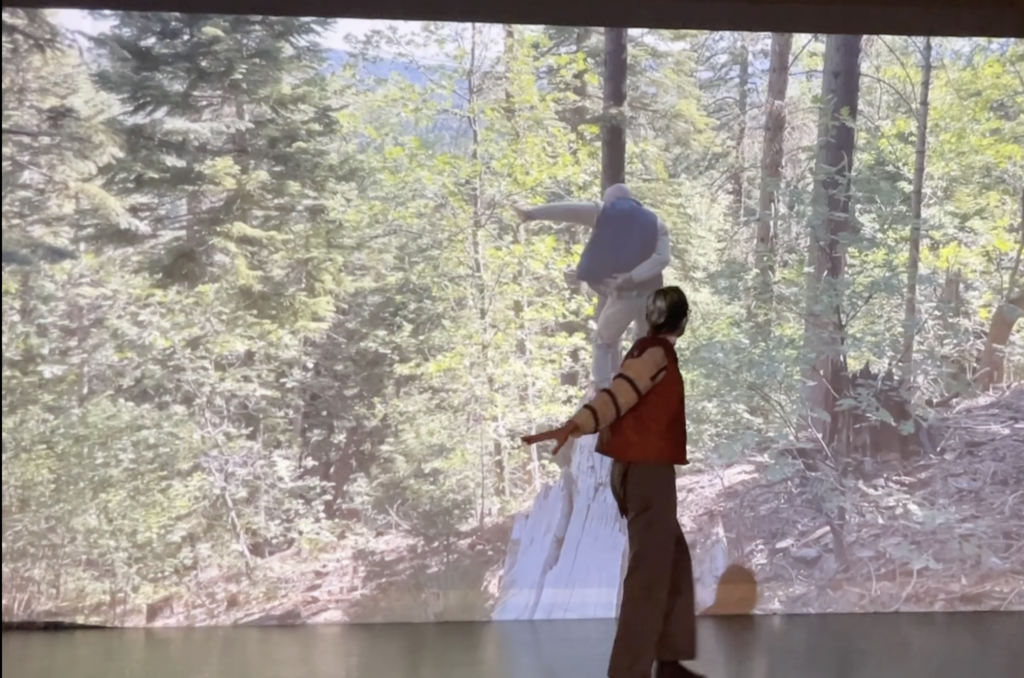
Ideally, I want this part of the installation to feel like a more private experience, but I found out that the large scale of the image was important during Cycle 2, which presents a conflict, because that large of an image requires a large area of wall space. My next idea was to station this in a narrow area or hallway, and to use two projectors to have images on wither side or surrounding the person. Cycle 3 was my attempt at adding another clip of footage and another mode of tracking in order to make the digital ecosystem more immersive.
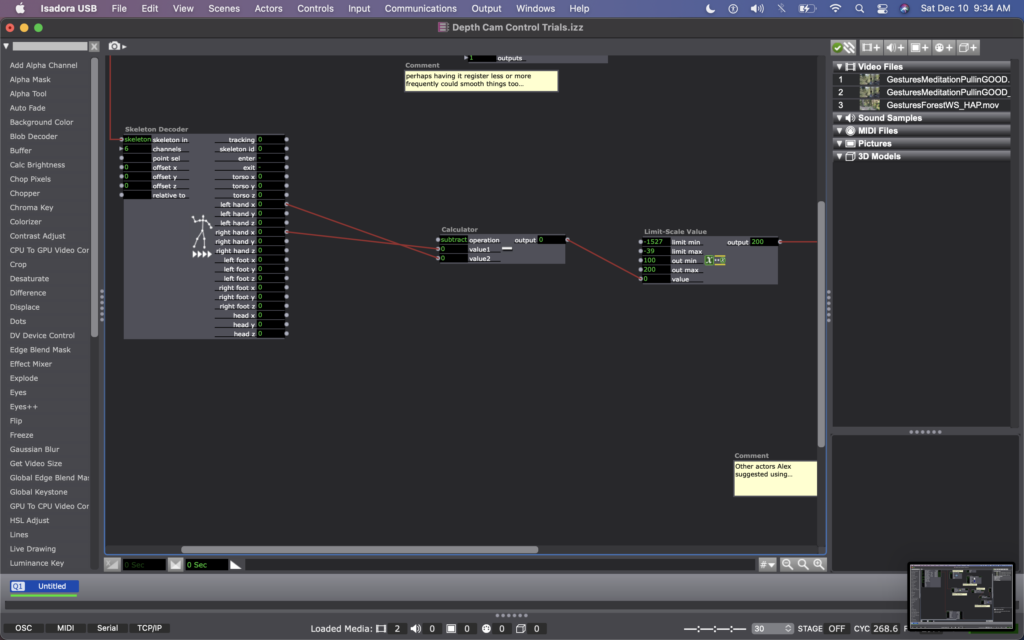
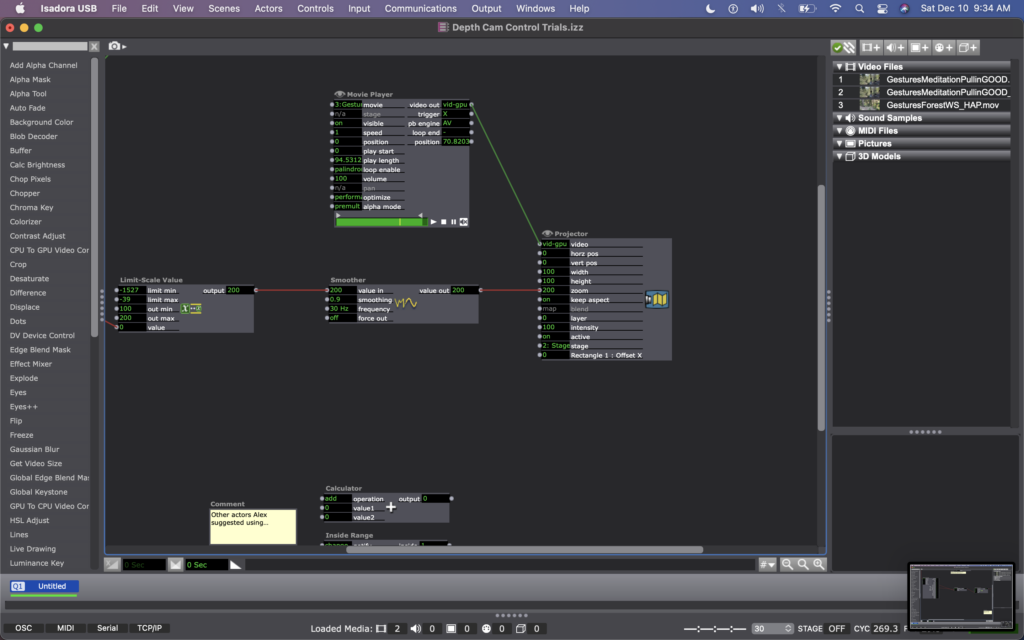
For this, I found some footage of Cody dancing far away, and thought it could be interesting to have the footage zoom in/out when people widen or narrow their arms. In my Isadora patch, this meant changing the settings on the OpenNI Tracker to track body and skeleton (which I hadn’t been asking the actor to do previously). Next, I added a Skeleton Decoder, and had it track the x position of the left and right hand. A Calculator actor then calculates the difference between these two numbers, and a Limit-Scale Value actor translates this number into a percentage of zoom on the Projector. See the images below to track these changes.
My sharing for Cycle 3 was the first time that I got to see the system in action, so I immediately had a lot of notes/thoughts for myself (in addition to the feedback from my peers). My first concern is that the skeleton tracking is finicky. It sometimes had a hard time identifying a body – sometimes trying to map a skeleton on other objects in space (the mobile projection screen, for example). And, periodically the system would glitch and stop tracking the skeleton altogether. This is a problem for me because while I don’t want the relationship between cause and effect to be obvious, I also want it to be consistent so that people can start to learn how they are affecting the system over time. If it glitches and doesn’t not always work, people will be less likely to stay interested. In discussing this with my class, Alex offered an idea that instead of using skeleton tracking, I could use the Eyes++ actor to track the outline of a moving blob (the person moving), and base the zoom on the width or area that the moving blob is taking up. This way, I could turn off skeleton tracking, which I think is part of why the system was glitching. I’m planning to try this when I install the system in Urban Arts Space.
Other thoughts that came up when the class was experimenting with the system were that people were less inclined to move their arms initially. This is interesting because during Cycle 2, people has the impulse to use their arms a lot, even though at the time the system was not tracking their arms. I don’t fully know why people didn’t this time. Perhaps because they were remembering that in Cycle 2 is was tracking depth only, so they automatically starting experimenting with depth rather than arm placement? Also, Katie mentioned that having two images made the experience more immersive, which made her slow down in her body. She said that she found herself in a calm state, wanting to sit down and take it in, rather than actively interact. This is an interesting point – that when you are engulfed/surrounded by something, you slow down and want to receive/experience it; whereas when there is only one focal point, you feel more of an impulse to interact. This is something for me to consider with this set up – is leaning toward more immersive experiences discouraging interactivity?
This question led me to challenge the idea that more interactivity is better…why can’t someone see this ecosystem, and follow their impulse to sit down and just be? Is that not considered interactivity? Is more physical movement the goal? Not necessarily. However, I would like people to notice that their embodied movement takes effect on their surroundings.
We discussed that the prompting or instructions that people are given could invite them to move, so that people try movement first rather than sitting first. I just need to think through the language that feels appropriate for the context of the larger installation.
Another notable observation from Tamryn was that the Astroturf was useful because it creates a sensory boundary of where you can move, without having to take your eyes off the images in front of you – you can feel when you’re foot reaches the edge of the turf and you naturally know to stop. At one point Katie said something like this: “I could tell that I’m here [behind Cody on the log] in this image, and over there [where Cody is, faraway in the image] at the same time.” This pleased me, because when Cody and I were filming this footage, we were talking about the echos in the space – sometimes I would accidentally step on a branch, causing s snapping noise, and seconds later I would hear the sound I made bouncing back from miles away, on there other side of the mountain valley. I ended up writing in my journal after our weekend of filming: “Am I here, or am I over there?” I loved the synchronicity of Katie’s observation here and it made my wonder if I wanted to include some poetry that I was working on for this film…
Please enjoy below, some of my peers interacting with the system.
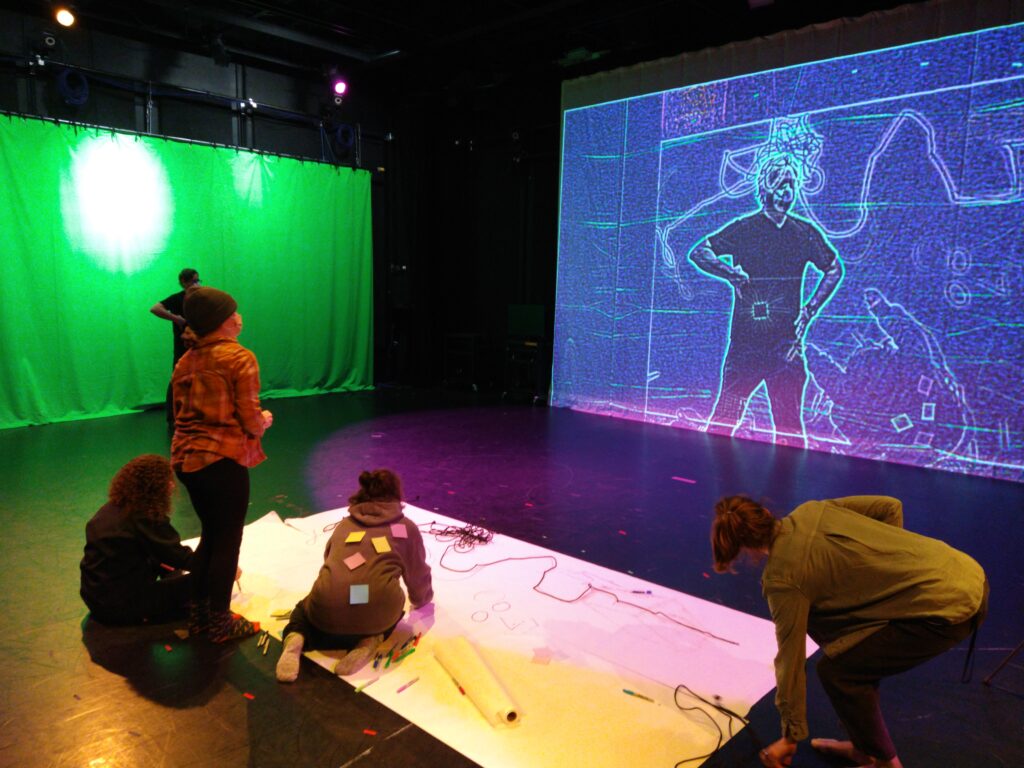
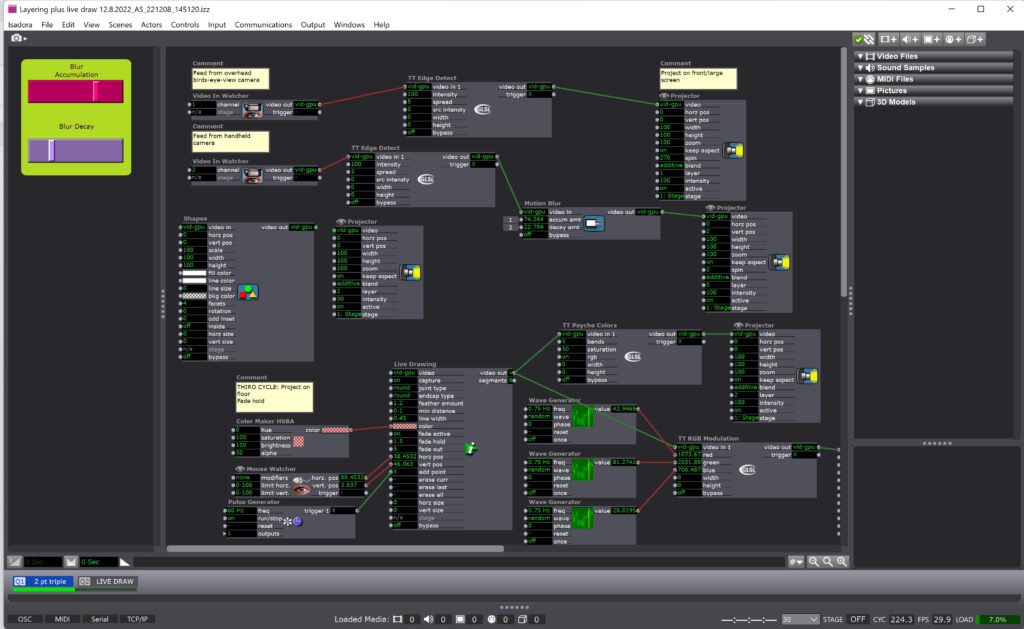
Cycle 3: Layering and Gesture: Collective Play
Posted: December 13, 2022 Filed under: Tamryn McDermott, Uncategorized | Tags: Cycle 3, Isadora 1 Comment »For this third iteration, I decided to set up three digital layers that provided space for play, collaboration, and digital/analog spaces to mingle. My initial idea was to consider how I could introduce the body/model into the space and suggest an opportunity for gestural drawing and experimentation both on physical paper and digitally. As you can see in the image below, participants were actively engaged in working on the paper, viewing what happening on the projection screen, and interacting with one another across these platforms and planes in space. A third layer not visible in the image below is a LIve Drawing actor in Isadora that comes into play in some of the videos below. I stuck with the TT Edge Detect actor in Isadora and played with a Motion Blur actor on the second layer so that the gestural movements would be emphasized.
Note the post-its on Alison’s back below. These were a great surprise as they were translated into digital space and were activated by her drawing and movement. They became a playful, unexpected surprise!
I really appreciated the feedback from this experience and want to share some of the useful comments I received as a record:
- Alison: I loved that Alison shared it was “confusing in a good way” and that she felt like it was a space where she could play for a long time. She identified that this experience was a social one and that it mattered that they were exploring together rather than a solo experience.
- Katie: Katie was curious about what would show up and explored in a playful and experimental way. She felt some disorientation with the screens and acknowledged that when Alex was using the live draw tool in the third layer, she didn’t realize that he was following her with the line. I loved that this was a surprise and realized that I didn’t share this as an option verbally well enough so she didn’t know what was drawing the line.
- Alex: Alex was one of the group that used the live draw tool and others commented that it felt separated from the group/collaborative experience of the other two layers. Alex used the tool to follow Katie’s movement and traced her gestures playfully. He commented that this was one of his favorite moments in the experience. He mentioned it was delightful to be drawn, when he was posing as a superhero and participants were layering attributes onto his body. There was also a moment when I said, “that’s suggestive” that was brought up and we discussed that play in this kind of space could bring in inappropriate imagery regardless if it was intended or not. What does it mean that this is possible in such a space? Consider this more. Think about the artifact on the paper after play, how could this be an opportunity for artifact creation/nostalgia/document.
- Mila: With each iteration, people discovered new things they can do. Drawing was only one of the tools, not the focus, drawing as a tool for something bigger. Love the jump rope action!
- Molly: How did we negotiate working together? This creates a space for emergent collaboration. What do we learn from emergent collaboration? How can we set up opportunities for this to happen? The live draw was sort of sneaky and she wondered if there was a way to bring this more into the space where other interactions were happening.
This feedback will help me work towards designing another iteration as a workshop for pre-service art teachers that I am working with in the spring semester. I am considering if I could stage this workshop in another space or if using the motion lab would be more impactful. If I set it up similarly in the lab, I would integrate the feedback to include some sort of floor anchors that are possibilities or weights connected to the ropes. I think I would also keep things open for play, but mention perspective, tools available, and gesture drawing to these students/participants who will be familiar with teaching these techniques to students in a K – 12 setting.
I have been exploring the possibility of using a cell phone mounted on the ceiling as the birds-eye-view camera and using NDI and a router to send through Isadora. I’ll work on this more in the spring semester as I move towards designing a mini-version for a gallery experience in Hopkins Hall Gallery as part of a research collective exhibition and also the workshop with the pre-service students. If I can get permission to host the workshop in the motion lab, I would love to bring these students into this space as my students this semester really appreciated the opportunity to learn about the motion lab and explore some of the possibilities in this unique space.
Mollie Wolf Cycle 2: The WILDS – Dancing w/ Cody
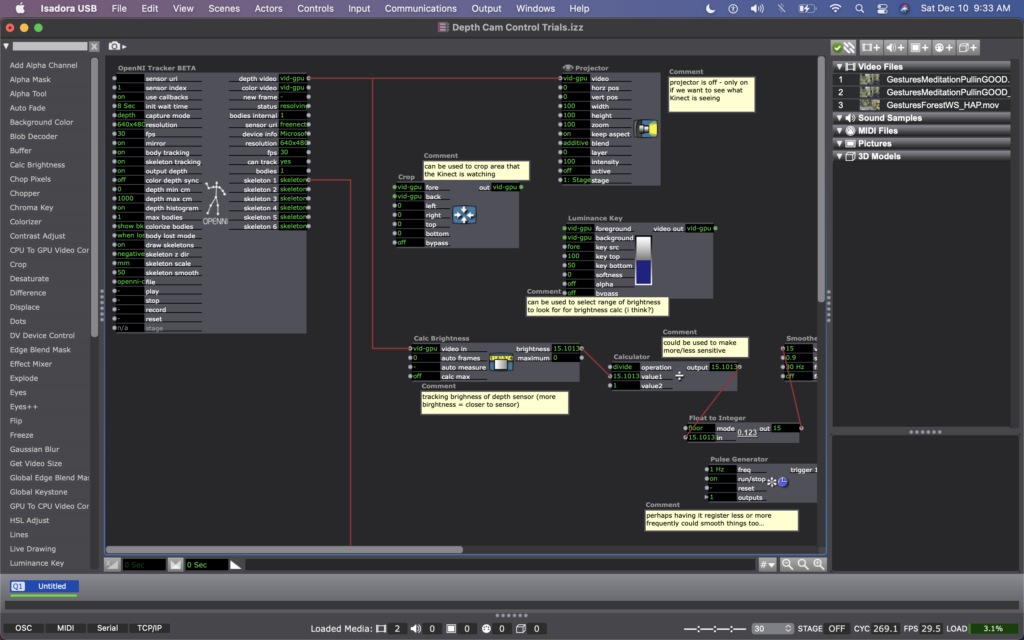
Posted: November 27, 2022 Filed under: Uncategorized | Tags: depth camera, Interactive Media, Isadora, kinect, mollie wolf Leave a comment »For Cycle 2, I began experimenting with another digital ecosystem for my thesis installation project. I began with a shot I have of one of my collaborators, Cody Brunelle-Potter dancing, gesturing, casting spells on the edge of a log over looking a mountain side. As they do so, I (holding the camera) am slowing walking toward them along the log. I was rewatching this footage recently with the idea of using a depth camera to play the footage forward or backward as you walk – allowing your body to mimic the perspective of the camera – moving toward Cody or away from them.
I wasn’t exactly sure how to make this happen, but the first idea I came up with was to make an Isadora patch that recorded how far someone was from an Xbox Kinect at moments in time regularly, and was always comparing the their current location to where they were a moment ago. Then, whether the difference between those two numbers was positive or negative would tell the video whether to play forward or backward.
I explained this idea to Alex; he agreed it was a decent one and helped me figure out which actors to use to do such a thing. We began with the OpenNI Tracker, which has many potential ways to track data using the Kinect. We turned many of the trackers off, because I wasn’t interested in creating any rules in regards to what the people were doing, just where they were in space. The Kinect sends data by bouncing a laser of objects, depending on how bright the is when it bounces back tells the camera whether the object is close (bright), or far (dim). So the video data that comes from the Kinect is grey scale, based on this brightness (closer is to white, as far is to black). To get a number from this data, we used a Calc Brightness actor, which tracks a steadily changing value corresponding to the brightness of the video. Then we used Pulse Generator and Trigger Value actors to frequently record this number. Finally, we used two Comparator actors: one that checked if the number from the Pulse Generator was less than the current brightness from the Calc Brightness actor, and one that did the opposite, if it was greater than. These Comparators each triggered Tigger Value actors that would trigger the speed of the Movie Player playing the footage of Cody to be -1 or 1 (meaning that it would play forward at normal speed or backwards at normal speed).
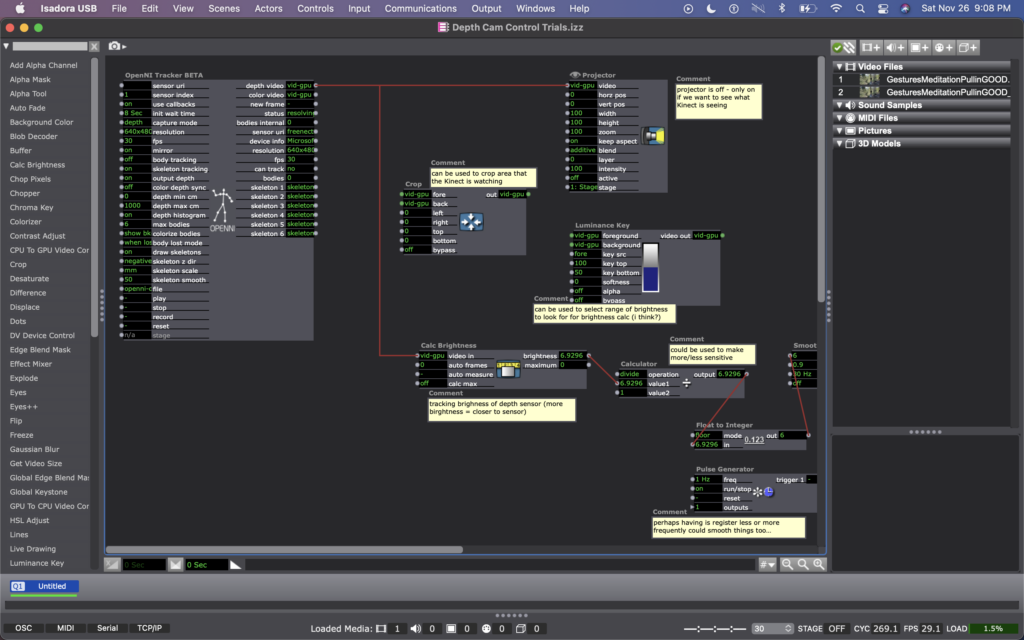
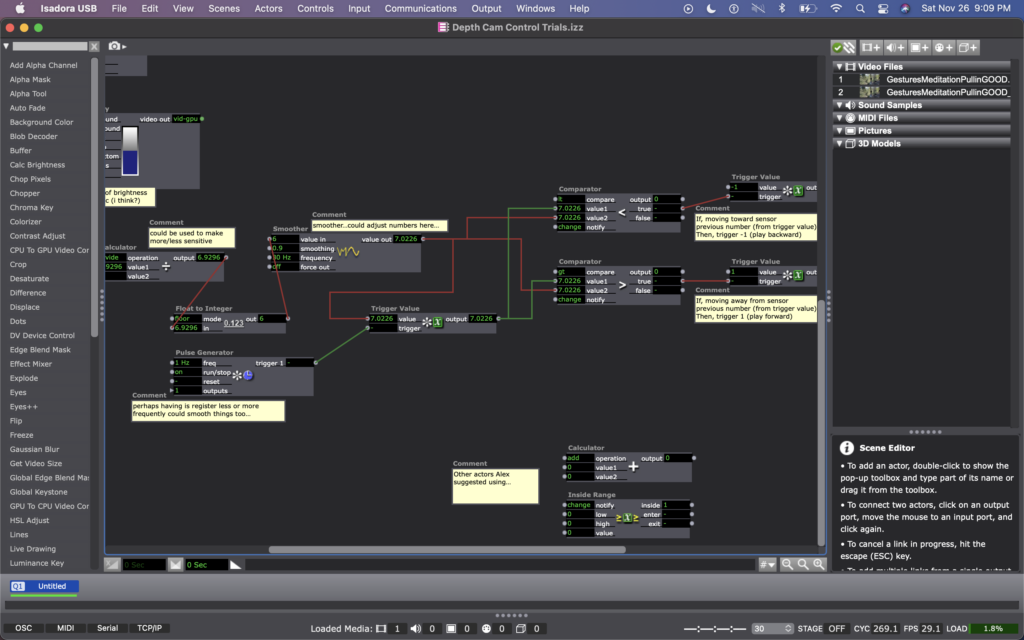
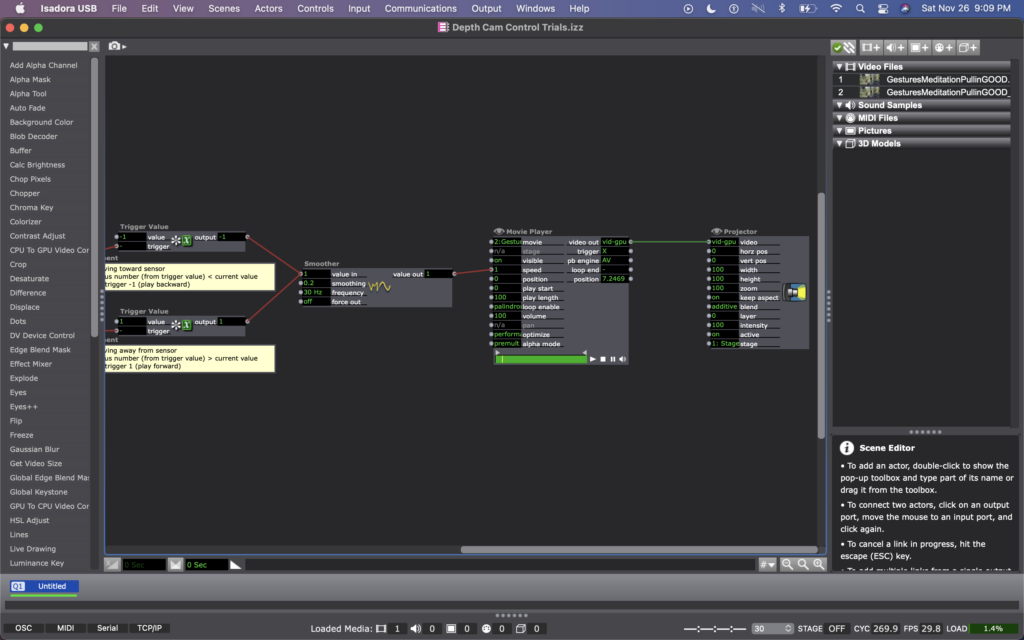
Once this basic structure was set up, quite a bit of fine tuning was needed. Many of the other actors you see in these photos were used to experiment with fine tuning. Some of them are connect and some of them are not. Some of them are even connected but not currently doing anything to manipulate the data (the Calculator, for example). At the moment, I cam using the Float to Integer actor to make whole numbers out of the brightness number (as opposed to one with 4 decimal points). This makes the system less sensitive (which was a goal because initially the video would jump between forward and backward when a person what just standing still, breathing). Additionally I am using a Smoother in two locations, one before the data reaches the Trigger Value and Comparator actors, and one before the data reaches the Movie Player. In both cases, the Smoother creates a gradual increase or decrease of value between numbers rather than jumping between them. The first helps the sensed brightness data change steadily (or smoothly, if you will); and the second helps the video slow to a stop and then speed up to a reverse, rather than jumping to reverse, which felt glitchy originally. As I move this into Urban Arts Space, where I will ultimately be presenting this installation, I will need to fine tune quite a bit more, hence why I have left the other actors around as additional things to try.
Once things were fine tuned and functioning relatively well, I had some play time with it. I noticed that I almost instantly had the impulse to dance with Cody, mimicking their movements. I also knew that depth was what the camera was registering, so I played a lot with moving forward and backward at varying times and speeds. After reflecting over my physical experimentation, I realized I was learning how to interact with the system. I noticed that I intuitively changed my speed and length of step to be one that the system more readily registered, so that I could more fluidly feel a responsiveness between myself and the footage. I wondered whether my experience would be common, or if I as a dancer have particular practice noticing how other bodies are responding to my movement and subtly adapting what I’m doing in response to them…
When I shared the system with my classmates, I rolled out a rectangular piece of astro turf in the center of the Kinect’s focus (and almost like a carpet runway pointing toward the projected footage of Cody). I asked them to remove their shoes and to take turns, one at a time. I noticed that collectively over time they also began to learn/adapt to the system. For them, it wasn’t just their individual learning, but their collective learning because they were watching each other. Some of them tried to game-ify it, almost as thought it was a puzzle with an objective (often thinking it was more complicated than it was). Others (mostly the dancers) had the inclination to dance with Cody, as I had. Even though I watched their bodies learned the system, none of them ever quite felt like they ‘figured it out.’ Some seemed unsettled by this and others not so much. My goal is for people to experience a sense of play and responsiveness between them and their surroundings, less that it’s a game with rules to figure out.
Almost everyone said that they enjoyed standing on the astro turf—that the sensation brought them into their bodies, and that there was some pleasure in the feeling of stepping/walking on the surface. Along these lines, Katie suggested a diffuser with pine oil to further extend the embodied experience (something I am planning to do in multiple of the digital ecosystems through out the installation). I’m hoping that prompting people into their sensorial experience will help them enter the space with a sense of play, rather than needing to ‘figure it out.’
I am picturing this specific digital ecosystem happening in a small hallway or corner in Urban Arts Space, because I would rather this feel like an intimate experience with the digital ecosystem as opposed to a public performance with others watching. As an experiment with this hallway idea, I experimented with the zoom of the projector, making the image smaller or larger as my classmates played with the system. Right away, my classmates and I noticed that we much preferred the full, size of the projector (which is MUCH wider than a hallway). So now I have my next predicament – how to have the image large enough to feel immersive in a narrow hallway (meaning it will need to wrap on multiple walls).