Pressure Project 3: Expanded Television
Posted: December 18, 2025 Filed under: Uncategorized Leave a comment »I had a lot of ideas for this pressure project but ended up going with an expanded version of my first pressure project. I thought it would be really fun to use a Makey Makey to an actual TV remote into something that can control my Isadora TV. If I used sticky notes and conductive pencil drawings, I could fake pressable buttons to change the channel and turn it on and off.
To me, the hardest part of using a Makey Makey is always finding a way to ground it all. But I had the perfect idea of how to do this on the remote: because people usually have to hold a remote in their hand when they use it, I can try to hide the ground connection on the back! See below.
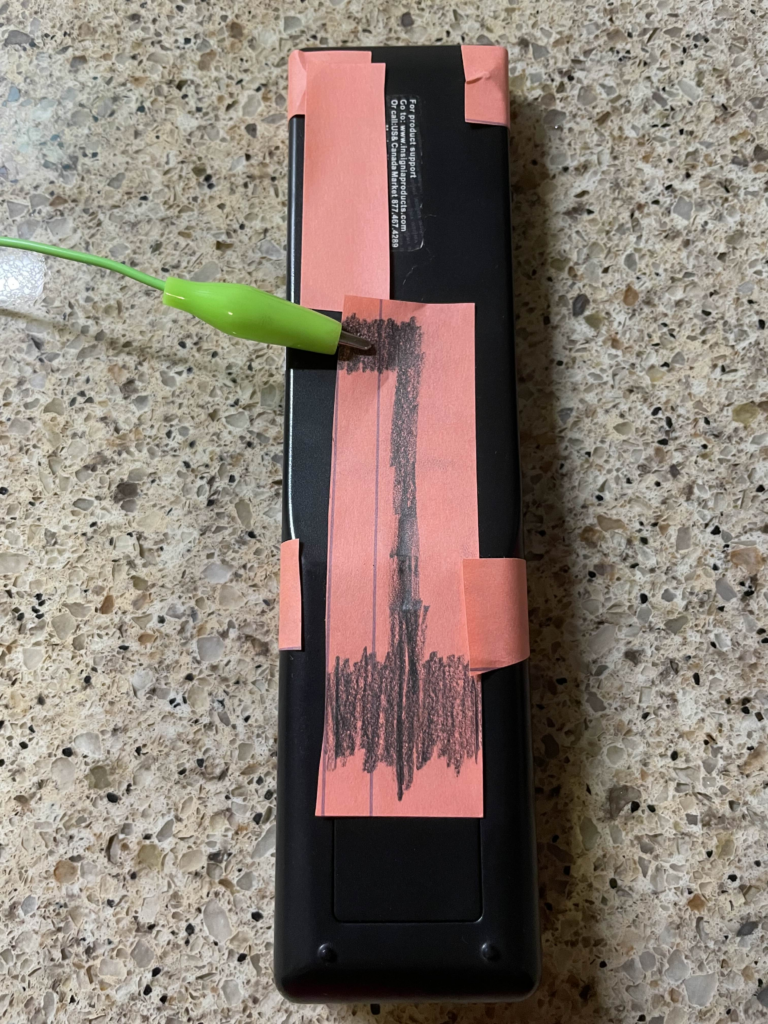
This worked somewhat well but because not everyone holds a TV remote with their hand flat against the back, it may not work for all people. You could use more paper and pencil to get more possible contact points, but this got the job done.
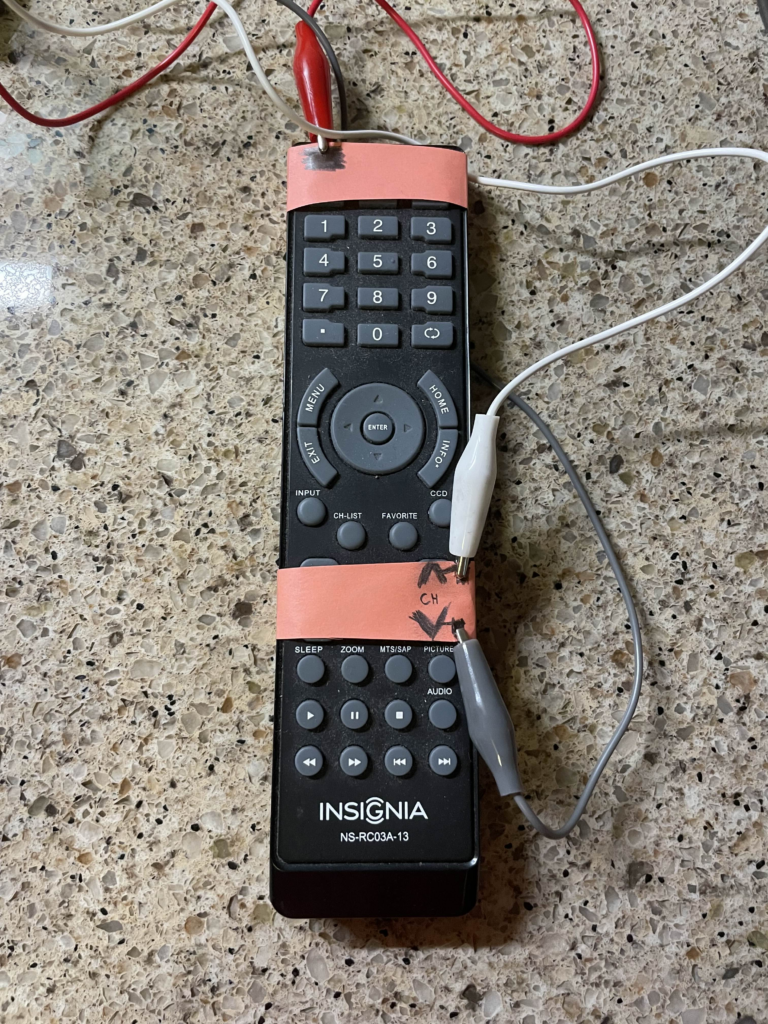
For the front buttons, I originally also wanted the alligator clips to be on the back on the remote, but I was struggling to get a consistent connection when I tried it. I think the creases at the paper bends around to the back of the remote cause issues. I’m pretty happy with the end result, however. See below.
For Isadora, I created a new scene that was the TV turning on so that people could have the experience of both turning on and off the TV using the remote. The channel buttons also work as you would expect. The one odd behavior is that turning on the TV always starts at the same channel, unlike a real TV which remembers the last channel that it was on.
I also added several new channels, including better static, a trans pride channel 🏳️⚧️, and a channel with a secret, a warning channel, and a weird filter glitchy channel. Unfortunately, I cannot get Isadora to open on my laptop anymore! I had to downgrade my drivers to get it to work and at some point the drivers updated again. I cannot find the old drivers I used anymore! It’s a shame cause I liked the new channels I added… 🙁
The static channel just moves between 4 or so images to achieve a much better static effect than before and the trans pride channel just replaces the colors of the color bar channel with the colors of the trans flag.
The main “secret revealed” I had was a channel that started as regular static but actually had a webcam on and showed the viewers back on the TV! The picture very slowly faded in and it was almost missed, which is exactly what I wanted! I even covered the light on my laptop so that nobody would have any warning that the webcam was on.
There was also a weird glitchy filter channel that I added. This was inconsistently displayed and was very flashy sometimes but other times it looked really cool. Because of this, I added a warning channel before this channel so that anyone that can’t look at intense things could look away. When I did the presentation, it was not very glitch at all and gave a very cool effect that even used the webcam a little bit (even though the webcam wasn’t used anywhere in that scene…)
The class loved the progression of the TV for this project. One person immediate became excited when they saw the TV was back. They also like the secret being revealed as a webcam and appreciated the extra effort I put in to covering the webcam light as well. In the end, I was very satisfied with how this project turned out, I just wish I could show it…
Cycle 3: Failure and Fun!
Posted: December 18, 2025 Filed under: Uncategorized Leave a comment »My plan for this cycle was simple: add phone OSC controls to the game I made in previous cycles. But this was anything but simple. The first guide I used ended up being a complete dead end! First, I used Isadora to ensure that my laptop could receive signals at all. After verifying this, I tried sending signals to Unity and nothing! I tried sending signals from Unity to Isadora and that worked(!) but wasn’t very useful… It’s possible that the guide I was following was designed for a very specific type of input which the phones from the motion lab were not giving, but I was unable to figure out a reason why. I even used Isadora to see what it was seeing as inputs and manually set the names in Unity to these signals.
After this, I took a break and worked on my capstone project class. I clearly should have been more worried about my initial struggles. I tried to get it working again at the last minute and found another guide specifically for getting phone OSC to work in Unity. I couldn’t get this to work either and I suspect this was because it was for touch OSC which I wasn’t using (and also didn’t need the type of functionality). I thought I could get it to work but I was getting tired and decided to sleep and figure it out in the morning. I set my alarm for 7 am knowing the presentation was at 2 pm (I got senioritis really bad give me a break!). So imagine my shock when I wake up, feeling rather too rested I should say, and see that it’s nearly noon! I had set my alarms for 7 pm not am…..
This was a major blow to what little motivation I had left. I knew there was no chance I could get OCS working in that time and especially no way I would get to make the physical cardboard props I was excited to create. I wanted to at least show my ideas to the class so I eventually collected myself and then quickly made a presentation to show at presentation time.
The presentation showed off the expanded control that I wanted to add had I been smarter in handling the end of the semester. The slides of the presentation can be seen below.
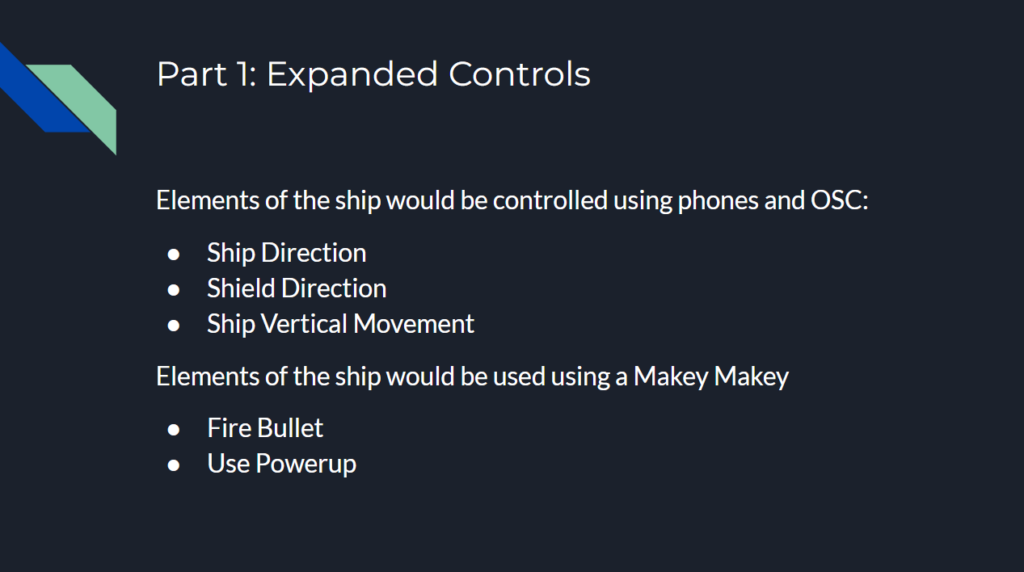

I then had an idea to at least have some fun with the presentation. Although I couldn’t implement true OSC controls, I could maybe try to fake some kind of physically controlled game by having people mime out actions and then use the controller and keyboard to make the actions happen in the game!
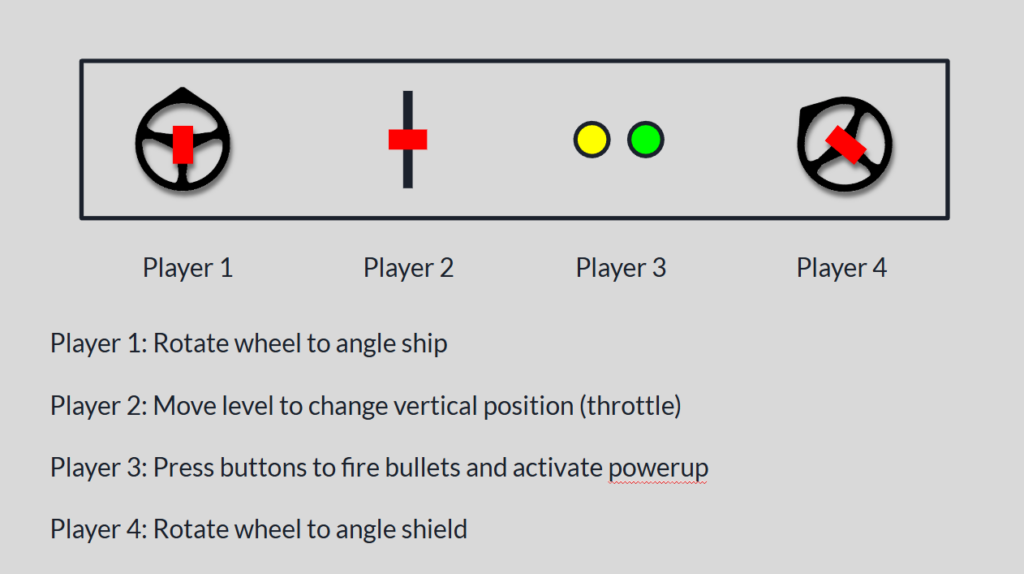
To my surprise, this actually worked really well! I had two people control the direction of the ship and shield by pointing with their arms, and one person in the middle control the vertical position of the ship with their body. I actually originally was going to have the person controlling the vertical position just point forward and backwards like the other two people, but Alex thought it would be more fun to physically run forwards and backwards. I’m glad he suggested this as it worked great! I used the controller which had the ship and shield direction, and someone else was on the laptop controlling the vertical position. The two of us would watch the people trying to control the ship with their bodies and tried to mimic them in game as accurately as we could. A view of the game as it was being played can be seen below.
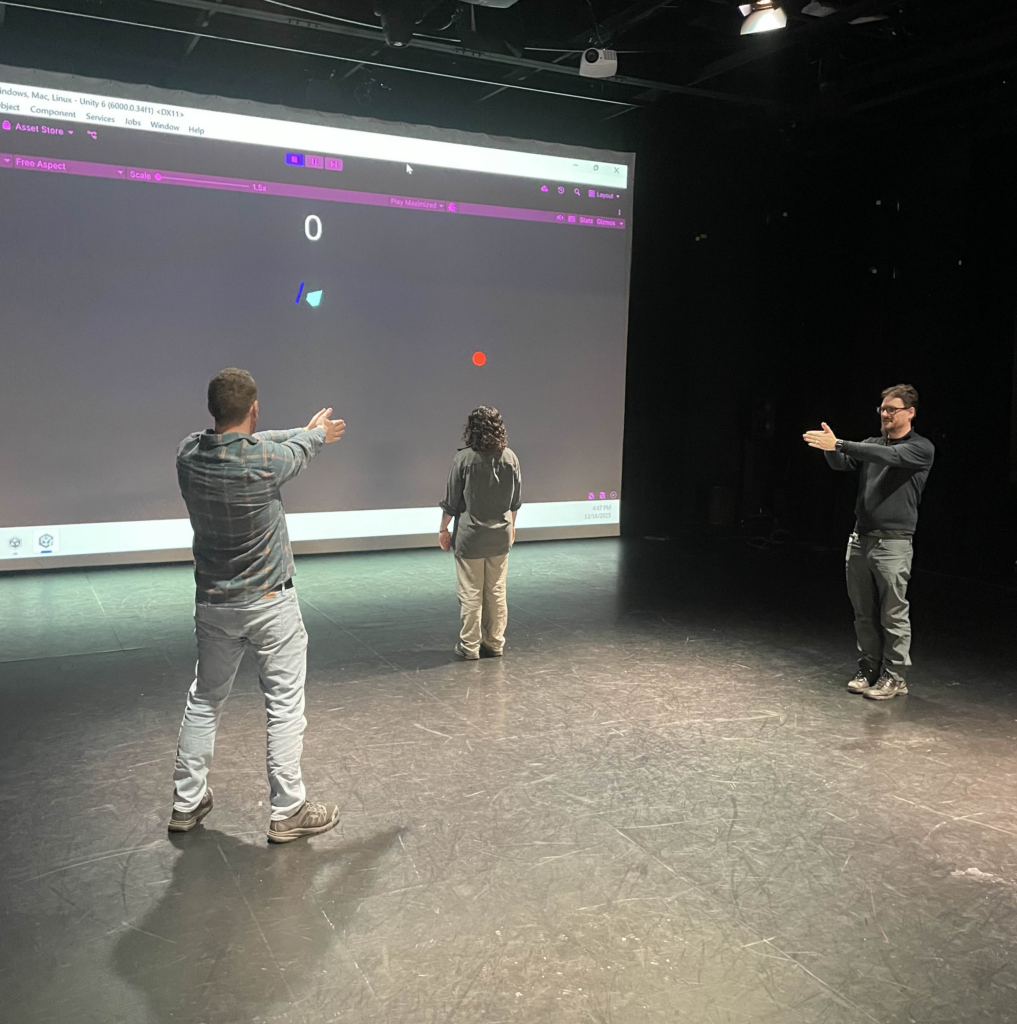
I think everyone had fun participating to a degree although there was one major flaw. I originally had someone yell “shoot!” or “pew!” whenever they wanted a bullet to fire, but this ended up turning into one person just saying the command constantly and it didn’t add much of anything to the experience. I did originally have plans that would have helped in this aspect. For example, I was going to make it so there could only be 2 or 3 bullets on screen at once to make spamming them less effective, or maybe have a longer cooldown on missed shots.
In the end, I had a very good time making this game and I learned a lot in the process. Some of which was design wise but a lot was also planning and time estimating as well!
Cycle 2: Space Shooter Expanded
Posted: December 18, 2025 Filed under: Uncategorized Leave a comment »I originally planned to implement phone OSC controls into my Cycle 1 Unity game for this cycle. I would then use the final cycle to refine the gameplay and expand the physical aspects of the controls. Holding a phone is pretty boring, but imagine holding a cardboard shield with a phone attached to it!
However, I realized after some testing that I would need to do some slight gameplay reworks first. This was because after I saw the projection capabilities of the motion lab, I learned that the amount of area that can be covered is severely limited. This is especially true in the vertical direction. After seeing this, I decided to change the way enemies are spawned in. Instead of appearing in a circle around the player, they would appear at the horizontal edges of the screen. Given the size of the projection, I think this will be easier on the player. It still felt limiting in a way though, so I decided to allow the player to move vertically up and down as well.
These were significant changes, so I needed to redesign the game first before adding the phone OSC elements. While going through this process, I added a few new things as well. The overview of changes is as follows:
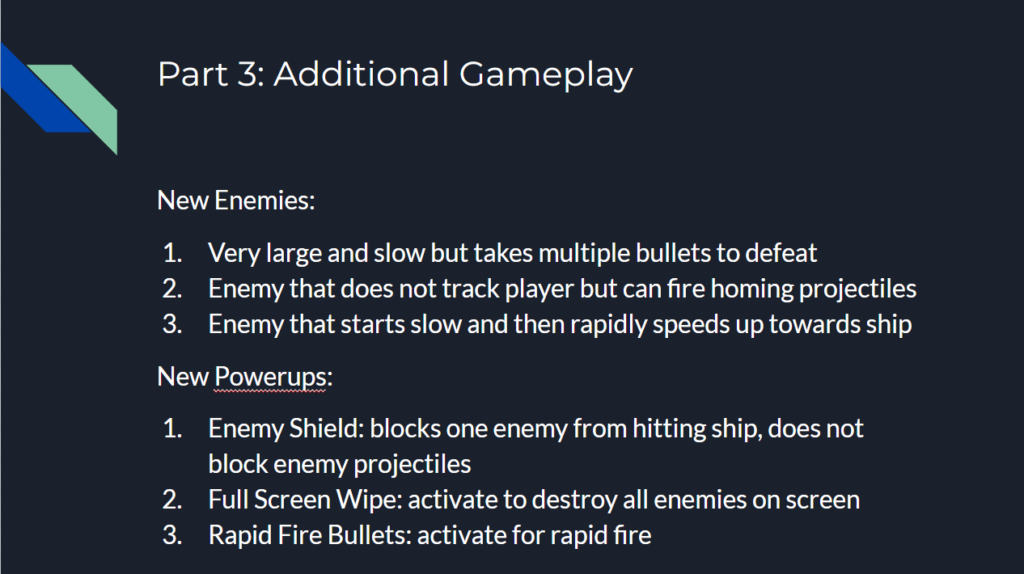
1. Enemy Spawner
The Enemy Spawner was changed to spawn enemies at the horizontal edges of the screen. This is actually much simpler than the circle spawning it was doing before
2. Player
The Player was given the ability to move up and down on the screen. This means the player class now has to look for more inputs the user can give. There is another consideration though, and that is that the player cannot be allowed to move off screen. To stop this, a check is done on what the player’s next position is calculated to be. If this position is outside the allowed range, the position is not actually updated.
3. Enemies
After implementing player movement, I discovered a major issue. The player can just move away from enemies to avoid them! This trivializes the game in many aspects, so a solution was needed. I decided to have enemies constantly look towards the player’s position. This worked exactly as expected. I decided to make enemy projectiles not track the player however, as this created additional complexity the people playing the game would have to account for.
4. New Enemy: Asteroid
Sense all enemies track the player now, I thought a good new enemy type would be one that didn’t. This new enemy type is brown instead of red and cannot be destroyed by player bullets. The only way to avoid it is to move the ship out of the way. To facilitate this gameplay, when an Asteroid enemy is spawned, it heads towards where the player is in that moment. This also ensures the player cannot be completely still the entire game.
5. Shoot Speed Powerup
After the recommendations I received from the Cycle 1 presentation, I decided to add a powerup to the game. This object acts similar to the projectile objects, in that it just travels forward for a set time. Except when it collides with the player ship, it lowers the cooldown between shots. This allows the player to shoot faster. This powerup only travels horizontally, again to add more variety to object movement.
The final result for this cycle can be seen below.
After finishing the game, I got a great idea. I remembered back to people attempting to play the game for cycle 1, and many of them found it overwhelming to control the ship direction and shield direction. But this new version of the game added an entirely new movement direction! That’s when I decided to turn my project from a single player experience to a multiplayer experience. I would have one person control the vertical movement of the ship on the keyboard, one person hold the left side of the controller to use the left joystick, and one person hold the right side of the controller to use the right joystick and trigger. This way, each person only really has one task and thus it should be a lot easier to keep track of.
However, once I tested this I ran into a major issue. The keyboard and controller could not move the ship simultaneously. It seemed like control was being passed between either keyboard and controller, and so they couldn’t happen at the same time as was needed to control the ship. After much testing, I found that if I had two input listeners, one for each type of user input, simultaneous control could be achieved!
I was running out of time for this cycle, and given the major reworks I made to the game, I decided to push phone OSC controls to the next cycle.
After presenting the game and having the class play it, I received very positive feedback! Most people liked how much easier it was to play when the tasks were divided up. The team effort also allowed them to achieve much higher scores than they were able to get for cycle 1. Two people holding one controller was a little awkward though, and the phone OSC would help with that. Ideally, it should feel like they are all part of a team that is controlling a single spaceship.
Cycle 1: Space Shooter
Posted: December 17, 2025 Filed under: Uncategorized Leave a comment »I knew that the interactive system I wanted to make for the cycle project was some kind of video game using Unity. I also knew that I wanted it to be a simple 2D shooter game where the player controls a ship of some kind and fires bullets at enemies. However, because this class is about interesting ways you can interact with systems, I thought using a controller would be boring! My initial plan was to use the top-down camera in the motion lab to track the player’s movement. This would turn the player’s body into the controller. Then, instead of a standard screen being used, the gameplay would be projected onto the floor. That way it was almost like the player was in the game, without having to use any VR! The game would have looked something like the classic game Space Invaders, shown below.

My plan was to have the person controlling the ship have a light on their head and another light they can activate. The camera would use the light on their head to track their movement and the activated light to fire a bullet. I realized there was likely a major flaw with this design though, and that was that the camera in the motion lab does not have a big enough view to accommodate the space I wanted. I also hadn’t considered the role that perspective would play on the camera. This made me move away from Space Invaders and more to a game like Asteroids, shown below.

The idea is to lock the player in the center of the screen so that the person controlling the ship can stand directly under the camera. This makes the camera angle less of an issue while still allowing the person to control the direction the ship is facing with their body. An additional interesting result of this is that the person in control cannot see behind themself like you could watching a screen of the entire game, which adds an additional interesting layer to the gameplay. Because the ship loses the horizontal movement seen in Space Invaders, I decided to add a shield mechanic to the game as well. The idea is that some enemies would shoot projectiles at you that you cannot destroy with bullets and must block with a shield. The person controlling the ship would use one arm to shoot bullets and one arms to block projectiles.
With that in mind, my goal for this cycle was to create the game working on a controller. The two joysticks would control the ship and shield direction and the right trigger would fire bullets. There would be two enemy types: One that is small and fast, and one that is bigger, slower, and can fire projectiles.
The main Unity scripts made were:
1. Player
2. Player Projectile
3. Shield
4. Enemy
5. Enemy Projectile
6. Enemy Spawner
7. Game Manager
I don’t want this post to just turn into a code review, but I’ll still briefly cover the decisions I made with these scripts.
1. Player
The Player checks for user input and then does the following actions when detected:
– set ship direction
– set shield direction
– spawn Player Projectile (the Player also plays the projectile fired audio clip at the same time)
2. Player Projectile
The Player Projectile moves forward until it either collides with an enemy or a timer runs out. The timer is important as otherwise the projectile could stay loaded forever and take up resources (memory leak). If the projectile collides with an enemy, it destroys both the enemy and the projectile.
3. Shield
The Shield is given its angle by the Player. It does not check for collision itself, the Enemy Projectile does that.
4. Enemy
The Enemy is actually very similar to the Player Projectile, it moves forward until it either collides with the player or a timer runs out. If the enemy collides with the player, it destroys the player which ends the game. There is also a variant of the Enemy that spawns Enemy Projectiles at set intervals.
5. Enemy Projectile
Similar to the Player Projectile, the Enemy Projectile moves forward until it either collides with the player or a timer runs out. If the projectile collides with the player, it destroys the player which ends the game. If the projectile collides with the shield, it destroys itself and the game continues (nothing happens to shield).
6. Enemy Spawner
The Enemy Spawn is what spawns enemies. Because enemies just move forward, this script calculates the angle between a random spawn point and the player and then spawns an enemy with that angle. The spawn points is a circle around the player. Every time an enemy is spawns, the time between enemy spawns is decreased (i.e. enemies will spawn faster and faster as the game progresses).
7. Game Manager
The Game Manager displays the current score (number of enemies defeated) as well as plays the destroy sound effect. When an enemy is destroyed, the interaction calls to the Game Manager to track the score and play the noise. When the player is destroyed, the interaction calls to the Game Manager to play the noise and display that the game is over.
The final game result for this cycle can be seen below.
Some additional notes:
The music is another element in the scene but all it does is play music so it’s pretty simple.
The ship is actually a diamond taken from a free asset pack on the Unity Asset Store. Link
The sound effects and background music were also found free on the Unity Asset Store. Because of the simplicity of the game, retro sounds made the most sense. Sound Link Music Link
Just after the entire game was done, I closed and reopened Unity and all collision detection was broken! I ended up spending hours trying to figure out why before creating an entirely new project and copying all the files over. So annoying!
After presenting to the class, I was initially surprised at how much some people struggled with the game. I knew it was difficult to keep track of both the ship and the shield using the two joysticks, but I didn’t consider how nearly impossible this was for people who had never used a controller. Otherwise, the reaction was fairly positive. One note that makes sense was to possibly try to differentiate between the two enemies clearer as they are the same exact color and that can be confusing. There were also some cool suggestions such as adding powerups to the game. It was also suggested that maybe instead of trying camera tracking, I could use phone OSC to have the players control the ship instead. This seemed like a much better idea and so I decided to investigate that for the next cycles.
Pressure Project 2: Japanese Sign
Posted: October 18, 2025 Filed under: Uncategorized | Tags: Pressure Project Leave a comment »As soon as I heard the requirements for this pressure project, I immediately knew I wanted to use a livestream. Not because I didn’t want to physically observe people in the real world, but because a livestream allowed me to go anywhere in the world. This seemed like a great idea, until I started looking for livestreams. I actually found a playlist of Japanese livestreams on YouTube and as I was going through them I realized one major flaw: there really weren’t many interactive systems to observe.
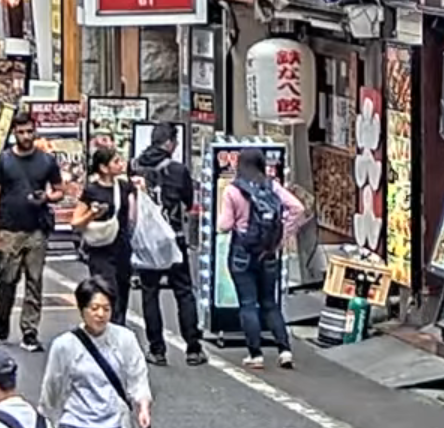
There was a famous livestream of a major Tokyo intersection, but this seemed too unpersonal and generic. A smaller intersection, while more personal, was still just as generic. Although as a note, barely anyone ever jaywalked in the streams I watched, even when there were clearly no cars at all. I ended up going with a stream of people walking down a street. There were shops, restaurants, many signs, and it all looked very… Japanese. I chose this one because, on top of looking very characteristic for Japan, there was a sign in a great location for observing. Additionally, I watched from 12-1pm (their time) so there was a lot of activity happening. See below for the sign in a screenshot of the livestream.
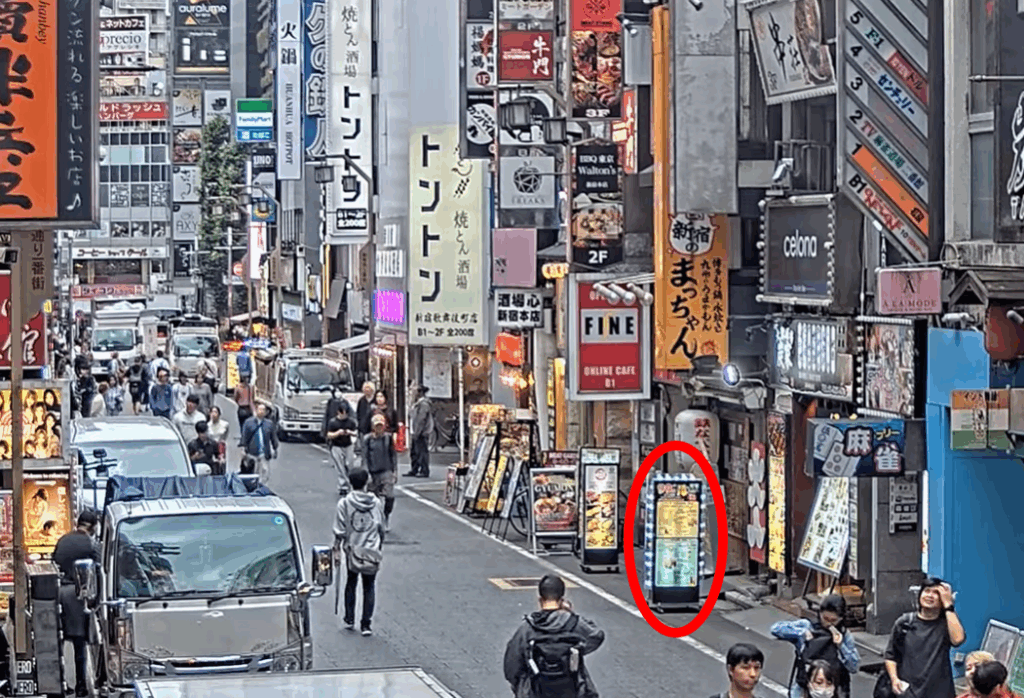
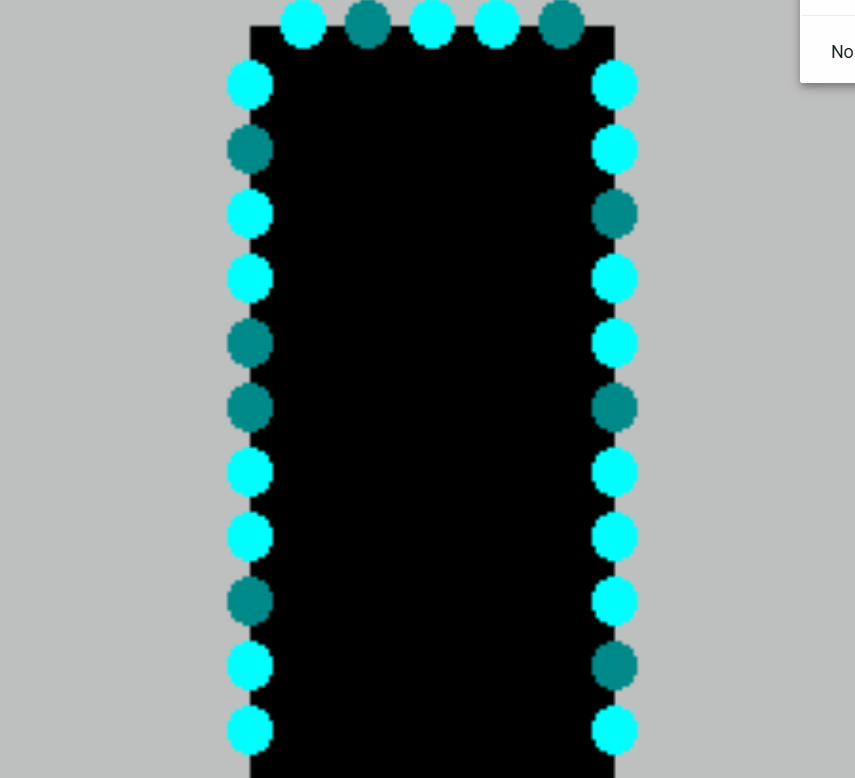
What made this sign a good candidate to observe though? Firstly, as I said above, it’s framed in a way where you can tell when people interact with the sign. Many of the other signs aren’t on street level, and sense we can’t see the exact location people’s eyes are looking, you can’t tell which sign they are looking at. The sign being on the ground makes it very clear when people look at it. Next, although you can’t really tell in the screenshot, this sign has lights around it that flash in a particular way. This was the “system” what people would interact with. Below is a mockup of exactly what the flashing light pattern looked like:
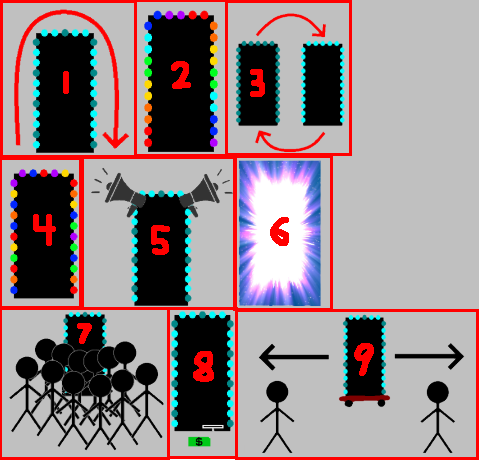
Now you may be thinking, is this really an interactive system? Perhaps it’s a bit of a stretch but first let’s cover how people interacted with this sign and signs in general. In my opinion, there are four key interactions:
Interaction #1:
A person doesn’t even see the sign. This is the worst case scenario. Either our potential observer was too busy looking at their phone or was in a rush to get through the street who knows, but in the end our sign made no influence on them at all… 🙁
Interaction #2:
A person sees the sign but doesn’t look. This is what I believe to be the most common interaction. I know I said the first type of interaction was worst case scenario, but in a way this one feels worse. People could tell there was a sign there, maybe even glanced at it to see what it was, but the sign’s existence was so ambivalent to them they simply didn’t care to look further.
Interaction #3:
A person sees and processes what is going on with the sign but does not stop walking. This is a great improvement over the first two interactions. People become so interested in the sign that they become curious of what it is. This interaction comes in a range but has an ideal scenario: the head turn. If someone turned their head to read the sign, that means it was so interesting to them, that up until the point where they physically could not see the sign anymore, they were still looking. There is room for improvement here though, as these people still walked by the sign when the time came.
Interaction #4:
A person stops to look at the sign. This is the best case scenario. A person was so interested in the sign, that whatever reason they were walking for become overridden. They must learn more about this sign. This is the only acceptable scenario. I will now redesign the sign to accomplish this goal… 🙂
Simple Changes
Assuming we want to keep things tame with the changes, let’s focus on the lights before adding new components.
Possible Change #1:
Make the light pattern more coherent and interesting. In the mock-up above, you can see the light pattern may vaguely be in a clockwise pattern, but adding more states and making it a clearly clockwise pattern could make people more likely to look, if just to see the pattern.
Possible Change #2:
Add more colors. A pattern of on/off is alright, but a pattern of different colors is definitely more likely to get people’s attention. This also adds an entire new layer to the lights, and that added complexity could keep people’s gaze longer.
Possible Change #3:
Make the pattern flashy. If the pattern has many lights on and then off in quick succession, people may be more likely to look. Especially someone who isn’t really paying attention as a sudden burst of activity may steal their focus.
Intense Changes
The simple changes are largely superficial. While they may get people to look more often and for longer, they’re less likely to get people to stop, which of course is the only goal that matters.
Possible Change #4:
Add many varied colorful and random patterns. The idea here is that there are just so many crazy lights and patterns and flashes occurring that people can’t possibly understand everything happening in the time it takes to walk down the street. People will have to stop in order to get the full pattern, if there even is one.
Possible Change #5:
Added speakers and proximity detectors to the sign. A speaker that just makes noise could get people to glance over, but if the audio is proximity based and makes noise depending on people’s distance to the sign, the personal aspect is more likely to get people to actually stop. The sign could say things like “Look at me!” or “You there, stop immediately!” in reaction to someone getting close to the sign and in many scenarios that person will stop.
Possible Change #6:
Makes the lights extremely bright. Now maybe this could have the opposite effect as people can’t look at the something that’s too bright because it hurts, but a light that is extraordinarily bright could cause people to stop in surprise. Although again looking away is not ideal, even if they stop.
Stop Them No Matter What
It’s still possible that the above changes won’t stop people. But what can we do to ensure that people stop no matter what?
Possible Change #7:
Add a fake crowd of people in front of the sign. It should really look like everyone wants to see this sign. How could anyone walking down the street resist the intrigue of what they could be looking at? They may even join the crowd and then strengthen its attraction towards other people…
Possible Change #8:
Add a piece of currency on the ground in front of the sign that is on a string. When people try to grab the money, the sign retracts it back into itself. The act of having to bed down and ground the string will stop someone, and then after they are stopped, they’ll likely look at the sign either in intrigue or confusion.
Possible Change #9:
All other changes have a chance of failure. In this change, a motorized system is added to the sign’s wheels that allow it to move back and forth freely. A motion detector tracks people’s movement and moves the sign to block people’s path so they physically must stop and look at the sign. This is the ultimate solution. I suggest all sign manufacturers invest immediately!
After presenting, the class discussed a few things that are worth noting. It was questioned if people are really “interacting with an automated computer system” by simply looking at a sign, however the changes I made, especially ones related to proximity, easily bring the system as a whole up to that specification. In terms of a less invasion approach, proximity lights were brought up as a possible idea. I kind of had moved this idea to the audio but it could easily work with lights as well. For example, maybe the color changes depending on your distance to the sign or maybe more and more lights turn on the closer you get. Either of these could definitely get a person to stop, especially if they notice that they are the ones controlling the lights.
This was definitely a fun project. I was a little disappointed that I couldn’t find something more interesting in a livestream, but I was satisfied with how I was able to spin something extremely simple into something a bit more complex.
Pressure Project 1: Bouncing Idle Screen
Posted: October 15, 2025 Filed under: Uncategorized | Tags: Isadora, Pressure Project Leave a comment »The idea for this pressure project came to me based on the “achievements” that Alex gave us to work towards. At first I was concerned about how I could possibly keep an audience engaged for over 30 seconds with something non-interactive. But then I thought about something completely noninteractive that does keep people engaged, and that’s the DVD bouncing idle screen. I specifically remember doing this myself whenever I saw it, but I knew other people liked doing it too from seeing it in internet memes or referenced in pop culture. This idea seemed perfect as it could definitely be done within Isadora.
The only issue was that it didn’t feel like it would be enough work for 5 hours. I then decided that because this idle screen plays on a TV, I could simulate someone changing channels. My first thoughts for other channels were full static and the color bars as obviously I can’t animate anything too complex (although maybe a live feed camera could have worked…). This was when I started creating the project in Isadora.
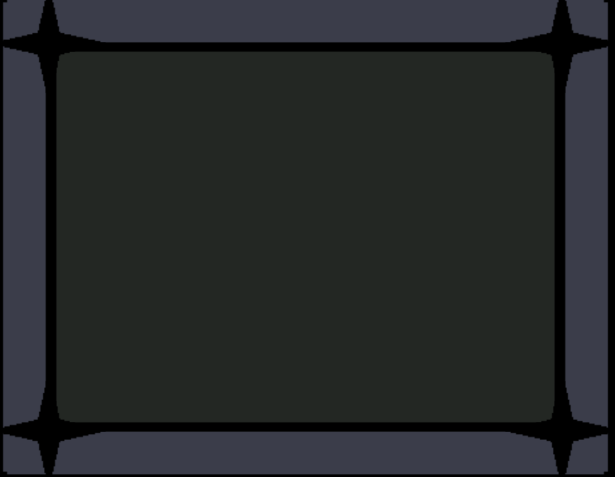
The first thing I made was the TV. I wanted an actual TV to be visible instead of just using the edges of the stage because it looks nicer but also because it just makes it feel more authentic. I also wanted it to be in the classic 4:3 resolution that old CRT TVs had. Another aspect of these older TVs that I wanted to emulate was the curved corners of the screen (technically the entire screen is bulging out but this is a 2D representation). With that plan in mind, I created the first TV with two boxes: the outer TV casing and the screen. I made the outer casing a darkish grey hue and the screen was a sort of dark grey/green thing that I associate with turned-off TVs of this type (the screen also has a thick black border so the entire thing doesn’t go from outer casing to the screen). The first issue came with adding the curved corners of the screen. The best way I could figure out how to do this was to use a shape with odd insets as that was the closest thing to a negative space curve. The issue with this however, was that it couldn’t be layered under border while on top of the screen, as those were both being represented by a single square. See below:
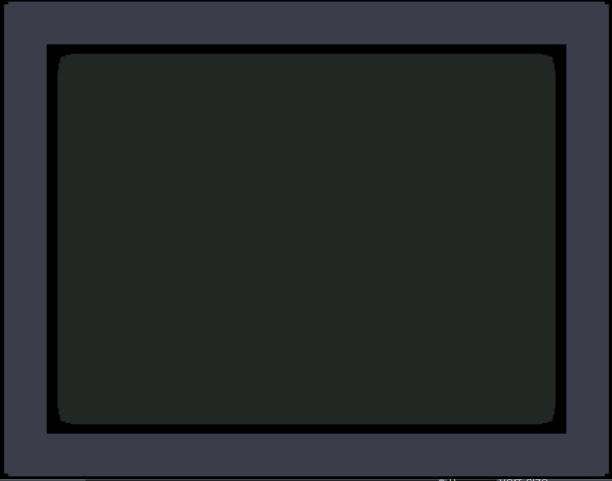
To solve this, I recreated the border casing as 4 individual rectangles so that the layering would allow the corner shape to be on top of the screen and under the border. The also allowed the entire TV itself to have softer edges as the rectangles ended up not perfectly flush. The TV was also made into a user actor where the color of the screen was controllable. The completed turned-off TV is below:
Next was to make the main attraction: the bouncing idle screen. The first thing I did was create a default white square. I used two wave generators for its vertical and horizontal position, with the wave generators in triangle mode as the movements should constant the entire time. To my surprise, this immediately worked in making the square bounce around the screen exactly as I wanted, the only exception is that it was bouncing around the borders of the entire stage. After some scaling and position subtracting (mostly done through trial and error) the square correctly bounced within the TV.
Now that I have something bouncing, it’s time to make that thing change colors every time it hits as edge. I did this by using an inside range actor connected to the wave generators. Every time the wave generators left the range of 0.5 – 99.5 it sent out a signal. This perfectly corresponds to when the shape bounces off a wall. I then connecting this signal to three random actors and connected those to a color maker RGBA actor’s red, green, and blue values to generator a random color for the shape. Now every time the square bounces off a wall, it also changes color.
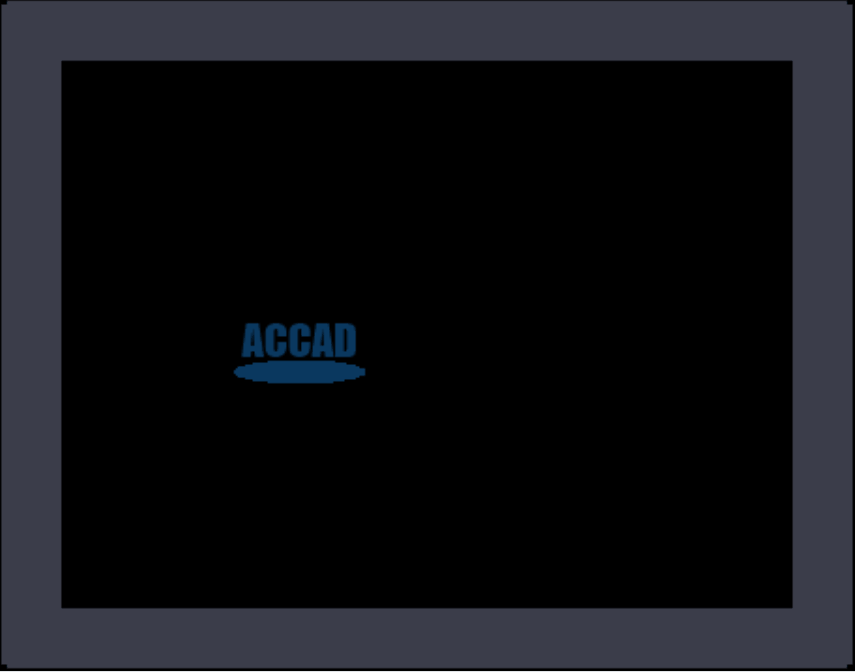
The final thing I needed to do was replace the default square shape with something else. I didn’t want to recreate the original exactly, so I replaced the “DVD” text with “ACCAD” and just put a small empty oval underneath it similar to the original. I turned this into a user actor to simplify the views and after a few more operations it looked great. See below:
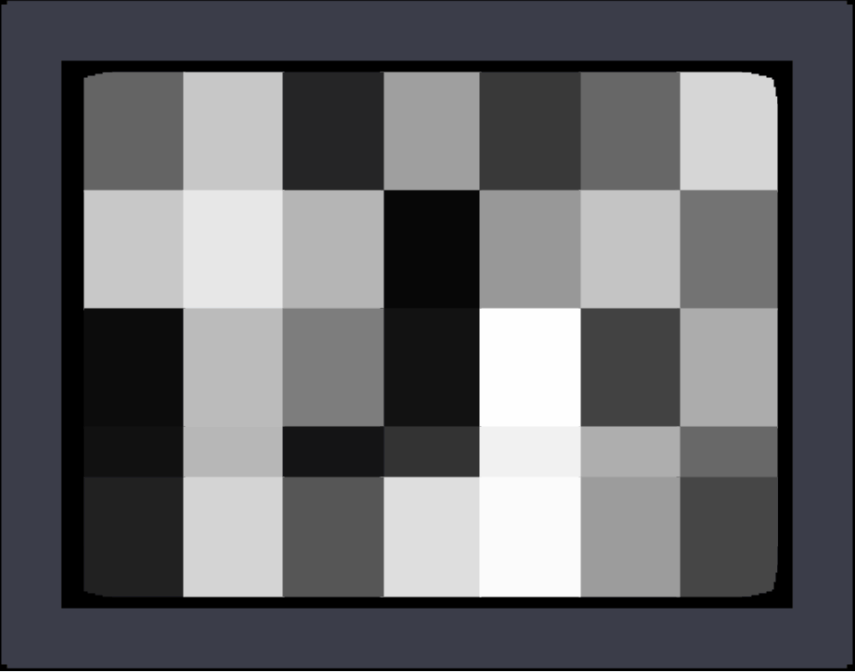
I was extremely happy with how this turned out, but I still needed a bit more to complete the project. The next thing I created was the static screen. At first I wanted it to be as accurate as possible by having a large number of shapes act as pixels, but this quickly showed to be not possible. At one point I had over a hundred little “pixels” that would get a random black and white color and position in the screen but the lag this caused was too great to continue. Not to mention the fact that it looked horrible! I then briefly thought about using several images of static screen and cycling between them, but I couldn’t remember how to display and swap images and this seemed like the easy approach any way. I ended up using a couple dozen large “pixels” to simulate a sort of static. By coincidence, they ended up in a similar pattern to how the color bars looked and so I was satisfied enough. The squares simply get a random black and white color in a pretty fast frequency. See below:
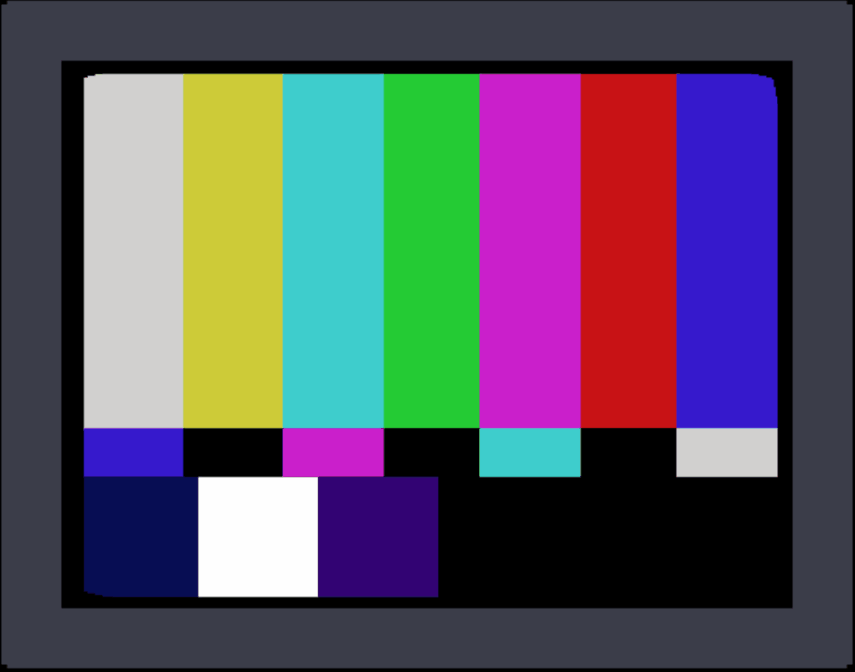
The last screen I made was the color bars. This was very simple as it was just static colors, although getting the exact correct positions was a little annoying sometimes.
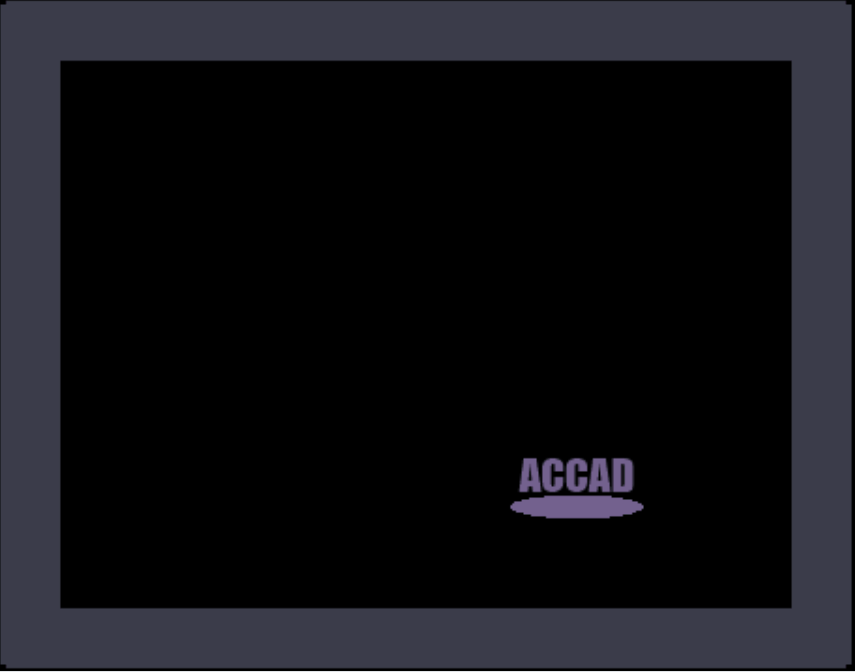
Finally, I decided to simulate the TV turning off as it felt like a pretty iconic old TV action and a satisfying conclusion. For this animation, I used two wave generators set to sawtooth and to only play once. One wave generator squishes a big white square vertically into a line, and then the other squishes it horizontally until it’s gone. The end result was surprisingly satisfying! See below for the color screen into turning off:
Now that I had all the scenes complete, I needed to link them together. For the idle screen, I decided to start a counter for the number of times it bounces off the top or bottom wall. After 20 bounces it switches to static. For both static and the color bars I simply had a pulse generator activating a counter to switch after an amount of pulses. There was probably a better way to do this, but I was running out of time and there was one more thing I wanted to do.
The very last thing I added was channel text to the corners of the static and color bar scenes. This would further signify that this was a TV the viewer was looking at. Ideally, this would be solid and then slowly fade away, but given the time crunch it was just a very slow constant fade. Because these scenes only play briefly, it isn’t too noticeable.
The complete (although slightly shortened) result can be seen below:
The feedback I received on this project was amazing! I seemed like everyone made at least some noise while it was playing. One person said they were getting physically engaged in the idle bounces. Some people didn’t realize it was a TV until it changed channels which actually surprised me as it seemed obvious given the context of the idle bouncing. I hadn’t thought about how someone who wasn’t completely familiar with it wouldn’t know what was happening or what the border was supposed to represent. I was extremely happy when someone pointed out the curved corners of the screen as I thought nobody would even notice or care about it. There were also feelings of nostalgia and anticipation among the viewers as well.
This pressure project was a ton of fun! Isadora is just a blast to create things with and pushing its capabilities is something I loved exploring. If I had more time, I definitely could have done a lot more with this project, but I’m looking forward to creating more interactive experiences in future projects!