Cycle 3
Posted: December 15, 2025 Filed under: Uncategorized Leave a comment »I somehow managed to get through cycles 1-2 without actually doing anything with Isadora or other technology. Although I learned a lot, I needed to include the “MES” in DEMS. And what a mes I made!
Perhaps the mist valuable topic explored in my Cycle 2 was the part about proximity. What is the distance between a users actions and the result of that action? Is it immediate like a typewriter, or further away like a garage door opener? Cycle 2 focused on proximity from the point of view of the user, but what about from the perspective of the tech itself? What is the user is unaware that they are interacting with technology at all? This is what Cycle 3 explored. How does a machine detect its own proximity to a user.
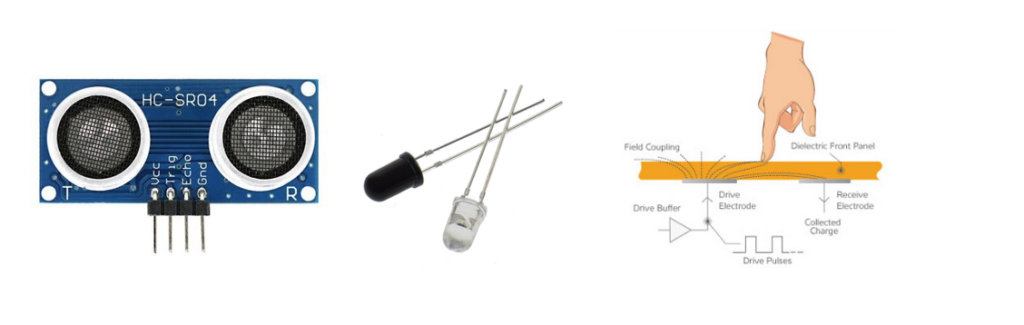
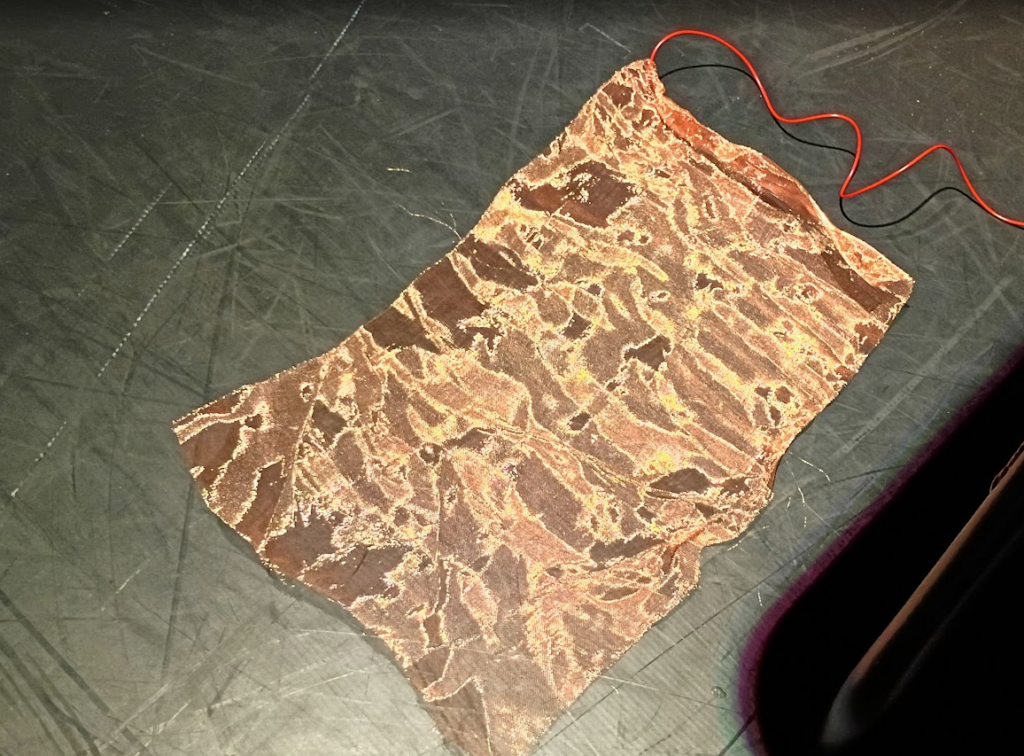
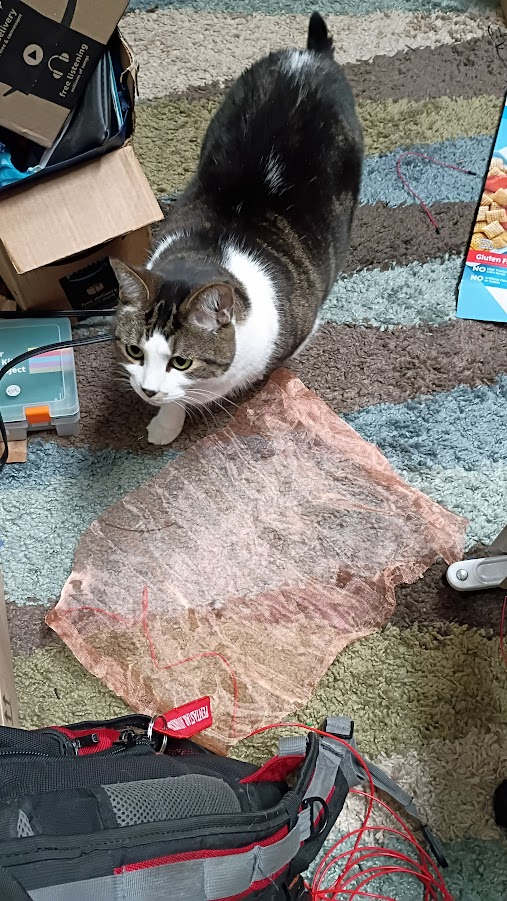
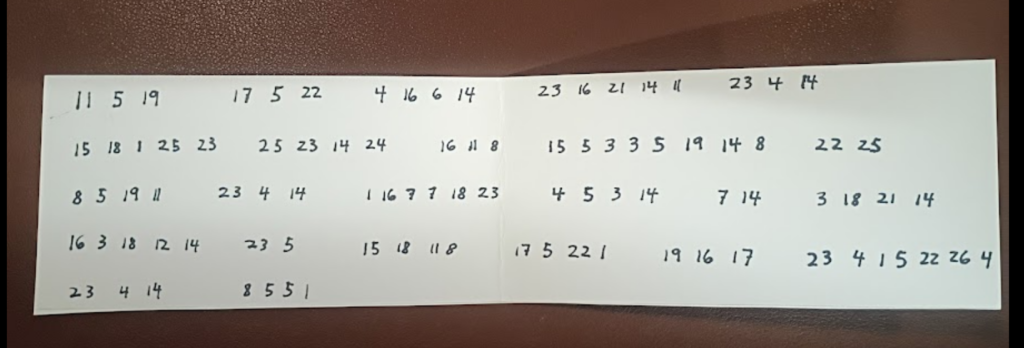
For this project I chose three technologies to explore, as shown above. First (left) is an ultrasonic sensor. It broadcasts an ultrasonic sound and listens for the returning echo. It is capable of detecting something within range as well as the distance the object is form the sensor. Second (center) is Infrared optical sensing. These are commonplace pieces of tech used to detect the presence of objects. A transmitter (clear LED) emits an IR beam of light. The receiver (black LED) detects the IR beam. If the path between the transmitter and detector is broken, the presence of an interfering object is detected. This is what usually prevents home garage doors form closing if something is in the way. Third (right) is a capacitive sensor. It detects the presence of an object by detecting a change in the state of charge across an electric circuit. See my PP3 for more information about how this works. For my tests I used a piece of copper mesh roughly 11×17 soldered to a length of wire (below). My cats were extremely interested in the mesh and kept triggering the sensor!
Cycle 3 includes two main parts. One, the electronics portion that explores the three sensor types mentioned above. The second piece is exploring how these inputs can be utilized by Isadora.
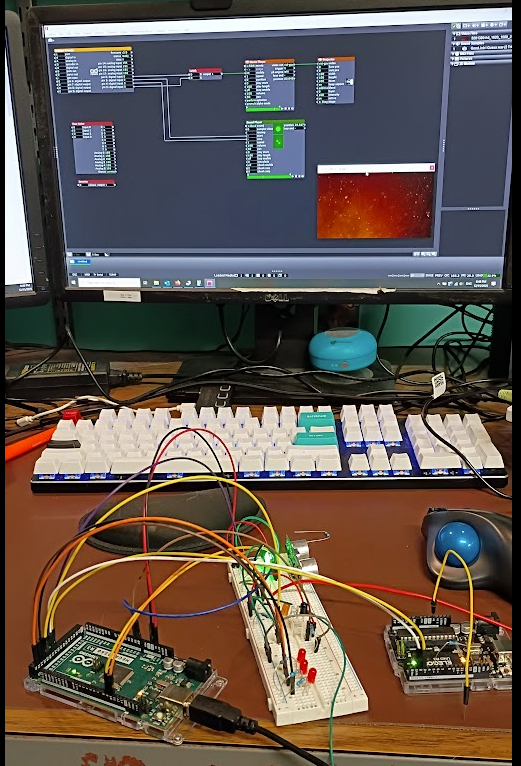
The photo above (my desk puts the MES in DEMS) shows the results of my efforts. On the left is an Arduino Mega controling the detection circuits and reporting to the PC and the user its status. The white piece in the middle is an electronics breadboard which contains the electrical components for the sensors. On the right is a smaller Arduino UNO loaded with the Firmata program that communicates with Isadora.
The system works by the Arduino Mega and the breadboard detecting the presence of a user then passing that information to the UNO, which then tells Isadora to do something. The Firmata User Actor, and its associated Arduino Firmware is an incredibly powerful and easy to use system that makes the task of getting GPIO in and out of Isadora. However, it does not provide easy means of expanding upon its functionality without essentially rewriting the Firmata software. This is why there is a second arduino, the mega, to handle the custom software needed to drive the detection circuits.
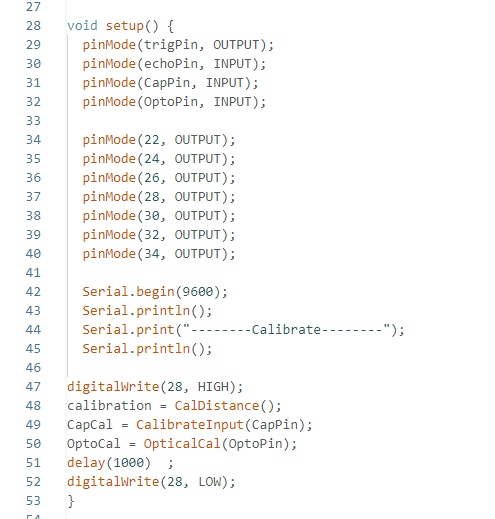
In an Arduino program, called a sketch, the first code that runs in part of a “setup” function. This is what tells the arduino what its ins and outs are as well as running any code that needs to happen before the main program takes over. Above is the code for my project. Lines 47-52 are the main interest here. The sensors require calibration before they can be used. The sensors need to know what the environment is like without the presence of a user so that it can compare that to when a user is nearby. Thus the first major step is to initialize each sensor type. Each sensor takes 10 readings, averages the results, and declares that is the default value. While this is happening an orange LED is illuminated on the breadboard to tell the operator that the system is in this process.
Once this step is completed, the system constantly takes readings from the sensors and compares the values to the calibration data, if the difference exceeds a threshold value a detection is registered. For convince the system also illuminates a red led to let the user know that a detection has occurred, there is a separate LED for each sensor. Here the user is the programmer, not the audience who is being detected. In addition to illuminating an LED to indicate that a sensor has detected something, a message is sent to the Isadora Arduino to let it know that there has been an event.
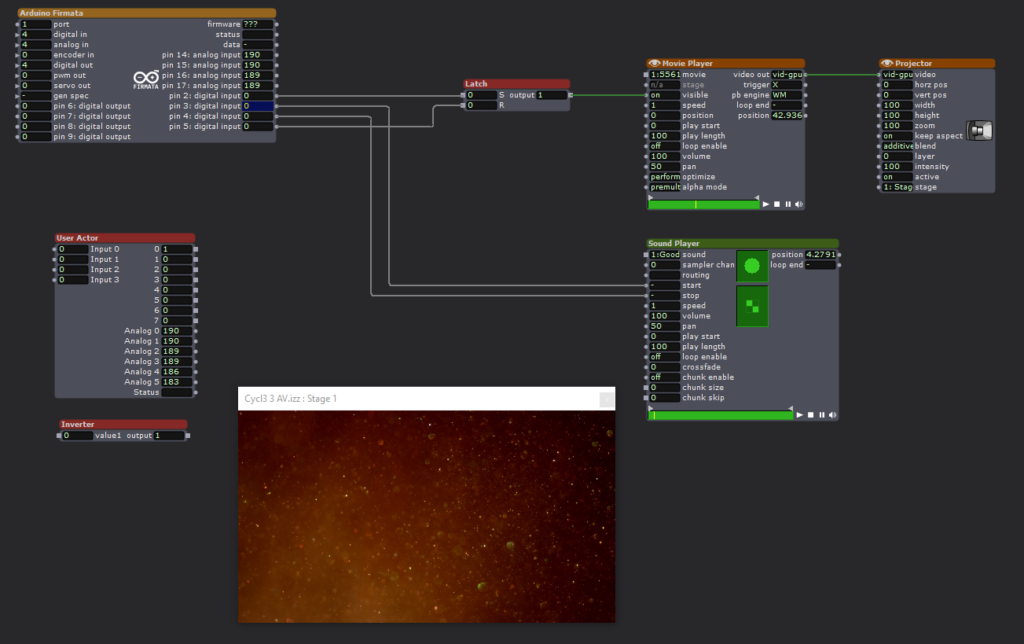
The Isadora scene is a straightforward affair. The Firmata actor is constantly monitoring the state of the Arduino Uno configured with the Firmata sketch via the Serial Bus. When pin2 goes high, a video is played. When pin3 goes high, an audio clip is played. Pin3 stops the audio. Pin4 resets a latch that keeps the video playing.
When the sensor electronics detects an acoustic trigger, it plays the video. When the optical sensor detects a change it plays the video, a second event stops the audio.
Expanding the Firmata Actor
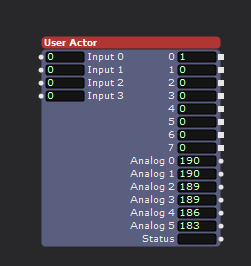
Above is a user actor that utilizes some additional logical processing to increase the number of inputs to Isadora. The Firmata Actor simply observes the digital pins of the connected Arduino to see if their input is either high or low. This is enough capability to implement binary decoding to allow the limited inputs to be expanded. As seen above, the user actor has 8 outputs, but the connected Arduino is only utilizing three of its physical inputs.
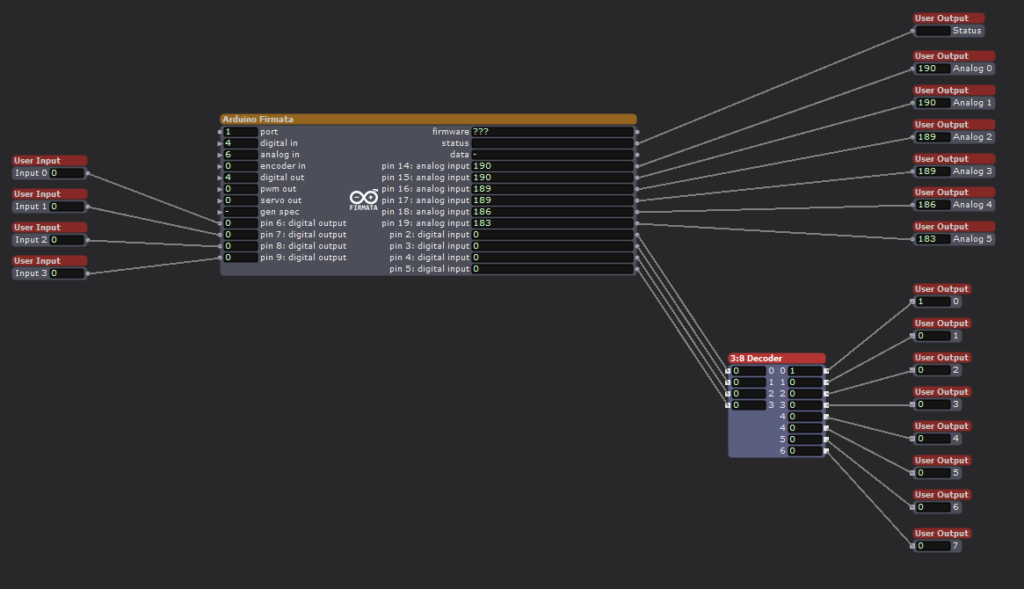
Looking inside the User Actor we can see the Firmata Actor with 4 digital inputs. We are ignoring the analog inputs for this exercise. Although there are four inputs shown, I am only using three of them to achieve 8 binary inputs. Utilizing all 4 physical inputs would allow for 16 binary inputs, but was not implemented here. The technical trick is occurring in the 3:8 Decoder user actor.
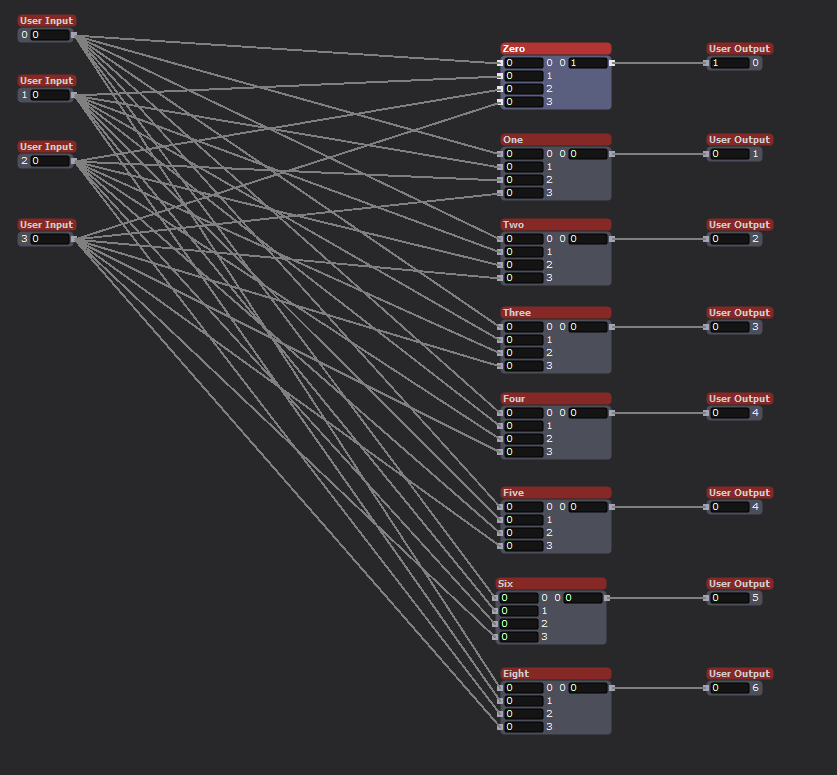
Inside the 3:8 Decoder actor we see that the four inputs are connected to 8 modules. These modules are the heart of the system.

Using the Logical Calculator actor is is possible to implement Complementary Digital Logic. If you are interested please look into OSU ECE 2060 and ECE 5020.

One final user actor was needed first, a digital inverter. This takes an input, either a 0 or 1, and outputs the opposite value. All that is needed is a Logical Calculator actor in XOR mode.
To implement Complementary Digital Logic, it is necessary to have the complement of a logical bit. In this case the opposite value of an input. For example, if Arduino input-1 is HIGH, we also need input-1! (input-1 Bar, or input-1 NOT). This tells the system that an input is NOT currently active. By combining the logical states of the three utilized physical inputs, with AND logical actors it becomes possible to encode additional states, to the value 2^(#inputs).
Currently the Arduino Mega processing the sensor input only has three sensors, but by encoding the status of the sensors it is possible to feed more sensor inputs into Isadora than would normally be possible using the Firmata actor. There are methods for passing serial data into Isadora to achieve even greater input count, but my method is technically simple to implement and is very robust and avoids complications that arise with serial communication protocols.
Putting all of this together for my home DEMS

A key part of my home DEMS is the creation of several secret doors. These are implemented by having sections of a wall sliding away to reveal the passageway. Just like an elevator, it is vital that the doors do not close on anyone (See my PP1, no chomping here). The IR optical sensor will work well for this use case. It is simple and works in a vary direct line of sigh manner. If anything breaks the beam it means that there is an obstruction in the doorway. By monitoring this sensor the door control can know not to close on anyone, or the cats.

What sort of mysterious home would I have without a giant, vaguely threatening, carnivorous plant! Certainly not one worth visiting. It is a goal to have such a character at home. Some type of large carniverous plant, think Audrey but cuter. I want the plant to follow people as they walk past, and if they get close enough I want it to take a chomp at them. This is the perfect place to utilize the ultrasonic sensor. By placing several such sensors around the plant it will be possible to detect the presence of a person as well as knowing how far away they are. With this data the plant can track them and eventually try and take a bite!
The optical and ultrasonic sensors are discrete and the light and sound they produce is undetectable by humans, but they require line of sight to work. Neither can work if they are completely enclosed or obscured. The IR detector is tiny, but does require a hole of some kind for the light to pass through (or an IR transparent window). The capacitive sensor is different, it can be completely hidden. The metal mesh that acts as the sensor can be hidden under carpet, behind a painting, under a tablecloth, even in the fabric of a pillow or cushion. I envision using it to detect when someone enters a room or if they are reaching to grab an object. For example, imagine a crystal ball sitting in the center of a table. By hiding the sensor under a small tablecloth it is possible to detect when someone reaches out to the ball, without actually touching anything. This could trigger some other effect such as the ball glowing or a sound playing.
If nothing else, the sensor made a good cat toy. Biscuit approves (below)! I had to cover it with an empty cereal box to keep them form clawing at it, but then they became very curious about the box! There was no winning.
Cycle 0.5
Posted: December 11, 2025 Filed under: Uncategorized Leave a comment »Setting the stage.
Going into the Cycle projects I found myself in an unusual situation. I was already working on a large project that would be a perfect fit for the DEMS class, but a project of a very unusual nature. I am a non-traditional student who returned to college much later in life than normal, providing me with more resources than the typical college student. In particular, a house. My wife and I both have theater backgrounds and strongly believe that it would be awesome to live in a “scooby-doo house”, filled with secret passages, mysterious artifacts, and perhaps a few skeletons in the closet. (For the record, there are indeed skeletons in the closet. That’s to good a joke to pass up.) We also want to share the fun with others and came up with the idea of hosting themed parties where guests would play the roll of adventurers who have gathered to solve a mystery. Thus, a DEMS has emerged.
We have gotten off to a good start on the decoration of the home and have progressed to the point where it is necessary to start devising the technology that would support the experience. My natural inclination is to focus on the inventing and construction of technology, not so much on the user experience. Building a secret door is a fun project, but how is it opened? What will clue guests into finding the hidden lever to reveal the secret? This is what my Cycle projects will focus on. To help sell the idea to the professor the following presentation was assembled.
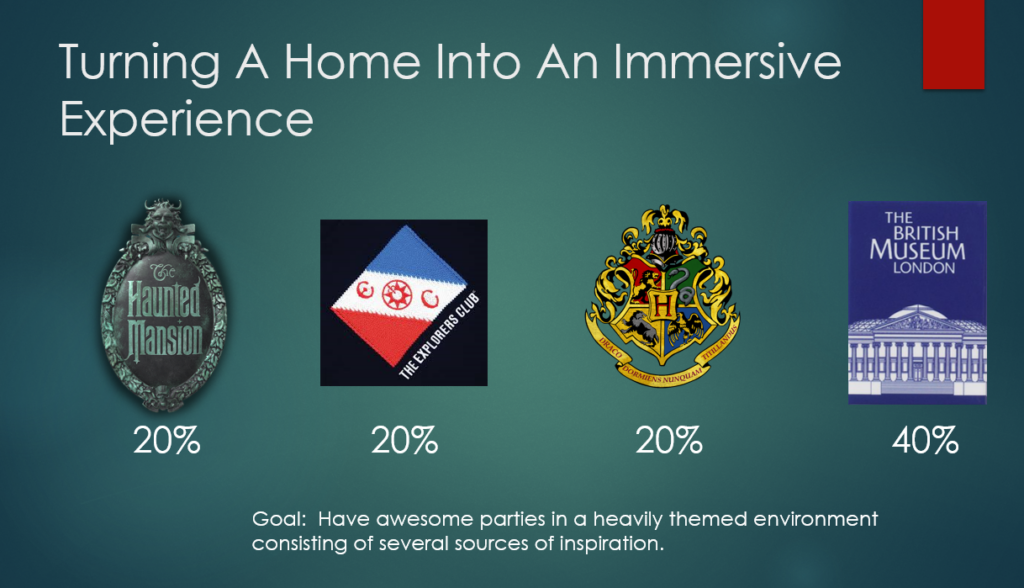
The key sources of inspiration are shown above. The goal is not to make a “haunted house”, but to live in a house that may or may not be haunted. Disney’s Haunted Mansion provides an excellent guidepost, spooky without being gory. The Explorers Club provides examples of daring exploration and scientific endeavors. Take a look at the interior of their headquarters via an image search, that is a significant source of inspiration. Hogwarts provides many great ideas. Who doesn’t want to receive an awesome letter in the mail telling them they have been selected to join a secret club!? Finlay, the British Museum. Again, take a look at some images of this place. Do we want a giant whale skeleton hanging form the ceiling? Yes. Yes we most certainly do.

We also found inspiration for the narrative part of the experience in a variety of places, shown above. For many years the Disney parks have been incorporating elements of a “secret” society known as SEA, the Society of Explorers and Adventurers. The members of this society, and their activities, are woven into the narrative that connects many of the theme park rides. In particular Tokyo DisneaSEA, the crown jewel of the Disney parks, goes all in on their story. SEA is a rabbit hole I invite you to go down.
Prior to its retirement we spent many, many hours at COSI exploring there exhibit “Adventure into the Valley of the Unknown.” There guests took on the role of adventurers exploring the ruins of a lost civilization. By solving puzzles guests would interact with the exhibit, ultimately revealing the truth behind the mysterious disappearance of the lost culture. It was truly a one of a kind experience and I invite you to take a internet peak into its past glory. (Shame on you COSI for removing it!) We are trying to make our home the spiritual successor of “Adventure.”
Finally there is NADIA Secret of Blue Water, a 90s Japanese Anime set in a alternate earth heavily inspired by the writings of Jules Vern. It has all the Victorian inspired fantastic technology one could ask for. Flying machines, incredible submarines, and a classic good vs. evil story. It is not a show for children as the plot takes many dark turns. I provides an excellent example of how to combine whimsy with serious themes and content.
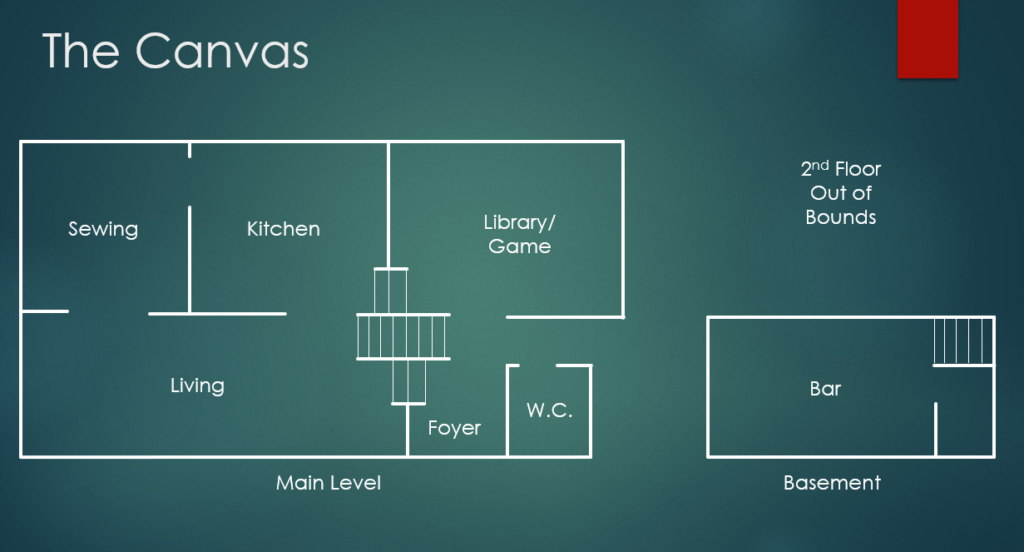
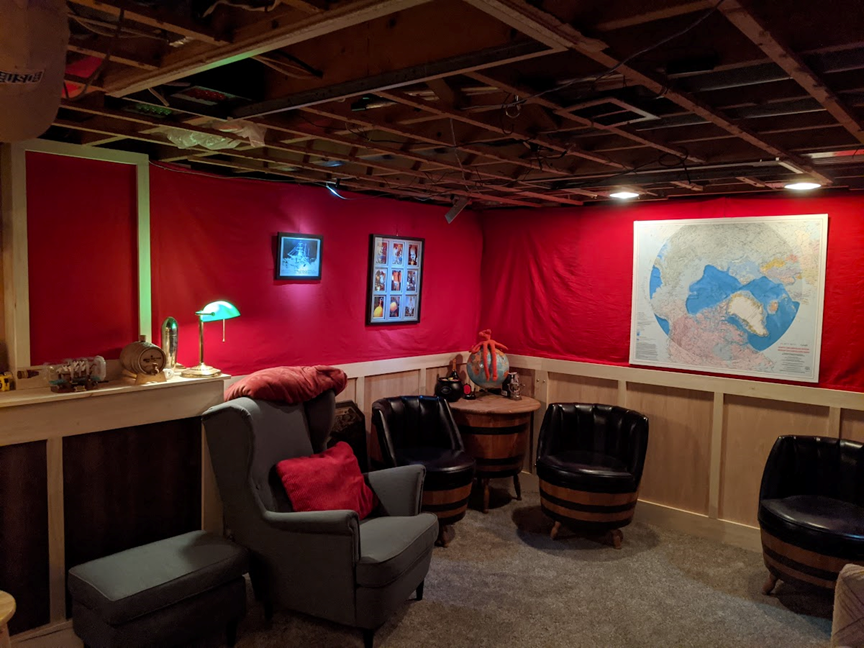
Our home is a 60/70s split level. Why they felt it was a good idea to require navigating several steps to get anywhere is still beyond us. The upstairs has the bedrooms that are out of bounds, and the basement is split in half, part for laundry and utilities, the other is a bar (yes there are themed cocktails). The bulk of the home is on one level with the foyer and library several steps lower in elevation.
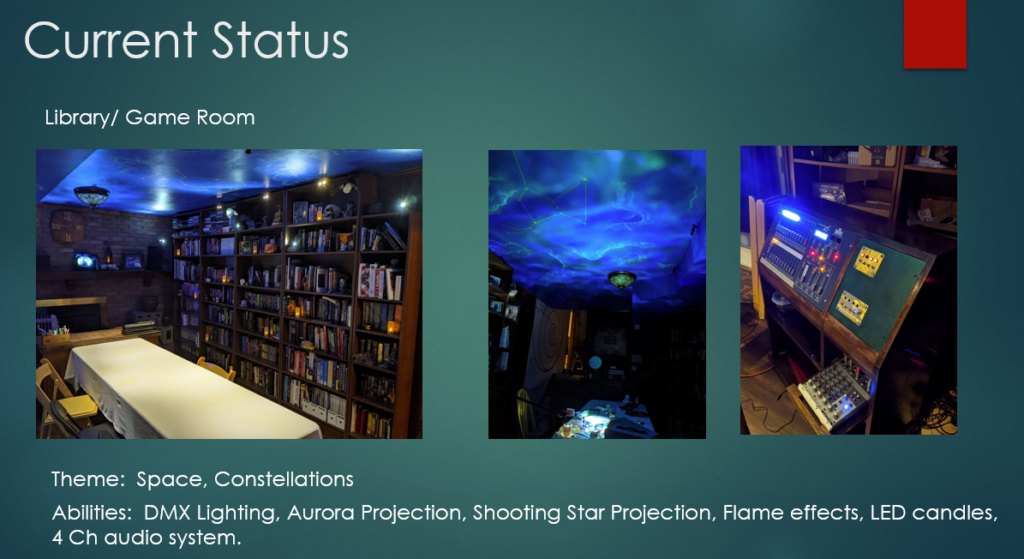
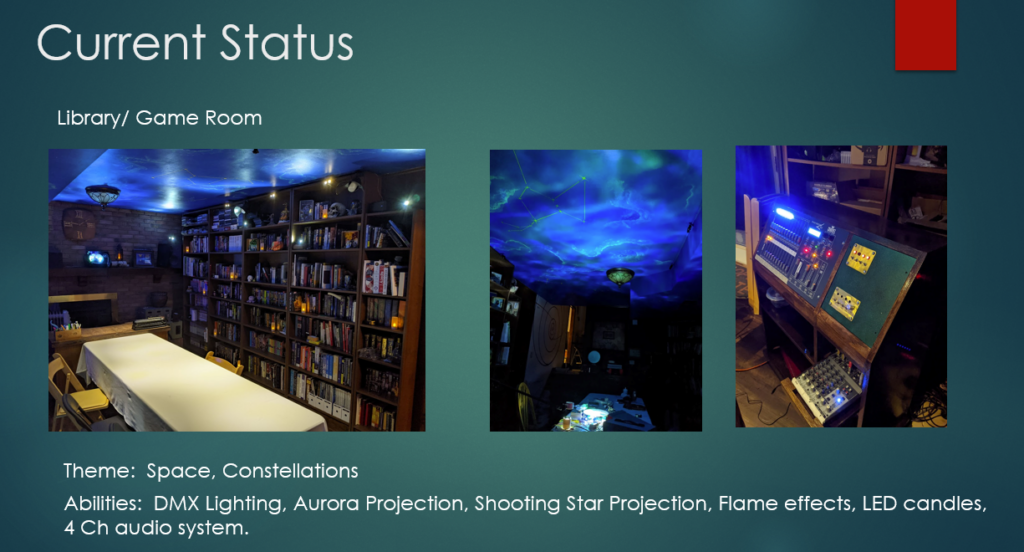
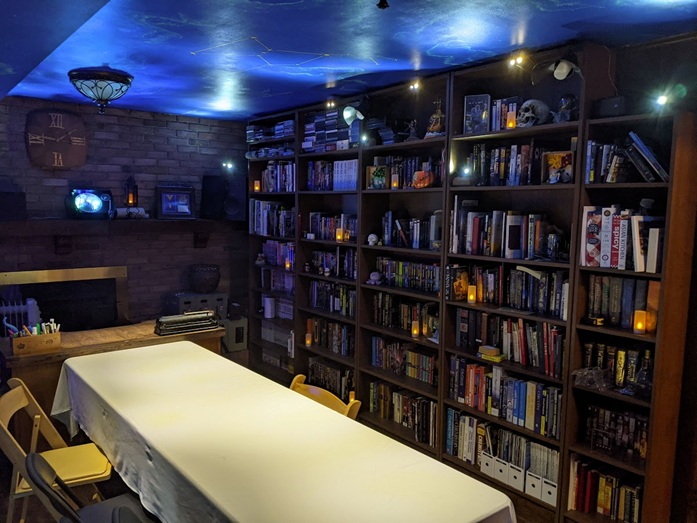
The crown jewel of the home is the library. Containing thousands of books it is our pride and joy. It also the room where we host D&D tabletop RPG games. To aid in creating an awesome environment for such games the room has been given several unusual abilities. First, the ceiling is a star chart covered with wispy nebula’s and constellations. By manipulating a control panel the lightning in the room can be adjusted to highlight the table, the ceiling, or a variety of lighting effects. There is an aurora projector to illuminate the ceiling with moving waves of light, there is a shooting star that randomly dashes across the ceiling, and there are flame effect lights that can make the room appear as if lit by firelight.
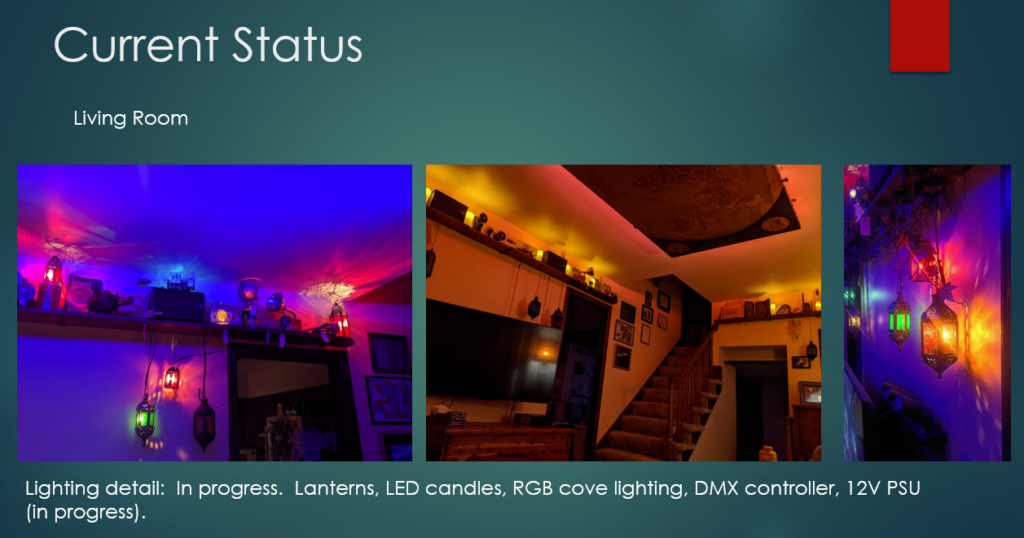
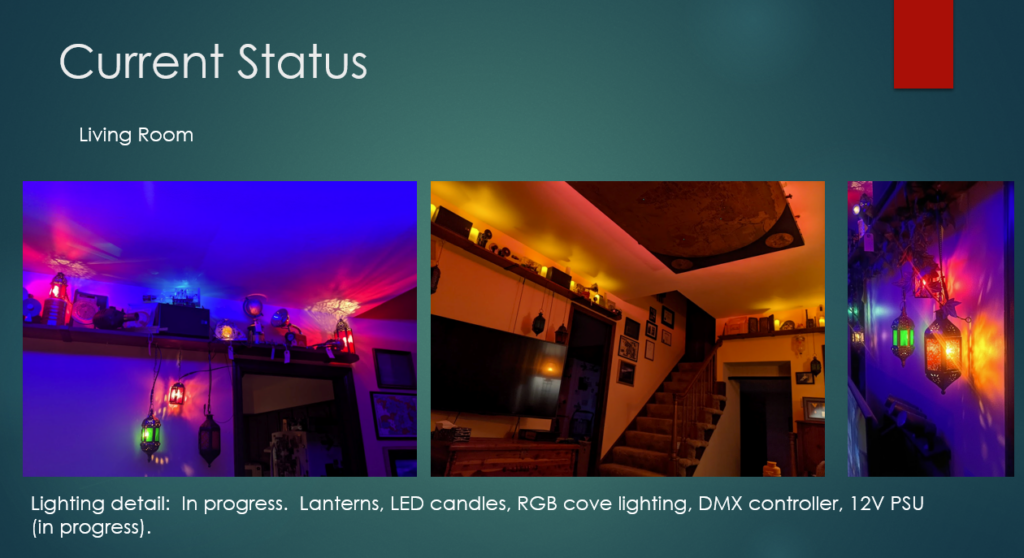
The living room is another work in progress. It has two modes, living and party. When its time to be fancy the regular table lamps are turned off and the DMX lighting system is turned on. The room is lit from recessed RGB LED hidden behind a map suspended form the ceiling. The room is surrounded with stained glass lanterns that light up. The room can be many colors, but I tend to like the blue look, it helps the lanterns pop. A shelf surrounds the room just below the ceiling that holds many :objects of interest”, perhaps a few hold secrets to discover?
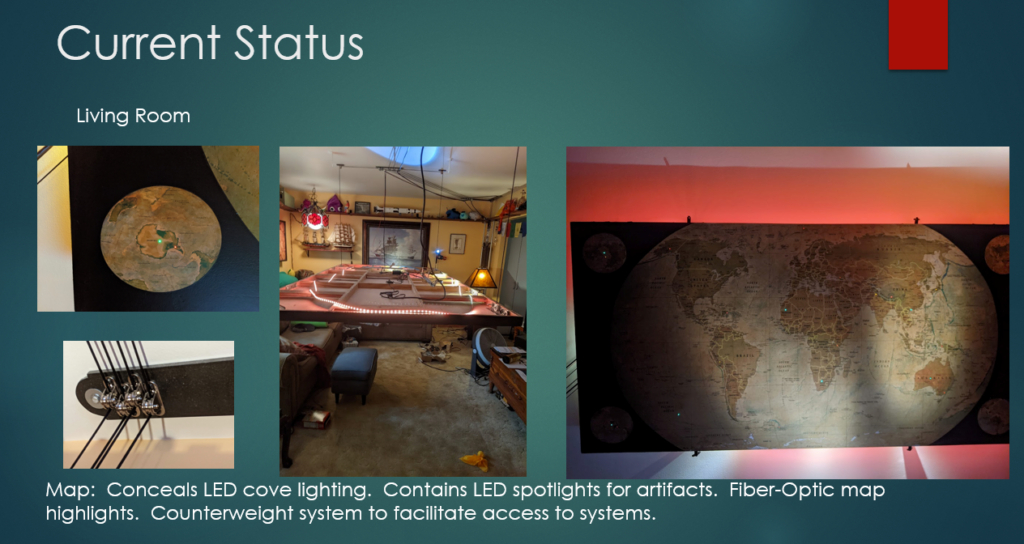
The stand out feature of the living room is the map on the ceiling. It conceals the LED lighting for the room and also has some hidden features. Embedded into the rear of the map are tiny fiber-optic filaments that poke through the map, they are invisible until turned on. When activated the fibers, through a variety of colors, highlight various natural and man-made areas of interest on the map. A more complex interface for these fibers is planed, allowing guests to manipulate the map and its secrets. A fun party trick is the counterweight system that allows the map to lower from the ceiling, allowing for access to the tech on the backside.

With all of this laid out it was time to turn it all into Cycle projects. I am writing this after posting Cycles 1-2, and can say in hindsight that much of this planing was tossed aside. However, putting together this document was instrumental in guiding what would become my cycle projects. Please look for my other posts to see how all of this evolved through the semester of ACCAD 5301.
Cycle 2
Posted: December 9, 2025 Filed under: Uncategorized Leave a comment »Exploring the “D” in DEMS.
For Cycle 2 I wanted to take some of the lessons learned from Cycle 1 and further develop them. (My Cycle 1 is the “Order of the Veiled Compass” project) My tendency is to focus on the building and engineering of projects and less so on the “devising”, this was an opportunity to take a deeper dive in to the part of DEMS I typically spend the least time on. My presentation was a simple PowerPoint slide show that explored how people interact with technology, not exactly riveting website material, so this post will present the information is , hopefully, a more interesting manner. The original presentation can be found here https://docs.google.com/presentation/d/1qVqp1khbiujVJ4hC5ohTrTZNLGGDL-AK/edit?usp=drive_link&ouid=106949091808183906482&rtpof=true&sd=true
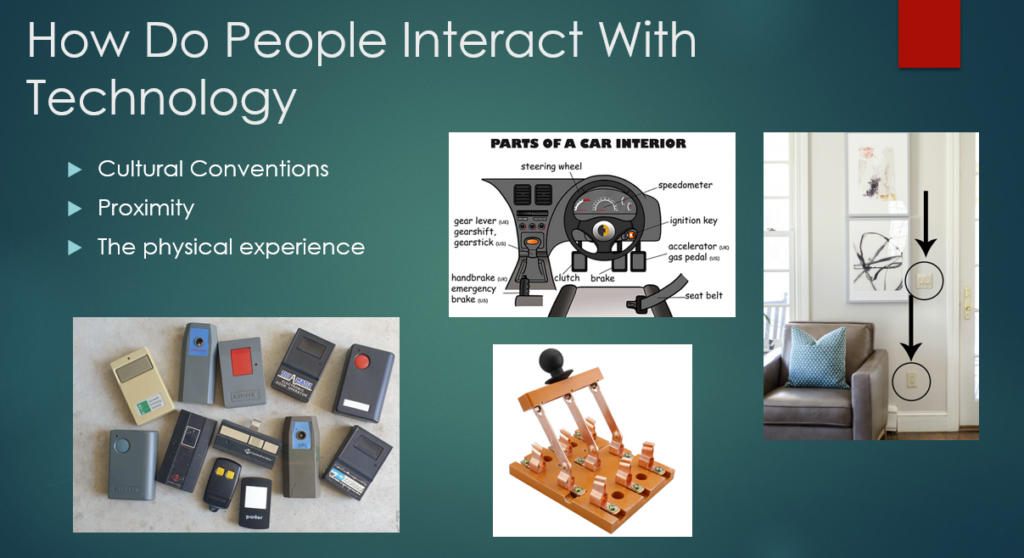
How do people interact with technology in both everyday life and in regards to an Experiential Media System? I identified what I believe are three key factors to our interactions, Cultural Conventions, Proximity, and the Physical Experience.
Since this post is on a website I can make several inferences about you (the reader). First, you have access to electricity and an internet connection. You can be anywhere on the earth, assuming you are indoors and there is a light switch, that switch is located within a foot or so of the doorway. If you have been a passenger in some sort of vehicle, that machine had a break peddle on the left and an accelerator on the right, with some type of switch within easy reach of the steering mechanism to activate turn signals. Cars, busses, trucks, etc… all share a similar technical language. An argument can certainly be made that many of these conventions are the result of Edison Electric, Westinghouse, and similar companies developing these technologies and distributing them, but the road to the present day is not as straight forward as it seams.

For example, I am 99.9999% confident that you can not drive a Model-T Ford. Looking at the above photo there are many familiar controls (assuming you can drive a stick). With the exception of the steering wheel and the gear shift lever, almost none of the familiar looking controls do what you think they do. It took awhile, but eventually the automakers of the world settled on a control layout that allows anyone who knows how to drive a car drive almost all other cars.
The key take away form all of this is that we are all conditioned to expect certain technologies to work is specific ways. Lights are turned on by a stitch by the door or a switch on the light itself. All cars have an accelerator and a break. None of us need a manual to use a faucet or garden hose, regardless of where on earth we find one. Any sink with a garbage disposal will have a control switch within a few feet of it.
We interact with technology is variety of ways, for this project I focused mainly on touch. Advances in machine vision and hearing have made it possible to interact with devices via gesture and our voice, but that is a conversation for a different day.
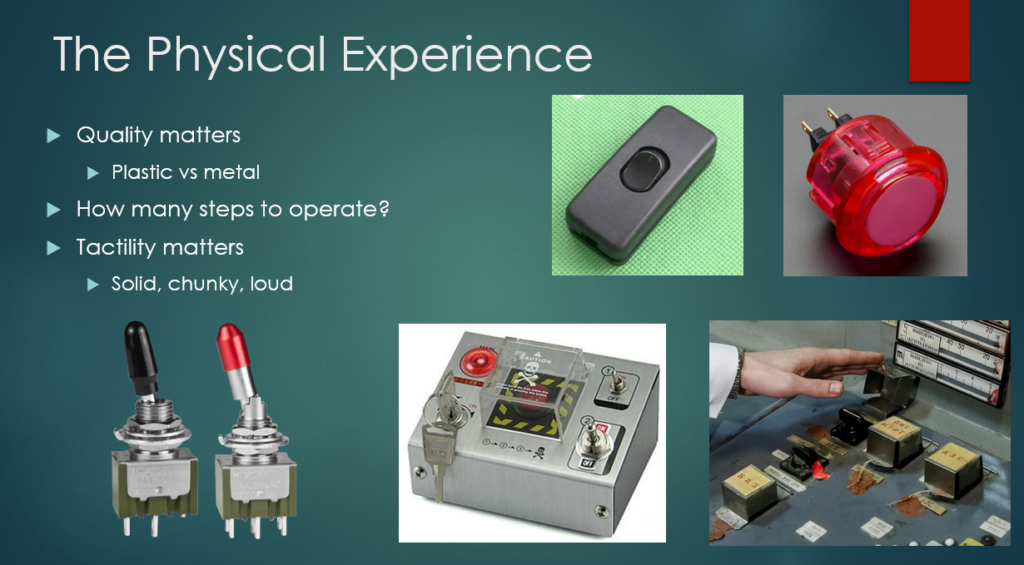
I wanted to take a closer look into what makes a physical interaction with technology a good one. This is personal preference of course, but I am confident that there are certain aspects we can all agree upon. One is that quality matters. Imagine you press a button on a vending machine or arcade game and its a plastic piece of junk that rattles, if it lights up it probably flickers, and it makes you press it several times to be sure it did something; that’s not the best interaction with technology. Compare that to a nice solid metal toggle switch, even better if that switch has some type of safety cover on it! I don’t want to go through the steps of launching a missile to make a pot of coffee, but I do appreciate solid feeling controls on the coffee maker.
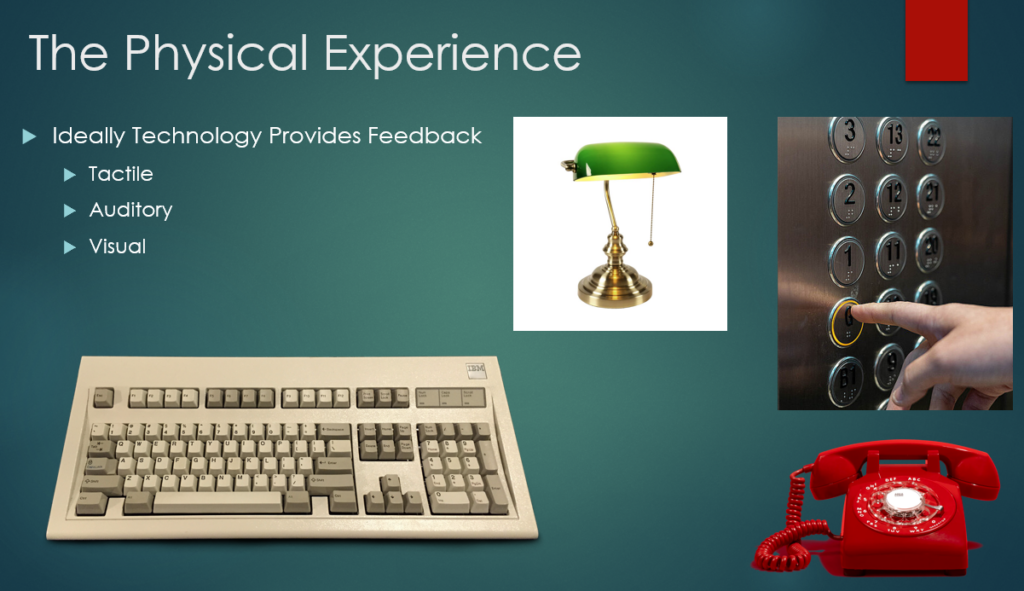
Feedback is a critical component to the physical experience. A doorbell is an excellent example of a system with ambiguous feedback. You press the doorbell. Did it work and nobody is home? Did the doorbell not ring? Unless you are inside to hear it there is no indication that it worked or not, which is frustrating. It can be very frustrating when technology doesn’t let the user know that it is working. Imagine an elevator that didn’t indicate which floor it was going to, or a telephone that was perfectly silent until answered, those would be horrible user experiences!
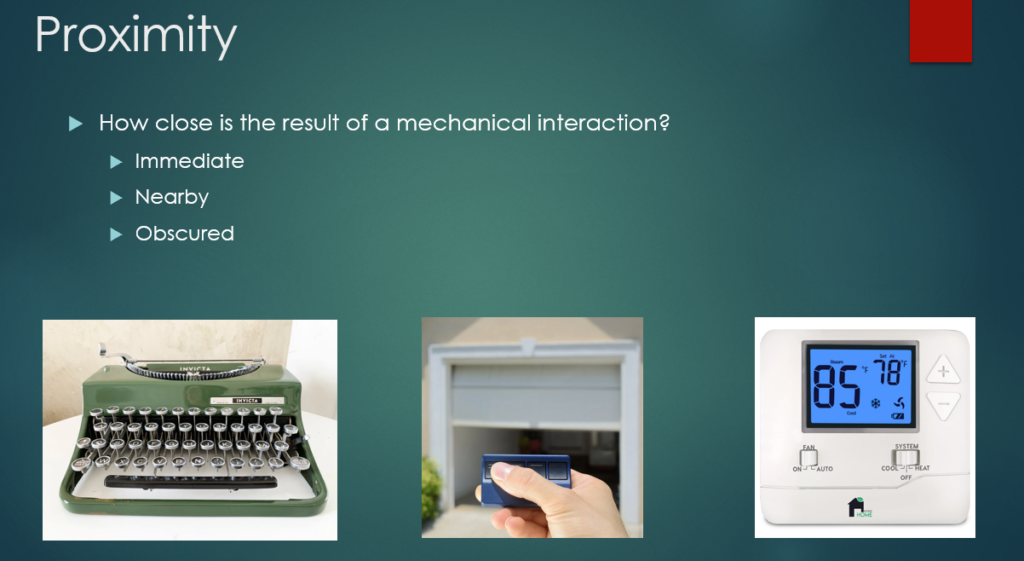
Of particular interest to me and my home DEMS project, is the idea of proximity. When a user interacts with a piece of technology, how far away is the response? Is it at the users fingertips like with a typewriter, or is the action completely obscured form the user such as a furnace controlled by a remote thermostat? Perhaps is a middle ground, remote but visible, like a garage door opener.
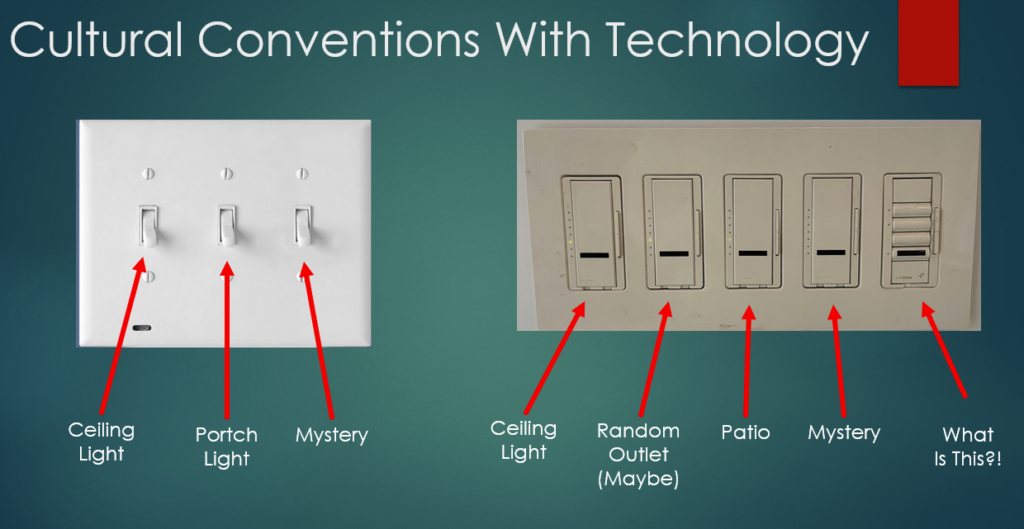
Building upon the idea of cultural expectations for technology, the concept of proximity helps us further describe our interactions with tech. Light switches are usually found near doorways. We enter a room, find the switch, and the light turns on. This is an example of close proximity, it is immediately obvious that the action of the user caused the technology to respond. Many of us have experienced the frustration that arises when the proximity has been increased. I know in my house there are several light switches whose function remains a mystery. My action of flipping the switch is not rewarded with a response that is immediately visible.
Lights are an example of a common piece of tech that we are accustomed to having close proximity to. The same is true with doors, television remotes, hand tools, etc… HVAC technology is usually hidden out of sight. When we adjust the thermostat the machines come to life but they are often out of sight and provide no indication that they are functioning.
All of this and DEMS.
The goal of all this is to help Devise an experiential media system. By having an understanding of the rules we all play by when it comes to technology, we can begin to play with the rules. For example, what if a light switch played a honking sound when flipped instead of turning on a light? Or what would someone do if they turned a doorknob and a door several feet away opened instead? By taking the ideas of cultural expectations, the physical experience, and proximity and playing with expectations, many new possibilities emerge.
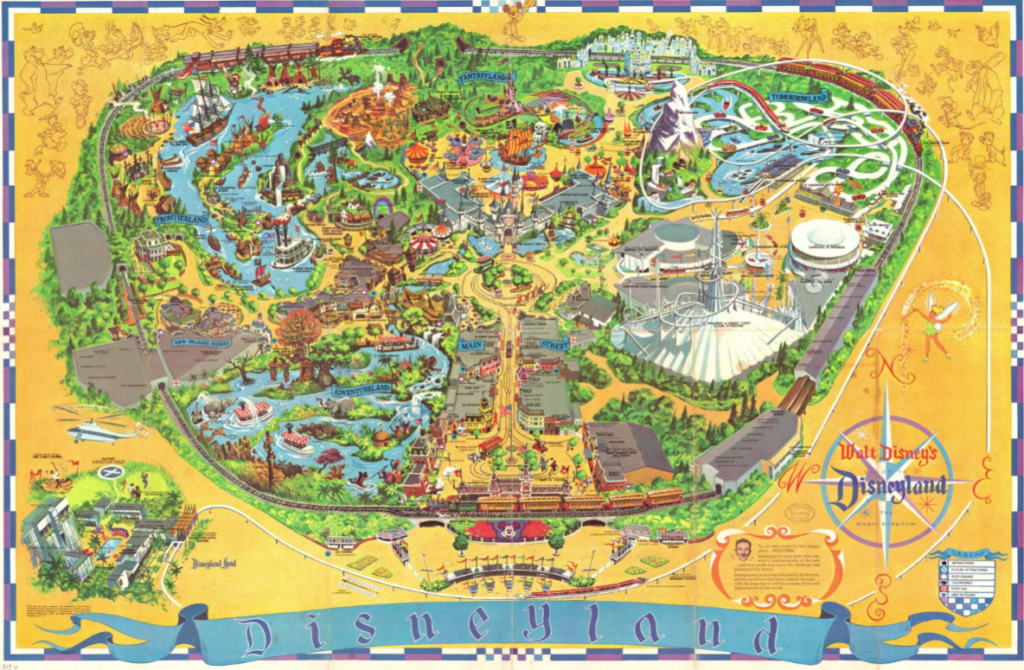
I can think of no greater example of this that the creation of Disneyland in 1955. The gates opened on July 17 and the world of immersive entertainment changed forever. (The opening day was an absolute disaster and I encourage you to read about it!) Guests were presented with technology and experiences that didn’t exist before, the rules had rewritten.
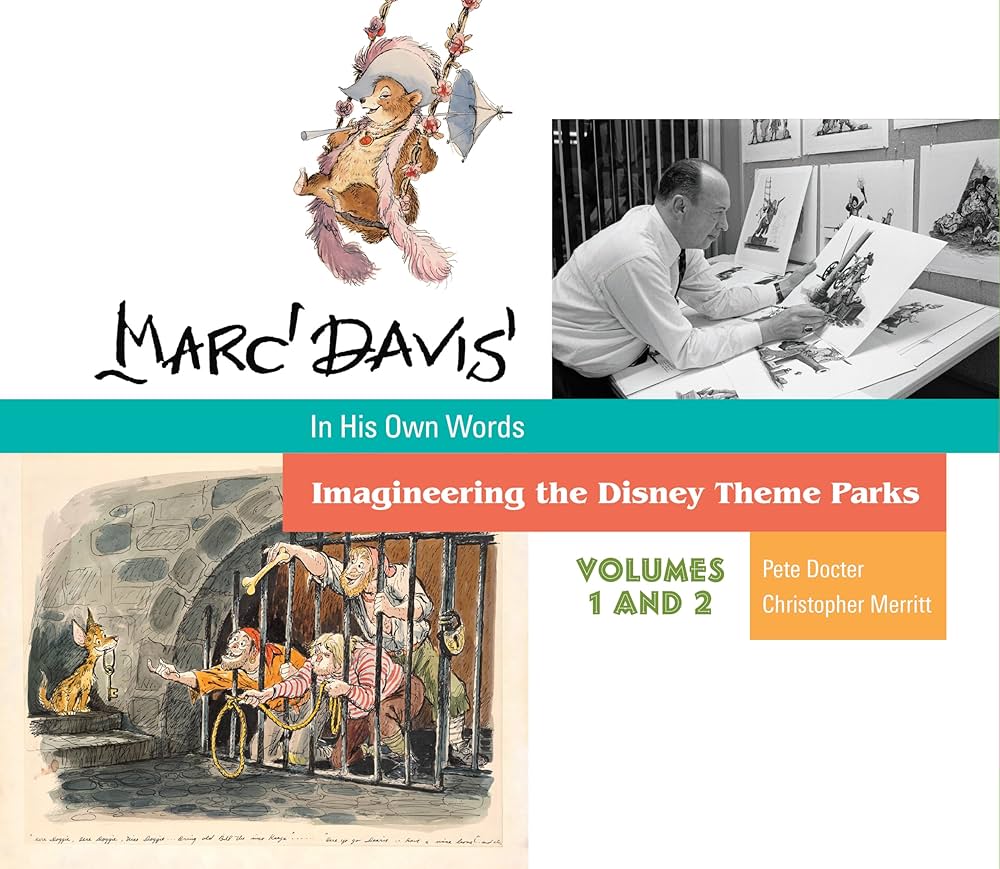
The above set of books served as a fascinating guide to the design and implementation of many attractions of the Disney parks and the 1964 Worlds Fair in New York. The goal was to sell tickets of course, but the means was by creating unique experiences that the world had never seen before. This required the invention of new technologies and concepts. One of the key problems to solve was how to get as many people as possible through the attractions as quickly as possible while also ensuring they had a good time.
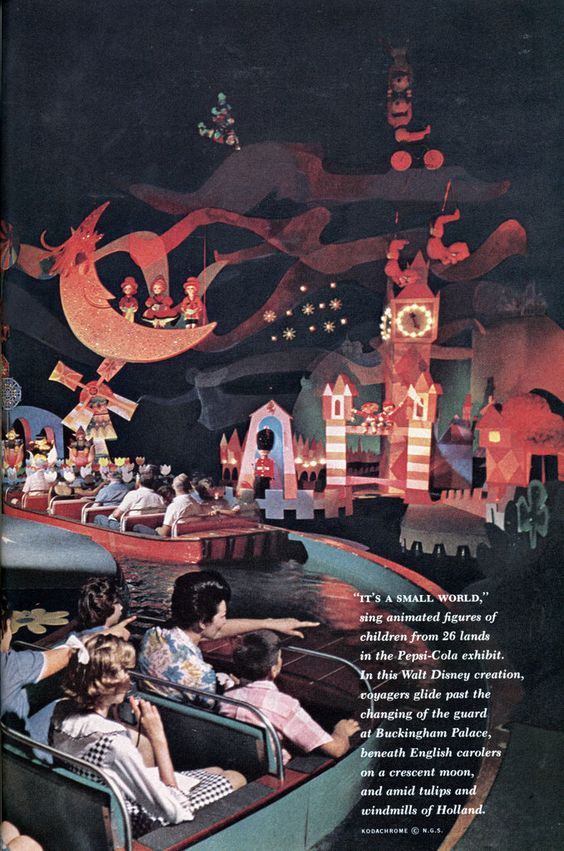
Above is “It’s a Small World” from the 1964 Worlds Fair. The ride was designed and built for the Pepsi pavilion and featured small boats for guests to ride. This allowed for a large number of people to be cycled through the attraction at a steady pace.

A better example of how technology and proximity come together is in the Jungle Cruise ride. Above is a piece of concept art for the ride by Mark Davis. The Disney team had to figure out how to tell a narrative as quickly as possible without letting the guests actually interact with anything. Guests must “keep their hands and arms inside the ride at all times” to protect them, and the attractions, from harm. By necessity the tactile experience is removed and the proximity is fixed at a middle distance. Guests also only have a few moments to observe the various scenes before they move past them. By limiting the “scenes” to simple motions and exaggerated behaviors it was possible for riders to “get” the visual gag being shown to them.

In theme parks, shrinking the proximity of the attraction to the guests can have an extreme impact. Above is the Yeti from the Expedition Everest ride at Disney’s Animal Kingdom in Orlando. It is one of the largest animations ever made, over 25′ tall, and goes from remote proximity to uncomfortably close very quickly. Anamatronics were commonplace by the time this ride came to be, they were often of the mostly static variety as seen on the Jungle Cruise or the Haunted Mansion. Here designers used proximity to terrify people. As the riders raced past the yeti on a roller coaster the enormous machine would lunge and swipe at the riders, just barley missing them (from the riders perspective). This never before seen behavior terrified people and was a huge success! Unfortunately the technology at the time was not up to the task and the animatronic has been mostly static for years due to maintenance issues.
Historic DEMS
Another source of inspiration for Cycle 2 was the work, “Stained Glass” by Sonia Hilliday and Laure Lushington. They explore the history and styles of stained glass through the ages focusing mainly on Christian cathedrals. Disney may have invented theme park, but perhaps it was the church that created DEMS? (What counts as the first DEMS is certainly up for debate, but here I will cherry pick the cathedrals as a prime example of a DEMS.)
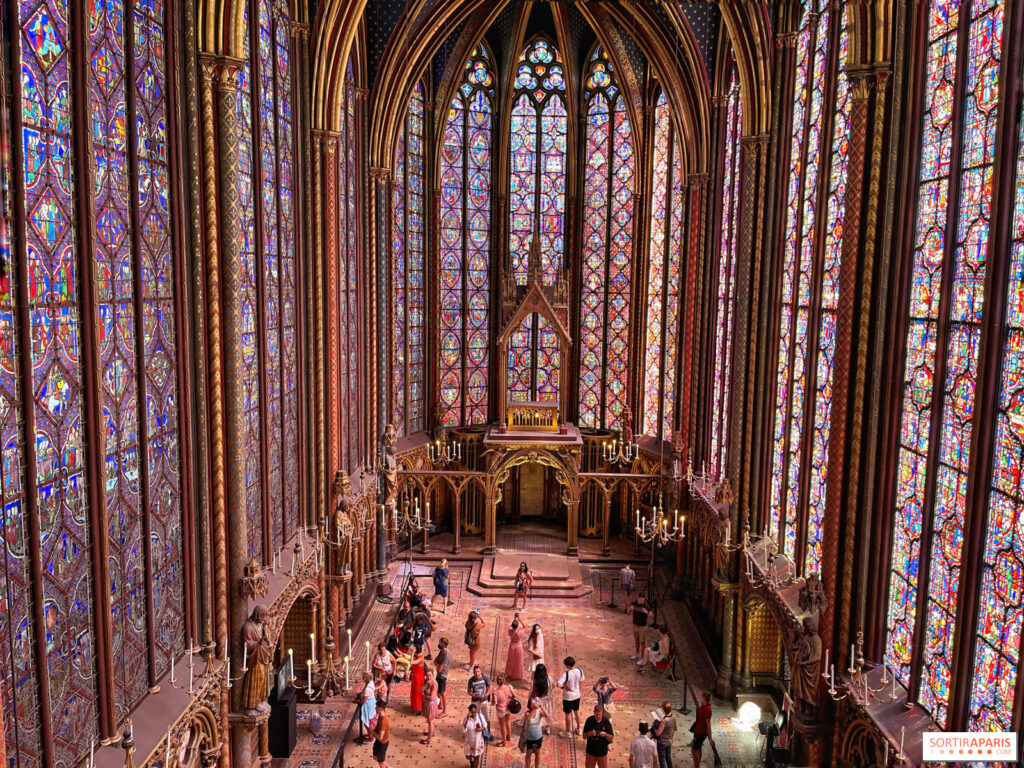
Above is Sainte-Chapelle in Paris, built 1241-1248. This is an outstanding example of a DEMS that takes into consideration proximity, the tactile experience, and cultural expectations. But first a little stage setting. Imagine you are visiting Paris in the 13th century, you have no idea what electricity is, or anything about technology more complex than a shovel, and you walk into that cathedral. It is the technological equivalent to a modern US Navy super-carrier. Every detail has been thought about and addressed. The smell of incense lingers in the air, a choir sings from an alcove, and everywhere is brilliant light. I imagine the experience would be like being hit with a metaphorical sledge hammer.

The physical experience is top notch in every respect. There are no cheap materials in this place, everything is solid wood, iron, and stone. The cultural part of the interaction is immense but I will not dive into that here. But what about proximity? Perhaps we are well to do and can get seats close to the altar for mass, the less well off sit further away. The monks and sisters are cloistered behind screens, preventing us from getting too close. What are we trying to gain proximity to in the first place? Proximity to the divine is the goal here. By utilizing the senses and cultural expectations the cathedral brings us closer to heaven. Proximity is not limited to physical distance in a DEMS.

Lets take a U-turn from the DEMS of the cathedral and visit medieval Kyoto, Japan. Above is Saihoji Temple, also known as the moss temple. Sophie Walker writes about such places in her excellent work, “The Japanese Garden.” If you ever want to write a book about Japanese gardens there is a rule you need to follow. For every one page about plants and the act of gardening, you must first write 40 pages about the human condition and its history.
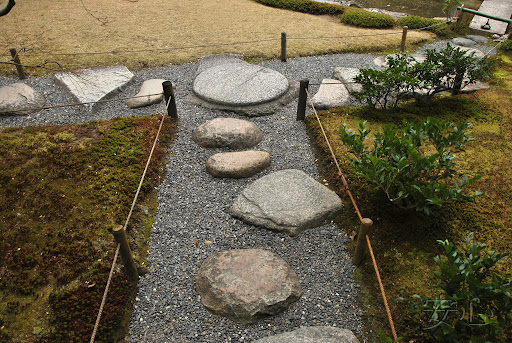
What looks like a natural arrangement of plants and rocks, is actually a meticulously crafted DEMS. Every aspect of a Japanese garden has been done with great care and thought. Every rock, every plant, or absence of plants, has been painstakingly planed out and executed with the upmost care. Like the cathedral the physical experience is top notch, all natural in this case, but we can expect stone and untreated wood in addition to the plants. The technology in the garden is hidden and deceptive. Below is a prime example of this. We see a simple path. Like the lights switch we all know how to step from stone to stone, but take a closer look. The stones are of uneven size and shape and do not lie in a straight line. To keep from tripping guests must walk slowly with care, paying careful attention to their footing. However, in the intersection there is a much larger flat stone. The designer of this path deliberately placed every stone knowing that when the guest got to the flat spot they would stop and take a better look at their surroundings. If there is a “best place” to view this area of the garden, it is form that stone. Using proximity and the careful control of what a guest can see and what is obscured is the technology at play here.
Another important concept from the Japanese garden is the simple technology of a gate. A gate is a physical barrier that dictates our access to something. Below we can see a garden path with a gate preventing access to what I presume is a tea house. Lets abstract the idea of a gate to a more metaphorical idea, lets think of gates as thresholds or transitions. In the garden, gates, either real or implied, are opportunities to transition our thoughts and emotions. The cultural purpose of these gates is to reduce our proximity to zero, we are invited to engage in self reflection. In the image below the idea is that to pass the threshold, here represented by a physical gate, the guest must leave something behind. It could be some worry, worldly desire, etc… The technology is extremely subtle, but equal in power to the cathedral.

It’s time to bring all of this together into a ACCAD5301 DEMS project.
A brief recap of Cycle 1 is in order here. My project is built around inviting guests into my home to enjoy a party. Please see my Cycle 1 project for the details. Guests arrive at the party with a clue in hand and an expectation that the event is going to be a little unusual. The intention is that each guest, or pair of guests, arrives at a specific time in order to get the full experience as intended. They ring the door bell and are welcomed into the house, which is where the fun begins.
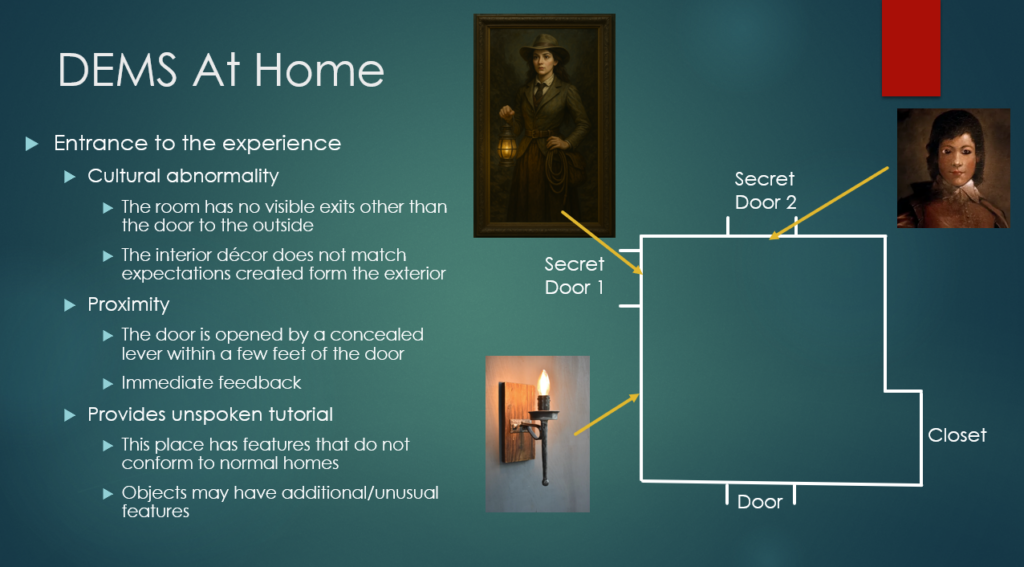
Right away I am taking the rules about how we expect technology to work and are bending them. The guests enter a room that has only one door, the entrance they came in through. A house is a technology, one that usually has more than a foyer, but that cultural norm has been broken here. Right away the guests are confronted with the reality that this place is unusual.
I do not like the idea of having hidden cameras in my home, so I will not have any. However it is still necessary to observe how the guests are managing the challenge of leaving the room. On one of the walls there is a painting of someone that has several secrets. First, the wall it is on is also a hidden door, but one that the guests are unable to open form where they are. Second, on the other side of the wall a small flap can be opened allowing someone to look through the eyes of the person in the painting. Again, this is giving a technology (the painting) properties that it shouldn’t have.
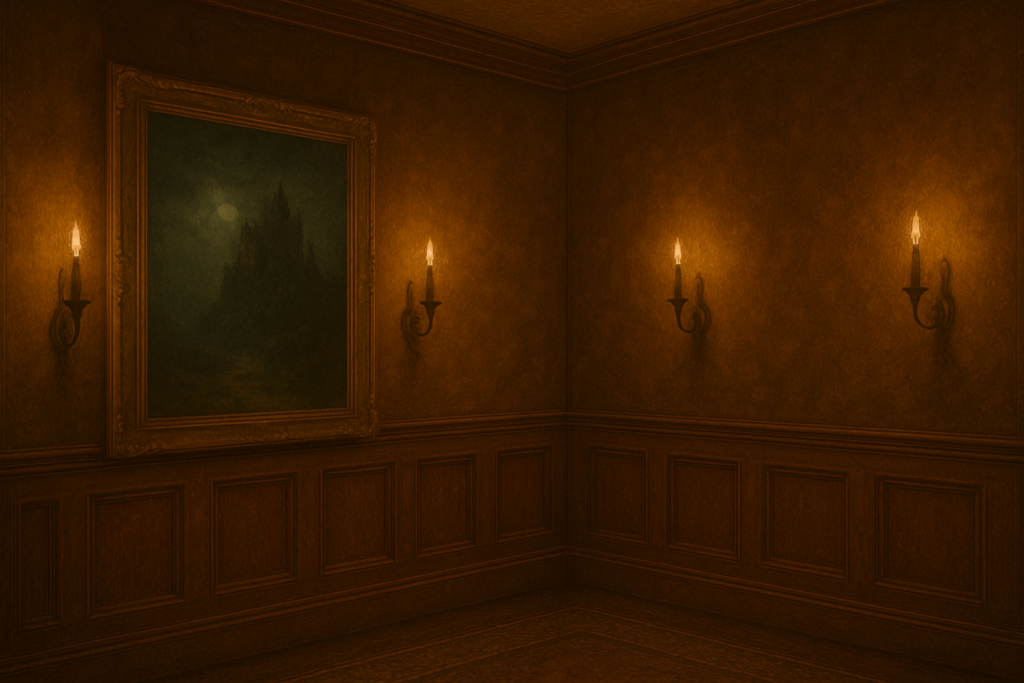
Above is a ChatGPT attempt at the room I am talking about. There are no obvious doors to leave through. However, there are several wall sconces! By solving the puzzle contained in the invitation the guests should be able to figure out that by manipulating one of the sconces the large painting (and the wall it’s on) moves asides providing access to the rest of the home.
Proximity is very important here. Guests need to learn that in this environment there are hidden mechanisms, and that objects may be capable of doing unusual things. When they perform an action the corresponding effect must be obvious. Here the act of manipulating a secret lever opens a door a few feet away, the connection is obvious. The guests should now be suspicious of every piece or art in the home!
The images above are a few examples of what the rest of the home currently looks like. I am the king of unfinished projects, and there is still much work to be done. Taking inspiration from the Japanese garden designers, the act of placing a door (threshold) separating the entrance to the home and the rest of the place, creates an opportunity to dramatically effect the guest experience. This is an opportunity for a WOW moment. The first room they encounter is lit by indirect lightning on the ceiling, I am partial to the blue look but it is capable of being other colors. The walls are lined with dozens of stained glass lanterns all glowing. There is a map of the world on the ceiling with various locations highlighted via hidden fiber-optic lights. Again, this is not normal for a home, which is exactly the point. This place doesn’t follow the normal culturally agreed upon rules.

The guests meet the host of the evening, the mysterious Curator. She welcomes the guests and gives them a brief tour. She also hands them a small envelop with another puzzle to solve inside. What the guests are not aware of yet is that the home has a basement which they are unable to access, there is another secret passage. They have been handed a clue that will lead them to the means to access the basement.
The exact puzzle is still being debated, but the first step is that the guest needs to find a key hidden in a secret compartment being a small piece of wall art. Again, this is not something that wall decor doesn’t normally do. The key itself is important. Anyone who finds a secret key to open a secret passage doesn’t want to have some ordinary house key! Oh no, that simply will not do here. The plan is to reward the guest by presenting them with something home made that is large, heavy, and ornate. The physical experience is a critical piece of this part of the DEMS.
This is where the difficulty ramps up a little. The key will have built into its design the clue as to where the lock is concealed. The example image above shows a skull key, perhaps the lock is hidden in the eye of a skull somewhere. Eventually the guest should be able to locate the hidden lock and manipulate it with the key. It is now time to increase the proximity of the action to the result. When the lock is turned, another painting slides away to reveal the access to the basement. (Yes, its the same trick as the first door, but the sliding panel takes up the least amount of space.) I want the result to be unsees from the guest. There needs to be some type of feedback to alert the guest that the lock worked, perhaps the skull could light up, or there is some type of sound that plays. There should be a little confusion though, the guest should want to look around to see what happened. When they look around they will eventually return to the library where there is now a new path to explore!
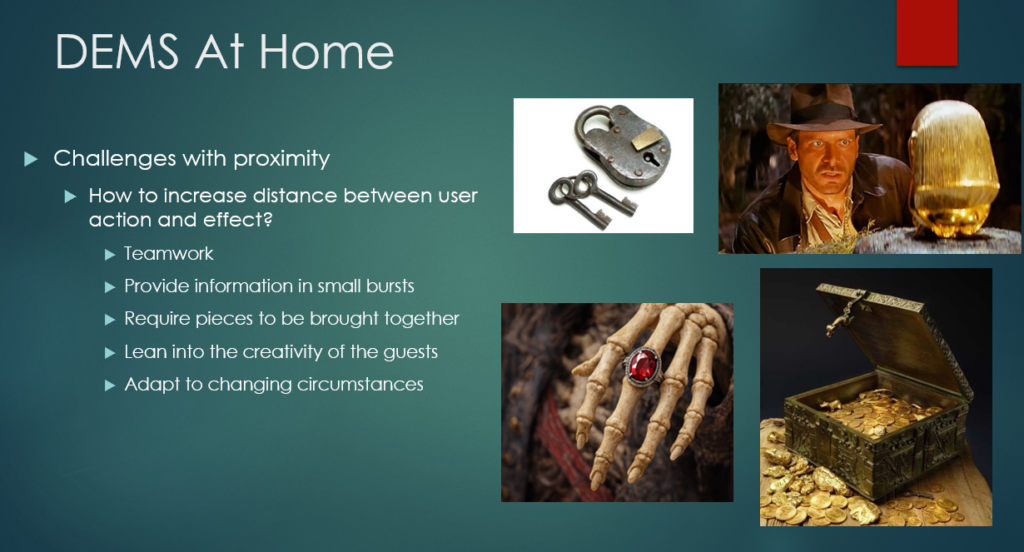
As the party progresses there will be more puzzles to solve. It will be necessary for the guests to work together to solve the mysteries, break the curses, etc… An exciting possibility arises when there are more people involved, the proximity of action to technological response can be increased. With more eyes on the look out for changes in the environment it becomes easier to bend even further the rules normally associated with technology.
I am particularly interested in puzzles that require pieces to be brought together to accomplish something. For example, suppose we have a locked treasure chest that has resisted all attempts to open. The chest arrived at the society with a letter mentioning a curse that must be broken before the treasure can be shared. Perhaps one of the guests has on them a ruby ring (they were supplied with this as part of their character) that has been in the family for generations and is said to have belonged to a famous pirate captain. Well what a coincidence, there just so happens to be a pirate skeleton in the library! (This is true, her name is Margret, and she has a fancy pirate hat.) Perhaps returning the ring to the hand of its rightful owner will break the curse?
The goal is to provide high quality props that have been given properties and abilities they shouldn’t have. By bringing these object closer together, or further apart, aka changing the proximity, something magical can happen. By intentional building in gates/thresholds, both of physical space and knowledge, it is possible to guide and manipulate guests in subtle ways that hopefully will lead to an enjoyable experience. It is a party after all.
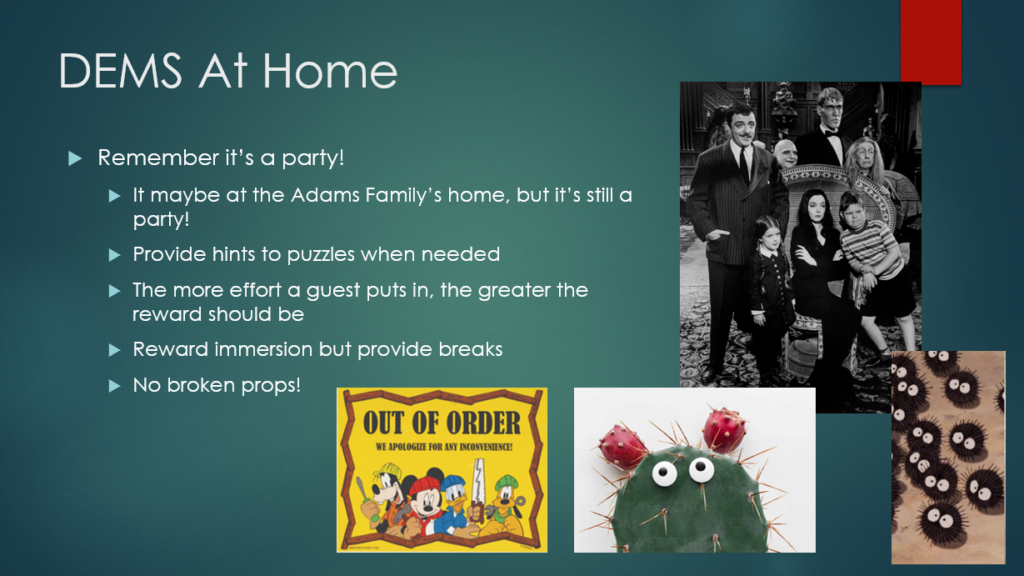
Everyone should have a good time. The point is not to punish people for not solving the puzzles, so hints should be given as needed. Similarly, broken props/tech should be removed. This is a quality DEMS! One that shouldn’t take itself too seriously, there is plenty of room for whimsy. There defiantly needs to be a giant carnivorous plant that chomps at people when they get too close!
Cycle 1
Posted: December 9, 2025 Filed under: Uncategorized Leave a comment »
Your adventure begins at the mailbox. You go to check your mail and find a large packing envelope inside addressed to you from an unfamiliar sender. Unlike the normal unexpected junk mail, this particular piece has been prepared with great care. The writing on the outside is in an elegant script and bears the mysterious symbol (above image). You take the envelope inside to open it.

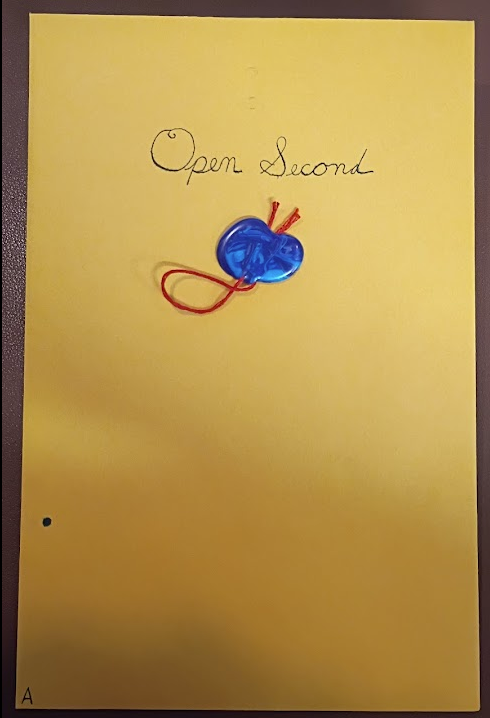
There are three smaller envelopes inside, the most striking is made of dark blue paper with gold trim bearing a wax seal. A plane manila envelope has “Open Second” on the outside and is also wax sealed. Lastly is a ordinary white envelop with “Open Third” written on the front. You open the blue envelope first. After breaking the seal a letter is revealed inside.

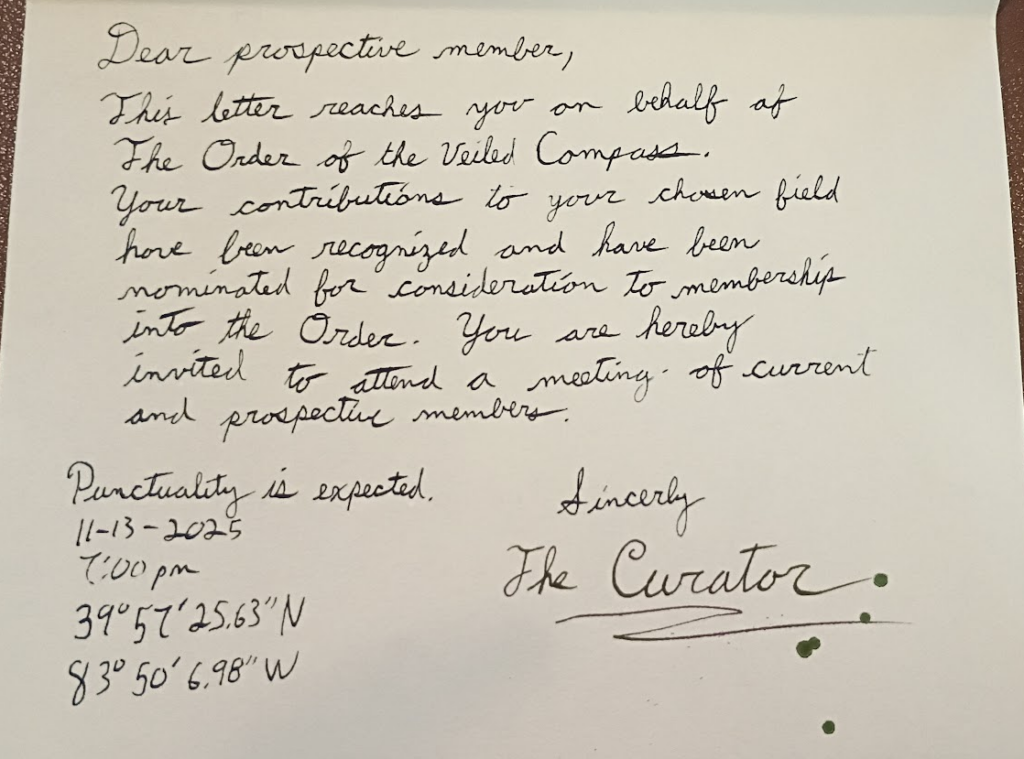
Someone named The Curator is inviting you to attend a gathering of fellow explorers and adventurers known as the Order of the Veiled Compass. There is no return address, only a set of geographic coordinates, a time, and a date. (There was a mistake made in the coordinates, they take you to a random field in Springfield, Ohio. Ooops.)
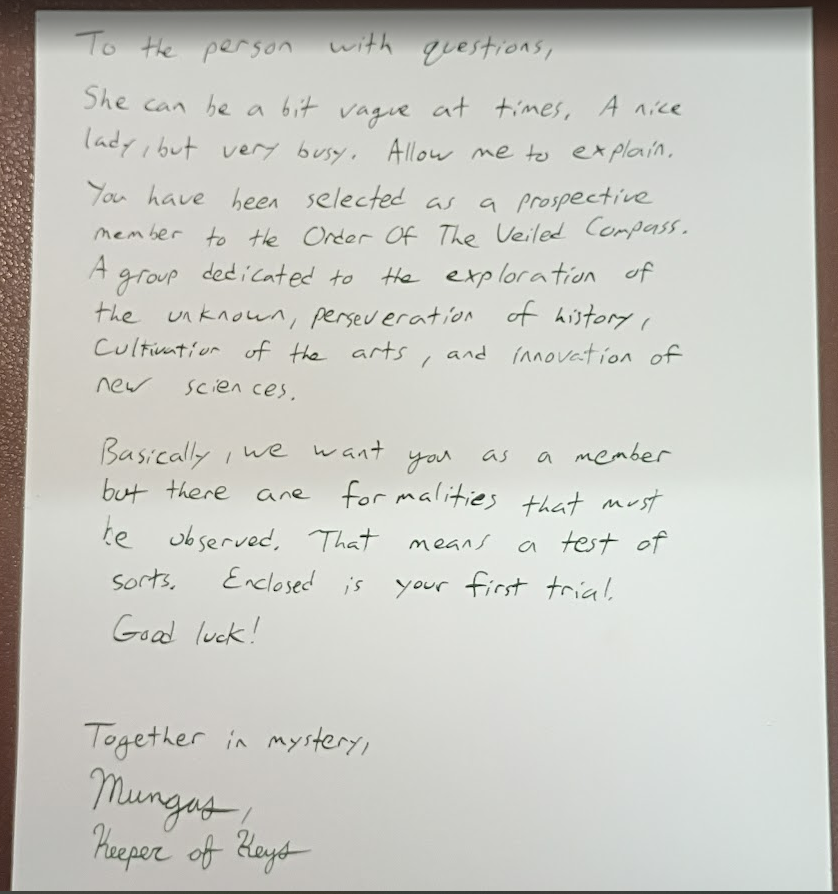
The second envelope contains a letter and a slip of paper covered in numbers. Someone calling themselves Mungas, the keeper of keys, provides a little more information about the society and that there are apparently some sort of tests involved.
Feeling a little confused you take another look at the first letter and notice small writing along the rear edge of the letter.

The second letter has a corresponding set of numbers. When placed next to each other the letters and markings line up to create a cypher.
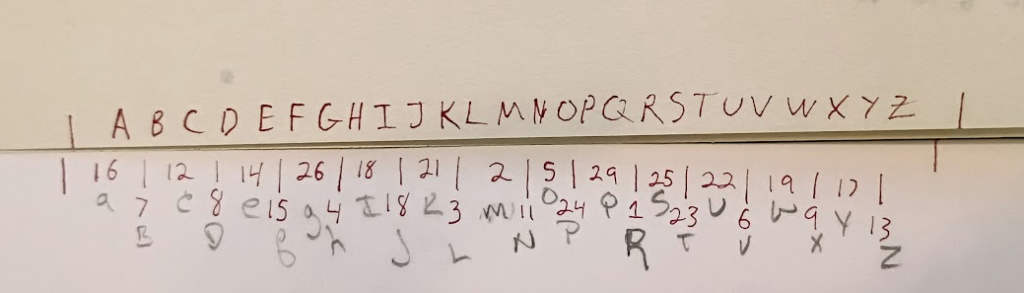
By combining the two letters and the slip of paper covered in letters, a message emerges.

With the puzzle solved you shift your attention to the third envelope. Inside is a printed message from the hosts of a party you are invited to. The letter explains that a themed party is being held and that you are instructed to create a character to play. The mysterious Curator has noticed the scientific, artistic, or adventurist activities of your character and has deemed them acceptable to join the Order of the Veiled Compass. A society dedicated to the discovery and preservation of the worlds arts, cultures, sciences, etc… The setting is an alternative Victorian history where the adventurous spirit of the age is highlighted while suppressing the ills of conquest and colonialism. The letter describes that is appropriate to explore and celebrate different cultures, but it is not acceptable to promote stereotypes or be disrespectful. Also, unlike the real Victorian settings, here there is room for magic, the occult, and other fantastic ideas. You are also given the address of where to go.
________________________________________________________________________________________________________________
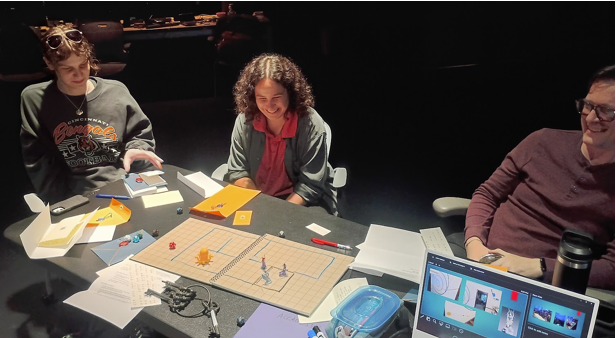
The experience described above tells the tale of what happened in the motion lab for my presentation of Cycle 1. The documents shown are prototypes for an immersive my wife and I have been creating in out home. Basically the two of us asked ourselves, “wouldn’t it be really neat to live in a scooby-doo house? Filled with secret passages, hidden treasures, and mysterious artifacts?” We have spent the past few years turning the interior of the house into a combination that is 20% Disney’s Haunted Mansion (the ride), 20% the Explorers Club, 20% Hogwarts, and 40% the British Museum London. It’s still very much a work in progress, but we have made significant progress. Below are a few photos of the place.

Not shown, but started, are the tracks and mechanisms that will support hidden doors that guests must figure out how to open. Guests must solve puzzles to gain access to various parts of the home. This was simulated in the motion lab by having the participants play a Dungeons & Dragons style RPG where they each moved their character around the house to solve several puzzles.
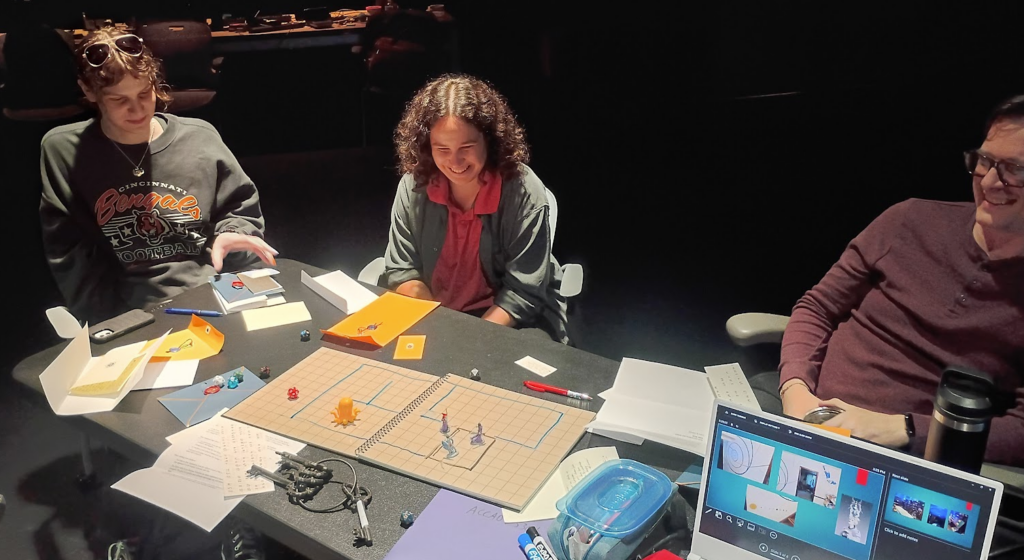
The presentation was both fun and insightful. Watching the “players” complete the puzzles and interact with the imaginary version of the house provided valuable insight into how the experience can be tuned to make the overall experience better. In particular the decoding puzzle in the letters needs work. The idea is sound, but the hidden message needs to be rethought to something more meaningful. The goal was that the secret message would tell the guests how to open the first secret door in the house. Much was lost in the translation from idea to the tabletop rpg, but it was clear that the future door opening mechanism and the message describing it need more thought.
Everyone had a good time and enjoyed the experience. It was a lot of fun to create the paper props that will act as the first experience guests have with the overall event.
Pressure Project 3
Posted: December 8, 2025 Filed under: Uncategorized Leave a comment »Make a MakeyMakey
Pressure Project 3 asked us to incorporate a MakeyMakey with Isadora to create something that a user could interact with via a non keyboard/mouse interface. I ran into a serious issue with the assignment as I did not have a MakeyMakey to work with! I was not in class the day they were handed out, and I didn’t have the ability to get one before the assignment was due. However, I am a freshly minted Electrical Engineer from OSU, so I decided to come up with an alternative.
First, lets talk about electricity. Electricity at it’s most basic is simply the movement of electrons from a source of high potential (voltage) to a lower potential (ground). (This is actually not entirely accurate and we can blame Ben Franklin for the error! But it works for our purposes.) The red arrow in the image below shows the flow electrons, also referred to as a current. The electrons with high charge want to get to ground, but there are a few things in their way. First is a resistor (the 1MΩ) which acts to resist the flow of electrons, they can’t move through it very fast. The 1M here is for 1 mega-ohm, a very large value for a resistor. The electrons do flow through the resistor but then run into a capacitor (the two parallel lines). A capacitor is a simple device, two metal plates that are very close to each other but not actually toughing. Here the electrons pile up on one side of the capacitor, they can’t actually get to ground. After a short moment enough electrons have made it through the resistor to cause the voltage at the capacitor to reach the same value as the power source. The key thing to know is that at rest the system is in a state where the voltage at the touch point is equal to that of the voltage source.
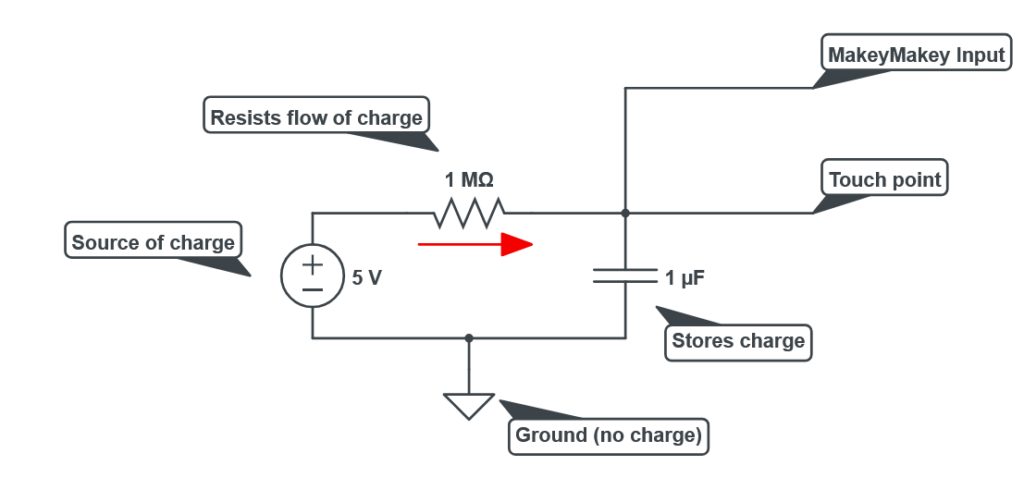
The MakeyMakey is constantly looking at the value of the voltage present on the charged side of the capacitor. But what if that voltage was to suddenly change? A sudden drop in voltage can be read by the MakeyMakey and recognized as a user input. Humans are good at carrying charge! When you shock yourself on a doorknob you are experiencing the transfer of charge from a high potential (you) to a lower potential (the door). The same thing happens here, when a person touches the wire connected to the MakeyMakey all the charge that was happily sitting in the capacitor suddenly sees a new place to go, into the user! All that charge rushes out of the system, and thanks to the resistor the power source can’t supply replacement electrons fast enough to maintain the voltage on the capacitor. Thus the MakeyMakey recognizes a voltage drop and triggers its output into the connected computer.
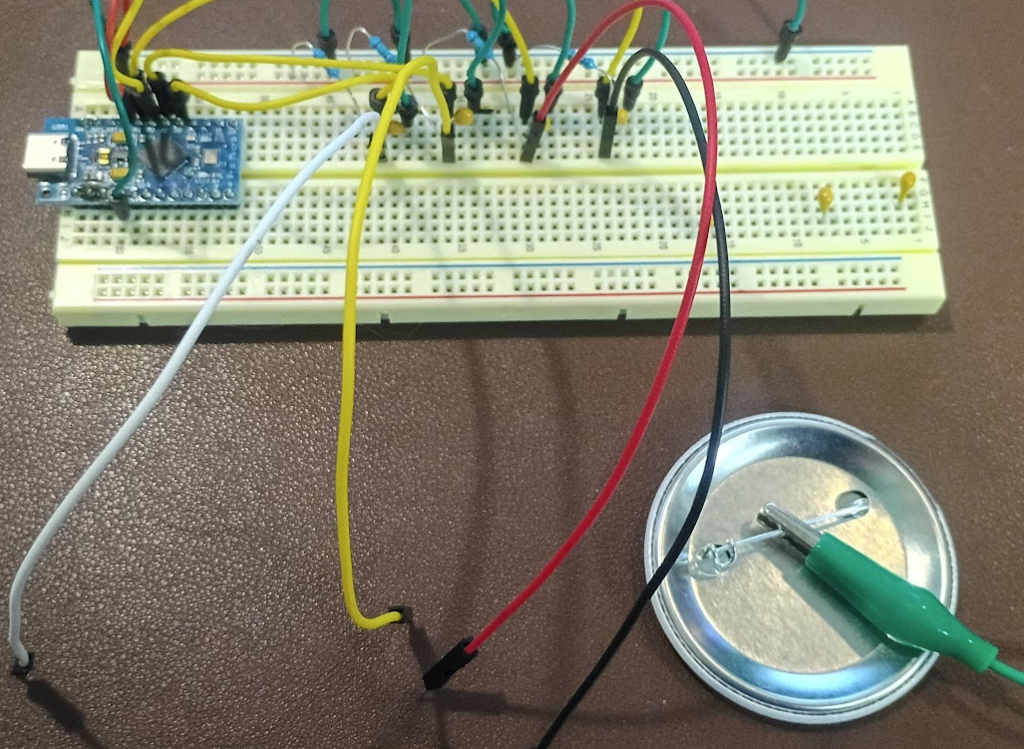
Above is my version of the MakeyMakey. The blue rectangle is an Arduino Leonardo and is responsible for running the program that makes the whole thing work. Key to this is that the Leonardo, unlike its other Arduino cousins, has a built in USB host, meaning it can natively act as a keyboard and mouse. The Arduino is supplying 5 volts of power to four pairs of resistors and capacitors as shown in the schematic above. The resistors are the skinny blue pieces and the capacitors are the round yellow bumps. The wires coming off towards the front are the sense points. The green wire connected to the back of a button is the ground.
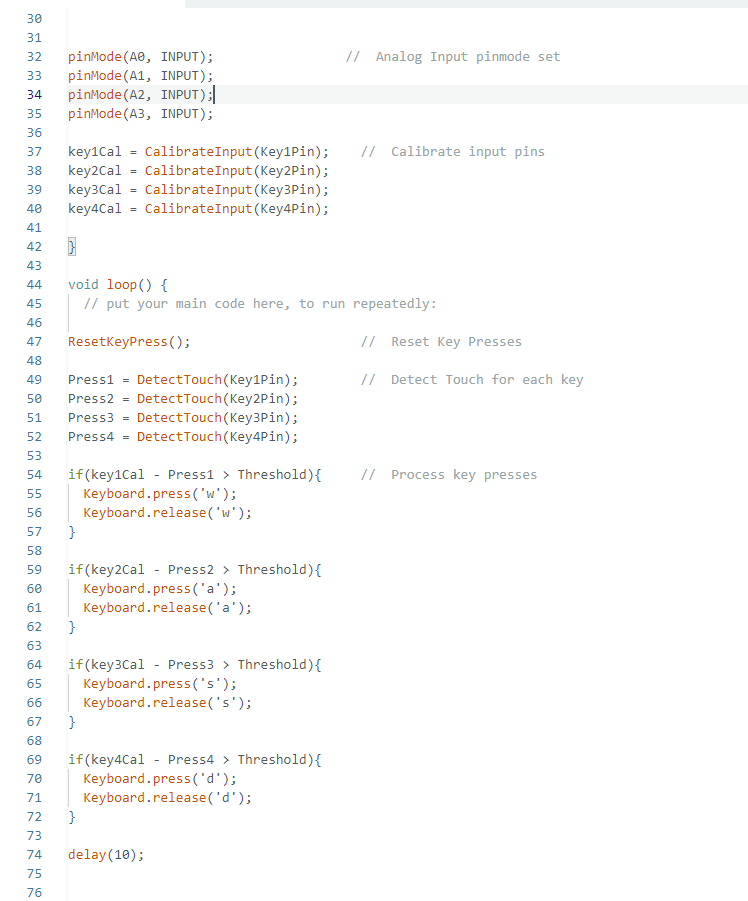
Above is a section of the code that makes the whole thing work. First the Arduino is told that it has four inputs, A0-A3. Next these inputs must be calibrated. The analog inputs that are constantly measuring the voltage of the capacitors see values that are continuously changing. Electrons really want to be at the lowest potential possible and are very good at doing so, this causes the inputs to the MakeyMakey to be a little unstable. The CalibrateInput function measures the input value several times and computes the average of the readings, this becomes the “default” value of each input. The DetectTouch function looks at each input and records its current state. The current state is compared to the calibration value, and if the difference is greater than 100 it is interpreted as a user input. The value of 100 is known as the “Threshold” and acts to prevent false positives. It allows for a little change in state without triggering a response. The value can be adjusted to regulate the sensitivity of the inputs. Finally, if an input has been detected a corresponding keystroke is passed to the host computer.
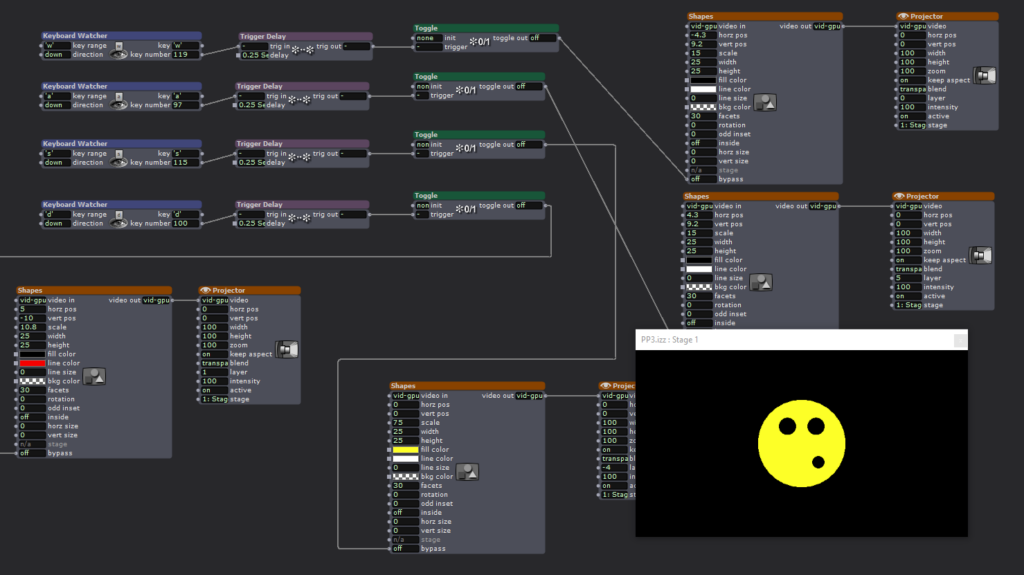
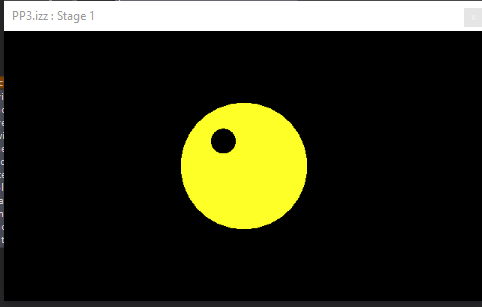
MakeyMakey Make it happen! Having solved my issue of not having a MakeyMakey it was time to connect it to Isadora. Keyboard Watcher Actors were configured to look for the keys W, A, S, D. Each input controlled a different part of the silly face shown. Touching the wires would turn on or off the black and yellow circles.
During the presentation a disaster occurred! All the USB-C cables we could find in the motion lab wouldn’t make my Arduino work! It was dead in the water without whatever magic cable I had left on my desk. Luckily I chose to use the same letters as the official MakeyMakey so it was easy to swap my contraption for the real thing. Isadora couldn’t tell the difference and the scene behaved as expected.
The MakeyMakey is truly an amazing piece of tech! It provides a fantastic means of exploring unusual interfaces for Isadora, games, or whatever the user can think of. However, building one from scratch opens up additional possibilities. Having access to both the code and the hardware allows for greater flexibility in operation. For example, my diy version is has much greater sensitivity. The MakeyMakey is unreliable at best if the user is not in constant contact with the ground wire. My diy version does not have this restriction, it can detect the change in charge state without the need for the user to be holding the ground. This behavior can be additionally controlled with the Threshold setting. Increasing the minimum change is state high enough results in the user having to be in contact with ground to ensure a large enough voltage drop across the capacitor. Or, if tuned the other direction, the sensor becomes more responsive to light touches. It is my intention to continue working on this project for Cycle 3 with the goal being to detect the presence of a person without them being aware of it.
Pressure Project 2
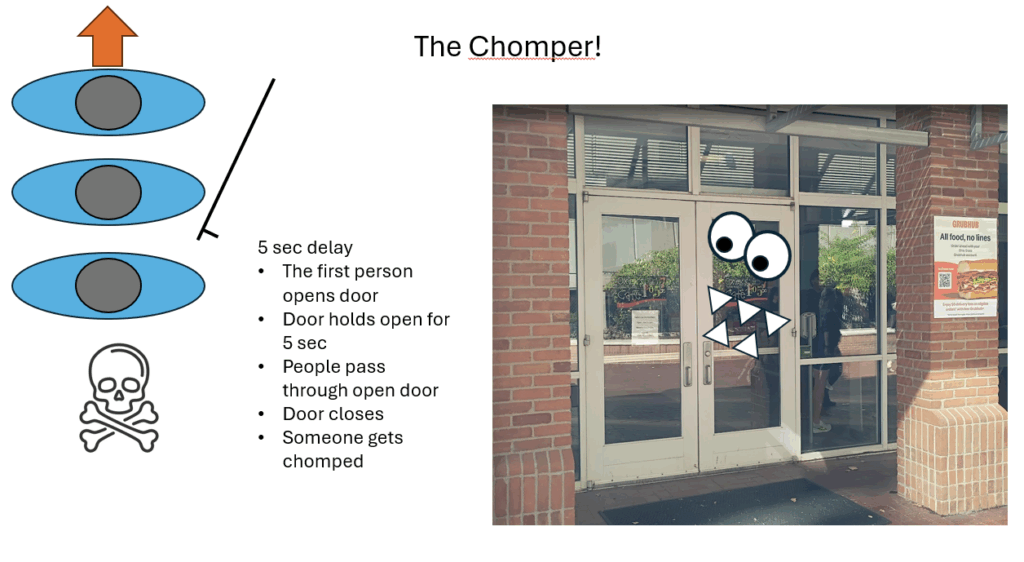
Posted: November 13, 2025 Filed under: Uncategorized Leave a comment »Chomper by the Numbers
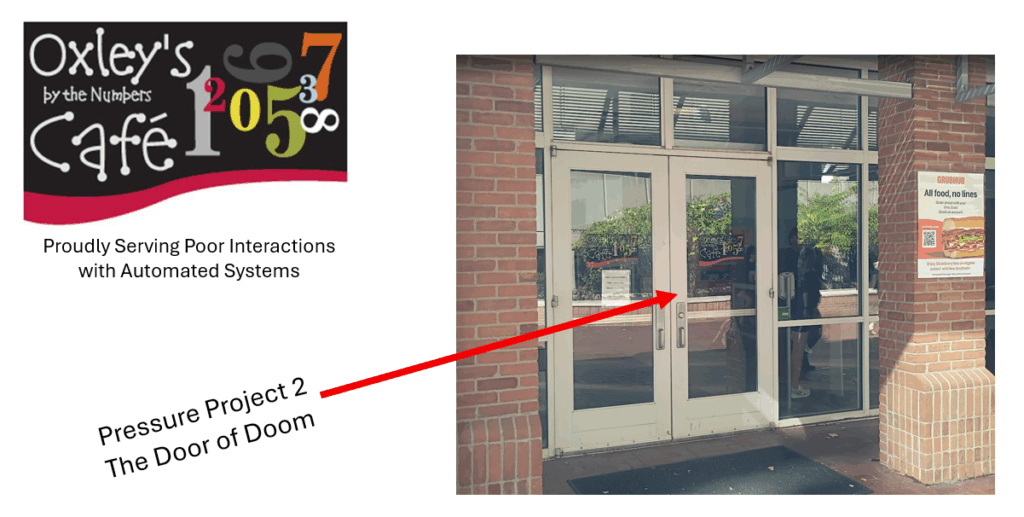
For PP2 we were tasked of observing instances of people interacting with something that could be considered, even remotely, technological. I chose the east entrance to Oxley’s Cafe near Dreese Labs on campus.
This particular entrance has a set of doors, one of which is slightly smarter than the other, it opens on it’s own when pushed or pulled.
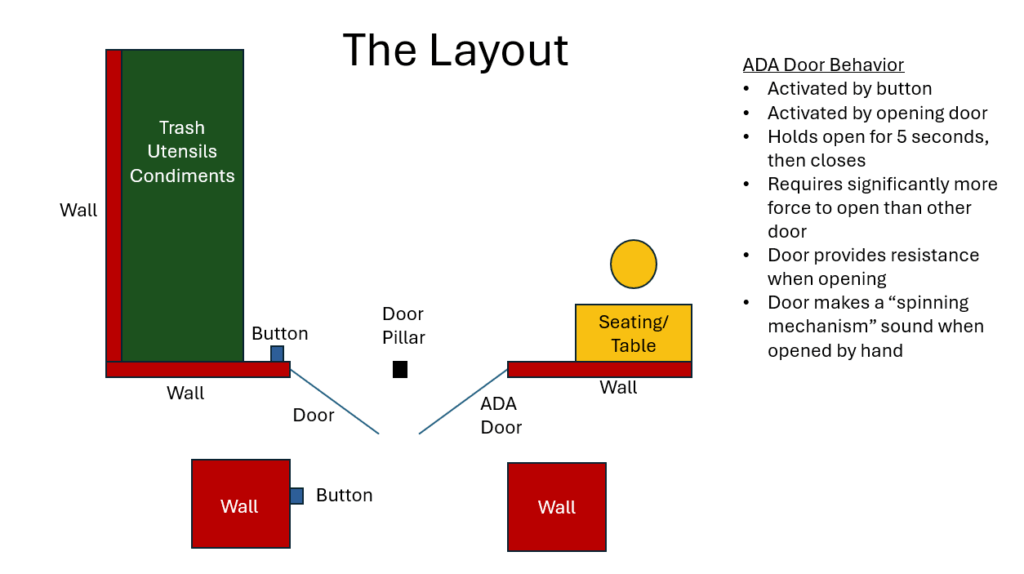
The door is also placed in an extremely high traffic area. During peek hours, around lunch, there is a constant flow of people passing through or past this set of doors.
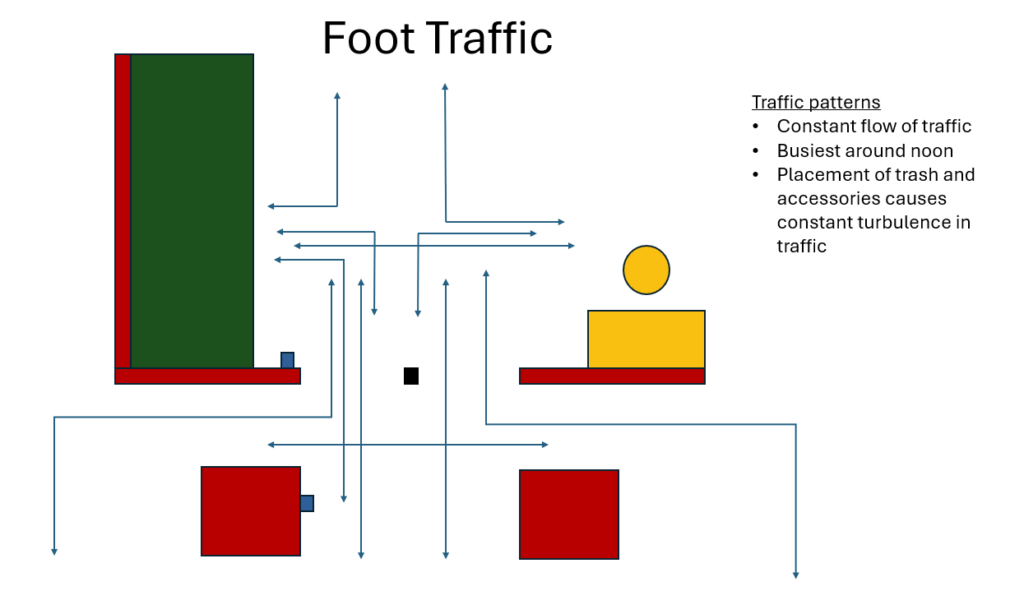
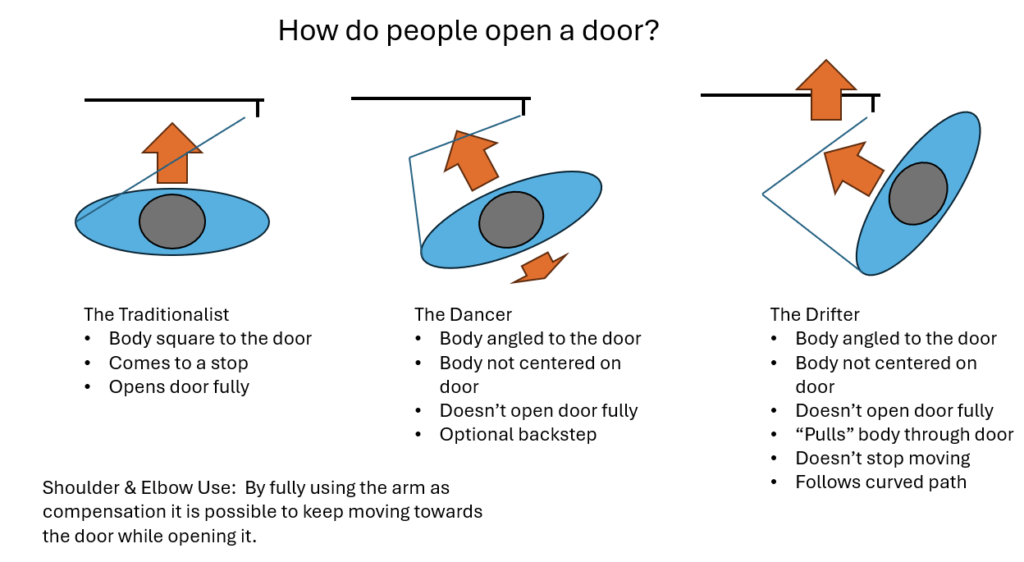
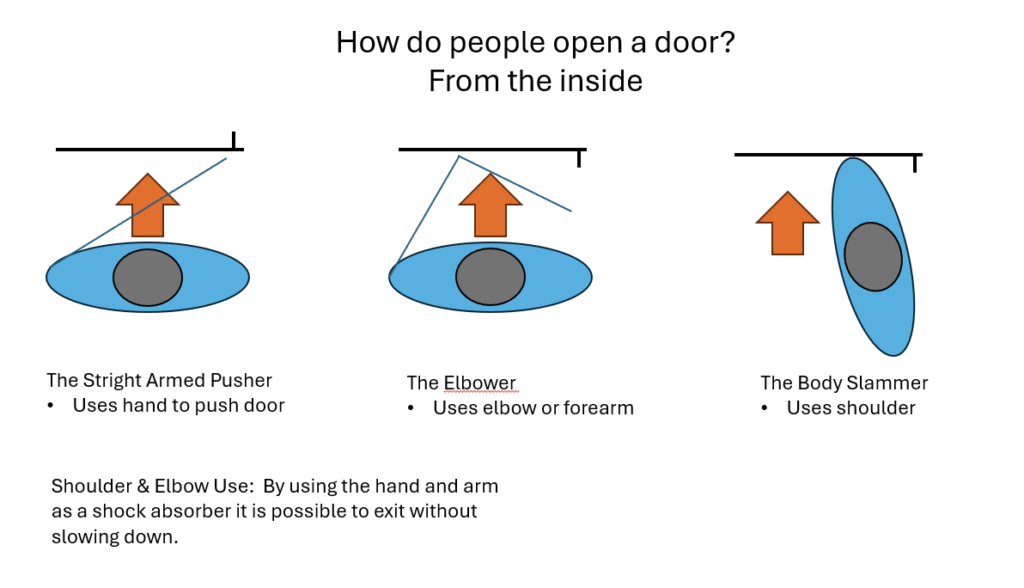
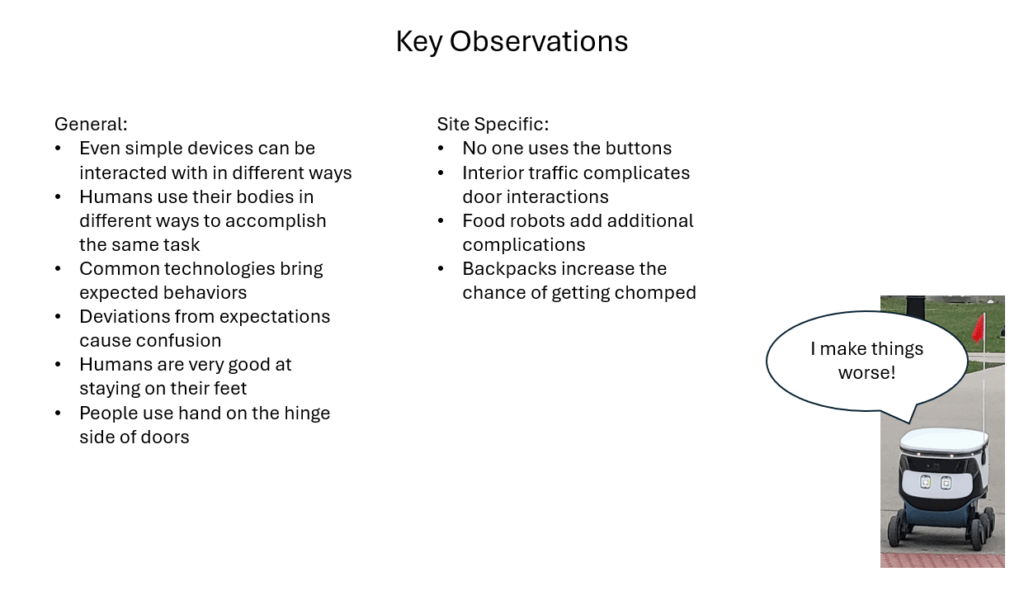
Taking inspiration from a classmate I paid close attention to exactly how people interact with the doors. This was an worthwhile effort and I learned a lot. It is easy enough to say “people open doors.” However, there is room for more detail! Which hand do they use, to the come to a stop or do they remain in motion, do they step backwards, etc… It turns out that by closely observing how people interacted with the doors several patterns emerged.
The same idea can be applied to people leaving the cafe.
But we must remember, this door has some smarts! The mechanism that opens, and holds open, the door adds significant resistance to the action of opening. It was clearly observed that this extra weight caused people passing through the door to experience something unexpected.
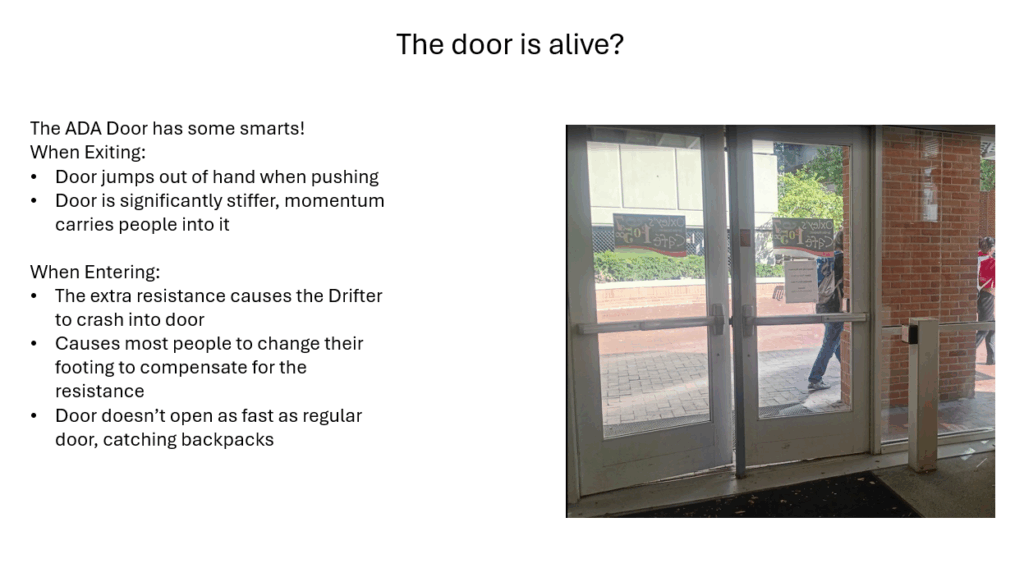
The most interesting observation was related tot he doors behavior of holding itself opening. There is no indication of when the timer runs out, leading some people to pass through without needing to touch the door, while the unfortunate few get chomped.
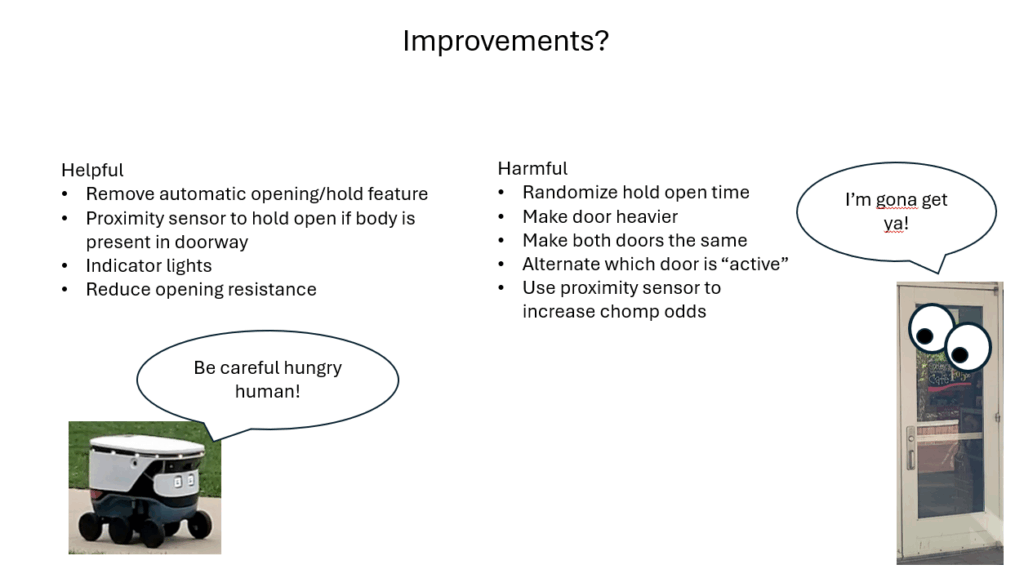
The Pressure Project also asked us to think of ways the interaction could be improved, or made worse.
The project was an excellent experience for taking a deep dive into an everyday occurrence, and finding new information there. I don’t spend much thought on observing how I move my own body, or how others move theirs. The simple act of paying attention to what it takes to open a door was eye opening. In particular, the seamless way the human wrist, arm, and shoulder work together to achieve the act of opening a door is highly complex. The key takeaway from PP3 is that when designing an immersive experience, in particular an interactive one, careful attention must be paid to every aspect of how a user interacts with a system.
Pressure Project 1 – The best intentions….
Posted: September 21, 2025 Filed under: Uncategorized | Tags: PP1 Leave a comment »I would like to take a moment and marvel that a product like Isadora exists. That we can download some software, and within a few hours create something involving motion capture and video manipulation, is simply mind blowing. However, I learned that Isadora makes it very easy to play with toys without fully understanding them.
The Idea
When we were introduced to the Motion Lab we connected our computers into the “magic USB” and were able to access the rooms cameras, projectors, etc… I picked a camera to test and randomly chose what turned out to be the ceiling mounted unit. I’m not sure where the inspiration came from, but I decided right then that I wanted to use that camera to make a Pac-Man like game where the user would capture ghosts by walking around on a projected game board.
The idea evolved into what I was internally calling the “Fish Chomp” game. The user would take on the role of an angler-fish (the one with the light bulb hanging in front of it). The user would have a light that, if red, would cause projected fishes to flee, or if blue, would cause the fish to come closer. With a red light the user could “chomp” a fish by running into it. When all the fish were gone a new fish would appear that ignored the users light and always tried to chase them, a much bigger fish would try to chomp the user. With the user successfully chomped, the game would reset.
How to eat a big fish? One bite at a time.
To turn my idea into reality it was necessary to identify the key components needed to make the program work. Isadora needed to identify the user and track its location, generate objects that the user could interact with, process collisions between the user and the objects, and process what happens when all the objects have been chomped.
User Tracking:
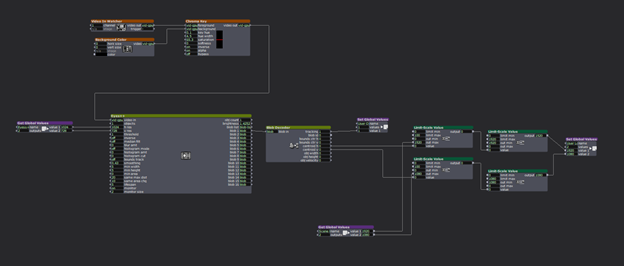
The location of the user was achieved by passing a camera input through a chroma key actor. The intention was that by removing all other objects in the image the eyes actor would have an easier time of identifying the user. The hope was that the chroma key would reliably identify the red light held by the user. The filtered video was then passed to the eyes++ actor and its associated blob decoder. Together these actors produced the XY location of the user. The location was processed by Limit-Scale actors to convert the blob output to match the projector resolution. The resolution of the projector would determine how all objects in the game interacted, so this value was set as a Global Value that all actors would reference. Likewise, the location of the user was passed to other actors via Global Values.
Fish Generation:
The fish utilized simple shape actors with the intention of replacing them with images of fish at a later time (unrealized). The fish actor utilized wave generators to manipulate the XY position of the shape, with wither the X or Y generator updated with a random number that would periodically change the speed of the fish.
Chomped?
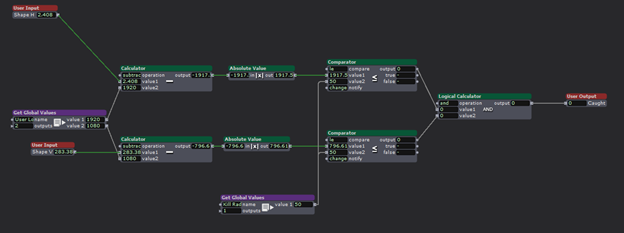
Each fish actor contained within it a user actor to process collisions with the user. The actor received the user location and the shape position, subtracted their values form each other, and compared the ABS of the result to a definable “kill radius” to determine if the user got a fish. It would be too difficult for the user to chomp a fish if there locations had to be an exact pixel match, so a comparator was used to compare the difference in location to an adjustable radius received form a global variable. When the user and a fish were “close enough” together, set by the kill radius, the actor would output TRUE, indicating a successful collision. A successful chomp would trigger the shape actor to stop projecting the fish.
Keeping the fish dead:
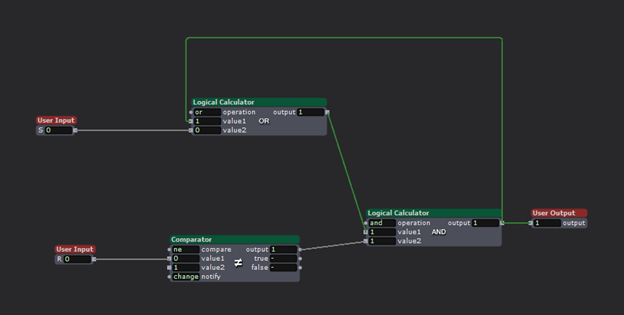
The user and the fish would occupy the same space only briefly, causing the shape to reappear after their locations diverged again. To avoid the fish from coming back to life, they needed memory to remember that they got chomped. To accomplish this, logic actors were used to construct a SR AND-OR Latch. (More info about how they work can be found here https://en.wikipedia.org/wiki/Flip-flop_(electronics) .) This actor, when triggered at its ‘S’ input, causes the output to go HIGH, and critically, the output will not change once triggered. When the collision detection actor recognized a chomp, it would trigger the latch, thus killing the fish.
All the fish in a bowl:
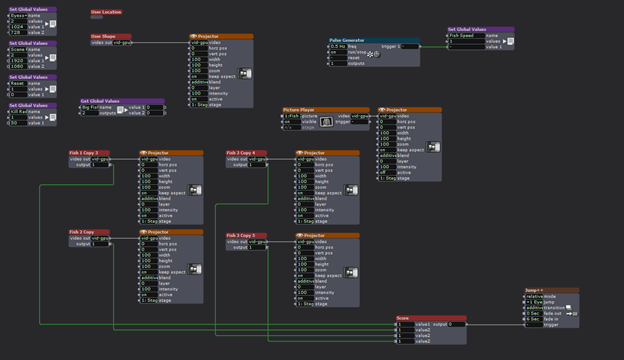
The experience consisted of the users and four fish actors. For testing purposes the user location could be projected as a red circle. The four fish actors projected their corresponding shapes until chomped. When all four fish actors latches indicated that all the fish were gone, a 4-inpur AND gate would trigger a scene change.
We need a bigger fish!


When all the fish were chomped, the scene would change. First, an ominous pair of giant eyes would appear, followed by the eyes turning angry with the addition of some fangs.
The intention was for the user to go from being the chomper to being the chomped! A new fish would appear that would chase the user until a collision occurred. Once this occurred, the scene would change again to a game over screen.

The magic wand:
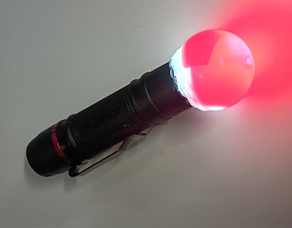
To give the user something to interact with, and for the EYES++ actor to track, a flashlight was modified with a piece of red gel and a plastic bubble to make a glowing ball of light.
My fish got fried.
The presentation did not go as intended. First, I forgot that the motion lab ceiling webcam was an NDI input, not a simple USB connection like my test setup at home. I decided to forgo the ceiling camera and demo the project on the main screen in the lab while using my personal webcam as the input. This meant that I had to demo the game instead of handing the wand to a classmate as intended. This was for the best as the system was very unreliable. The fish worked as intended, but the user location system was too inconsistent to provide a smooth experience.
It took a while, but eventually I managed to chomp all the fish. The logic worked as intended, but the scene change to the Big Fish eyes ignored all of the timing I put into the transition. Instead of taking several seconds to show the eyes, it jumped straight to the game over scene. Why this occurred remains a mystery as the scenes successfully transitioned upon a second attempt.
Fish bones
In spite of my egregious interpretation of what counted as “5 hours” of project work, I left many ambitions undone. Getting the Big Fish to chase the user, using images of fish instead of shapes, making the fish swim away or towards the user, and the ideas of adding sound effects were discarded like the bones of a fish. I simply ran out of time.
Although the final presentation was a shell of what I intended, I learned a lot about Isadora and what it is capable of doing and consider the project an overall success.
Fishing for compliments.
My classmates had excellent feedback after witnessing my creation. What surprised me the most was how my project ended up as a piece of performance-art. Because of the interactive nature of the project I became part of the show! In particular, my personal anxiousness stemming from the presentation not going as planed played as much a part of the show as Isadora. Much of the feedback was very positive with praise being given for the concept, the simple visuals, and the use of the flashlight to connect the user to the simulation in a tangible way. I am grateful for the positive reception from the class.
Bumping Old Discussion
Posted: August 26, 2025 Filed under: Uncategorized Leave a comment »I found Peter’s pressure project utilizing an Arduino to be an interesting idea. Using the microcontroler as a means for creating unusual interfaces is a fantastic idea. He mentions that the hardware caused things to change “on screen”, which is particularly fascinating. I assume that the Arduino was providing input to some other application that processed the audio/video aspect of the project. I’m curious if in addition to what was described, can the Arduino also receive information from the A/V application while also serving as an input device? For example, could touching the fruit controllers also cause lights or motors to activate based on instructions form the computer controlling everything?