Duque bumping old discussion
Posted: August 26, 2024 Filed under: Uncategorized Leave a comment »https://dems.asc.ohio-state.edu/wp-admin/post.php?post=3321&action=edit
https://dems.asc.ohio-state.edu/?m=201911
Posted: August 22, 2024 Filed under: Uncategorized Leave a comment »Cycle 3 | 400m Dash | MakeyMakey
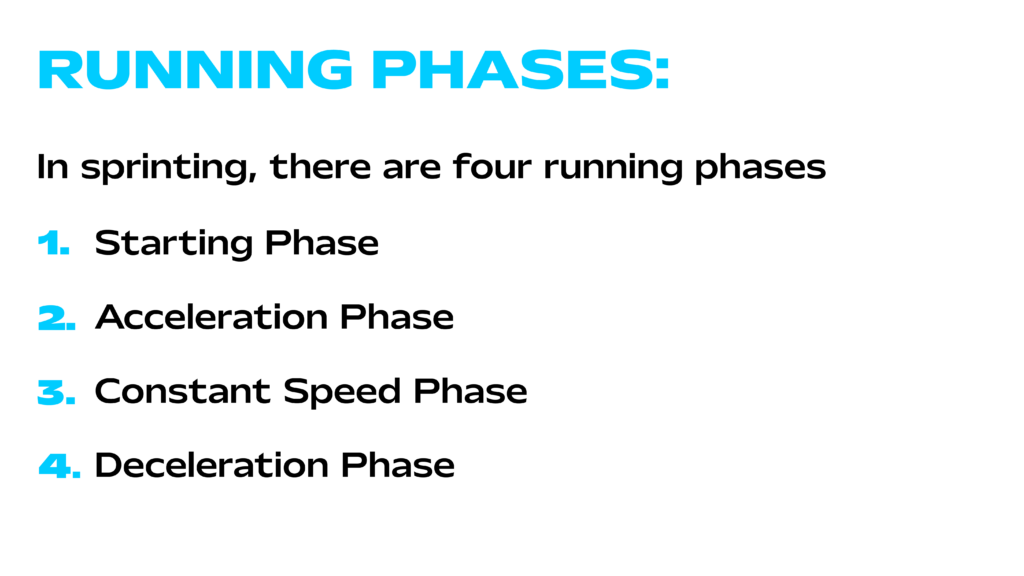
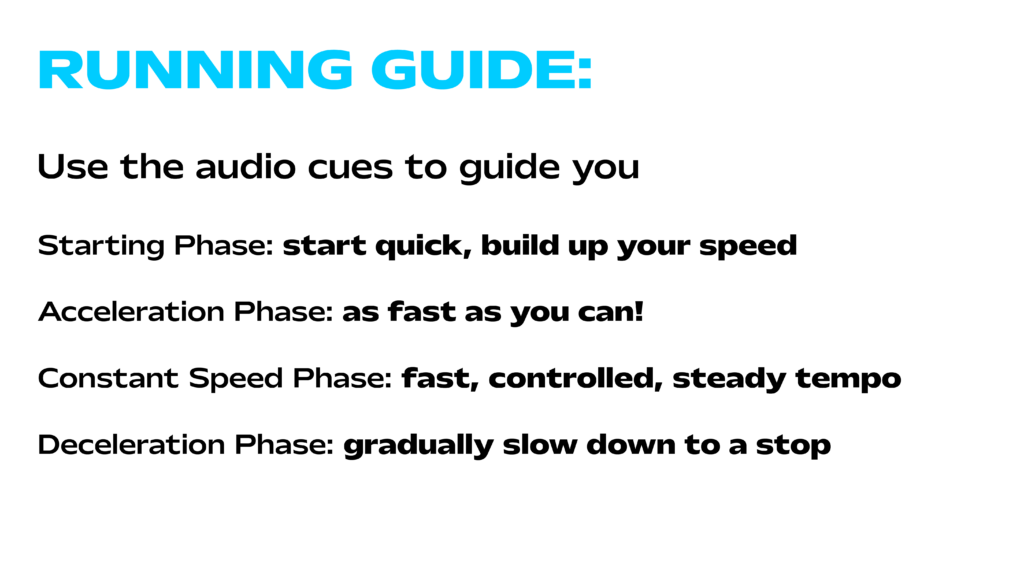
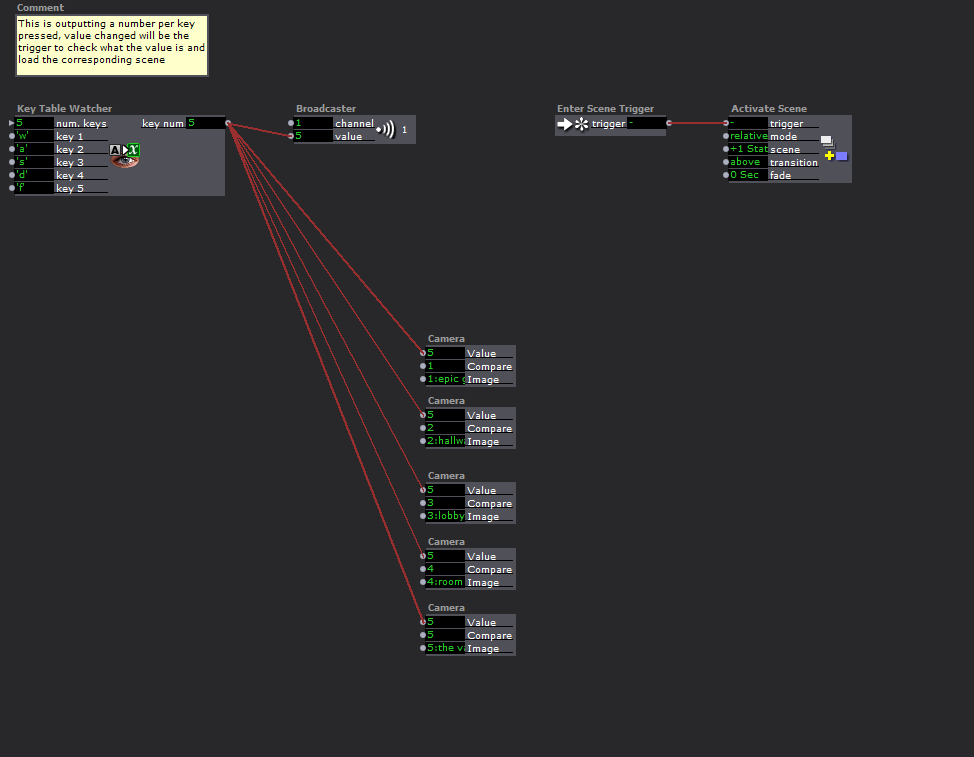
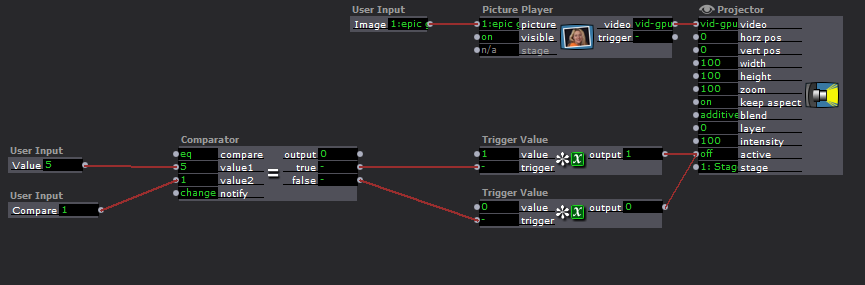
Posted: May 6, 2024 Filed under: Uncategorized Leave a comment »To continue with the cycles, for cycle 3, I chose to incorporate a MakeyMakey and foil to create a running surface for participants, replacing the laptop’s arrow keys. I expected the setup to be relatively straightforward. In previous cycles, I had trouble with automatic image playback, so I decided to make short videos on Adobe Express (which is free). Using this platform, I created the starting video, the audio cue video, and the 400m dash video with the audio cues.
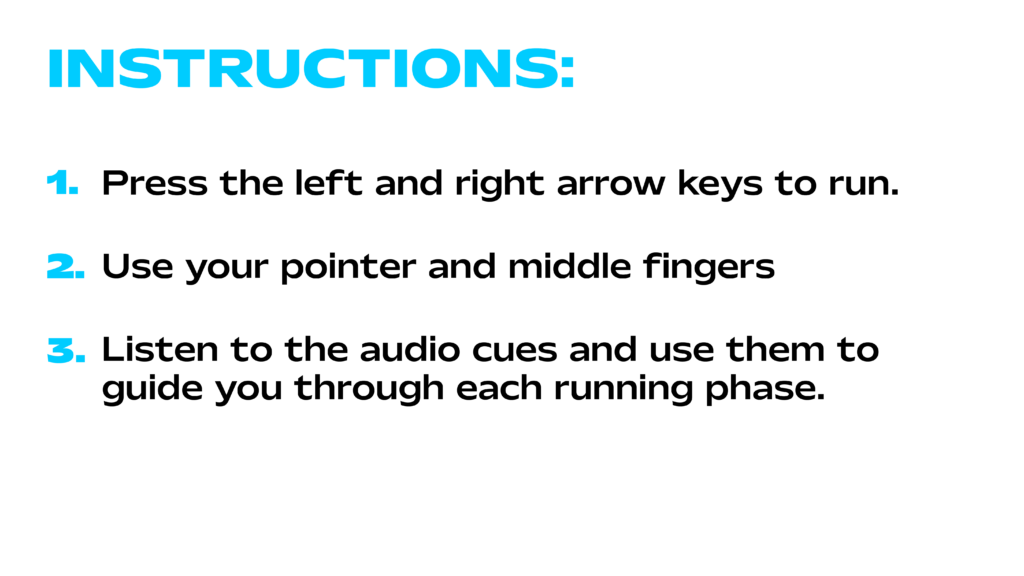
After finalizing my videos and audio cues to my satisfaction, I encountered difficulties getting the MakeyMakey foil to function properly. Through various tests, troubleshooting, and help from Alex, I discovered that participants needed to hold the “Earth” cord while stepping on the foil. Additionally, they either needed sweaty socks or bare feet to activate the MakeyMakey controls. I copied the 400m dash race onto two separate screens and arranged two running areas for my participants. For the two screens and separate runs to work I had to devise a race logic with user actors.


During the presentation, I encountered technical difficulties again. It became apparent that because the participants had possibly sweaty feet, the foil was sticking to them, keeping the MakeyMakey control stay activated. Which caused issues with the race. We quickly realized that I needed to tape down the foil for the race to function properly.


If I were to work on another cycle, I would prioritize ensuring that the running setup functions smoothly and reliably, with both participants able to hear audio from their devices. Additionally, I would expand the project by incorporating race times, a running clock, and possibly personalized race plans tailored to participants’ goal race times or their best race times.
Cycle 2 | 100m Dash
Posted: May 5, 2024 Filed under: Uncategorized Leave a comment »I found myself lacking motivation for my cycle 2 idea, feeling that sticking with my cycle 1 concept was becoming forced. After a discussion with Alex about my thesis interest, we explored some ideas I had been considering. We thought it might be engaging to develop a running simulation where participants experience a first-person sprint, aided by audio cues for speed adjustments. For cycle 2, we decided participants could use their middle and pointer fingers along with the arrow keys to simulate the run, with each button press incrementally advancing the video.
During the presentation, I encountered some technical issues. I realized I needed a better method for sound implementation since I was relying on GarageBand on my phone, which was not effective because the first-person POV 100m dash video to progressed too rapidly. This led to my first feedback suggestion. It was proposed that instead of a 100m dash, a longer race would better showcase the audio cues, allowing participants more time to hear them. Overall, I was pleased with the feedback. Hearing my classmates’ responses to the experience, I decided that for cycle 3, I would incorporate a MakeyMakey and foil to create a running surface for participants, replacing the laptop’s arrow keys.


Cycle 3 – Unknown Creators
Posted: May 5, 2024 Filed under: Uncategorized Leave a comment »For this cycle I had a few ideas. My first one was that I wanted to add some amount of interactivity, as the project felt stagnant. I wasn’t sure how I wanted to do this though. At first I thought I could go back and use some of that tech I made from Pressure Project 3 that I didn’t end up using. Maybe the panels could have knobs on them or something? After talking about where I wanted the project to go with my mentor, it seemed like maybe interactivity wasn’t the way to go. Adding layers of interactivity could potentially confuse people as to what the project is about, and instead Scott emphasized expanding scope to talk more broadly about the subject outside of game development (he gave an example about how one side could be a politician talking about the problems a certain indigenous group and then footage of that group and what they actually had issues with). There are certainly ways of adding interactivity but I did want to expand towards media in general since who don’t know about the games industry can’t meaningfully interact with the piece anyways
Oftentimes, when I would talk about the project, I would reference many different kinds of media, like film or theater, and I wanted to incorporate examples of what I was talking about from these areas too. I ended up pulling examples from two people who I think are better known than Todd Howard: Guillermo Del Toro, Academy Award-winning director, and Michael Jackson, who uhh… is Michael Jackson. I went and collected footage from the making of Pinocchio, a relatively recent film of Del Toro’s that I knew had a ton of talented stop-motion people working on. This is the video that I used for that: https://www.youtube.com/watch?v=LWZ_K7oKu-o
I pulled an example of a well-regarded stop motion animator and puppeteer, Georgina Hayns. She is better known among stop-motion enthusiasts and creators but most lei people probably don’t know who she is, including me. I also pulled an interview of Del Toro from CBS: https://www.youtube.com/watch?v=_7xcED5GoaA
For Michael Jackson, I pulled some old interview footage from 1978: https://www.youtube.com/watch?v=fTTl4Vaow5Y
For the person behind the scenes, I decided to go with Brad Buxer, who I know worked with Michael Jackson and other famous creators like Stevie Wonder from my own personal research and intrigue (I was first told about this via Harry Brewis’s video about the origins of the Roblox oof: https://www.youtube.com/watch?v=0twDETh6QaI). Typically in the music industry there are creators that write lyrics or melodies that don’t get credited to the same degree, and Brad talks about how it’s easy for big creators to pawn off creation to people who work under them. This is a whole different issue, but I think this example is really good since Michael Jackson is a really well known celebrity. Here is Brad Buxer’s Masterclass course that I used for footage: https://www.youtube.com/watch?v=qlYQooIyCAI. What’s funny is that it was actually speculated that Michael Jackson did the music for Sonic 3, but what’s interesting is that Brad Buxer actually is credited for Sonic 3 music and because he is known for working with Michael Jackson, credit is usually give to Jackson. This isn’t completely relevant to the project, I just thought it was interesting that there is a tie back to the games industry. Come to think of it Guillermo Del Toro is also really good friends with another well known game developer, Hideo Kojima, small world I guess.
Anyways, same as before, I had to take the footage and throw it into Premiere Pro to splice it and edit in names and such.
Once again I displayed the project and people felt like I was getting even closer to properly conveying intent. Orlando hadn’t seen any iterations of this project and his interpretation was very close to what I had intended. There was a lot of great conversation sparked too, which was great to see! Overall I’m very happy with this iteration of the project, I’m thinking about applying for a motion lab residency to continue work on this, but for now I’m done.
Cycle 2 – Unknown Creators
Posted: May 5, 2024 Filed under: Uncategorized Leave a comment »For this cycle I decided that I wanted to take feedback from the previous cycle and try and incorporate it into this next one.
For starters, Jiara had mentioned that the wrinkle and material of the fabric felt meaningful. I hadn’t thought about this but I think she’s right, and I wanted to use these ideas. I wasn’t going to change the material, but I did end up making the backsides of the panels more wrinkly and the front more clean. The clean side would be the side with Todd and the messy backside would be the unknown people. I felt this worked really nicely because not only was it conveying metaphorically that these are people who are behind the veil, that they typically deal with messiness that we don’t see, but also it made the images and text harder to see, which I think was in line with my message about how hard it is to find these people.
I also went into premiere pro and edited the footage. I needed the footage of the unknown developers to be arranged so that there were two different people that I could put on the panels. I also added names job titles under all the developers, which I would use within the project. I wanted to express who these people are more directly while still allowing for ambiguity. I remapped the projections, putting the people on their respective panels. I also took Todd’s name and stretched it along the ground to better emphasize the perspective puzzle.
The final thing I did was inspired by talking with my mentor, Scott Swearingen. As I described the project to him he thought it would be interesting if the unknown people were hard to hear in the some way, the maybe the footage was jumbled or disjointed. I liked this idea, but I didn’t want to manually splice the footage. I figured I could have the video jump to random positions while playing, but I didn’t want it to be completely random, and I was trying to figure out how long I wanted footage to play for. I remembered something that Afure and others had said about how it felt like the two pieces of footage were talking to each other, like one was the interviewer and the other was the interviewee. As I was thinking about this, I thought it could be interesting to use the audio data from Todd’s clip and use it to jumble the other footage.
At first I thought I could just get the audio frequency bands from the Movie Player actor, but for some reason I couldn’t do that. I’m not entirely sure why and I tried looking into it (main forum post: https://community.troikatronix.com/topic/6262/answered-using-frequency-monitoring-in-isadora-3-movie-player), it seemed like it wasn’t possible within the Movie Player in this version of Isadora. After talking with Alex though I really just needed to route the audio through Blackhole on the motion lab mac and then use live capture to get the audio data. We created a custom audio configuration that would play to both Blackhole and the motion lab speakers, and after getting the data I simply compared the bands with a threshold. If the band values went above that threshold, the unknown creator footage would jump to a random position.
In terms of setup, everything stayed mostly the same, the only difference this time was the inclusion of a bench on the side of the unknown creators. I wanted people to linger in this area, and I hoped that providing seating would accommodate this (it didn’t but it was worth a shot).
Here is the final video:
After everyone saw it they noticed the things that I had changed and it seemed that I was moving in the right direction. The changes this time were small, but even those small changes seemed to make a difference. The piece felt a little more cohesive, which is good, and the most validating thing for me was Nathan’s reaction. He hadn’t seen the first version of this project and within the span of around 2 or 3 minutes I heard him say “Oh I get it”. He caught that you could only hear the audio from the unknown people when Todd stopped talking and immediately got what the project was about, and I was really happy to hear this. He knew who these people are so it seems that people with prior knowledge could potentially get ahold of the intended message. Still, people without prior knowledge are left alienated, and I wanted to address this going forward.
Pressure Project 3 – SP35 Potions 1
Posted: May 5, 2024 Filed under: Uncategorized Leave a comment »I’m putting a bunch of documentation in here!
Images of my camera system 😀
Prototyping lol, I’m thinking of creating a custom knob?
So this project changed right in the middle. I was thinking more about the ideas I had with perspective puzzles and I really wanted to take this idea and use it for my cycles, so I tabled the idea for now. In DESIGN 6300, I had been doing more research into educational games and the concept of serious games, which are games that are used for non-entertainment purposes (examples could be games used in the classroom, training simulations for new hires, or training simulations for military personnel like pilots). I wanted steer my project in a different direction and I was thinking about a conjecture I did while looking into instructional design.
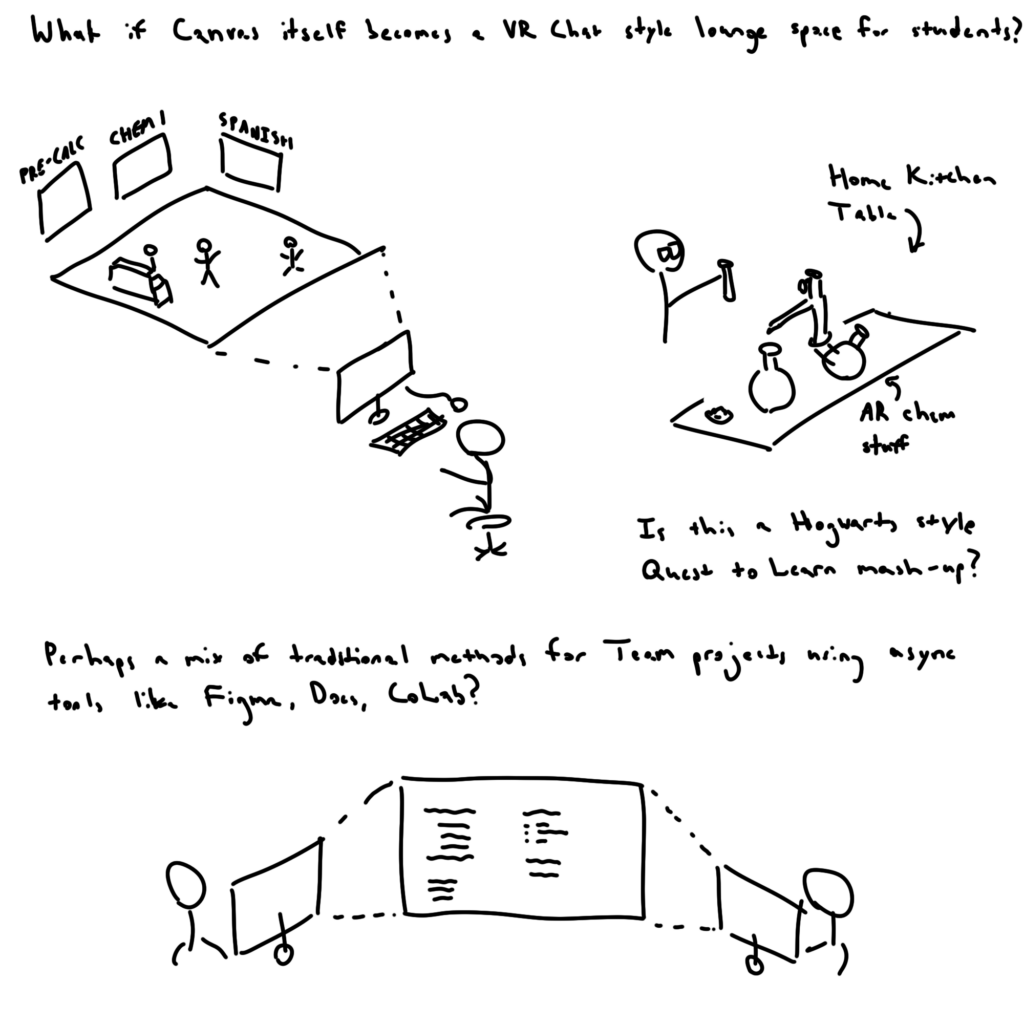
I had found a lot of research looking into the effects of the pandemic and hybrid education, and I had also found a lot of research about integrating educational tools into devices created for the Internet of Things (in general integrating educational tools with new technologies was a big theme). In that conjecture I tried to imagine what a game-based hybrid learning space could look like, thinking about how massively multiplayer online games (MMOs) represent their public virtual spaces, and how that relates to public spaces in schools that students gravitate towards. I also tried to think about how collaboration and lessons would be taught, inspired by the work I do on the IFAB VR projects, what if chemistry was taught in AR, so that students could get proper hands-on experience using things like distillery sets? The biggest problem I saw actually related to that idea, students needing hands-on experience and to be engaged, which was a downside of hybrid learning; it seems that there is something about being in the room that’s important to cultivating a learning environment.
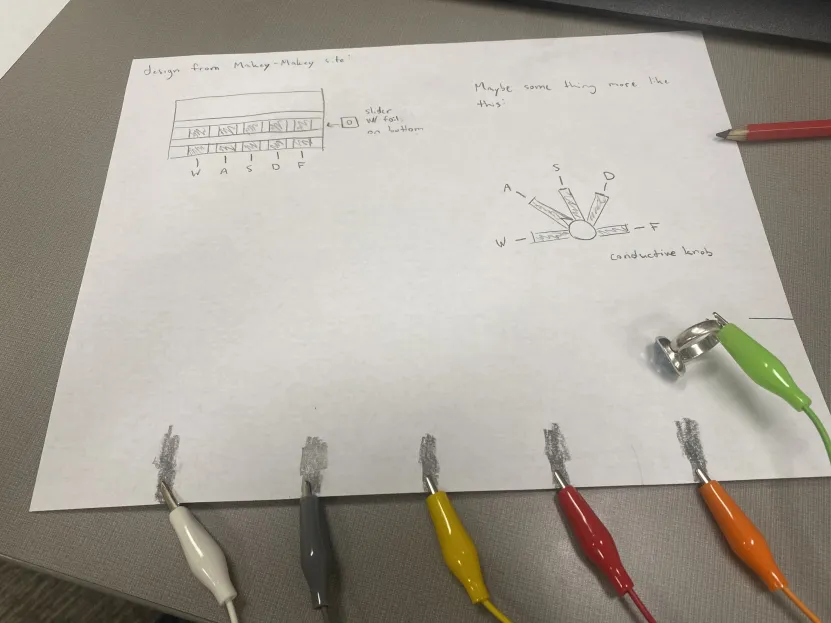
Thinking about this, I wondered if the tactile nature of Makey-Makey controllers could be used to help with hybrid learning experiences. Building off of how Quest to Learn (Quest to Learn (q2l.org)) gamifies it’s learning and a previous project I had made that was a wizard battle game using Makey-Makey’s, I wanted to see if I could make a Harry Potter style “potions” class, where the potions are chemicals, and the end goal is some sort of chemistry lesson.
One of the first things I did was think about how I wanted to use the Makey-Makey. At first I was thinking about actually using liquids of some sort. There are a lot of simple chemistry lessons that teach about concepts like why oil and water don’t mix well together, and I was hoping that I could work these kinds of lessons into the hardware (plus water conducts electricity well, oil doesn’t, there is definitely room for some sort of electronic magic).
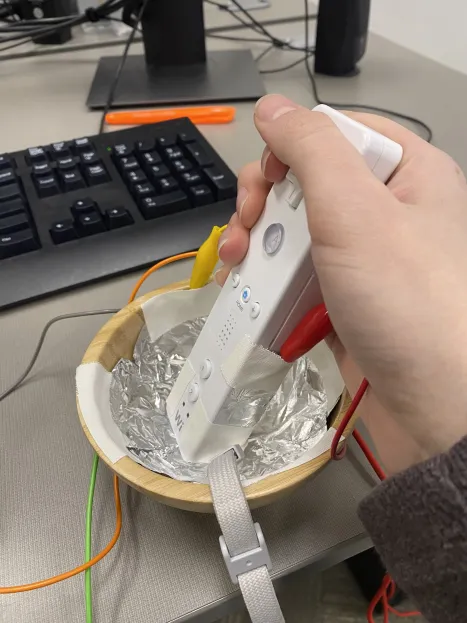
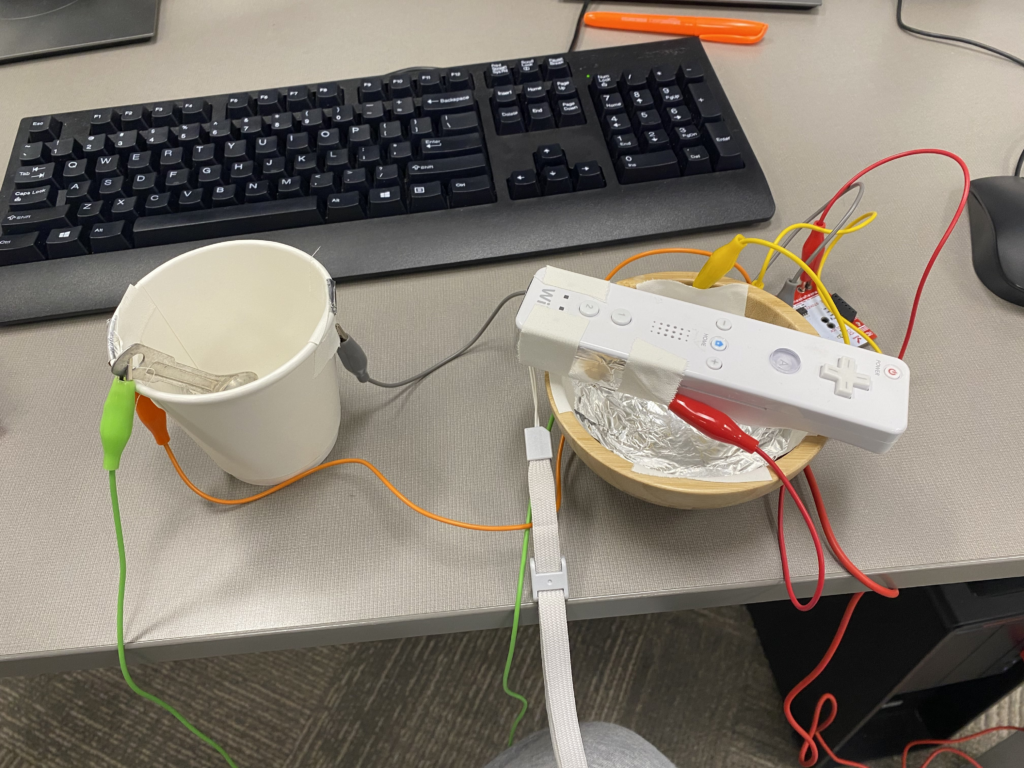
I started with a cup of water that could be dipped into to get electrical current, but I found that I wasn’t able to control the circuit very well when I was using liquids. I then thought about how I could potentially mimic actions that one might have to do in a “potions” class, inspired by the kinds of strange chemistry magic that NileRed does (he has a wild YouTube channel where he does wacky chemistry hijinks, here is a video where he turns vinyl gloves into grape soda: https://youtu.be/zFZ5jQ0yuNA?si=EHvenzlJcoIEZPO6). I wanted to get the physical motions of grinding up a piece of material, pouring that material into a liquid, and stirring to dissolve it and saturate a solution. To do this, I was going to make a mortar and pestle controller and a beaker controller. I didn’t have a mortar and pestle or a beaker, and I only had 10 hours (now 5 after pivoting) to do the whole project, so I had to get creative. For my mortar and pestle, I filled the inside of a wooden bowl with aluminum foil and taped some to the bottom of a Wii Remote, which looked like this:
I also ended up making this cup and checking in Isadora whether the person was “stirring” and how fast. I did this by putting two pieces of foil on either side of the of the inside of the cup. The play used a metal spoon to tap both of the pieces of foil in rapid succession, which led to a back and forth motion that is akin to stirring.

Video-Bop: Cycle 3
Posted: May 2, 2024 Filed under: Uncategorized | Tags: Cycle 3 Leave a comment »The shortcomings and learning lessons from cycle 2 provided strong direction for cycle 3
The audience found that the rules section of cycle 2 were confusing. Although, I intentionally labelled these essentials of spontaneous prose as rules, it was more of a framing mechanism to expose the audience to this style of creativity. Given this feedback, I opted to structure the experience so that they witnessed me performing video-bop prior to trying it themselves. Further, I tried to create a video-bop performance with media content which outlined some of the influences motivating this art.
I first included a clip from a 1959 interview with Carl Jung in which he is asked:
‘As the world becomes more technically efficient, it seems increasingly necessary for people to behave communally and collectively. Now, do you think it possible that the highest development of man may be to submerge his own individuality in a kind of collective consciousness?’.
To which Jung responds:
‘That’s hardly possible, I think there will be a reaction. A reaction will set in against this communal dissociation.. You know man doesn’t stand forever.. His nullification. Once there will be a reaction and I see it setting in.. you know when I think of my patients, they all seek their own existence and to assure their existence against that complete atomization into nothingness or into meaninglessness. Man cannot stand a meaningless life’
Mind, that this is from the year 1959. A quick google search can hint at the importance of that year for Jazz:
Further, I see there to be another overlapping timeline. That of the beat poets:
I want to point a few events:
29 June, 1949 – Allen Ginsberg enters Columbia Psychiatric Institute, where he meets Carl Solomon
April, 1951 – Jack Kerouac writes a draft of On the Road on a scroll of paper
25 October, 1951 – Jack Kerouac invents “spontaneous prose”
August, 1955 – Allen Ginsberg writes much of “Howl Part I” in San Francisco
1 November, 1956 – Howl and Other Poems is published by City Lights
8 August, 1957 – Howl and Other Poems goes on trial
1 October, 1959 – William S. Burroughs begins his cut-up experiments
While Jung’s awareness is not directly tied to American culture or jazz and adjacent artforms, I think he speaks broadly to the post WW2 society. I see Jung as an import and positive actor in advancing the domain of psychoanalysis and started working at a psychiatric hospital in 1900 in Zürich. Nonetheless, critique of the institutions of power and knowledge surrounding mental illness emerged in the 1960s most notably with Michel Foucault’s 1961 Madness and Civilization and in Ken Kesey’s (a friend of the beat poets) 1962 One Flew over the Cuckoo’s Nest. It’s unfortunate that a psychoanalytic method and theory developed by Jung which emphasizes dedication to the patient’s process of individuation, is absent in the treatment of patients in psychiatric hospitals throughout the 1900s. Clearly, Ginsberg’s experiences in a psychiatric institute deeply influenced his writings in Howl. I can’t help to connect Jung’s statement about seeing a reaction setting in to the abstract expressionism in jazz music and the beat movement occurring at this time.
For this reason I included a clip from the movie Kill your Darlings (2013) which captures a fictional yet realistic conversation had by the beat founders Allen Ginsburg, Jack Kerouac, and Lucian Carr upon meeting at Columbia University.
JACK
A “new vision?”
ALLEN
Yeah.
JACK
Sounds phony. Movements are cooked up by people who can’t write about the people who can.
LUCIEN
Lu, I don’t think he gets what we’re trying to do.
JACK
Listen to me, this whole town’s full of finks on the 30th floor, writing pure chintz. Writers, real writers, gotta be in the beds. In the trenches. In all the broken places. What’re your trenches, Al?
ALLEN
Allen.
JACK
Right.
LUCIEN
First thought, best thought.
ALLEN
Fuck you. What does that even
mean?!
JACK
Good. That’s one. What else?
ALLEN
Fuck your one million words.
JACK
Even better.
ALLEN
You don’t know me.
JACK
You’re right. Who is you?
Lucien loves this, raises an eyebrow. Allen pulls out his poem from his pocket.
I think this dialogue captures well the reaction setting in for these writers and how they pushed each other respectively in their craft and position within society. Interesting is Kerouac’s refute of being associated with a movement which is a stance he continued to hold into later life when asked about his role in influencing American countercultural movements of the 60s 1968 Interview with William Buckley. Further, this dialogue shows how Kerouac and Carr incited an artistic development in Ginsberg giving him the courage to break poetic rules and to be uncomfortably vulnerable in his life and work.
For me video-bop shares intellectual curiosities with that of the beats and a performative improvised artistic style with that of Jazz. So I thought performing a video-bop tune of sorts for the audience prior to them trying it would be a better way to convey the idea rather than having them read from Kerouac’s rules of spontaneous prose. See a rendition of this performance here:
With this long-winded explanation in mind, there were many technical developments driving improvements for cycle 3 of video-bop. Most important was the realization that interactivity and aesthetic reception is fostered better from play as opposed to rigid-timebound playback. The first 2 iterations of video-bop utilized audio-to-text timestamping technologies which were great at enabling programmed multimedia events to occur in time with a pre-recorded audio file. However, after attending a poetry night at Columbus’s Kafe Kerouac, the environment where poets read their own material and performed it live inspired me to remove the timebound nature of the media system and force the audience to write their own haikus as opposed to existing ones.
Most of the technical coding effort was spent on the smart-device web-app controller to make it more robust and ensure no user actions could break the system. I included better feedback mechanisms to let the users know that they completed steps correctly to submit media for their video-bop. Further, I made use of a google-images-download to allow users to pull media from google images as opposed to just Youtube which was an audience suggestion from cycle 2.
video-bop-cyc3 (link to web-app)
One challenge that I have yet to tackle, was the movement of media files as downloaded from a python script on my PC into the Isadora media software environment. During the performance, this was a manual step as I ran the script and dragged the files into Isadora and reformatted the haiku text file path. See the video-bop process here:
Cycle 2: Video-Bop
Posted: May 1, 2024 Filed under: Uncategorized | Tags: Cycle 2 Leave a comment »Feedback from cycle I directed me towards increased audience interactivity with the video-bop experience.
Continuing in the spirit of Kerouac, I was inspired by one of his recordings called American Haikus in which he riffs back and forth with tenor saxophone player Zoot Sims. Kerouac, not being a traditional musical instrumentalist (per say), recites his version of American Haiku’s in call and response with Zoot’s improvisations:
“The American Haiku is not exactly the Japanese Haiku. The Japanese Haiku is strictly disciplined to seventeen syllables but since the language structure is different I don’t think American Haikus (short three-line poems intended to be completely packed with Void of Whole) should worry about syllables because American speech is something again… bursting to pop. Above all, a Haiku must be very simple and free of all poetic trickery and make a little picture and yet be as airy and graceful as a Vivaldi Pastorella.” (Kerouac, Book of Haikus)
Kerouac’s artistic choice to speak simple, yet visually oriented ‘haikus’, allows him inhabit and influence the abstract sonic space of group improvised jazz. These haikus are at par with the music motifs typical of trading which is when the members of jazz ensemble will take turns improvising over small musical groupings within the form of the tune they are currently playing. What I find most cool is how you can feel Zoot representing Kerouac’s visual ideas in sound and in real-time. In this way, a mental visual landscape is more directly shaped by merging musical expression and the higher cognitive layer of spoken language. It is not new for abstract music to be given visual qualities. Jazz pianist Bill Evans described the prolific ‘Kind of Blue’ record as akin to “Japanese visual art in which the artist is forced to be spontaneous…paint[ing] on a thin stretched parchment.. in such a direct way that deliberation cannot interfere”(Evans, Kind of Blue Liner notes 1959)
As a new media artist, I tried to create a media system which would engage the audience in this creative process of translating abstract ideas of one form into another. I believe this practice can help externalize the mental processes of rapid free association. To do so, I had to build a web-application accessible to the audience connected to a cloud database which could be queried from my PC running the Isadora media software. This web-app could handle the requests of multiple users from their phones or other smart-devices with internet access. I used a framework familiar to me using Dash to code the dynamic website, Heroku to host the public server, and AstraDB to store and recall audience generated data.
See src code for design details
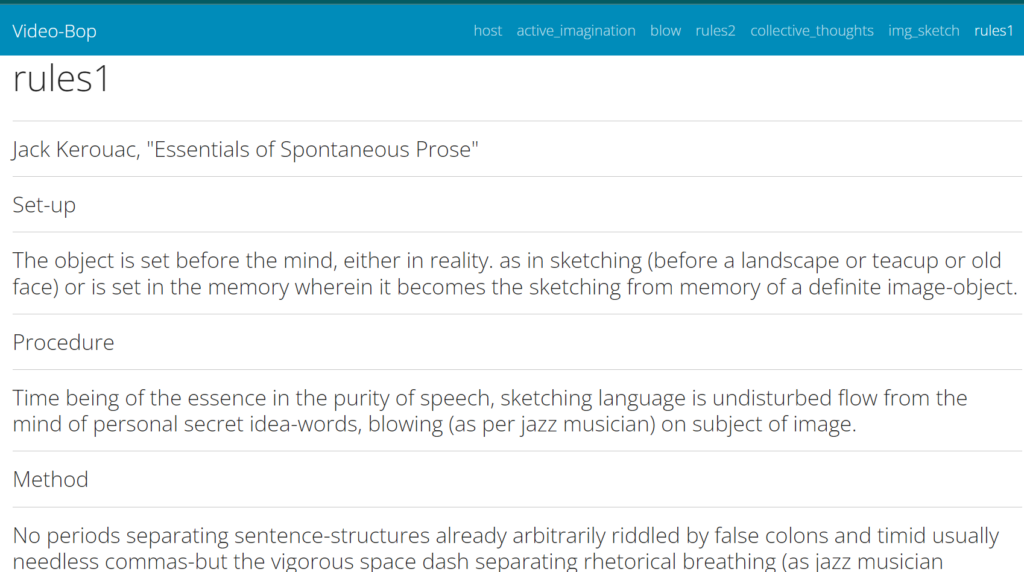
The experience stared with the audience scanning a QR code to access the website, effectively tuning their phones into an interactive control surface. Next, they were instructed to read Kerouac’s Essentials of Spontaneous Prose which humorously served as the ‘rules’ for the experience. This was more of a mood setting device to frame the audience to think about creativity from this spontaneous image oriented angle.
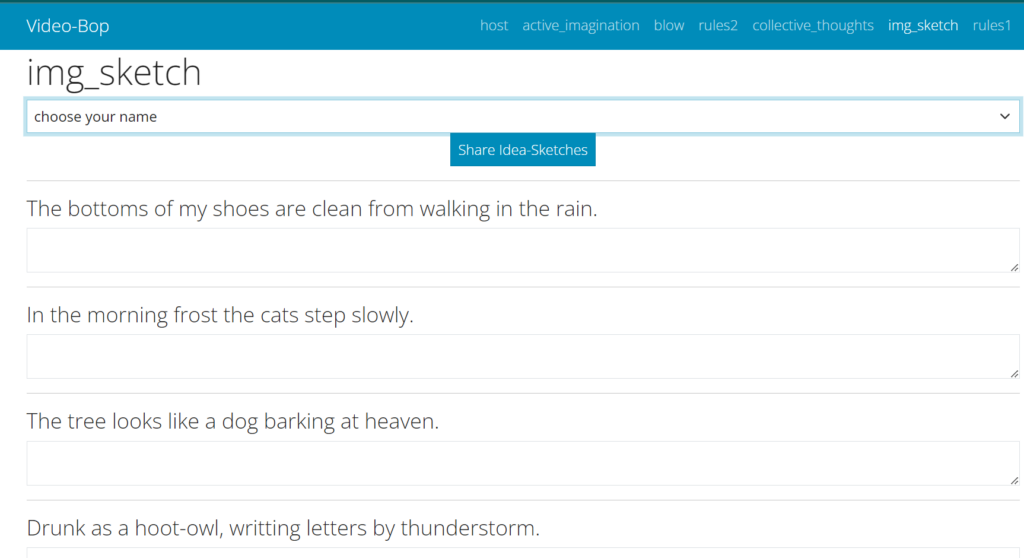
Next, I played a series of Kerouac’s Haikus and instructed the audience to visit a page on the site where they could jot their mental events for each haiku as they listened to the spoken words and musical interpretation by Zoot. After this, there was a submit button which sent all their words to the database and was then dynamically rendered onto the next page called ‘collective thoughts’. This allowed everyone in the audience to anonymously see each other’s free associations.
Example from our demo
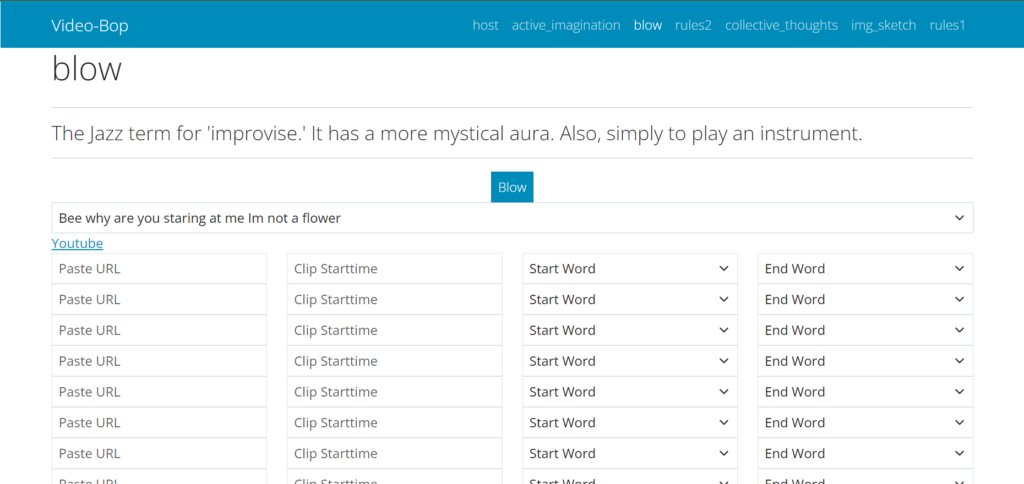
After, reading through the collective image-sketches from the group, we decided on a crowd favorite Haiku to be visualized. The visualization process was equipped to handle multiple Youtube video links with timecode information to align with the time occurrence of spoken words in a prerecorded video. This process followed form from Cycle I in how I quickly explored Youtube to gather imagery which I thought expressive of the message within the ‘History of Bop’ Poem. This practices forces a negotiation in expression between original image thoughts and the available videos on the medium of Youtube equipped with its database of uploaded content and recommender systems. An added benefit to having the interaction on their personal phones is that it connects to their existing Youtube app and any behavioral history made prior to entering into the experience. The page to add media looked like this:
This was the final step and it allowed tables to be generated within the cloud database which were in a form for which they could be post-processed into a json file which worked with the visualizing patch I made in Isadora for Cycle 1. I had written a python script to query the database and download all of the media artifacts and place them into the proper format.
Unfortunately, I didn’t have much time to test the media system prior to presentation day and the database was overwritten due to a design issue. Someone had submitted a blank form which overwrote all of the youtube data entered by the other audience members. For this reason, I was not able to display the final product of their efforts. Yet, it was a good point of failure for improvement in cycle 3. The audience was disappointed that they didn’t see the end product, but I took this as a sign that the experience created an anticipation which had powerful buildup.
Cycle 3- Who’s the Alien?
Posted: May 1, 2024 Filed under: Uncategorized Leave a comment »For Cycle 3 I wanted to switch the game up a bit and combine the two game ideas I did before. This game would be played majority through the headphones but still have visuals to follow. This game was about figuring out who the alien is among the humans on a spaceship. I chose two aliens. There would be a captain for each round and they would choose which 3 layers have to take a test to prove their humanity. Each of the test would happen through the headphones. I didn’t change much in terms of Isadora patches. I wanted to keep the game simple but social.

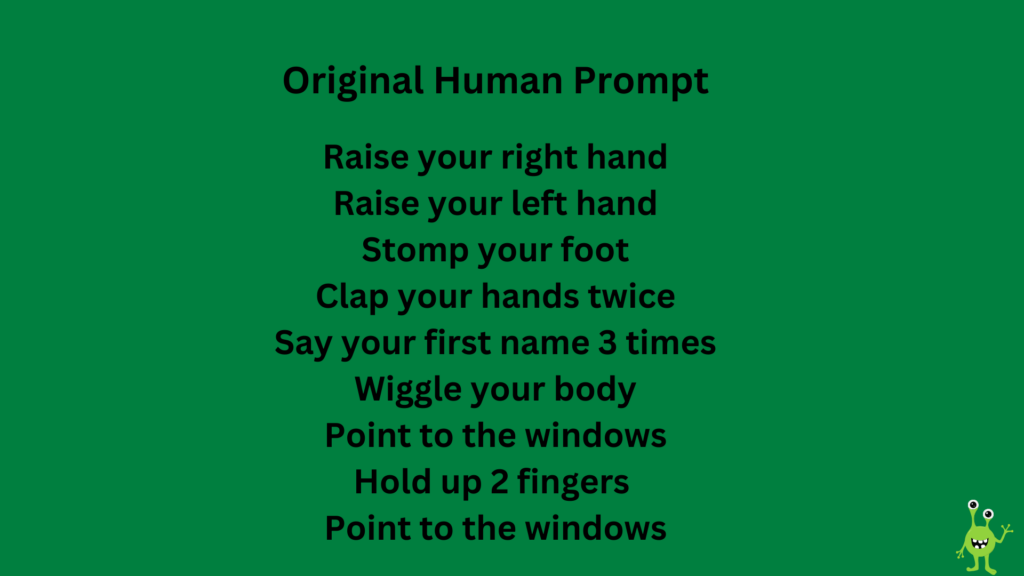
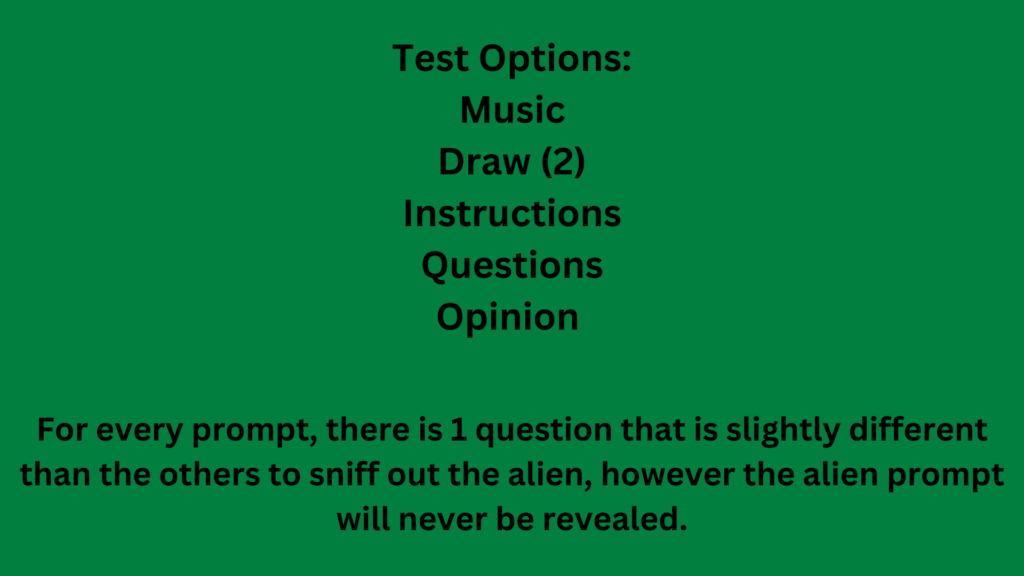
These were the test options.
For every prompt, two questions were the same and one was slightly off. Here is an original question asked for the Instructions prompt.