WORK > PLAY > WORK > PLAY >>>
Posted: September 12, 2023 Filed under: CgRyan, Isadora, Pressure Project I, Uncategorized | Tags: Isadora, Pressure Project, Pressure Project One Leave a comment »My goals for Pressure Project #1 were to deepen and broaden skills working in Isadora 3 and to create a motion piece that could hold attention. The given Resources were 6 hours and a minimum of using defined Actors: Shape, Projector, Jump++, Trigger Delay, and the Envelope Generator, and that would auto-play.
PROCESS
Pressure Project 1: TAKE 1 took 3 hours, and though I learned the basics of scene transition and shape control and video placement, I was not satisfied with how the scenes progressed and connected: I had not taken the time to create a defined concept. (When feeling “time pressured” I sometimes forget what one of my most respected design teachers at ArtCenter said “To save time, take the time to create a concept first.”)
Pressure Project #1 – TAKE 1
CONCEPT
I am both a designer and an artist, and creating a balance between personal work [PLAY] and paid client projects [WORK] has been an ongoing battle over my careers. I decided I wanted to symbolize this “dance” between WORK and PLAY in my motion piece. Conceptually, I think of WORK as a rectangle, or a “frame” that defines the boundaries of both Resources and what the Valuation criteria are. When I think of PLAY, I think of circles, more open and expansive, and playful. When I think of the combination of these 2 concepts, I see a choreography between grace and collision, satisfied expectations and for serendipity. When deciding on the pacing and transitions of the whole, I wanted to create an “endless loop” between WORK and PLAY that symbolized my ubiquitous see-saw between the two poles. An endless loop would represent “no separation” between WORK and PLAY: my live-long goal of to have work that feels like PLAY, and to WORK meaningfully at my PLAY so that it is worth the currency of my life force: time and energy.
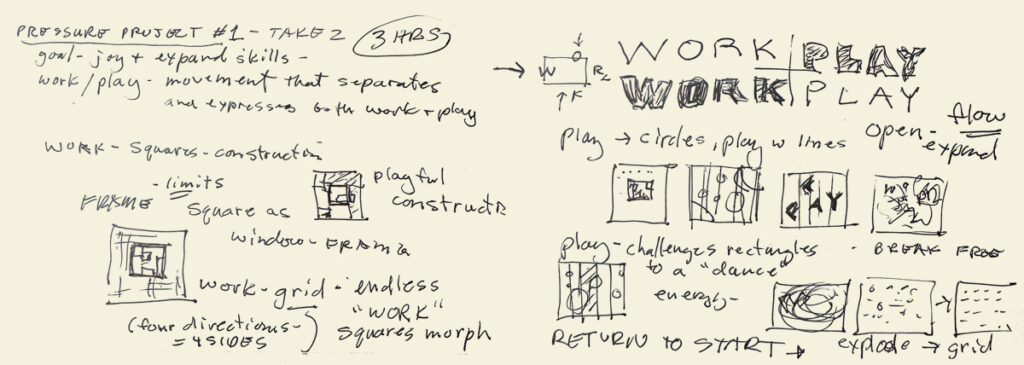
Concept: WORK > PLAY sketch
ADDITIONAL TUTORIALS
I found an additional Isadora tutorial “Build it! Video Porthole” by Ryan Webber that demonstrated skills I wanted to learn: how to compose video layers with masking and alpha channels, and another demo of the User Actor. From this tutorial, I was inspired to use the Alpha Mask actor to make the WORK > PLAY > repeat cycle explicit. I decided to use the letters of the two “four letter words” to explicitly to represent my history as a communications designer, and to alternate between a more structured motion path using the squares and a more playful evolution as the piece transitioned to circles, then a finale of a combination.
LIMITED REMAINING TIME: 2.5 hours
To respect the time limit of the project, I used an application that I use in both personal art “play” and client work, After Effects, to quickly create three simple animations with the WORK + PLAY letters to use with the Alpha Mask actor.

After Effects alpha masks
To save additional time, I used a combination of motion pattern videos I have used in earlier projection mapping projects. I used the Shapes and Alpha Mask actors in Isadora to combine the elements.

Scene 1 – 3 stills: videos in alpha masks
To create the endless “loop” transitions between the three scenes, I used the Trigger Delay actor on each of the three scenes, using the jump value of “-2” to return to scene one.
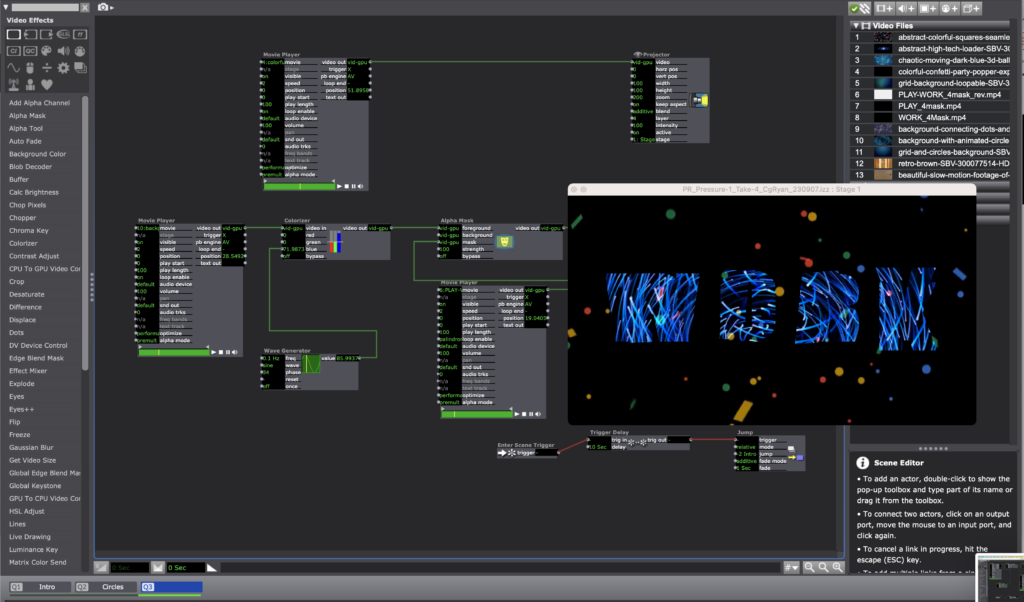
Scene 3: Trigger Delay and Jump++ to return to Scene 1: “-2”
To export the Isadora project to video to post online, I used the Capture Stage to Movie actor. I look forward to the next Pressure Project!
PP1: Good Morning, Boredom
Posted: September 12, 2023 Filed under: Uncategorized Leave a comment »Below is a recording of my “finalized” Pressure Project 1 output:
The Creation
I originally had the idea for a DVD-like screensaver creation about an hour into my work on a completely different idea. I hadn’t fallen in love with it, but had sank a decent amount of time in it. It involved hexagons of various sizes popping up into view, revealing a picture I had taken underneath. While trying to move one of the hexagons across the screen, it shot in a diagonal all the way into the top right corner. I instantly felt a dopamine hit since it reminded me of watching the DVD screensaver as a kid and waiting for it to hit a corner. I immediately switched course and started working on getting a square to bounce around the screen in a way where it wouldn’t immediately hit the corner.
Above is a screenshot of the user actor for the shape acting as the DVD logo itself. By using the triangle wave in the wave generator, I was able to make the square “bounce.” It took me some time to figure out how to keep the square changing color only at the moments where it hit the sides, and I still don’t think that part works every time. I used the HSBA Color Maker actor to help randomize the color each time.
While I knew I could probably hold 30 seconds of the audience’s attention (or at least my own attention) with just the screensaver, I thought it would be interesting to subvert expectations by adding another square. I also wanted to incorporate randomness somehow, so I made the other squares move around and change color randomly.

Above is a picture of scene 6, where all of the boxes appear and start moving around the screen. After playing with the “meat” of it for probably around 4-5 hours, I added the beginning and ending. I ended up picking Singin’ in the Rain for the movie framing device since it’s seen as a classic–everyone knows “Good Morning”–and I liked the idea of having a song being paused in the middle. It also helped add the feeling of nostalgia I was going for since it’s an older movie. Below is a video of my Isadora screen while the action played.
The Performance
After six hours of working on a project, I tend to get stuck in the role of creator and have a hard time seeing things from an outside perspective. I’ll admit that I worked on the whole things in two sittings (which was not a great idea in retrospect). By the time I was “done,” I was so immersed in my work that I had no idea if it even made sense anymore. This wasn’t a great feeling, but in a way, it made the experience of watching the class during the performance much more rewarding. I suddenly was able to see the piece in a new light, especially since people were so vocal with their reactions.
CG’s point about the first square going on the hero’s journey resonated with my original thought; once I’d created the other squares, I realized that I had made a main character and edited the rest of the project to reflect that. What Arvcuken said about it being a “series of interruptions” also stuck out to me. I had a hard time summarizing the piece, but that was an eloquent and accurate way to put it.
Finally, the class’ guttural reaction to the first time the screensaver showed up was awesome to watch as the creator of the piece. While I was hoping for more of a lighthearted response, it was in a way rewarding to see the sudden frustration everyone felt knowing that the box would take a while to hit the corner. Even though it wasn’t a positive feeling, I enjoyed getting to see such a large reaction over what I had made. I also apologize for making something so frustrating–once I saw it I couldn’t pass it up.
Lawson: Pressure Project 1
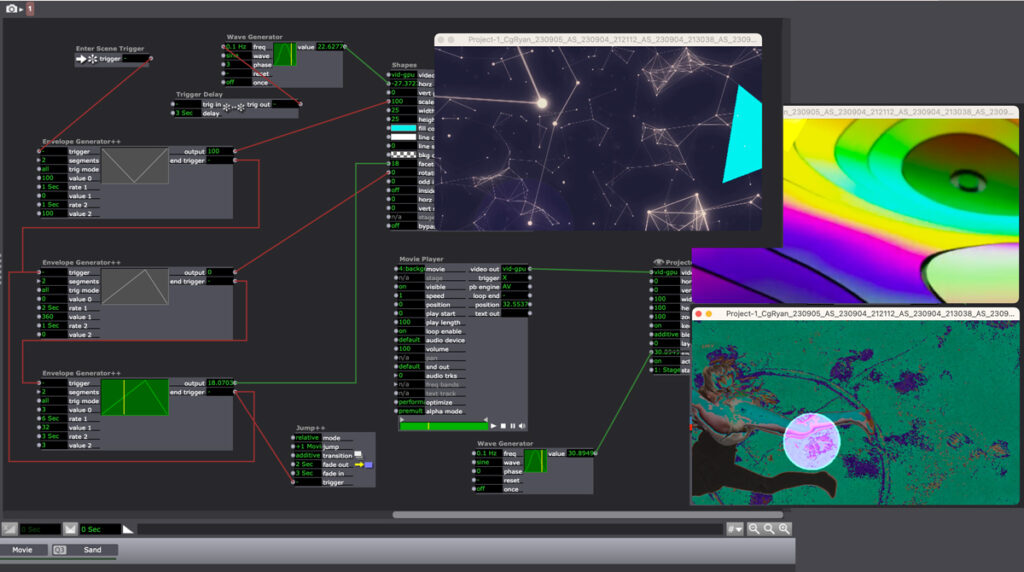
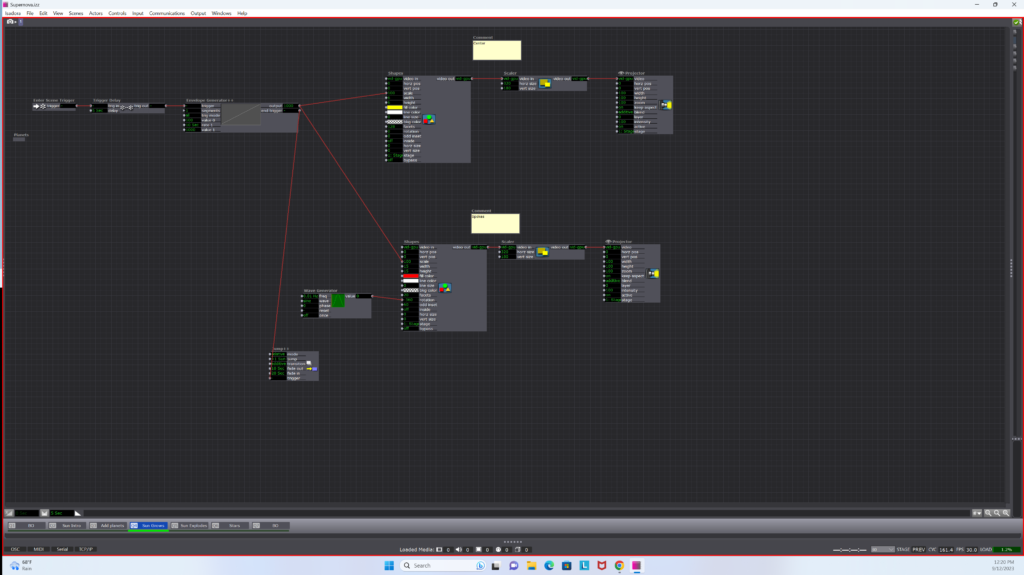
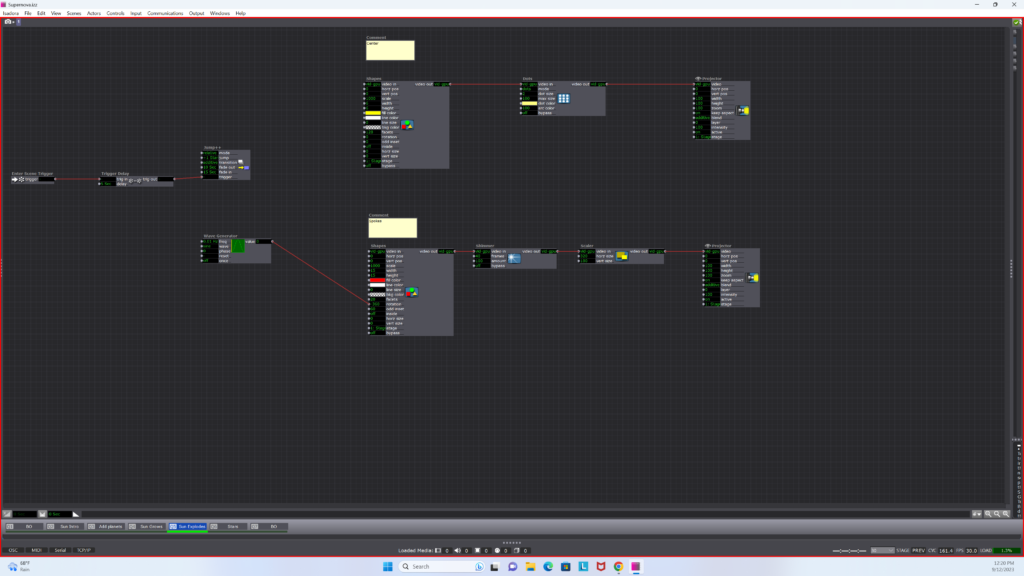
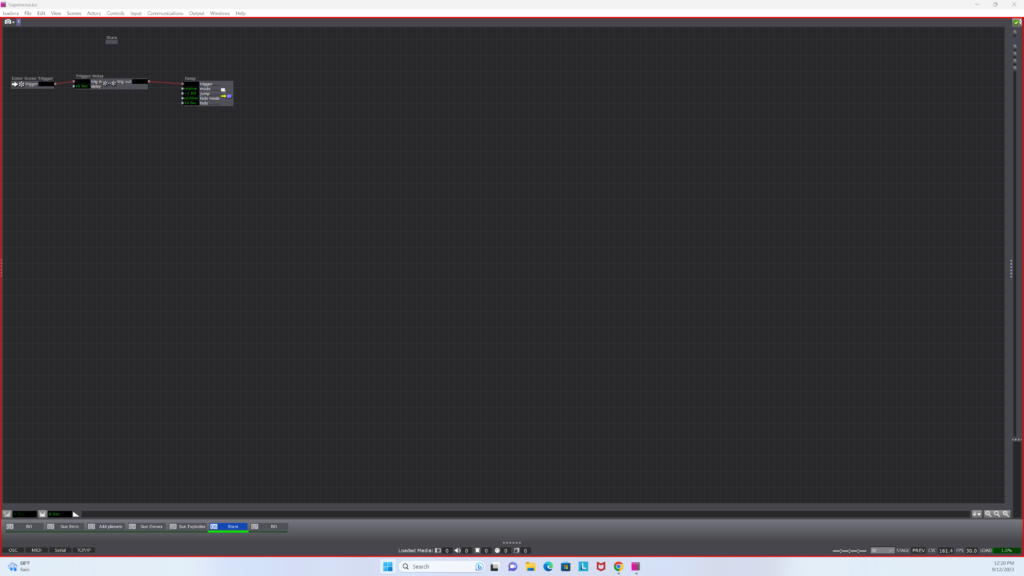
Posted: September 12, 2023 Filed under: Nico Lawson, Pressure Project I, Uncategorized | Tags: Isadora, Pressure Project, Pressure Project One Leave a comment »For pressure project one, I was inspired to create a narrative as opposed to an infinite loop. I have recently been interested in outerspace and interstellar processes and decided to create an animation of a supernova, albeit in a simple, geometric representation.
To create a sense of time and scale, I played with trigger delays, envelope generators, and the fade in/fade out aspects of the jump++ actor. Playing with the fade in and fade out aspects of the jump scene actor helped me to create the perception of a camera zooming out to show the entire solar system. Trigger delays and envelope generators allowed me to establish movement of particular elements and create a sense of passing time. Because I did not yet know about the spinner actor I used a wave generator to manipulate the planet shapes’ horizontal and vertical positions long an elliptical pathway. To prevent them from traveling together in a straight line, I gave each planet a different scale limit and used trigger delays to offset the initiation of the planets’ pathways. For this reason, the planets appear to move in a random pathway across the screen, rather than circular orbits.
To create the sun’s “explosion,” I used an envelope generator to increase it’s scale over 10 seconds. In the next scene I used the shimmer actor to disrupt the pointed red shape and the dots actor to disrupt the yellow circle. The seeming “fizzling” of the sun was achieved through the cross-fade between scenes.
If I was to improve this patch, I would want to first, reduce the load on the Isadora program and offset the limited power of my computer’s processor, and second, create an orbit for my planets using the spinner actor. I might also use the explode and particle actors to create a “real” explosion of the sun rather than the illusion that I created using the shimmer actor. Additionally, I think that I could use the layer functions and blend mode of the projector actors to allow the planets to disappear and reappear around the sun, rather than showing up as bright spots when the images overlap.
Upon further reflection…
From a storytelling and pacing standpoint, I wish that I had allowed the scene in which the planets appear to stay longer. For me, the scene jumps to quickly after the last planet appears, rushing the story rather than establishing the presence of a solar system. For similar reasons, I wish that I had used a similar strategy of trigger delays and envelope generators to allow the stars to appear at the end of the story. I think that the narrative would have had a more satisfactory ending had I allowed the stars to slowly establish themselves rather than appear all at once. It would have also been a more satisfying final image if I had used a particle generator to create a background of smaller stars- this would have created significantly more depth to the screen.

Bump: Tamryn McDermott “Collective Play”
Posted: September 12, 2023 Filed under: Uncategorized Leave a comment »I am bumping Tamryn’s project: “Collective Play.” I appreciate that she included feedback from her peers and how she might incorporate the feedback later. The feedback also provides additional documentation of people’s experience of the project beyond video and photo.
Bump: “Cycle 3: Puzzlr Final” by Juan Torres Brenes LaRoche
Posted: September 12, 2023 Filed under: Uncategorized Leave a comment »This project really captured my interests as its bridge between digital programing and physical action (puzzle game) is what I want to pursuit in my creation.
The article describes the author’s struggles and achievements in designing and building puzzle units which had to contains electric components while it works as puzzle plates.
As I work on building robots or machines in my art, I could understand how it was difficult to make it functional both physically and electrically (and aesthetically!).
The author’s idea and realization of synching the physical puzzling action at a player’s hands and the reflected image on a monitor is fascinating because it beautifully bridges the relationship between the body of a player and a digitally designed system.
Bump: Cycle III – Bar: Mapped by Alec Reynolds
Posted: September 12, 2023 Filed under: Uncategorized Leave a comment »This project is fascinating to me because of its ability to take an ordinary experience like going to a bar and elevate it into more of a unique and interactive experience. Usually, venues are mostly background settings, but in this project, the venue becomes its own character. In Alec’s post he mentioned how the end product wasn’t what he initially envisioned, but I still found the video to be interesting.
Link: https://dems.asc.ohio-state.edu/?p=3384
Bump: Layering and Gesture: Collective Play —Tamryn McDermott
Posted: September 11, 2023 Filed under: Assignments Leave a comment »I appreciate the educational aspect/goal of this project. I also really enjoy the fact that it encourages social interaction and collaboration.
Using the motion lab in this way to create this interactive and collaborative environment is a really cool way to teach these concepts. I am glad I came across this project since it reminds me to think about the ways that art, technology, education, and collaboration can each enhance each other.
Link to Post: https://dems.asc.ohio-state.edu/?p=3655
Bump: Ghosts in the Landscape – Mollie Wolf
Posted: September 11, 2023 Filed under: Arvcuken Noquisi, Assignments | Tags: bump Leave a comment »I really liked this entry, and how this individual talked through their thought process and work procedure. The methods of problem-solving discussed throughout this entry really depict flexibility and openness to new ideas based on the limitations or allowances of the programming software, which is relatable to my experience with developing film and electronic music performances. I liked how this person adjusted their design to fit within and around limiting parameters (such as the difference actor creating an outline of the moving people instead of showing the full person like they initially wanted). It’s interesting to think about devising experimental media systems as a constant dialogue with the tools we work with, constantly assessing the potential within these tools and building projects out of what is visibly possible to us…
Bump: “Cycle 2: Audio Game” – Taylor Olsen
Posted: September 11, 2023 Filed under: Uncategorized Leave a comment »This project jumped out to me because I am always interested in games that are unique, and I have never encountered a game concept like the one described here. I am also interested in making a game that utilizes a unique concept and/or an abnormal control scheme, an idea partially inspired by this project.
A link to the original post: https://dems.asc.ohio-state.edu/?p=2157
PP1 – WIZARD VAN SPACE ADVENTURE .COM
Posted: September 10, 2023 Filed under: Arvcuken Noquisi, Pressure Project I | Tags: Au23, Isadora, Pressure Project Leave a comment »Hello. Welcome to the Wizard Zone. The Wizard will now show you more about his wonderful Isadora Pressure Project.

Just kidding. He doesn’t know anything about Isadora. Anyway. Here’s a video capture of the thing:
How I built it~
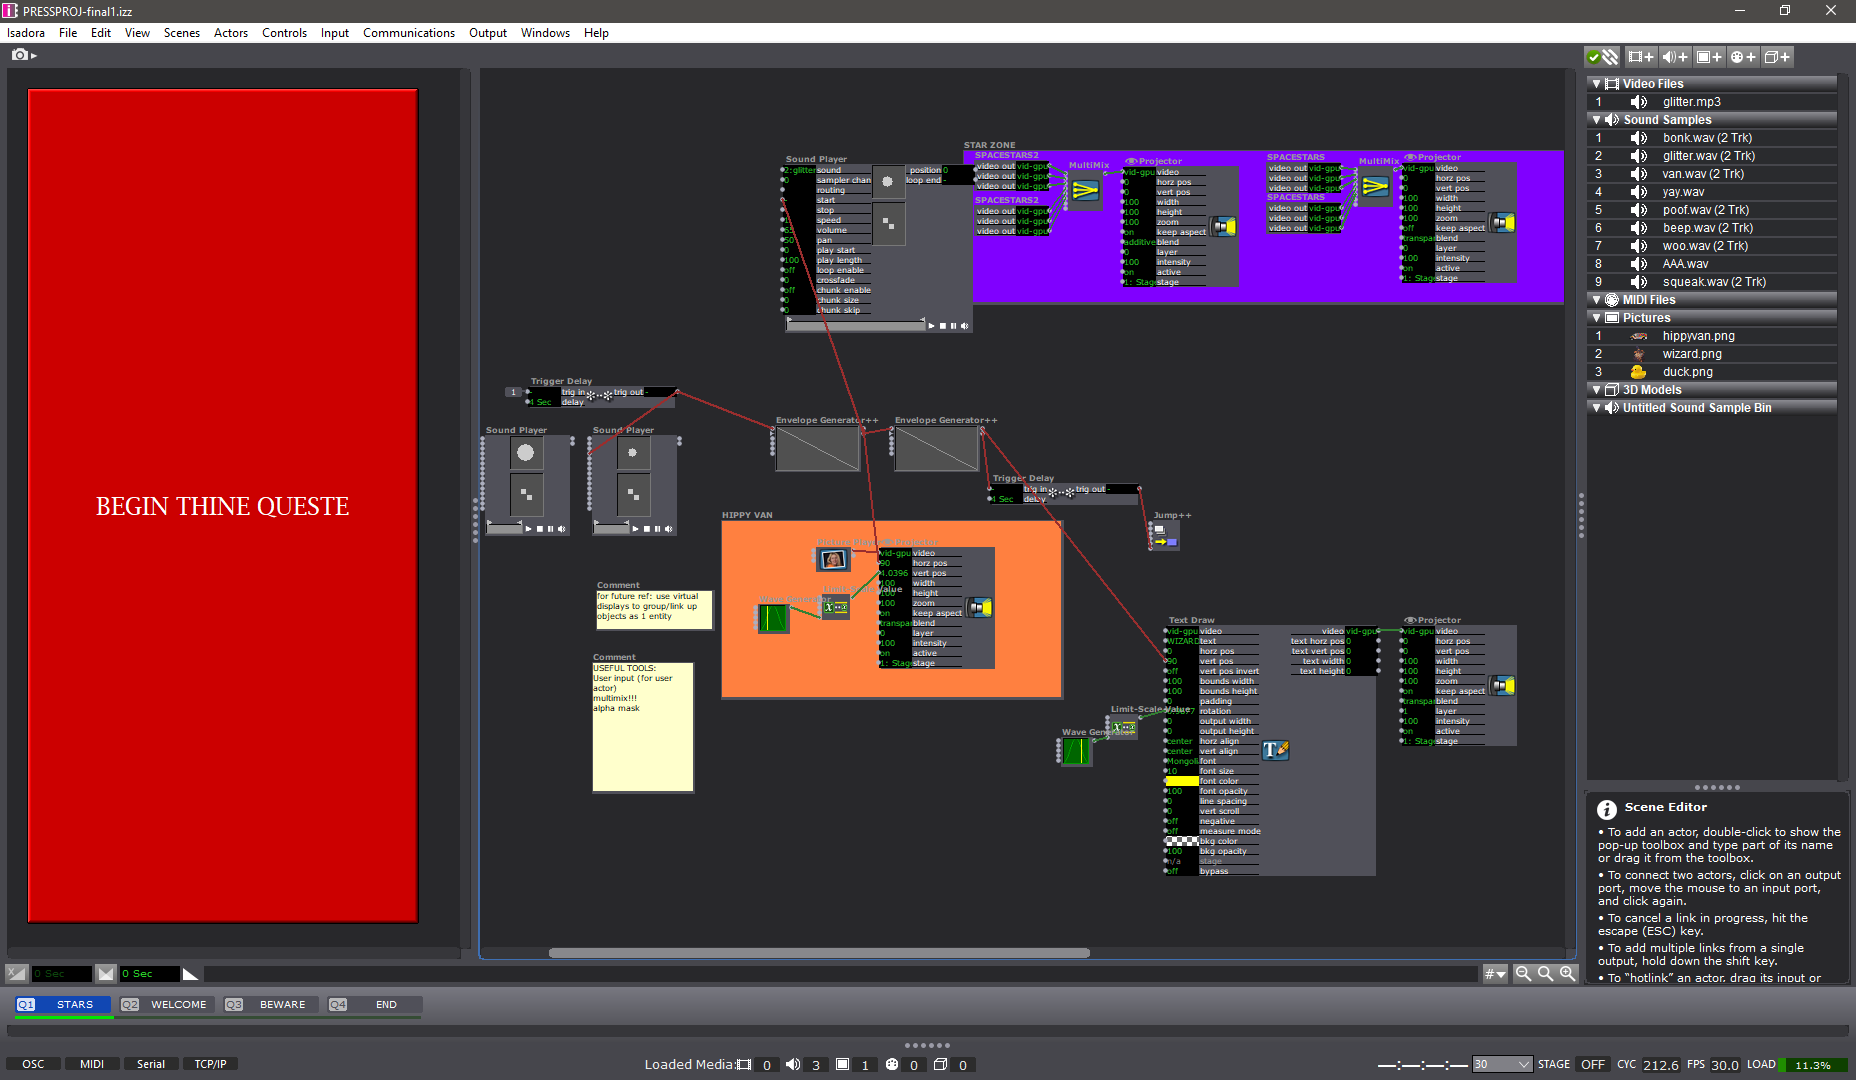
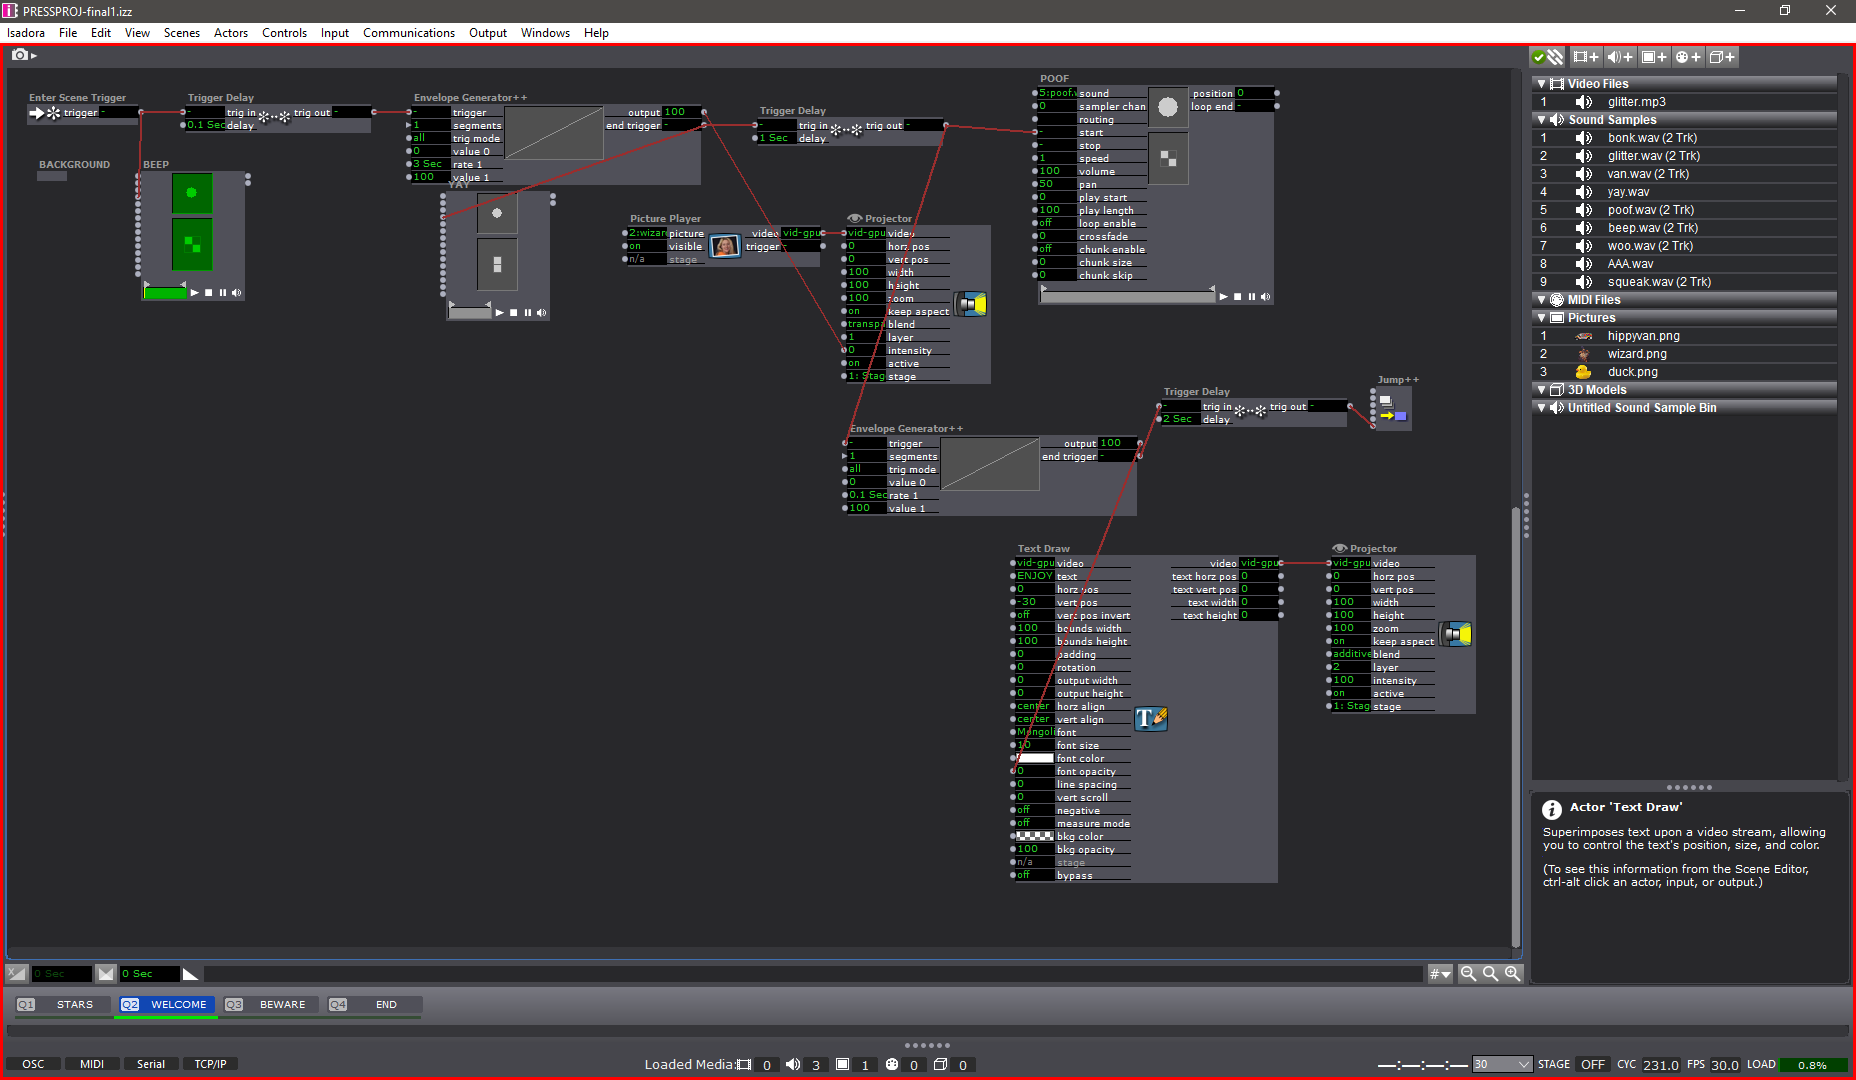
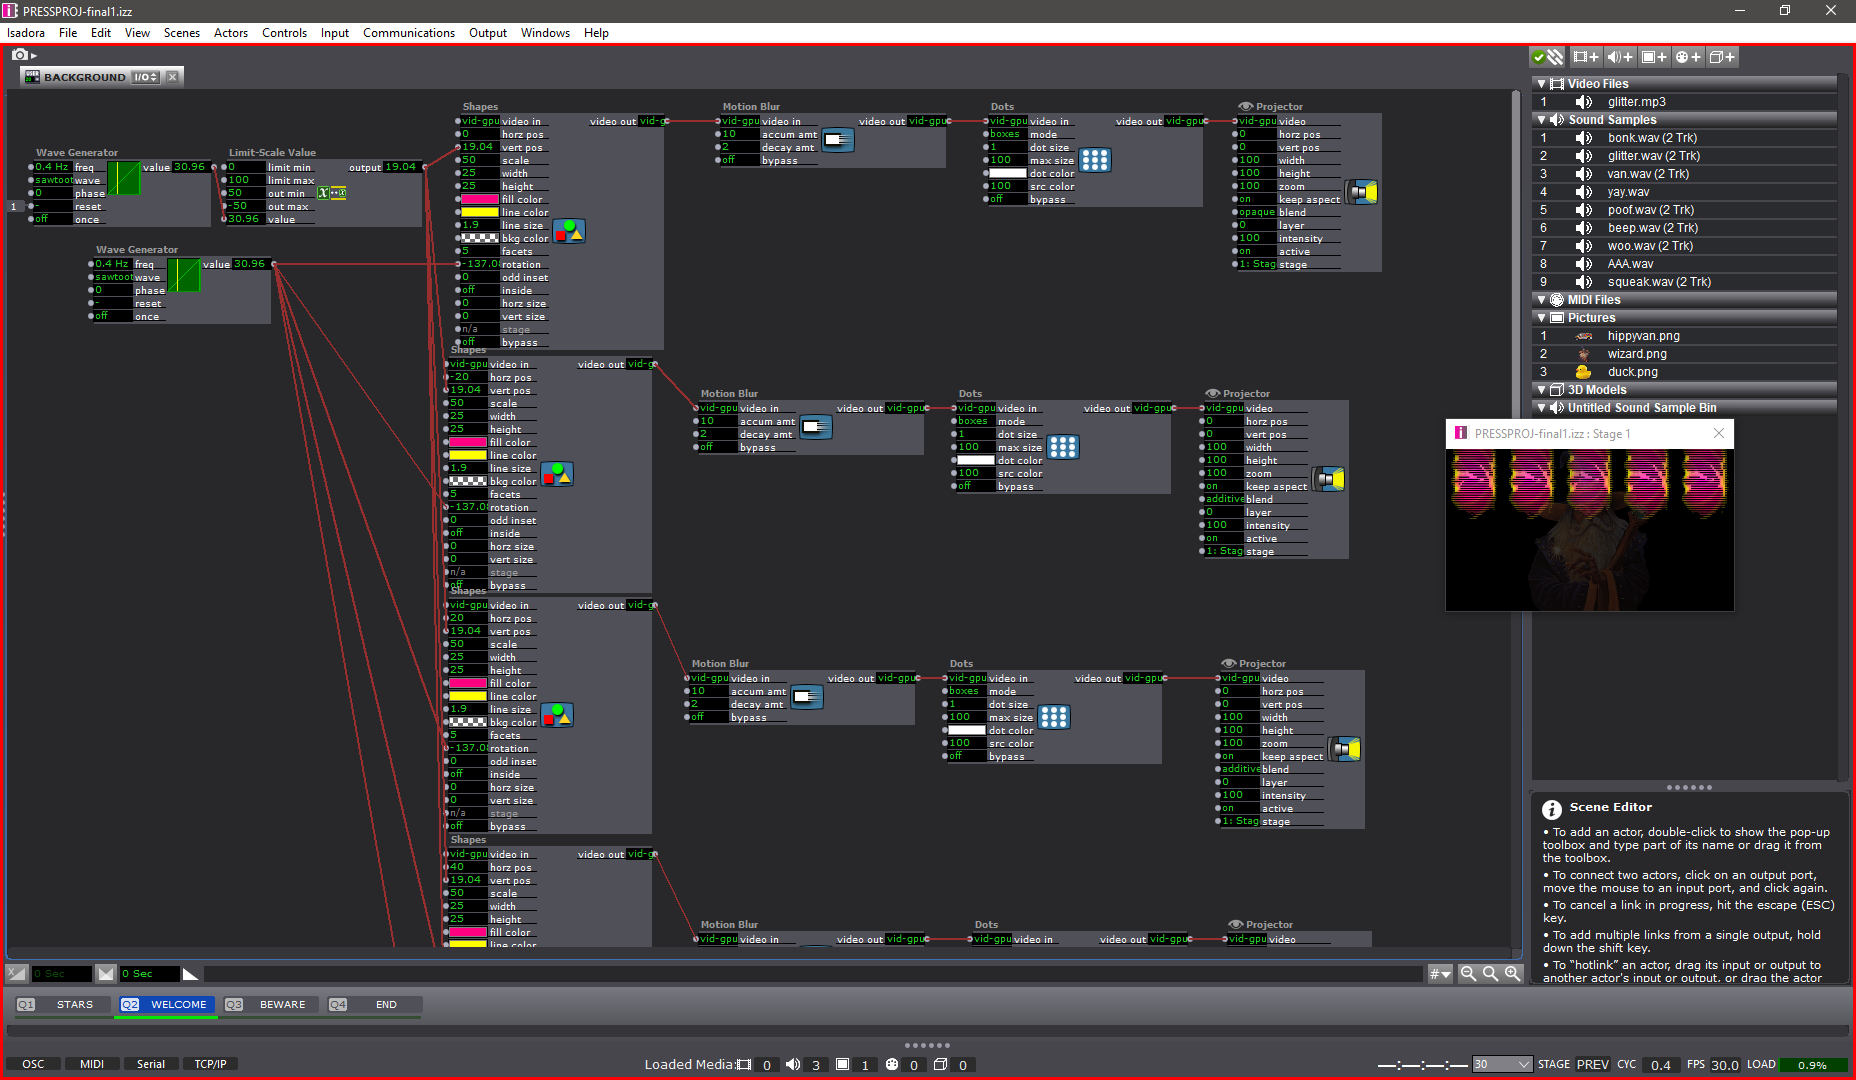
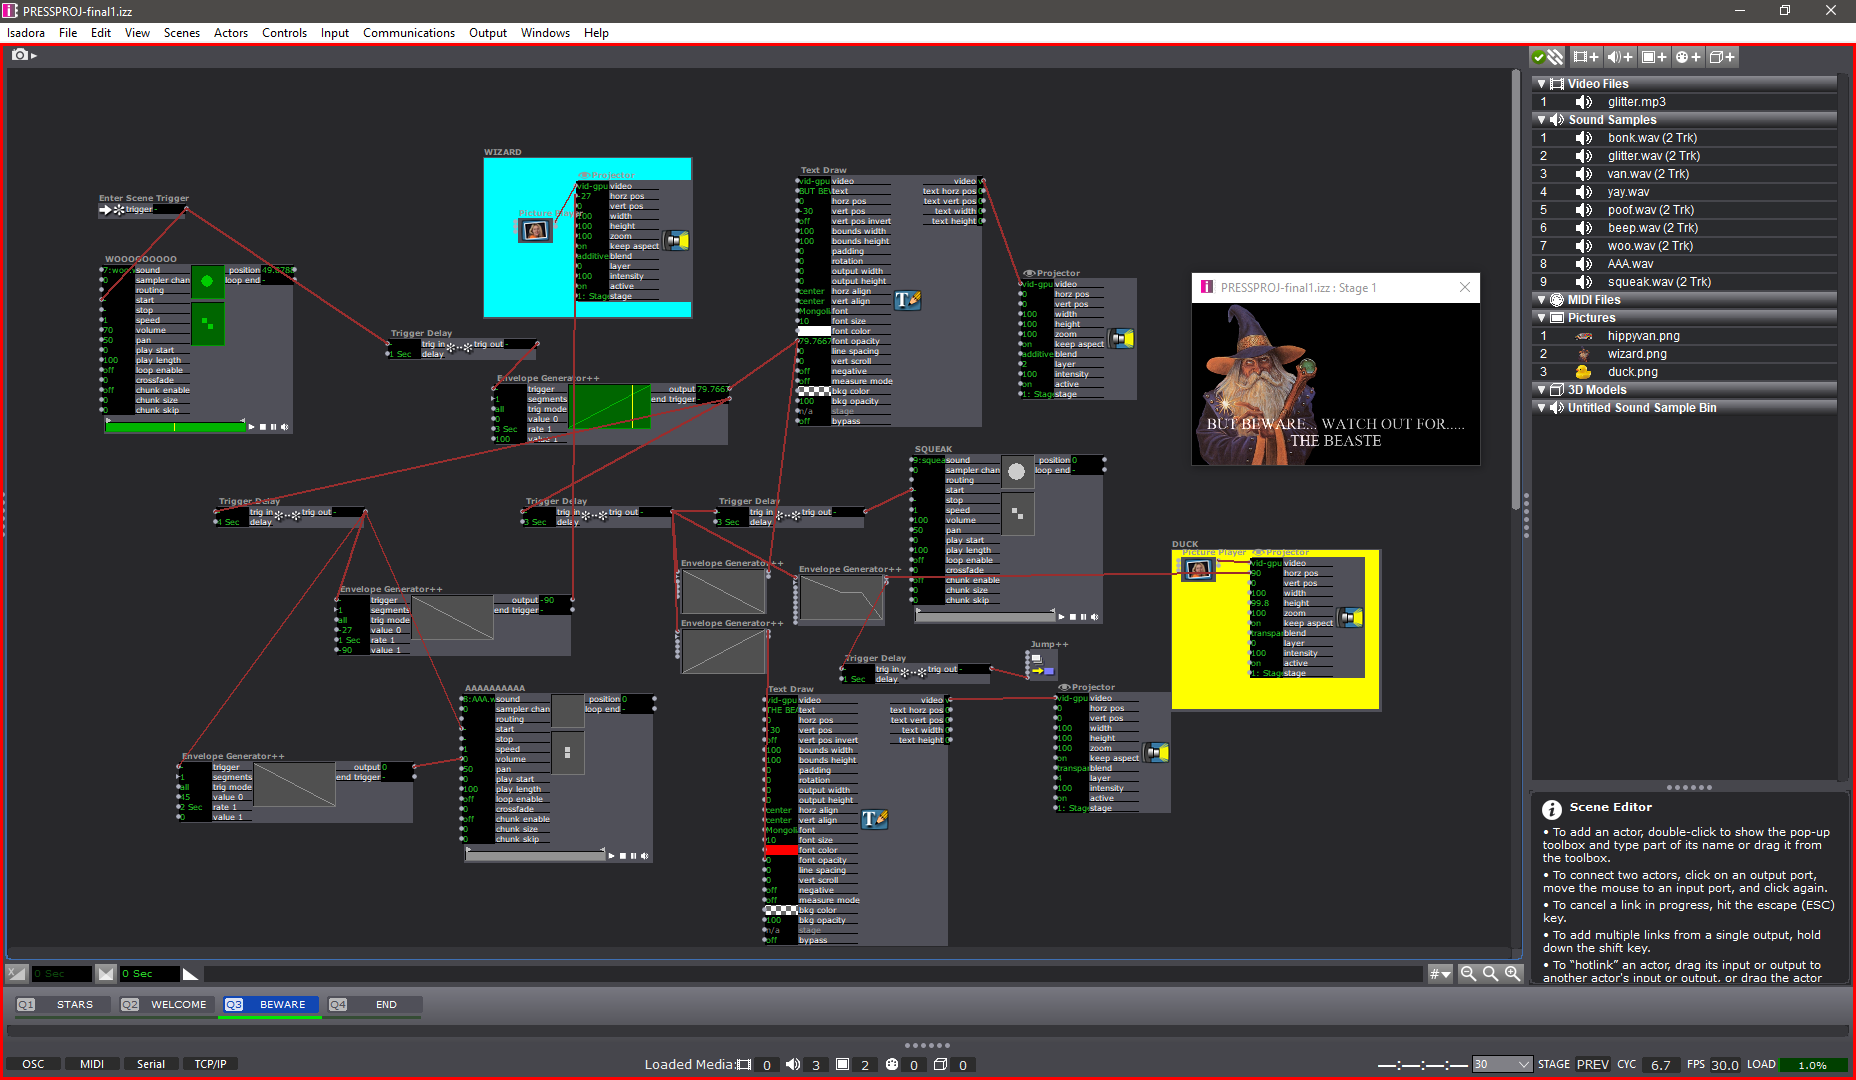
For this pressure project I wanted to extend beyond just shapes actors, and create something silly and personally entertaining. I use MaxMSP (and a bit of Pure Data) for my Sonic Arts major, so I am used to this type of interface for audiovisual coding. I knew I wanted to throw some wizards in this project, because that’s what I did for a lot of Marc Ainger’s MaxMSP projects in his class.
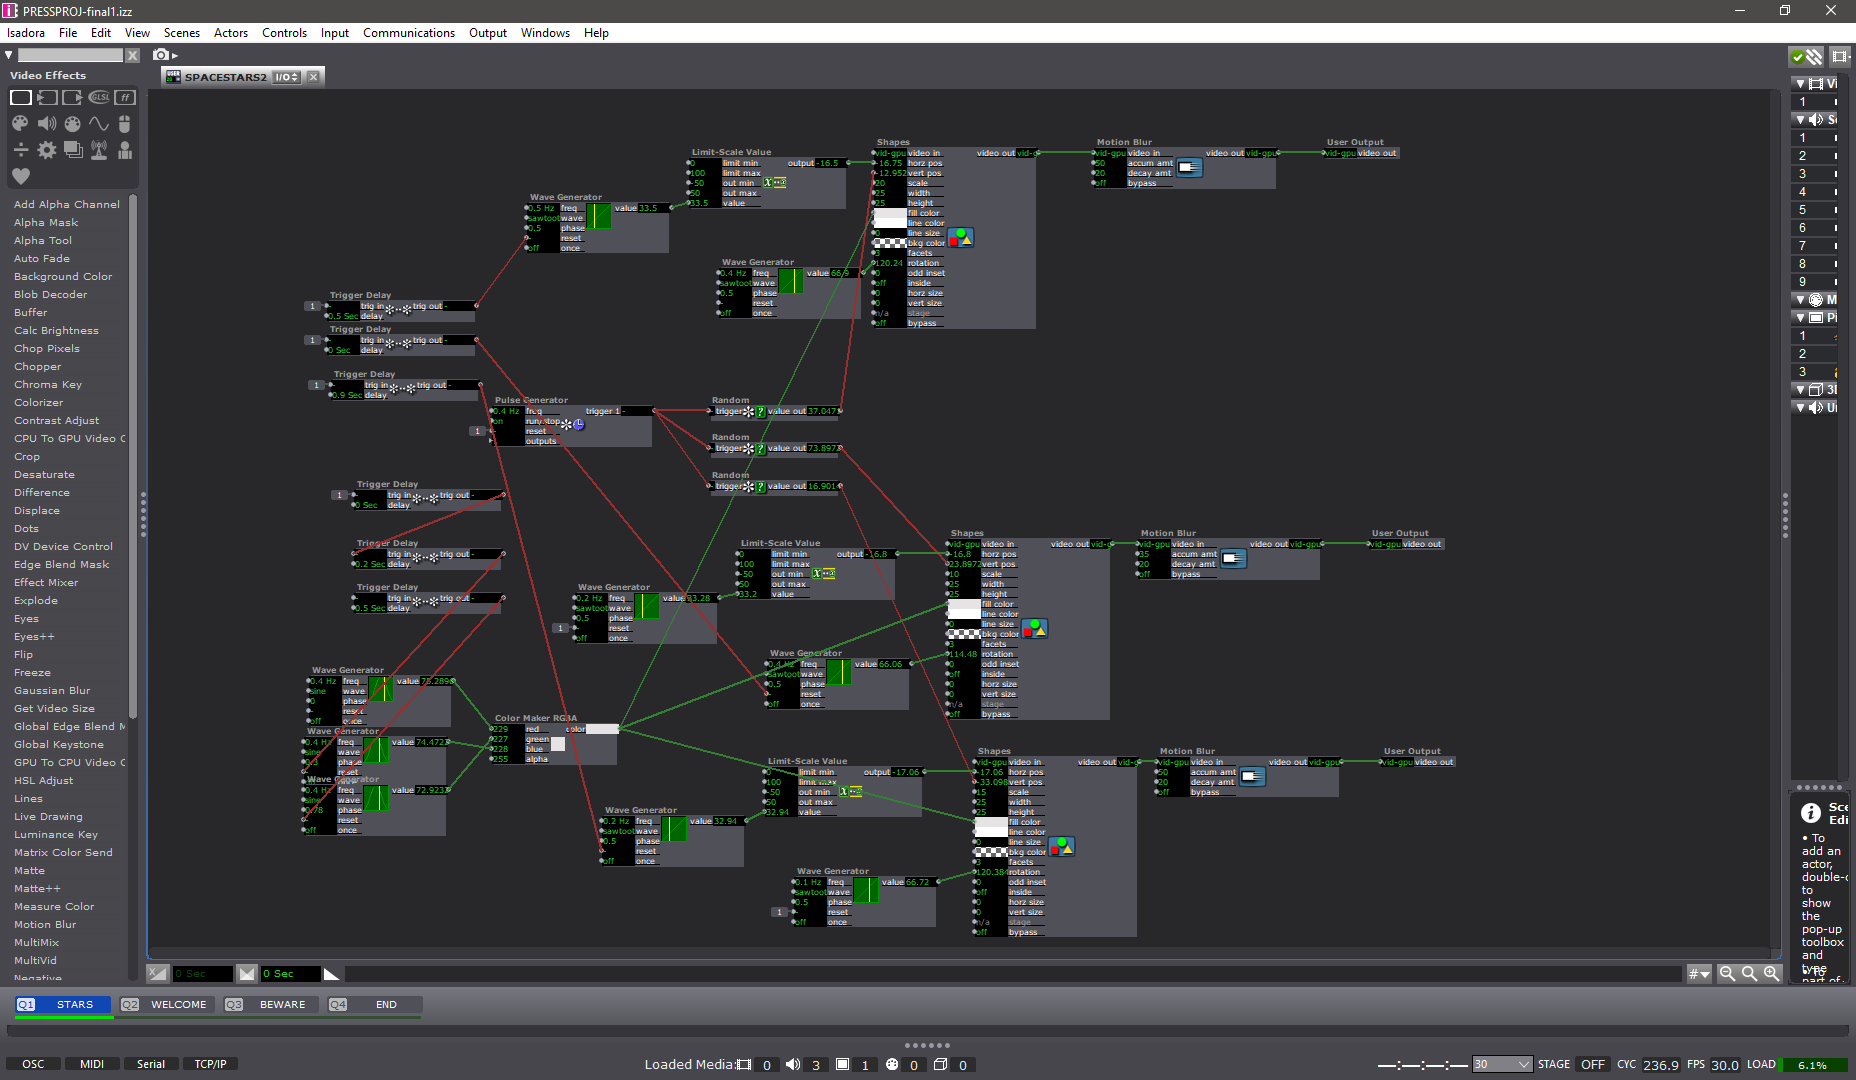

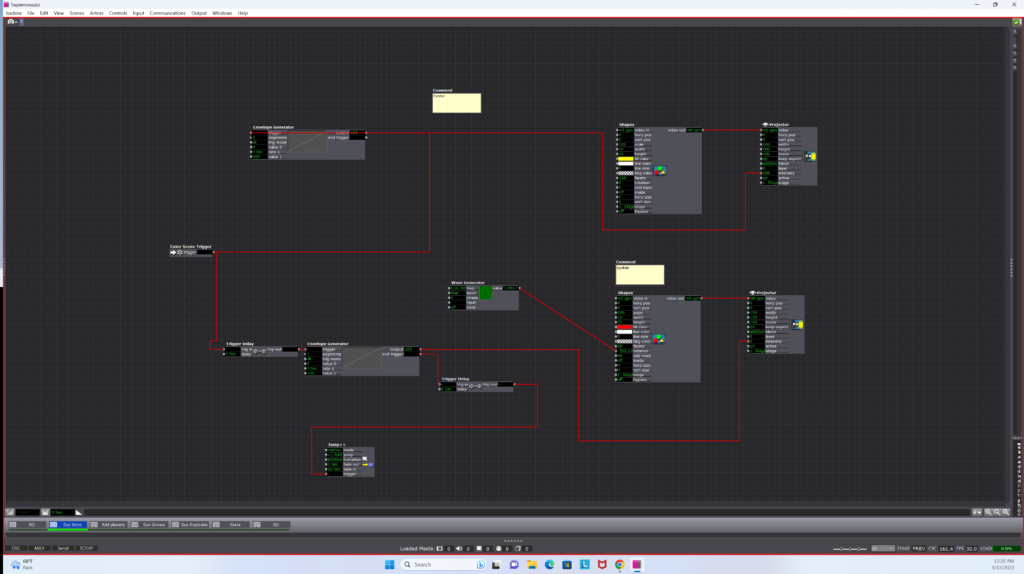
For the first hour of the allotted time, I followed the Isadora Guru videos to create a star-field backdrop. I used pulse and (sawtooth) wave generators to create rotating triangles which move left to right on the screen, before restarting at a different y-axis location and moving left-to-right again. I’m sure there is a much more effective way to produce this effect (so that the shapes reset at the right moment), but I found this to be a great start to immerse myself in the software. I threw the stars into user actors to clean up my first stage and create more stars without too much effort.
After that I started messing with images. I found some good PNGs to work with:


I used the picture playor actor with wave generators and limit-scale value actors to create movement for the PNGs, and I used envelope generators to make the PNGs appear, disappear, move in-and-out of frame, etc.. My process was just a lot of playing around and improvising. I added some text draw actors to my stage so that I could give the scene a little bit of absurd context. WIZARD VAN SPACE ADVENTURE .COM was just the first thing that came up in my head. I liked the idea of turning this whole thing into some kind of intro for the Wizard’s personal HTML/Adobe Flash site (rip Flash).

Stage 2 is the only other stage that has User Actors. I set up 5 rotating, falling pentagons which serve as a funky background for the Wizard to appear in front of. I threw on the dots actor to make them a little more retro. For future reference: the computer did not like this. Either do this more efficiently (virtual stages?) or record it as a video to use instead.
Stage 3 is the Chaos Zone. It was at this point that I was just plugging everything in to see what would work, with no regard for neatness. I used a ton of envelope generators for the text to appear then disappear, for the duck to slide in, for the Wizard to run away, etc.. Trigger delays really helped time things out, especially with the sounds…
THE SOUNDS
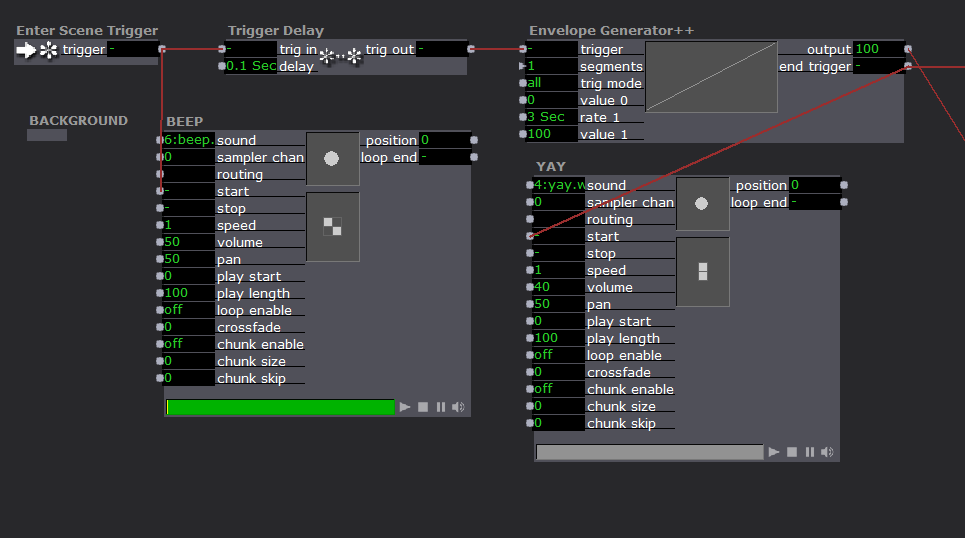
SOUNDS PRO-TIP: As far as I know your audio clips have to be in .WAV format in order to function properly. I tried using .MP3s and they showed up in a different non-sound-oriented actor. Beware.
It felt like a bit of a cop-out, but I knew using sound effects would instantly improve the engagement of an audience with my project. I used a bunch of cartoon sound effect I recorded off YouTube. I needed a distinct voice for the Wizard, so I grabbed some .WAV files off the Team Fortress 2 wiki (Soldier’s dying scream 2 and “yaaay!” to be specific).
The sound player actor is fairly uncomplicated. You just need to plug a trigger into the “start” input. Throughout each stage, my sound player actors are plugged into either the end trigger of an envelope generator, or the trig out of a trigger delay. I’m curious about what more I could do with the sound player and its various inputs – whether I could stretch it to do some of the crazy sample things I can do with MaxMSP…
Reflection
During presentation I appreciated Alex’s comment about how my presence impacted the experience of the piece – I served as a cog in the media system, because I came up to the computer (in front of the TV screen), pressed the big red start button, speedwalked away, and came back to shut it off at the end. It was a purposeful decision to be active in the performance (via button-pressing) – it gives me greater control over the performance environment and adds a personable humor to the entire experience. It’s something I will be thinking about more as we have more pressure projects and work more with Isadora – how does the perceived presence (or absence) of a human person in a media system impact the audience’s enjoyment/experience of a piece? I suppose that difference can be demonstrated in the difference between my in-person presentation of this piece and how you experience it in my video recording shown above….