Pressure Project 2, Gabe Carpenter
Posted: February 21, 2022 Filed under: Uncategorized Leave a comment »My pressure project focuses on playing a simple maze game with the Makey-Makey. The game is controlled with the D-Pad and includes a reset mechanic, secret messages, and a short ending that reveals a secret exit.
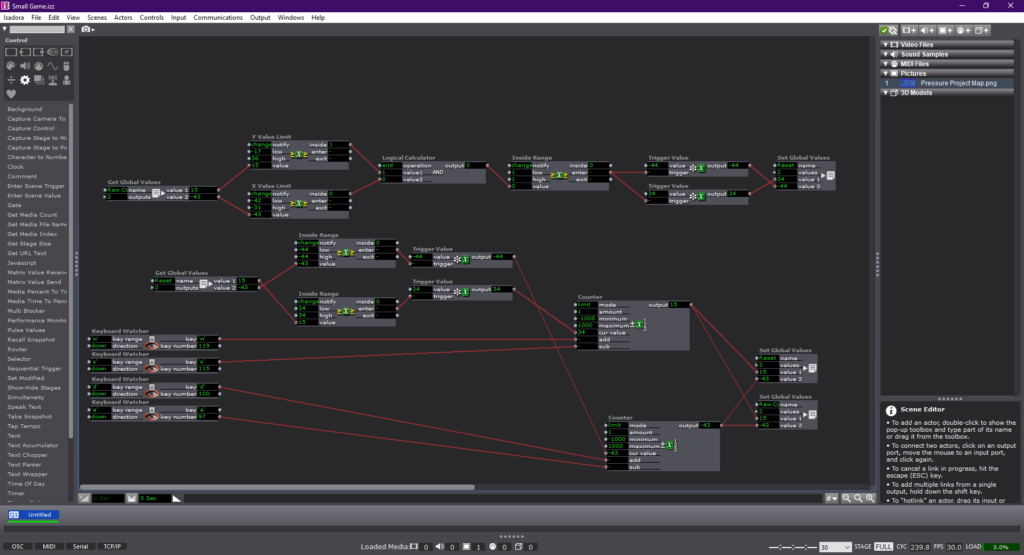
The first trial of my game included a non-functional collision system but aimed to set up the basic wall detection that the program would use. The wall detection started out as an attempt to use 2 inside range actors and comparators to determine if each parameter was met. The 2 inside range actors act as the x and y boundaries of any given wall.
The next phase of development yielded a solid method for determining hitboxes. This method feeds the aforementioned two inside range actors into a calculator, that then adds the outputs together. Upon receiving a “2” output, the calculator triggers a value that resets the player back to their original position. The data of the position is sent to a global values actor, which relays it to the counter that acts as the memory portion of the game.
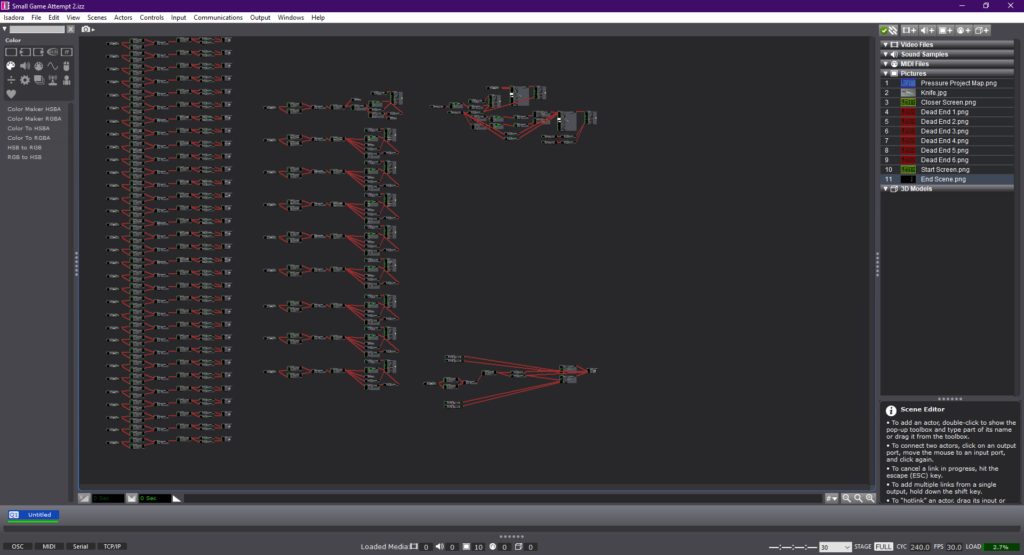
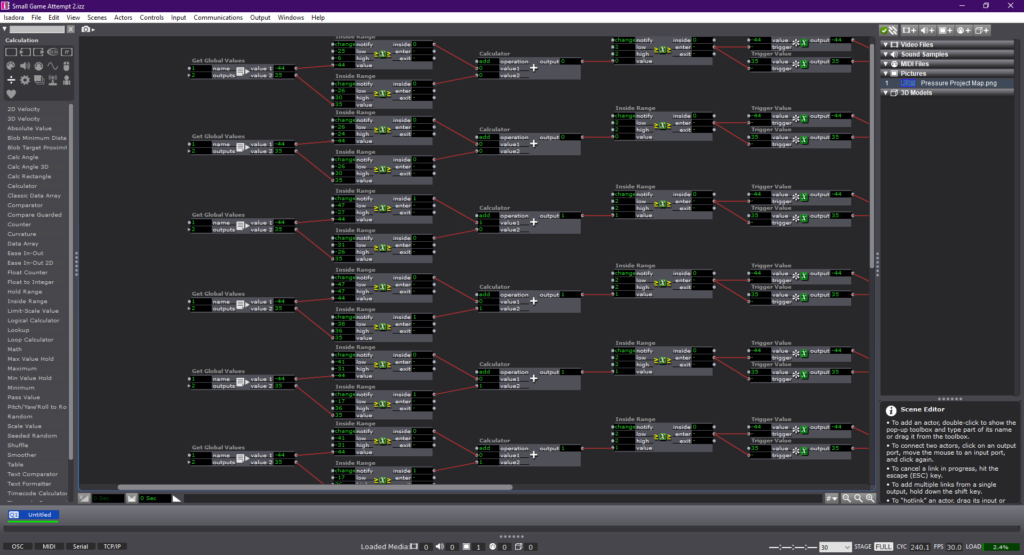
The final layout may seem messy at first, but the long row along the left side of the image is a series of hit detection pipelines for each individual wall. The row in the middle is an added sequence change that occurs when the player enters a certain area. The screen will change color and a message will be given to the player. This is done using another hitbox detection system, and triggering a waveform generator to fade the new image onto the map and then take it away again. The other smaller pipelines are the controller link and the ending “cutscene” trigger.
This is a video of me playing the game and achieving the ending.
Pressure Project 1- Congestion – Min Liu
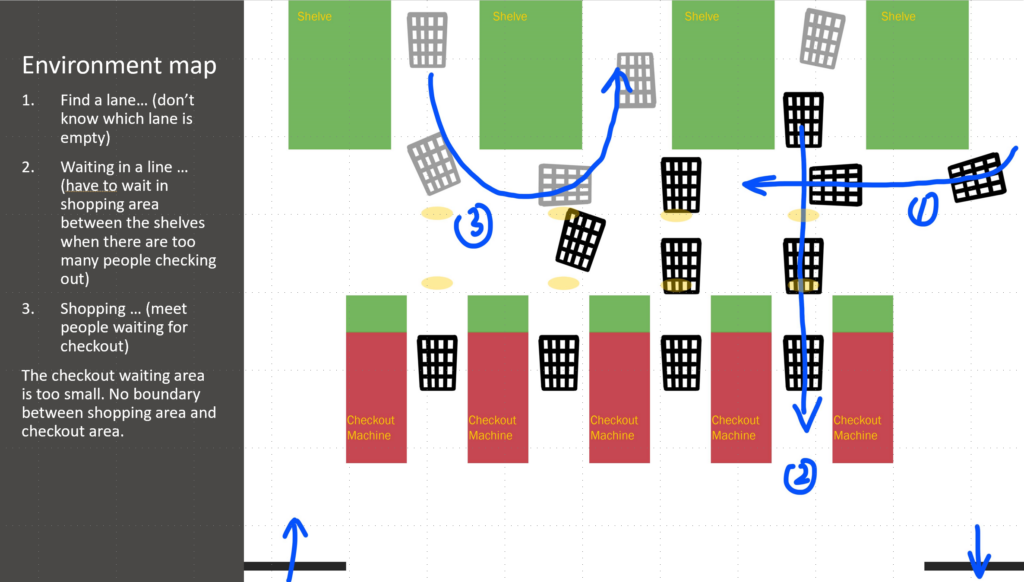
Posted: January 27, 2022 Filed under: Uncategorized Leave a comment »In weekends and holidays, there are many people shopping in groceries and congestion often happens in checkout area. For this pressure project, I observed people, environment and technology in the self-checkout area of the Giant Egle grocery store to have better understanding of the traffic happens here, and brainstormed some ideas (benevolent intervention) to solve this issue.
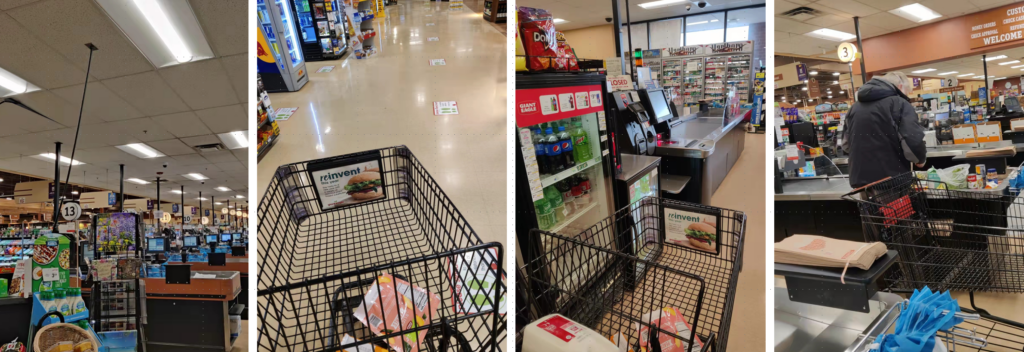
I took some photos in this area. Based on past experience and my observation today, I draw this environment map which shows the flow direction, congestion pattern and their relationship to physical environment.
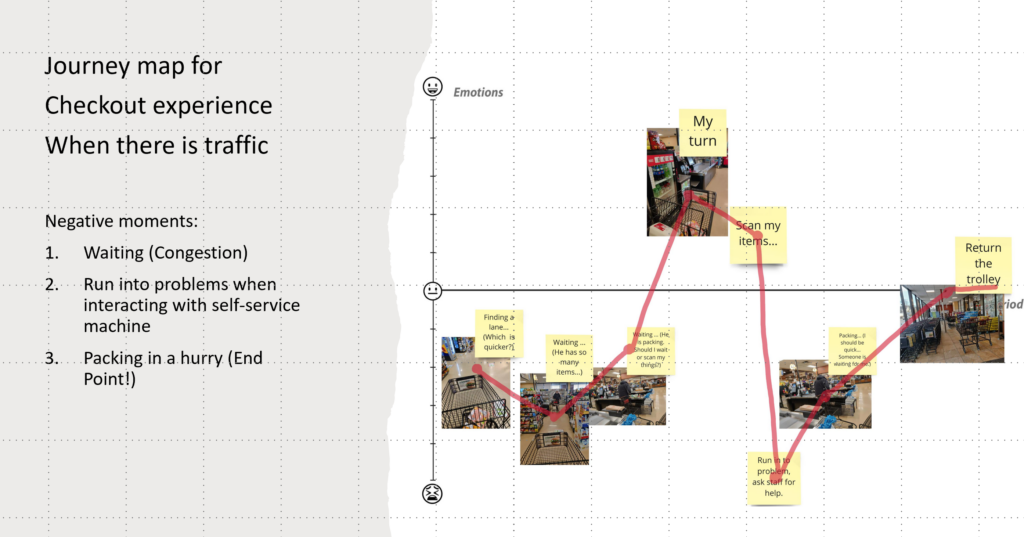
The journey map helped me organize and visualize custom’s behavior and emotional change during self-checkout process. It also shows some design possibilities to enhance shopping experience.
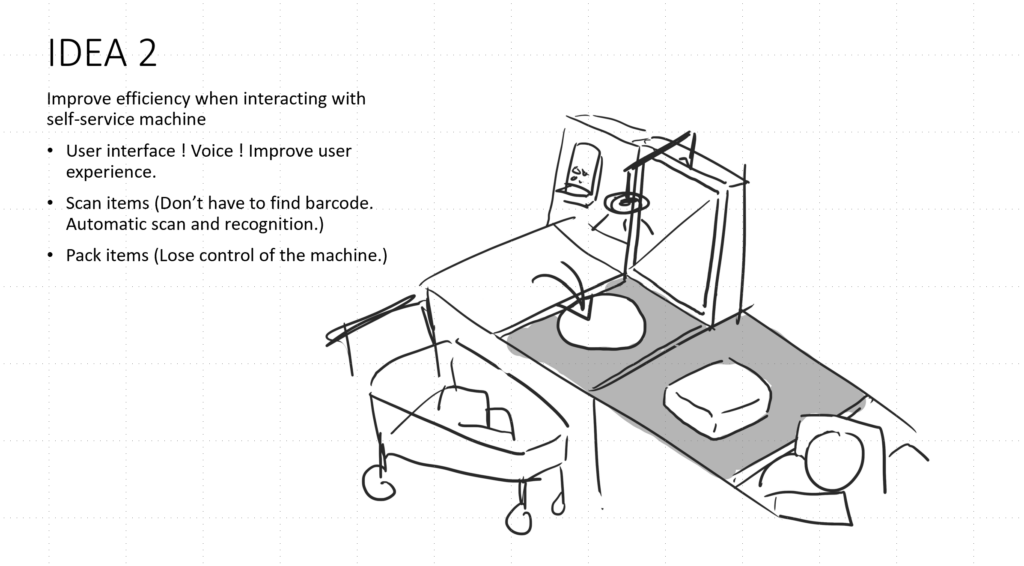
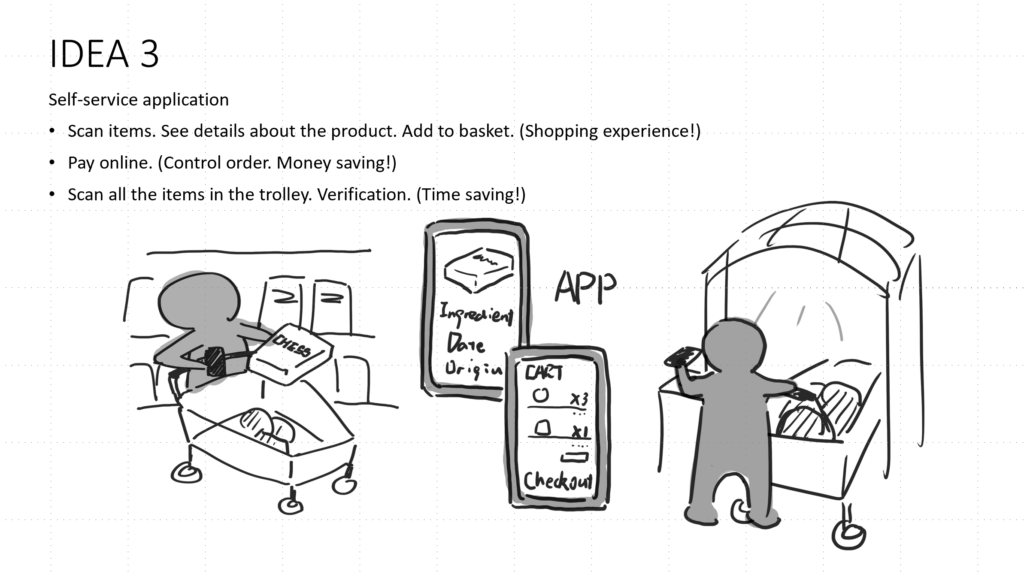
To avoid congestion and enhance self-checkout experience, we can change the environment layout (IDEA 1) and improve the efficiency of interaction with the self-service machines (IDEA 2). Re-designing a self-service machine is a big project. A lot of things need to be improved including the user interface, packing area, scanning system… More automatic scanning system can avoid troublesome process of finding the barcodes or inserting the item number. (Alec said Kroger had tried similar checkout system in some pilot stores.) Then I suddenly think of why we must wait and checkout in a specific area and why we cannot just pay while we are shopping. And I came up with the third idea -a self-service app, which I thought it’s time and money saving. Alex said that this app can be malevolent if it’s designed to intrigue consumption. It’s true. It’s important to think about possible issues causes by technologies.

Pressure Project 1 (Theme Park Admission Queuing) – Alec Reynolds
Posted: January 27, 2022 Filed under: Uncategorized Leave a comment »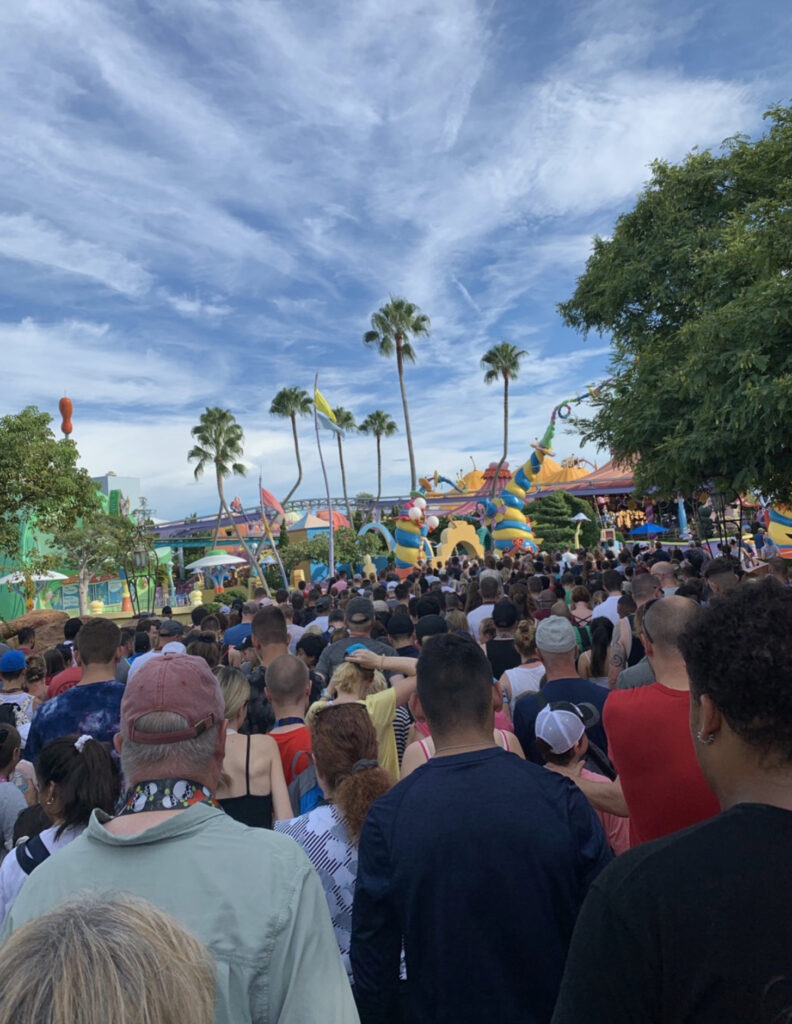
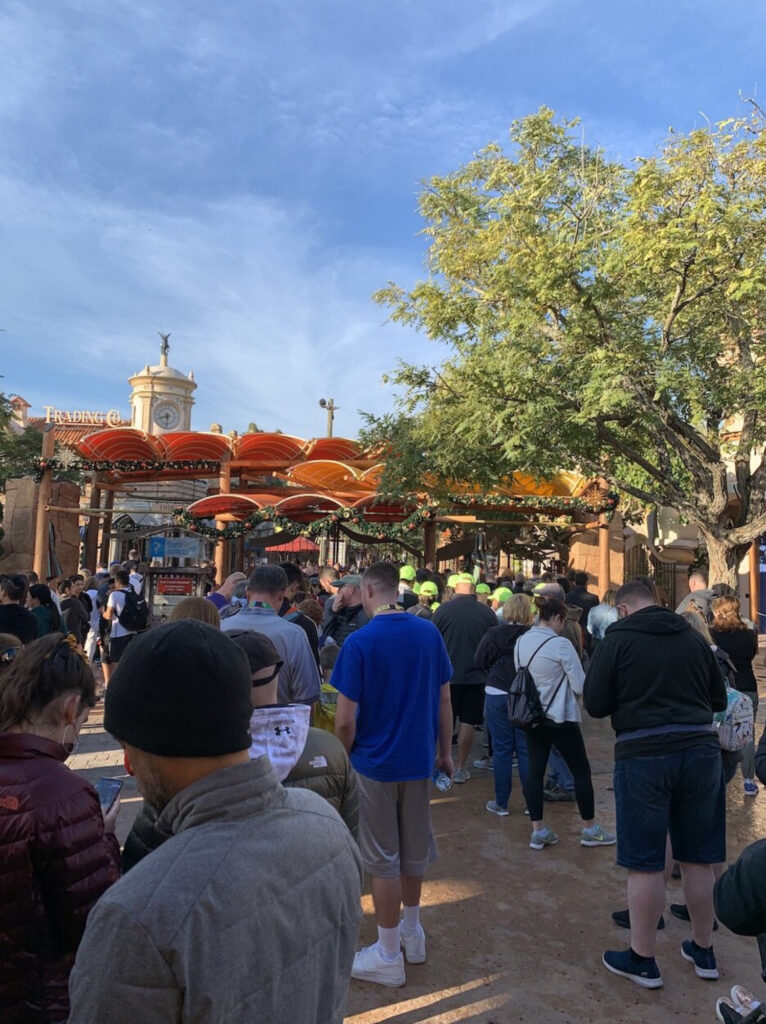
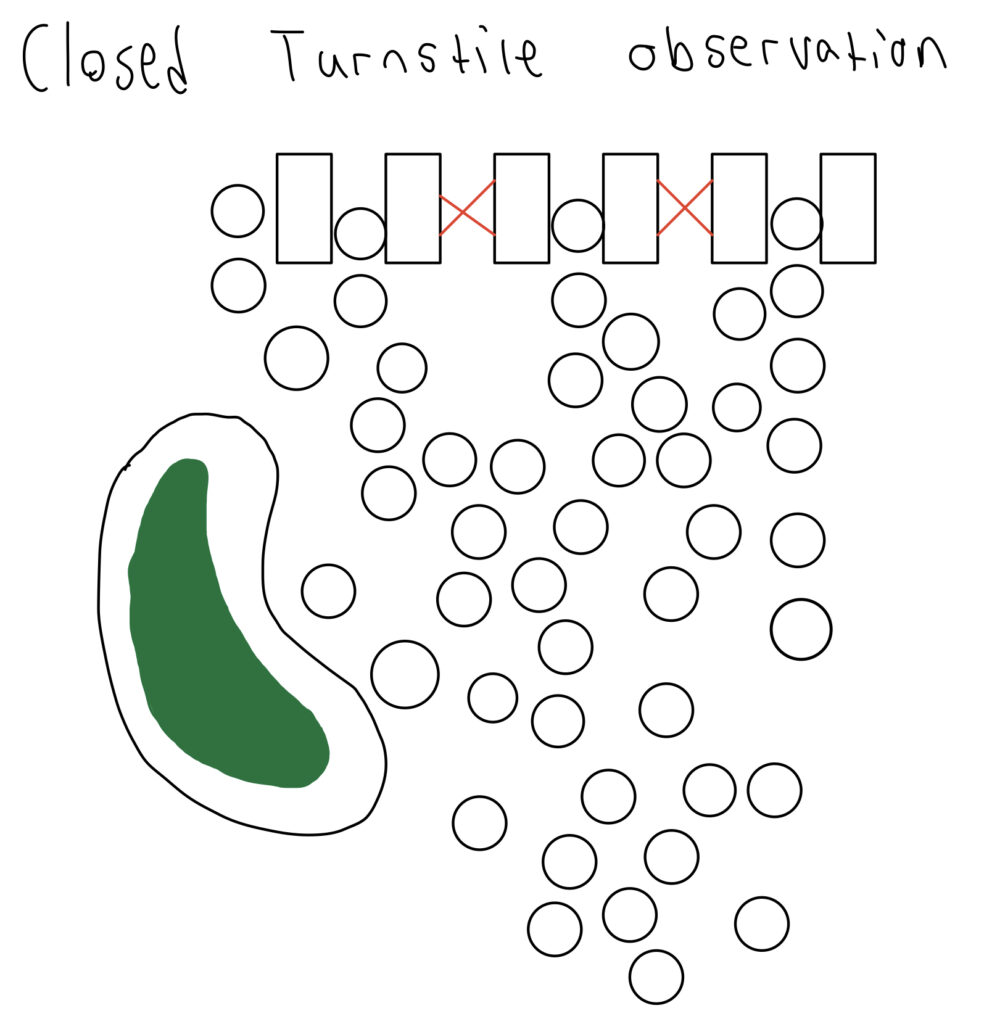
During my visit to Universal Orlando Resort Island’s of Adventure, I noticed an interesting dynamic of social congestion before I even entered the park. To gain admission to the park, one must pass through turnstiles at the front of the park with a valid form of admission. Before the park opens for the operating day, eager guests, ready to get a jump on their day, pile in by the hundreds. This leads to a huge back up of guests and an inefficient admission throughput. Before we dive in to a solution to this problem, let’s contextualize the situation with some of my observations.
OBSERVATIONS:
-Looking at the nature of the congestion I noticed that it was homogenous and the majority of people moved towards the gates. A majority of the congestion contained groups, versus individuals.
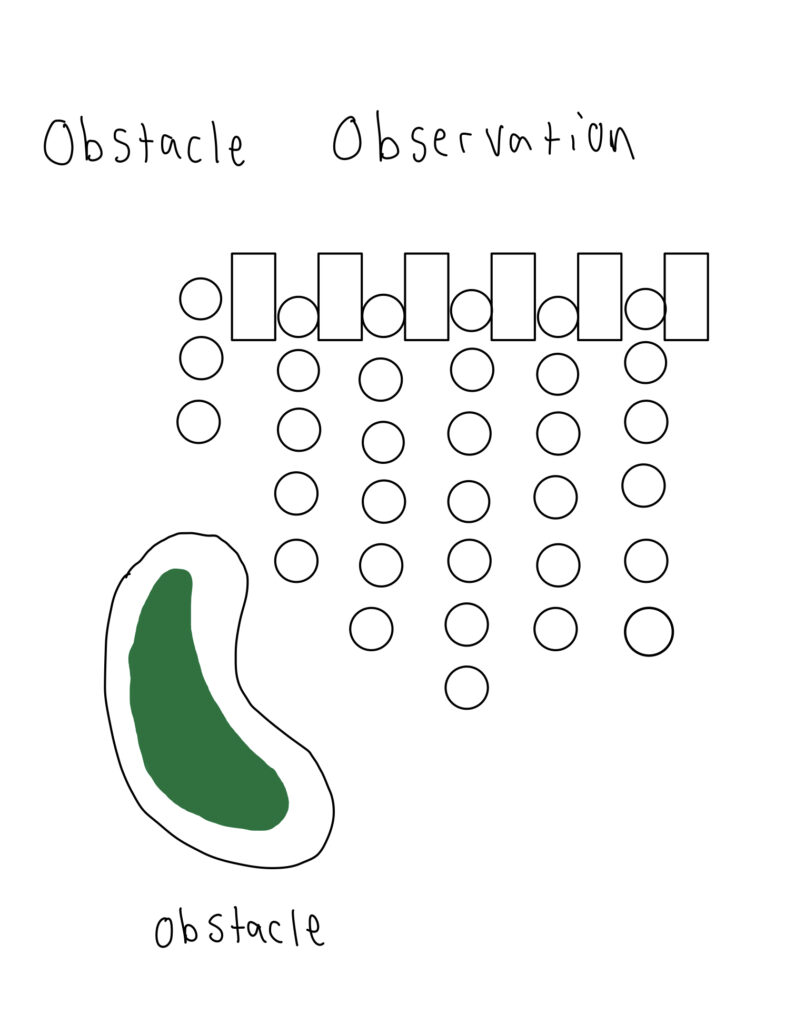
-There were many obstacles that the crowd had to navigate around, including floral planters, ticket kiosks, poles and shade structures, ticket sale booths, trees and other common objects like waste recepticals.
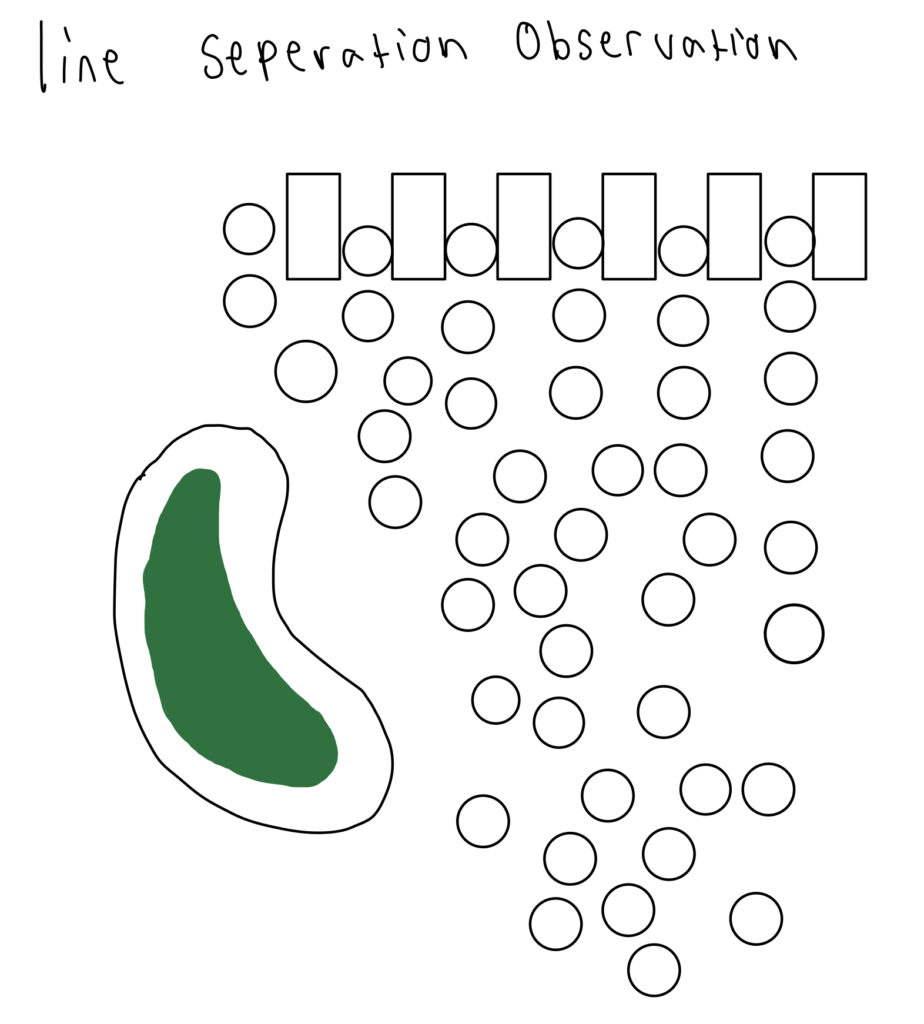
-All the lines moved at a unique pace.
-Groups were often spotted abandoning their spot in line to opt in for a seemingly faster one.
-Some turnstile lines appeared to have less guests in them if they were partially obscured by an object.
-From far away, there was no clear separation of individual lines.
-Closed turnstiles would lead to a bottleneck merge effect close to the open turnstiles, creating an even denser congestion.
Observational Imagery:
Benevolent Solution
My solution to this problem revolves around a machine program that can identify the current state of a line regarding its length and identify guests waiting in a single queue and assign them a turnstile row to go to. There would be a physical queue that all guests would enter together and they would eventually be instructed on which line to join by a human operator who would have a line of communication with the crowd grouping analyzer.
More Specifically, the program would have to give a weight to different groups in order to ensure that its assignments create a near equal wait time for all guests entering the park. There are a lot of discretionary factors that would have to go into this type of screening algorithm that borders the line of data representation and discrimination.
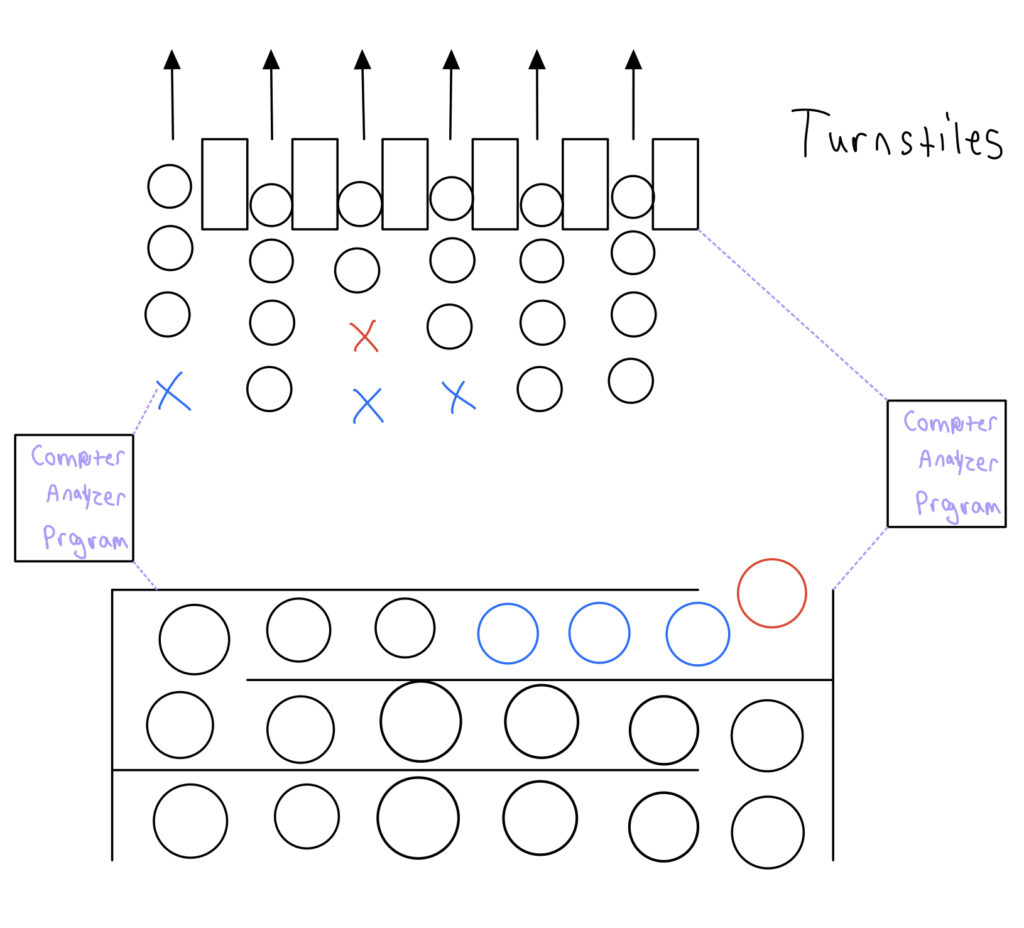
Ultimately, this is a way of giving the perception to guests that their wait time is less than it actually is. By having the crowds moving consistently in a single line (everyone equal) and then assigning them a turnstile line that is an equivalently short wait as everyone else, it should take away that nagging sensation that all too many of us have had before, “Ugh, I picked the wrong line.”
Pressure Project 1: Benevolent Spacing
Posted: January 27, 2022 Filed under: Pressure Project I, Uncategorized Leave a comment »For this pressure project, we were assigned to view a public space experiencing a high level of traffic and congestion. The day before it was due, I had a very stressful experience in a classroom having to do with traffic patterns and congestion (including a spilled coffee), so I decided to make that classroom my chosen space for the project.
In the classroom, there are rows of seats that are very close together and hard to walk through. There are desks attached to the seats that fold out, causing even less walking space. During the last 60 seconds of class, everyone already starts to aggressively pack and zip their backpacks, queuing to our teacher to end the class. In order for people to get out of their seats, they either have to step around people with their fat backpacks running into each other, or wait for the outside person to finish packing up. I, being left-handed, like to sit on the outside to get the left-handed desk. When class ends, people are either awkwardly squeezing around me or waiting for me to gather my items in a discombobulated manner.
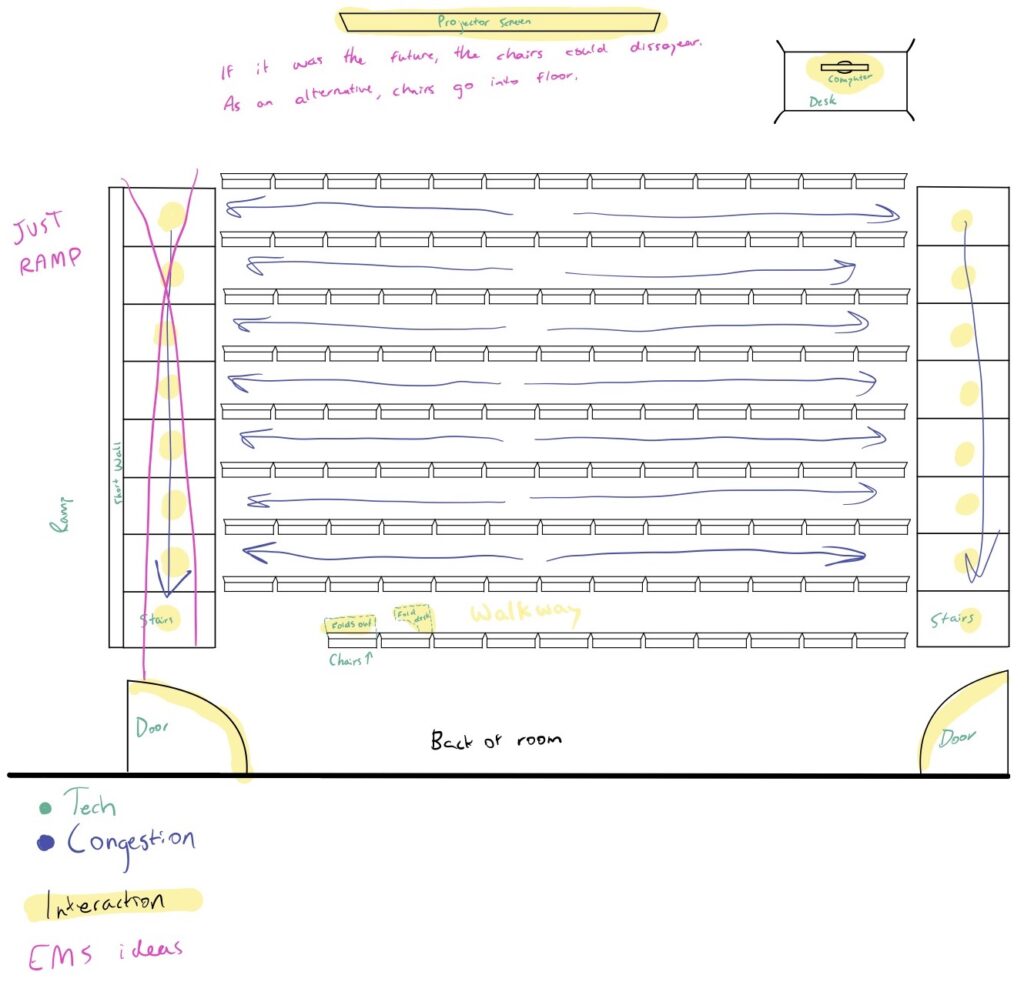
In the picture below, I drew a diagram of the classroom illustrating the different tech in the room, as well as where the congestion occurs.

After creating this diagram, I then began to brainstorm some ideas for how to benevolently adjust the space, reducing the congestion. Here were some ideas I had:
- Eliminate the left-side stairs, making that whole side a ramp and giving more space to walk up towards the door.
- There is not enough space between the chairs. To fix this, we only need chairs necessary for the amount of students. When not in use, chairs are stored under the floor. They are collapsable/foldable, and are only out when they are being sat in.
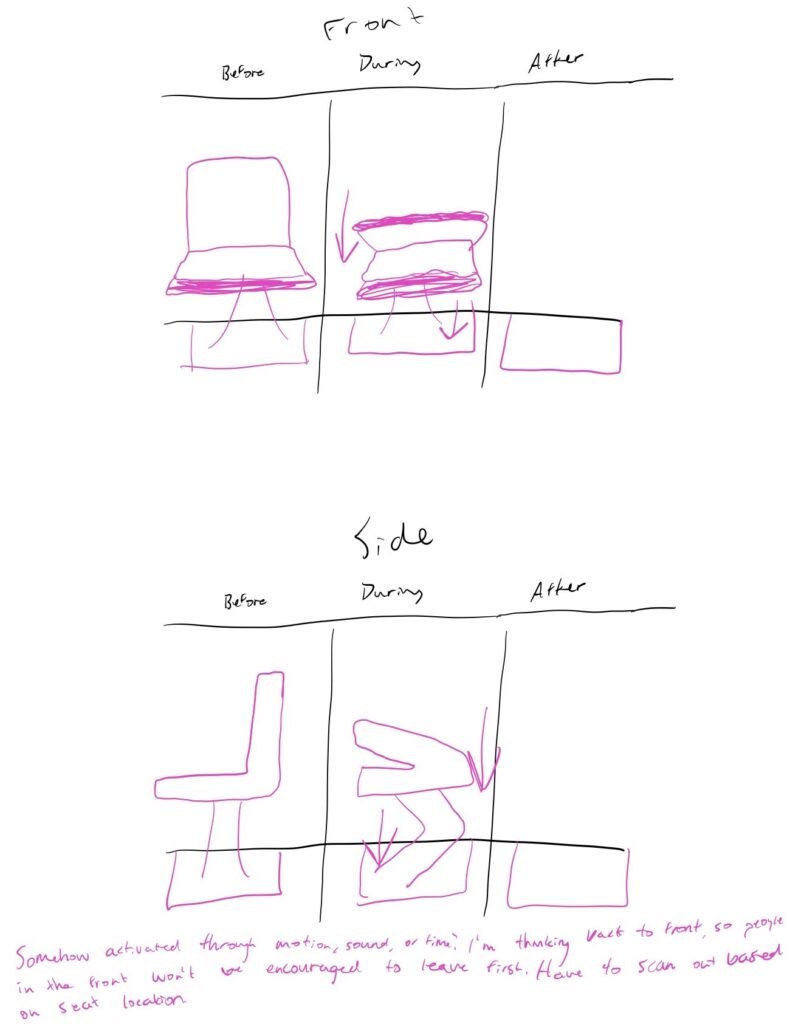
- To guide traffic, the seats could fold down automatically, working their way from the back to the front. This would encourage students who sit in the back to leave first, and the students who are sitting in the front will be encouraged to wait their turn to leave and not run over the people trying to get out of their seats closer to the back.
- Since this is college, it’s possible that the students won’t care the order the seats fold in. So instead, the students would swipe their BuckID on their seat, and they would need to swipe their BuckID to exit the room. The swipes would only be accepted in a particular order based on the seats that students were sitting in. While this is more authoritarian than I prefer, it would create a more efficient traffic pattern when leaving the classroom.
- Finally, Alex offered the idea of the teacher letting the students out five minutes early, but making sure to discuss with the students that the five minutes was given to them to take their time leaving and to not run fellow students over on their way out the door.
In the picture below, I drew out what some of the modifications to the room could look like, and I also drew out what the folding seat would look like:
This pressure project challenged me to think more deeply about inefficient uses of the space and designs that were not made by people who would also be using the space. The people who designed this classroom were not also going to be sitting in there, and then have to make it across campus in ten minutes for their next class. As someone who is in the space, I am able to think more experientially about the design, and then make adjustments where I see fit.
Pressure Project 1 – Yujie
Posted: January 27, 2022 Filed under: Uncategorized Leave a comment »When I see the key words “traffic” and “congestion” in pressure project instruction, the first thing come to my mind is the intersections on the street. Because English is my second language and my learning experience of those two words when I was young restrict me from thinking broadly and metaphorically. Though I realized that I limit myself to the narrow concept of traffic and congestion, the pressure time frame stops me from trying to do the process again. So I decide to follow what I have already chosen, which is an intersection on the High Street. One thing I’ve got from this experience is that we should always think twice about the descriptive language itself and be aware of any cultural or experiential bias we might have around it.
Here is a top-down diagram I have drown:
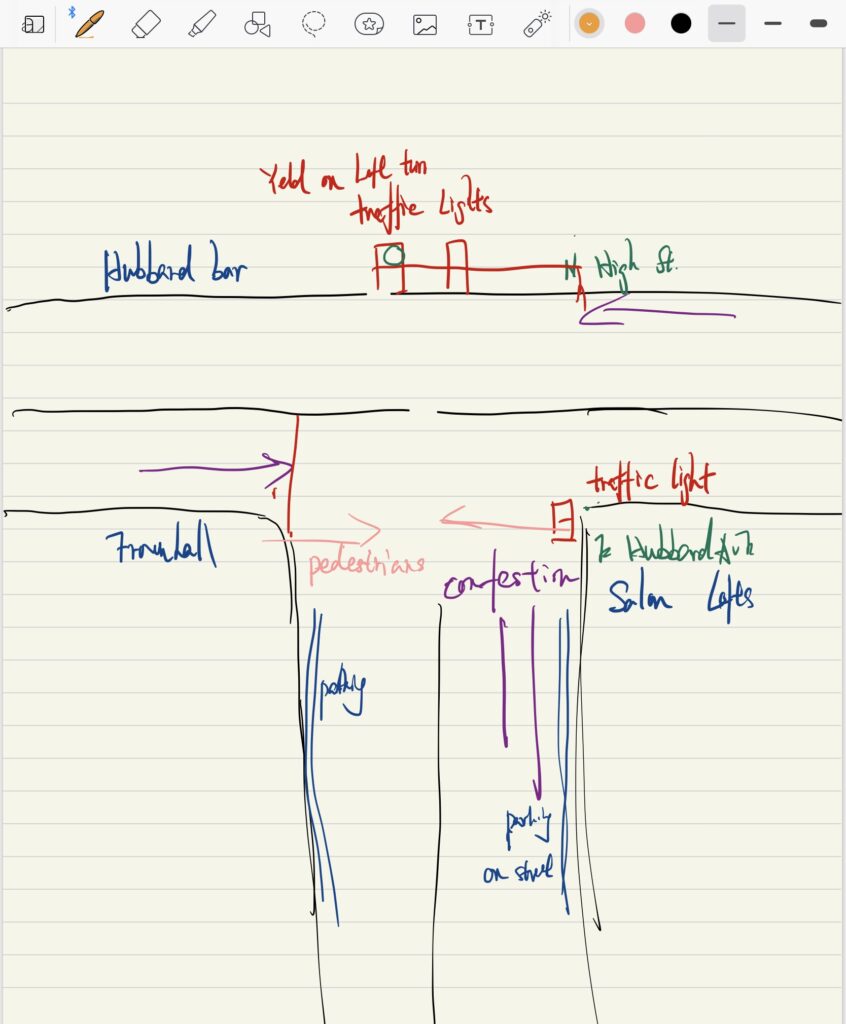
I’m using AEIOU framework from the week 1 readings to organize information I observed in a high traffic congestion on the intersection of the N High St. and E Hubbard Ave. at night in the weekend. AEIOU stands for Activities, Environments, Interactions, Objects, and Users.
Activities: pedestrians passing across E Hubbard Ave; vehicles moving from E Hubbard Ave. into N High St. and vise versa.
Environments: the intersection located in busy venues of bar and restaurant on Short North. During the weekend after about 10pm, partygoers are packed on the high street. There is a high traffic congestion on E Hubbard Ave where cars try to turn right of left into High St.
Interactions: Drivers coming from E Hubbard Ave encounter the traffic lights, avoid pedestrians walking across the street, and yield drivers on the High Street; drivers on high street move on normal speed; pedestrians encounter traffic light.
Objects: there is a traffic lights for pedestrians to cross the street; another traffic light is for vehicles coming from E Hubbard Street.
Users: drivers on the E Hubbard Street who experience congestion during the traffic peak hour at night on the weekend.
Problem: drivers coming from E Hubbard Street experience congestion because they have to wait for pedestrians to cross and have to yield drivers on the high street coming from both directions. The left turn traffic light only turn to green circle instead of greet arrow, so drivers have to wait for a long time until both direction are clear. This might not a problem during non-peak time, say weekdays or daytime.
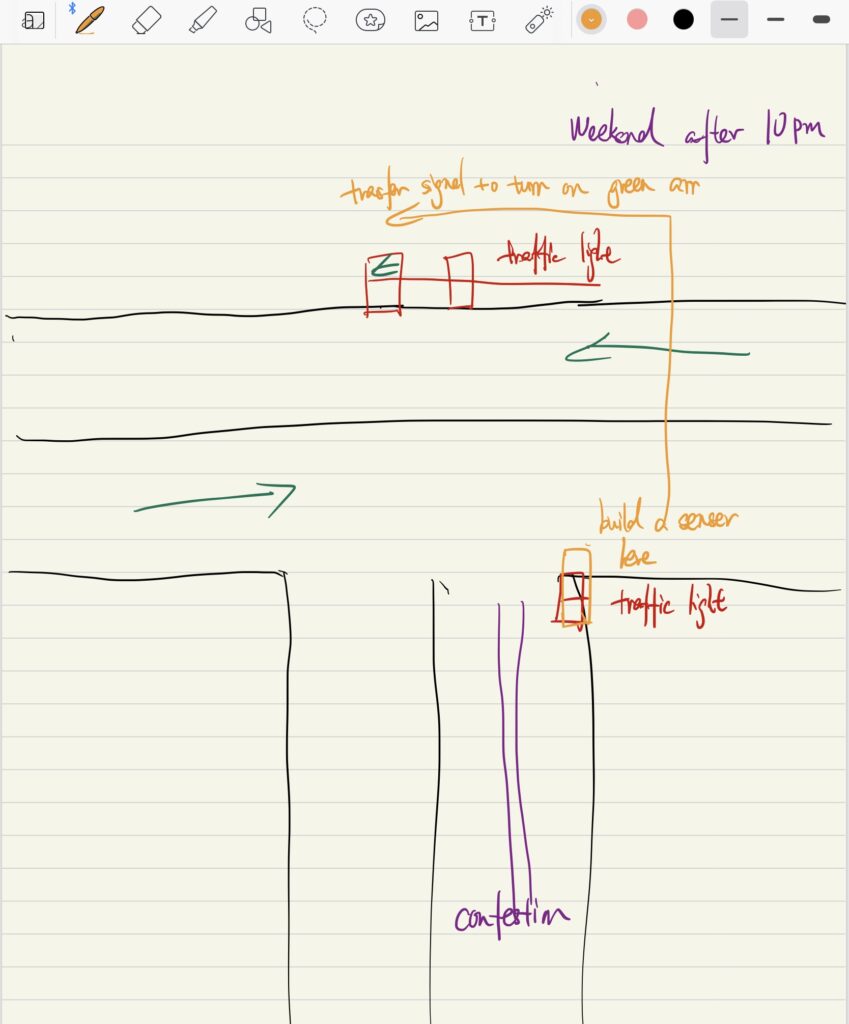
Intervention: I suggest building a congestion senser on the right side of E Hubbard Street to track the congestion. The senser can be something like the kinetic senser which is sensitive to the movement of vehicles. If there is a stop of vehicle movement and it last for about more than 1 minutes, the senser will trigger the traffic light on High Street to turn to green arrow instead of green circle. The senser can be only turned on during the weekend at 10pm-1am.
See the photo below:
Pressure project !
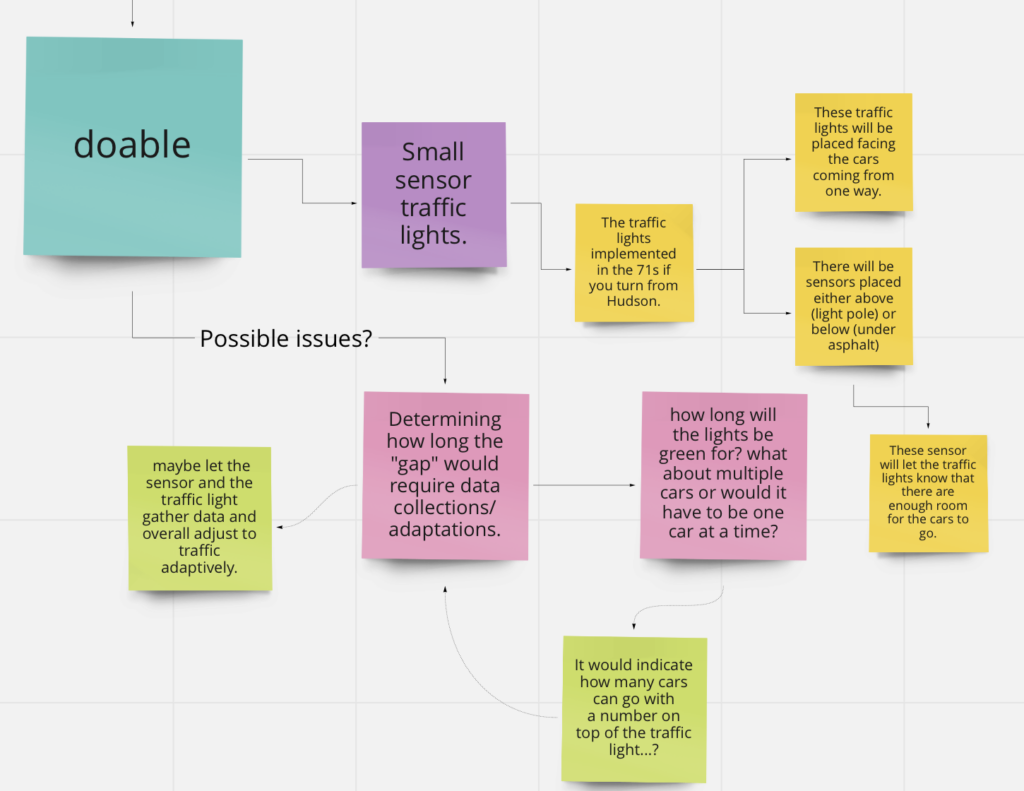
Posted: January 27, 2022 Filed under: Uncategorized Leave a comment »I chose the intersections of the one ways and Summit st. Summit is a two lane one way street with parked cars on each side of the road, with two way bike path. So realistically summit is a 5 lane streets taken up with w lanes of parked cars. Throughout my observation I remembered how terrible it is to turn on to summit because you cannot see through the parked cars for the on coming traffic of the summit. So I started taking notes on my iPad of traffic patterns and eventually transferred them to a mind map.
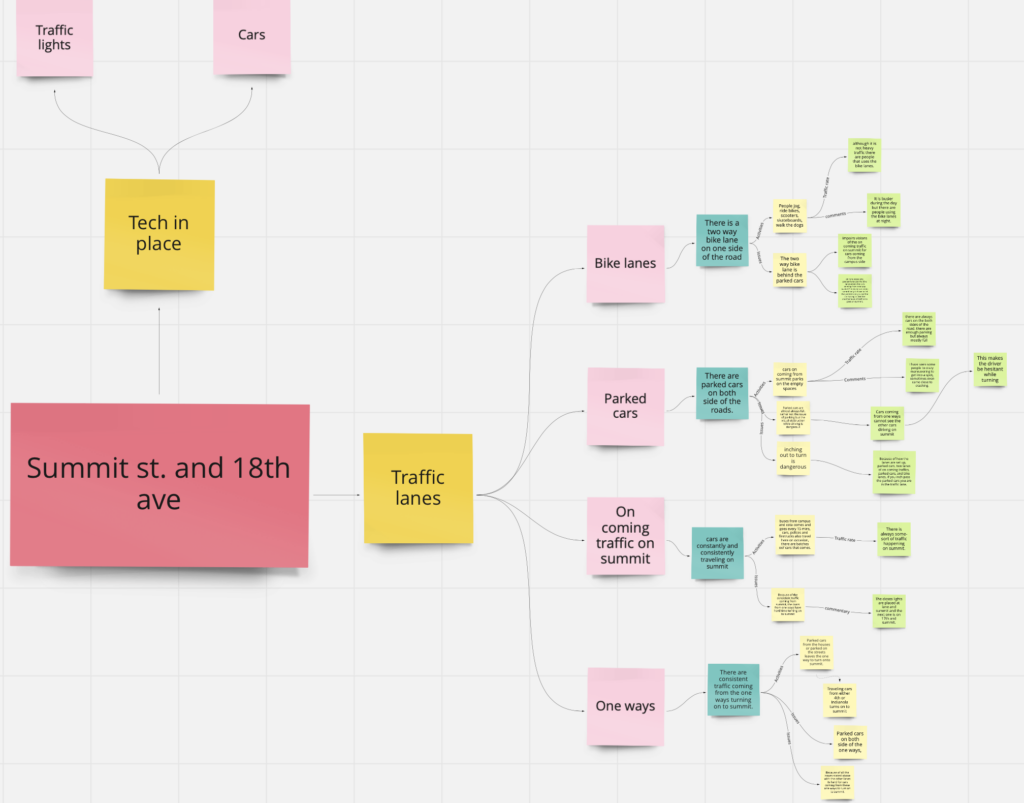
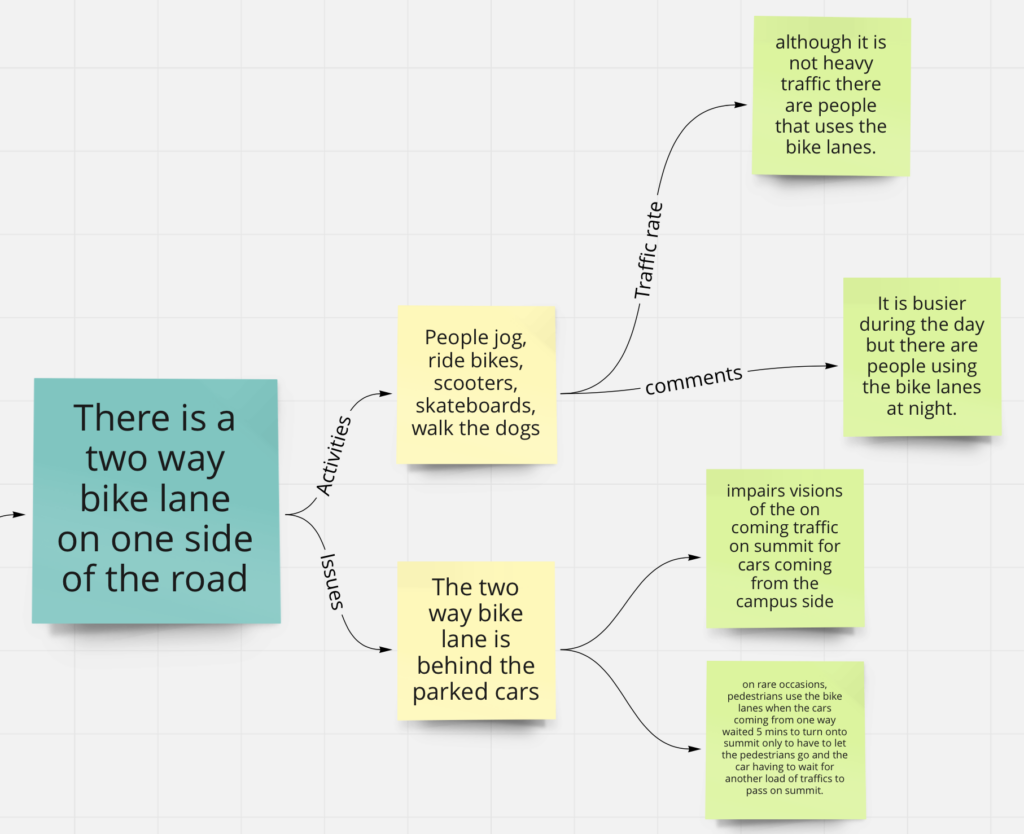

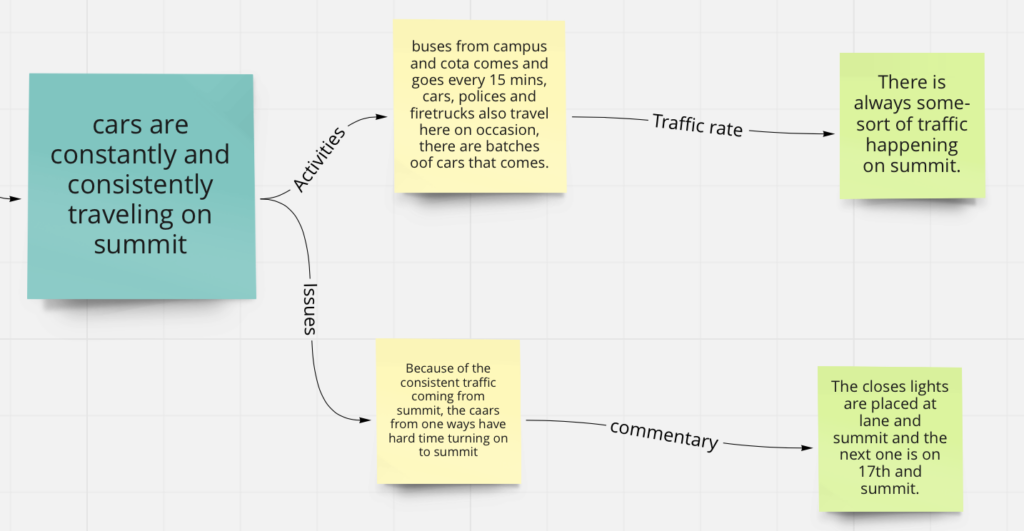
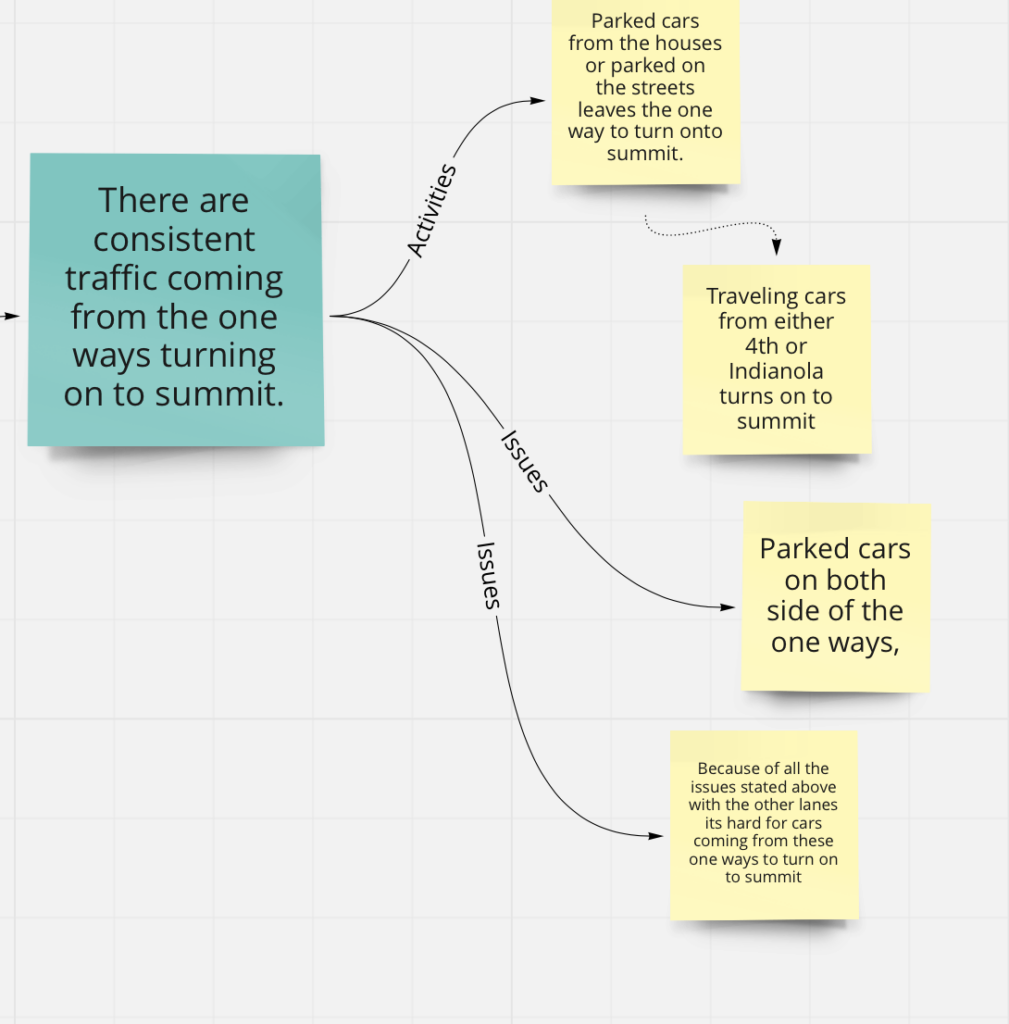
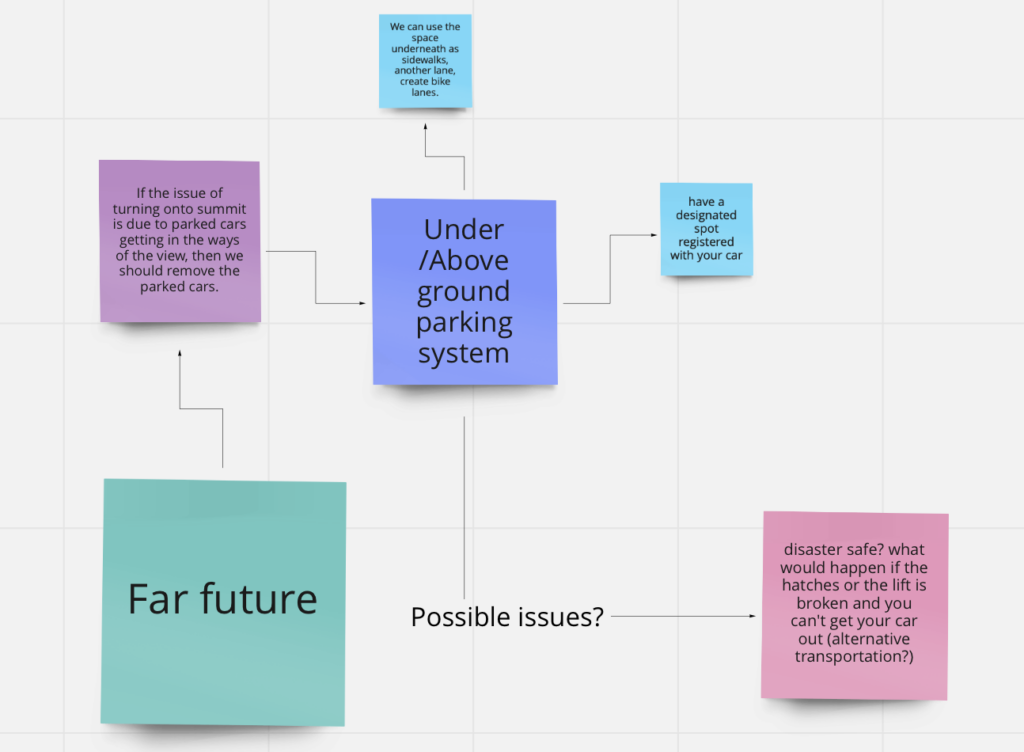
After taking notes and organizing them I tried to think of ways to help with these issues and made a mind map.
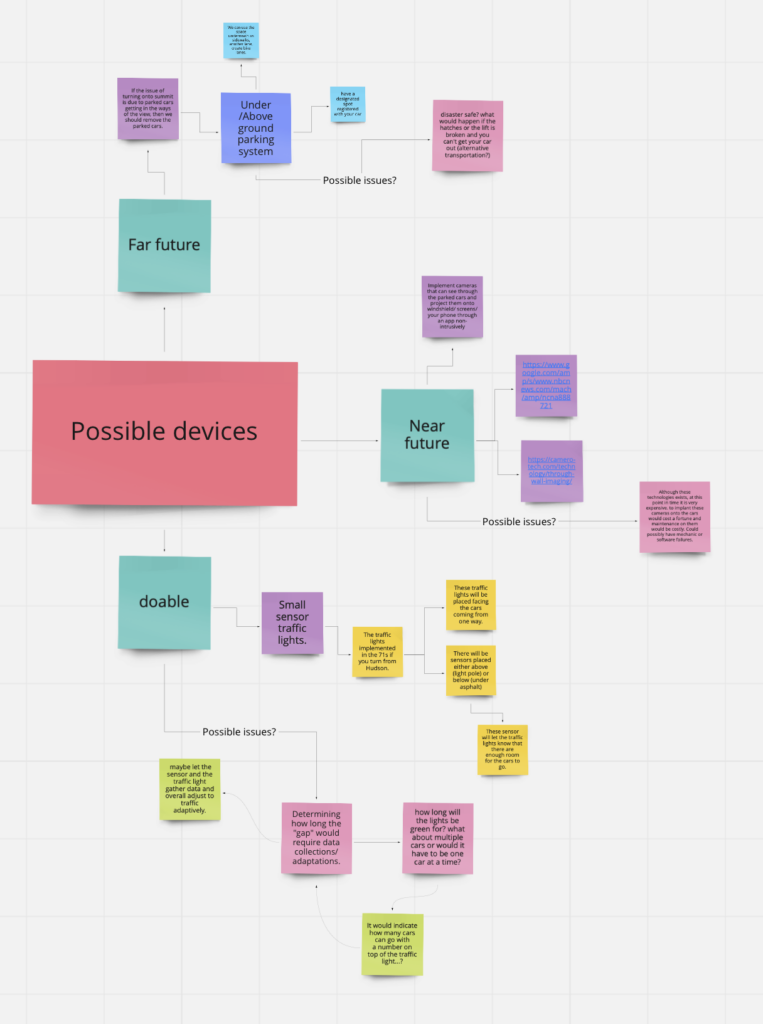

These are two links that are in the mind map. it talks about see through walls tech If anyone is interested.
In conclusion, there are possible implementable actions we could plan and initiate, we just haven’t figured out where the taxes we paid last year went.
Pressure project 1 – Ashley Browne
Posted: January 27, 2022 Filed under: Uncategorized Leave a comment »Pressure Project 1
Goodale Park – “The Grass is Lava!”
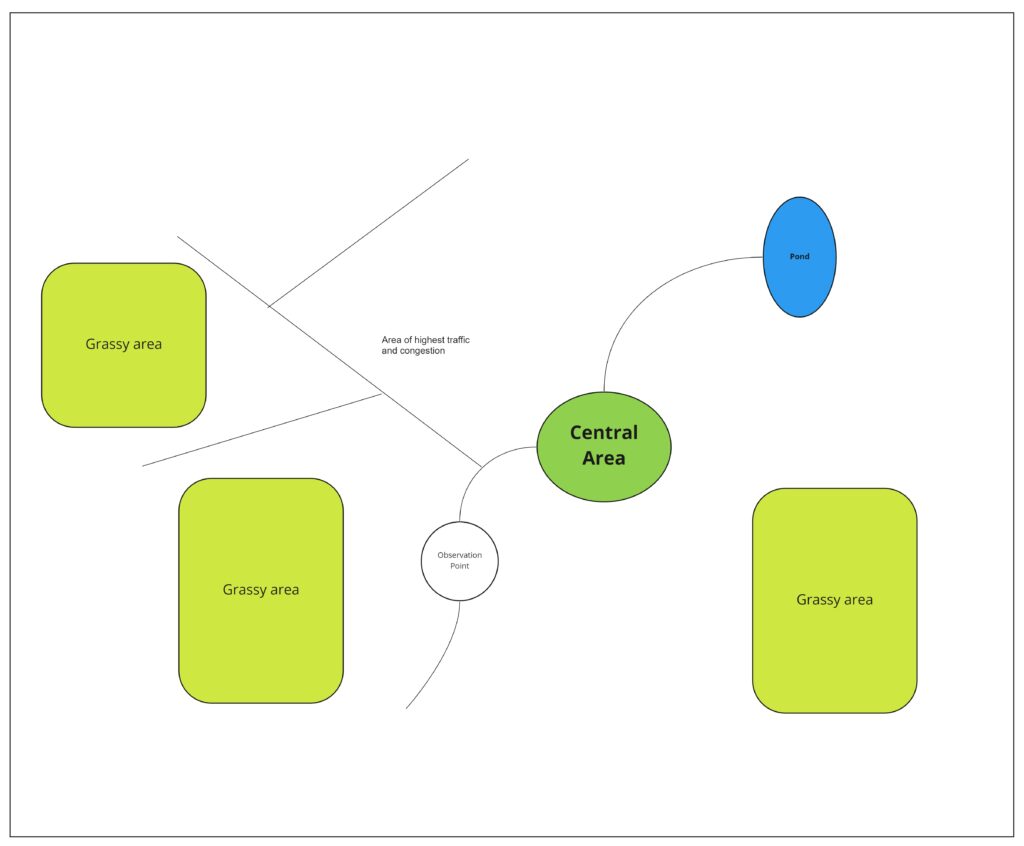
Over the weekend I went to Goodale Park with my dog. Our walk was brief, but during my time there I took a moment to observe the foot traffic in the public space. I was particularly interested in choosing this park since many people use it as a dog park– and I wanted to see how human interactions were or were not limited in that section of the park.
I knew that gauging human interactions would be somewhat different in this context, to begin with– since most people followed their dog’s around rather than walk along the guided pathway. I started to consider that the concrete paths that connected through the park could also be seen as a form of “technology” that was meant to guide the traffic flow of dog owners rather than the dogs themselves. It gave them a place to walk with friends, chat, exercise, etc. while also being able to keep a clear eye on their pets as they ran around and played. Also because it was cold and the snow was still melting at this point, this also limited the flow of traffic.
Key Observations:
- People would walk anywhere, regardless of the path because they were following their pets
- People would stop in the middle of the path and increase congestion because they were watching or attending to their pet in that spot
- Pets on leash would try to play with dogs not on a leash, causing the owners to either pull them along the path or choose to step off the path
- Regular park goers would not interact with dogs, even if they were in the dog park section
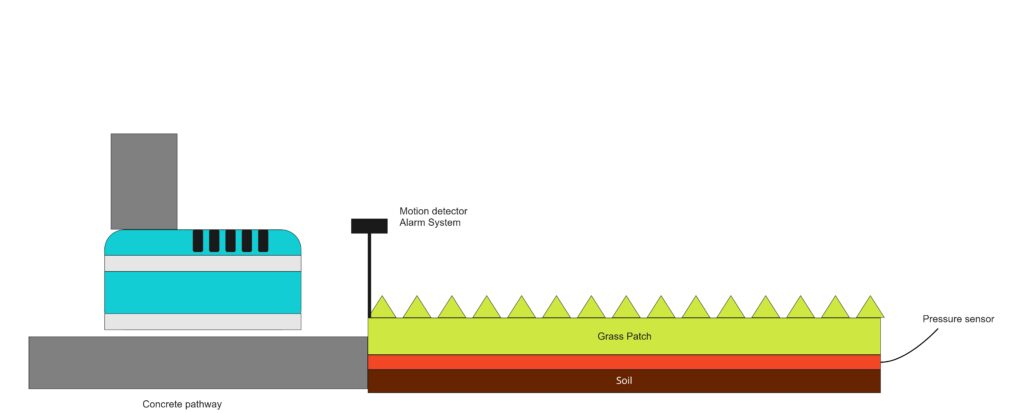
For my interventionary EMS, I knew I wanted to devise a system that would alter the traffic or access of the pet owners but would still allow for all the dogs to run around as they please. To do so, I would place pressure and motion-detecting sensors that would recognize whenever a person would try to leave the pathway and step onto the grass. The motion detector would sense whenever a large enough animal stepped away from the concrete path, and the pressure sensors beneath the grass turf would calculate the weight and force in which the person was stepping– it was heavy enough, it would determine that it was a person stepping onto the grass and sound off an alarm.
If only people are allowed to walk in the designated area, this would extremely alter the flow of traffic– for one there would be more congestion, and when groups of multiple people passed each other while on the same path they would have to walk in single file so as to not alert the alarm system. Dog owners would not be allowed to interact with their dogs unless it came to them on the sidewalk area.
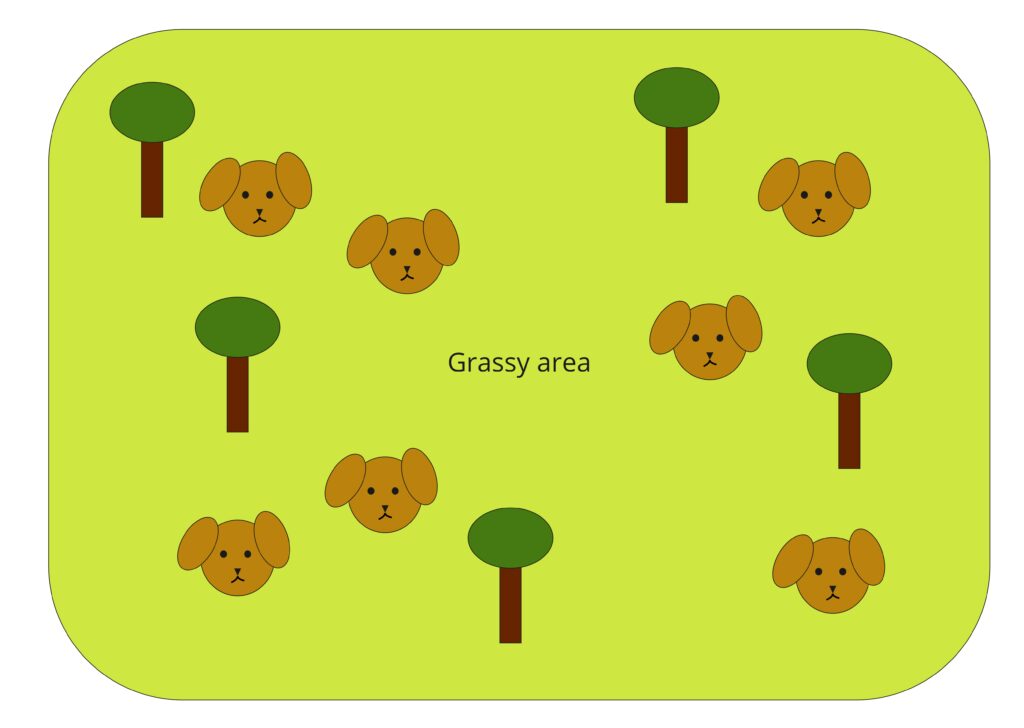
Also, because people would only be allowed to walk on the paths it would force them to experience the park in a very repetitive and cyclical nature since they would circle the path over and over. After a while, park-goers would lack the incentive to stay for longer periods of time. This would lead to less attraction to Goodale Park in general.
Although this intervention seems malevolent in nature, I’d also be interested to see the change in the wildlife as a result of it. With less disturbance to the grasses and trees in the area, would things start to overgrow? Which animals would make new homes in a park that was meant for animals to enjoy?
Pressure Project 1 by Jenna Ko
Posted: January 27, 2022 Filed under: Uncategorized Leave a comment »When I first heard the terms “congestion” and “intervention”, the first thing that came into my mind was BMV driving test that I took a couple months ago.
Although there were 48 agencies across the state, surprisingly the supply was insufficient to meet the demand, especially in the urban area. The written exam was first come, first served, so I visited a nearby, relatively highly-rated BMV half an hour after it opened. The line was already so long, so I had to wait an hour to sign up for the exam. When I finally got a chance to speak to the receptionist, she said I may or may not be able to take the exam that day. Surprisingly, there was only one computer in the BMV, so it all depended on how fast people could finish their exams. My cousin and I both had a schedule that does not usually align with BMV hours, so I decided to wait, and spent 2 hours glaring at 4 people taking the exam. Unfortunately, they were out of time, and we had to go back home. On our second visit, we arrived a little earlier and luckily I was able to take the exam and get the permit. Unlike the written exam, the driving test was only by reservation, so I went to the BMV website, and this is where the project begins. I chose to devise a benevolent intervention because the existing technology was already malevolent enough.
After I entered my personal information, my BMV records were identified, and I was able to access the scheduling webpage. This is how the system was designed:

It all went smoothly until I had to click each agencies to check the availability. Either the slots for the dates that I selected were unavailable, or their earliest date available did not work for my schedule. Accordingly, not only did I have to check each agencies individually, but also I had to check each dates for each of them. For instance, if I wanted to take an exam in October 24, I had to click each agencies to check their availability in October 24. The inefficient interface was causing serious congestion, because some agencies were fully booked a month in advance, while nearby agencies had many unbooked slots; The users got tired of checking each station individually, assumed all the stations were fully booked, and decided to wait for a month while neighboring agencies in the corner of the map were available the next day. I felt frustrated because the interface was overcomplicated for such a simple task, so this is how I simplified the process:
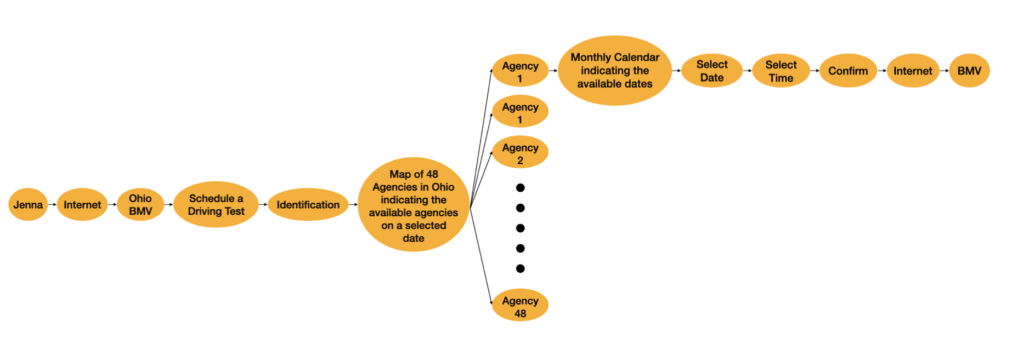
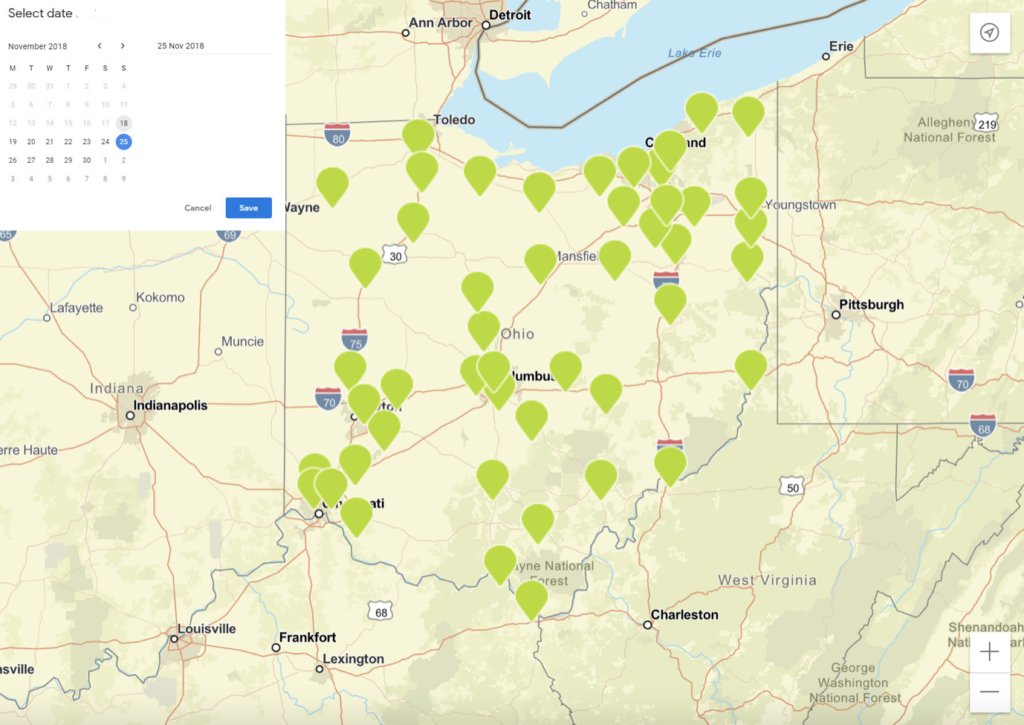
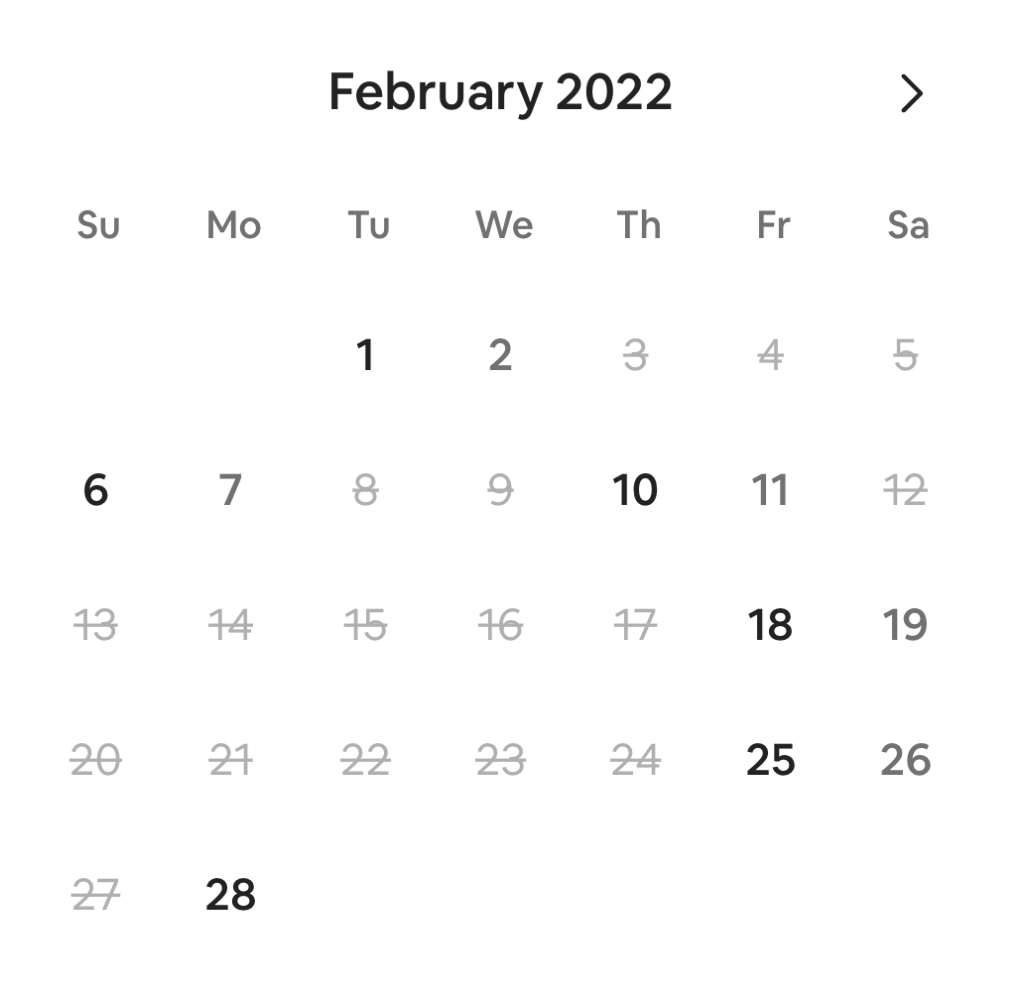
Since most people have their own schedule, I thought it would be convenient to see on the map which agencies are available on a selected date. For those who want to take the exam at a specific agency, instead of having them check the availability for each dates only to find out that it’s fully booked, I thought it would be nice to indicate the available dates on a monthly calendar, so we don’t have to check each dates one by one. This way, the user can also find out the earliest date available intuitively.
Pressure Project 1, Gabe Carpenter, 2022
Posted: January 26, 2022 Filed under: Uncategorized Leave a comment »- I sat on the bench in my dormitory lobby watching people using the elevators around lunchtime.
- There is a lot of congestion right in front of the elevators, as several groups of people like to travel together and clog the small hallway while waiting their turn
- The hallway is a bit narrow, and there are only three elevators running on either side of the building.
- There are roughly 1400 students in the building, divided by two that is 3 elevators per 700 students.
- The current elevators cause a lot of slowdowns due to their lack of speed and poor efficiency in deciding what floors to go to and in what order.
- The ways in which people enter the elevators can also cause a lot of issues, bringing various packages and other items that take up space.
- The elevators are controlled by a keypad on the outside that gives the user an option for up or down, and a numbered pad on the inside that includes a list of all of the floors that the user can be taken to.
The main problem with congestion in my dorm is the elevators and the lack of movement that appears when there are a lot of people. The elevators can only visit one floor at a time, thus visiting a maximum of 3 floors per group. This is only counting if all occupants of each elevator are going to the same floor. Any variation of destinations would require more stops and slow down the process further. There is also the issue of cramming 6 to 9 people inside of one elevator, especially in current times as the Covid-19 pandemic continues to be a problem.
My proposal is a new system of elevators made for maxim speed and efficiency in moving people from one floor to the next. These elevators would mainly be single occupancy machines intended to take one person at a time. This may seem to be counterproductive at first, but the efficiency comes from the simplicity of the system. When one person enters and presses their floor, the elevator can instantly close and move at the maximum comfortable speed to the desired location and return. With less weight, the elevator can move faster, and the doors can automatically be closed once a single person is inside, instead of waiting for more potential riders. This also allows for less confusion about which floor to go to and will return elevators much quicker than waiting on a single machine to bounce between 3 to 5 floors. The system would have six single elevators on each side, with an additional cargo elevator at the end as well. The cargo elevator would be intended to move large packages or any other objects that could not fit on the personal elevators and would be able to accommodate one person along with the move-in cargo bins that most dorms have in them.
Project Bump
Posted: January 25, 2022 Filed under: Uncategorized Leave a comment »The storytelling project caught my eyes. It was personal, intimate, and visual. I could follow the creator’s emotional journey after Fukushima Nuclear disaster. It think it would be interesting to see it being more interactive. I began to think of how to make my content more specific and personal yet still be approachable to the audience.