Pressure project 1 – Ashley Browne
Posted: January 27, 2022 Filed under: Uncategorized Leave a comment »Pressure Project 1
Goodale Park – “The Grass is Lava!”
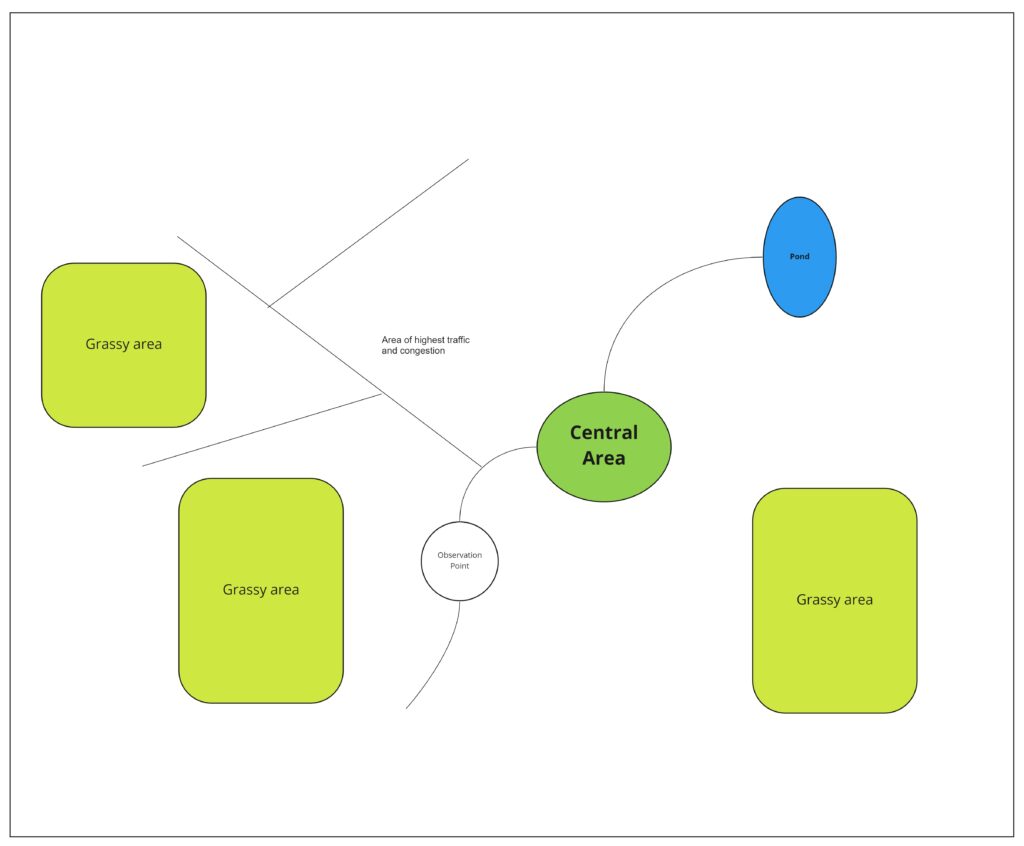
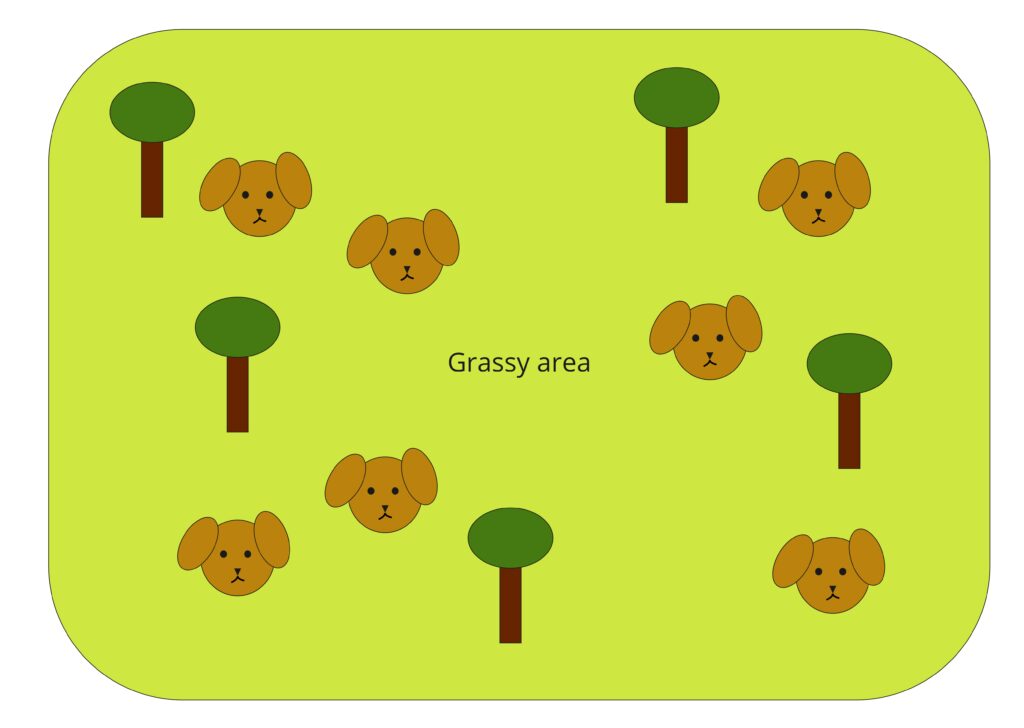
Over the weekend I went to Goodale Park with my dog. Our walk was brief, but during my time there I took a moment to observe the foot traffic in the public space. I was particularly interested in choosing this park since many people use it as a dog park– and I wanted to see how human interactions were or were not limited in that section of the park.
I knew that gauging human interactions would be somewhat different in this context, to begin with– since most people followed their dog’s around rather than walk along the guided pathway. I started to consider that the concrete paths that connected through the park could also be seen as a form of “technology” that was meant to guide the traffic flow of dog owners rather than the dogs themselves. It gave them a place to walk with friends, chat, exercise, etc. while also being able to keep a clear eye on their pets as they ran around and played. Also because it was cold and the snow was still melting at this point, this also limited the flow of traffic.
Key Observations:
- People would walk anywhere, regardless of the path because they were following their pets
- People would stop in the middle of the path and increase congestion because they were watching or attending to their pet in that spot
- Pets on leash would try to play with dogs not on a leash, causing the owners to either pull them along the path or choose to step off the path
- Regular park goers would not interact with dogs, even if they were in the dog park section
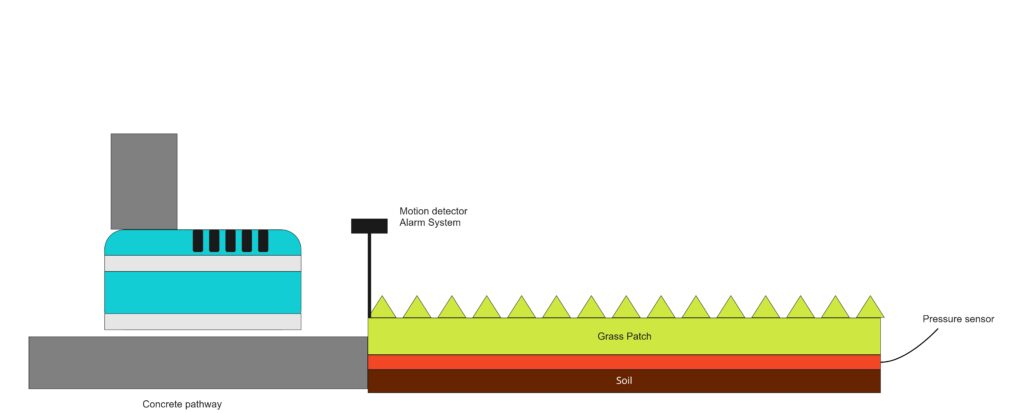
For my interventionary EMS, I knew I wanted to devise a system that would alter the traffic or access of the pet owners but would still allow for all the dogs to run around as they please. To do so, I would place pressure and motion-detecting sensors that would recognize whenever a person would try to leave the pathway and step onto the grass. The motion detector would sense whenever a large enough animal stepped away from the concrete path, and the pressure sensors beneath the grass turf would calculate the weight and force in which the person was stepping– it was heavy enough, it would determine that it was a person stepping onto the grass and sound off an alarm.
If only people are allowed to walk in the designated area, this would extremely alter the flow of traffic– for one there would be more congestion, and when groups of multiple people passed each other while on the same path they would have to walk in single file so as to not alert the alarm system. Dog owners would not be allowed to interact with their dogs unless it came to them on the sidewalk area.
Also, because people would only be allowed to walk on the paths it would force them to experience the park in a very repetitive and cyclical nature since they would circle the path over and over. After a while, park-goers would lack the incentive to stay for longer periods of time. This would lead to less attraction to Goodale Park in general.
Although this intervention seems malevolent in nature, I’d also be interested to see the change in the wildlife as a result of it. With less disturbance to the grasses and trees in the area, would things start to overgrow? Which animals would make new homes in a park that was meant for animals to enjoy?
Pressure Project 1 by Jenna Ko
Posted: January 27, 2022 Filed under: Uncategorized Leave a comment »When I first heard the terms “congestion” and “intervention”, the first thing that came into my mind was BMV driving test that I took a couple months ago.
Although there were 48 agencies across the state, surprisingly the supply was insufficient to meet the demand, especially in the urban area. The written exam was first come, first served, so I visited a nearby, relatively highly-rated BMV half an hour after it opened. The line was already so long, so I had to wait an hour to sign up for the exam. When I finally got a chance to speak to the receptionist, she said I may or may not be able to take the exam that day. Surprisingly, there was only one computer in the BMV, so it all depended on how fast people could finish their exams. My cousin and I both had a schedule that does not usually align with BMV hours, so I decided to wait, and spent 2 hours glaring at 4 people taking the exam. Unfortunately, they were out of time, and we had to go back home. On our second visit, we arrived a little earlier and luckily I was able to take the exam and get the permit. Unlike the written exam, the driving test was only by reservation, so I went to the BMV website, and this is where the project begins. I chose to devise a benevolent intervention because the existing technology was already malevolent enough.
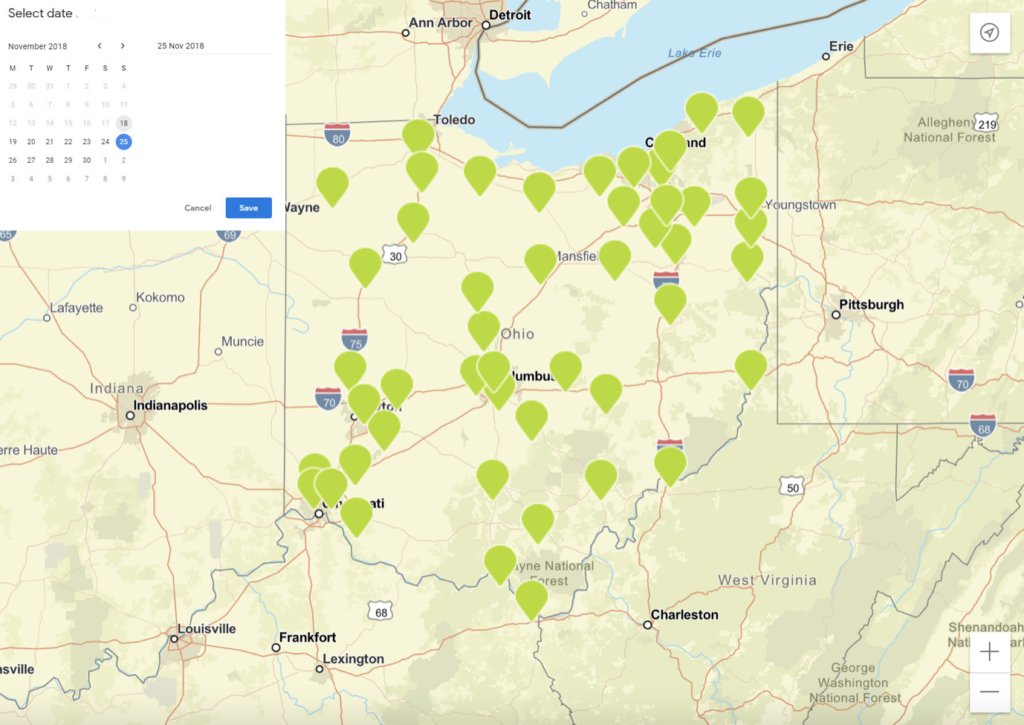
After I entered my personal information, my BMV records were identified, and I was able to access the scheduling webpage. This is how the system was designed:

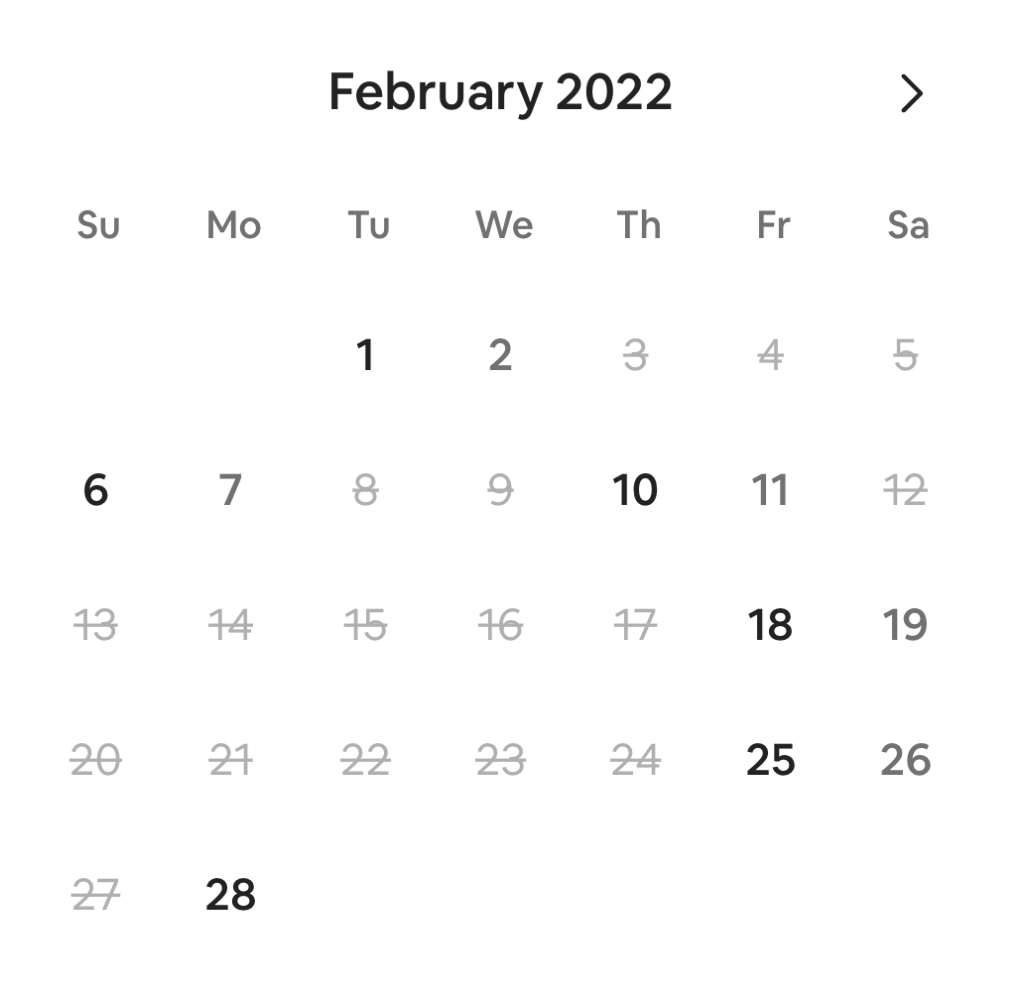
It all went smoothly until I had to click each agencies to check the availability. Either the slots for the dates that I selected were unavailable, or their earliest date available did not work for my schedule. Accordingly, not only did I have to check each agencies individually, but also I had to check each dates for each of them. For instance, if I wanted to take an exam in October 24, I had to click each agencies to check their availability in October 24. The inefficient interface was causing serious congestion, because some agencies were fully booked a month in advance, while nearby agencies had many unbooked slots; The users got tired of checking each station individually, assumed all the stations were fully booked, and decided to wait for a month while neighboring agencies in the corner of the map were available the next day. I felt frustrated because the interface was overcomplicated for such a simple task, so this is how I simplified the process:
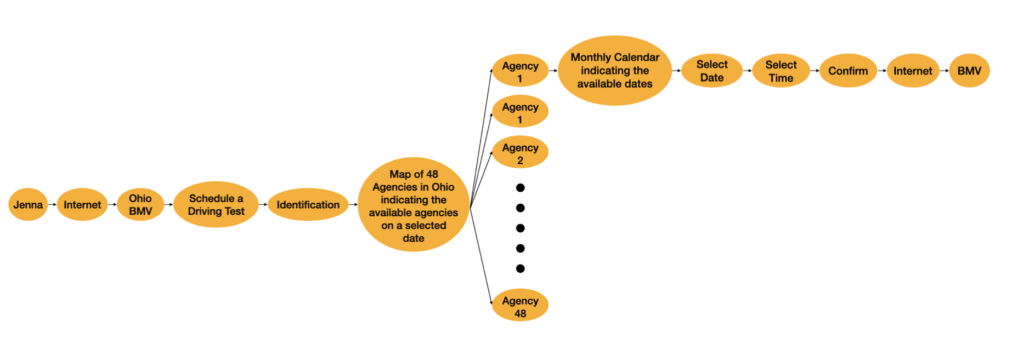
Since most people have their own schedule, I thought it would be convenient to see on the map which agencies are available on a selected date. For those who want to take the exam at a specific agency, instead of having them check the availability for each dates only to find out that it’s fully booked, I thought it would be nice to indicate the available dates on a monthly calendar, so we don’t have to check each dates one by one. This way, the user can also find out the earliest date available intuitively.
Pressure Project 1, Gabe Carpenter, 2022
Posted: January 26, 2022 Filed under: Uncategorized Leave a comment »- I sat on the bench in my dormitory lobby watching people using the elevators around lunchtime.
- There is a lot of congestion right in front of the elevators, as several groups of people like to travel together and clog the small hallway while waiting their turn
- The hallway is a bit narrow, and there are only three elevators running on either side of the building.
- There are roughly 1400 students in the building, divided by two that is 3 elevators per 700 students.
- The current elevators cause a lot of slowdowns due to their lack of speed and poor efficiency in deciding what floors to go to and in what order.
- The ways in which people enter the elevators can also cause a lot of issues, bringing various packages and other items that take up space.
- The elevators are controlled by a keypad on the outside that gives the user an option for up or down, and a numbered pad on the inside that includes a list of all of the floors that the user can be taken to.
The main problem with congestion in my dorm is the elevators and the lack of movement that appears when there are a lot of people. The elevators can only visit one floor at a time, thus visiting a maximum of 3 floors per group. This is only counting if all occupants of each elevator are going to the same floor. Any variation of destinations would require more stops and slow down the process further. There is also the issue of cramming 6 to 9 people inside of one elevator, especially in current times as the Covid-19 pandemic continues to be a problem.
My proposal is a new system of elevators made for maxim speed and efficiency in moving people from one floor to the next. These elevators would mainly be single occupancy machines intended to take one person at a time. This may seem to be counterproductive at first, but the efficiency comes from the simplicity of the system. When one person enters and presses their floor, the elevator can instantly close and move at the maximum comfortable speed to the desired location and return. With less weight, the elevator can move faster, and the doors can automatically be closed once a single person is inside, instead of waiting for more potential riders. This also allows for less confusion about which floor to go to and will return elevators much quicker than waiting on a single machine to bounce between 3 to 5 floors. The system would have six single elevators on each side, with an additional cargo elevator at the end as well. The cargo elevator would be intended to move large packages or any other objects that could not fit on the personal elevators and would be able to accommodate one person along with the move-in cargo bins that most dorms have in them.
Project Bump
Posted: January 25, 2022 Filed under: Uncategorized Leave a comment »The storytelling project caught my eyes. It was personal, intimate, and visual. I could follow the creator’s emotional journey after Fukushima Nuclear disaster. It think it would be interesting to see it being more interactive. I began to think of how to make my content more specific and personal yet still be approachable to the audience.
Project bump
Posted: January 25, 2022 Filed under: Uncategorized Leave a comment »I was interested in this project because of the artist’s conceptual link to memory– which I think relates back to my own research and art practice. I thought the installation was equally beautiful and interesting. The way that the thin fabric allows the projections to overlap onto each other, but also frame certain scenes depending on the way it was draped was really mesmerizing. I found this overlapping to be a powerful symbol in talking about the artist’s shared cultures of being Iranian and African American. I watched the short clip of the installation space and I think it could be even more interesting to see how the fabric and projection could respond to viewer interaction or the place they take up in the space.
Project Bump
Posted: January 25, 2022 Filed under: Uncategorized Leave a comment »I chose to bump this post for a myriad of reasons. Primarily, this is an old companion that I did not know took this course so his name caught my attention. Secondly, I am a huge fan of projection mapping. This course has reframed my understanding of interaction with technology and I believe that Aarons project demonstrates a great compromise between digital systems and real time feedback.
Project Bump
Posted: January 25, 2022 Filed under: Uncategorized Leave a comment »Pressure Project 2 (Sara) | Devising EMS (ohio-state.edu)
I enjoy this pressure project. The little game Bottle Lighting motivate exhausted people spending too much time in front of screen to do wrist stretching exercise. Prolonged use of devices like smart phone and computer can cause many physical injuries like poor vision, neck pain … It is a good idea to remind people of the possible issues and help them in a gamification way.
Project Pump
Posted: January 25, 2022 Filed under: Uncategorized Leave a comment »https://dems.asc.ohio-state.edu/wp-admin/post.php?post=2214&action=edit
I find this dancing club project very interesting. One of the reasons that I choose this project is to see what are the possibilites of devising experiential dancing body that are already explored. I like the idea of connecting the virtual body and physical boby as well as the virtual space and theater conventions. The funny little twist here is that people get ticket in a box office to be the performers themselves. The whole interactive process is orgnized by a stucture that dictate people to move in certain way but finally failed at some point. The author’s realization that people are uncontrollabe tells us something about the slippage of the intentional devising concerning human experience.
Project bump
Posted: January 25, 2022 Filed under: Uncategorized Leave a comment »https://dems.asc.ohio-state.edu/wp-admin/post.php?post=2768&action=edit
I was looking through some of the pressure project and this caught my eyes because of the description and the though process of developing the program was well intended and planned then executed. Understanding what kind of work and thoughts that goes into making art, following through with the intention and plan is hard to do at times especially with these projects that has a limited time. I liked the intention and the art that came from that intention.
Pressure Project 3 Bump
Posted: January 24, 2022 Filed under: Uncategorized Leave a comment »The digital storytelling in this project caught my attention. The enthusiasm in his voice kept me engaged wanting to know more on prohibition. The still images gives the viewer time to take in the story being told as well as hold the visual context for the narrative. I also enjoy cocktails! https://dems.asc.ohio-state.edu/?p=2924&trashed=1&ids=158