Cycles 1-3
Posted: April 28, 2021 Filed under: Uncategorized Leave a comment »For the duration of the current millennium, I have been working in the live audio field. I have also been involved in a handful of theatre events. It is through this work that I have grown attached to the practice of providing support to performers. Within the pandemic milieu, I have been severed from my Allen & Heath digital audio console for the longest period yet. More importantly, I have no access to performers to support. I am not much of a performer myself, so I have resorted to the lowly wooden train set.
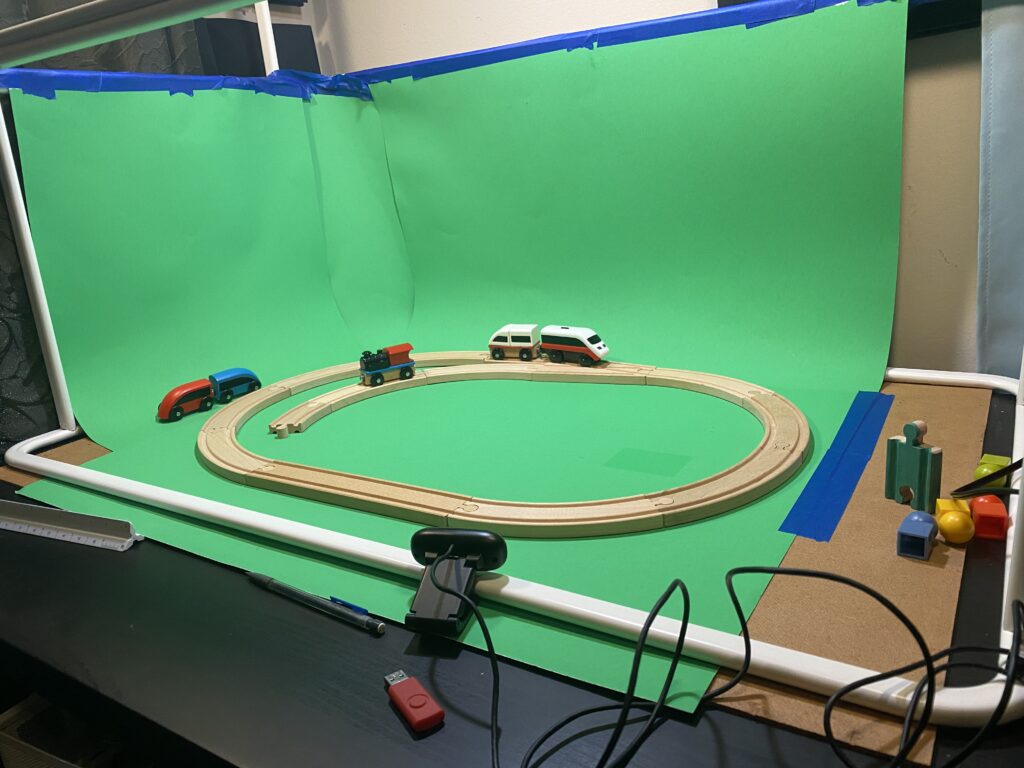
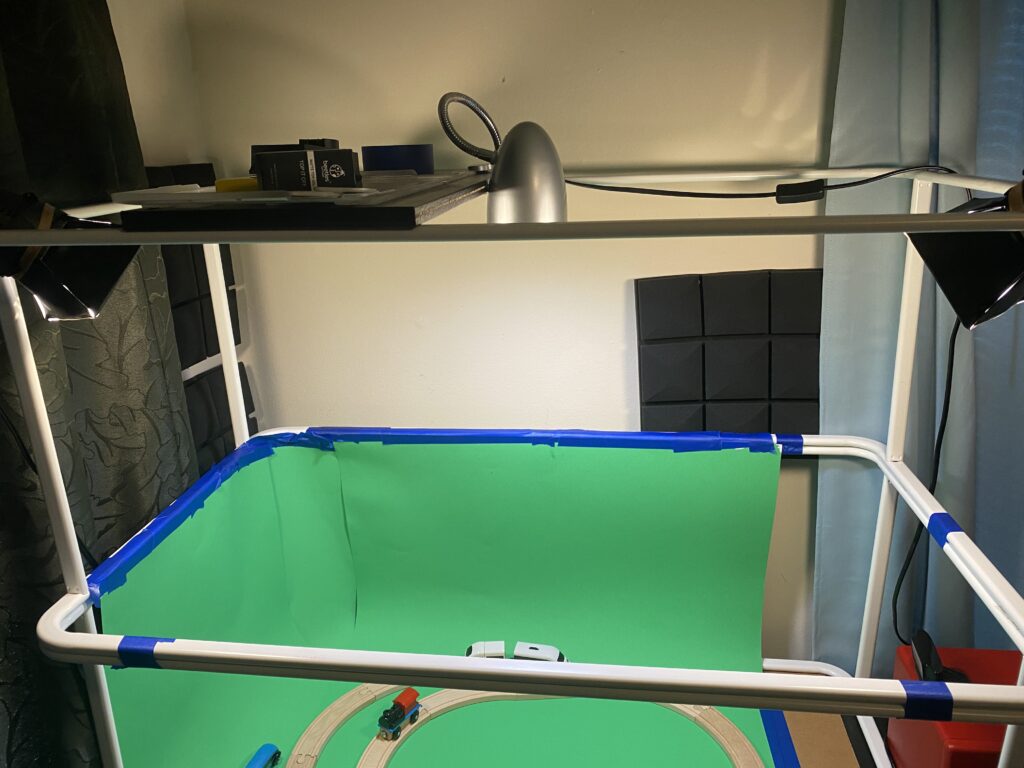
In Cycle 1, I created a green box setup for the purpose of chromakeying my train into an interactive environment. It was a simple setup: 2 IKEA Mulig clothing racks to provide a structure for mounting lights and cameras, 3.5 sheets of green posterboard, 2 Logitech webcams(1 of which is 1080p), a pair of mini LED soft box lights for key lighting and a single soft LED for back lighting.

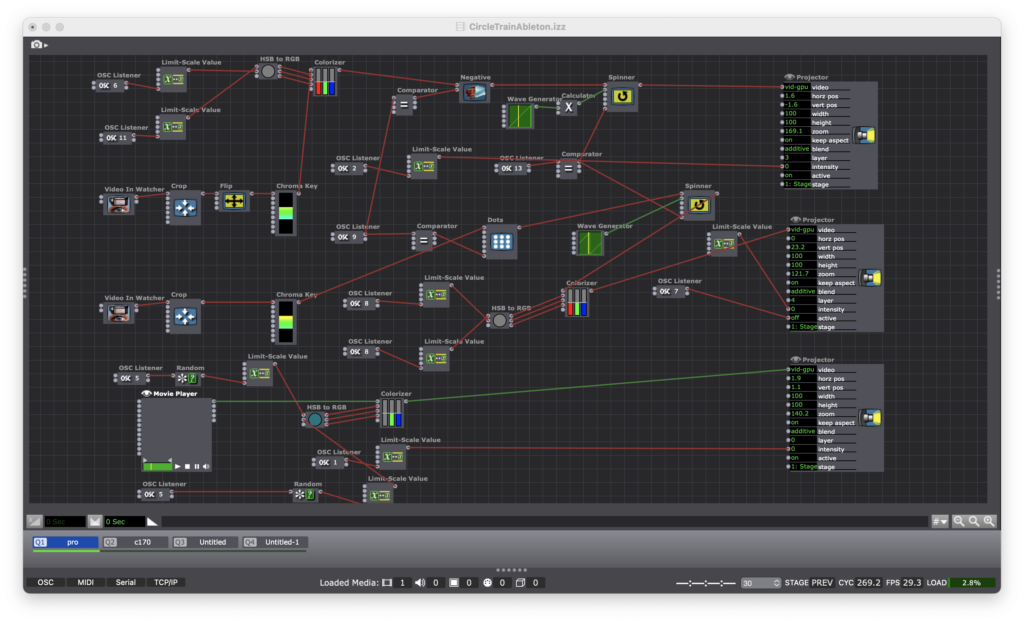
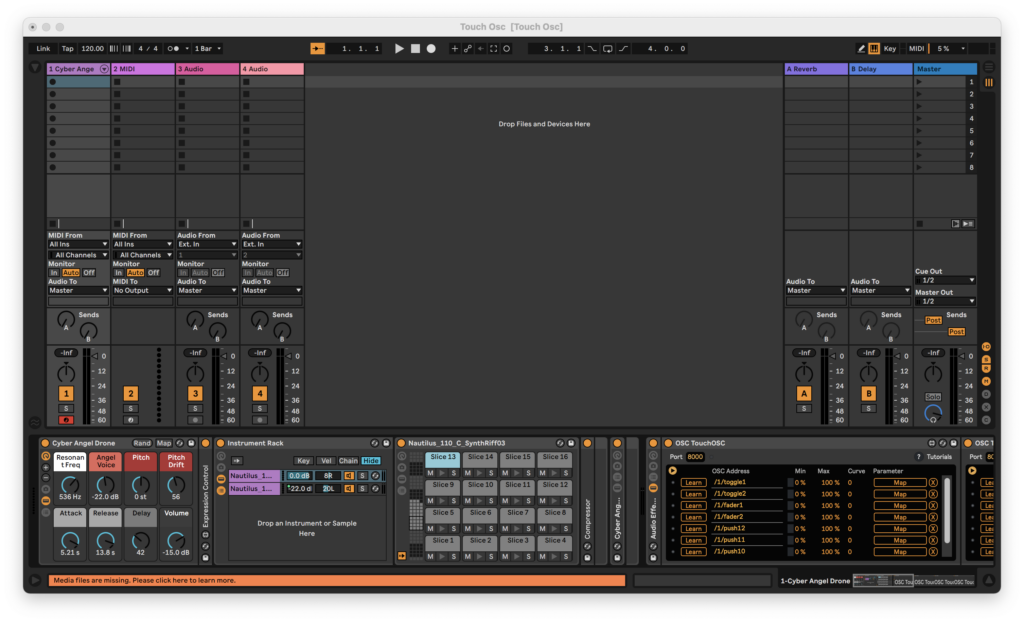
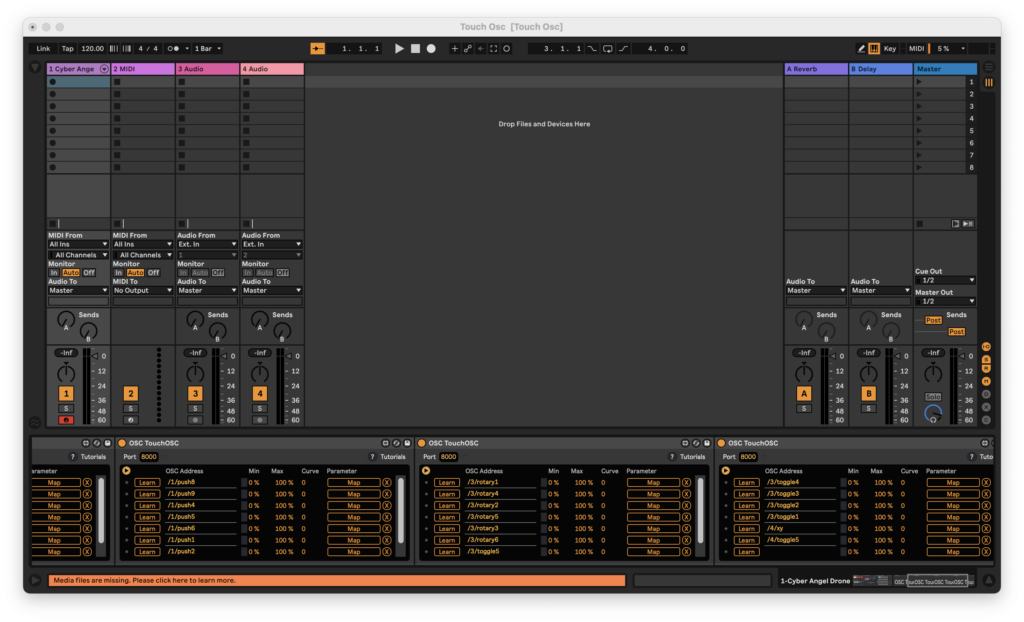
Within Isadora, I patched each of the webcams into a distinct video effect, a spinner actor, and a master RGBA/Colorizer. Using the “Simple” preset in TouchOSC on an iPad and an iPhone, I was able to set OSC watchers to trigger each of the effects, the spinner and the colorizer. The effects were triggered with the MPC-style drum pad “buttons” in TouchOSC on the iPad and the colorizer was set to an XY pad on the iPhone. All of this is layered over a blue train themed video. The result is a patch that makes the train a true “performer” dancing to a Kick and Snare beat…that no one can hear…yet.
Cycle 2 began with the untimely death of my green box in a gravity related accident. In dealing with this abrupt change in resources, the cycle saw the implementation of Ableton Live. Woven into the Cycle 1 patch is a change of OSC channels in order to line up with the MIDI notes of a Kick and Snare in Ableton. I built in some ambition into my Ableton set by assigning every button in the “Simple” TouchOSC preset. The result is a similar video performance by the train, but now we can hear its music.
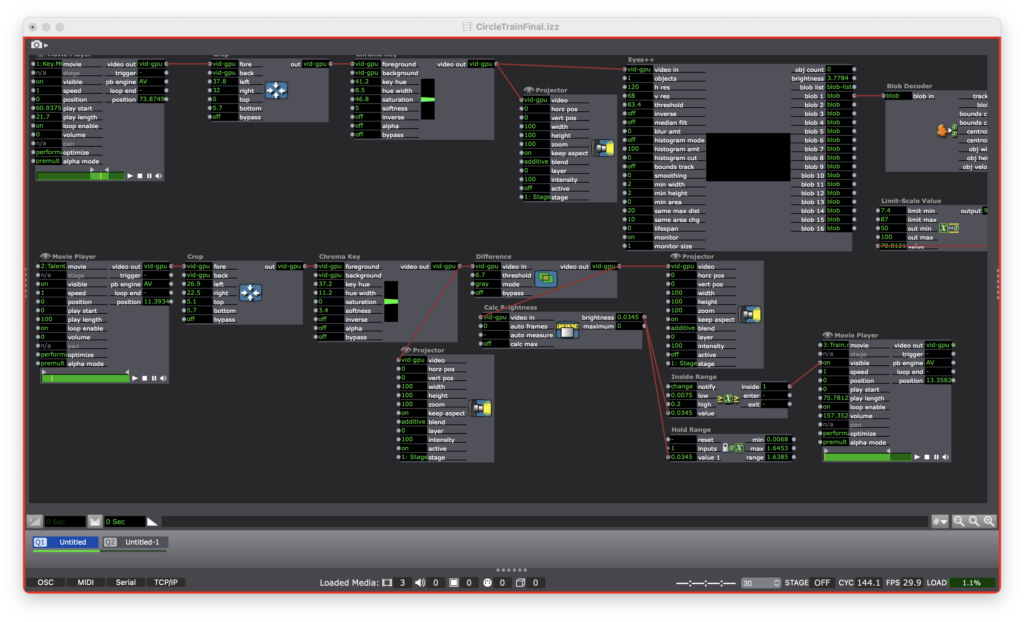
Cycle 3 began with a number of deviations from the train theme. I was looking for new ways to integrate my previous discoveries in a manner that would be less constrained by the physical domain existing solely in my house. I toyed around with some inverse chromakey patches that would sense the head of a blue-yarn mallet and trigger a sound. In returning to the train theme, I attempted to make an overlay that would use blob tracking and proximity targets to trigger sounds.
Ultimately, I resurrected the green box…and it the product looks and behaves a bit like a zombie. I went with a different Eyes++ setup in tandem with a simple motion tracker. As it turns out, I messed up the Eyes++ to the point that it wasn’t doing anything at all. In my final patch, the motion sensor is simply turning a train sound on and off as the train enters the frame of the camera. I intended to implement an cartoon overlay that would follow the train around the track thanks to the Eyes++ rig. Alas, the Roger Rabbit train is Sir Not-Appearing-in-This-Film thanks to a supply chain disruption of that most important of resources: time.
In this patch, I used video of the train from two different angles: bird’s eye and slightly downward. This made the patch easier to work with since I wasn’t constantly turning the train on and off. It also zombified the Cycle a bit more with the train no longer being a live performer. However, I justify this decision with the idea that the train was only ever a stand-in for a live performer.
On a final note, I will be packaging the final patch for future enjoyment to be accessed on this site.
Cycle 1/2 (Sean)
Posted: April 7, 2021 Filed under: Uncategorized Leave a comment »My first couple of cycles got mashed up a bit. I was working with the set deadline of tech rehearsal and performance of my solo thesis show, Mr. Shirley at the End of the World. In ordinary times, this would be presented live but due to the pandemic, I had to film the production for virtual presentation. The primary reason I enrolled in this class was to work with Isadora to program the sound and media in my show. Here are some images below.
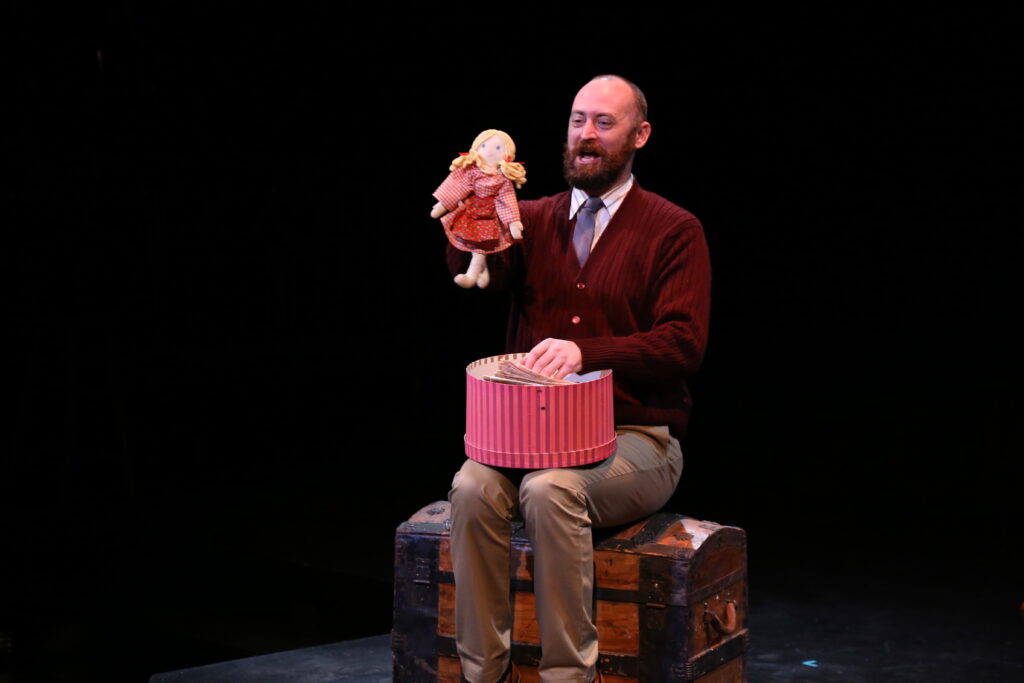

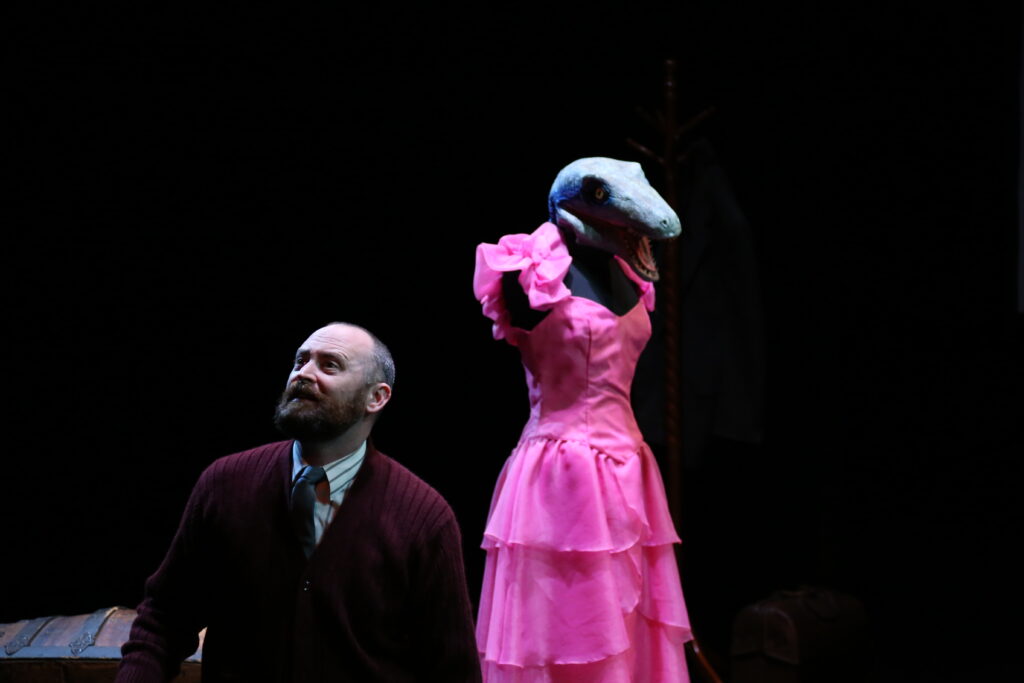
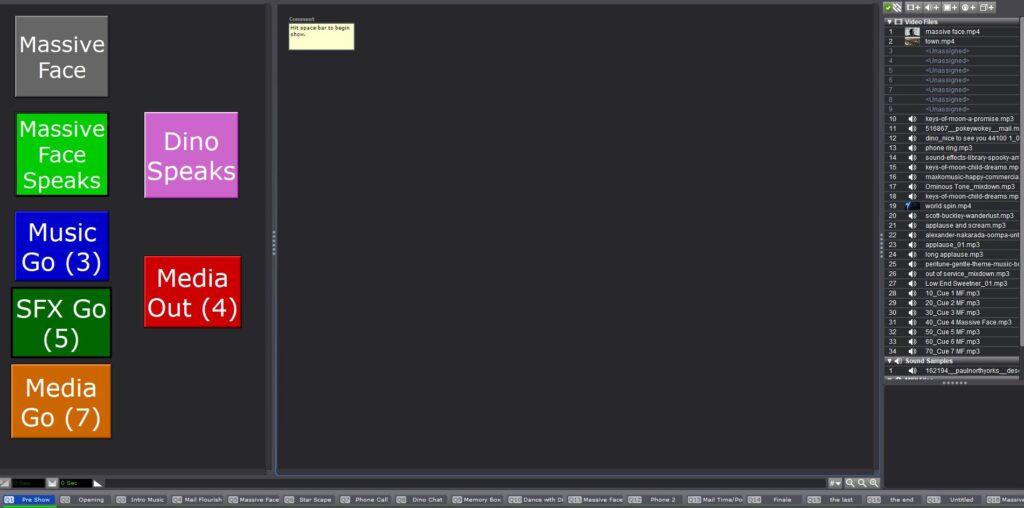
Basically what I was trying to do was create a user friendly interface for the person running the media/sound for my show to just hit assigned buttons and make things happen on cue. I tried my best to automate as many transitions as I could to cut down on them having to think too hard about what do. For instance, to begin the show they just hit the space bar and the next could scenes cycled through automatically. A visual cue was noted in the program to let the Isadora operator know when to transition to the next scene by hitting the “Media Out” button I created.
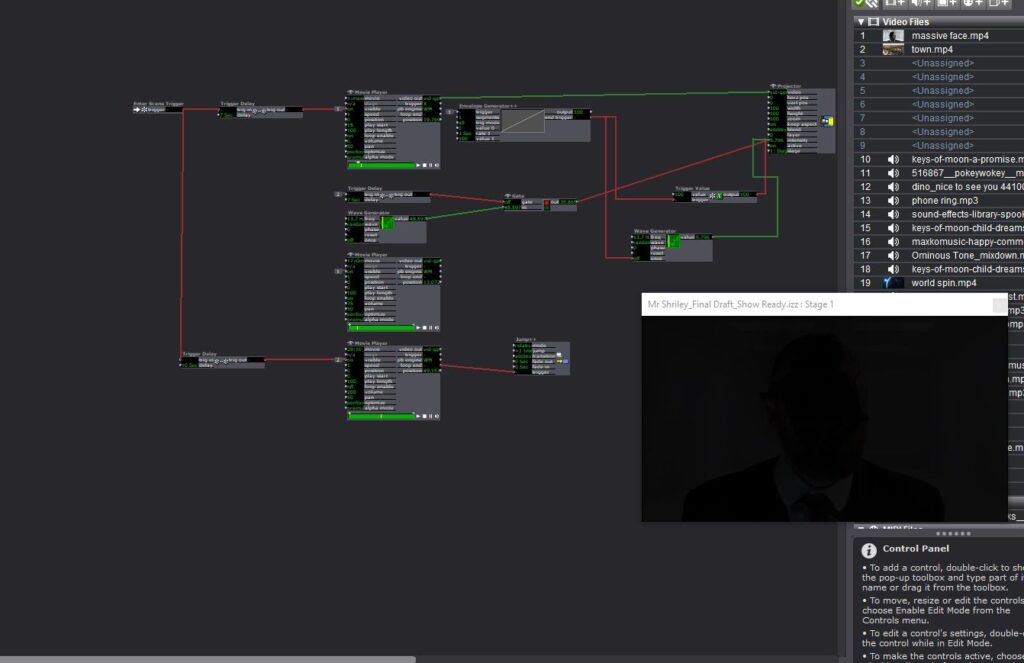
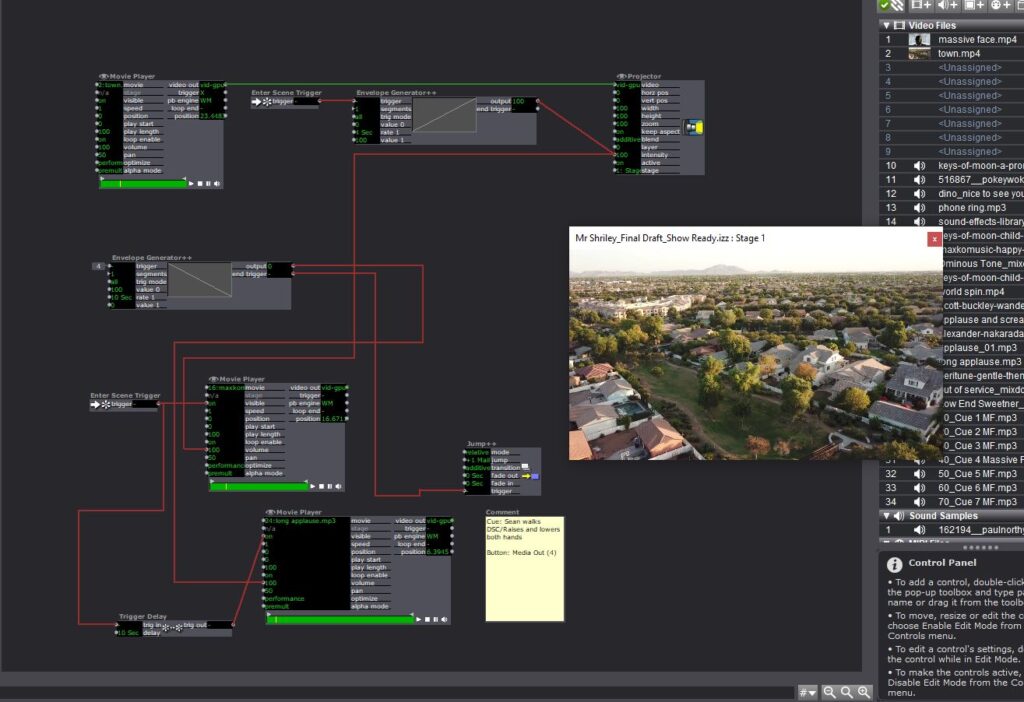
I made some fairly significant use of the envelope generators in this to control the fading of music and media images. I also created a User Actor that would act as a neutral background and repeat several times throughout the performance. I also utilized a router on several scenes so that I could use the same button to initiate separate MP3 files.
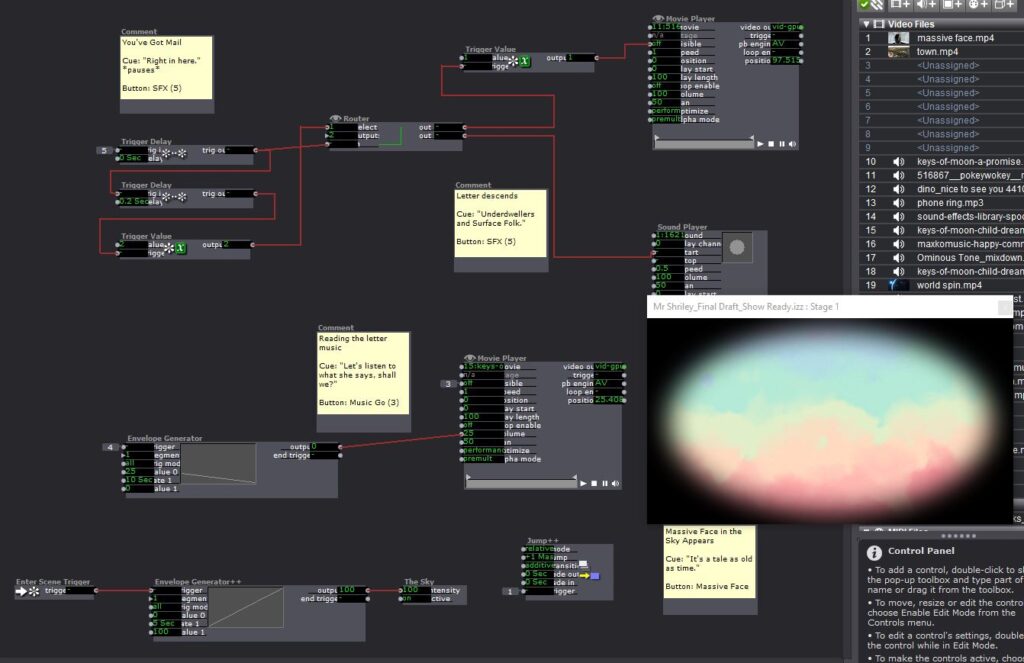
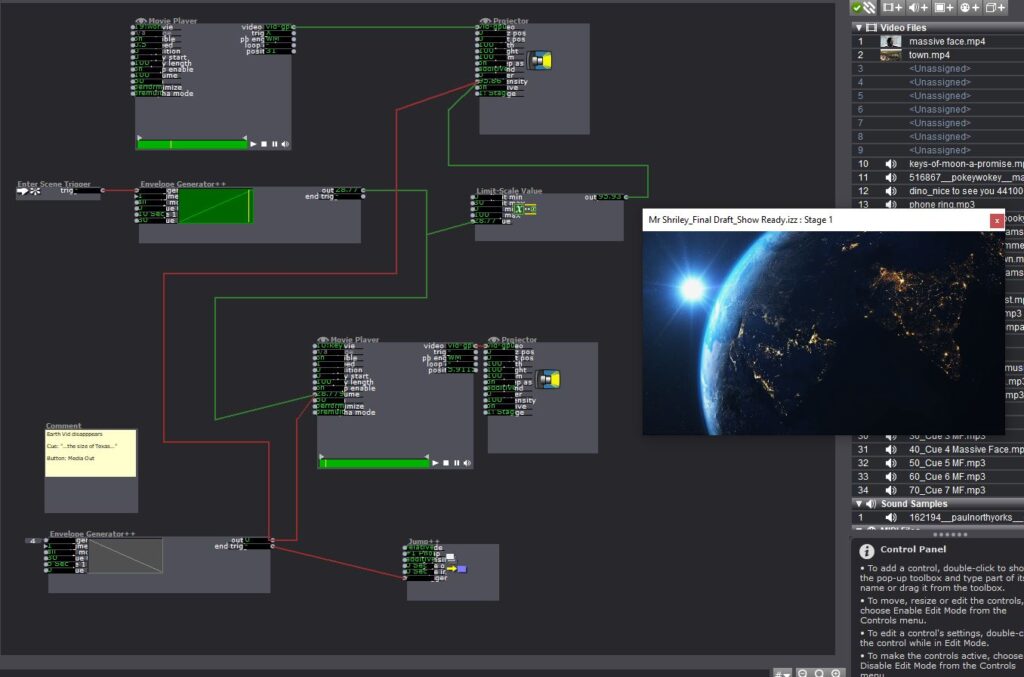
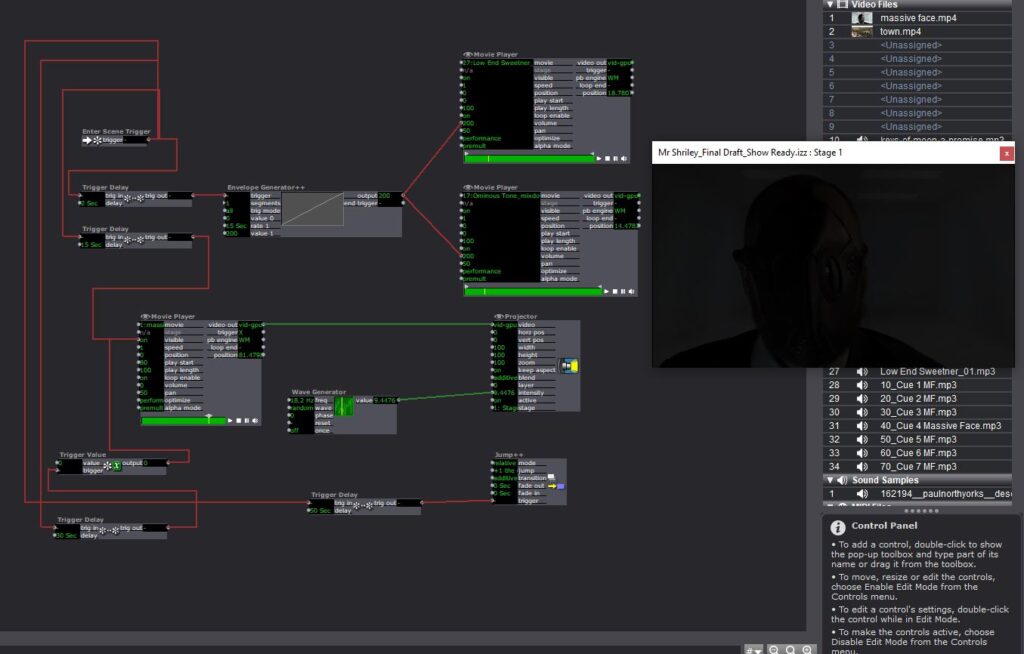
The next two slides are from the end of the show. After the last cue I’m able to let the rest of the show play out without having to manually hit any buttons.
Cycle 1 Documentation (Maria)
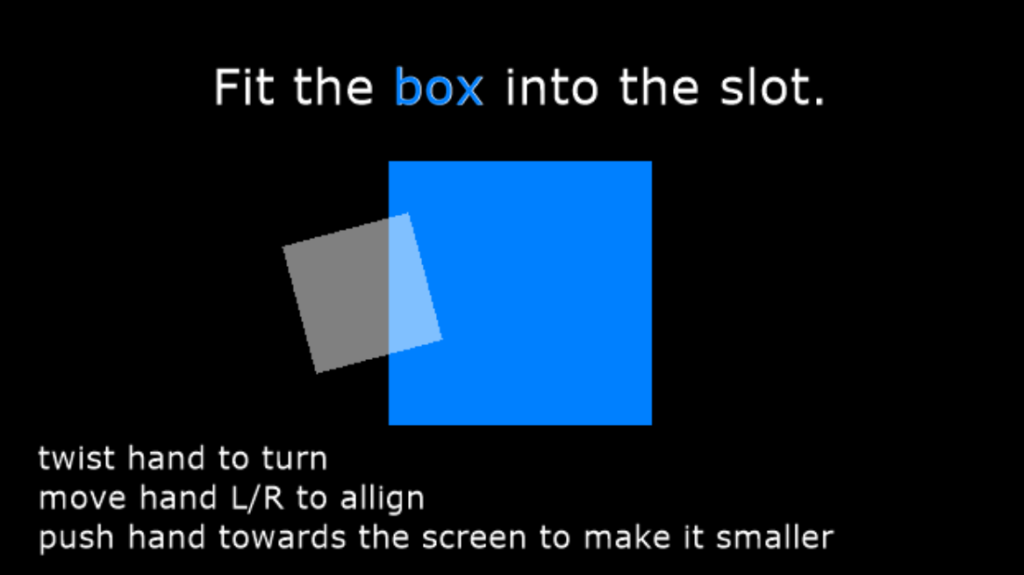
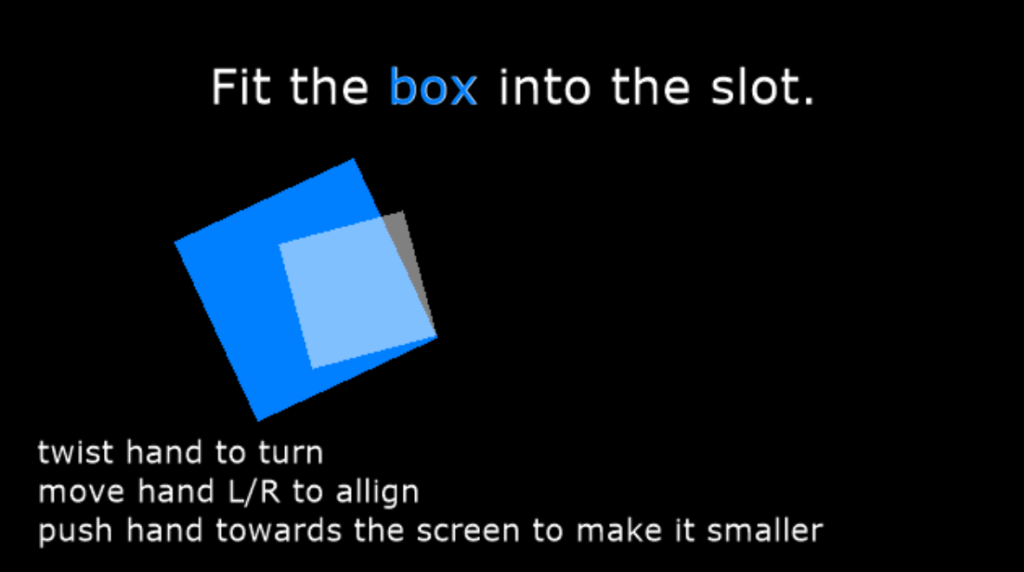
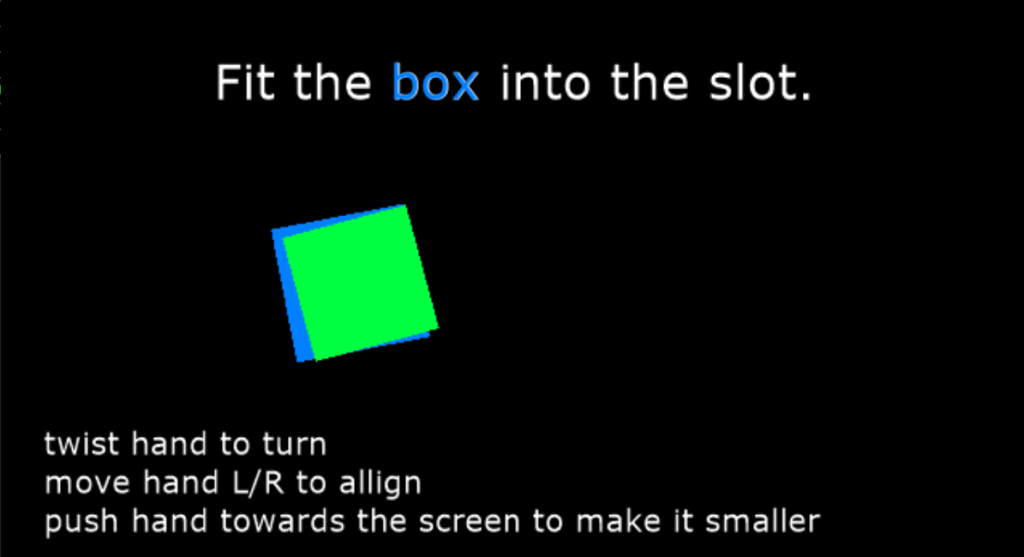
Posted: March 29, 2021 Filed under: Maria B, Uncategorized Leave a comment »For this cycle, I wanted to explore interaction design with the LEAP motion. I made two little ‘puzzles’ in Isadora in which the user would have to complete certain actions to get to the next step. I thought a lot about the users experience–providing user feedback in response to actions and making the movements intuitive. The first one was simply pressing a button by moving your hand downwards.


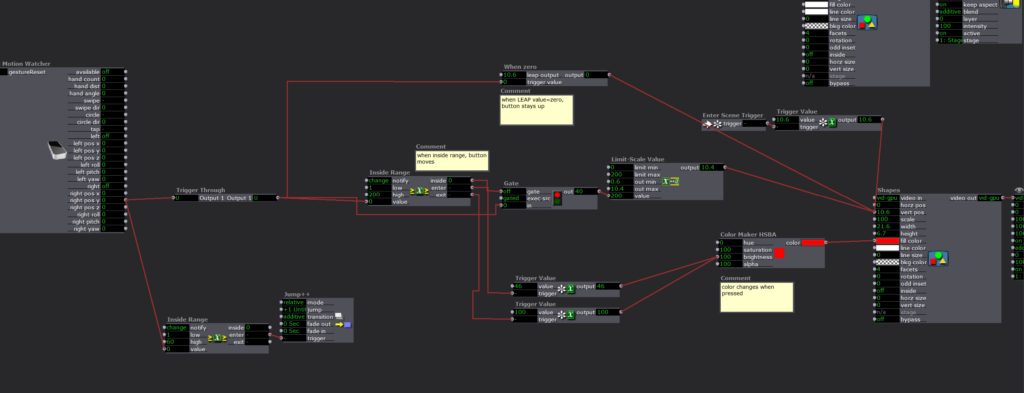
The second puzzle was aligning a shape into a hole based on the movement of the users hands.
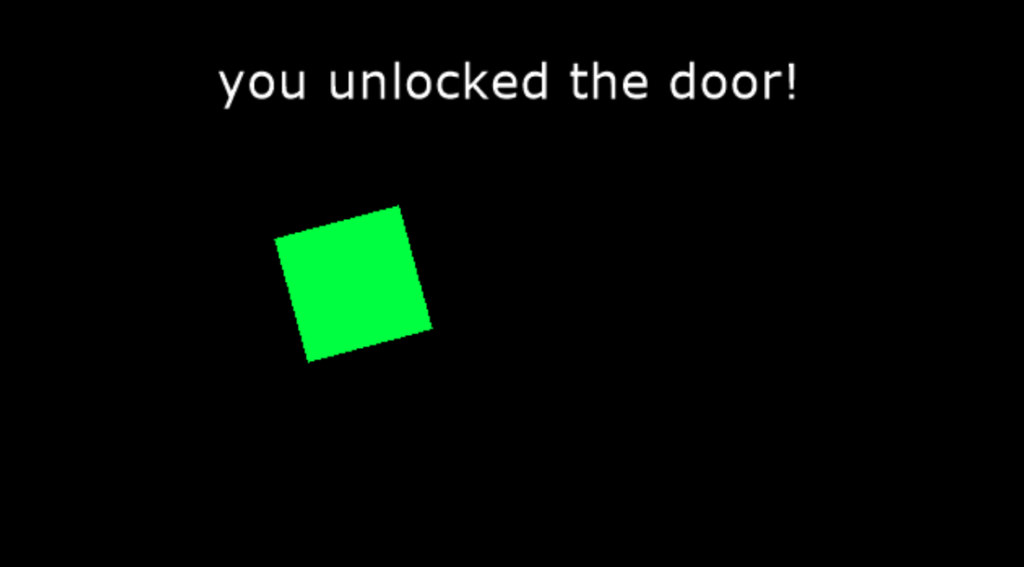
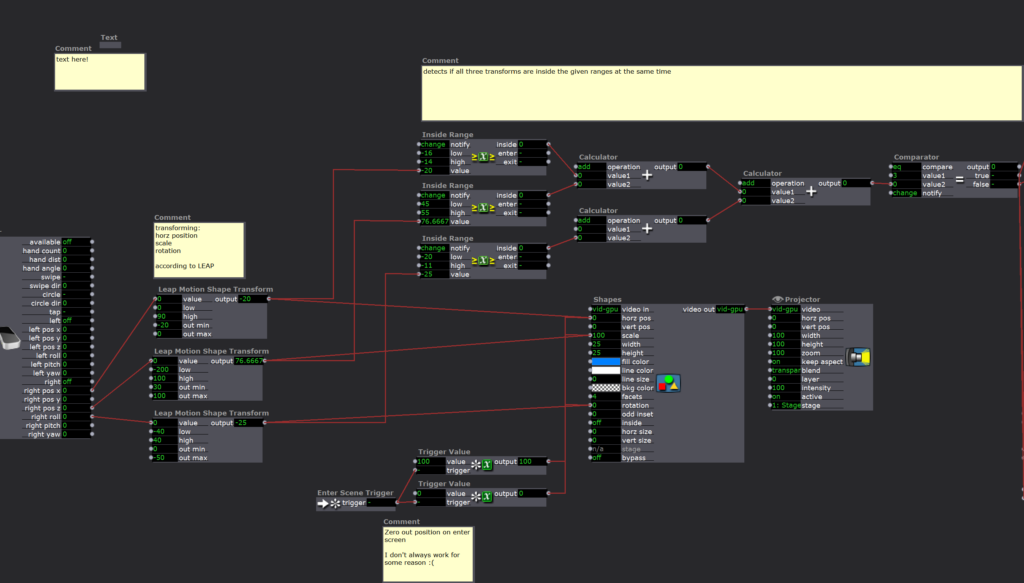
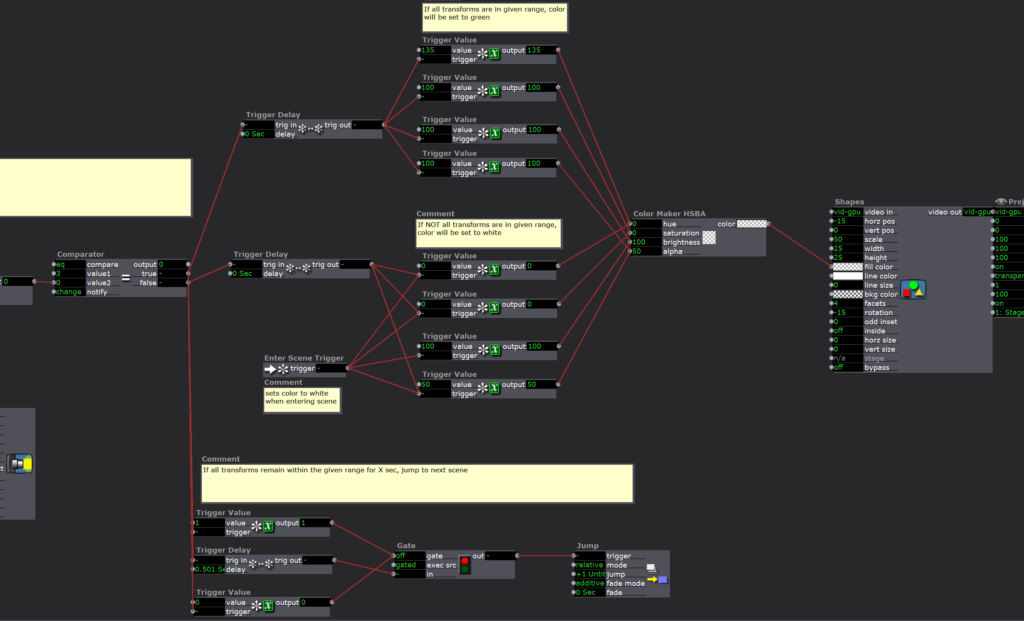
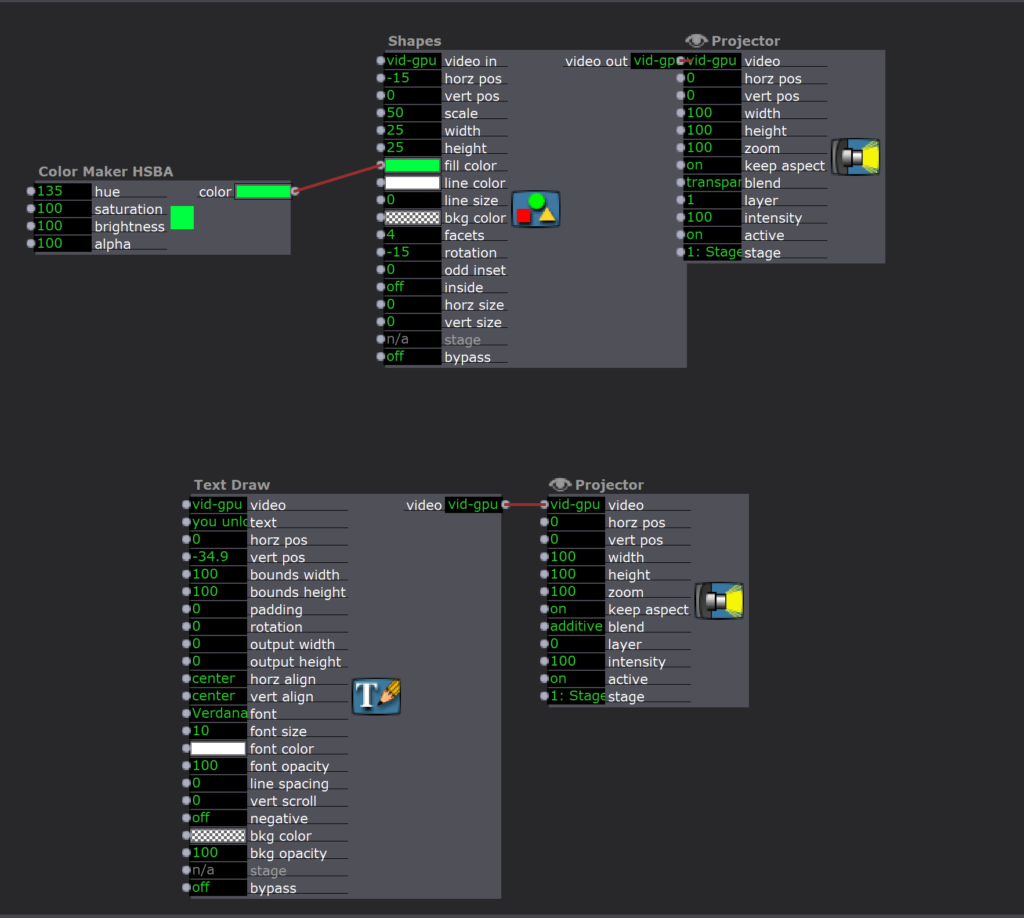
For the next cycle, the goal is to create more of a story that guides/gives purpose to these puzzles.
Pressure Project 2 (Murt)
Posted: March 20, 2021 Filed under: Uncategorized Leave a comment »For this project, I decided to work with some design elements which I did not use in PP1: set travel paths and pre-existing image assets. While I was able to get the Leap Motion functioning as I wanted it(almost), I ran out of time before I could get the trigger system set up.
I call this piece Kaiju vs. Yog-Sothoth even though two of the four available characters are American cartoon characters. The characters are: Gamera, Mothra, Reptar, and Daniel Tiger. The user is intended to select characters by moving a cursor(a six-fingered hand pointer). Each character tries to fight the Lovecraftian “Outer God” Yog-Sothoth. Only Daniel Tiger is successful. Emotional intelligence is somehow effective against Yog-Sothoth’s non-corporeal intrusion of our world.
The first of the two Isadora scenes is the character select screen which includes the Leap Motion system, shapes, and character PNGs.
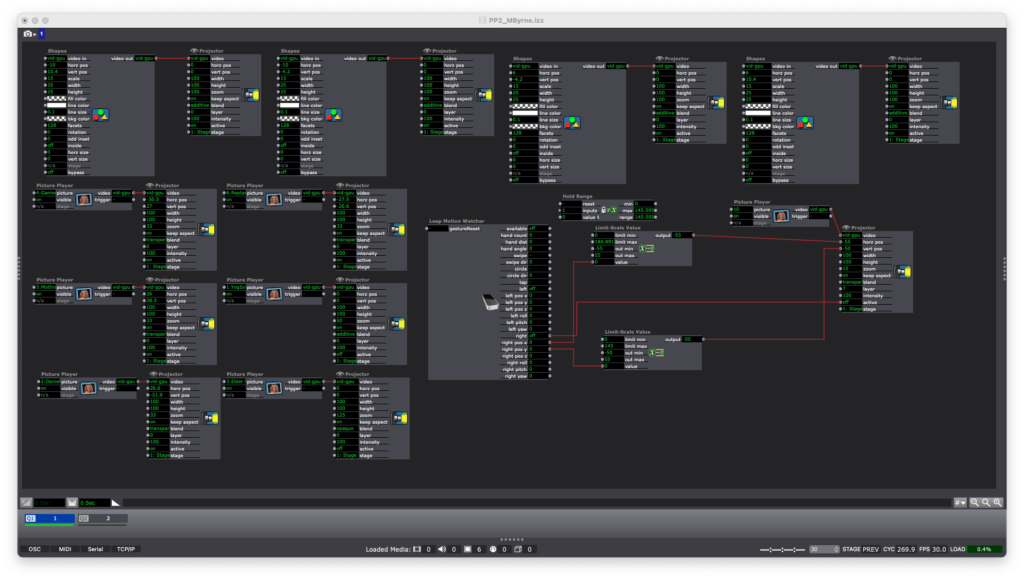
The second scene is Gamera going up against Yog-Sothoth. YS is animated with Gaussian Blur and some random waves which control X/Y dimensions. Gamera is animated in scale and path, plus a chat bubble. There is one additional animation which occurs after Gamera’s charge.
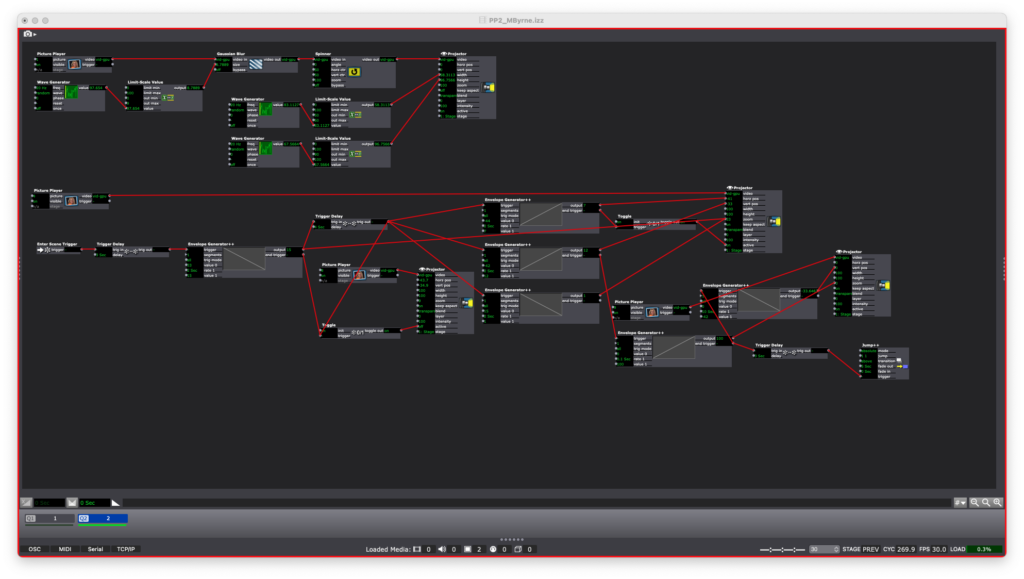
It would have been nice to see this finished, but I think what I was able to come up with is fun in itself.
Pressure Project 1 (Murt)
Posted: March 20, 2021 Filed under: Uncategorized Leave a comment »For PP1, my first area of concern was finding that moment of delight. I thought about the sorts of things that many people find delightful that also fit the resources which I possessed as a novice Isadora user. I settled on bubbles or balloons.
I created user actors for bubbles of various size, shape and color. Two of the bubbles explode and appear randomly. All of the bubbles initialize at random locations and oscillate vertically and horizontally on a sine wave. Each bubble also has random values feeding a Color Maker. The exploding bubble user actor above has an EnvGen controlling the Alpha channel. Some bubbles have their Facet value controlled by a Table to create star polygons. One of these stars has a WaveGen oscillating its Odd Inset value. I used five different scenes to cycle through the bubbles and to create an infinite sequence. I also made a control page with buttons for “GO” and “Stop”
The result is something that resembles a screen saver.
When I took Fundamentals of Media Design in the Theatre Department, one of our assignments was to move shapes around the screen using AE. This put the shapes onto a definite path, which is something I wanted to avoid with PP1. Perhaps I could have replaced one of the exploding bubbles with one which would follow a path but appear randomly.
Overall I found this project useful for learning workflows within Isadora, especially scene changes and control screens.
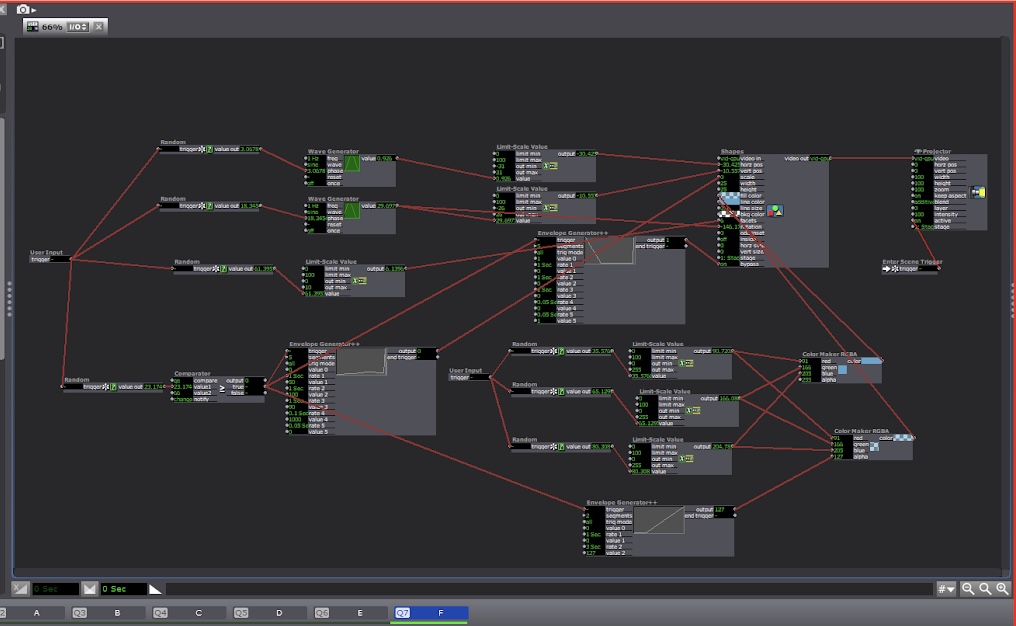
Pressure Project 3 (Maria)
Posted: March 12, 2021 Filed under: Maria B, Pressure Project 3, Uncategorized Leave a comment »I approached this project wanted to tell a fictional, widely recognized narrative that I knew well. So I chose to tell the story of The Lion King. My initial plan for this pressure project ended up being a lot more than I could chew in the allotted 9 hours. I wanted to bring in MIDI files that told the story through sound, and map out different notes to coordinate with the motion and color of visuals on the screen (kind of like what was demonstrated in the Isadora MIDI Madness boot-camp video). After finding MIDI versions of the Lion King songs and playing around with how to get multiple channels/instruments playing at once in Isadora, I realized that trying to map all (or even some) of these notes would be WAY too big of a task for this assignment.
At this point, I didn’t have too much time left, so I decided to take the most simple, straightforward approach. Having figured out the main moments I felt necessary to include to communicate the story, I went on YouTube and grabbed audio clips from each of those scenes. I had a lot of fun doing this because the music in this movie is so beautiful and fills me with so many memories 🙂
- Childhood
- Circle of Life
- Just can’t wait to be King
- “I laugh in the face of danger”
- Stampede
- Scene score music
- “Long live the king”
- “Run, run away and never return”
- Timone and Pumbaa
- First meet
- Hakuna Matata
- Coming Back to Pride Rock
- Nala and Simba Reunite
- Can You Feel the Love Tonight
- “simba you have to come back” “sorry no can do”
- Rafiki/omniscient Mufasa “Remember who you are”
- Simba decides to go back
- The Battle
- Score music of sad pride lands/beginning of fight
- “I killed Mufasa”
- Scar dies
- Transition music as Pride Rock becomes sunny again -> Circle of Life
I took this as an opportunity to take advantage of scenes in Isadora and made a separate scene for each audio clip. The interface for choosing the correct starting and ending points in the clip was kind of difficult, it would definitely be easier to do in Audition but this was still a good learning experience.
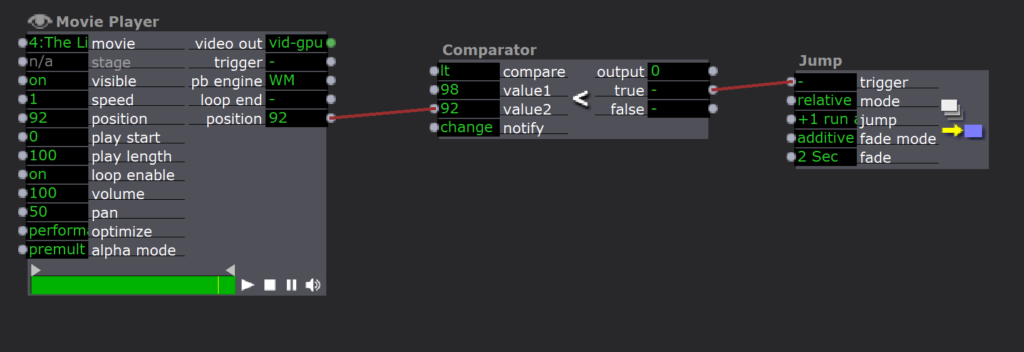
I used MP3 files since they act as movie files, and the movie player actor has outputs while the sound player does not. I determined the correct starting position using the ‘position’ input (and sometimes using a ‘Time to Media Percent Actor’ if I already knew exactly where in the clip I wanted to start). I connected the position output to a comparator that triggered a Jump actor to go to the next scene when the position value (value 2) went above the value I inputted (value 1).
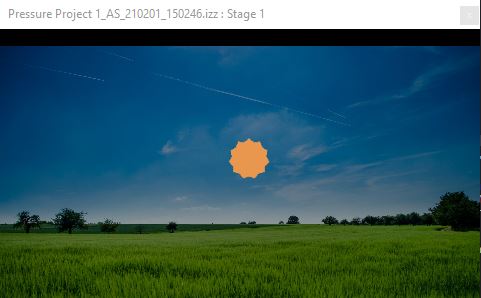
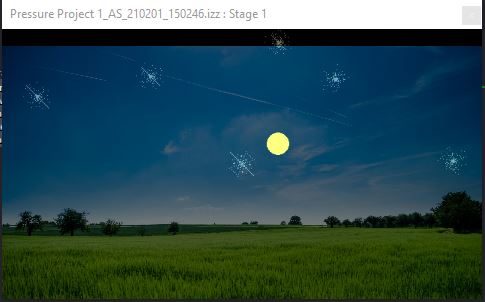
Here is the final result:
I wasn’t super proud of this at first because I didn’t feel like I took enough creative liberties with the assignment. However, when I shared it in class, it seemed to evoke an emotional response from almost everyone! It really demonstrated the power music has to bring up memories and emotions, especially when it is something so familiar. Additionally, it showed the power of a short music/audio clip to tell a story without any other context–even the people who weren’t super familiar with the movie were able to gain a general sense of the story arc.
Pressure Project 1 (Sean)
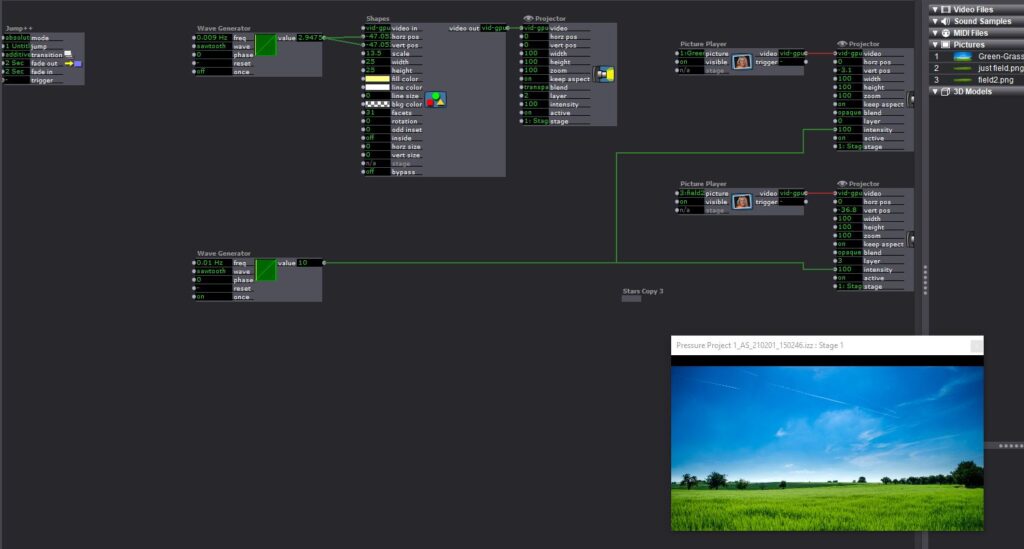
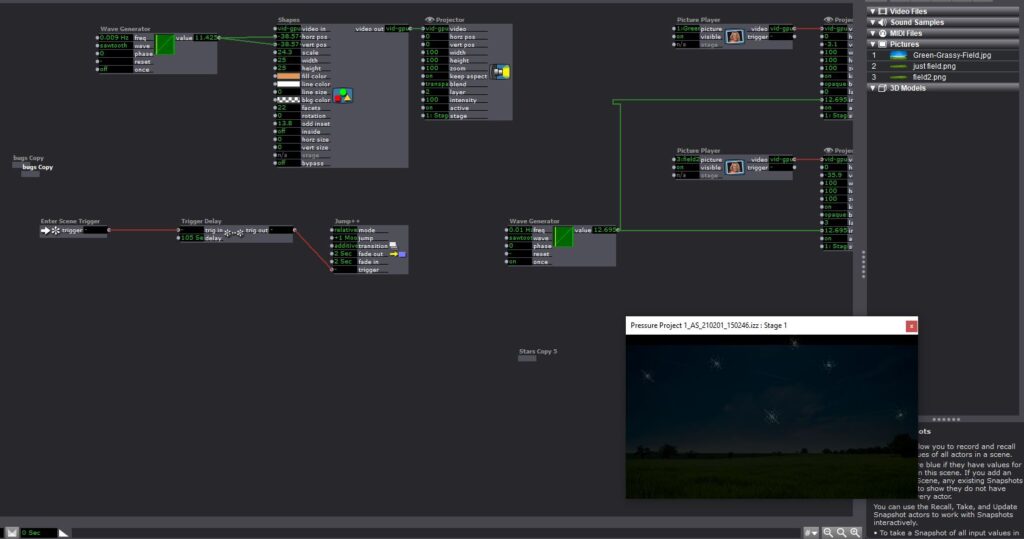
Posted: February 3, 2021 Filed under: Uncategorized Leave a comment »I used my time based pressure project to create a scene of the sun rise fading into a moon rise. I found an image of a big grass field with a few trees scattered around as a background. I had to do some photoshop work to layer the image so that the sun would appear to come up over the horizon and move across the sky. I played with the transparency and the opacity of the image to try and get it to appear as one.

This was really an opportunity to test what I thought I knew about Isadora and to try and recreate some of the actors we had covered in class. I began by playing with the Shapes actor to create the two celestial bodies that would move across the sky – the sun and the moon. I started by trying to figure out how to have them in the same scene and just follow each other, but then I was eating lunch and I had the idea I could make DIFFERENT scenes and that might just make the project more clean.
So I made two scenes. A sun rise and a moon rise. I adjusted the fascets and the odd insert setting on the shapes actor to create the sun and moon in different scenes. I knew that I wanted them to move with a deliberate slowness over the course of an extended duration. I messed quite a bit with the timing output of the wave generators to make them move across the sky at the tempo I desired.
Then next step was to synchronize the increasing and decreasing intensity of the background image to make it appear as thought the sun and the moon were rising. I found myself working again with the wave generator and learning how to change the min/max output and initilizing the setting so that the value when up or down how I wanted to see them
Next, I wanted to have some overlapping stars in the sky to create the illusion that they were contiguous scenes. Shapes actor again set the fascets and odd insert high. I used a random wave generator to give the stars a twinkling quality and used what I had learned about the inverting the value of the intensity to make them appear and disappear as the sun rose.
I was trying to create the effect of lady bugs in my daytime scene that would disappear as it got dark, but I couldn’t get them where I wanted them. We adjusted these settings in class and now I think I have a better understanding of how those actors were talking to each other and how to address that in the future.
Project Bump – Sean
Posted: January 28, 2021 Filed under: Uncategorized Leave a comment »Project Bump – Maria
Posted: January 27, 2021 Filed under: Uncategorized Leave a comment »I really enjoyed the task of creating a “fortune teller machine” for this pressure project. I have no idea how I would make it myself (although I think I could probably figure it out if I spent some time playing around), but I thought it was a really cool application of the interactivity of what Isadora allows!
Reading this student’s reflection revealed a variety of issues that I will probably run into in my own pressure projects, like spending several hours trying to find a specific actor, or making a patch much more complex than it actually needs to be. It’s good to be reminded that these are part of everyone’s learning processes and I shouldn’t let them get me down if I run into them myslef 🙂
Project Bump (Sara)
Posted: January 26, 2021 Filed under: Uncategorized Leave a comment »I scrolled backwards through time to find a project that caught my eye, but I found myself somewhat overwhelmed by the myriad techniques and technologies on display that we have not yet discussed in class. For my own peace of mind (and, admittedly, to satisfy my curiosity), I then clicked on my former peer Taylor’s subsection to scope out his very first Pressure Project in the course.
As is to be expected from one of the most cerebral people I have known, even Taylor’s first foray into Isadora was technically-challenging and highly interactive. What most struck me about the work, though, was his writing in relation to it. He speaks frankly about frustrations, fiddling, and failures even in the midst of what evolved into a successful work. And honestly, I found this to be encouraging. Yes, I will undoubtedly, most assuredly bump into any number of walls as I try to cobble something “delightful” together in five hours. But, given that hard and fast time constraint, rather than try to punch the wall down with my fists, I’ll need to circumnavigate these barriers to keep moving forward. Taylor mentioned that the time limitation led him to make “simpler choices.” I’ll keep that in mind and try to do the same.