Pressure Project 1
Posted: September 10, 2020 Filed under: Uncategorized | Tags: Pressure Project, Self-Generating Patch Leave a comment »
For this pressure project I was thinking about what kinds of things interest an audience and bring the element of “mystery” into a piece. I started with a sound that I liked and kind of fashioned the mood of everything else to meet that which is what turned it into a oceanic journey. In the process I got very caught up in “what happens next” so in a way I was focusing on narrative and my thinking was very linear. It started with a series of scenes of the ocean from land, I threw the shapes in there just as a mood filter with the colors as well as a way to direct the audience’s eye to something more mobile with the stationary background images.
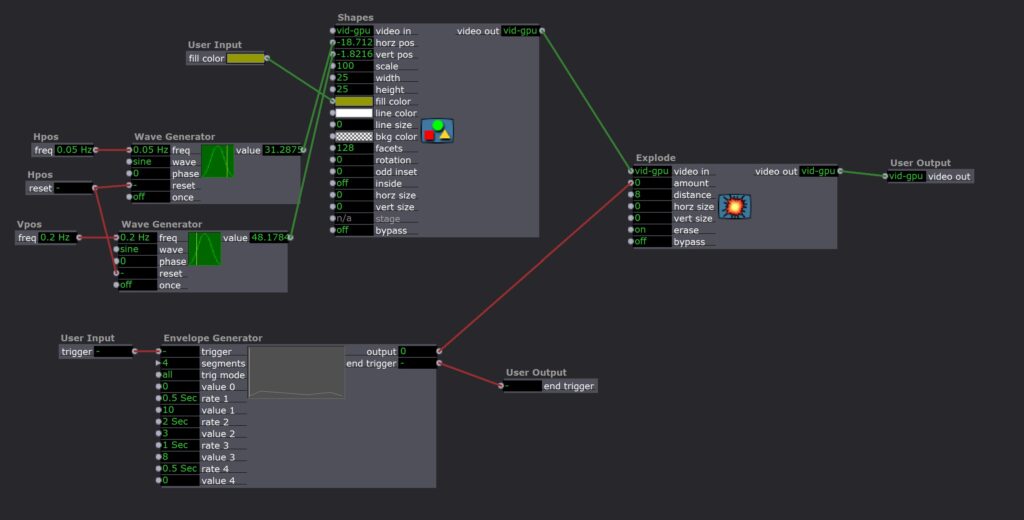
Then I just had the idea of going deeper into the ocean with the background and as I started changing the backgrounds I wanted to add a new element of surprise. That’s where I started bringing in the animals, I thought they were fun and connected to the story I was telling about the layers of the ocean. There were a lot of ideas I had for the animals that didn’t pan out. I wanted to find sounds for each of them so you would like hear a whale sound when the whale went by and a dolphin sound when the dolphin went by but I ran out of time.
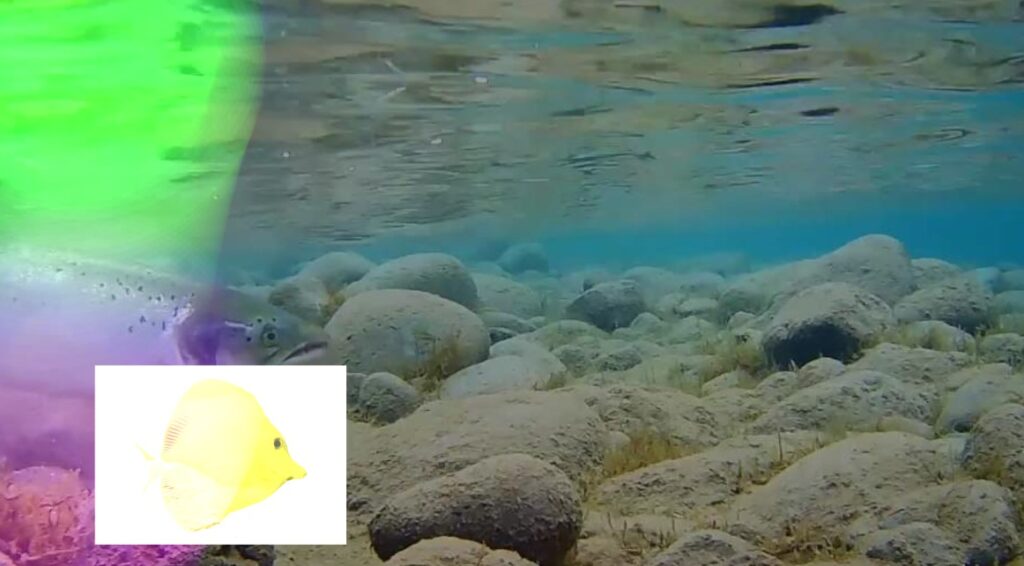
I also wanted them to be on their own without the white boxes but I forgot about how alpha channels worked so I didn’t get that part down. The timing went well since I was able to trigger the changes of the background with given animals numbers so I was able to stay pretty true to the story I was telling and match the types of animal to their particular ocean environment.
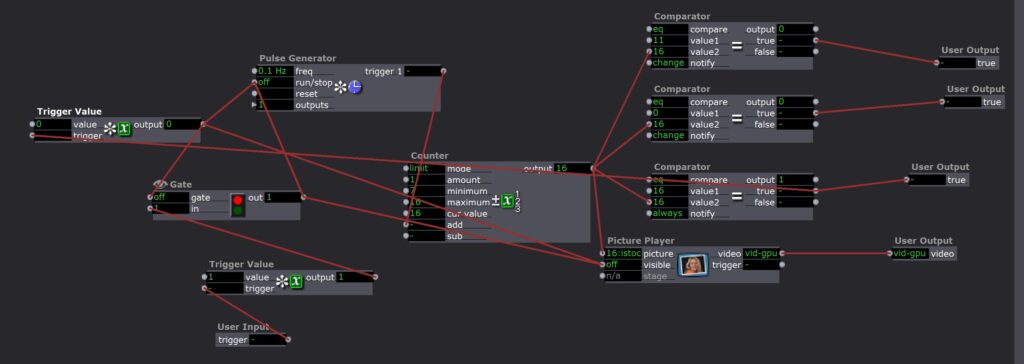
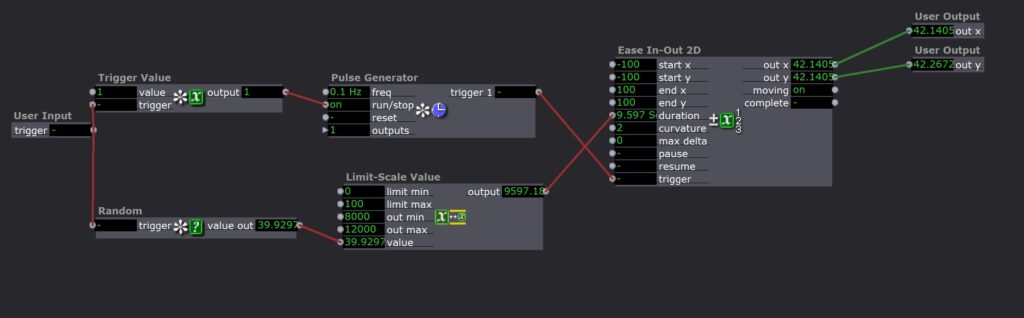
One thing I really wanted was for the animals to be able to be layered on each other and entering from random sides of the stage and at random times. I think I could have gotten the layering with multiple picture players going at the same time and maybe staggering the pulse generator attached to them but I need to do some more exploring into actors to solve the issue of random entrances.
I think it was really cool to hear people’s responses to it and the ways that they interpreted my media. In my mind, the song inspired wonder and peace but for some people they said it felt kind of sad. I saw the moving circles as impressions of nostalgia and slow beauty but some people saw them as another character altogether. I imagined it as an experience akin to scuba diving that was more exploratory but other people saw a lot more narrative. While I feel like many of the experiences were within the same vein, it was interesting to hear the different permutations of the story. In many ways I feel it referenced back to our discussions about what experience is and how meaning is communicated.
My experience working on the project forced me to notice how important it is for me to plan first. I didn’t want to plan anything because I am a very hands on person, usually I just start digging in and making and things arise out of my activity and I find it difficult to think without doing. However, in this case that way of working proved detrimental. I got invested in the making process and did end up making a lot but it ended up very linear and I didn’t start thinking about a way to loop it until the last 30 minutes of my time and at that point there were so many interlocking parts that it wasn’t really possible. So I wish that I had set up a framework for myself at the beginning about the structure I wanted to come out with rather than just diving into the content. I also wish that I had taken more advantage of scenes which may have helped me figure out how to loop it better because it would have separated out the different sections. Another thing I want to incorporate more in my process is clearer decision-making so that I don’t end up running out of time and not completing things. One of the reasons I think I didn’t have time to make all the animal effects that I wanted to was because I was also trying to do new things with the scenes and effects with the circles and if I had just chosen one thing to work on I probably could have done it.
Overall, great learning experience with interesting results!
Project Bump
Posted: September 8, 2020 Filed under: Uncategorized Leave a comment »https://dems.asc.ohio-state.edu/wp-admin/post.php?post=1761&action=edit
The pictures of this project immediately got my attention. With a group of people standing in a space together with, what looks like, a projection on the floor and a wall with several dots. I love the idea of creating an experience that was playful, interactive, tricky, and physically engaging. Modernizing a board game like Candy Land with projections and body movement. so cool!
Project Bump
Posted: September 8, 2020 Filed under: Uncategorized Leave a comment »I found Aaron Cochran’s cycle project to have an interesting trajectory. https://dems.asc.ohio-state.edu/?p=2281
I like how Aaron went from working with the Kinect sensor and projector to create the interactive game. I thought the idea of this kind of augmented reality game was executed well and the environment seemed very responsive to the movements of the player. Throughout all three of his cycles Aaron seemed to have a logical process that arrived at a good result.
Project Bump
Posted: September 7, 2020 Filed under: Uncategorized Leave a comment »I really enjoyed reading about Parisa Ahmadi’s final project “Nostalgia” (https://dems.asc.ohio-state.edu/?p=1743). The way the visuals of the final project overlapped on various fabrics created a full world of ideas just like how I would imagine my memories swirling around my mind. The softness of the fabric and genuine content of the visuals develops a more intimate space and allows audience members to feel comfortable experiencing what ever they end up experiencing. Since the visuals were connected to specific triggers on objects the audience would be able to directly interact and have a sense of how they impact their environment. Overall it seemed like a really thoughtful project and the result was able to surround the viewer with activity that interacted with all of the senses.
Cycle 1
Posted: December 13, 2019 Filed under: Uncategorized Leave a comment »I changed the project I wanted to do many times leading up to Cycle 1. So, for cycle 1 I sort of did a pitch to the class of what I had finally decided that I wanted to work on.
I chose to do a Naruto inspired “game” that tracks the position of a user’s hands and then does something when the correct amount of hand signals were “recognized”.
I wanted to use Google’s hand tracking library but at the suggestion of the class I opted to use the much better Leap motion controller to due the hand tracking. The leap motion controller has a frame rate of 60 frames per second which makes it ideal for my use case.
Secondly, I had the idea of using osc to send messages to the lightboard when a jutsu was successfully completed.
Short presentation below:
Cycle 3 “”lighting dance challenge”
Posted: December 13, 2019 Filed under: Uncategorized Leave a comment »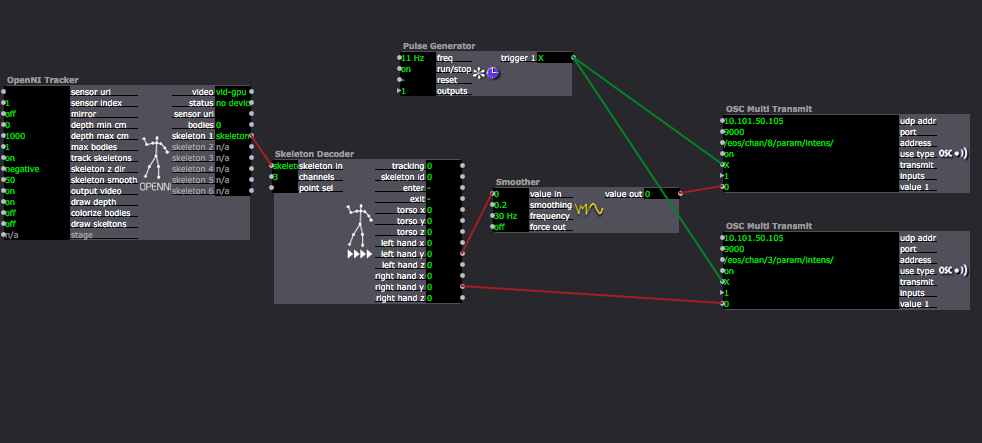
In the last performance, I changed a lot to play with the actor “OpenNI”. It helped me really design the various simple movements which can be recognized by the connector while showing a great “dance composition” on the stage. Another thing is, with the help of the actor “OSC Multi Transmit”, I have the chance to connect the data of human body directly to the data of lighting intensity/color. With out only trigger the cues I made in to lighting board, it bring up more possibilities of the idea of having audience member control single light directly.
So I finally made the structure for my final:
Introduction part:
People: myself
Position: Red Spot
Movement: Rise/put down arms (allow various speed).
Isadora: connector see the arms position data, connect to the lighting intensity.
Audience Participate Part:
People: three audience members
Position: stand on “red spot”, “yellow spot” and “blue spot” individually
Movement: red: rise/put down arms (with certain tempo I gave).
yellow: kneel down and stand up (with certain tempo I gave).
Blue: jump into certain area and leave (with certain tempo I gave).
Isadora: red: arms position data
yellow: torso position data
blue: body brightness data
When all the audience members all doing the right movement with the right tempo on stage, they can successfully trigger the lights at different tempo to create a dance piece with all various movement and lighting changes. If they all doing right, I will go in front of the connect sensor 2 to add the intensity so that it will trigger a strobing lights with the sudden silence. It seems something wrong, but after 5 seconds, a automatically lighting dance will be triggered which means everyone did a good job and it is the symbol of the success.
However, in the final show, the connector didn’t work that well which did not fully showed my design. But the introduction part went really well.
Thank you Alex and Oded really helped me go through every technology problem and artistic problems I had. This project kept changing until the end and without everyone’s help, i cannot really finish this! And really a great course!
Cycle 2 – Hand tracking algo
Posted: December 13, 2019 Filed under: Uncategorized Leave a comment »I spent the majority of the time leading up to this cycle devising a hand-tracking algorithm that could efficiently and robustly track the position of the fingers in (one) hand. There are a few approaches I took:
Approach 1: Get the position of the palm of the hand from polling the leap motion controller. Then subtract the difference of the finger position to get its relative position.
Pros: Consistent, deals with location away from Leap motion controller well
Cons: Gives bad data at certain orientations
Approach 2: Get the differences of the finger positions in relation to each other. These deltas will provide relative finger positions to each other.
Pros: Works well at most hand orientations
Cons: Not as good when fingers close together
Approach 3: Check to see if each finger is extended and generate a unique code corresponding to each finger for each frame.This is the approach I went with. This makes it much easier to program as it abstracts away a lot of the calculations involved. Also, this ended up being arguably the most robust out of the three due to only using Leap Motion’s api.
Pros: Very robust, easy to program, works well at most orientations
Cons: Will have to make hand signals simpler to effectively use this approach.
Cycle 2 “Tech Rehearsal”
Posted: December 13, 2019 Filed under: Uncategorized Leave a comment »In my cycle 2 showing, I took away the fun part we had in cycle one where I have audience members dancing with the music on the stage and reacted to the lightings. In this cycle, I tried a little bit serious run to have people become my crew member and help me trigger the lightings with their movement.
In this run, I called them helper instead of “lighting designer” which makes more sense to me. But still, I don’t think the audience members only have one title when they join my project. They can be the performer moving on the stage while become the crew member trigger the lighting with their movement tasks. I think I should really blur their title instead of really giving them a position contains various jobs.
Also, with the help of Alex, I add one OpenNI actor to have the connector recognize people’s shape, so that it can see where people’s arms/legs/torso are moving. With the help of this, I designed a movement of clapping over head and when the connect see both of the hands reach the same hight it will trigger the cue. It really helped me develop more movements for audience members rather than just letting them appear/not appear in the area where the connector can see.
I will develop more movements after this cycle and really blur audience member’s role as being a lighting helper and a performer at the same time.
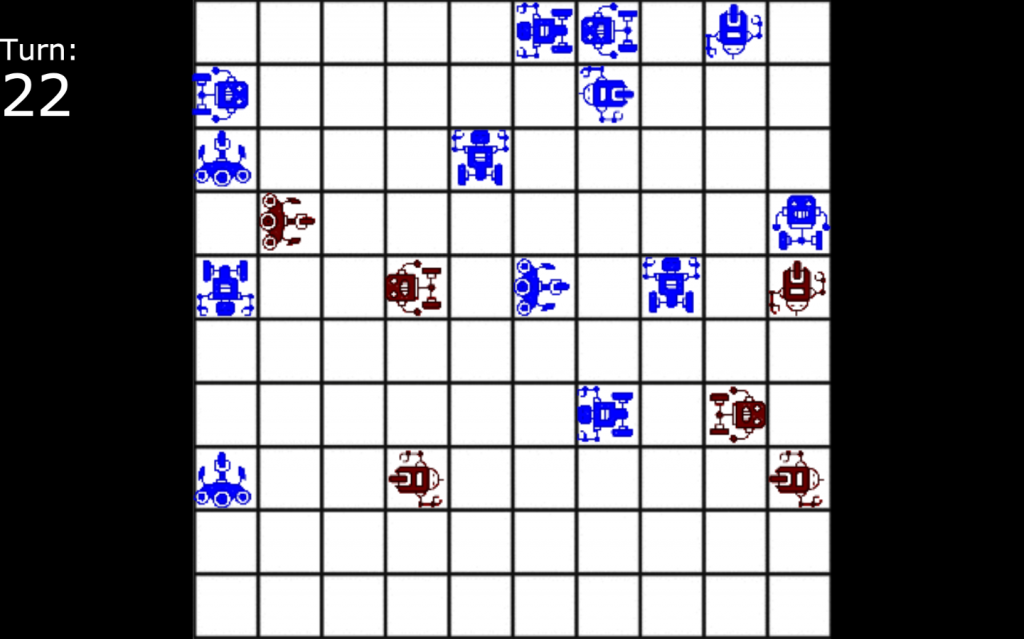
DroidCo. Final
Posted: December 12, 2019 Filed under: Uncategorized Leave a comment »For the final stage of my project, I finished the display and game logic of DroidCo. As a final product, DroidCo. allows two players to use OSC to “write code” (by pressing a predetermined selection of buttons) that their droids will execute to compete. The goal of the game is to convert every droid on the grid onto your team.
function main()
{
	var worldState = JSON.parse(arguments[0]);
	var droid = arguments[1];
	var startIndex = (droid * 6) + 2;
	var team = worldState[startIndex + 1];
	var x = worldState[startIndex + 2];
	var y = worldState[startIndex + 3];
	var dir = worldState[startIndex + 4];
	var red;
	var blue;
	var hor;
	var ver;
	var rot;
	switch (team){
		case 1:
			blue = 50;
			red = -100;
			break;
		case 2:
			blue = -100;
			red = 50;
			break;
	}
	switch (x){
		case 0:
			hor = -45;
			break;
		case 1:
			hor = -35;
			break;
		case 2:
			hor = -25;
			break;
		case 3:
			hor = -15;
			break;
		case 4:
			hor = -5;
			break;
		case 5:
			hor = 5;
			break;
		case 6:
			hor = 15;
			break;
		case 7:
			hor = 25;
			break;
		case 8:
			hor = 35;
			break;
		case 9:
			hor = 45;
			break;
	}
	switch (y){
		case 0:
			ver = 45;
			break;
		case 1:
			ver = 35;
			break;
		case 2:
			ver = 25;
			break;
		case 3:
			ver = 15;
			break;
		case 4:
			ver = 5;
			break;
		case 5:
			ver = -5;
			break;
		case 6:
			ver = -15;
			break;
		case 7:
			ver = -25;
			break;
		case 8:
			ver = -35;
			break;
		case 9:
			ver = -45;
			break;
	}
	switch(dir){
		case 0:
			rot = 180;
			break;
		case 90:
			rot = 270;
			break;
		case 180:
			rot = 0;
			break;
		case 270:
			rot = 90;
			break;
	}
	return [red, blue, hor, ver, rot];
}
Above is the code for the “droid parser” which converts each droid’s worldState data into values that Isadora can understand to display the droid.
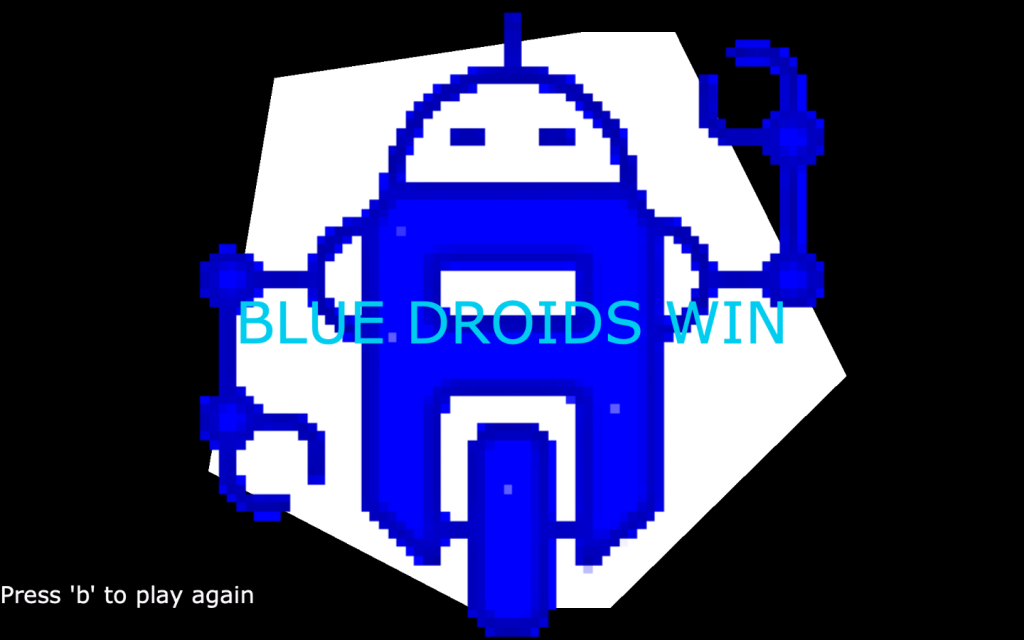
Overall, the game was a major success. It ran with only minor bugs and I accomplished most of what I wanted to do with this project. The code was rather buggy (I underestimated the strain new users could put on my code). I also ran into several problems with players’ code not executing exactly as they wrote it. These bugs are definitely due to the String Constructor (Isadora does not handle strings very well), but I think I can work out the kinks.
Cycle 2 – DroidCo. Interface Development
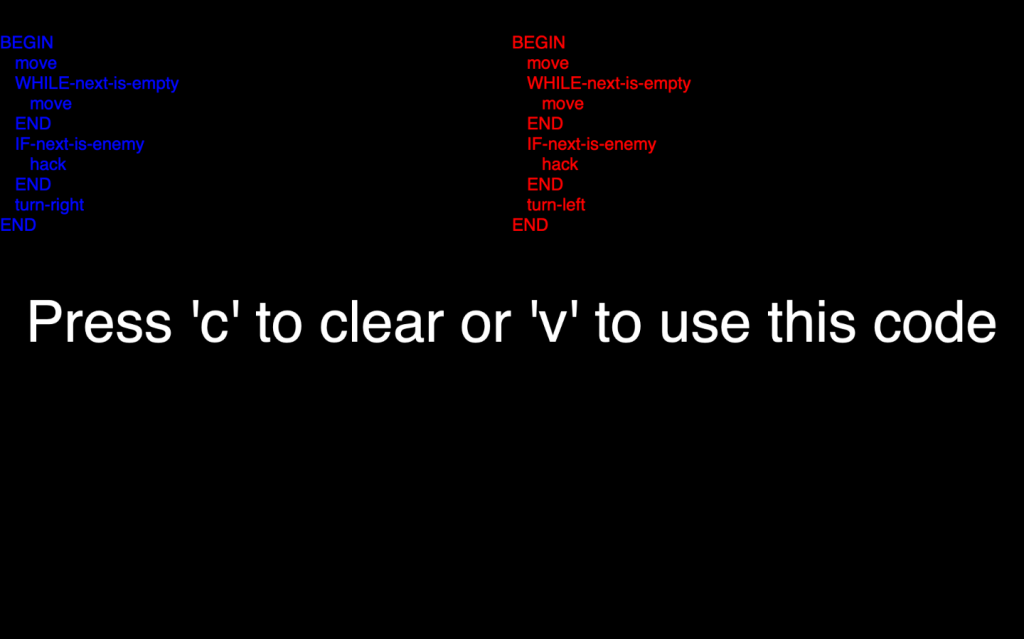
Posted: December 12, 2019 Filed under: Uncategorized Leave a comment »For cycle two, I finished the development of the OSC interface for DroidCo. The interface consisted of a set of buttons that sent keywords to Isadora which would then be used to generate the virtual code for each team’s droid to run.
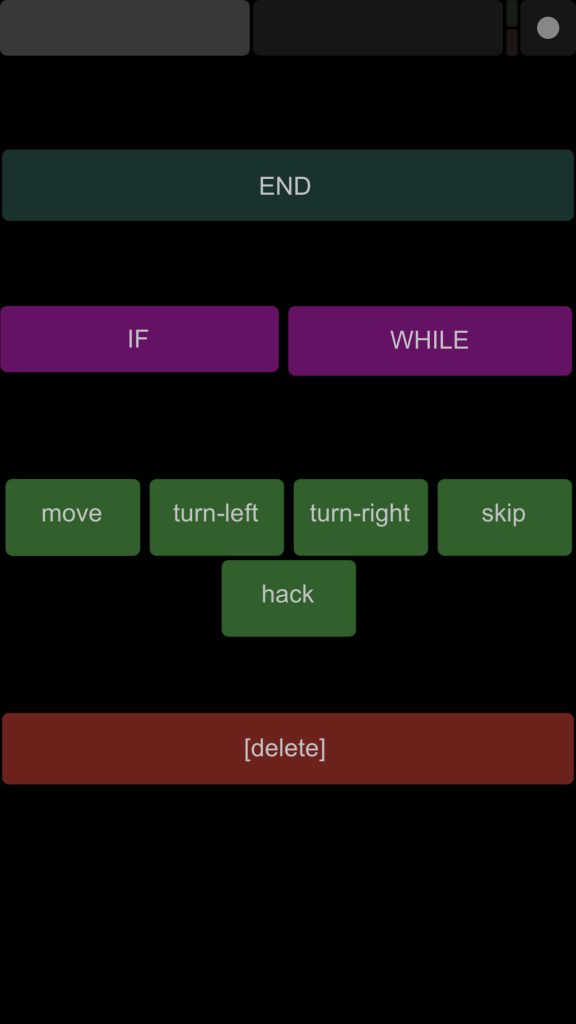
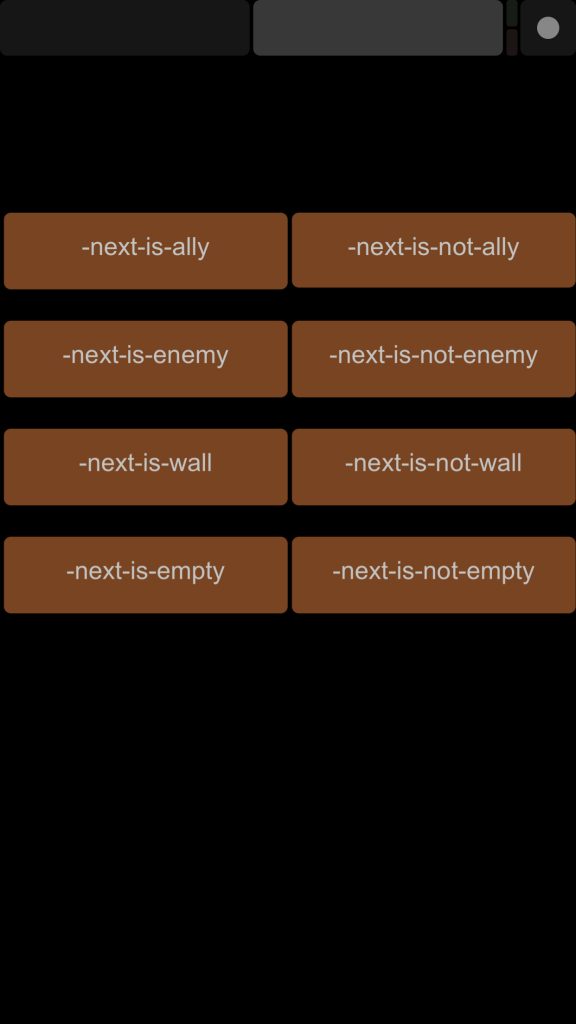
The interface (available in both an iPhone/iPod version and iPad version) consisted of two pages. The first contained the END command to complete code blocks, IF and WHILE to create conditional blocks, action keywords to trigger turn actions, and a delete button to remove lines of code. The second page contained all the conditionals that would be used with the IF and WHILE blocks.
To process these OSC inputs, I created a String builder javascript program. This program takes the next OSC input and adds it to a code string (the string the compiler from cycle 1 uses to create the virtual code) and a display string that shows the user their code (with proper indentation). Below is the code for this program.
function main(){
	var codeString = arguments[0];
	var displayString = arguments[1];
	var next = arguments[2];
	var ends = arguments[3];
	var i;
	switch(next){
		case "END ":
			codeString = codeString.concat(next);
			ends = ends - 1;
			for (i = 0; i < ends; i++){
				displayString = displayString.concat("\t");
			}
			displayString = displayString.concat(next);
			displayString = displayString.concat("\n");
			break;
		case "IF":
			codeString = codeString.concat(next);
			for (i = 0; i < ends; i++){
				displayString = displayString.concat("\t");
			}
			displayString = displayString.concat(next);
			ends = ends + 1;
			break;
		case "WHILE":
			codeString = codeString.concat(next);
			for (i = 0; i < ends; i++){
				displayString = displayString.concat("\t");
			}
			displayString = displayString.concat(next);
			ends = ends + 1;
			break;
		case "move ":
			codeString = codeString.concat(next);
			for (i = 0; i < ends; i++){
				displayString = displayString.concat("\t");
			}
			displayString = displayString.concat(next);
			displayString = displayString.concat("\n");
			break;
		case "turn-left ":
			codeString = codeString.concat(next);
			for (i = 0; i < ends; i++){
				displayString = displayString.concat("\t");
			}
			displayString = displayString.concat(next);
			displayString = displayString.concat("\n");
			break;
		case "turn-right ":
			codeString = codeString.concat(next);
			for (i = 0; i < ends; i++){
				displayString = displayString.concat("\t");
			}
			displayString = displayString.concat(next);
			displayString = displayString.concat("\n");
			break;
		case "skip ":
			codeString = codeString.concat(next);
			for (i = 0; i < ends; i++){
				displayString = displayString.concat("\t");
			}
			displayString = displayString.concat(next);
			displayString = displayString.concat("\n");
			break;
		case "hack ":
			codeString = codeString.concat(next);
			for (i = 0; i < ends; i++){
				displayString = displayString.concat("\t");
			}
			displayString = displayString.concat(next);
			displayString = displayString.concat("\n");
			break;
		case "back":
			if(codeString != "BEGIN "){
				if(codeString.substring(codeString.length - 4) == "END "){
					ends = ends + 1;
				}
				codeString = codeString.substring(0, codeString.lastIndexOf(" "));
				codeString = codeString.substring(0, codeString.lastIndexOf(" ")+1);
				displayString = displayString.substring(0, displayString.lastIndexOf(" "));
				displayString = displayString.substring(0, displayString.lastIndexOf(" ")+2);
			}
			break;
		default:
			codeString = codeString.concat(next);
			displayString = displayString.concat(next);
			displayString = displayString.concat("\n");
			break;
		}
	var ret = new Array(codeString, displayString, ends);
	return ret;
}